| Oracle® Communications ASAP Cartridge Development Guide Release 7.2 E22486-01 |
|

 Previous |
 Next |
| Oracle® Communications ASAP Cartridge Development Guide Release 7.2 E22486-01 |
|
Previous |
Next |
This chapter describes how to map network element (NE) commands to cartridge actions, entities, and parameters.
The bottom-up methodology begins with the identification of the NE commands, man-machine language (MML) commands or API calls, to be supported in the NE specification for the relevant service packages. You must develop an understanding of the services provided by the NE and the sequence in which the commands are provisioned to implement the services. This simplifies the effort of identifying action processors, atomic actions, and service action commands. You must also identify the parameters required to provision each action.
Every service action, atomic action, and action processor consists of a combination of the following:
Vendor, technology, and software load (see "Defining Network Cartridge Project Parameters" and "Defining Service Cartridge Project Parameters")
Actions (see "Selecting the Action Tokens")
Entities (see "Selecting Entity Tokens"
|
Note: Using Oracle Communication Design Studio for ASAP, you can define actions and entities using the Atomic Action Wizard, Service Action Wizard, Action Processor Wizard, or Cartridge Layout tool. For more information on these features, see Oracle Communications Design Studio for Activation Help. |
This set of tokens represents the actions that can be taken on the NE. Different NE vendors may use different tokens to represent identical actions (for example, ADD and SET). NEs from different vendors may use similar tokens to represent different actions (for example ADD and ACTIVATE). Oracle recommends that you select one of the mainstream actions (as shown in the list below) without distorting the meaning of the action taken. If this is not possible, select the action token reflected in the vendor documentation.
Actions can be any verb however the mainstream actions recommended by Oracle are as follows:
ADD
DEL
CHG
ACTIVATE
DEACTIVATE
QRY
The action token used in a service action is in most cases the same as the action token used in the corresponding atomic action, and action processor when there is a one-to-one mapping. Many-to-one mapping reflects the net result of the actions taken at the atomic action and action processor level in the action of the service action. Action processors in most cases should use the same action as defined in the atomic action.
Table 4-1 provides an example of a service action-to-atomic and action processor mapping.
NEs can have various domain-specific entities that require further specification. These entities are the recipient of the action verbs.
In some cases, the volume of services supported on an NE requires that you create logical functional groups of services called service packages. For example, a cartridge for an NE that supports various types of data services might have the following service packs:
ATM
FRAME
FRATM
BGP
When multiple service packages organize a cartridge, a common service package can contain common components, if applicable, such as connection classes, helper classes, common actions taken across service packages, and so on.
You can also choose the service names that can be manipulated in the cartridge. Services could be subscribers, features such as call waiting, three way calling, or logical components such as cross connects. For example:
X-CONN
SUBS
CALL-FORWARD
THREE-WAY-CALLING
PORT
GSM-SUBS
Service package and service name should be used in the naming convention of service action, atomic action, and action processor commands. Separate compound service package and service sub-tokens with a dash rather than an underscore. For example:
For activation network cartridges, service actions, atomic actions, and action processors are created and linked in a 1:1:1 relationship for all combinations of the actions and entities you specify.
For an activation service cartridge, only service actions are created, allowing a non-restricted association either with already existing network activation cartridges atomic actions or new atomic actions defined as part of the solution. For activation service cartridges, a decision must also be made about the type of service model you create (common, mixed, or vendor/technology/software load-specific), which affects the naming convention used for the atomic actions.
When using the cartridge generation feature, you specify the actions that will be performed by the cartridge (for example, ADD, MOD, DEL, QUERY and so on) and the entities targeted by these actions (for example, PORT, SUBSCRIBER, SUBSCRIPTION, LINE, and so on). After entering this information into the Cartridge editor Cartridge Layout tab, you can generate a framework model by clicking the Generate Cartridge button.
Design Studio uses the action and entity tokens in the Java autogeneration feature (class and package names) therefore do not use special characters (like dashes) when naming these components. Use single tokens when defining actions and entities. Use standard names for actions whenever possible, like ADD, DELETE, QUERY and MODIFY across all the cartridges. Use short and descriptive names for entities. Whenever the cartridge template cannot be auto generated in a single pass, use the feature several times. For example:
In the first pass, generate a template for ADD, DELETE, QUERY, MODIFY actions and SUBSCRIBER and FEATURE entities
Remove actions and entities for which the template has been generated under the Cartridge Layout tab and add new actions and entities (like ENABLE, DISABLE, BLOCK, UNBLOCK actions and SERVICE entity).
The cartridge generation feature does not overwrite a framework that already exists. Rather, it adds to framework new and modified actions and entities. Additionally, Design Studio does not delete old actions or entities. You can, however, delete them manually.
Each atomic action command has parameters that are sent to the NEP by the atomic action command. The parameters determine whether the SARM transmits a particular atomic action command.
tbl_asdl_parm is a Static Table that is used by the SARM to define the parameter labels and values associated with a given atomic action. It also provides the mapping between the service action parameter labels received from the service request processor (csdl_lbl) and the atomic action parameter labels (asdl_lbl) transmitted to the NEP for interpretation by the Interpreter State Tables.
For each service action label (csdl_lbl), the SARM checks the current service action parameter name-value pairs for a matching label. If no matching label is found, it checks for a label in the work order global parameter name-value pairs. If no matching label is found in either of these parameter name value pairs and the parameter type (param_typ) which is mandatory, the default value (default_vlu), is used.
If no default value is set, the SARM registers an atomic action parameter mapping failure. If the parameter is indexed, the csdl_lbl must contain a ++ or the SARM will not start.
Atomic action parameters can be one of the following types:
R: required scalar
O: optional scalar
C: required compound
N: optional compound
M: mandatory indexed
I: optional indexed
X: required XML
Y: optional XML
P: required XPATH
Q: optional XPATH
+ –: the current index value for this atomic action. Only applicable to indexed atomic actions.
|
Note: You can create, modify, or delete new runtime parameters, specify the parameter type, and specify whether the parameter is optional or mandatory using the Design Studio Data Schema editor. See Oracle Communications Design Studio for Activation Help references for the Activation tab and the Details tab for the ASAP Data Schema editor. |
You may use a data dictionary with ASAP in the following two scenarios:
When you have identified the NE commands and identified actions and entities (or generated a cartridge framework), you must create a data dictionary of all parameters required for the NE commands. In this scenario, you are creating the data dictionary based on the information you have gathered about the NE.
You import an existing data dictionary into Design Studio, and you must associate the relevant data or structured elements to NE commands, actions, and entities. In this scenario, the data dictionary already exists, and you must map and configure these data elements for use with ASAP.
For more information about creating a data dictionary, see Oracle Communications Design Studio for Activation Help.
After you have created the data dictionary, you must encapsulate the parameters within atomic action commands. In most cases, you create one atomic action command for each of the provisioning actions that can be taken on the NE. For more information about creating atomic actions, see "Creating and Configuring Atomic Actions and Action Processors".
Design Studio automatically creates a data dictionary for each cartridge project when you create a new Design Studio cartridge project. Design Studio also creates data dictionaries for cartridges imported into Design Studio.
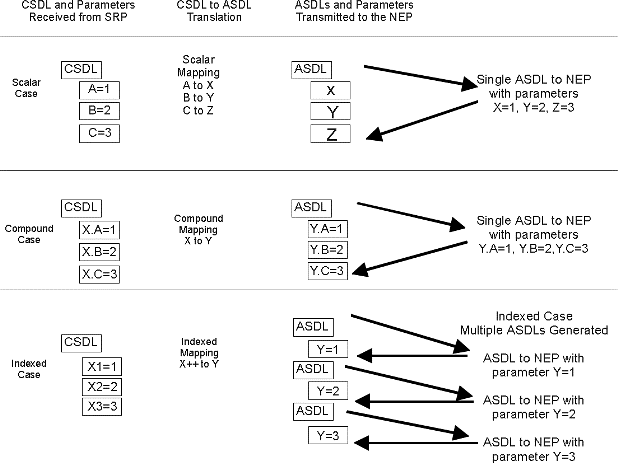
Scalar parameters are conventional name-value pair parameters.
   Service Action      C-ADD_FEATURE
        PARM  NE_ID   NEWYORK
        PARM  LEN     2111112
        PARM  LATA    516
        PARM  LCC     555
To create a mandatory, optional, or indexed scalar parameter using Design Studio:
Select Studio, then select Show Design Perspective.
Select the Data Element tab.
Right click in the Data Element dialog box.
Select Add Simple Schema Element.
The Create Data Schema Element wizard appears.
Enter the following:
In the Entity field, enter the name of the project to which you want to add a scalar parameter.
In the Name field, enter an element name.
In the Display Name field, enter a display name. The Data Schema editor supports multiple languages for this field. The field adjacent to Display Name displays your language. You can define a Display Name field value for any language you select from the list. For more information, see Oracle Communications Design Studio Help.
In the Multiplicity field, select one of the following:
Required: This attribute makes the parameter mandatory.
Optional: This attribute makes the parameter optional.
Range: Any ranged parameter with a Minimum value greater than 0 is considered a mandatory ASAP parameter. Any ranged parameter with a Minimum value of 0 is considered an optional ASAP parameter.
Click Finish.
The new parameter appears in the Data Element dialog box.
Click the new parameter.
The Data Schema editor appears.
In the Element section, click the Activation tab.
From the Runtime type list, select SCALAR.
(Optional) Select Indexed to index the parameter.
These parameters contain a sequential numerical index value to tell the SARM that it should execute the same operation (for example, an atomic action command) for all occurrences of that index. Consequently, if there are several options on a particular service action command (OPT1, OPT2, OPT3, etc.), you can specify the OPT parameter as an indexed parameter. When you specify the OPT parameter as an indexed parameter, the SARM generates several occurrences of that same atomic action command, and each command has a different value for the option being transmitted to the NEP.
If there are 100 such indexed parameters on the service action command, the SARM transmits the same atomic action command 100 times. Each time the SARM transmits the atomic action command, the parameter has a different option value.
If an indexed parameter is configured to be transmitted on a given atomic action command, only one indexed parameter value is transmitted with each atomic action command, and the same atomic action command is executed repeatedly.
For instance, if the work order contains:
OPT1 = 3WC
OPT2 = CWT
And the service action-to-atomic action mapping contains the following:
Service Action Parameter   Atomic Action parameter
------------------------   -------------------------
OPT[++]                    OPTION
|
Note: By convention, the ++ notation appears at the end of the label within square brackets. This convention makes it easy to identify the index. |
That particular atomic action is executed twice. The first time, the atomic action has an OPTION parameter with the value 3WC. The second time, the atomic action has an OPTION parameter with the value of CWT.
Regardless of whether the service action references a State Table or a Java provisioning class, the service action has access only to one parameter, which in this example is OPTION.
Compound parameters contain structures or arrays of information that are represented by a particular structure name or compound parameter name. Each compound parameter can contain a large number of elements. If you use compound parameters, you only require a single entry in the ASAP translation tables to call the compound parameter and all its associated parameter elements.
If you configure a compound parameter to be transmitted on an atomic action command, ASAP transmits all elements for the compound parameter to the NEP at the same time.
|
Note: In the case of compound parameters, the base name of the parameter on the work order must be exactly as specified in the tbl_asdl_parm and the base name must not have a period in it. |
For example, if there is a compound parameter with the base name CMPNDPARAM specified in the tbl_asdl_parm as type C, you can define a work order with the following parameters:
CMPNDPARAM1=value1
CMPNDPARAM2=value2
CMPNDPARAM3=value3
CMPNDPARAMABC=value4
A compound parameter can be used by selecting parameter type C or N. A compound parameter (whether it is indexed or not) does not trigger the multiple execution of the same atomic action.
The following formats are supported for compound parameters:
Format 1 – Suffix cannot contain a period. For example:
BasenameSuffixA
BasenameSuffixB
BasenameSuffixC
Format 2 – a period comes directly after the basename. For example:
Basename.SuffixA
Basename.SuffixB
Basename.SuffixC
|
Note: The basename must match the name defined in tbl_asdl_parm. |
To create a compound parameter using Design Studio:
Select Studio, then select Show Design Perspective.
Select the Data Element tab.
Right click in the Data Element dialog box.
Select Add Structured Schema Element.
The Create Data Schema Structure wizard appears.
Enter the following:
In the Entity field, enter the name of the project to which you want to add a scalar parameter.
In the Name field, enter an element name.
In the Display Name field, enter a display name. The Data Schema editor supports multiple languages for this field. The field adjacent to Display Name displays your language. You can define a Display Name field value for any language you select from the list. For more information, see the Oracle Communications Design Studio Help.
In the Multiplicity field, select one of the following:
Required: This attribute makes the parameter mandatory.
Optional: This attribute makes the parameter optional.
Range: Any ranged parameter with a Minimum value greater than 0 is considered a mandatory ASAP parameter. Any ranged parameter with a Minimum value of 0 is considered an optional ASAP parameter.
Click Finish.
The new parameter appears in the Data Element dialog box.
Click the new parameter.
The Data Schema editor appears.
In the Element section, click the Activation tab.
From the Runtime type list, select COMPOUND.
|
Note: All child elements inherit the Activation tab attributes from the base compound element. |
(Optional) Select Indexed to index the parameter.
From the Data Element area, right click the new parameter.
Select Add Simple Child Schema Element.
|
Note: Compound parameters do not support structured child schema elements. |
Enter the following:
In the Name field, enter an element name.
In the Display Name field, enter a display name. The Data Schema editor supports multiple languages for this field. The field adjacent to Display Name displays your language. You can define a Display Name field value for any language you select from the list. For more information, see the Oracle Communications Design Studio Help.
In the Multiplicity field, select one of the following:
Required: This attribute makes the parameter mandatory.
Optional: This attribute makes the parameter optional.
Range: Any ranged parameter with a Minimum value greater than 0 is considered a mandatory ASAP parameter. Any ranged parameter with a Minimum value of 0 is considered an optional ASAP parameter.
Click Finish.
Repeat steps 7 to 10 for any additional parameters to be included in the compound parameter.
The compound parameter can have an index. If using a compound indexed parameter, the parameter type must be C. The following format is supported for only indexed compound parameters.
Basename[1].Suffix
Basename[2].Suffix
Basename[3].Suffix
You can define compound parameters and indexed parameters at the same time. This allows for the specification of multi-dimensional data elements.
|
Note: For an example of a compound indexed parameter, see "Scenario 4 – One Service Action to Multiple Atomic Actions Routed to Multiple NEs". |
Avoid the use of compound parameters unless absolutely necessary. Using compounds makes the SARMs error checking capability far less effective and makes order entry through Order Control Application (OCA) more difficult. When multiple sets of parameters that have variable numbers of elements must be passed to the same implementation method for provisioning, a compound parameter with an associated index can be used (the index is purely for logical representation of the data and should not be confused with the atomic action indexing capability in ASAP). For example, a Java method that provisions multiple features in an optimized manner could be passed a compound structure containing variables as shown:
FEATURE[1].NAME = 3WC
FEATURE[2].NAME = CFD
FEATURE[2].NUM_RINGS = 5
BLOCKED_NUMBER[1].PATTERN[1]
BLOCKED_NUMBER[1].PATTERN[2]
Whenever an index is used within an atomic action parameter label, the index is encapsulated within brackets (regardless of the type of ASAP parameter):
SUD[1].CODE = A
SUD[1].VALUE = 1
SUD[2].CODE = C
SUD[2].VALUE = 7
Though rarely configured within a cartridge, support for dynamic routing should be considered in certain scenarios such as IP (routers) configuration. In such cases, the reserved COMM_PARAM label should be configured as an optional compound in the parameter list for each atomic action.
Thee XML and XPATH parameter types are used in service modeling for network actions (atomic actions), similar to existing scalar, index, and compound parameter type. XML can be used as values for both information parameters and extended work order properties.
If the network action (atomic action) contains an XML parameter; JProcessor class within the Java enabled NEP loads the XML data from the SARM database and makes the raw XML available as the value of the XML parameter and as a Document Object Model (DOM) object.
XML parameters pass structured information into ASAP. The values of these XML parameters must be well formed XML that can be successfully processed by a standard XML parser.
To create an XML parameter using Design Studio:
Select Studio, then select Show Design Perspective.
Select the Data Element tab.
Right click in the Data Element dialog box.
Select Add Simple Schema Element.
The Create Data Schema Element wizard appears.
Enter the following:
In the Entity field, enter the name of the project to which you want to add a scalar parameter.
In the Name field, enter an element name.
In the Display Name field, enter a display name. The Data Schema editor supports multiple languages for this field. The field adjacent to Display Name displays your language. You can define a Display Name field value for any language you select from the list. For more information, see the Oracle Communications Design Studio Help.
In the Multiplicity field, select one of the following:
Required: This attribute makes the parameter mandatory.
Optional: This attribute makes the parameter optional.
Range: Any ranged parameter with a Minimum value greater than 0 is considered a mandatory ASAP parameter. Any ranged parameter with a Minimum value of 0 is considered an optional ASAP parameter.
Click Finish.
The new parameter appears in the Data Element dialog box.
Click the new parameter.
The Data Schema editor appears.
In the Element section, click the Activation tab.
From the Runtime type list, select XML.
The XPath parameter type defines an XPath expression into XML data. From the runtime perspective, the JSRP, SARM and Java enabled NEP transfers XML data and XPath expressions to each other by saving the complex data into the SARM database, loading them from the database, and evaluating the XPath expression against the XML data.
When you provision a work order, the SARM loads the XML data from the SARM database and evaluates an XPath expression against the XML data in the following cases:
An XPath parameter is used as part of service action spawning logic to determine whether an atomic action should be spawned or not
An XPath parameter is used to spawn multiple instances of the same atomic actions depending on how many instances of XML elements are present in the work order
If there is an XPath parameter present in the atomic action, JProcessor evaluates the associated XPath expression when a user requests the value of the XPath parameter.
XPath parameters provide a mechanism to extract fragments from another XML parameter at runtime. In ASAP they are always used in association with an XML parameter, called in Design Studio, the Dependent XML. Design Studio enforces the association when defining XPath parameter in the context of an atomic action, but not in the context of data schema entity. If the association is defined in the context of a data schema entity, Design Studio makes an attempt to recreate it when the XPath data element is used in the context of an atomic action.
To create an XML parameter using Design Studio:
Select Studio, then select Show Design Perspective.
Select the Data Element tab.
Right click in the Data Element dialog box.
Select Add Simple Schema Element.
The Create Data Schema Element wizard appears.
Enter the following:
In the Entity field, enter the name of the project to which you want to add a scalar parameter.
In the Name field, enter an element name.
In the Display Name field, enter a display name. The Data Schema editor supports multiple languages for this field. The field adjacent to Display Name displays your language. You can define a Display Name field value for any language you select from the list. For more information, see the Oracle Communications Design Studio Help.
In the Multiplicity field, select one of the following:
Required: This attribute makes the parameter mandatory.
Optional: This attribute makes the parameter optional.
Range: Any ranged parameter with a Minimum value greater than 0 is considered a mandatory ASAP parameter. Any ranged parameter with a Minimum value of 0 is considered an optional ASAP parameter.
Click Finish.
The new parameter appears in the Data Element dialog box.
Click the new parameter.
The Data Schema editor appears.
In the Element section, click the Activation tab.
From the Runtime type list, select XPATH.
(Optional) Select Indexed to index the parameter.
In the Dependent XML field create or select a dependent XML. This attribute displays the path of the XML file that defines the parameter. This field is available only for the XPATH run-time type parameter.
You can group ASAP scalar parameters in Design Studio by using the structured schema element feature. The structure element is a container that holds ASAP parameters. For example the following scalar groups can be defined using two levels of structure elements:
Structure element1
     Structure element2
              Scalar1
              Scalar2
Structure element3
     Structure element4
              Scalar3
              Scalar4
In a real world scenario, these structure could be as follows:
Person
     Name
         First_name
         Last_name
Place
     Address
         Number
         Street
The structure elements used in Design Studio are converted into individual ASAP scalar parameters by absorbing the structured element names into the scalar parameter name. The example used above describing a person and place would look as follows as ASAP parameters:
Person_Name_First_name
Person_Name_Last_name
Place_Address_Number
Place_Address_Street
To group scalar parameters using Design Studio:
Select Studio, then select Show Design Perspective.
Select the Data Element tab.
Right click in the Data Element dialog box.
Select Add Structured Schema Element.
The Create Data Schema Structure wizard appears.
Enter the following:
In the Entity field, enter the name of the project to which you want to add a scalar parameter.
In the Name field, enter an element name.
In the Display Name field, enter a display name. The Data Schema editor supports multiple languages for this field. The field adjacent to Display Name displays your language. You can define a Display Name field value for any language you select from the list. For more information, see the Oracle Communications Design Studio Help.
In the Multiplicity field, select one of the following:
Required: This attribute makes the parameter mandatory.
Optional: This attribute makes the parameter optional.
Range: Any ranged parameter with a Minimum value greater than 0 is considered a mandatory ASAP parameter. Any ranged parameter with a Minimum value of 0 is considered an optional ASAP parameter.
Click Finish.
The new parameter appears in the Data Element dialog box.
Click the new parameter.
The Data Schema editor appears.
In the Element section, click the Activation tab.
From the Runtime type list, select SCALARS.
From the Data Element area, right click the new parameter.
Select one of the following:
Add Simple Child Schema Element: Select this attribute if you want to immediately define xml or scalar parameters within the first structured element. If you select this option, go to step 12.
Add Structured Child Schema Element: Select this attribute if you want additional structured child schema elements below the first structured element. If you select this option, repeat steps 5 to 11.
Enter the following:
In the Name field, enter an element name.
In the Display Name field, enter a display name. The Data Schema editor supports multiple languages for this field. The field adjacent to Display Name displays your language. You can define a Display Name field value for any language you select from the list. For more information, see the Oracle Communications Design Studio Help.
In the Multiplicity field, select one of the following:
Required: This attribute makes the parameter mandatory.
Optional: This attribute makes the parameter optional.
Range: Any ranged parameter with a Minimum value greater than 0 is considered a mandatory ASAP parameter. Any ranged parameter with a Minimum value of 0 is considered an optional ASAP parameter.
Click Finish.
Repeat steps 12 to 13 for any additional parameters to be included in the scalar or xml parameter group.
|
 Copyright © 2012, Oracle and/or its affiliates. All rights reserved. Legal Notices |
|