
Oracle® Insurance Rules Palette 9.4.0.0 E18894_01
Action Events provide the ability to perform actions on a field when an event occurs on the screen. Configuration is done by establishing user events and linking them to Action Sets via ID attributes. So when the user selects something in OIPA an event invokes a set of Action Sets that change fields or displays messages.
There are various types of Action Events that can be configured.
create custom error and warning messages that appear to the end user after the system validates what was entered.
change whether fields are enabled or disabled when an event occurs.
change whether fields are hidden or displayed.
change a field’s data according to the value in a trigger field.
Configuration is performed through the Events pane located on the menu bar across the top of the Configuration Area.
IMPORTANT: Please see the XML Configuration Guide, which can be accessed from the Help menu, for a list of all elements, attributes and values needed for configuration. View Transaction Rules | Transaction Elements | ActionEvents.
Events Pane
Configure the fields that the actions can be applied to.
Configure the event that needs to occur to invoke the actions. This is done using XML.
Identify the set of actions, ScreenMath, QuerySets and/or ActionSet, that are configured in the event.
If needed, configure ScreenMath to define the math that is available for use when an event is invoked. Either global or local math can be used by fields.
If changing field data, configure a QuerySet that defines the data used to populate combo boxes according to a trigger field’s value.
If creating errors, warnings or controlling a field, configure an ActionSet that defines the action to be performed on a field.
The events section identifies the type of event that needs to occur to invoke a set of actions. It also identifies the field that is connected to the event.
The available event types that can invoke an action are:
ONLOAD: runs the event on the initial load of the screen.
ONCHANGE: runs the event when a trigger field is changed.
ONSUBMIT: processes the event when the final submission on the screen is selected.
Check-out the transaction, segment or business rule's XML file.
Click the Events tab. The Event Navigator window will open.
Double-click the Events node. The XML data will open on the Configuration Area.
Configure the event. Identify the event TYPE and, if applicable, the FIELD that the event applies to.
Configure any combination of Math, ActionSets and/or QuerySets. Each action ID attribute must have a matching action.
Check-in the file to save the changes to the database.
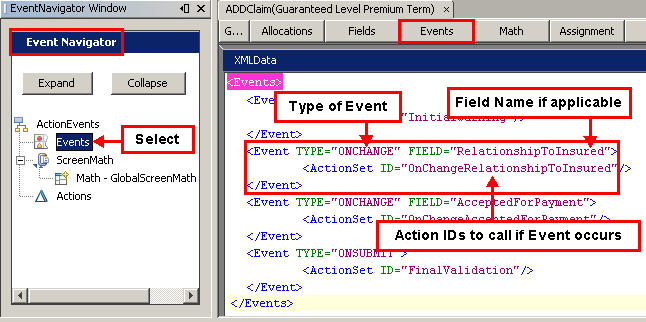
Events XML
Event TYPE, FIELD and IDs
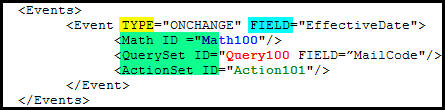
There are three types of actions: (Use any combination of the options listed below.)
Math identifies a set of math configuration to be used for the event called ScreenMath.
ActionSets identifies a set of action configuration to be used for the event.
QuerySets identifies a set of query configuration to be used for the event.
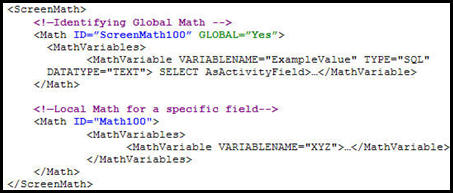
Configure the <ScreenMath> section in order to perform field math to support actions. In <ScreenMath> configure <Math> sub-elements that are each identified with an ID so that events may locate it for use. This is different from the <Math> section, because it provides the ability to perform calculations for the Fields section. ScreenMath is not available for use in the main transaction <Math> section.
The <ScreenMath> is identified through a configurable ID and can include two types of <Math>:
Global ScreenMath: All fields can use math in this section. It is only loaded on the initial load of the screen and cannot use field values.
Local ScreenMath: This is invoked when indicated by an action. Fields may be used; however, the configuror must be aware that the ScreenMath logic must be configured in such a way as to ensure that all fields being used take into consideration all of the calls to the use of the ScreenMath for that ID.
There can only be one GLOBAL ScreenMath section. The GLOBAL attribute with a value of Yes indicates to the system that the math is global. Without the GLOBAL attribute the system identities the <Math> as local. The global ScreenMath is available in the local ScreenMath section. Local ScreenMath is not available in global ScreenMath. When naming ScreenMath do not name global and local math the same. If the names are the same, the local math will take precedence.
Screen Math XML
Check-out the transaction, segment or business rule's XML file.
Click the Events tab. The Event Navigator window will open.
Right-click the Screen Math node and select New Math Section.
Enter the Section ID, which is the name of the ScreenMath.
Check the Global box if the math being configuring is global math.
Select Finish.
Configure the math section by dragging and dropping math variables from the Palette window.
Check-in the XML file to save the changes to the database.

Global Screen Math on Events Pane
Note: View the ScreenMath XML from the XML Source pane. See image below.
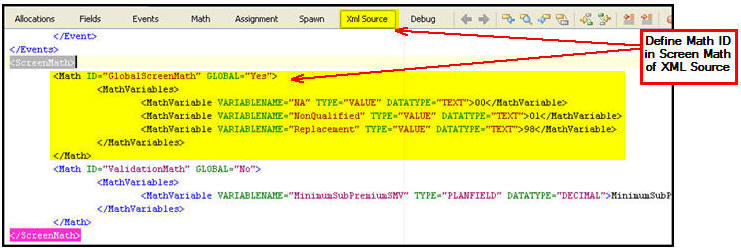
Screen Math XML from XML Source Pane
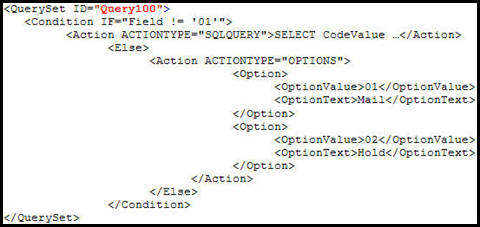
QuerySets allow combo boxes to load with a SQL statement, as well as define a set of hard coded combo box options. <QuerySet> is a sub-element of <Actions> and each <QuerySet> is identified with an ID attribute that the <Event> section uses to locate the correct configuration.
When configuring the change of combo box data, make sure to use the FIELD attribute in the corresponding <Event> section for the trigger field. In the <QuerySet> sub-element use the FIELD attribute for the field that will have its data changed.
Conditional logic can also be written in this section.
Compare single values by writing expressions. Please see the V9 XML Configuration topic in this help system for a list of all elements, attributes and values needed for configuration. View Common Elements | Operations Available for Expression Writing.
Use available functions.
Use Global and Local math (Must use MathID prefix).
Compare dates.
QuerySet XML
Check-out the transaction, segment or business rule's XML file.
Click the Events tab. The Event Navigator window will open.
Double-click the Actions node. The XML data will open on the Configuration Area.
Configure the action by defining the QuerySets needed for the event. A sample is shown above.
Check-in the file to save the changes to the database.
ActionSets allow for the configuration of errors and warnings, enabling fields, disabling fields, hiding fields, displaying fields and assigning a value to a field. <ActionSet> is a sub-element of the <Actions> and each <ActionSet> is identified with an ID attribute that the <Event> section uses to locate the correct configuration.
There is also the ability to write conditional logic in the section. Available logic includes:
Compare single values by writing expressions.
Use available functions.
Use global and local math (must use MathID prefix).
Compare dates.
Available actions are:
Error: Provides an error message to the user. The user will not be able to proceed until all errors are fixed.
Warning: Provides a warning message to the user. The user will be able to proceed even with warnings on the screen.
Enable: The user can key in a field value.
Disable: The user cannot key in a field value and the fields background color changes.
ReadOnly: The user cannot key in a field value but the fields background color does not change.
Show: The user will see the field.
Hide: The user will not see the field.
Assign: Allows a value to be set based on the change of a different field. Assign does not have an option to set a value and then re-execute the OnLoad or OnChange of the field being set.
Check-out the transaction, segment or business rule's XML file.
Click the Events tab. The Event Navigator window will open.
Double-click the Actions node. The XML data will open on the Configuration Area.
Configure the action by defining the ActionSets needed for the event.
Check-in the file to save the changes to the database.
Copyright © 2009, 2011, Oracle and/or its affiliates. All rights reserved. Legal Notices