
 Read more...
You will use wizards to create create the business components that will provide access to data in existing database
tables and implement the business logic.
Then use the diagrammer, Component Palette and Property Inspector to create an ADF task flow, create a template for all
the pages in the application, and create starter pages based on the template.
You will use the Configure ADF Security wizard to enable security in the application, and define users, roles and grants for
application resources. The you will use the Expression Builder to add login links to the login page, then add conditional
logic to the application, and test run it.
| Purpose | Duration | Application |
|---|---|---|
This tutorial shows you how to create a simple Fusion Web Application and then configure
ADF security. To see the complete application you will create, click the Download button to download a zip of the final application, and then unzip it in your JDeveloper mywork folder. |
50 minutes |  |
Read more...
do the following before you run the application:
Follow all the instructions in Step 1: Install the Schema.
-
Open the application in JDeveloper. In the Application Navigator, expand the Application Resources panel. Then expand Connections > Database. Right-click FOD and choose Properties. Modify only the following properties so that they point to the database where you installed the FOD schema: Host Name, Port, SID. Then click Test Connection to confirm that you can connect. Click OK if the connection was successful.
-
To run the application, double-click adfc-config.xml in the ViewController project, then follow the instruction in Step 12, substep #6.
Download the schema.zip file from OTN.

Unzip the file to a convenient location (for example,
c:\temp).From the File menu, choose Open. Open the workspace
c:\temp\Infrastructure\Infrastructure.jws.If you are prompted to migrate the project, click Yes to confirm, then click OK.
In the Application Navigator, expand the MasterBuildScript project. Under Resources double-click build.properties to open it in the editor.
Set the appropriate values in the build.properties file (
jdeveloper.home, and all thejdbc.*anddb.*settings). Keep all other properties set to their default values. The demo user must be named FOD.
The relevant settings are:Setting Description jdeveloper.home The /jdeveloperdirectory where you have JDeveloper installed, for example,c:/JDeveloper_11/jdeveloper/jdbc.urlBase Base URL for your database, for example, jdbc:oracle:thin:@localhostjdbc.port Port number for your database, for example, 1521jdbc.sid Database System Identifier, for example, XEorORCLdb.adminUser Database user with admin privileges, for example, systemdb.demoUser.tablespace Tablespace name where the FOD user will be installed, for example, USERSIn the MasterBuildScript project, select the build.xml file.
In the Structure window, right-click the refreshSchema target and choose Run Target "refreshSchema".
When prompted, enter the password for the database user with admin privileges.
After running the Ant task, you should see a build successful message in the JDeveloper Log window.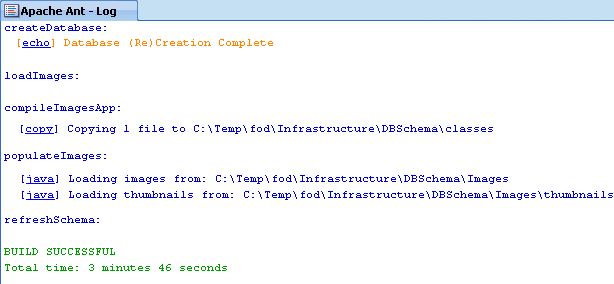
If there are errors, you should verify that your database is running (try connecting through SQL*Plus), and that the values you provided in thebuild.propertiesfile are correct. Also, make sure that the DBA user you specified has the CREATE USER privilege.
Read more...
It will be convenient to have this schema installed, and you only need to do it once. If you have already installed the FOD schema, you can skip this step and go directly to the next. To install the schema, you will also need to have an Oracle database and access to a privileged (DBA) user which has permissions to create users. Any Oracle 10g version (or later) of the database should work for this schema. To install the schema, you will download and expand a zip file, then use Ant to perform the installation.
-
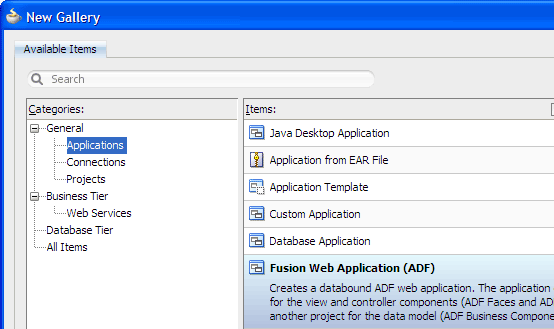
From the main menu, choose File > New. In the New Gallery, expand the General category and select Applications. Then in the Items list, select Fusion Web Application (ADF) and click OK.
-
To follow along with the example, enter
SecureApplicationas the application name.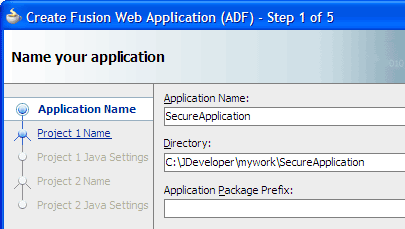
Accept the defaults and click Finish.
The Application Overview window opens by default in the editor window area when you create a new application. You can optionally close the window, since you will not be using it to create objects for this application.
Read more...
At the same time, it keeps track of your projects and all
environment settings.Based on prebuilt templates, a JDeveloper application allows you to specify a predefined type of environment, depending on the type of application you want to create (web application, Java application, and so on). Application templates provide you with a quick way to create the project structure for standard applications with the appropriate combination of features already specified. The application template also filters the work you do in JDeveloper such that the choices available are focused only on the features you are working with.
In this tutorial, you will use the Fusion Web Application template that is configured for building a databound ADF web application. Once you have created an application using a suitable template, you can still new projects to the application and specify what features are to be included. To do this, in the Application Navigator, right-click the application name and choose New Project. In the New Gallery, you can select any type of project in the Items list.
Read more...
The project or projects in the application define the associated features.
A JDeveloper project, which is used to logically group files that are related, keeps track of the source files, packages, classes, images, and other elements that your program may need. Projects manage environment variables such as the source and output paths used for compiling and running your program. Projects also maintain compiler, runtime, and debugging options so that you can customize the behavior of those tools per project.
You can add multiple projects to your application to easily access, modify, and reuse your source code. Different projects might contain files representing different tiers of a multi-tier application, for instance, or different subsystems of a complex application. These files can reside in any directory and still be contained within a single project.
Read more...
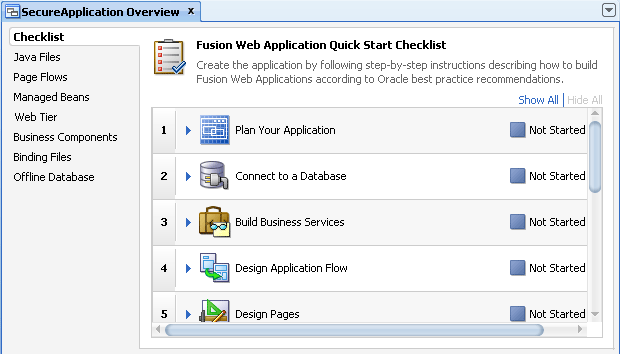
The Checklist steps you through the building of a Fusion Web application, according to Oracle recommended best practices. It optionally walks you through the entire process of configuring and building your application, with links to specific dialogs and wizards. Each step is also designed to teach you about the architecture, tools and resulting files using a combination of links to step-by-step instructions, relevant sections of the Developer's Guides, and descriptions of what happens in the IDE as a consequence of doing the work in a step.
The new application created from the template appears in the Application Navigator already partitioned into tiered projects, with the associated features set in each project. The Projects panel in the Application Navigator should look like this:
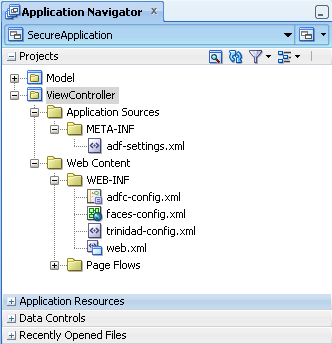
Projects are displayed as the top level in the hierarchy in the Application Navigator. The Fusion Web Application (ADF) template that you used for your web application partitions your application into two projects: Model and ViewController.
In the Application Navigator you can collapse and expand any panel. You adjust the size of panels by dragging the splitter between two panels. To group and sort items in the Projects panel, use the
JDeveloper has the capability of recognizing many different file types, displaying each in its appropriate viewer or editor when you double-click the file in the Application Navigator. Closing an application or project closes all open editors or viewers for files in that application or project and unloads the files from memory.
Note: Nodes in italics in the Application Navigator mean that the elements have not yet been saved. A project node is bold when a file in the project is selected.
You will establish a connection to the database you installed, to use the Fusion Order Demo (FOD) schema.
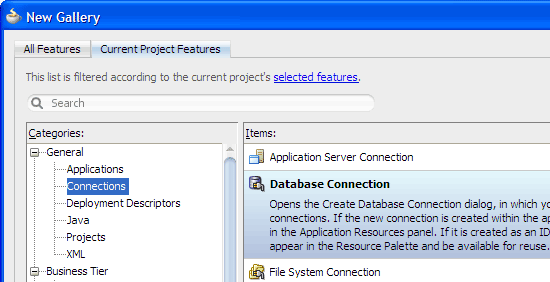
From the main menu, choose File > New > General > Connections > Database Connection, then click OK to open the Create Database Connection dialog.
-
Select Application Resources as the Create Connection In option.
-
Enter a name for the connection, select the connection type, and enter the username and password. To follow along with this example, use
FODfor the connection name andfodfor the username.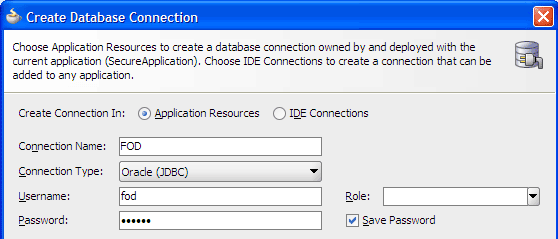
Enter the Oracle JDBC settings to point to the host, port and SID for your database.
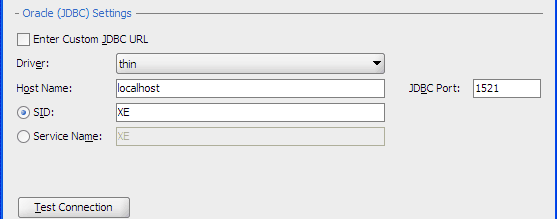
-
Click Test Connection to confirm that you can connect. Click OK if the connection was successful.
-
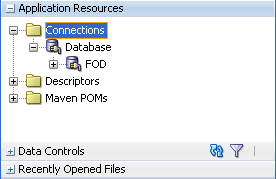
In the Application Navigator, expand the Application Resources panel, then expand the Connections and Database nodes to see the database objects.
Read more...
Expand the connection node you created, then click the various + icons to see the schema and database objects.
After adding the database connection to the application resources, you can optionally contract the Application Resources panel to increase the size of the Projects panel in the Application Navigator.
-
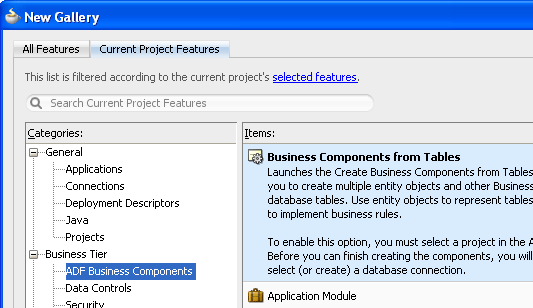
In the Application Navigator, right-click the Model project and choose New > Business Tier > ADF Business Components > Business Components from Table, then click OK.
It automatically handles O/R mappings and persistence for instances of its own library classes
It allows you to make complex requests for data retrieval using SQL
It automatically handles transaction management, including optimistic or pessimistic locking
It provides a framework for implementing complex business logic
It automatically implements many Java EE design patterns
It has a powerful caching and data passivation system for increasing the performance and scalability of applications
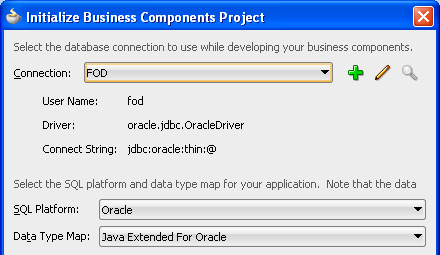
In the Initialize Business Components Project dialog, ensure that FOD is the currently selected database connection. Then click OK.
On step 1, Entity Objects, click Query to populate the Available list.

If your schema has many tables, you may experience a short delay.-
Select two tables, PRODUCTS_BASE and WAREHOUSE_STOCK_LEVELS, from the Available list and click
 to move them to the
Selected list. Then click Next.
to move them to the
Selected list. Then click Next.
The tables are related by a foreign key so the resulting business components represent a one-to-many relationship.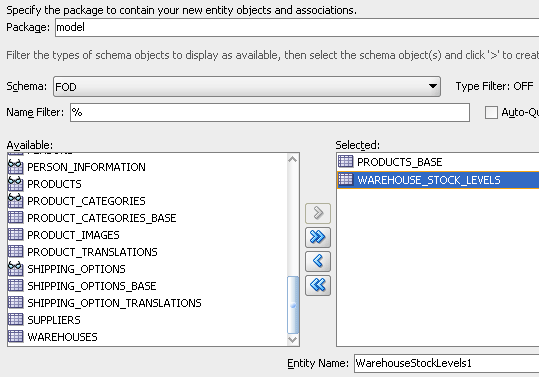
-
On step 2, Entity-based View Objects, click
 to move both objects from the Available list to the Selected list.
Then click Next.
to move both objects from the Available list to the Selected list.
Then click Next.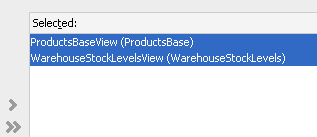
-
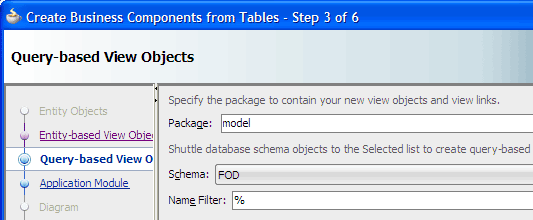
Click Next to skip step 3, Query-based View Objects, which aren't needed.
-
On step 4, Application Module, change the application module name to
ProductsModuleand click Finish.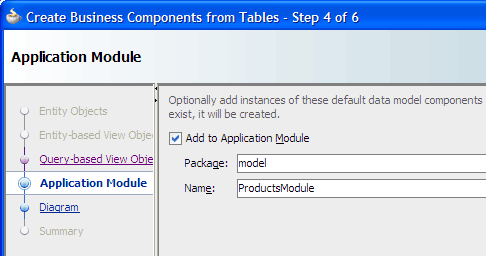
-
Click
 Save All to save your work.
After completing the Create Business Components from Tables wizard, the Model project in the Application Navigator should look similar to this: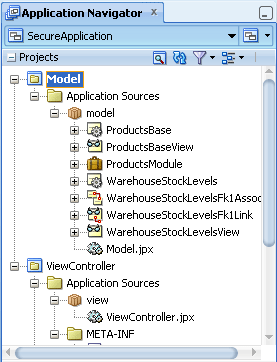
Entity objects, like ProductsBase, which represent objects in the data source (usually tables, views, and synonyms in a database)
Associations like WarehouseStockLevelsFkAssoc, which represent relationships between these objects (such as foreign key relationships)
View objects, like ProductsBaseView, which collect data from the data source (usually by using a SQL query)
View links, like WarehouseStockLevelsFkLink, which represent relationships (such as master-detail relationships) between view object result sets
Application modules, like ProductsModule, which provide a single point of access to the view objects and view links
Read more...
The particular database objects that you choose in the wizard are important. Your selections will determine how the generated business components will be related. For instance, if two tables define a one-to-many relationship through their foreign key column, the business components generated by the wizard will also describe this relationship. In the business components terminology, a one-to-many relationship is also known as a master-detail relationship. In the example, the two tables will be used to display data in a master-detail form.
JDeveloper also provides business component wizards that let you edit any business components you create with this wizard, and add new business components later.
The Create Business Components from Tables wizard does not create a user interface (this is governed by the "view" portion of the application), nor does it determine other application logic such as control flow. It just provides a representation of, and access to, data, and implements business logic.
Specifically, Oracle ADF Business Components technology handles all aspects of application plumbing automatically:
Read more...

The Data Controls panel is a data binding tool that lets you add databound UI controls to user interfaces by dragging and dropping. In a step, you will use the Data Controls panel to design the master portion of a master-detail form.
In the Model project, the navigator displays the business components that you created in this series of steps: entity objects, view objects, associations, view links, and application modules. To display the business components sorted by type, select Sort By Type in the
Your wizard selections produced these business domain components that represent features of the data source:
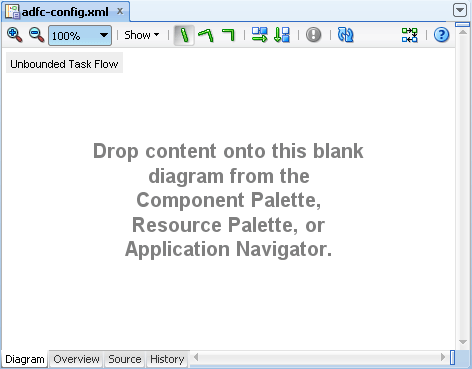
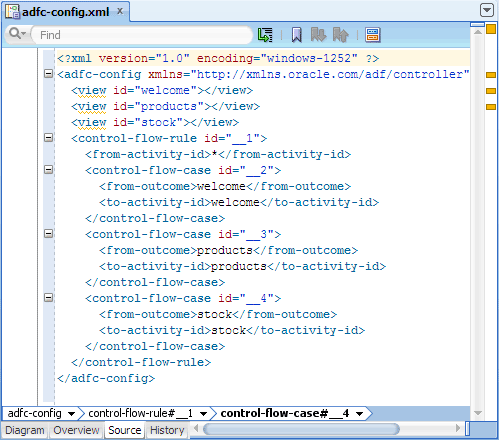
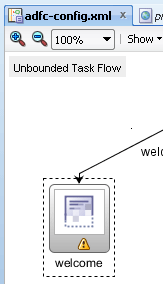
In the Application Navigator, expand the ViewController project, Web Content and Page Flows folders, and double-click adfc-config to open it in the diagrammer.
In the Component Palette, ADF Task Flow page, Components panel, Control Flow section, click
 Wildcard Control Flow Rule then drag and drop it on the diagram to add a control flow case icon.
You do not need to enter a name for it.
Wildcard Control Flow Rule then drag and drop it on the diagram to add a control flow case icon.
You do not need to enter a name for it.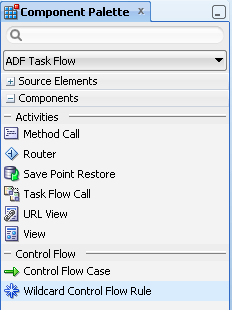
The required navigation rules and cases are added to the configuration file automatically for you.
The different cases for each rule are shown on the diagram as arrows connecting pages, with the direction of the arrow indicating the pages from which and to which the user will navigate. A label is associated with each case, to be used to distinguish the different cases from a single page.
In the Components panel, Activities section, click
 View then
drag and drop it on the diagram to add a view activity to represent your first
application page. Change the view name to
View then
drag and drop it on the diagram to add a view activity to represent your first
application page. Change the view name to welcome.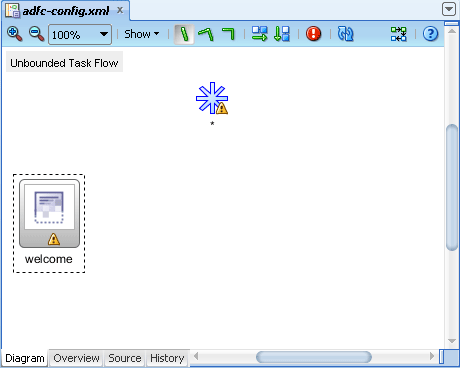
Drag and drop two additional
View
components on the diagram to add the second and third view activities. Change the view names to productsandstock.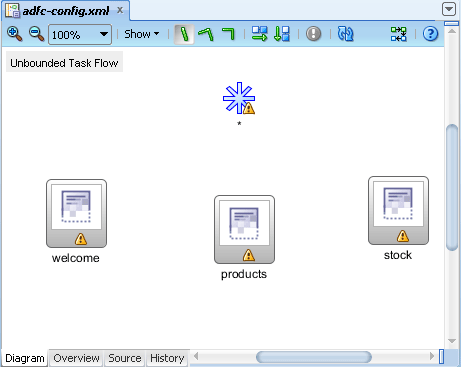
In the Component Palette, Control Flow section, click
 Control Flow Case. Then in the diagram, click on the wildcard control flow rule icon and then the welcome view
icon. Enter
Control Flow Case. Then in the diagram, click on the wildcard control flow rule icon and then the welcome view
icon. Enter welcomefor the outcome label.Click
Control Flow Case again. Then in the diagram, click on the wildcard control flow rule
icon and then the products view icon. Enter productsfor the outcome label.Click
Control Flow Case again. Then in the diagram, click on the wildcard control flow rule icon and then the
stock view icon. Enter stockfor the outcome label.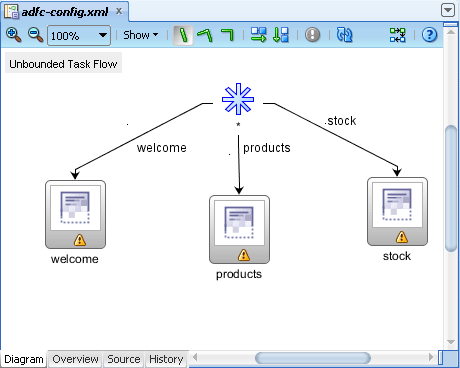
Read more...
An ADF task flow includes the view activities and control flow rules that define an application's page flow. There are two types of task flows: bounded and unbounded. A bounded task flow has a single entry point and zero or more exit points; it contains its own set of private control flow rules, activities, and managed beans. An unbounded task flow is for top-level application flows; it consists of all activities and control flows in an application that are not included within any bounded task flow. A typical application is a combination of an unbounded and one or more bounded task flows.
You will first create an ADF task flow diagram that defines the flow of your application: a welcome page, and pages that display product and stock information. To begin creating a task flow, you have opened the blank task flow diagram created by default when you used the Fusion Web Application template. You can also create task flows using the Create ADF Task Flow dialog.
Read more...
You add pages and navigation rules to a navigation diagram by selecting elements from the ADF Task Flow page of the Component Palette and dropping them on the diagram, or by creating the pages first, and then dragging them from the Application Navigator onto the diagram.
When you draw navigation on a task flow diagram:
Read more...
The first activity you dropped
is the default, as indicated by the green halo or circle. Currently
the task flow does not do anything: the !
icon on each view activity indicates that the view activity
is not bound to any page. Later you will tie a page to each
view activity, and add navigation.
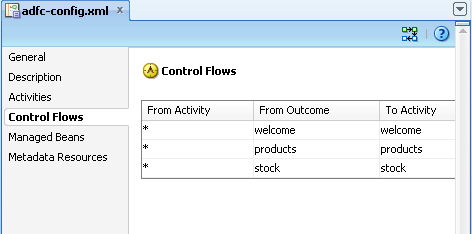
You can see the rules that JDeveloper has added to the task flow file using a visual format by clicking the Overview tab at the bottom of the editor window and selecting the Control Flows navigation tab at the left, for example:
You can see the same rules in the XML source of the task flow file by clicking the Source tab at the bottom:
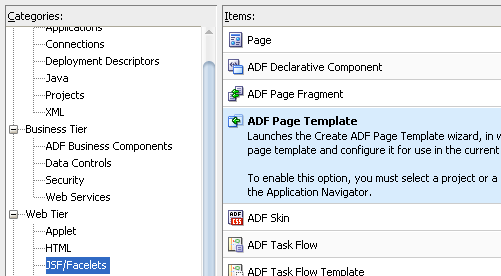
In the Application Navigator, right-click the ViewController project and choose New > Web Tier > JSF/Facelets > ADF Page Template, then click to open the Create ADF Page Template dialog.
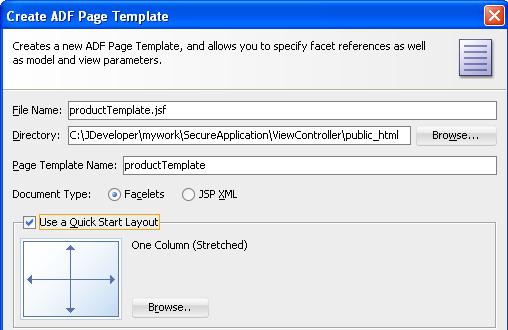
Enter
productTemplate.jsfin the File Name field. Confirm that Facelets is selected as the document type.Select Use a Quick Start Layout. Then click Browse.
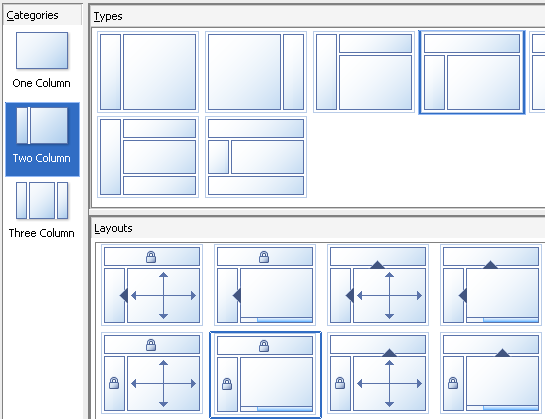
In the Component Gallery, select the Two Column category, the fourth type, and the sixth layout with locks in the top and left facets and no stretching. (You should see Two Column Left, Header (Scrolled) in the Options box on the right.) Then click OK.
With the Facet Definitions tab in front, click
 to add a facet. Enter
 main_contentin the Name field. Then click OK.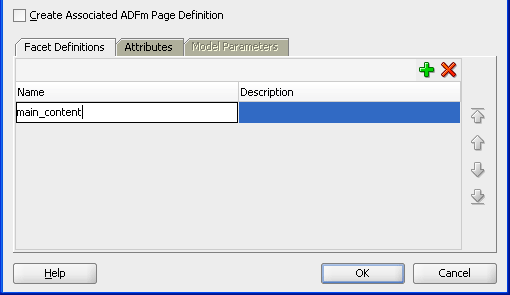
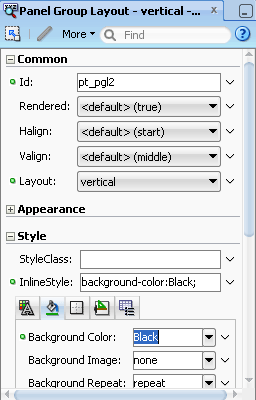
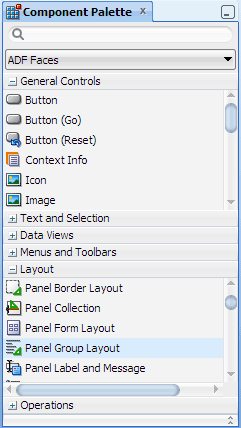
In the Component Palette, ADF Faces page, Layout panel, drag
 Panel Group Layout
and drop it on the top facet of the template, in the visual editor.
Panel Group Layout
and drop it on the top facet of the template, in the visual editor. 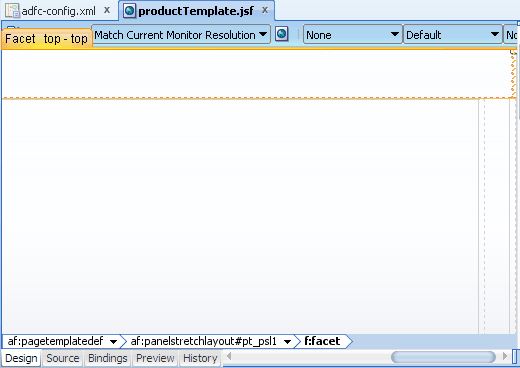
-
In the Property Inspector, Common section, select vertical from the Layout dropdown list. Expand the Style section, select the Background tab, and select Black from the Background Color dropdown list.
In the Component Palette, Text and Selection panel, drag and drop
 Output Text
into the panel group layout you just added.
Output Text
into the panel group layout you just added. In the Property Inspector, Common section, enter
Product Informationas the Value. Expand the Style section, select the Text tab, and select White from the Color dropdown list, medium from the Font Size dropdown list, and bold from the Font Weight dropdown list.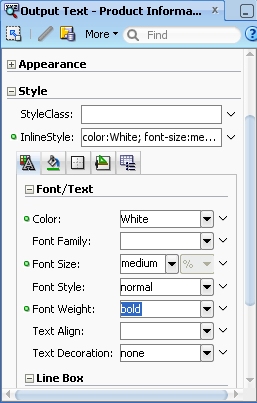
In the Component Palette, Layout panel, drag
Panel Group Layout
and drop it on the start facet of the template. 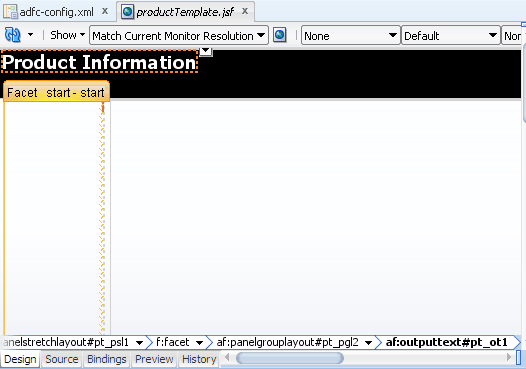
In the Property Inspector, Common section, select vertical from the Layout dropdown list. Expand the Style section, select the Background tab, and select ActiveBorder from the Background Color dropdown list.
-
In the Component Palette, General Controls panel, drag and drop
 Link
into the panel group layout in the start facet. In the Property Inspector, Common section,
enter
Link
into the panel group layout in the start facet. In the Property Inspector, Common section,
enter welcomeas the Text and the Action property fields. Drop two additional
Link
components into the panel group layout in the start facet. Enter productsas the Text and Action property of the first, andstockas the Text and Action property of the second link.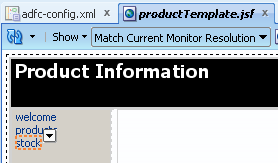
In the visual editor, click the blank area to the right of the start facet, below the top facet. (In the editor crumbs, you should see that you have selected the panel group layout.)

Scroll the Component Palette, Layout panel, to the Core Structure section, then drag and drop
 Facet
into the panel group layout in the center facet, where you will add the custom content for each page.
Choose main_content from the dropdown list. Click OK.
Facet
into the panel group layout in the center facet, where you will add the custom content for each page.
Choose main_content from the dropdown list. Click OK. 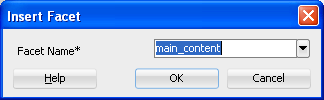
Click
Save All to save your work.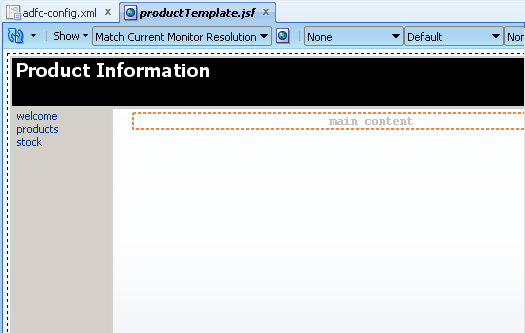
Read more...
Typically you would create and bind navigation components on a page template, then use the template to create your pages.
Using a page template also provides the same layout and look and feel for your application pages.
A page template is created in a template definition file written in XML. The template is described in two sections inside the template definition file: a metadata section that contains all the metadata for the template (such as the template display name), and a layout section that contains all the individual ADF Faces components that make up the template page layout.
The Create ADF Page Template dialog helps you to create metadata for the template only, such as the template's display name, and any facet definitions or attributes that the template might include. In the example, you will enter a file name for the template, and add a facet definition. The facet definition you add will allow page authors to add their own page contents when they create their pages using the template. After creating the initial metadata, you will use tools such as the visual editor and Component Palette to define the components for the layout part of the template definition.
Read more...
In the Create JSF Template dialog, when you select Use a Quick Start Layout and click Browse, you can choose from one, two, or three column layouts, and then determine how you want the columns to behave. When you use a quick start layout option, JDeveloper adds the components necessary to display the template layout. Once your page template file is created, you can add UI components and work with the page source.
Read more...
JDeveloper provides a Component Palette to add user interface and data components to your pages. While inserting, copying, or moving page components, you select an insertion point on the page in the visual editor or in the Structure window in relation to a target page element. JDeveloper provides visual cues to indicate the location of the insertion point before, after, or contained inside a target component.
After adding a component, you can set the properties of the component using the Property Inspector.
Read more...
The facet you defined, main_content, will be used for page content. Page template facets define areas on the template where content can be added by page authors when they use the template to create their JSF pages. To allow page authors to add their own content, you define one or more facets as placeholders for future content.
Click the adfc-config.xml tab to bring the diagram to the front, then double-click the welcome view icon to open the Create JSF Page dialog.
The New Gallery
The ADF Task Flow diagrammer
Accept the default file name of
welcome.jsfand Facelets as the document type. Under Page Layout, select Page Template. Then select productTemplate and click OK.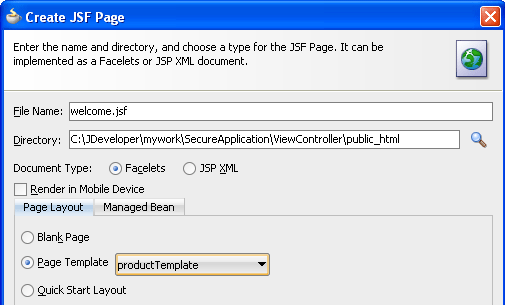
In the Component Palette, ADF Faces page, expand the Text and Selection panel. Drag
 Output Text (Formatted) and drop it into the main_content
facet on the page.
Output Text (Formatted) and drop it into the main_content
facet on the page.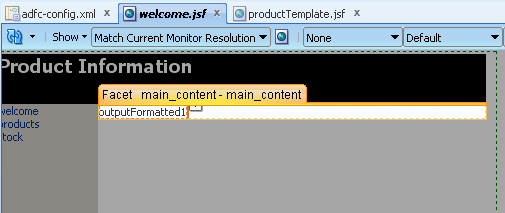
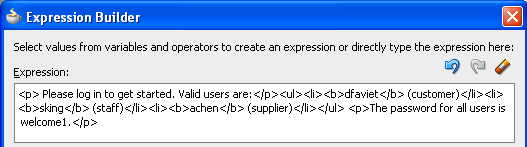
In the Property Inspector, select Expression Builder from the Value context menu. Enter the following in the Expression field and click OK:
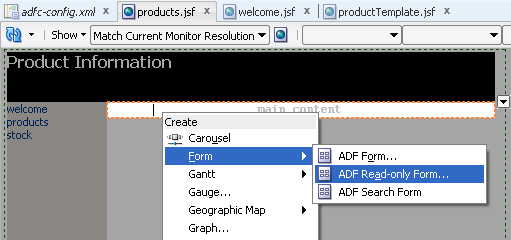
Click the adfc-config.xml tab to bring the diagram to the front, then double-click the products view icon to open the Create JSF Page dialog. Under Page Layout, select Page Template. Confirm that productTemplate is selected and click OK.
In the Application Navigator, expand the Data Controls panel and the ProductsModuleDataControl node. Drag and drop the ProductsBaseView1 node onto the main_content facet in the visual editor.
From the Create context menu, choose Form > ADF Read-only Form.
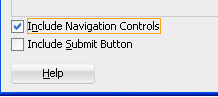
In the Edit Form Fields dialog, select all the fields except the following: ProductName, ProductStatus, CostPrice, and ListPrice. Then click
 Delete.

Select Include Navigation Controls, and click OK.
The products.jsf page should look like this, in the visual editor: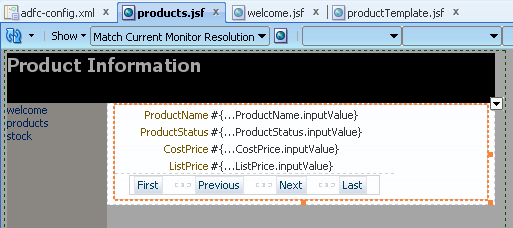
-
Click the adfc-config.xml tab to bring the diagram to the front, then double-click the stock view icon to open the Create JSF Page dialog. Under Page Layout, make sure Page Template is selected. Confirm that productTemplate is selected and click OK.
From the Data Controls panel, drag and drop the ProductsBaseView1 node onto the main_content facet in the visual editor. From the Create context menu, choose Navigation > ADF Navigation List.
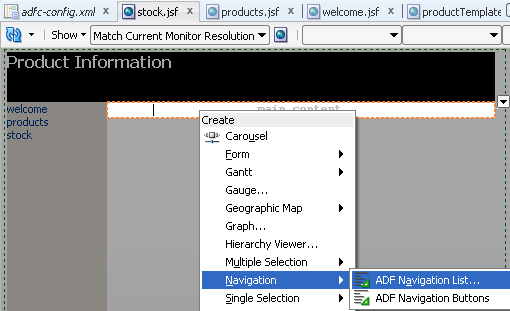
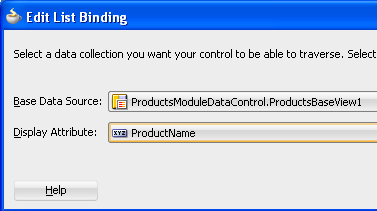
In the Edit List Binding dialog, select ProductName as the display attribute and click OK.
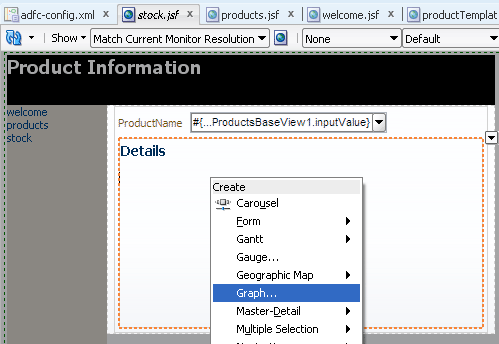
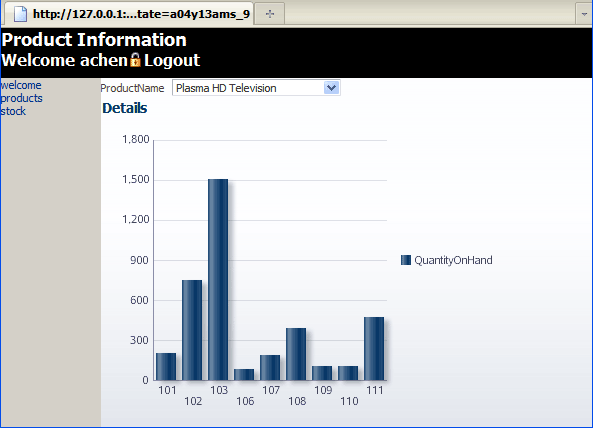
In the Data Controls panel, expand ProductsBaseView1, scroll down, and select WarehouseStockLevelsView2. Drag it into the Panel Header - Details box on the page and select Graph from the Create menu.
-
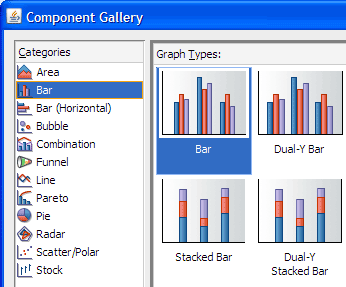
In the Component Gallery, select Bar as the category and graph type, and click OK.
In the Create Bar Graph dialog, drag QuantityOnHand from the Available list to the Bars field. Drag WarehouseId from the Available list to the X Axis field. Then click OK.
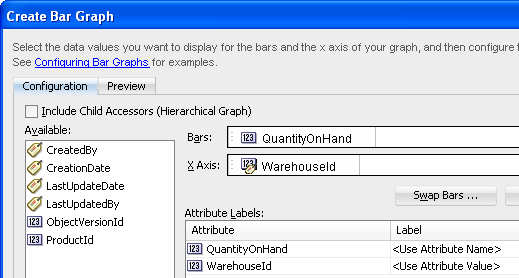
-
In the Property Inspector of the bar graph component, Appearance section, enter
Bar graphin the ShortDesc field. Click
Save All
to save your work.
The stock.jsf page, the last page you updated, should look similar to this page in the visual editor: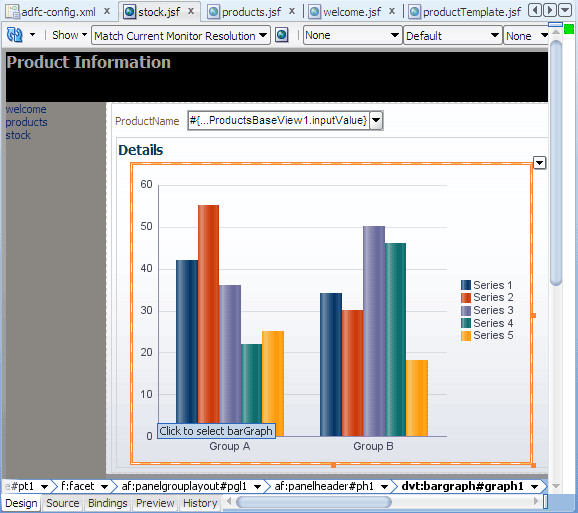
In the editor window, click the adfc-config.xml tab to bring the diagram forward. Right-click the welcome page icon and choose Run.
If the Create Default Domain dialog displays, enter the default password, for exampleweblogic1, in the Password and Confirm Password fields, then click OK.
When you run the welcome.jsf page, it should look similar to this page in your browser: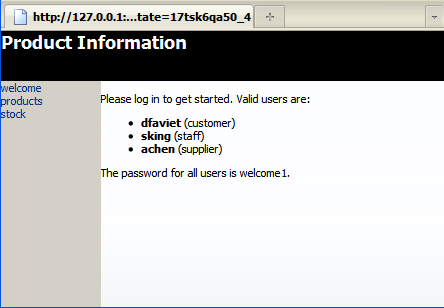
Starts Integrated WebLogic Server, if not already running.
Compiles and deploys the application to Integrated WebLogic Server.
Launches the application in your default browser using a default address. For example:
http://<your_machine_IP_address>:<http_port>/<application_name>-<project_name>-context-root/faces/<path_to_the_JSP>
.jsf) or JSP documents written in XML syntax (which have file extension .jspx).
Read more...
You can create the pages with the Create JSF Page dialog, opening it from:
welcome.jsf, products.jsf and
stock.jsf pages based on the page template.
When you create a new Facelets (
.jsf) page, JDeveloper automatically creates a starter page structure with two
xmlns attributes for the ADF Faces and JSF Core tag libraries. The other elements included
in a starter file are elements for laying out a page, specifically everything else within <f:view>
and </f:view>.
products.jsf page to create a read-only form.
At runtime, the products are shown one at a time.
Read more...
For navigating through the data, navigation buttons can be included in the read-only form.
To begin designing the form and table, use the JDeveloper data binding tool, known as the Data Controls panel. Oracle ADF data controls are represented on the Data Controls panel, where they can be added to the view as UI controls. When you drag a node to the page, the Create menu displays.
Read more...
In addition to Graph, data visualization components include Gauge, Gantt chart, Geographic Map, and Pivot Table. You can choose the type of graph you want to create from the Component Gallery.
Using the Data Controls panel to get started, you will create a bar graph based on the view object WarehouseStockLevelsView2. You will configure the graph in the Create Bar Graph dialog.
Read more...
By default, JDeveloper automatically configures an integrated server named Integrated WebLogic Server that references a user-specific instance of Oracle WebLogic Server bundled with the IDE. Integrated WebLogic Server is a Java EE runtime service for packaged archive deployment. Based on zero-copy deployment, Integrated WebLogic Server lets you run and test an application and its projects as a Java EE application in a Java EE container. No special connection setup is required to use Integrated WebLogic Server. You can run the entire application, a project, or individual JSF pages.
When you run the view activity, JDeveloper automatically:
-
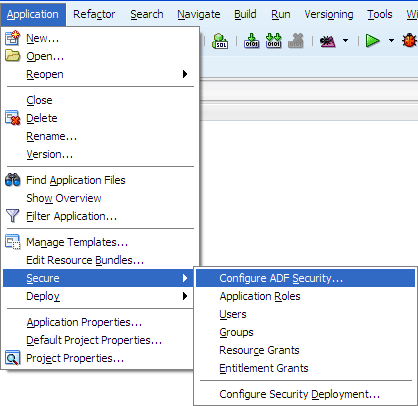
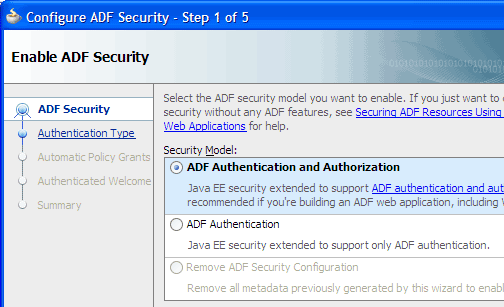
From the main menu, choose Application > Secure > Configure ADF Security to open the Configure ADF Security wizard.
On Step 1, select ADF Authentication and Authorization, then click Next.
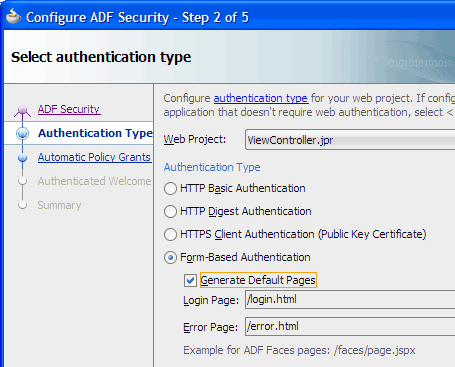
On Step 2, select Form-Based Authentication and Generate Default Pages. Then click Next.
-
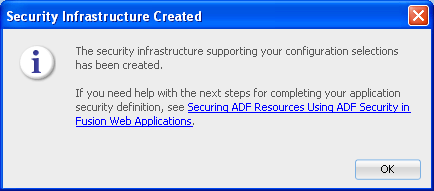
Click Next to accept the defaults in the remaining steps, then click Finish. Click OK in the message prompt.
Enabled ADF authentication to prompt the user to log in and to allow page redirects
Enabled ADF permission checking so that only authorized users will have access to ADF resources
Read more...
Oracle ADF Security is built on top of the Oracle Platform Security Services (OPSS) architecture, which itself is well-integrated with Oracle WebLogic Server. While other security-aware models exist that can handle user login and resource protection, Oracle ADF Security is ideally suited to provide declarative, permission-based protection for ADF bounded task flows, top-level web pages that use ADF bindings (pages that are not contained in a bounded task flow), and at the lowest level of granularity, rows of data defined by ADF entity objects and their attributes.
You enable ADF Security for Fusion web applications when you run the Configure ADF Security wizard. The wizard configures ADF Security for the entire Fusion web application, so that any web page associated with an ADF security-aware resource is protected by default. This means that after you enable ADF Security, your application is locked down so that the pages are considered secure by default.
The first time you run the Configure ADF Security wizard and enable authentication and authorization, you secure ADF resources at the level of the application. Additionally, you select specific project-level settings for the user interface project, including the authentication type and the authentication welcome. The wizard adds these web application settings to the
web.xml file in the project you select.
Read more...
When you run the wizard with the default option selected, your application will enforce authorization for ADF security-aware resources. Enforcing authorization for ADF resources means that you intend to define security policies for these resources to make the web pages of your application accessible. Until you do so, all pages that rely on the ADF bounded task flows and ADF page definitions will remain protected.
The other two wizard options to configure Oracle ADF Security should not be used when you want to enable ADF Security. Those options allow you to temporarily disable Oracle ADF Security and run your application without security protection.
ADF Authentication and Authorization (default) enables the ADF authentication servlet so that you can redirect to a configured web page when the user logs in and logs out. This option also enables ADF authorization to enforce permission checking against security policies that you define for ADF resources. This option assumes that you will define application roles and assign explicit grants to those roles to manage access to ADF security-aware resources.
Read more...
Selecting Form-Based Authentication allows you to specify a user-written HTML form for authentication. Selecting the Generate Default Pages option causes JDeveloper to generate a default form-based login page named
login.html.
The wizard-generated login and error pages are HTML pages that are added to the top-level folder of your user interface project, ViewController. The generated login page defines a form with the standard
j_security_check action.
The form takes the user name and password as input to the j_SecurityCheck method within the container's security model.
Read more...
After you run the Configure ADF Security wizard with the default ADF Authentication and Authorization option selected in the ADF Security page, you will have:
web.xml file now specifies form-based authentication and identifies the location of the pages,
adding the following code:
<login-config>
  <auth-method>FORM</auth-method>
  <form-login-config>
    <form-login-page>/login.html</form-login-page>
    <form-error-page>/error.html</form-error-page>
  </form-login-config>
</login-config>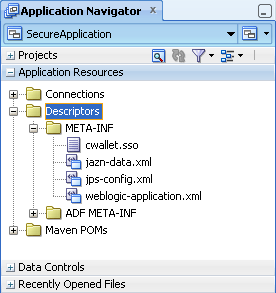
The wizard-generated login.html and error.html pages are added to the ViewController project.

From the main menu, choose Application > Secure > Application Roles to open the Application Roles page of the overview editor.
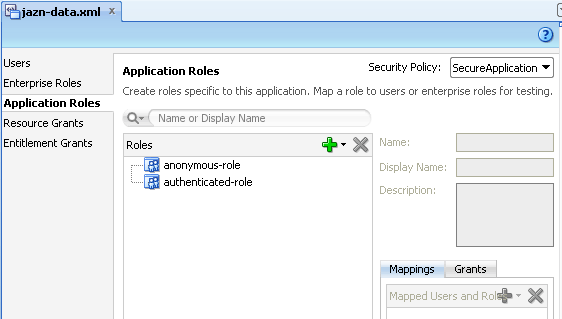
-
In the overview editor, click
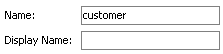
to the right of Roles and select Add New Role, then enter customeras the name of the new role.
Grant permissions to the application roles
Associate test users with each application role
-
Click
to the right of Roles again and select Add New Role > at Root Level. Enter staffas the name of the additional role. Repeat to add another new role,supplier.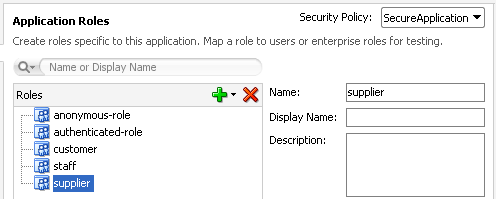
Click the Users tab, then click
to the right of Users to add a new user.
Enter dfavietas the name andwelcome1in the Password and Confirm Password fields.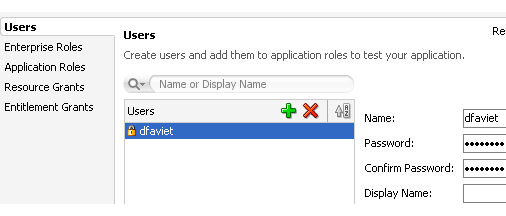
-
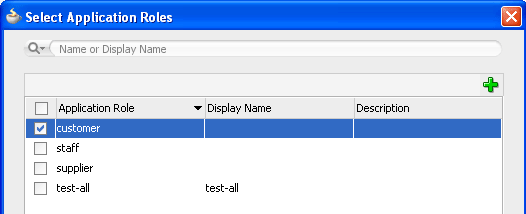
Click
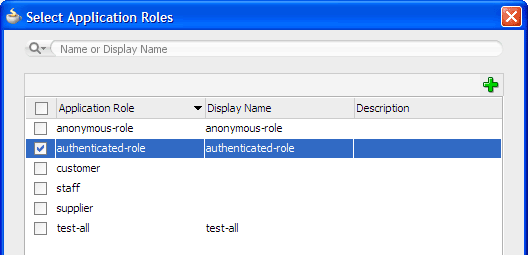
to the right of Assigned Roles and choose Assign Application Role. Select customer from the Select Application Roles dialog and click OK.
-
Click
to the right of
Users. Enter skingas the name andwelcome1in the Password and Confirm Password fields. -
Click
to the right of Assigned Roles and choose Assign Application Role. Select staff from the Select Roles dialog and click OK. -
Repeat the previous two steps to create a third user. Enter
achenas the name andwelcome1as the password. Select supplier as the application role.
The Users page shows the assigned role for the selected user.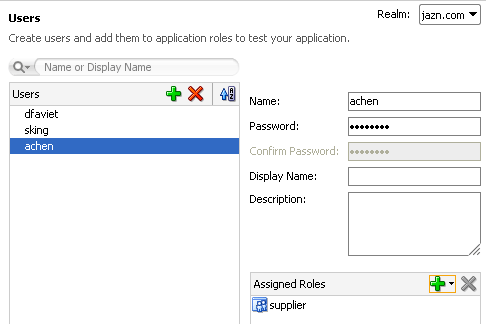
Read more...
After you enable ADF Security you must grant users access rights so that they may view the web pages of the Fusion web application. Access rights that you grant users are known as a security policy that you specify for the page's corresponding ADF security-aware resource. Ultimately, it is the security policy on the ADF resource that controls the user's ability to enter a task flow or view a web page.
You create application roles to represent the policy requirements of the application and to define groups of users with the same view permission rights. The application roles that you create in the application policy store are specific to your application. For example, in the context of the work flow, there may be application roles such as customer, staff, and supplier.
At runtime, the access rights are conferred on the user through the application role for which the user is defined as a member. Thus, before you can define security policies, the policy store must contain the application roles that you intend to issue grants to.
Read more...
An application role is a role used by an ADF application. It is specific to the application, defined by the application policy, and not necessarily known to the Java EE container. Application roles are scoped in the sense that they can contain only users and roles defined in the application.
After you create the application role, you will:
You use the Enterprise Roles page to group users that you add to the identity store. You can use this mechanism to assign entire groups of users to application roles that you have defined for the purpose of conferring access rights defined by ADF security policies. However, Integrated WebLogic Server does not require you to create enterprise roles to run the application within JDeveloper. For the purpose of testing the application, it is sufficient to create a few test users and assign them directly to application roles.
Ultimately, when you deploy an application for staging outside of JDeveloper, you migrate the policy store to the target server.
jazn-data.xml file.
Read more...
Because the policy store element names
the application, at runtime all application roles that you create will be visible to your application only.
For the purpose of testing the application, it is sufficient to create a few test users and assign them directly to application roles.
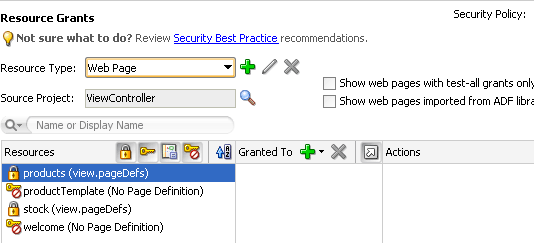
In the overview editor, select the Resource Grants navigation tab.
In the overview editor for jazn-data.xml, select Web Page from the Resource Type dropdown.
-
In the Resources list, select products, then click
to the right of
Granted To and choose Add Application Role.
Select authenticated-role and click
OK. 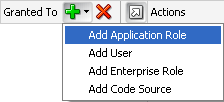
-
In the Resources list, select stock, then click
to the right of Granted
To and choose Add Application Role.
Select supplier and click OK.
The Resource Grants page should now look like this: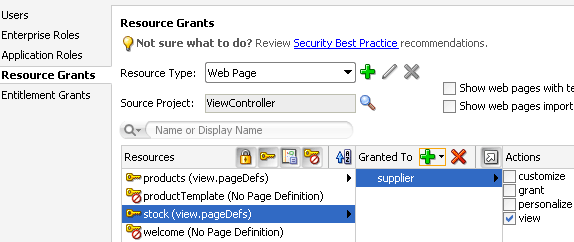
Read more...
In this application, you will define resource grants in the Fusion web application for resource instances associated with web pages to make web pages accessible to users.
To begin defining resource grants you will open the Web Page page of the overview editor for jazn-data.xml.
Read more...
For example, the home or welcome page should be seen by all visitors to the site, while a corporate site should be available only to those who have identified themselves through authentication.
In both cases, the page may be considered public, because the ability to view the page is not defined by the users' specific permissions. Rather, the difference is whether the user is anonymous or a known identity.
In the Oracle ADF Security model, you differentiate between the absence of security and public access to content by granting access privileges to the anonymous-role principal. The anonymous role encompasses both known and anonymous users, thus permission granted to anonymous-role allows access to a resource by unauthenticated users, for example, guest users. To provide access to authenticated users only, the policy must be defined for the authenticated-role principal.
Roles are selected in the Select Roles dialog.
Read more...
You use the overview editor to define security policies for resources associated with web pages for the entire application.
You can also use the overview editor to sort resource instances and easily view those that have no security policy yet defined.
In the development environment, this is the
jazn-data.xml file. After you configure the jazn-data.xml file using the editors, you can run the application in Integrated WebLogic Server and the contents of the policy store will
be added to the domain-level store, the system-jazn-data.xml file, while the test users will be migrated to the
embedded LDAP server that Integrated WebLogic Server uses for its identity store. The domain-level store allows you to test
the security implementation by logging on as test users that you have created.
-
In the Application Navigator, expand ViewController and Web Content, and double-click productTemplate.jsf to open it in the visual editor.
In the Component Palette, ADF Faces page, Layout panel, drag
Panel Group Layout
and drop it below the Product Information
title in the visual editor. In the Property Inspector, select horizontal from the Layout
dropdown list. 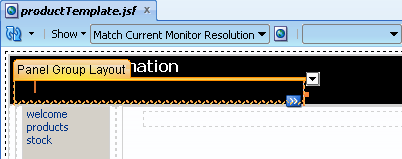
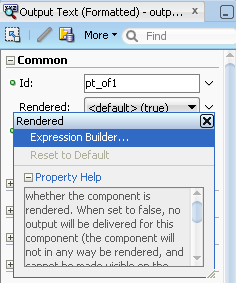
In the Component Palette, Text and Selection panel, drag and drop
Output Text (Formatted)
into the panel group layout you just added. In the Property Inspector, select Expression Builder from the Rendered context menu.
-
In the Expression builder, expand ADF Bindings and securityContext and select authenticated. Confirm that
#{securityContext.authenticated}is the expression and click OK.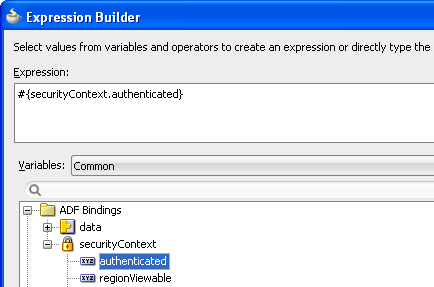
In the Property Inspector, select Expression Builder from the Value context menu. In the Expression field, enter
Welcomefollowed by a space. Expand ADF Bindings and securityContext and select userName. Confirm thatWelcome #{securityContext.userName}is the expression and click OK.
In the Property Inspector, expand the Style section, select the Text tab, and select White from the Color dropdown list, small from the Font Size dropdown list, and bold from the Font Weight dropdown list.
In the Component Palette, General Controls panel, drag and drop
 Image to the right of the output text you just modified. (You should see the target box Panel Group Layout - horizontal.)
In the Insert Image dialog, click the Source dropdown arrow (on the right) and then click
Edit on the context menu.
Image to the right of the output text you just modified. (You should see the target box Panel Group Layout - horizontal.)
In the Insert Image dialog, click the Source dropdown arrow (on the right) and then click
Edit on the context menu. 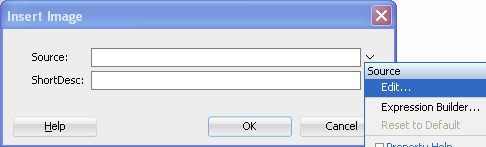
-
Browse to
jdev_home\jdeveloper\ide\lib\oicons.jar\oracle\javatools\icons, select key.png then click OK. Click Yes to copy the image to the resources directory, click Save to save it, then click OK.
 -
In the Property Inspector of the image component, select Reset to Default from the Source context menu.
This clears the field without removing the image file from the project. -
In the Property Inspector of the image component, from the Source context menu again, select Edit. Browse to
jdev_home\jdeveloper\ide\lib\oicons.jar\oracle\javatools\icons, select listLockIcon.png and click OK, then click Yes and Save to
copy the image into your project. Then enter
listLockIcon.png and click OK, then click Yes and Save to
copy the image into your project. Then enter
#{securityContext.authenticated ? resource['images:listLockIcon.png'] : resource['images:key.png']}in the Source field of the Property Inspector.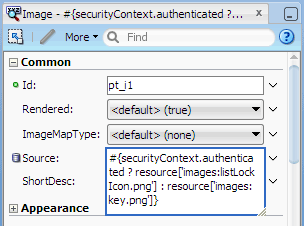
-
In the Structure window, select the af:image component you added in the previous step. In the Component Palette, General Controls panel, drag and drop
Link (Go) below the af:image component in the Structure window
so that it appears to the right of the image in the page. 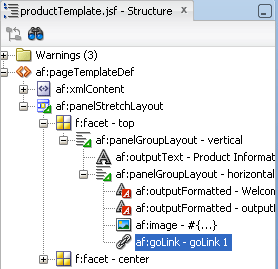
-
In the Property Inspector, enter
#{securityContext.authenticated ? "Logout" : "Login"}in the Text field. Then enter the following in the Destination field:
#{securityContext.authenticated ? "/adfAuthentication?logout=true&end_url=/faces/welcome.jsf"

     : "/adfAuthentication?success_url=/faces/products.jsf"}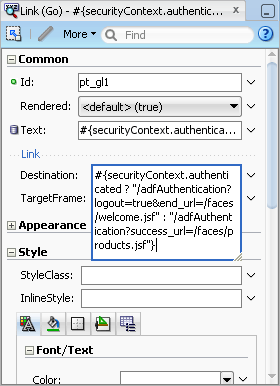
Expand the Style section, select the Text tab, and select White from the Color dropdown list, small from the Font Size dropdown list, and bold from the Font Weight dropdown list.
The productTemplate.jsf page now looks similar to this in the visual editor: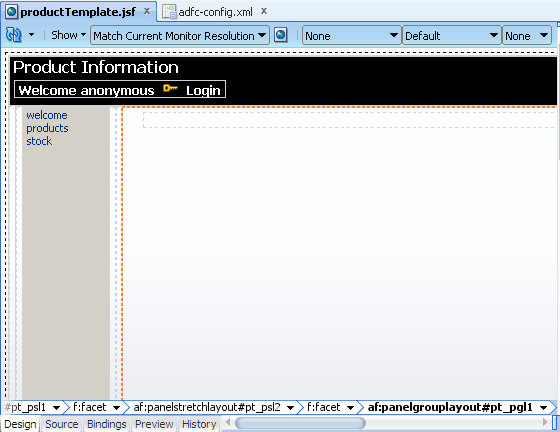
In the editor window, click the adfc-config.xml tab to bring the diagram forward. Right-click the welcome page icon and choose Run.
When you run the application, the first page should look similar to this page in your browser:
Read more...
You will also add two icons to your page, to indicate whether or not the user is logged in. You can use
key.png (for not logged in) and listLockIcon.png (for logged in) from
jdev_home\jdeveloper\ide\lib\oicons.jar.
You will use the Property Inspector and Expression Builder to enter the syntax that determines what is rendered.
Read more...
The conditional expression entered in the next step for the Go Link sets the text of the link to Logout if the user is authenticated, Login if not.
This expression sets the destination of the link to call the ADF authentication servlet, which is the standard way to handle login and logout. Different parameters are passed depending on which action is required: logout if the user is authenticated (logged in); and login if the user is not authenticated. The login action automatically redirects to the login page, then to the page specified by the success_url parameter (
products.jsf in
this case). The logout action redirects to the page specified by the end_url parameter
(welcome.jsf).
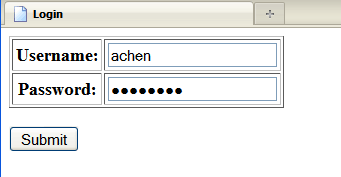
achen
and the password welcome1, then click Submit.
Read more...
Notice that the Welcome message now displays below the page title, and the icon and the text next to the icon have changed. The contents of the products page also display:
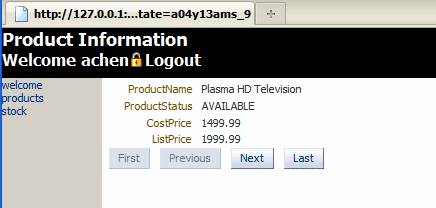
Click stock to view the stock page.
Log out and log in again, this time as
dfaviet. Then select the stock link. You will see an authentication exception,
because dfaviet is a customer and doesn't have permission to access the stock page.
-
Click the products.jsf tab to bring the page to the front in the editor window, and select the label for the Cost Price field.
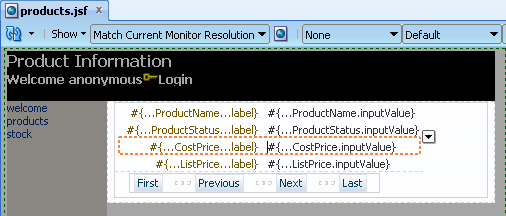
In the Property Inspector, confirm that the Panel Label and Message component is shown, then select Expression Builder from the Rendered context menu. Enter
#{securityContext.userInRole['staff']}in the Expression field and click OK.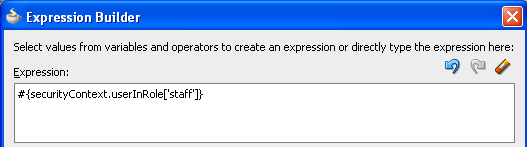
-
In the editor window, click the productTemplate.jsf tab to bring the page to the front, and select the products link on the left.
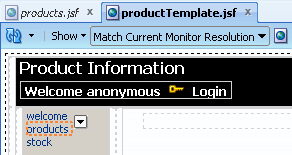
In the Property Inspector, select Expression Builder from the Rendered context menu. Enter
#{securityContext.authenticated}in the Expression field and click OK.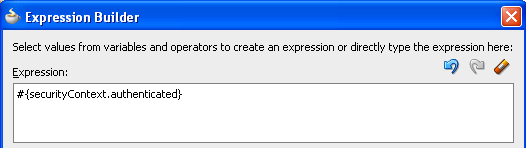
Select the stock link in the page, and select Expression Builder from the Rendered context menu. Enter
#{securityContext.regionViewable['view.pageDefs.stockPageDef']}in the Expression field and click OK.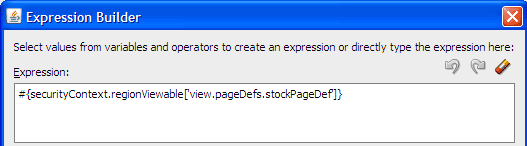
In the editor window, click the adfc-config.xml tab to bring the diagram forward. Right-click the welcome page icon and choose Run.
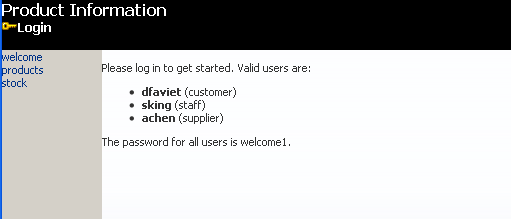
Thewelcome.jsfpage should now look like this in your browser before you log in: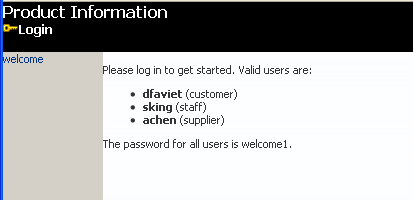
The products and stock links are not displayed if you're not logged in.
The stock link is not displayed unless you are logged in as
achen.In the products page, the Cost Price field is not displayed unless you are logged in as
sking.
Read more...
You also use conditional logic to hide the Cost Price field in the products.jsf page, so that only staff can view that field.
The expressions are entered in the Expression Builder, which you open from the Property Inspector.
Read more...
#{securityContext.userInRole['staff']}
This expression sets the Rendered property to true if the user has "staff" as one of their roles. In other words, the field will only be displayed to staff.
#{securityContext.authenticated}
We allow all authenticated users to access the products page, so we are going to display the link only to authenticated users.
#{securityContext.regionViewable['view.pageDefs.stockPageDef']}
This expression causes the link to be rendered only if the stock page (or more correctly its page def file) is viewable in the current security context.
Read more...
- Create an ADF task flow, a template for all the pages in the application, and starter pages based on the template.
- Use the Configure ADF Security wizard to enable security in the application.
- Define users, roles and grants for application resources.
- Use the Expression Builder to add login links to the login page, and add conditional logic to the application.
- "Enabling ADF Security in a Fusion Web Application" in Fusion Developer's Guide for Oracle ADF
- Developing Rich Web Applications With Oracle ADF
- Web User Interface Developer's Guide for Oracle ADF