
 Read more...
To create a train sequence in a bounded task flow, you will use the task flow diagrammer and
Component Palette to draw and connect train stops, call another train, change the train sequence, and add exit points.
You will also add control flow rules to define how control flow passes from the called train back to the calling train
when the called train flow exits. Next you will create a page template, add the ADF Train component, and bind the
component to the train model. Then you will use the template to create JSF page fragments for the train stops. Finally, you
will create a JSF page that consumes the first bounded task flow as an ADF region, then run the page.
| Purpose | Duration | Application |
|---|---|---|
This tutorial shows you how to create bounded task flows with a train sequence that represents activities in a multistep page flow. To see the complete application you will create, click the Download button to download a zip of the final application, and then unzip it in your JDeveloper mywork folder. |
40 minutes |  |
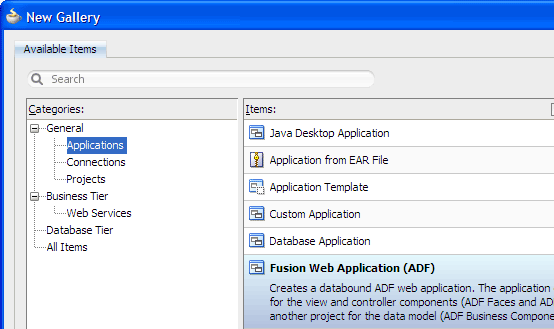
From the main menu, choose File > New. In the New Gallery, expand the General category and select Applications. Then in the Items list, select Fusion Web Application (ADF) and click OK.
To follow along with the example, enter
TrainWebAppas the application name.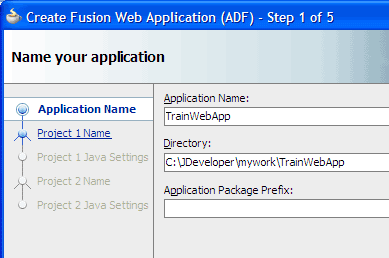
Accept the defaults and click Finish.
The Application Overview window opens by default in the editor window area when you create a new application. You can optionally close the window, since you will not be using it to create objects for this application.

Read more...
At the same time, it keeps track of your projects and all
environment settings.Based on prebuilt templates, a JDeveloper application allows you to specify a predefined type of environment, depending on the type of application you want to create (web application, Java application, and so on). Application templates provide you with a quick way to create the project structure for standard applications with the appropriate combination of features already specified. The application template also filters the work you do in JDeveloper such that the choices available are focused only on the features you are working with.
In this tutorial, you will use the Fusion Web Application template that is configured for building a databound ADF web application. Once you have created an application using a suitable template, you can still add new projects to the application and specify what features are to be included. To do this, in the Application Navigator, right-click the application name and choose New Project. In the New Gallery, you can select any type of project in the Items list.
Read more...
The project or projects in the application define the associated features.
A JDeveloper project, which is used to logically group files that are related, keeps track of the source files, packages, classes, images, and other elements that your program may need. Projects manage environment variables such as the source and output paths used for compiling and running your program. Projects also maintain compiler, runtime, and debugging options so that you can customize the behavior of those tools per project.
You can add multiple projects to your application to easily access, modify, and reuse your source code. Different projects might contain files representing different tiers of a multi-tier application, for instance, or different subsystems of a complex application. These files can reside in any directory and still be contained within a single project.
Read more...
The Checklist steps you through the building of a Fusion Web application, according to Oracle recommended best practices. It optionally walks you through the entire process of configuring and building your application, with links to specific dialogs and wizards. Each step is also designed to teach you about the architecture, tools and resulting files using a combination of links to step-by-step instructions, relevant sections of the Developer's Guides, and descriptions of what happens in the IDE as a consequence of doing the work in a step.
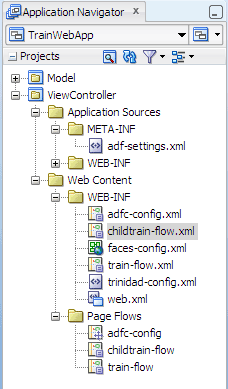
The new application created from the template appears in the Application Navigator already partitioned into tiered projects, with the associated features set in each project. The Projects panel in the Application Navigator should look like this:
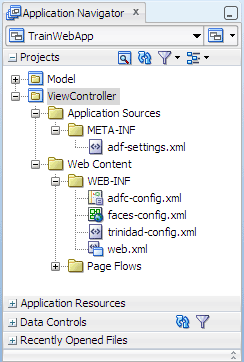
Projects are displayed as the top level in the hierarchy in the Application Navigator. The Fusion Web Application (ADF) template that you used for your web application partitions your application into two projects: Model and ViewController.
In the Application Navigator you can collapse and expand any panel. You adjust the size of panels by dragging the splitter between two panels. To group and sort items in the Projects panel, use the
JDeveloper has the capability of recognizing many different file types, displaying each in its appropriate viewer or editor when you double-click the file in the Application Navigator. Closing an application or project closes all open editors or viewers for files in that application or project and unloads the files from memory.
Note: Nodes in italics in the Application Navigator mean that the elements have not yet been saved. A project node is bold when a file in the project is selected.
-
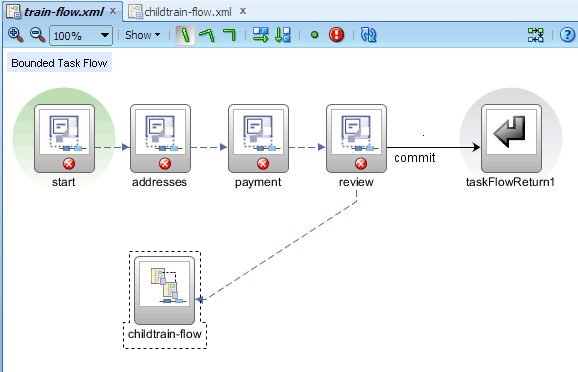
In the Application Navigator, right-click the ViewController project and choose New > Web Tier > JSF/Facelets > ADF Task Flow, then click OK.
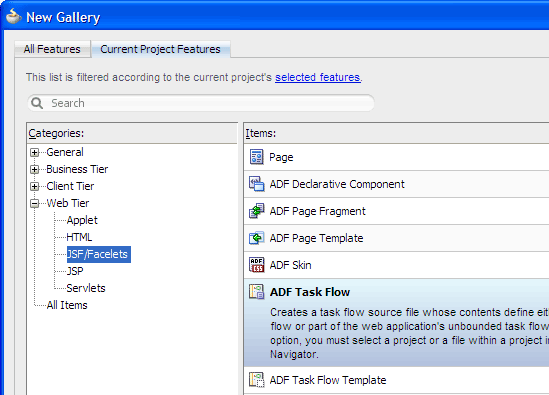
Unbounded task flow: A set of activities, control flow rules, and managed beans that interact to allow a user to complete a task. An unbounded task flow consists of all activities and control flows in an application that are not included within any bounded task flow.
Bounded task flow: A specialized form of task flow that, in contrast to an unbounded task flow, has a single entry point and zero or more exit points. It contains its own set of private control flow rules, activities, and managed beans. A bounded task flow allows reuse, parameters, transaction management, and reentry.
-
In the Create ADF Task Flow dialog, enter or select the following values:
Field or Option Value File Name train-flow.xmlCreate as Bounded Task Flow selected Create with Page Fragments selected Create Train selected
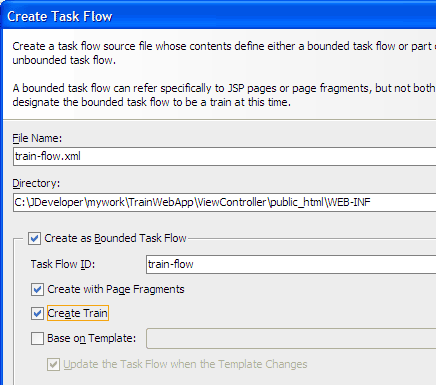
Click OK.
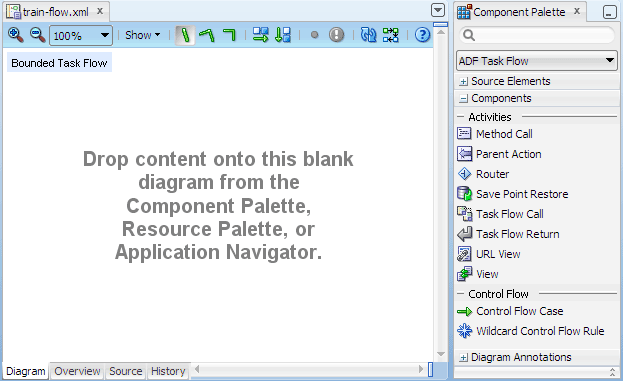
By default JDeveloper displays the new bounded task flow in the diagrammer.
-
In the Component Palette, ADF Task Flow page, Components panel, drag and drop
 View on the diagrammer, then rename the activity. Do this four times, using the following activity names:
startaddressespaymentreview
-
Drag and drop
 Task Flow Return on the diagram. Accept the default name of
 taskFlowReturn1. -
In the Component Palette, click
 Control Flow Case. On the diagram, click the review icon, then click the taskFlowReturn1 icon. Rename the control flow case element to
 commit.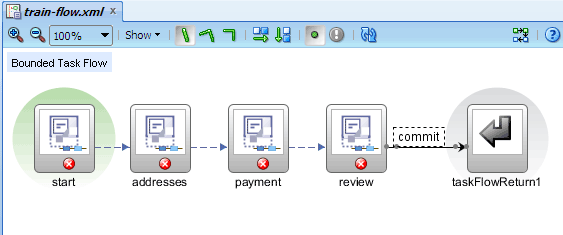
The required control flow rules and cases are added to the task flow definition file automatically for you. The different cases for each rule are shown on the diagram as arrows connecting activities, with the direction of the arrow indicating the direction of navigation. A label is associated with each case, to be used to distinguish the different cases from a single activity.
There are two ways to change the outcome of a control flow case: change the label directly on the diagram; or select the control flow case and change its
from-outcomeproperty in the Property Inspector.-
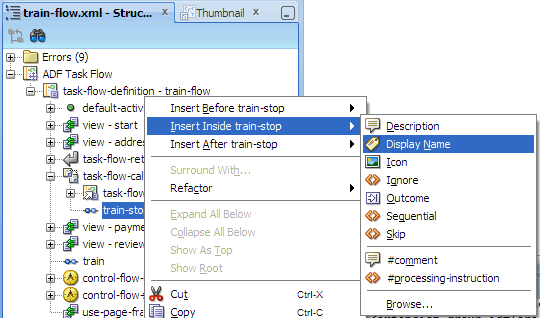
In the Structure window, expand view - start. Right-click train-stop and choose Insert Inside train-stop > Display Name.
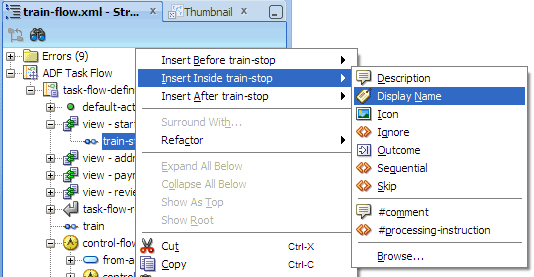
-
In the Property Inspector, enter
Startin the Display Name field.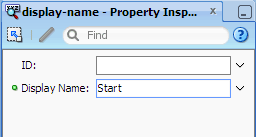
-
Repeat the procedure in steps 7 and 8 to add train stop display names to the remaining three view activities, using the following Display Name values:
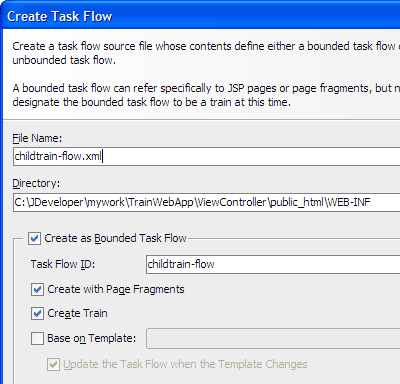
AddressesPaymentReview In the Application Navigator, right-click the ViewController project and choose New > Web Tier > JSF/Facelets > ADF Task Flow, then click OK.
-
In the Create ADF Task Flow dialog, enter or select the following values, then click OK.
Field or Option Value File Name childtrain-flow.xmlCreate as Bounded Task Flow selected Create with Page Fragments selected Create Train selected
-
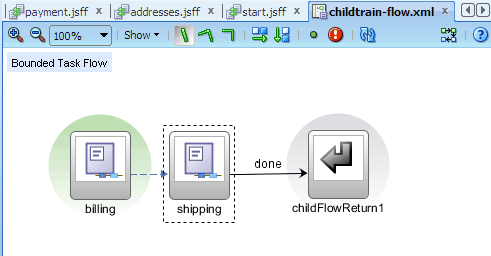
In the Component Palette, drag and drop
View on
the diagrammer, then rename the activity to billing. Repeat the procedure to add one more view activity, using the nameshipping.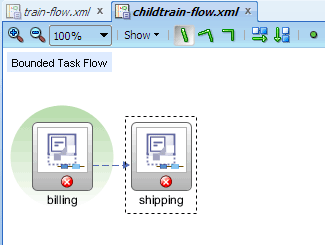
Drag and drop
Task Flow Return on
the diagram. Change the name to childFlowReturn1.Draw a
Control Flow Case from shipping to childFlowReturn1. Rename the case element to done.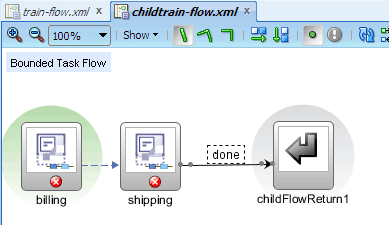
-
In the Structure window, expand view - billing. Right-click train-stop and choose Insert Inside train-stop > Display Name. In the Property Inspector, enter
Billingin the Display Name field. -
Repeat the procedure in step 15 to add a display name to the remaining view activity, using the Display Name value
Shipping. Click
 Save All to
save your work.
Save All to
save your work.
Read more...
There are two types of task flows:
Read more...
If you have a set of pages that users should visit in a particular order to complete a task, you can use the ADF Faces Train component on each page to display a series of navigation items that guide users through the multistep task. The Train component navigates users through the pages in an order specified in the underlying train model.
To implement the train model, you create a train flow based on activities in a bounded task flow that specifies the
<train/> element in its metadata. You cannot create a train from activities in an
unbounded task flow.
In this tutorial you will create two bounded task flows for two trains because a bounded task flow can have a single train only. If your bounded task flow logically includes multiple trains, you must add each train to a separate bounded task flow.
You select the Create with Page Fragments checkbox because later you want to reference JSF page fragment files.
<train/> element in its metadata can be used to define a
train task flow.
Read more...
You can also create a task flow template that has the <train/> element in its metadata, and then
create a bounded task flow based on the template. Like any task flow diagram, you draw a train flow using the diagrammer.
On the task flow diagrammer, each train stop is usually a view activity corresponding to a JSF page or page fragment, although you can also use a task flow call activity as a train stop. You add pages and navigation rules to the diagram by selecting elements from the ADF Task Flow page of the Component Palette and dropping them on the diagram, or by creating the pages first, and then dragging them from the Application Navigator onto the diagram.
Read more...
On the task flow diagram containing a train, a dotted line connects each train stop, indicating the sequence in which the end user visits the stops. You cannot drag the dotted lines to change the sequence, but you can right-click a train stop and choose the appropriate option to move the train stop forwards or backwards in the sequence.
By default, train stops are sequential, that is, an end user can select a sequential train stop only after visiting the train stop that is before it in the sequence. A nonsequential train stop can be selected in any order.
A train can contain both sequential and nonsequential stops, as shown in the following illustration:

The first stop (indicated in bold) is the current train stop. From the first stop, the end user can click the second stop, third stop or seventh stop (indicated by enabled icons that are not in bold). The second stop is sequential because the user can click it only after visiting the first stop. The third stop and seventh stop are nonsequential because they can be clicked immediately after the user visits the first stop, but without also having to visit the second stop.
Suppose the end user clicks the seventh stop, without visiting the second or third stop. The following illustration shows the train when the seventh stop is now the current stop:

In the preceding illustrations, note that when the first or seventh stop is the current stop, the end user also cannot navigate to the fourth, fifth and sixth stops, indicating that those stops are sequential.
Now suppose from the first illustration (where the first stop is the current stop), the end user navigates to the second stop and then the seventh stop. The following illustration shows the train when the seventh stop is the current stop, after having visited the second stop:

Note that after any stop has been visited, the stop's icon color changes to show that those stops can be visited again at any time.
Read more...
A bounded task flow can have zero to many task flow return activities. Each task flow return activity specifies an outcome that is returned to the caller when the bounded task flow exits. You can specify only one outcome per task flow return activity.
When you draw navigation on a task flow diagram:
<train/> element is automatically added for you by JDeveloper when you check the Create Train box in
the Create Task Flow dialog.
Read more...
If you did not check the box when you created a bounded task flow, you can add the train behavior later by using the overview editor for the bounded task flow. For example, click Overview at the bottom of the editor window, then click Behavior on the left. Use the Train checkbox to specify whether the bounded task flow is a train.

You can also use the Property Inspector of the task-flow-definition for the train flow to set train behavior. In the Behavior section, choose true from the Train dropdown list to make the bounded task flow a train.
 Read more...
if both WEB-INF and Page Flows in
the Web Content folder are expanded:
Read more...
if both WEB-INF and Page Flows in
the Web Content folder are expanded:
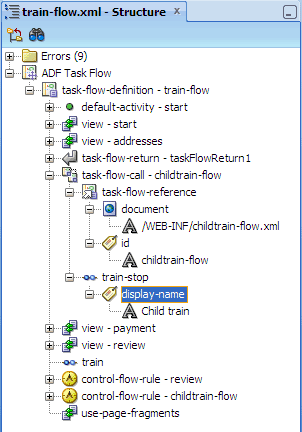
In the Structure window, the task flow elements of the bounded task flows should look similar to these:
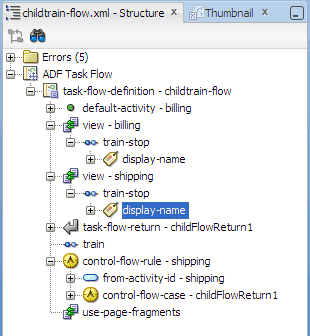
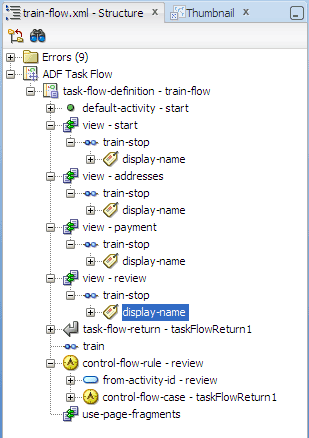
The train element specifies that the bounded task flow is a train. The use-page-fragments element indicates that all view activities in the task flow will be associated with page fragments.
In the editor window, click the train-flow.xml document tab to bring the diagram forward. (If not already open, double-click train-flow.xml in the Application Navigator to open the diagram.)
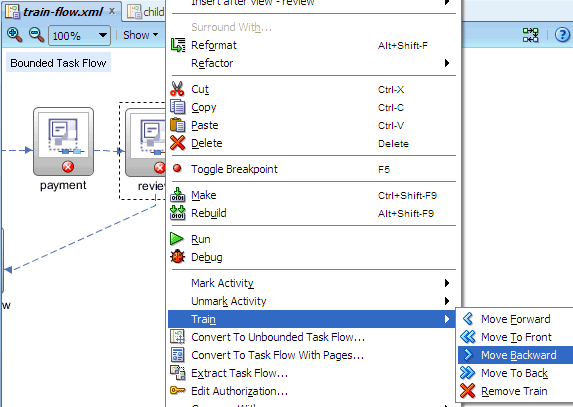
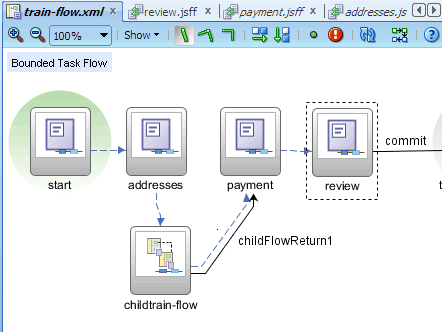
In the Application Navigator, under Page Flows in the ViewController project, drag childtrain-flow to the diagram and then drop it beneath the addresses icon.
-
On the diagram, right-click the review icon and choose Train > Move Backward.
-
Then right-click the payment icon and choose Train > Move Backward.
The diagram should now look like this:

In the Component Palette, click
Control Flow Case.
On the diagram, click the childtrain-flow icon, then click the payment icon.
Accept the default element name of childFlowReturn1.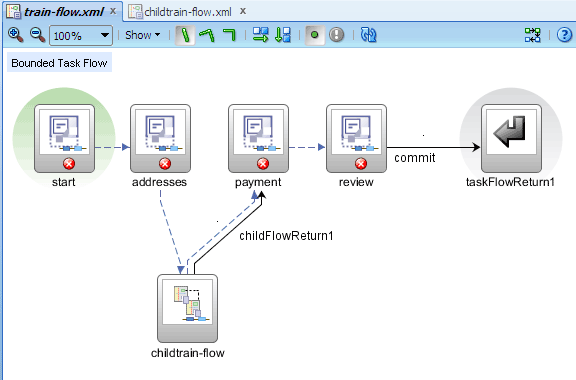
-
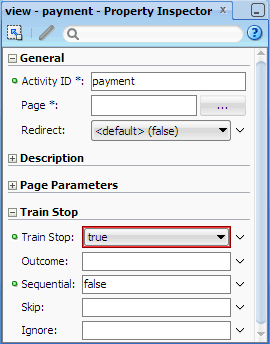
On the diagram, select the payment icon. In the Property Inspector, Train Stop section, enter
falsein the Sequential field. -
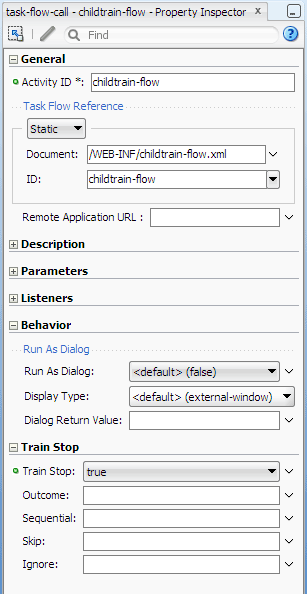
In the Structure window, expand task-flow-call - childtrain-flow. Right-click train-stop and choose Insert Inside train-stop > Display Name.
-
In the Property Inspector, enter
Child trainin the Display Name field. Click
Save All to save your work.
Read more...
The child bounded task flow must be created as its own train (that is, it must have
the <train/> element in its metadata) and contain its own train stops. There is no limit to the depth
of calls that are allowed to child trains.
To call another train task flow from a train task flow, you add a task flow call activity, either by dragging and dropping a Task Flow Call from the Component Palette or by dragging and dropping a train flow from the Application Navigator.
JDeveloper automatically configures the task flow call activity for you when you drag and drop a train flow from the Application Navigator. Otherwise you have to configure the task flow call activity yourself in the Property Inspector:
 Read more...
So after you add a child train flow as a task flow call, you have to move the train stops either backward or forward to get the desired sequence.
Read more...
So after you add a child train flow as a task flow call, you have to move the train stops either backward or forward to get the desired sequence.
At runtime, the activities in the called task flow are always performed together, regardless of whether the called task flow is being visited the first time or later on return visits.
childtrain-flow in the parent train-flow, you have to manually wire a
control flow case to return from the child train.
Read more...
Recall that previously you added a task flow return childFlowReturn1 on
childtrain-flow with the outcome childFlowReturn1 and the control flow case done:
The outcome
childFlowReturn1 is returned to the calling task flow when the called bounded task flow exits. The calling task flow defines the rule to handle control flow upon return.
When you add the control flow case on the parent train in the diagrammer, connecting the task flow call activity
childtrain-flow to
the activity on the parent train to return to upon exiting the child train flow, JDeveloper automatically uses the outcome previously defined.
At runtime, when users navigate into the child train flow pages, they need a way to navigate back to the parent train page. Later when you create the JSF page fragments, you will provide the way on a child train page by manually adding a command button that uses
done as the action outcome.
Read more...
The Sequential option can contain an EL expression that evaluates user input or some other factor, for example,
#{myTrainModel.isSequential}. When the EL expression evaluates to true, the train stop behaves as sequential.
When it evaluates to false, the train stop behaves as nonsequential.
In addition you can alter the overall train sequence by skipping over or ignoring individual train stops. The Skip and Ignore options on the activity corresponding to a train stop also use an EL expression that evaluates user input or some other factor to determine whether to skip over or ignore the train stop. If the Ignore option evaluates to
true, the train stop is hidden from the user. If the Skip option evaluates to true,
the train stop appears disabled and will be passed over. During navigation, the end user is taken to the next
enabled stop in the train. For example, if you want the train to execute by default at train stop 3 instead
of the first one, specify skip=true on train stops 1 and 2.
train-flow.xml, the task-flow-call - childtrain-flow element should look like this when all its nodes are expanded:
Read more...
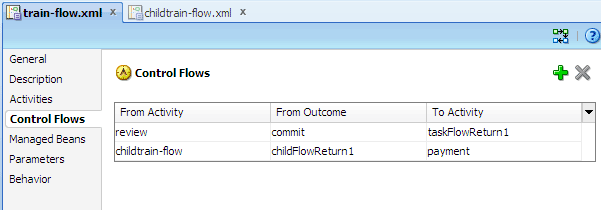
You can see the rules that JDeveloper has added to the task flow file using a visual format. At the bottom of the editor window, click the Overview tab, then select the Control Flows navigation tab on the left:
You can see the same rules in the XML source of the task flow file by switching to the XML editor.
For example, in the XML editor, the root element is
<adfc-config>. Within the <adfc-config> element is the <task-flow-definition> element that identifies the bounded task flow. The <control-flow-rule> elements are as follows:
<adfc-config xmlns="http://xmlns.oracle.com/adf/controller"...>
  <task-flow-definition id="train-flow">
    ...
    <control-flow-rule id="__1">
      <from-activity-id>review</from-activity-id>
      <control-flow-case id="__2">
        <from-outcome>commit</from-outcome>
        <to-activity-id>taskFlowReturn1</to-activity-id>
      </control-flow-case>
    </control-flow-rule>
    <control-flow-rule id="__3">
      <from-activity-id>childtrain-flow</from-activity-id>
      <control-flow-case id="__4">
        <from-outcome>childFlowReturn1</from-outcome>
        <to-activity-id>payment</to-activity-id>
      </control-flow-case>
    </control-flow-rule>
    ...
  </task-flow-definition>
</adfc-config><train-stop> element and child elements specify the behavior for that train stop, for example, whether the stop behaves as nonsequential or sequential, as shown in the following code for the payment view activity:
  ...
  <view id="payment">
    <train-stop>
      <display-name>Payment</display-name>
      <sequential>false</sequential>
    </train-stop>
  </view>
...-
In the Application Navigator, right-click the ViewController project and choose New > Web Tier > JSF/Facelets > ADF Page Template, then click OK.
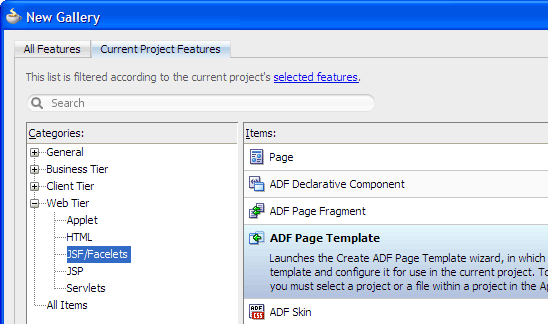
In the Create ADF Page Template dialog, enter
traintemplate.jsfin the File Name field.Confirm that Facelets is selected as the document type, and Use a Quick Start Layout is not selected.
With the Facet Definitions tab in front, click
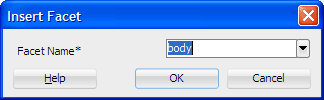
 to add a facet. Enter
 bodyin the Name field, then click OK.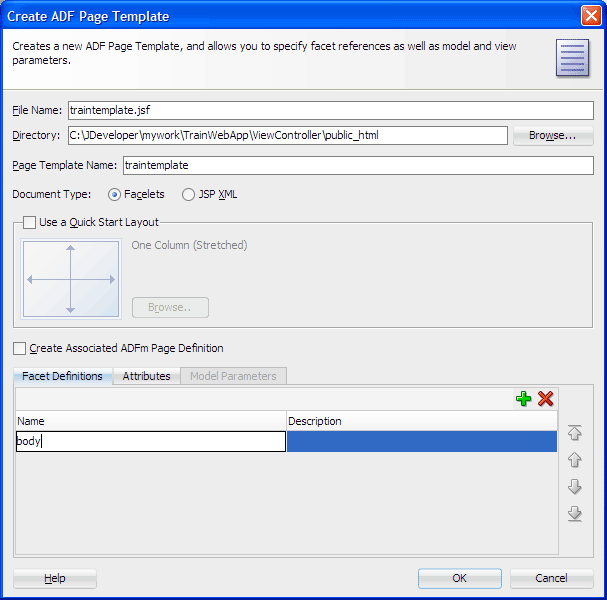
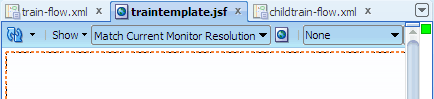
At the top of the editor window, click the document tab traintemplate.jsf to make sure the visual editor is in focus.
-
In the Component Palette, ADF Faces page, Layout panel, drag
 Decorative Box and drop it on the blank page in the visual editor.
When you drag the component to the visual editor, you should see a target rectangle with the name Page Template Def on the page; this means the component you are dragging will be inserted inside that target.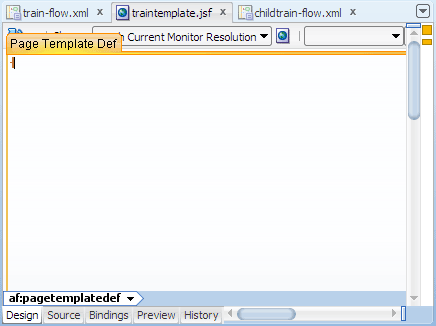
-
In the Component Palette, Layout panel, Core Structure section, drag
 Facet and drop it into the center facet of the decorative box you just added.
Choose body from the Facet Name dropdown list, then click OK.
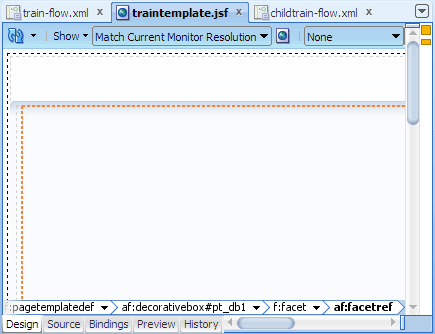
Thebodyfacet, defined in the page template definition, allows page authors to add their own content when they create their pages or page fragments using the page template.Click
Save All to save your work.
The visual editor should look similar to this:
Read more...
In a real-world application, you may already have the JSF page fragments created in the
Application Navigator. In that case, you would associate the View activities on each bounded task flow diagram with
those page fragments. You would do this by dragging the page fragments from the Application Navigator and dropping
them onto the appropriate View on a diagram.
By creating a page template and then creating the page fragments from the template, you ensure that the pages in your application have a consistent page layout. And by adding the ADF Train component in the template, this means you only add the Train component once, instead of adding it on each and every page that requires a Train component.
Read more...
The template is described in two sections inside the template definition file: a metadata section
that contains all the metadata for the template (such as the template display name), and a layout section that
contains all the individual ADF Faces components that make up the template page layout.
The Create ADF Page Template dialog helps you to create metadata for the template only, such as the template's display name, and any attributes or facet definitions that the template might include.
If you wish to allow page authors to set or modify any property of a component within the template layout, you would define one or more attributes in the page template. If you wish to allow page template users to add their own content, then you would define one or more facets as placeholders for future content.
For instance, if your template includes a decorative box component and you want page authors to add their own content anywhere within the
center facet of the decorative box, you might add a facet definition with the
name box-contents. Then when you design the page template's layout, to allow page authors to drop content
into the center facet of the decorative box, you would insert the af:facetRef tag into
the center facet of the decorative box and reference the box-contents facet name. For example:
<af:decorativeBox>
  <f:facet name="center">
    <af:facetRef facetName="box-contents"/>
  </f:facet>
</af:decorativeBox>box-contents facet.
Read more...
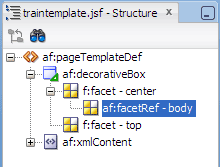
The Structure window for
traintemplate.jsf should look like this:
The entire template definition is contained within the
af:pageTemplateDef element, which is divided into two
parts: the af:xmlContent element, and the components that define the layout of the template. The metadata describing
the template's facet (and attributes and model parameters, if any) are contained with the af:xmlContent element.
Any components outside of af:xmlContent (but still within af:pageTemplateDef) constitute the template's page layout.
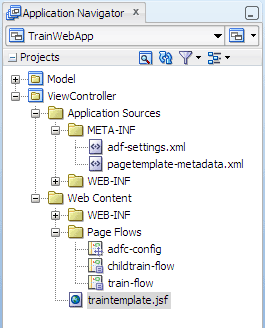
In the Application Navigator, the
pagetemplate-metadata.xml file is a special file created by JDeveloper to
keep track of all the page templates you create in the project:
The
pagetemplate-metadata.xml file contains the names and paths to the files that contain the template
definitions. For example:
<pageTemplateDefs xmlns="http://xmlns.oracle.com/adf/faces/rich/pagetemplate">
  <pagetemplate-jsp-ui-def>
    /traintemplate.jsf
  </pagetemplate-jsp-ui-def>
</pageTemplateDefs>-
In the editor window, click the traintemplate.jsf document tab to make sure the template page is in focus. If necessary, click the Design tab at the bottom to use the visual editor.
-
In the Component Palette, ADF Faces page, General Controls panel, Location section, drag
 Train and drop it into the top facet of the
decorative box component.
Train and drop it into the top facet of the
decorative box component.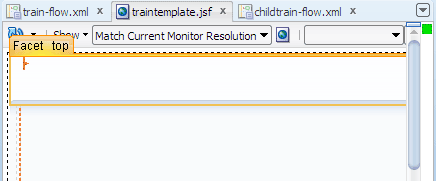
-
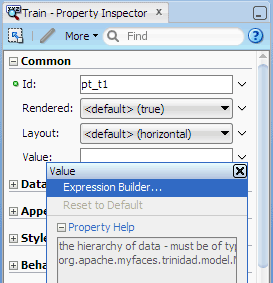
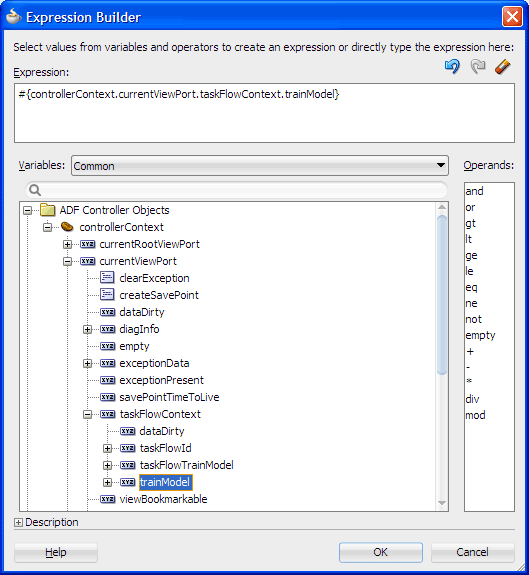
In the Property Inspector of the train component, Common section, choose Expression Builder from the dropdown menu next to the Value field.
Control a specific train behavior (that is, how the train advances users through the train stops to complete the multi-page task).
Dynamically generate the train stops, including the train stop labels, and the status of each stop (that is, whether a stop is currently selected, visited, unvisited, or disabled).
-
Expand ADF Controller Objects | controllerContext | currentViewPort | taskFlowContext. Then select trainModel and click OK.
Click
Save All to save your work.
The visual editor should look similar to this: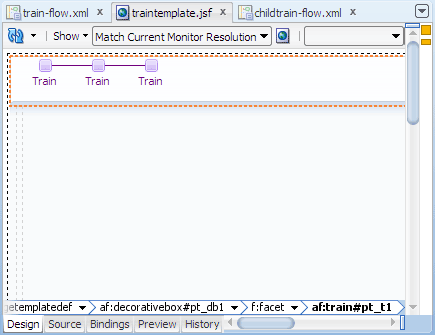
Read more...
The Train component renders each activity or page in the task flow as a train stop, with lines connecting all stops. The end user clicks a stop to navigate to a particular page. Not only does a train display the total number of pages in a multi-page task, it also indicates the location of the current page in relation to the entire task flow.
For each page in the train task flow, you must add the Train component manually to the page. But in this tutorial, you add the Train component to the page template, and then create the pages from the page template.
Read more...
The Train component works by having the value attribute bound to a train
model of type org.apache.myfaces.trinidad.model.MenuModel. The train menu model contains the information needed to:
#{controllerContext.currentViewPort.taskFlowContext.trainModel}
When you use the Component Palette to add a Train component to a page that is already associated with a view activity in a train task flow, JDeveloper automatically binds the Train component to the train model for you.
Otherwise you can bind the Train component yourself by using the Expression Builder.
Read more...
In the Property Inspector for the train component, you should see the following EL expression in the Value property field:
#{controllerContext.currentViewPort.taskFlowContext.trainModel}
In the editor window, click the train-flow.xml document tab to bring the diagram forward.
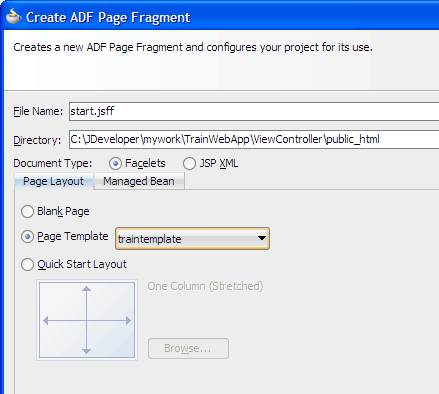
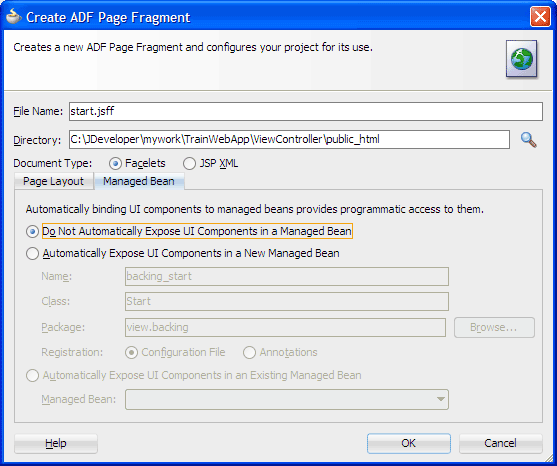
On the diagram, double-click a view icon (for example, start) to open the Create ADF Page Fragment dialog.
Accept the default file name (for example, start.jsff) and make sure Facelets is the selected document type.
On the Page Layout page, select Page Template and then select traintemplate from the dropdown list.
-
Click Managed Bean and then select Do not Automatically Expose UI Components in a Managed Bean.
Click OK.
JDeveloper displays the page fragment in the visual editor. The Train component from the page template should be visible on the page.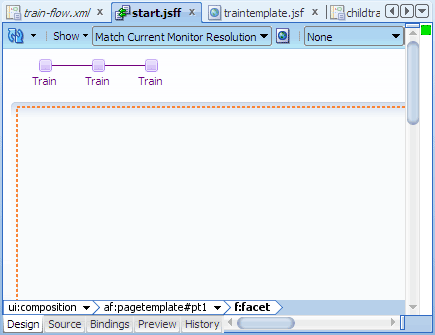
-
In the visual editor, add contents to the page by inserting ADF Faces components into the body facet. To follow along with the example, in the Component Palette, ADF Faces page, Layout panel, Interactive Containers and Headers section, drag
 Panel Header
and drop it into the body facet on the page. Then insert an output text component into the panel header component.
Panel Header
and drop it into the body facet on the page. Then insert an output text component into the panel header component. 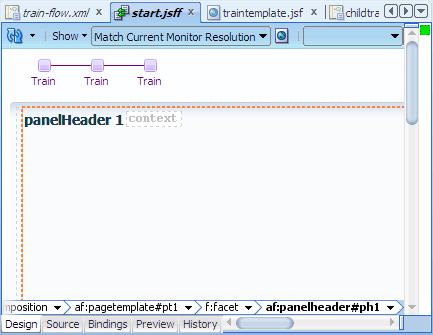
-
Repeat steps 1 through 7 for each remaining view icon on the
train-flowdiagram. In the editor window, click the childtrain-flow.xml tab to bring the diagram forward.
-
Repeat steps 2 through 7 for both view icons on the
childtrain-flowdiagram to create the page fragments. In the editor window, click the billing.jsff tab to bring the page forward.
In the Component Palette, ADF Faces page, General Controls panel, Location section, drag
 Train Button Bar
and drop it into the menuBar facet of the panel header component on the page.
Train Button Bar
and drop it into the menuBar facet of the panel header component on the page.
If following along with the example, you would have added the panel header component as described in step 7.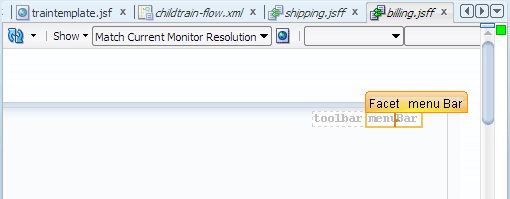
Accept the EL expression of
#{controllerContext.currentViewPort.taskFlowContext.trainModel}and click OK.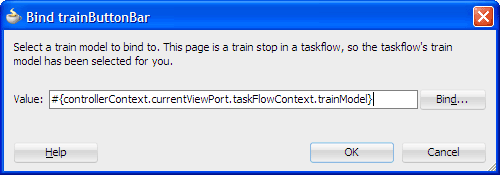
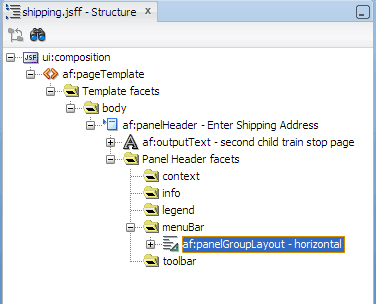
In the editor window, click the shipping.jsff tab to bring the page forward.
In the Component Palette, Layout panel, drag
 Panel Group Layout and drop it into the menuBar facet of the panel header component.
In the Property Inspector, Common section, select horizontal from the Layout dropdown list.
In the Component Palette, General Controls panel, Location section, drag
Train Button Bar and drop it into af:panelGroupLayout - horizontal in the Structure window.
Accept the EL expression of
#{controllerContext.currentViewPort.taskFlowContext.trainModel}and click OK.In the Component Palette, General Controls panel, drag
 Button and drop it into af:panelGroupLayout - horizontal in the Structure window.
 -
In the Property Inspector of the button component, Common section, enter
Return to parent flowin the Text field. Then select done from the Action dropdown list.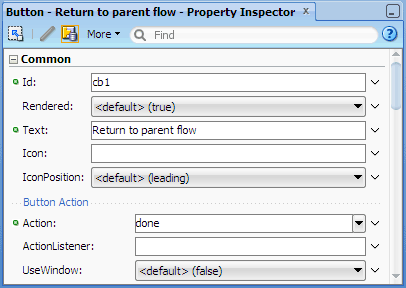
Click
Save All to save your work.
The buttons on theshipping.jsffpage, which includes a Train Button Bar component with its Back and Next buttons, should look similar to this: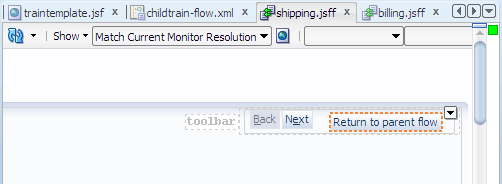
Read more...
In a real-world application, you may already have the JSF page fragments created in the
Application Navigator. In that case, you would associate the View activities on each bounded task flow diagram with
those page fragments. You would do this by dragging a page fragment from the Application Navigator and dropping
it onto the appropriate View on a diagram. Then you would add and bind the Train component on each page,
if your pages do not depend on a page template that already contains the Train component.
Read more...
By default components are not exposed to managed beans. If you wish to bind components to managed beans, select one of the automatic binding options on the Managed Bean page in the dialog.
The option to bind to an existing managed bean is enabled only if the application has a managed bean already configured.
If you choose to automatically expose UI components in a managed bean, JDeveloper automatically creates a backing bean for any new page that you create. When you drop a component on the page, JDeveloper inserts a bean property for each component, and uses the
binding attribute to bind component instances to those properties, allowing the
bean to accept and return component instances.
Note: If you intend to add ADF bindings to a page, do not use the automatic binding feature. If you use the automatic binding feature, you will have to remove the managed bean bindings later, after you have added the ADF bindings.
body facet.
Read more...
This is just an example; it is entirely up to you how you want to design the page layout. Typically, you would insert a container component such as Panel Stretch Layout, Decorative Box, or Panel Group Layout, and then insert the necessary child components into the container component.
In the example, you can simply insert a Panel Header component and then insert an Output Text component into the panel header component. Then in the Property Inspector, you can change the
Text and Value property of the respective components
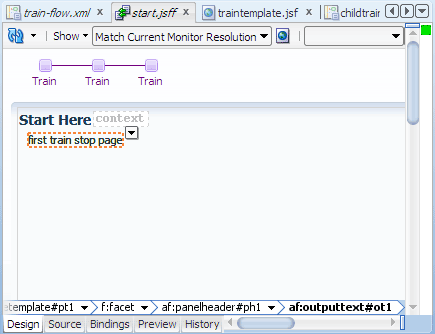
to some text that reflects the page you are creating.
For example, if you are creating the first train stop page, enter
Start Here in the Text field of
the panel header component, and enter first train stop page in the Value field of of the output text component.
In the XML editor for the page fragment, you should see the code JDeveloper adds for you in the body facet.
For example:
<af:pageTemplate viewId="/traintemplate.jsf"..>
  <f:facet name="body">
    <af:panelHeader text="Start Here"..>
      <f:facet name="context"/>
      <f:facet name="menuBar"/>
      <f:facet name="toolbar"/>
      <f:facet name="legend"/>
      <f:facet name="info"/>
      <af:outputText value="first train stop page"../>
    </af:panelHeader>
  </f:facet>
</af:pageTemplate>train-flow diagram,
Read more...
notice that the red error icons on the view activities have been removed since all the view activities are now
associated with page fragment files.
In the visual editor, a page fragment might look similar to this if you added the panel header component and output text component:
 Read more...
The optional Train Button Bar component can be used in conjunction with the Train component to provide additional navigation items for the train, in the form of Back and Next buttons. With the Train Button Bar, you can navigate only to the next or previous train stop from the current stop.

After adding the component, in the XML editor for the page fragment, you should see the code JDeveloper added for you in the
menuBar facet of af:panelHeader:
<af:pageTemplate viewId="/traintemplate.jsf"..>
  <f:facet name="body">
    <af:panelHeader text="Enter Additional Addresses"..>
      <f:facet name="context"/>
      <f:facet name="menuBar">
        <af:trainButtonBar
  value="#{controllerContext.currentViewPort.taskFlowContext.trainModel}"../>
      </f:facet>
      <f:facet name="toolbar"/>
      <f:facet name="legend"/>
      <f:facet name="info"/>
      <af:outputText value="first child train stop page"../>
    </af:panelHeader>
  </f:facet>
</af:pageTemplate>As shown in the following illustration, in the parent
train-flow, recall that after you added the task flow call
activity childtrain-flow to invoke childtrain-flow, you had to manually wire a control flow case to return
from the child train. You added the control flow case on the parent train by connecting the task flow call
activity childtrain-flow to the payment view activity on the parent train, which is the parent page to return to upon exiting the child train flow.
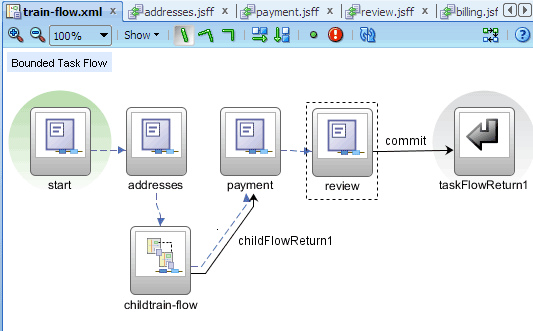
Then in
childtrain-flow, recall that you added the control flow case done between the shipping view activity and the
task flow return childFlowReturn1.
At runtime, when
childtrain-flow exits, the outcome childFlowReturn1 is returned to the calling train-flow,
which then handles the control flow upon return via the control flow case done.
So on the child train page that contains the command button for navigating back to a parent page, you have to set the button's action outcome to
done.
shipping.jsff should look like this:
Read more...
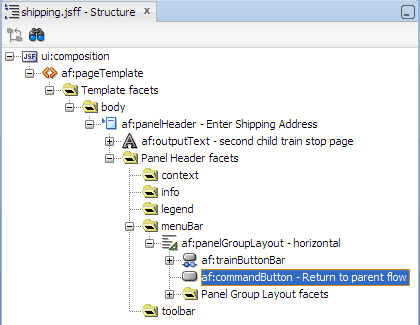
The button you added next to the train button bar component is the button end users will click to navigate out of the child train flow.
In the Application Navigator, ViewController project, double-click adfc-config under Page Flows to open the default page flow diagram.
-
In the Component Palette, ADF Task Flow page, Components panel, click
 View then click on the diagram to add a page icon. Change the default page name to
 main.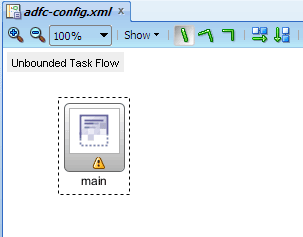
On the diagram, double-click the page icon you just added to open the Create JSF Page dialog.
-
Select Facelets as the document type and accept the default file name of
main.jsf.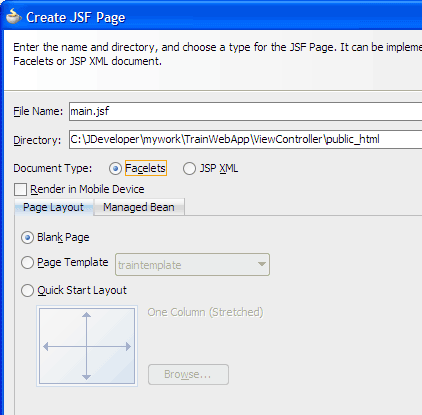
-
On the Page Layout page, select Quick Start Layout, then click Browse.
-
In the Component Gallery, select the Two Column category on the left. Then on the right, select the fourth type and the fifth layout.
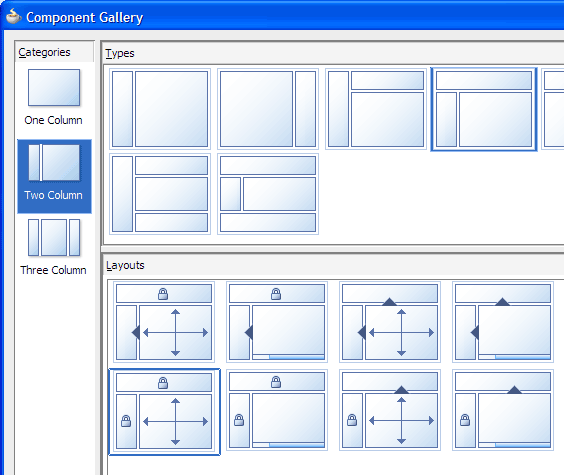
You should see Two Column Left, Header (Stretched) under Options on the right.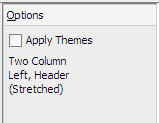
Select Apply Themes, then click OK.
The Create JSF Page dialog should now display the quick start layout selection you made: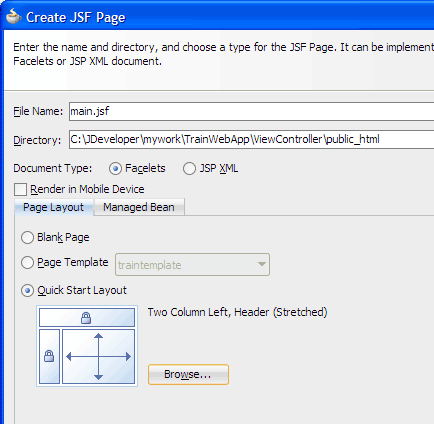
Click Managed Bean and select Do Not Automatically Expose UI Components in a Managed Bean. Then click OK.
JDeveloper displays the page in the visual editor.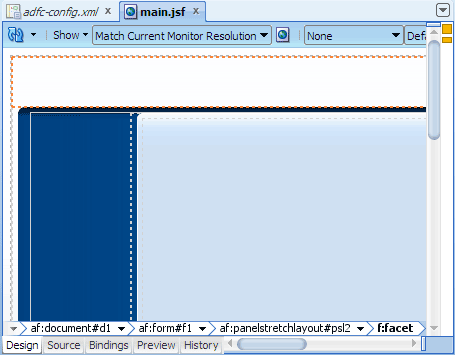
-
If you wish, you may go directly to step 14 to insert the train flow as a region, then run the page. Otherwise you may continue with the optional layout steps 10 through 13.
In the Component Palette, ADF Faces page, Layout panel, Interactive Containers and Headers section, drag
 Panel Accordion and drop it on the start facet in the visual editor. In the Property Inspector, Common section, change DiscloseMany to true.
 -
In the Structure window, expand af:panelAccordion. Select the child af:showDetailItem.
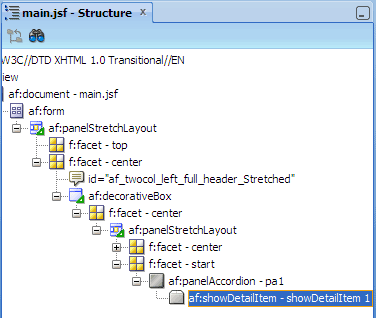
In the Property Inspector, Common section, change the Text value to
Browse.-
In the Structure window, right-click af:panelAccordion and choose Insert Inside af:panelAccordion > Show Detail Item to add a second pane. In the Property Inspector, Common section, change the Text value to
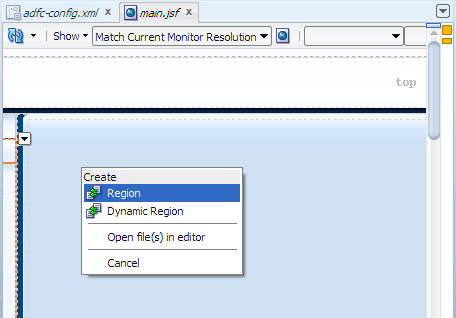
Search. From the Application Navigator, drag the train-flow node under Page Flows and drop it on the center facet in the visual editor. From the Create context menu, choose Region.
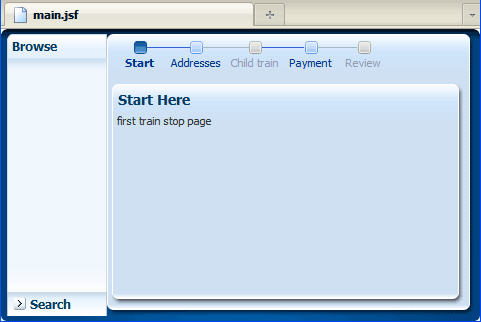
In the editor window, click the adfc-config.xml tab to bring the diagram forward. Right-click the main page icon and choose Run.
If the Create Default Domain dialog displays, enter the default password, for exampleweblogic1, in the Password and Confirm Password fields, then click OK.
When the application is run and the page is first rendered at runtime, the region's content on the page is that of the first view activity on thetrain-flowdiagram:Starts Integrated WebLogic Server, if not already running.
Compiles and deploys the application to Integrated WebLogic Server.
-
Launches the application in your default browser using the following default address:
http://<your_machine_IP_address>:<http_port>/<your_application_name>-<your_project_name>-context-root>/faces/<path_to_the_page> -
Click the second train stop Addresses to navigate to the next page in the train flow.
While difficult to notice in this simple example, note that navigation to the Addresses view occurs within a region on the page. The content of the region is updated using partial page rendering (PPR).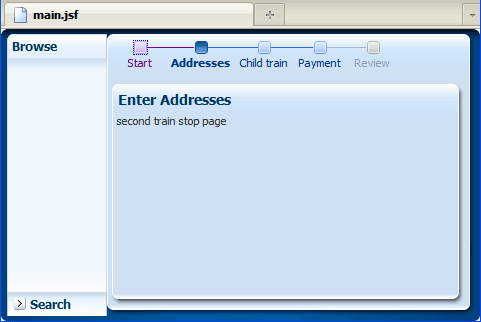
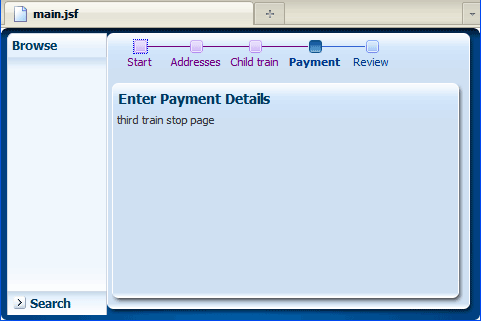
Click the Payment train stop to jump ahead to the third stop without entering the child train flow.
This is possible because you set the third stop as nonsequential.-
On the Payment page, click Addresses again, then click the Child train stop to enter the child train flow.
You should see the first page of the child train flow. A child train flow has an icon representation of the parent train before and after the child train stops.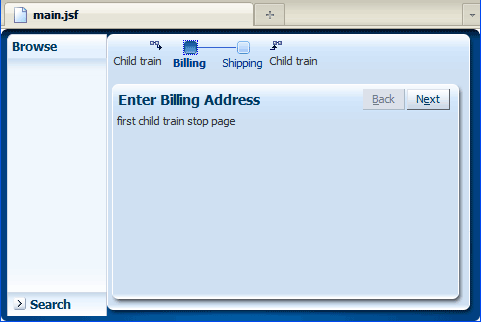
-
Use the Back and Next buttons or the train stops to navigate forward and backward within the child train flow.
On the Shipping page, click the button to return to the parent train flow.

adfc-config.xml) when you create a
Fusion web application using the Fusion Web Application template.
Read more...
A Fusion web application always contains an unbounded task flow, which contains the entry point or points to the application. At runtime, the Fusion web application can call bounded task flows from activities that you add to the unbounded task flow.
Read more...
JDeveloper includes pre-defined page layouts that use these layout components to provide you with a
quick and easy way to correctly determine the layout of your pages.
In the Component Gallery of quick start layouts, you can choose from one, two, or three column layouts, and then determine how you want the columns to behave (for example, fixed widths or stretched). You can also choose to add color and styling to the quick start layout you select by checking the Apply Themes checkbox.
Read more...
For example, the following code is generated for a two column left, header stretched layout:
<!DOCTYPE html PUBLIC "-//W3C//DTD XHTML 1.0 Transitional//EN"
 "http://www.w3.org/TR/xhtml1/DTD/xhtml1-transitional.dtd">
<f:view xmlns:f="http://java.sun.com/jsf/core"
        xmlns:af="http://xmlns.oracle.com/adf/faces/rich">
  <af:document title="main.jsf" id="d1">
    <af:form id="f1">
      <af:panelStretchLayout topHeight="50px" startWidth="100px"..>
        <f:facet name="top"/>
        <f:facet name="center">
          <!-- id="af_twocol_left_full_header_Stretched" -->
          <af:decorativeBox theme="dark"..>
            <f:facet name="center">
              <af:panelStretchLayout startWidth="100px"..>
                <f:facet name="center">
                  <af:decorativeBox theme="medium"..>
                    <f:facet name="center"/>
                  </af:decorativeBox>
                </f:facet>
                <f:facet name="start"/>
              </af:panelStretchLayout>
            </f:facet>
          </af:decorativeBox>
        </f:facet>
      </af:panelStretchLayout>
    </af:form>
  </af:document>
</f:view>.jsff).
Note: If following along with the example, you have created both task flows,
train-flow and childtrain-flow, with the
option Create with Page Fragments selected in the Create ADF Task Flow wizard.
If you did not select the Create with Page Fragments checkbox, you can convert the pages
to page fragments by right-clicking the view activities on the task flow diagrammer and then choosing
the Convert to Task Flow with Page Fragments command on the context menu.
An ADF region appears as a sub-area on a page, allowing you to reuse the bounded task flow as a region on more than one page. For example, to display a task to the user within a page that has other content such as a header and a side bar, you would use a region to wrap the task flow within the page. In JDeveloper, you simply drag and drop the task flow onto the page as a region.
 Read more...
Integrated WebLogic Server is a Java EE runtime service for packaged archive deployment. Based on zero-copy deployment, Integrated WebLogic Server lets you run and test an application and its projects as a Java EE application in a Java EE container. No special connection setup is required to use Integrated WebLogic Server. You can run the entire application, a project, or individual JSF pages.
When you run a JSF application in the IDE, JDeveloper automatically:
Note: Terminating the application stops and undeploys the application from Integrated WebLogic Server but it does not terminate Integrated WebLogic Server.
The following graphic shows the different areas on main.jsf that make up the page layout.
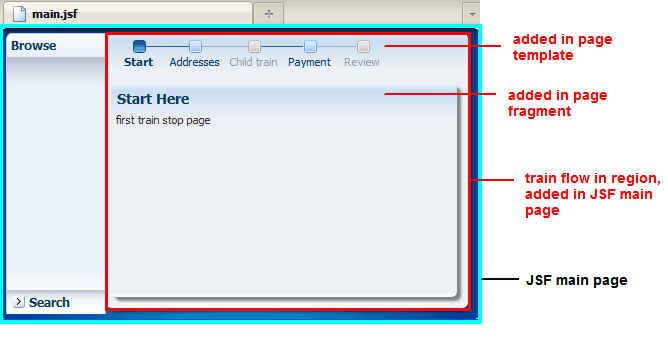
Recall that the train component was added in the page template; the panel header and output text components were added in the page fragment that was created using the template; the ADF region as outlined by the red box was added to the main.jsf page.
Read more...
Train stops that can be visited from the current stop are indicated by enabled icons that are not in bold.
After a train stop has been visited, the stop icon and display name changes color, to indicate that the stop can be visited again at any time.
Read more...
- Use JDeveloper wizards and dialogs to create applications, task flows, page templates, and starter pages
- Define bounded task flows as trains and draw train flows
- Invoke another train using a task flow call activity
- Use task flow return activities to return control flow back to the caller
- Use control flow rules to handle control flow when the called train flow completes execution
- Bind an ADF Train component to a train model
- Add an ADF Region to a page
- Use Integrated WebLogic Server to run a Fusion web application