
In the web services world, REpresentational State Transfer (REST) is a key design idiom that embraces a stateless client-server architecture in which the web services are viewed as resources and can be identified by their URLs. The HTTP methods such as GET and POST are the verbs that the developer can use to describe the necessary create, read, update, and delete (CRUD) actions to be performed. Conforming to the REST constraints is referred to as being ‘RESTful’.
This tutorial illustrates how to implement the REST architecture using Oracle JDeveloper 11g 11.1.2. It shows how to create a REST service from simple Java classes and then shows you how to consume and interact with a REST service from an ADF Web application through the use of the URL Service Data Controls.
 Read more...
REST is not a standard but a proposed architecture for your web applications. REST prescribes the use of standards such as HTTP, URL, URI, XML, HTML, image and video supports, as well as Resource Types and MIME Types.
Starting from a startup application with a simple POJO defined, you deploy a web service in WebLogic Server. Creating a new ADF Application, you define URL Service Data Controls that implement three basic methods (GET, PUT, and DELETE). Then you create a jsf page and add the data controls to your page and experiment the methods in your running page.
Before starting this tutorial you should:
-
Have access to or have installed Oracle JDeveloper 11.1.2.0.0. You can download it from Oracle Technology Network. Install it into a directory of your choice, which, in this tutorial is referred to as JDEVELOPER_HOME.
| Purpose | Duration | Application |
|---|---|---|
| This tutorial describes how to implement the REST architecture with JDeveloper. You see how to make a set of POJO classes REST compliant using the JAX-RS- library. Then, running the REST service in WebLogic server, you create ADF URL data controls for the Get, and Delete methods. Then, in a jsf page you use these data controls to experiment with your REST methods in your page.. To see the complete applications you will create, click the Download button to download the zip file of the finished applications, and unzip it to c:\temp folder. |
45 minutes |  |
-
To download the Rest.zip file right click the following link and choose Save Link As... from context to download the file on a local directory of your choice.
-
Unzip the Rest.zip file on a local directory of your choice (i.e. temp)
-
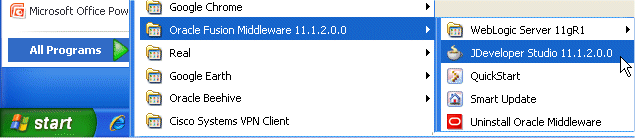
Start JDeveloper by selecting Start > Programs > Oracle Fusion Middleware 11.1.2.0.0 > JDeveloper Studio 11.1.2.0.0
If a dialog box opens asking if you would like to import preferences from a previous JDeveloper installation, click NO.
-
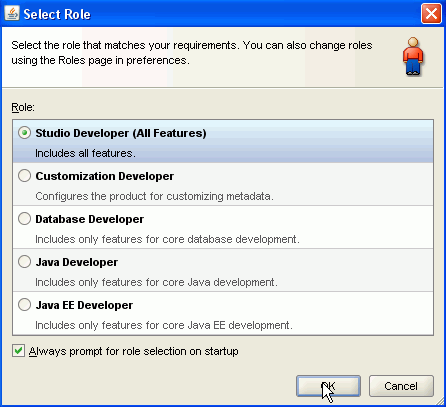
In the Select Role dialog, choose Studio Developer and click OK.
-
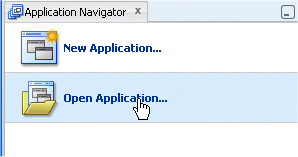
Click the Open Application link (or from the tool menu, choose File | Open).
-
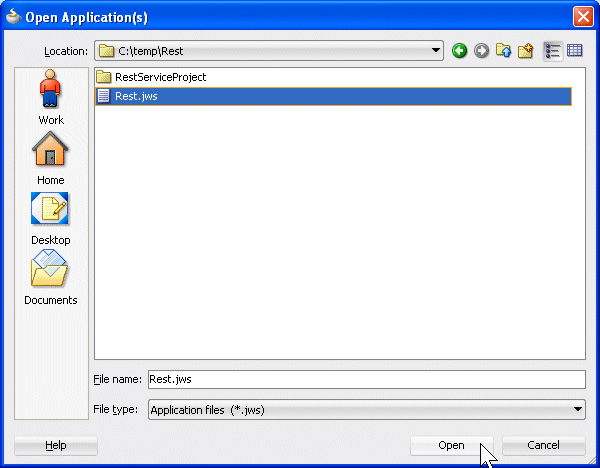
Locate the workspace Rest.jws where you've unzipped the Rest.zip file. i.e.: c:\temp\Rest.
-
Expand RestServiceProject to discover the existing components.
The project contains a Java class called Emp that defines the data structure that we are working with, and another class called Service that provides various methods on the Emp object such as adding and deleting instances of the object.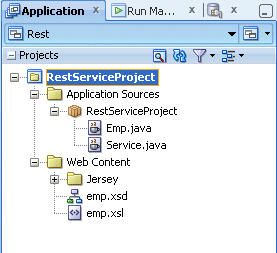
-
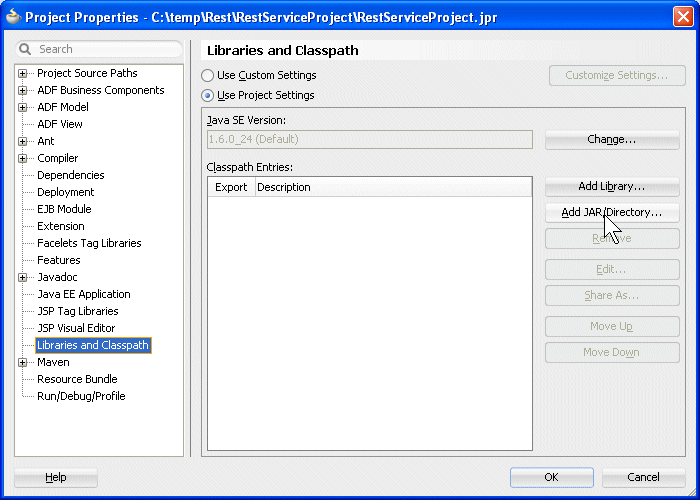
To add the Jersey library, right-click RestServiceProject and select Project Properties from context .
 To make your project REST compliant, you need to add the Jersey library.Read more...
Java defines standard REST support via JAX-RS (The Java API for RESTful Web Services). Jersey contains basically a REST server and a REST client.
The core client is mainly available for testing and provides a library to communicate with the server.
-
In the Project Properties dialog, select the Libraries and Classpath node and click the Add/JAR/Directory.
-
Expand the Rest | RestServiceProject | public_html | Jersey | directory nodes where you installed the Rest application and select the lib folder.
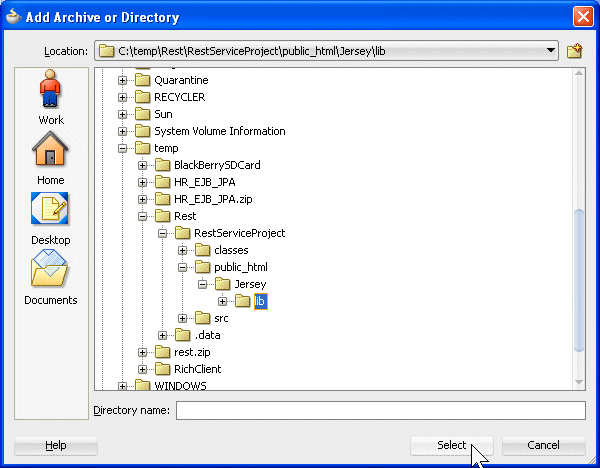
Click Select.
-
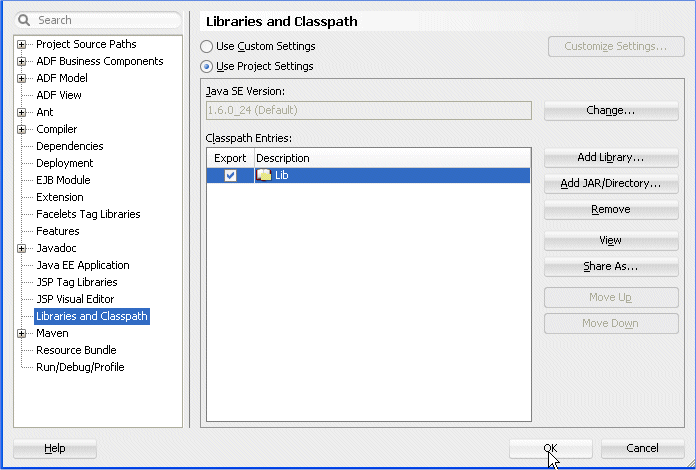
Back to the Project Properties dialog, the new library has been added, click OK. Then save all your work.
 JAX-RS: Java API for RESTful Web Services is a Java programming language API that provides support in creating web services according to the Representational State Transfer (REST) architectural style.Read more...
JAX-RS uses annotations, introduced in Java SE 5, to simplify the development and deployment of web service clients and endpoints.
Read more...
Shaping can even control the default values for fields on dialogs within the tool. When you first start JDeveloper, you are prompted to choose a role that describes how you are going to use JDeveloper. If you choose a role of "Java Developer" versus "Database Developer " versus "Customization Developer " you will get a totally different experience!
Close the Tip of the Day window.
Read more... The very first time you open JDeveloper, the Start Page displays. You can re-invoke the Start Page later by choosing Help | Start Page.
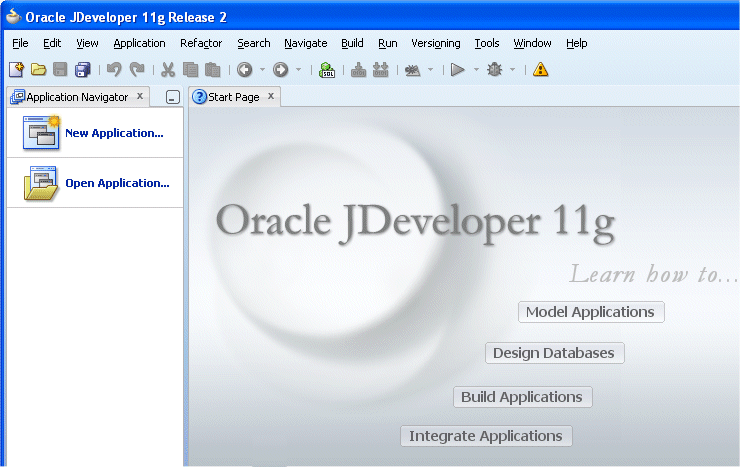
Notice the various options available to help you learn about JDeveloper. After exploring these options, click the X on the Start Page tab to close it. (the X appears when you mouse over the tab).
Read more... Clients initiate requests to servers; servers process requests and return appropriate responses. Requests and responses are built around the transfer of representations of resources.
A resource can be essentially any coherent and meaningful concept that may be addressed. A representation of a resource is typically a document that captures the current or intended state of a resource. At any particular time, a client can either be in transition between application states or "at rest." A client in a rest state is able to interact with its user, but creates no load and consumes no per-client storage on the servers or on the network.
The client begins sending requests when it is ready to make the transition to a new state. While one or more requests are outstanding, the client is considered to be in transition. The representation of each application state contains links that may be used next time the client chooses to initiate a new state transition.
REST was initially described in the context of HTTP, but is not limited to that protocol. RESTful architectures can be based on other Application Layer protocols if they already provide a rich and uniform vocabulary for applications based on the transfer of meaningful representational state. RESTful applications maximize the use of the pre-existing, well-defined interface and other built-in capabilities provided by the chosen network protocol, and minimize the addition of new application-specific features on top of it.
To turn your POJO and WebService into REST supporting services you'll use annotations. You are going to map specific methods in your code to specific REST operations by adding the appropriate annotation. We'll also see how annotations are used to map parameters on the request URL to be used in the service.
To make your classes REST compliant, perform the following steps:
Double click the Emp.java node to open the POJO class in the java code editor and explore its code.
The Emp class is a standard data transfer object with all the getters and setters for an employee object. Later you'll add a tooString method to provide an XML string to represent this object at runtime.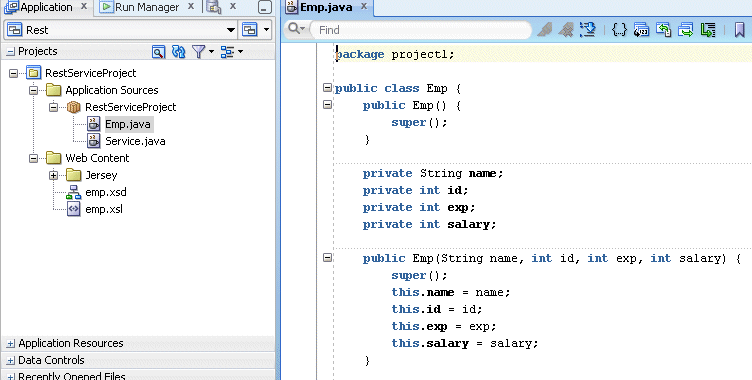
The REST architectural style describes the following six constraints applied to the architecture, while leaving the implementation of the individual components free to design.Read more...
- Client–server Clients are separated from servers by a uniform interface. This separation of concerns means that, for example, clients are not concerned with data storage, which remains internal to each server, so that the portability of client code is improved. Servers are not concerned with the user interface or user state, so that servers can be simpler and more scalable. Servers and clients may also be replaced and developed independently, as long as the interface is not altered.
- Stateless The client–server communication is further constrained by no client context being stored on the server between requests. Each request from any client contains all of the information necessary to service the request, and any session state is held in the client. The server can be stateful; this constraint merely requires that server-side state be addressable by URL as a resource. This not only makes servers more visible for monitoring, but also makes them more reliable in the face of partial network failures as well as further enhancing their scalability.
- Cacheable As on the World Wide Web, clients are able to cache responses. Responses must therefore, implicitly or explicitly, define themselves as cacheable, or not, to prevent clients reusing stale or inappropriate data in response to further requests. Well-managed caching partially or completely eliminates some client–server interactions, further improving scalability and performance.
- Layered system A client cannot ordinarily tell whether it is connected directly to the end server, or to an intermediary along the way. Intermediary servers may improve system scalability by enabling load balancing and by providing shared caches. They may also enforce security policies. - Code on demand (optional) Servers are able to temporarily extend or customize the functionality of a client by transferring logic to it that it can execute. Examples of this may include compiled components such as Java applets and client-side scripts such as JavaScript.
- Uniform interface The uniform interface between clients and servers, discussed below, simplifies and decouples the architecture, which enables each part to evolve independently. The four guiding principles of this interface are detailed below. The only optional constraint of REST architecture is code on demand. If a service violates any other constraint, it cannot strictly be referred to as RESTful.
Complying with these constraints, and thus conforming to the REST architectural style, will enable any kind of distributed hypermedia system to have desirable emergent properties, such as performance, scalability, simplicity, modifiability, visibility, portability and reliability.
-
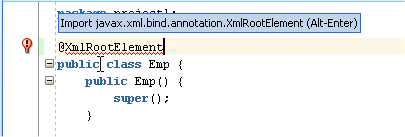
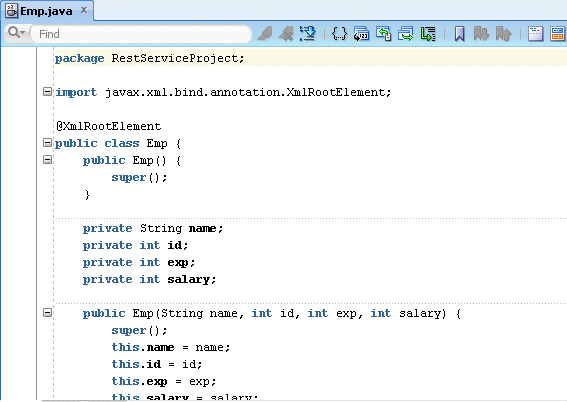
Right above the class definition add the @XmlRootElement annotation statement which defines the root element for a XML tree.
-
As requested, press the Alt + Enter keys combination to populate the required import statement.
-
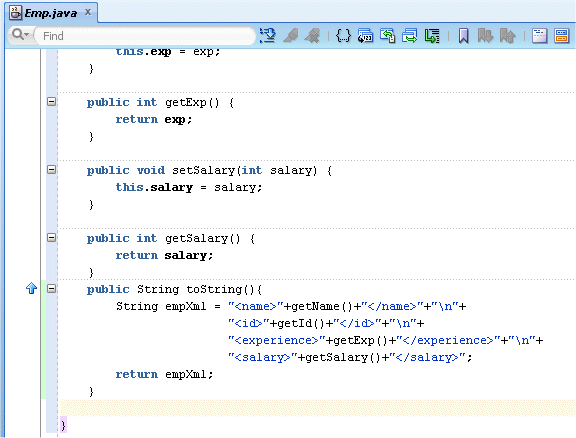
At the bottom of the class, add the following method that returns a displayable string for an employee. Then save all your work.
public String toString(){
String empXml = "<name>"+getName()+"</name>"+"\n"+
"<id>"+getId()+"</id>"+"\n"+
"<experience>"+getExp()+"</experience>"+"\n"+
"<salary>"+getSalary()+"</salary>";
return empXml;
}
-
Double click Service.java to open the web service class and explore its code.
The Service class is a class with the CRUD methods using annotation. In the next few steps, you'll add annotations to bind consumer methods to HTTP methods.
Also included in the class is a collection that is defined as a static java collection (static ArrayList<Emp>).
It adhears to the Singleton design pattern. It indicates there is a single class of this type and there will only ever be one instance of this array in memory. This allows the class to employ stateful behavior.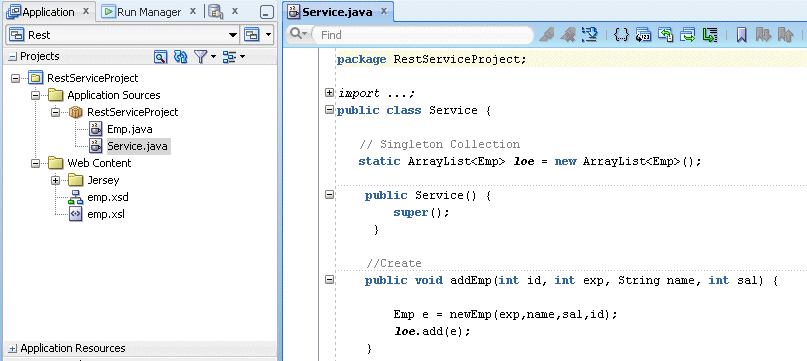
-
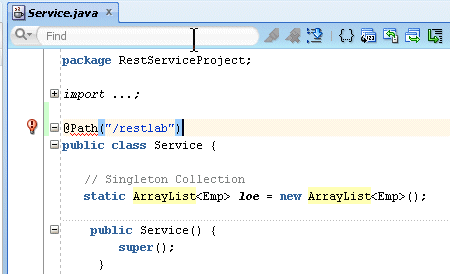
Prior to the Class definition, enter the following annotation: @Path("/restlab"). The complete path to a web service resource is now based on the base URL and the @Path annotation from your class.
-
Click the light bulb in the margin and select the Configure Project for JAX-RS Web Services option.
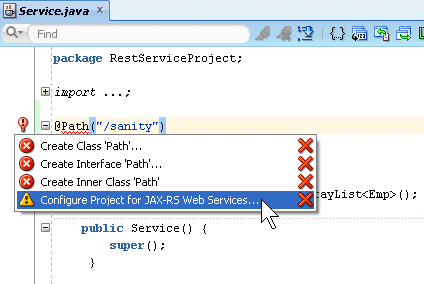
-
While configuring the project with this option, the web.xml and the weblogic.xml files have been created
Close the weblogic.xml tab and looking at the Service.java entry in the Application Navigator, notice that the icon next to the name has changed. The class is now recognized as a web service class type.
Save all your work.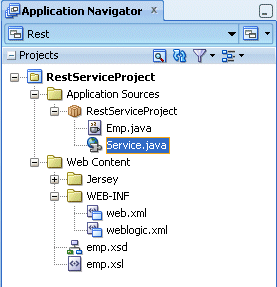
-
In the Service.java class, above the //Read comment, add the @GET annotation syntax which Indicates that the following method will answer to a HTTP GET request.
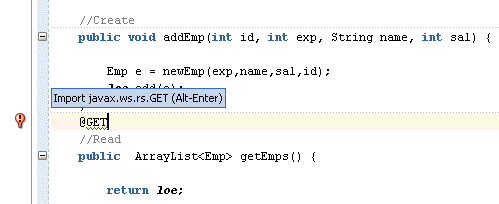
Press the Alt + Enter key combination to add the proposed import statement.
-
Just after the @GET annotation, add @Produces("application/xml"). @Produces defines which MIME type is delivered by a method annotated with @GET.
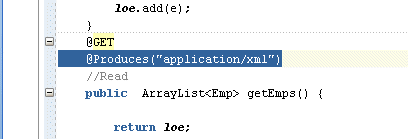
Press the Alt + Enter key combination to add the proposed import statement.
-
Change the signature of the addEmp method from:
public void addEmp(int id, int exp, String name, int sal){
to:
public void addEmp(@QueryParam("id") int id, @QueryParam("exp")int exp, @QueryParam("name") String name, @QueryParam("sal")int sal) {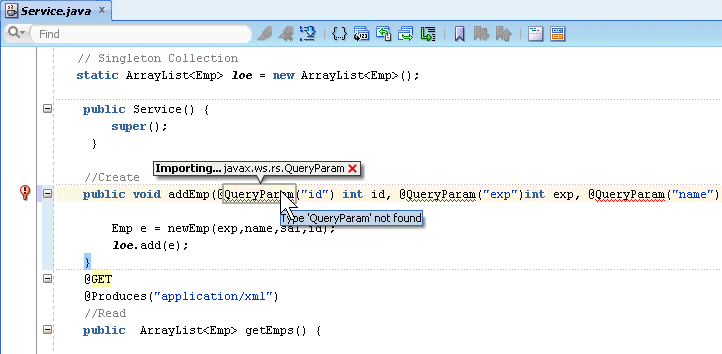
The @QueryParam is a parameter that is used in the URL and map to the id variable name.
Press the Alt + Enter key combination to add the proposed import statement. Save all your work. -
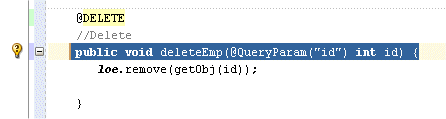
Just above the //DELETE comment, add @DELETE annotation.
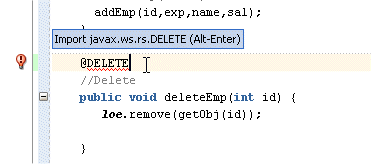
Press the Alt + Enter key combination to add the proposed import statement.
-
Change the signature for the deleteEmp method adding the @QueryParam annotation:
public void deleteEmp(@QueryParam("id") int id) {
-
After the Helper Methods comment, add the following annotation and methods to populate employee records.
@PUT
@Path("defaultEmp")
public Response addEmp(){
loe.add(new Emp("Adderley",1,5,1000));
loe.add(new Emp("Coltrane",2,6,2000));
loe.add(new Emp("Davis",3,7,3000));
return Response.ok().build();
}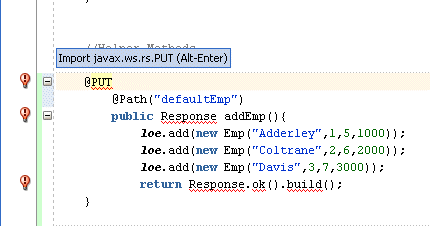
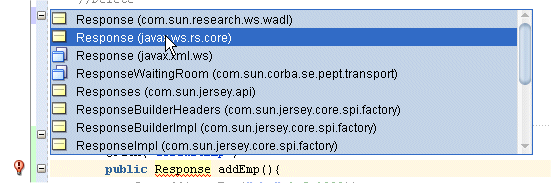
Press the Alt + Enter key combination to add the proposed import statements.
-
Verify that you have the following import statements and then save all your work.
import java.util.*;
import javax.ws.rs.DELETE;
import javax.ws.rs.GET;
import javax.ws.rs.PUT;
import javax.ws.rs.Path;
import javax.ws.rs.Produces;
import javax.ws.rs.QueryParam;
import javax.ws.rs.core.Response;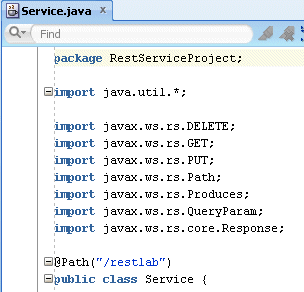
-
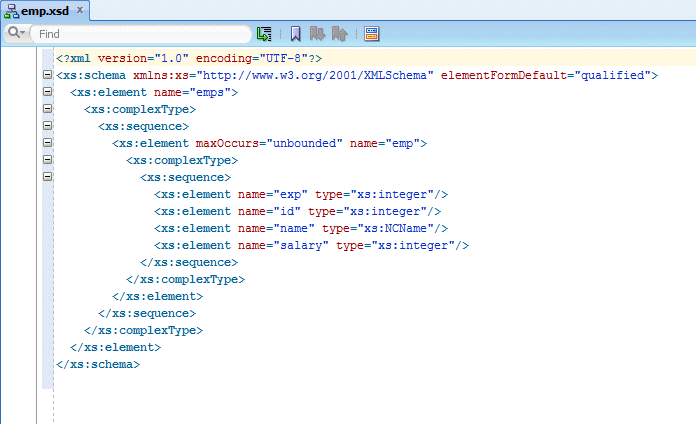
Double click the emp.xsd node to open the xml file and explore it. The XSD file (XML Schema Document) is a schema definition file, one of several XML schema languages. The XSD can be used to express a set of rules to which an XML document must conform in order to be considered 'valid' according to that schema.
Notice the three attributes defined in the emp class (id, name & salary).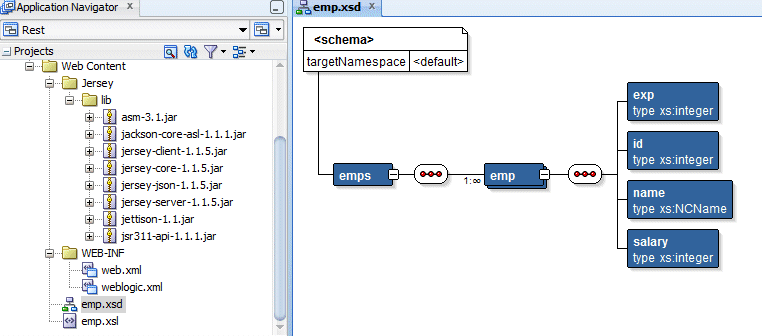
-
Click the Source tab to display the xml code. This representation of the file shows you the detailed definition of the schema, including the elements and element types.
-
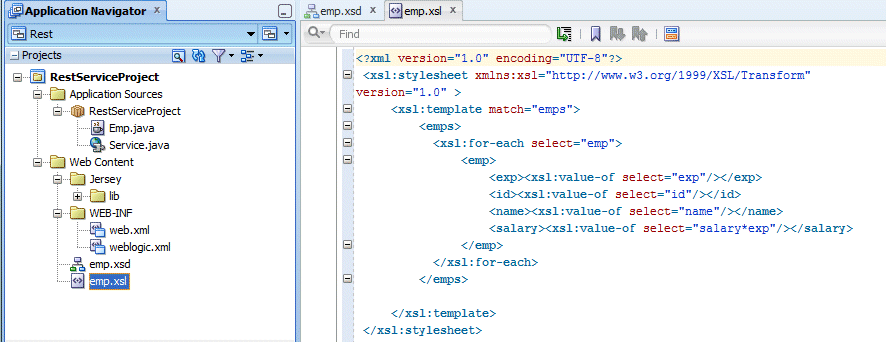
Double click the emp.xsl node to open the xml file and explore its code. The XSL file (Extensible Stylesheet Language) is used to transform and render XML documents. XSL is a language for expressing style sheets. A XSL style sheet is like a CSS file, a file that describes how to display an XML document of a given type.
-
Click the Save All
 icon on the JDeveloper menu bar to save your work.
 -
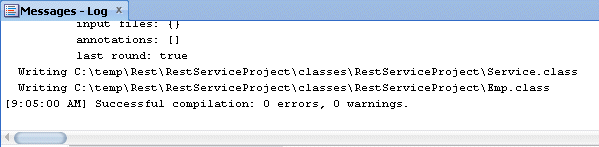
Right click RestServiceProject and select Rebuild from context.
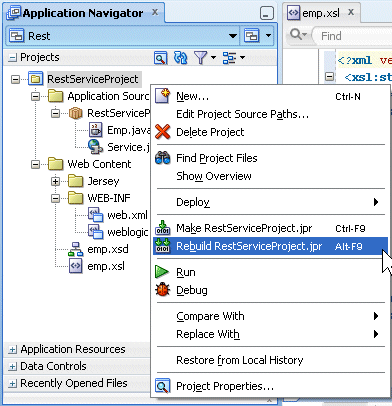
-
Make sure the compilation is successful.
-
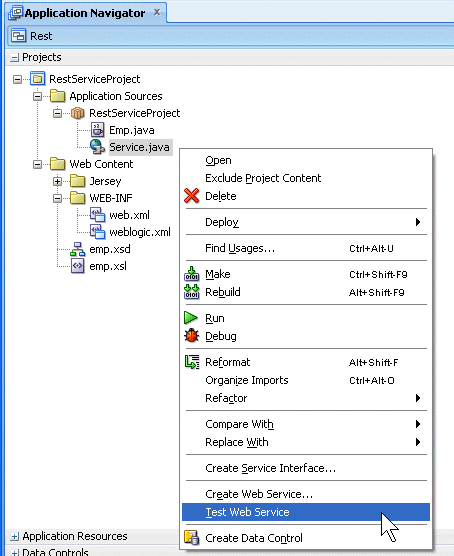
Right-click the Service.java node in the Application Navigator and select Test Web Service from context.
-
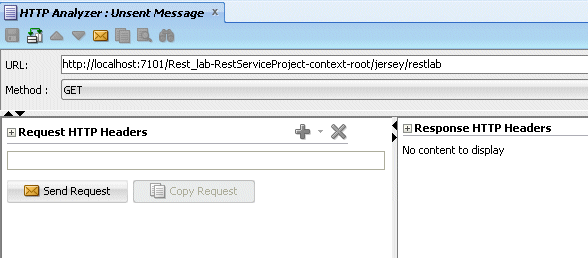
Wait for the web service to be deployed. Then the HTTP Analyzer gets uploaded.
-
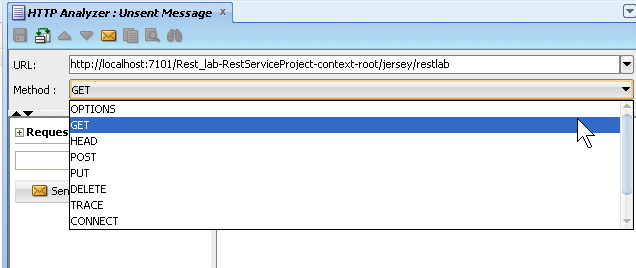
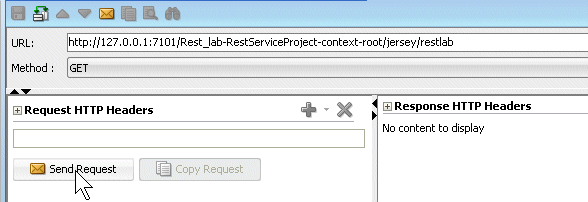
Notice that the Method is already set and the GET Method is specified by default. Click the method list of values to discover all the available methods.
-
Switch back to the Service.java class. Notice that the Get method matches the getEmps method in the Service.java class.

-
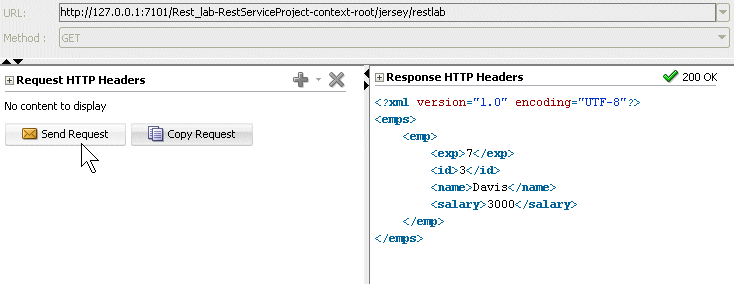
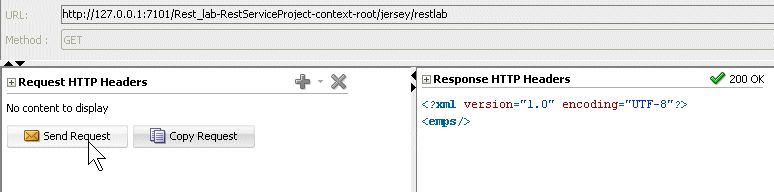
Back in the HTTP Analyzer, click the Send Request button to retrieve the existing employees.
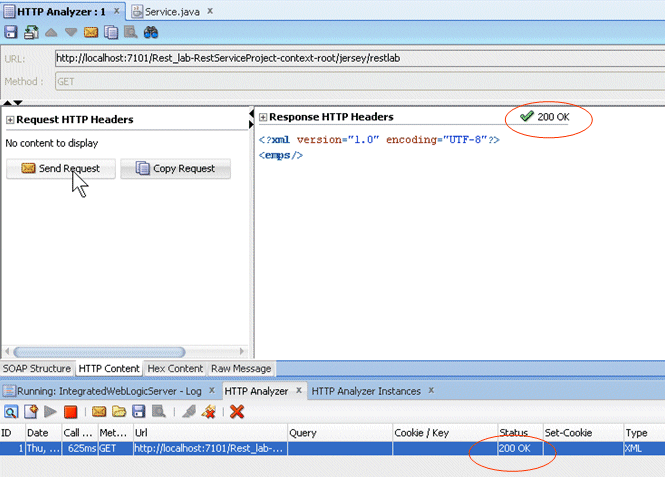
No employees are returned yet, since no employees have been populated. Notice the 200 OK return status indicating that the method was successfully performed.
-
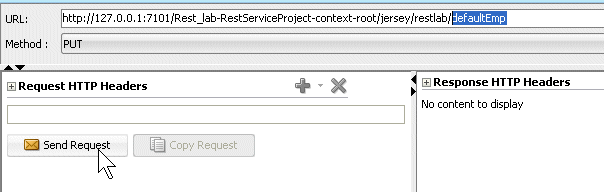
Click the Service.java tab and locate the PUT annotation where the emps are populated. Notice that the path for the addEmp method is called defaultEmp.

-
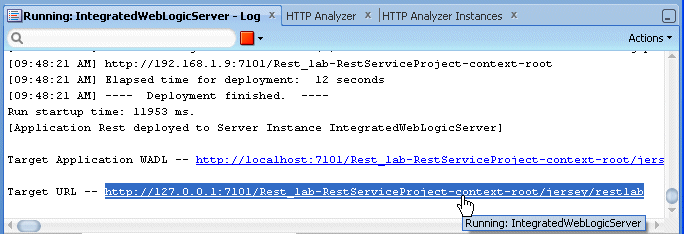
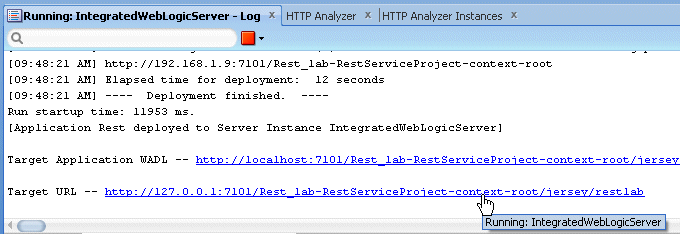
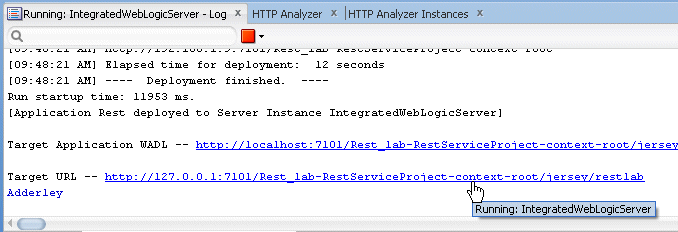
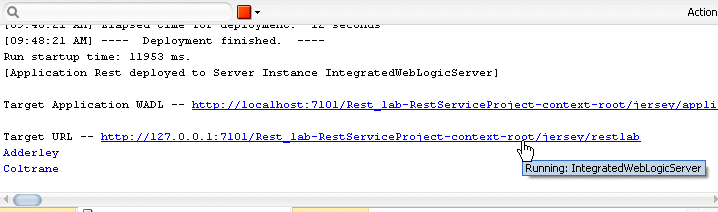
In the Log window, click the http://127.0.0.1:7101/Rest_lab-RestServiceProject-context-root/jersey/restlab link to re launch a new request.
-
Back to the HTTP Analyzer, add /defaultEmp at the end of the URL and select the PUT method.
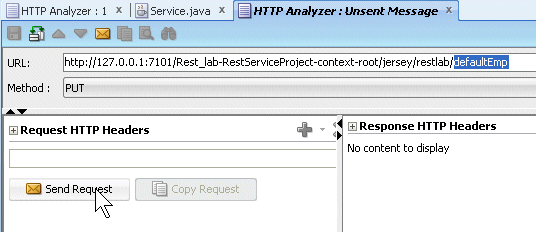
Click the Send Request button.
-
Once again the 200 OK status indicates that the request was performed successfully, meaning that the Emps were created.

-
In the Log window re-click the http://127.0.0.1:7101/Rest_lab-RestServiceProject-context-root/jersey/restlab link to re launch a new request.

-
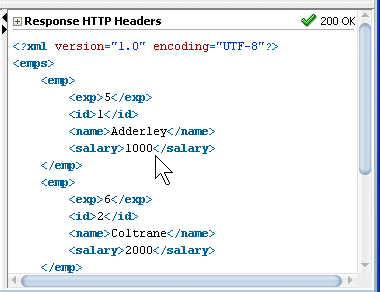
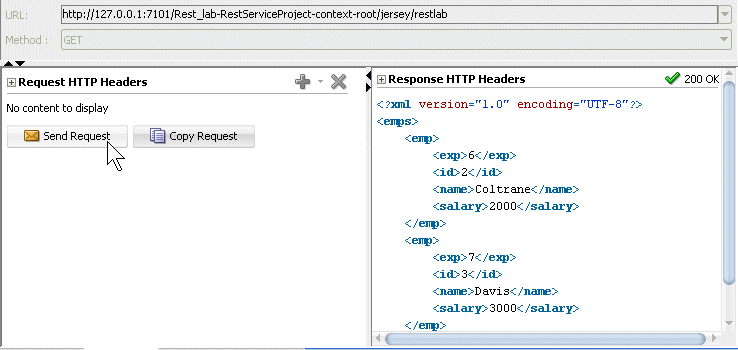
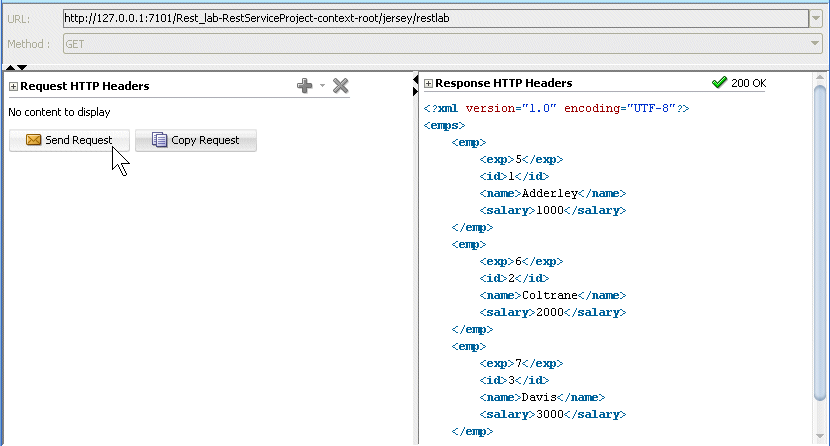
Click the Send Request button to perform the default GET method and fetch the employees previously created.
Now, you can see that all employees defined in the PUT annotation are retrieved and displayed.
-
In the Log window re click the http://127.0.0.1:7101/Rest_lab-RestServiceProject-context-root/jersey/restlab link to re launch a new request.
-
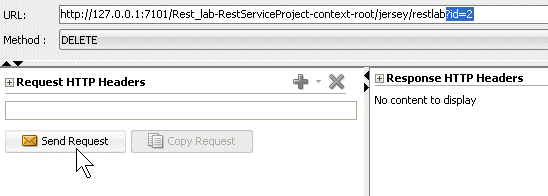
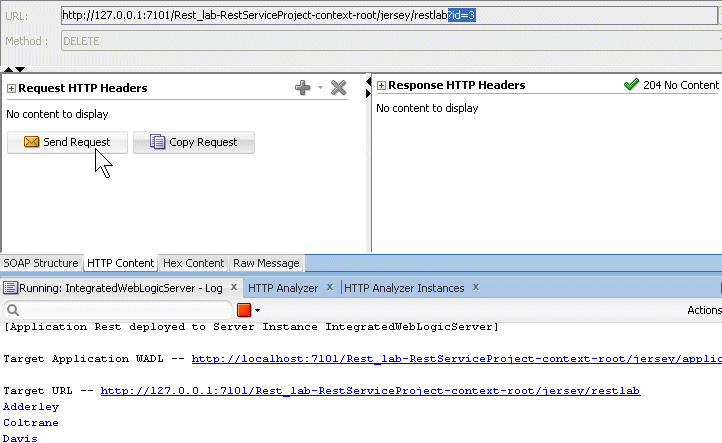
To test the Delete method, at the end of the URL type: ?id=1 to indicate which specific emp to delete and choose the DELETE method from the list.
Click the Send Request button.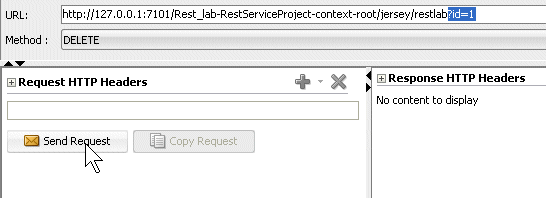
The 204 No Content status is now returned.

-
Back In the Log window re-click the http://127.0.0.1:7101/Rest_lab-RestServiceProject-context-root/jersey/restlab
link to re launch a new request. Notice the first emp name Adderley is displayed.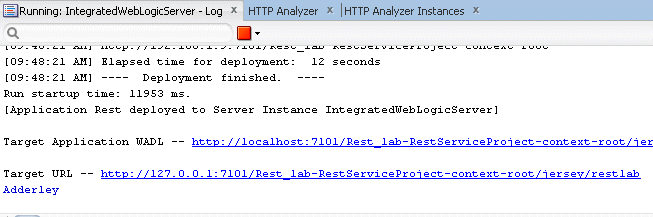
-
Click the Send Request button with the default GET method to fetch the employees. Notice that emp #1 has been removed.
-
In the Log window re-click the http://127.0.0.1:7101/Rest_lab-RestServiceProject-context-root/jersey/restlab link to re launch a new request.
-
At the end of the URL type: ?id=2 to indicate which specific emp to delete and choose the DELETE method from the list. Click the Send Request button.
-
Back In the Log window re-click the http://127.0.0.1:7101/Rest_lab-RestServiceProject-context-root/jersey/restlab
link to re launch a new request.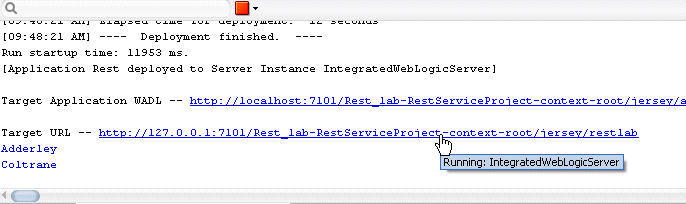
-
Click the Send Request button with the default GET method to fetch the employees. Notice that emp #2 is gone.
-
In the Log window re-click the http://127.0.0.1:7101/Rest_lab-RestServiceProject-context-root/jersey/restlab link to re launch a new request.
-
At the end of the URL type: ?id=3 to indicate which specific emp to delete and choose the DELETE method from the list. Click the Send Request button.
-
Back In the Log window re-click the http://127.0.0.1:7101/Rest_lab-RestServiceProject-context-root/jersey/restlab link to re launch a new request. Click the Send Request button with the default GET method. No more emps are returned.
-
Back in the Log window re-click the http://127.0.0.1:7101/Rest_lab-RestServiceProject-context-root/jersey/restlab link to re launch a new request. Append /defaultEmp at the end of the URL, select the PUT method and click the Send Request button. This is to repopulate the web service with employees again.
-
Back In the Log window re-click the http://127.0.0.1:7101/Rest_lab-RestServiceProject-context-root/jersey/restlab link to re launch a new request. Click the Send Request button with the default GET method. Emps have been repopulated.
Now that the emps are populated again, you see how you can use these data in a page.
-
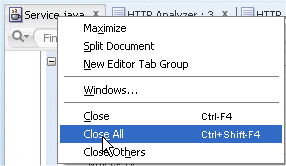
Right-click any tab and select Close All from context to dismiss all opened editors.
-
Now that the Back-end side is tested and validated, you implement the web service in a Front-end side where web service REST methods can be used as data controls and implemented in a page.
To create the application perform the following steps:
-
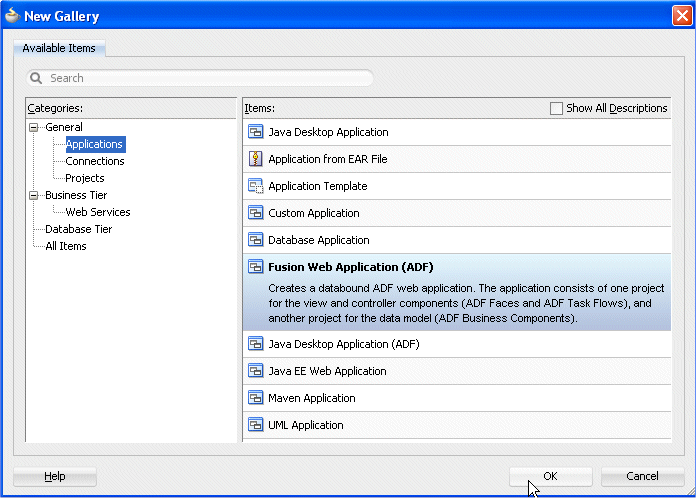
From the down arrow, select New Application to open the New Gallery.

-
In the New Gallery, choose the Fusion Web Application (ADF) and click OK.
 Rest
Rest -
In the Name your application page of the Create Fusion Web Application wizard, modify the default application name to REST_DC.
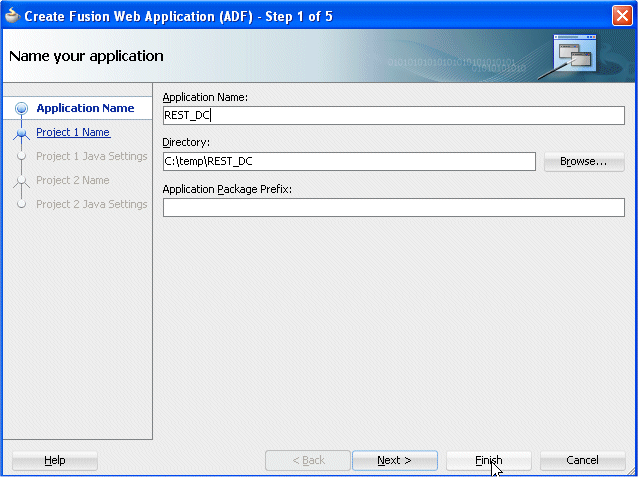
Click Finish.
-
The new ADF Fusion application creates two projects. The Model project and the ViewController project.
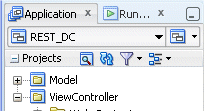
-
In the Application Navigator, projects are displayed as the second level in the hierarchy under the application. The Application Navigator should look like this:
Read more... Applications are stored in files with the extension .jws. When you open JDeveloper, the last application used is opened by default, so that you can resume where you left off.
In JDeveloper you always work with projects contained within an application. A JDeveloper project is a logical grouping of related files. You can add multiple projects to an application to easily access, modify and reuse your source code.
This step explains how to expose URL services using the ADF Model layer. A URL service can be simply a URL against which a query is posted, so that the URL can be exposed as an ADF form. For example, you can have a URL service that allows you to access employee data for your company.
Read more...
Though there are no hard and fast rules, the following general guidelines are applicable for most cases:
GET is used to retrieve data or perform a query on a resource. The data returned from the web service is a representation of the requested resource.
POST is used to create a new resource. The web service may respond with data or status indicating success or failure.
PUT is used to update existing resources or data.
DELETE is used to remove a resource or data. In some cases, the update and delete actions may be performed with POST operations as well, for example, when the services are consumed by browsers that do not support PUT or DELETE.
-
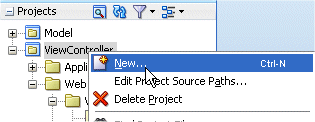
Right-click the Model node in the Application Navigator and select New... from the context menu.
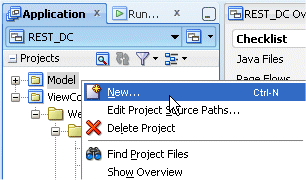
-
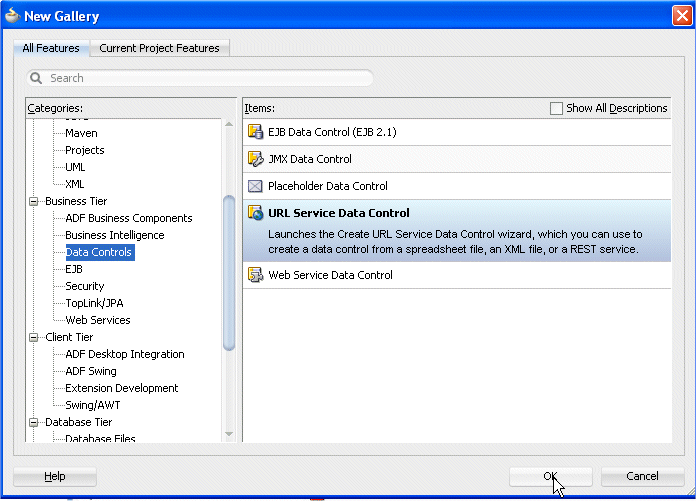
The New Gallery displays. Click the All Features tab, select the Business Tier | Data Controls node as the category and choose URL Service Data Control as the Item. Then click OK.
-
In the Create URL Service Data Control dialog, change the name to URL_Get, and have the Connection field set to Create New Connection.
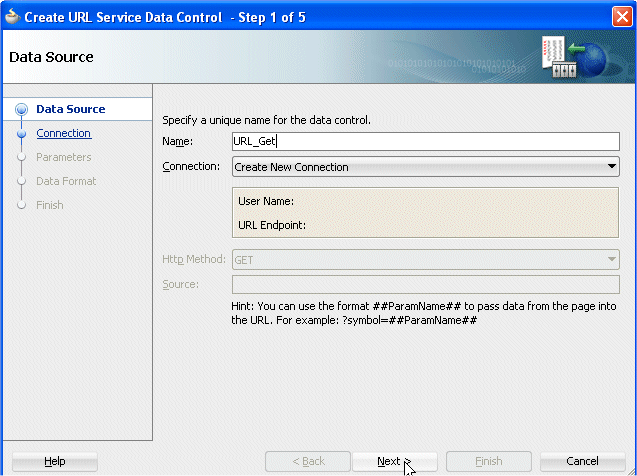
Click Next.
-
In the Connection step, enter the following values:
Name RESTConn URL Endpoint http://localhost:7101/ Source Rest_lab-RestServiceProject-context-root/jersey/restlab 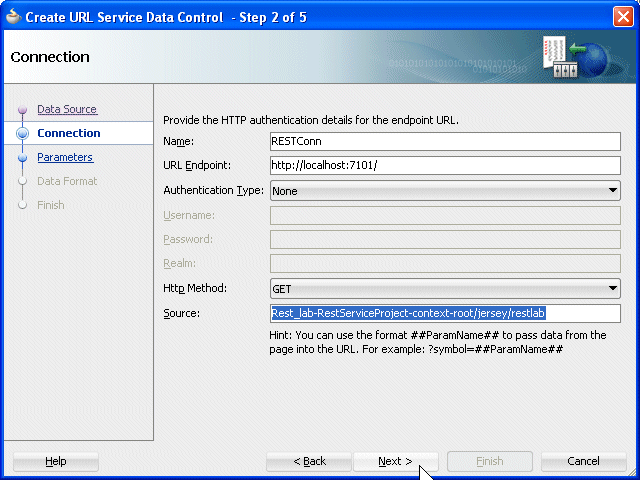
Click Next.In the Parameters step, click Next again.
-
In the Data Format step, select XML from the drop-down list. In the new fields, enter the following values:
XSD URL: http://127.0.0.1:7101/Rest_lab-RestServiceProject-context-root/emp.xsd
XSL URL: http://127.0.0.1:7101/Rest_lab-RestServiceProject-context-root/emp.xsl
Click Next.
-
In the Finish step, click the Test URL Connection button. It should return a URL successful status if the web service is up and running.
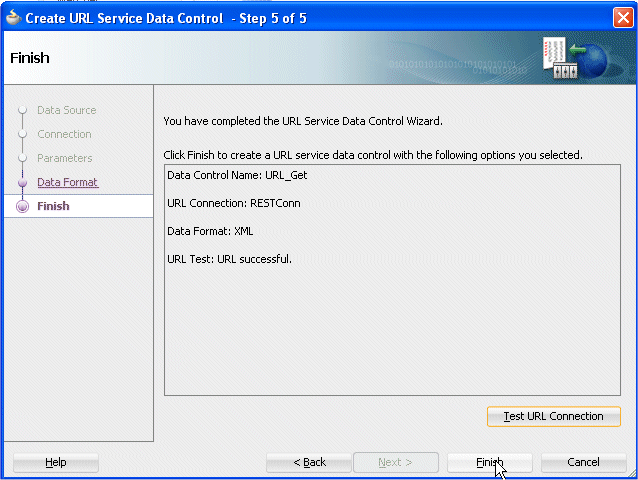
Click Finish.
-
The Application Navigator now should look like the following:
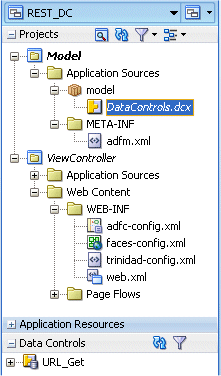
Notice that the Get method created in the Data Controls accordion.
-
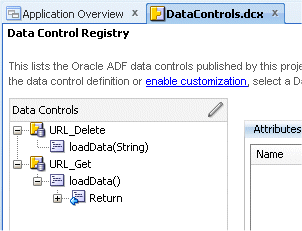
The DataControls.dcx opens in the editor showing the URL_Get data control in the Data Control Registry.
Save all your work.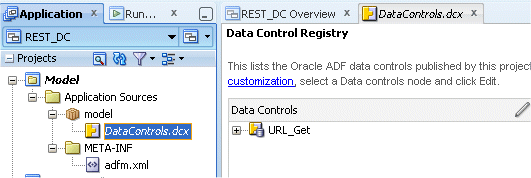
-
Right-click the Model node again to create a the delete service. In the New Gallery, select the Business Tier | Data Controls node as the category and choose URL Service Data Control as the Item. Then click OK.
-
In the Data Source step of the Create URL Service Data Control, type URL_Delete as the name.
Select RESTConn as the Connection from the drop-down list.
Select DELETE as the Http Method.
In the Source, enter Rest_lab-RestServiceProject-context-root/jersey/restlab?id=##id##.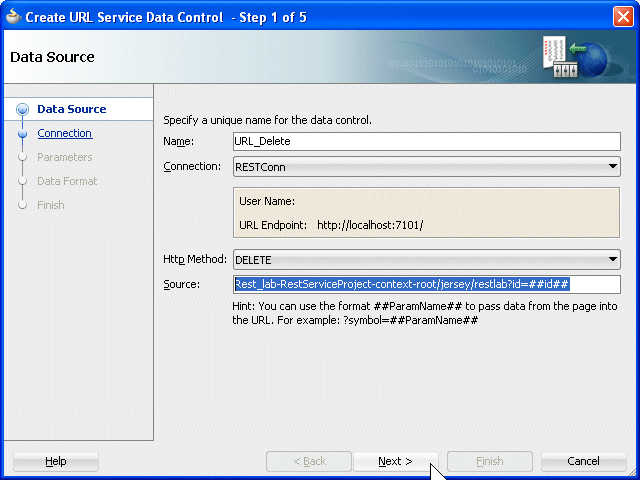
Click Next.
-
In the Parameters step, for the id parameter enter the default value 0.
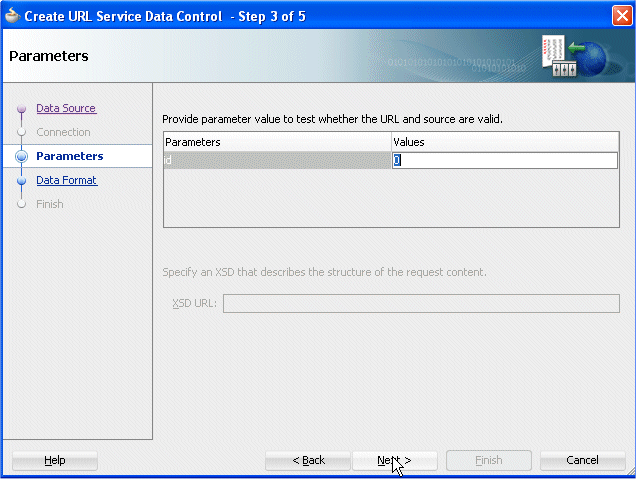
Click Next.
-
In the Data Format step, select XML as the Data Format.

Click Next.
-
In the Finish step click the Test URL Connection button.
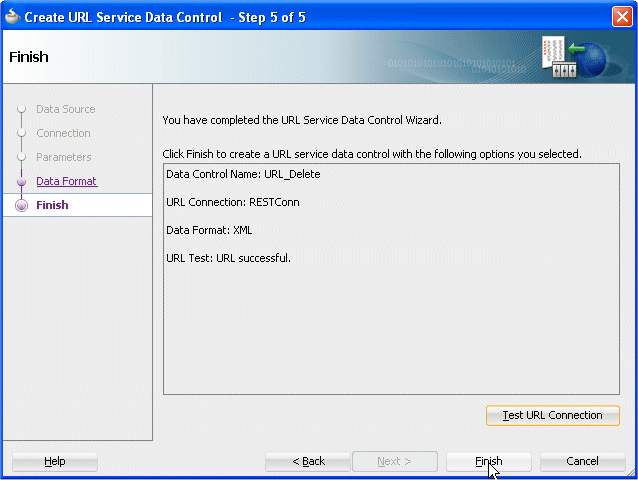
You should get a URL successful return status. Click Finish.
Save your work. -
Open the Data Controls accordion to visualize the created data controls.
Press the refresh icon to see the two new data controls.
In the Data Controls panel, each data control object components can create a a different type of component.Read more...
Data Control - You cannot use the data control itself to create UI components, but you can use the child objects listed under the data control. There may be more than one data control, each representing a logical grouping of data functions. Typically, there is one data control for a given source. However, you may have additional data controls that were created for other types of objects (for example, application modules or web services).
Method - Represents a custom method on the data control that may accept parameters, perform some action or business logic, and return data or data collections. If the method is a get method of a map and returns a data collection, a method return icon appears as a child under it. If a method requires a parameter, a folder appears under the method, which lists the required parameters. The URL Service data control exposes only one method loadData() which retrieves the contents of the URL.
Method Return - Represents a data collection that is returned by a custom method. A method return appears as a child under the method that returns it. The objects that appear as children under a method return may be attributes of the collection, accessor returns that represent collections related to the parent collection, other methods that perform actions related to the parent collection, and operations that can be performed on the parent collection.
Accessor Return - Represents an object returned by a bean-style accessor method on the business service. An accessor method is used when the objects returned are JavaBeans. Accessor returns appear as children under method returns, other accessor returns, or in the Attributes node under built-in create methods. Accessor returns are objects that are related to the current object in the parent collection. This relationship is usually based on a common unique attribute in both objects.
Attribute - Represents a discrete data element in an object. Attributes appear as children under method returns or accessor returns.
Operation - Represents a built-in data control operation that performs actions on the parent object. If an operation requires a parameter, a folder appears under the method, which lists the required parameters. Data control operations are located in an Operations node under method returns or accessor returns and under the root data control node. The operations that are children of a particular method or accessor return operate on that return object only, while operations under the data control node operate on all the objects represented by the data control.
-
You can also review the details of the data controls in the editor. Expand the data control nodes to examine each component created.
-
Click the Save All
icon on the JDeveloper menu bar to save your work.
Read more...
Each URL service data control represents a single operation of the service. For example, the GET operation and the PUT operation for a given URL service are represented by two different data controls. Typically, all of the actions for a given URL service will share a common URL connection.
URL services can also utilize representational state transfer (REST) actions.
Read more...
The HTTP actions (GET, PUT, POST, DELETE) are mapped to service operations that access and manipulate data at the service implementation. The response data can be returned in delimiter separated value and XML formats, and you can specify an XSD URL to define the input format for the PUT and POST actions.
The model project is now defined and contains the data control pointing to the web service. Now you can start building a page that implements the data controls. To do so, perform the following actions:
-
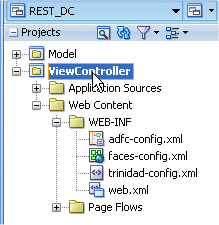
Collapse the Model project and expand the ViewController one.
-
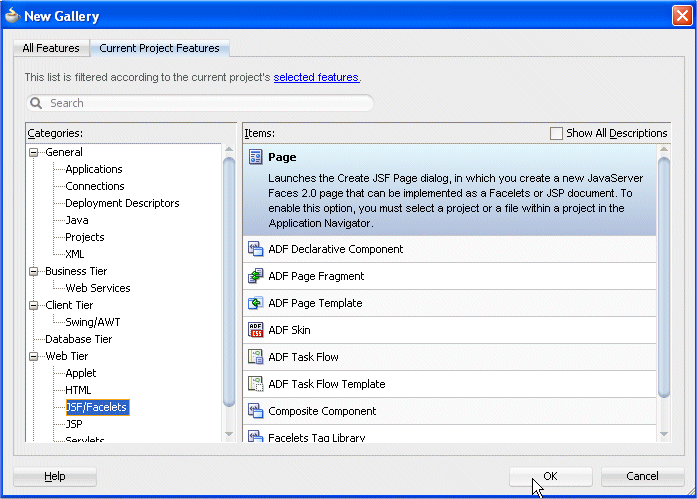
Right-click the ViewController node and select New from context.
-
In the New Gallery, select the Web Tier | JSF/Facelets node and select the Page item.
You can create UI pages that allow you to display and collect information using data controls created for your business services.Read more...
For example, using the Data Controls panel, you can drag an attribute for an item, and then choose to display the value either as read-only text or as an input text field with a label. JDeveloper creates all the necessary JSF tag and binding code needed to display and update the associated data. For more information about the Data Controls panel and the declarative binding experience. Instead of having to drop individual attributes, JDeveloper allows you to drop all attributes for an object at once as a form. The actual UI components that make up the form depend on the type of form dropped.
You can create forms that display values, forms that allow users to edit values, and forms that collect values (input forms). Once you drop the UI components, you can then drop built-in operations as command UI components that allow you to navigate through the records in a collection or that allow users to operate on the data, such as committing, deleting, or creating a record. For example, you can create a button that allows users to delete data objects displayed in the form. You can also modify the default components to suit your needs.
Click OK.
-
In the Create JSF Page dialog, type Emp as the File Name , select Facelets as the Document Type and choosing the Page Template, select the Oracle Three Column Layout.
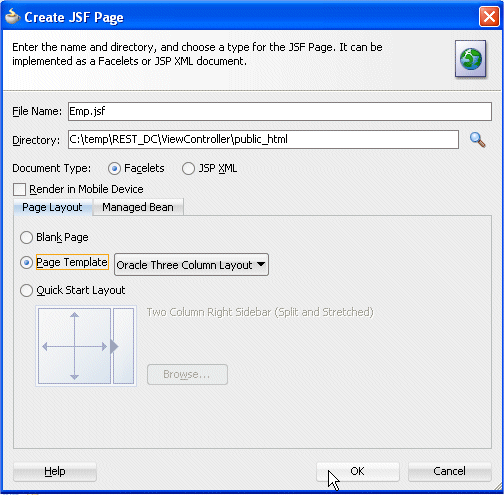
Click OK.
-
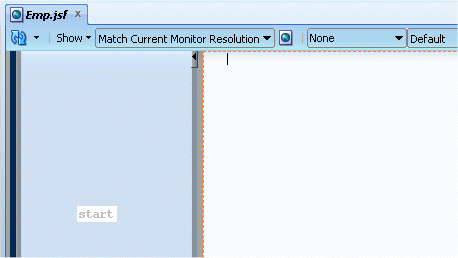
Wait for the page to display in the Design editor.
-
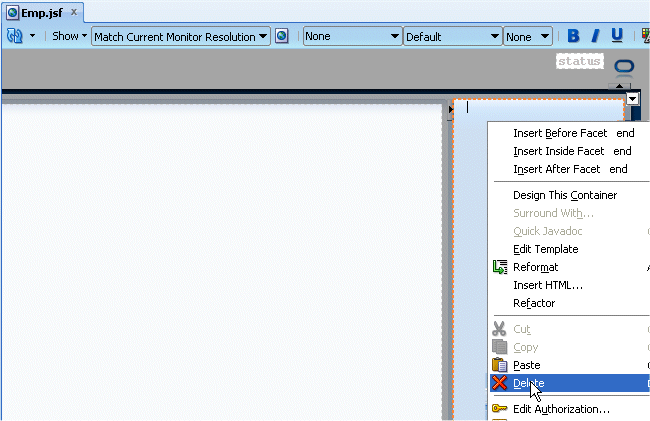
You now have a page with three facets (start - center - end). Scroll to the right and right-click in the end pane and select Delete from context since you will only use two panels.
-
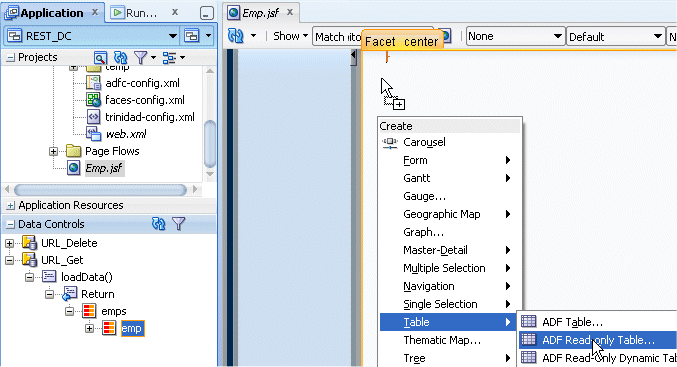
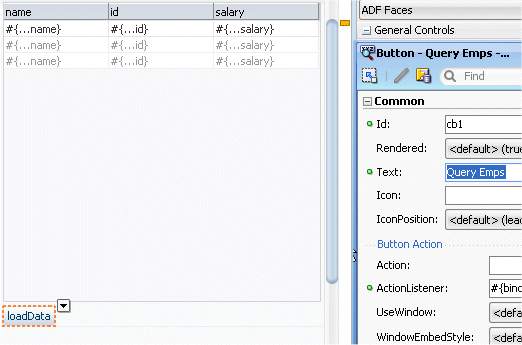
In the Data Controls accordion, select the URL_Get | loadData | Return | emps | emp entry and drop it onto the center facet. From the context menu, select Table --> ADF Read-only Table
Unlike forms, tables allow you to display more than one data object from a collection at a time.Read more...
You can create tables that simply display data, or you can create tables that allow you to edit or create data. Once you drop a collection as a table, you can add command buttons bound to actions that execute some logic on a selected row. You can also modify the default components to suit your needs. Unlike with forms where you bind the individual UI components that make up a form to the individual attributes on the collection, with a table you bind the ADF Faces table component to the complete collection or to a range of n data objects at a time from the collection. The individual components used to display the data in the columns are then bound to the attributes. The iterator binding handles displaying the correct data for each object, while the table component handles displaying each object in a row. JDeveloper allows you to do this declaratively, so that you don't need to write any code. -
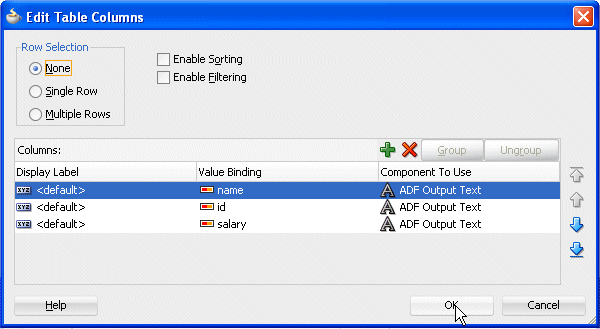
In the Edit Table Columns, click OK to accept defaults.
-
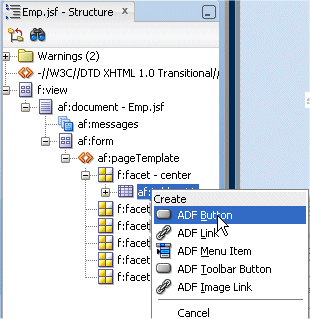
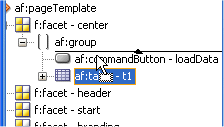
In the Data Controls pane, select the loadData method and drop it above the af:table - t1 in the Structure pane.

-
From the context menu select ADF Button.
-
In the Structure pane, select the af:table - t1 node and move it up just above the button you just created.
-
Select the loadData button and in the Property Inspector, type Query Emps in the text field.
-
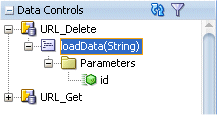
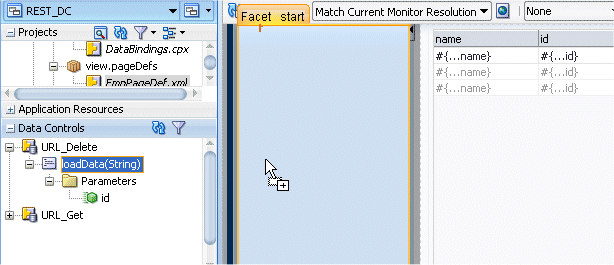
Collapse the URL_Get node and expand the URL_Delete one.
-
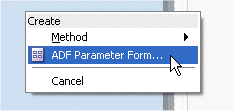
Select the loadData (String) entry and drop it onto the start facet.
-
Select ADF Parameter Form from context.
Instead of dropping each of the individual attributes of a collection to create a form, you can a complete form that displays or collects data for all the attributes on an object.Read more...
Dropping an object as a form from the Data Controls panel has the same effect as dropping a single attribute, except that multiple attribute bindings and associated UI components are created. The attributes on the UI components (such as value) are bound to properties on that attribute's binding object (such as inputValue) or to the values of control hints set on the corresponding business object. -
In the Edit Form Fields type Emp Id in the Display Label for the id component.
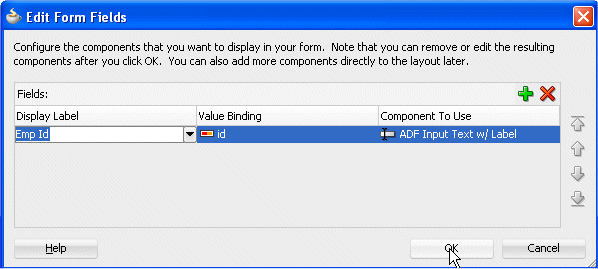
Click OK.
-
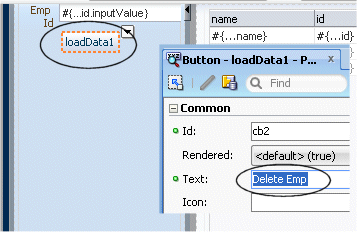
Select the loadData2 button and in the Property Inspector, enter Delete Emp as the Text.
-
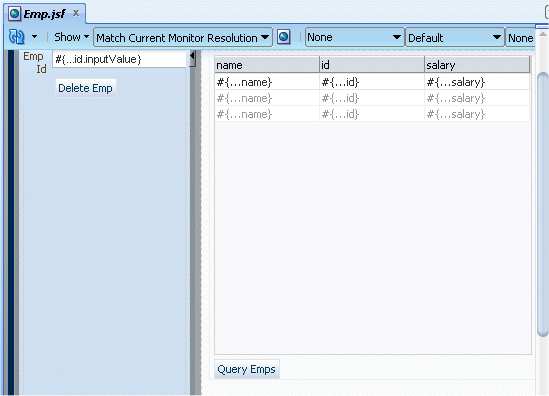
Your page should look like the following:
-
Click the Save All
icon on the JDeveloper menu bar to save your work.
In this step, you run the page and experiment the REST methods implemented as ADF data controls. In order to test the page, the WebLogic Server must be started and the employee collection must be loaded. If your environment is not setup in this way, complete the first three steps. Otherwise you may skip them and start on number 4.
-
Right-click the Service.java node in the Application Navigator and select Test Web Service from context.
-
In the Log window re-click the http://127.0.0.1:7101/Rest_lab-RestServiceProject-context-root/jersey/restlab link to re launch a new request.
-
In the HTTP Analyser, a ppend /defaultEmp at the end of the URL, select the PUT method and click the Send Request button. This is to repopulate the web service with employees again.
-
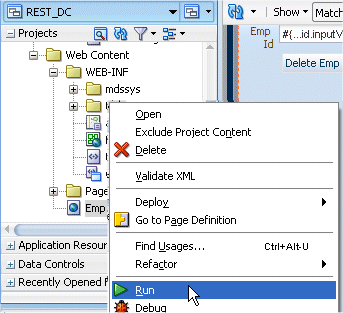
In the Application Navigator, right-click the Emp.jsf node and select Run from context.
-
Wait for the page to display in your browser.
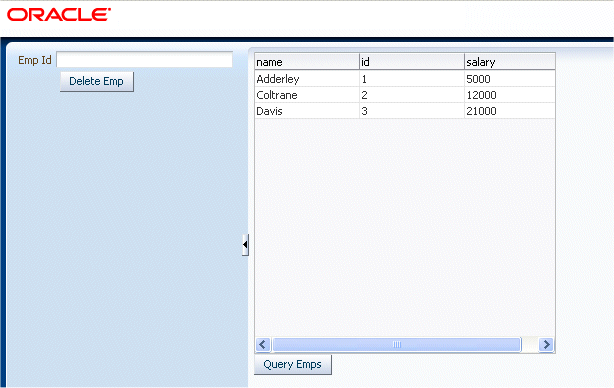
Notice that the Emps are queried automatically displaying the existing records.
-
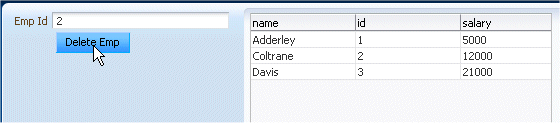
In the Delete Emp section, enter a value for an existing emp id to delete. (i.e. 2).
-
From the center pane, click the Query Emps button.
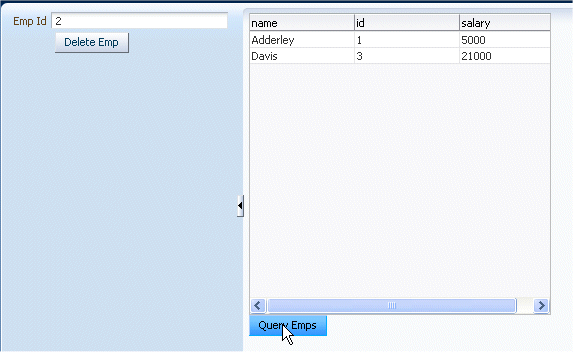
Notice that one of the emp has been removed from the list.
-
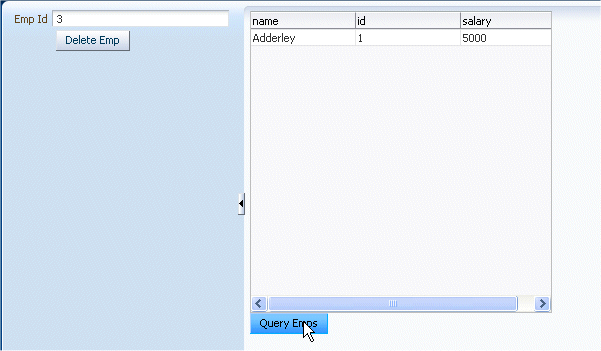
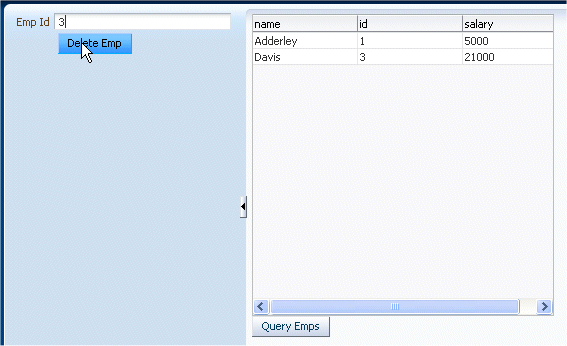
In the right side pane, enter a new id value (3) and click the Delete Emp button.
-
Back in the center pane, click the Query Emps button. The deleted employee is now gone.
-
You can try to remove the last employee, if you wish.
Click the Delete Emp button.
You've successfully performed this REST tutorial.
In this tutorial you learned how to find your way around the JDeveloper IDE. You learned how to:
- Create Resource and Service classes using REST annotations
- Use the HTTP Analyzer to test a web service
- Create Data Controls based on a REST web service
- Create a JSF page that uses web service data controls
- Run a page to test the REST web service
- Oracle® Fusion Middleware User's Guide for Oracle JDeveloper
11g Release 2 (11.1.2.0.0) - Using the HTTP Analyzer with RESTful Web Services - Oracle® Fusion Middleware User's Guide for Oracle JDeveloper
11g Release 2 (11.1.2.0.0) - Creating RESTful Web Services - RESTful Web Services