
 Read more...
JDeveloper should be already installed and you should have access to an Oracle 11g database with DBA grants.
| Purpose | Duration | Application |
|---|---|---|
| This tutorial shows you how to create a database diagram with database components. You'll see how to create a database user, reconcile the offline definitions with the current database definitions, and generate a DDL reconciliation script. Finally you reverse-engineer database objects. To see the complete application you will create, click the Download button to download a zip of the final application. Unzip it into your JDeveloper folder. |
40 minutes |  |
The JDeveloper application is the highest level in the organizational structure. It stores information about the objects you are working with, while you are creating your application. It keeps track of your projects and the environment settings while you are developing.
-
Start JDeveloper by selecting Start > All Programs > Oracle Fusion Middleware 11.1.2 > JDeveloper Studio 11.1.2
-
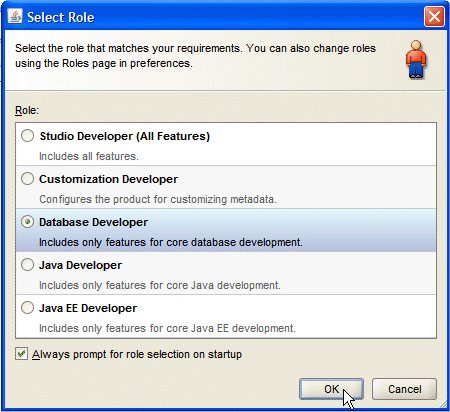
If prompted for a Role, choose Database Developer and click OK.
Close the Tip of the Day window.
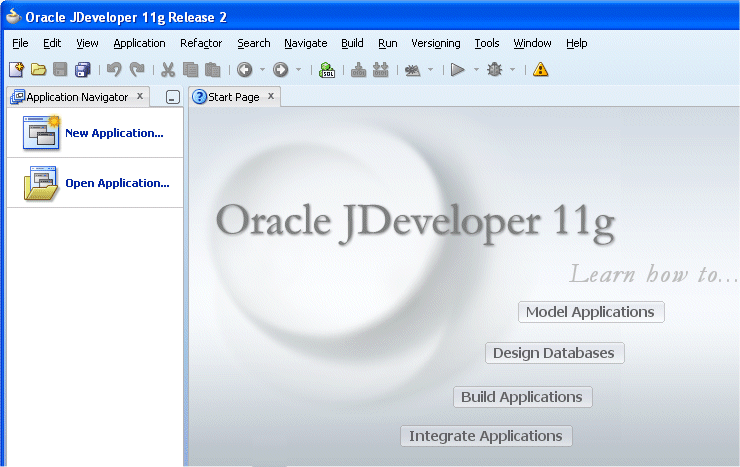
Once loaded, the JDeveloper IDE appears.Read more...
The very first time you open JDeveloper, the Start Page displays. Notice the various options available to help you learn about JDeveloper. After exploring these options, click the X on the Start Page tab to close it. (the X appears when you mouse over the tab).
You can re-invoke the Start Page later by choosing Help | Start Page.
-
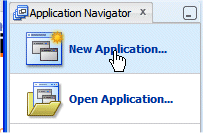
In the Applications Navigator, click New Application.
-
In the New Gallery, select General | Applications and choose Database Application.
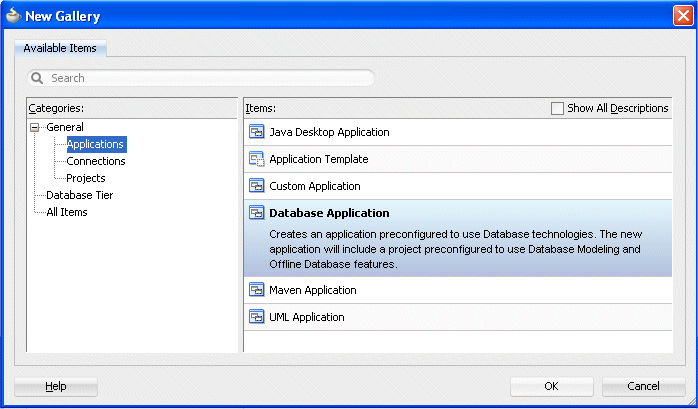
Click OK.
-
In the Create Database Application dialog, change the Application Name from Application1 to CreateDBObjects and type oracle as the Application Package Prefix. Notice that the Directory Name automatically changes to match the new Application Name.
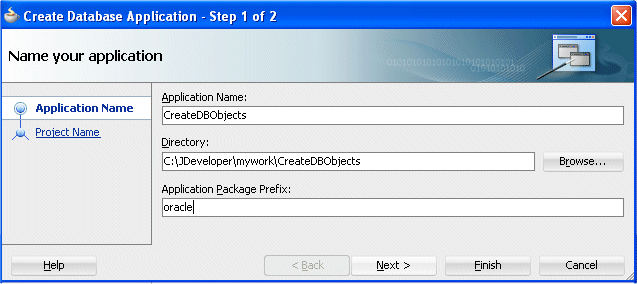
Click Next.
-
In Step 2 of the Wizard enter NewSchema as the Project Name.
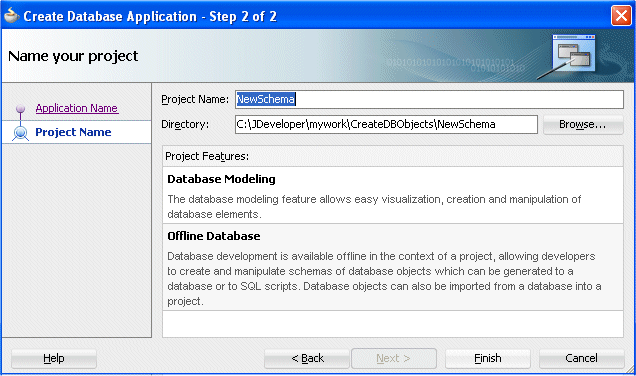
Click Finish.
When you work in JDeveloper, you organize your work in projects within applications.Read more...
JDeveloper provides a number of predefined templates which enable you to create applications and projects that are configured for developing different types of applications.
The templates provide the environment for the basic range of technologies supported by JDeveloper. You create your working environment by selecting the template that best fits your needs and then configuring it to add any additional technologies you intend to use.
The options available to you in the New Gallery, and for some context menu operations, depend on your template selection for that application. -
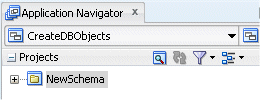
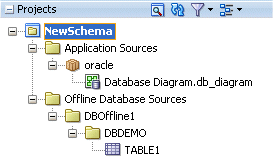
The Application Navigator should look like the following:
 In the Application Navigator, Projects panel, projects are displayed as the top level in the hierarchy.Read more...
The Application Overview window (Application | Show Overview) opens in the editor window area when you create a new application. All objects that you create within JDeveloper appear in the Application Overview file summary pages, arranged by object type. You can create new files and artifacts, and view them filtered by status and project.
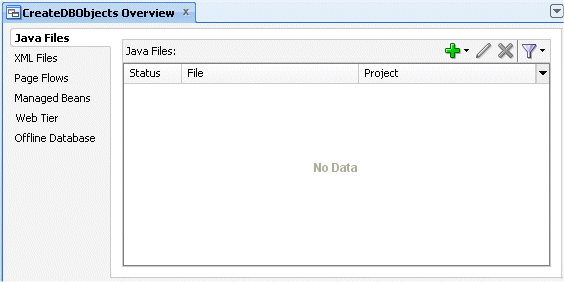
You can optionally close the window, since you will not be using it to create objects for this application. -
Save your work by clicking Save All
 . You should save your work at regular intervals as you progress through the rest of the tutorial.
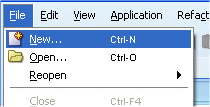
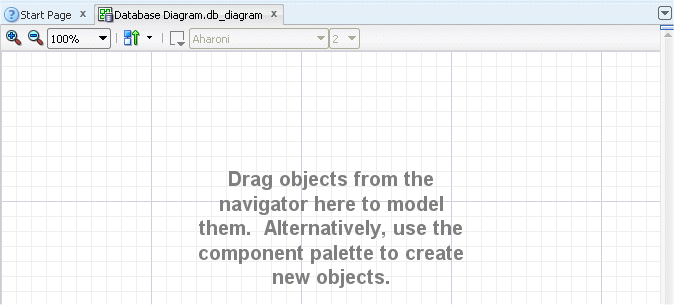
One way to develop offline database object definitions is by using a database diagram. You can create offline tables, foreign key relationships, views, synonyms, sequences, usages, and joins directly on the diagram. You drag components from the Component Palette onto the diagram, then draw relationships and annotations, such as attachments and dependencies, between objects. A form of UML notation is used to represent each of the objects on the diagram. Each component you create on the diagram is also displayed in the Application Navigator. To begin creating a database diagram, you will open the Create Database Diagram dialog.
-
To open the dialog, choose File | New.
-
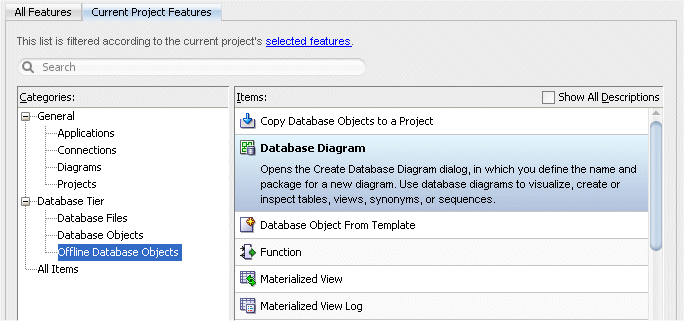
In the New Gallery, expand Database Tier and select Offline Database Objects, then select Database Diagram.
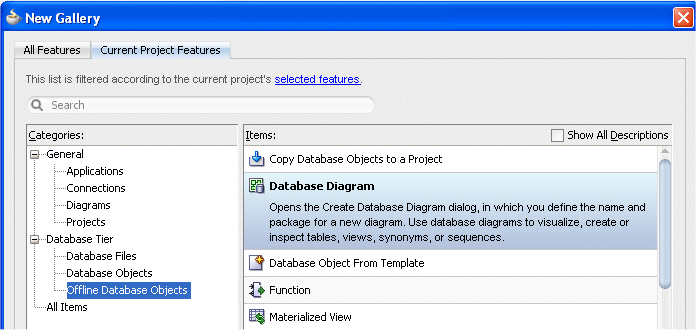
Click OK.
From the diagram, you can edit your objects with in-place editing.Read more...
Alternatively, you can open the object editors to edit them declaratively, adding the elements that define the objects, such as columns, indexes, partitions, and tablespaces.
A project can have many database diagrams and mix objects from different schemas and databases on one diagram.
-
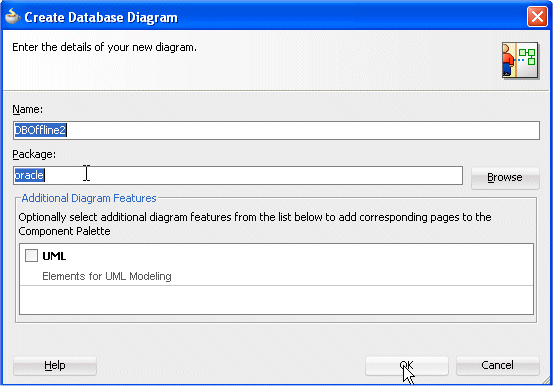
In the Create Database Diagram dialog, enter Database Diagram as the name.
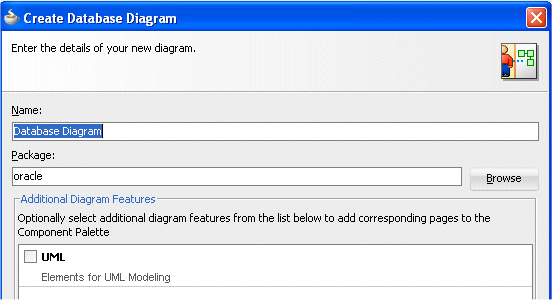
Click OK.
-
A new empty diagram opens.
-
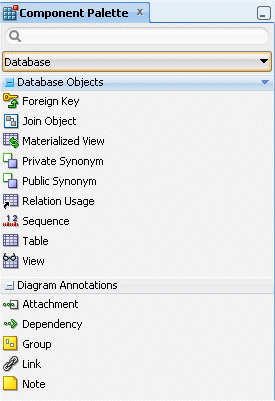
Make sure the Component Palette displays the Database components.
-
From the Component Palette, drag and drop the table icon
 component onto the diagram.
-
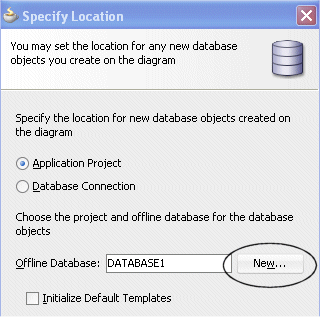
In the Specify Location dialog, select Application Project. Click New to open the Create Offline Database dialog.
-
Enter DBOffline1 as the database name, and DBDEMO as the default schema name.
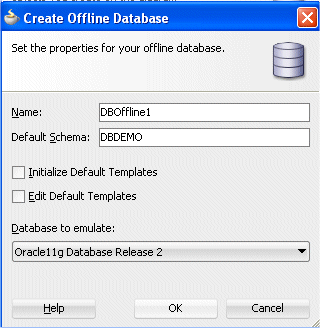
Click OK. Click OK again to close the Specify Location dialog.
-
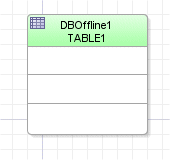
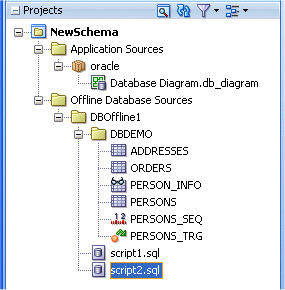
The Application Navigator displays the new offline database diagram and table.
-
The database diagram displays the default table, named TABLE1.
-
Click Save All
to save your work.
You can use JDeveloper to work directly with database objects through a database connection. Alternatively, you can work with offline database definitions which you can subsequently generate to a database schema.
Read more...
Or you can import database objects from a database schema, make the changes you want, and then generate the changes back to the same database schema, to a new database schema, or to a file that you can run against a database at a later date. You can also use JDeveloper's modeling tools to visualize your offline database objects on a diagram.
You will use in-place editing in the database diagram to visually define and edit tables, columns and key relationships.
-
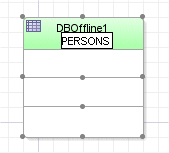
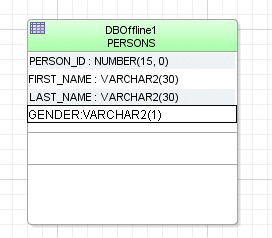
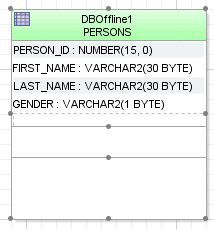
In the database diagram, select the new table name TABLE1, and change it by typing PERSONS. Then press Enter or Tab.
-
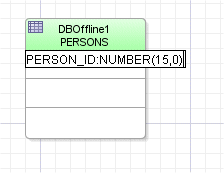
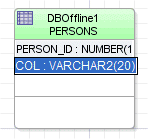
To add a column definition, click in the white box under the table name, then click again to expose the default format. Type PERSON_ID:NUMBER(15,0) and press Tab.
-
With the default format exposed in the next box, add the column definitions FIRST_NAME:VARCHAR2(30 BYTE), LAST_NAME:VARCHAR2(30 BYTE) and GENDER:VARCHAR2(1 BYTE), one at a time pressing Tab to advance to the next.
 When you see the default format exposed in the box, you can type over the default text.Read more...
Press Tab when you finish entering the columns, then click the top of the box next to the table name.
You can resize the table box by dragging any of the points along the edge.
To create a Primary Key or change the Primary Key to another column, you can double-click the table definition in the diagram and use the Edit Table dialog.
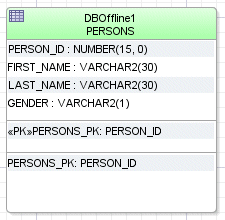
The Primary Key is indicated by <<PK>> on a database diagram. You might have to stretch the inside box to show the primary key.
Indexes can also be displayed in the third block.
To control the displayed properties, right-click in the table and select Visual Properties from context. -
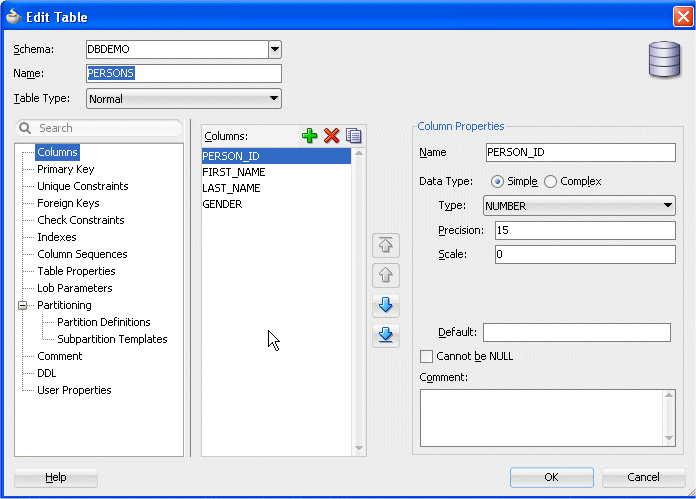
Double-click the PERSONS table component on the diagram to open the Edit Table dialog, where you can create a primary key.
-
Select Primary Key in the navigation panel, then shuttle PERSON_ID from the Available Columns list to the Selected Columns list.
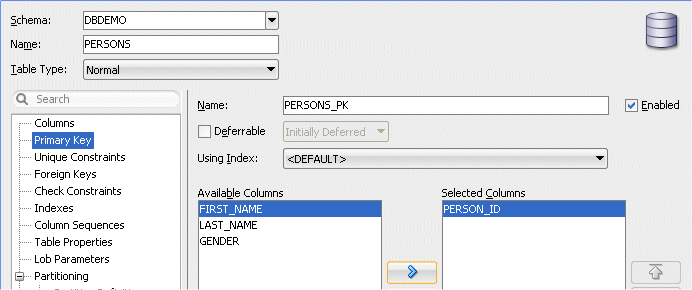
Click OK. A unique index is automatically added for the primary key.
-
In the Component Palette, drag and drop a Table component
onto the diagram. Then change the table name to ADDRESSES. 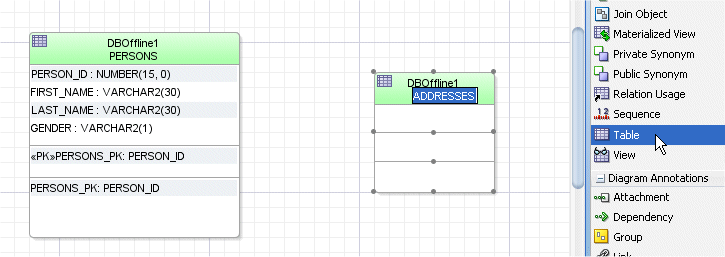
-
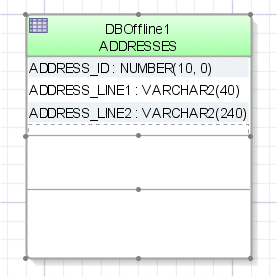
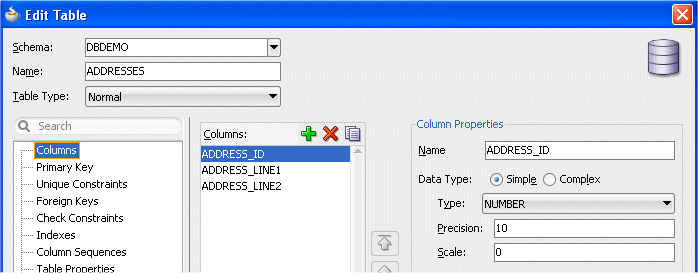
In the ADDRESSES table, add the following column definitions: ADDRESS_ID:NUMBER(10,0), ADDRESS_LINE1:VARCHAR2(40) and ADDRESS_LINE2:VARCHAR2(240).
-
Double-click the ADDRESSES table component on the diagram to open the Edit Table dialog, where you can create a primary key.
-
Select Primary Key in the navigation panel, then shuttle ADDRESS_ID from the Available Columns list to the Selected Columns list.
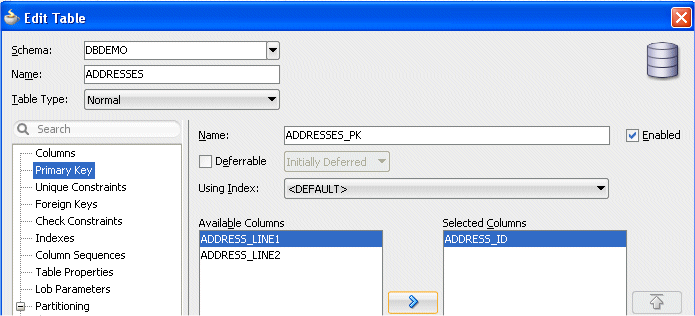
Click OK.
-
In the Component Palette, select the Foreign Key component
 . In the diagram, click the top of the PERSONS table, then click the top of the ADDRESSES table to create the foreign key.
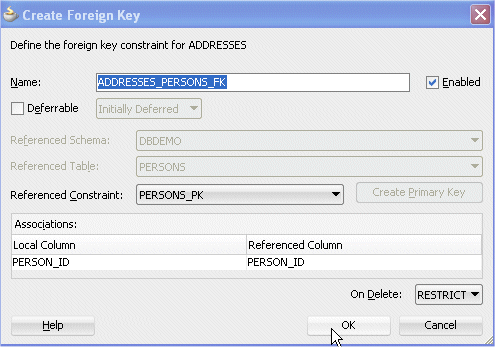
 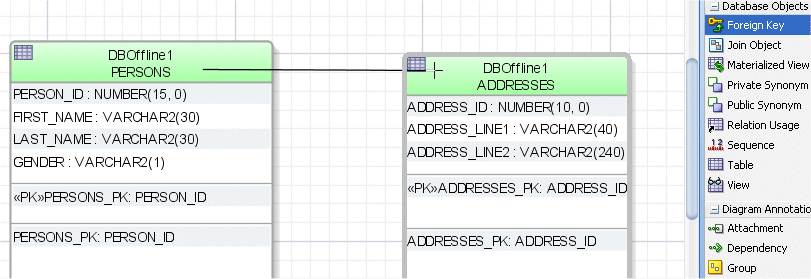 The Create Foreign Key dialog lets you edit the default foreign key properties.Read more...
You can change the default name of the foreign key column or select another existing column as the foreign key column if you have already created it.
By drawing the foreign key from PERSONS to ADDRESSES, a foreign key with cardinality 1:M is created in ADDRESSES.

You could delete the key from the diagram by right-clicking the relationship and choosing Delete. -
In the Create Foreign Key dialog, accept the default foreign key properties and click OK.
-
The diagram should now look like the following:

Notice the Primary, Foreign keys and indexes displayed in the tables.
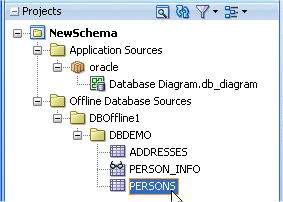
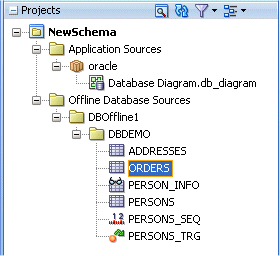
The Application Navigator should look like the following:
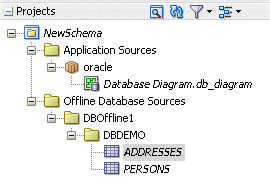 In the Application Navigator, the PERSONS and ADDRESSES tables are displayed in the Offline Database Sources node.Read more...
The Foreign Key is shown on the diagram. If you cannot see the Foreign Key, Primary Keys or some of the columns, stretch the table objects.
-
Click Save All
to save your work.
Views are virtual tables based on the result-set of a SELECT statement that lets you combine tables and present the data as if the data were coming from a single table. You can add SQL Functions, Joins, WHERE, GROUP BY, ORDER BY, or HAVING clauses to a view, to present exactly the data you want to the user.
-
From the Component Palette, drag and drop the View component
 onto the diagram. Then change the view name to PERSON_INFO.
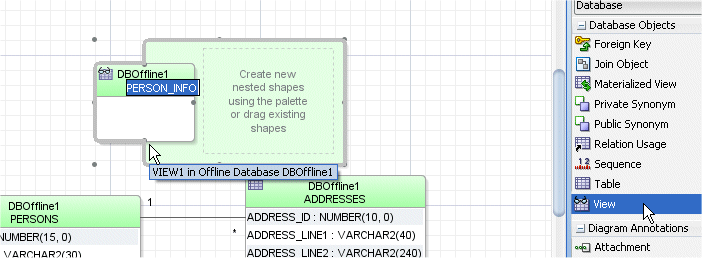
-
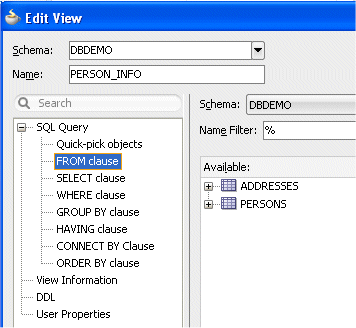
In the diagram, double-click PERSON_INFO to open the Edit View dialog and then select FROM clause in the navigation panel.
-
Expand ADDRESES | ADDRESSES_PERSONS_FK in the Available list, and select PERSONS, then shuttle it to the Selected list to create a join between ADDRESSES and PERSONS.

-
Select the JOIN node in the Selected list, and then click Edit
 .
. 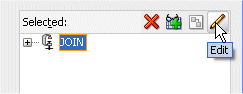 You can create a JOIN in the Edit View dialog; once the JOIN node is selected, the Edit button is available.Read more...
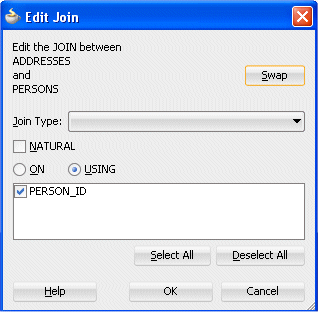
When you click Edit , the default JOIN is USING in the Edit Join dialog because the key column in both tables is PERSON_ID.
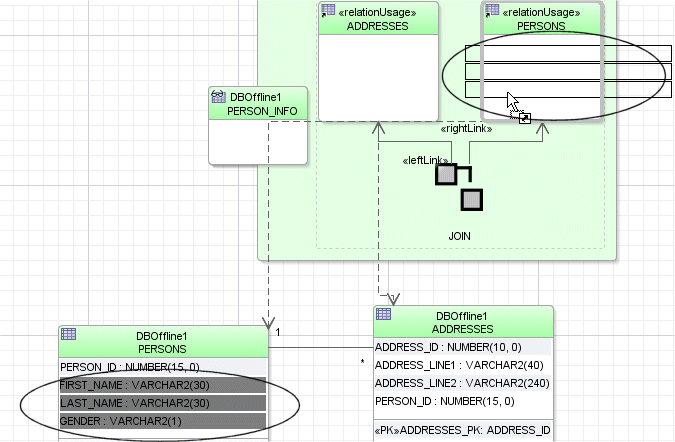
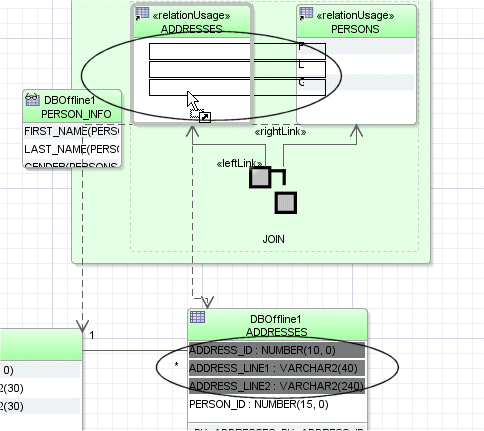
Another way to populate a view and create a JOIN is to use the diagram. You can drag tables onto the view to add the table usages to the FROM clause of the view and all the columns to the SELECT clause. You can delete columns from the view using in-place editing. Alternatively you can select and drag individual columns from tables onto the view. You can have multiple table usages on the same view. You then need to create JOIN objects between the table usages in the view.
To do this, you would select Join Object in the Component Palette and click on the two table usages to be joined. This opens the Edit Join dialog, which would look similar to this:
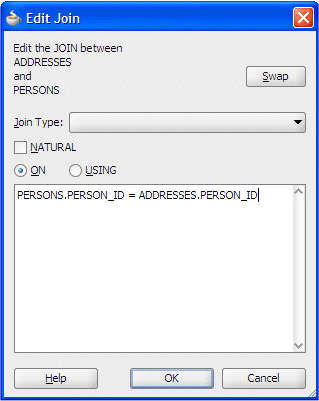
You then select the Join properties. Use JDeveloper's code completion functionality to select the columns.
In the editor:
type ' p' and select PERSONS
type ' .p' and select PERSON_ID
type ' ='
Then do the same to get ADDRESSES.PERSON_ID -
In the Edit Join dialog, accept the default JOIN, which is created using the Foreign Key, and click OK.
Click OK again to close the Edit View dialog.
-
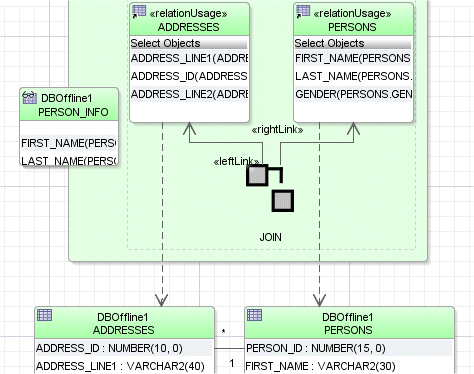
In the database diagram, select All the columns except PERSON_ID in the PERSONS table. Then drag and drop them onto PERSONS view.
-
In the diagram, select All the columns except PERSON_ID in the ADDRESSES table. Then drag and drop them onto ADDRESSES view.
-
The database diagram now includes the offline database view:
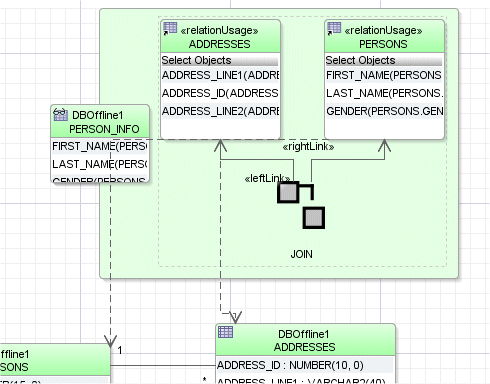
The database diagram now includes the offline database view:
Read more...
You can use the Edit View dialog to edit other clauses of the view, such as GROUP_BY and ORDER_BY. To specify that the SQL statement for the view uses CREATE or CREATE OR REPLACE, use the DDL page of the Edit View dialog. This page can also be used to review the complete SQL for the view.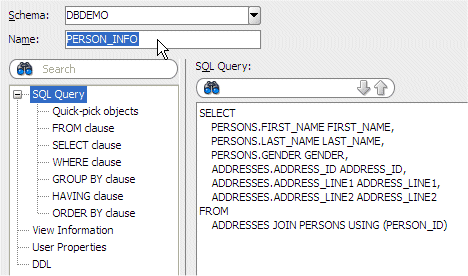
-
Click Save All
to save your work.
A sequence is a schema object that can generate unique sequential values. These values are often used for primary and unique keys. One way to populate a key with a value from a sequence is to use a trigger to insert the sequence's NEXTVAL into the field.
You use the Edit Table dialog to specify that you want to have the primary key for the table populated from a new sequence and updated via a new trigger. Read more...
On generation of the DDL for the table, both the sequence and the trigger will be generated with no additional coding required.
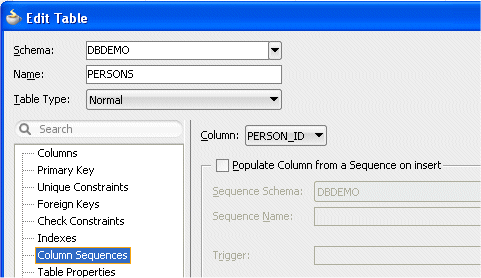
To open the Edit Table dialog, you will double-click the table in the Application Navigator. You can also open the dialog by choosing Properties from the context menu.
-
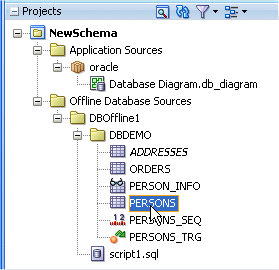
In the Application Navigator, under Offline Database Sources | DBOffline1 | DBDEMO, double-click PERSONS to open the Edit Table dialog.
-
Click Column Sequences in the navigation panel. Confirm that PERSON_ID is selected in the Column dropdown list.
-
Select Populate Column from a Sequence on insert check box.
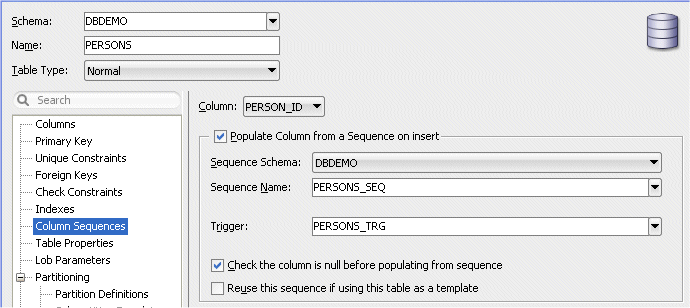
Click OK.
In the Edit Table dialog, selecting Populate Column from a Sequence on insert on a column creates a default sequence for that column, and an associated trigger.
Read more...
In this example, PERSONS_SEQ is created. PERSONS_TRG is created to insert the next value of the sequence into the PERSON_ID column.
-
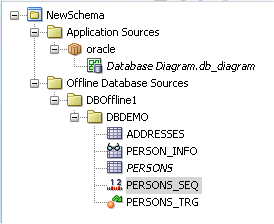
PERSONS_TRG trigger and PERSONS_SEQ sequence appear in the Application Navigator.
-
In the Application Navigator, select the PERSONS_SEQ node then drag and drop it onto the diagram.
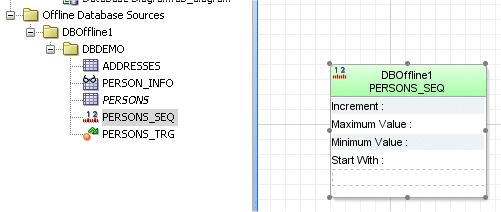
-
In the Component Palette, select the Dependency component. In the diagram, click the PERSONS table, then click the PERSONS_SEQ sequence to create the relationship.

-
Click Save All
to save your work. -
The offline database diagram and Application Navigator display the new sequence and trigger you created.
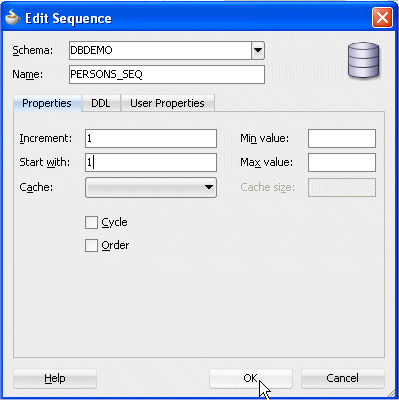
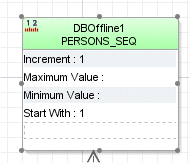
You can edit the sequence (for example, set the increment, minimum and maximum values) by double-clicking PERSONS_SEQ in the Application Navigator to open the Edit Database Sequence dialog.
Read more...
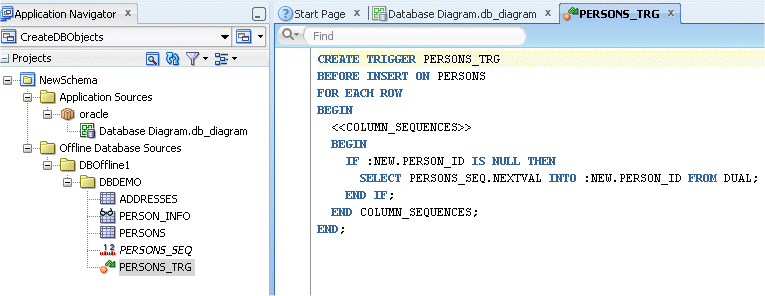
To review or edit the PL/SQL for the trigger, double-click PERSONS_TRG in the Application Navigator to open the source editor.
If you have been following along with the example, the database objects created emulate an Oracle 11g database. If you have created objects that emulate another database type, for example an Oracle XE database, you may not be able to create partitions in a table.
Read more...
Partitions can be further broken down into subpartitions for finer levels of manageability and improved performance. Indexes can be partitioned in a similar fashion. You will add another table (ORDERS) to your example and create a foreign key between it and the PERSONS table. You then add a partition to the ORDERS table to partition orders with an order date before 1 January 2007 and for the year 2007.
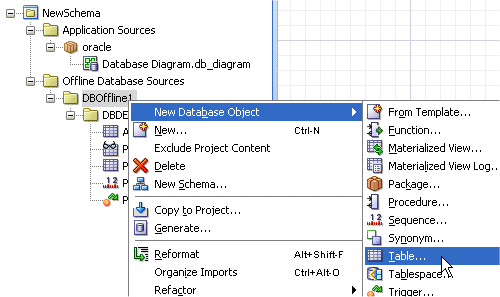
To begin creating another new table , you will open the Create Table dialog. To open the dialog, right-click the offline database node in the Application Navigator and choose New Data base Object | New Table .
You will specify the table name and other details in the Create Table dialog.
-
In the Application Navigator, under Offline Database Sources, right-click the DBOffline1 node, and choose New Data base Object New Table.
-
In the Create Table dialog, enter ORDERS as the table name, and select Advanced to display additional options. You should see a default column ( COLUMN1) populated in the Columns list.
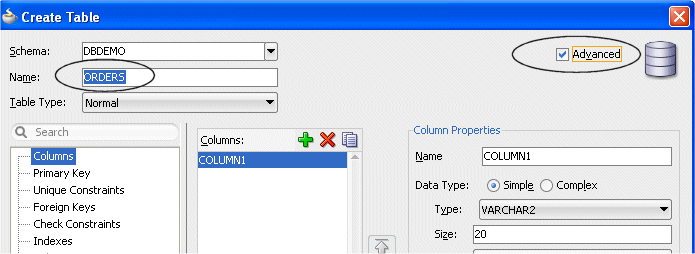
-
Under Column Properties, change the name to ORDER_ID, then select NUMBER from the Type dropdown list.
-
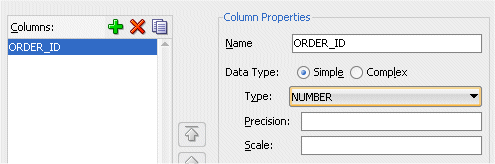
Click Add
 three times to add three more default columns. Then change the names and types to the following values: ORDER_DATE (type DATE), ORDER_TOTAL (type NUMBER), PERSON_ID (type NUMBER).
-
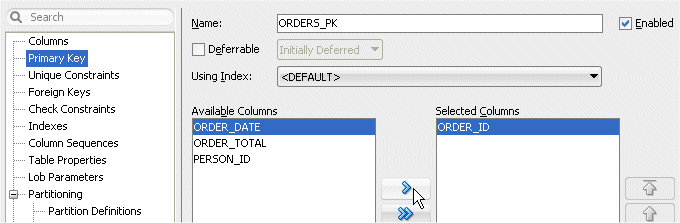
In the navigation panel, select Primary Key, and shuttle ORDER_ID from the Available list to the Selected list.
-
In the navigation panel, select Foreign Keys and click Add
to add a new foreign key. 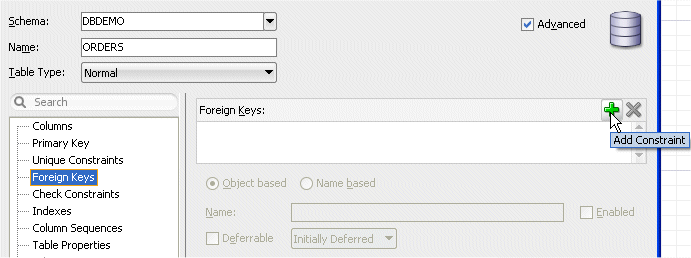
-
Choose PERSONS from the Referenced Table dropdown list.
-
Confirm that PERSON_ID is selected in the Local Column dropdown list.
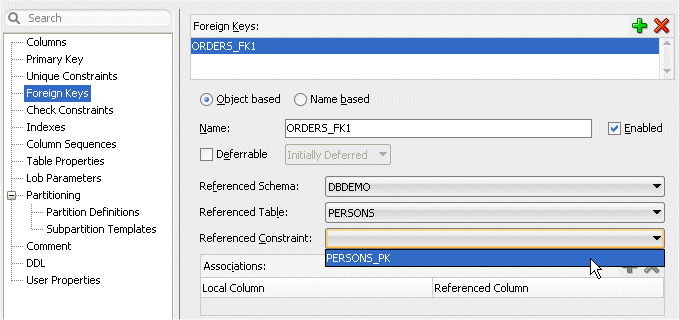
 You can choose from any of the schemas that you have referenced in your project to create foreign keys between tables in different schemas.Read more...
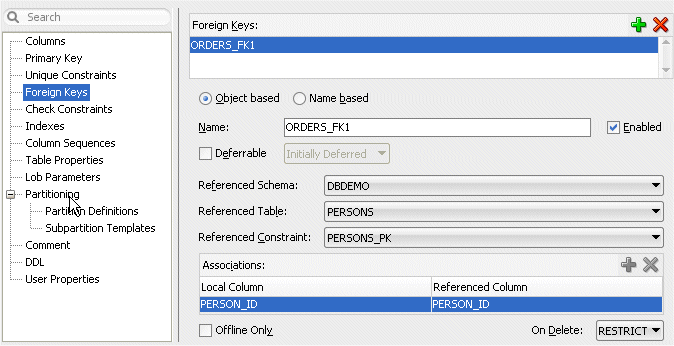
The Associations column in the referenced table defaults to that table's primary key (in this example, PERSON_ID).
Select any column in the local table as the foreign key column (in this example PERSON_ID).
A name based foreign key allows you to create a foreign key in a table that you have not added to your project. To do this, select Name based.
You can then enter the Referenced Schema, Table, and Constraint names, select the column in your table that is to be used as the foreign key, and enter the Referenced Column from the referenced table.
The Offline Only option lets you specify whether or not the information is used when DDL is generated for the table. -
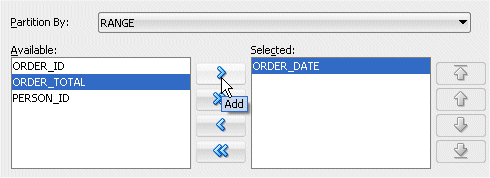
In the navigation panel, select Partitioning, and select RANGE from the Partition By dropdown list.
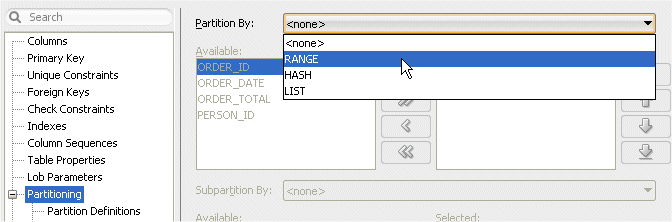
-
Shuttle ORDER_DATE from the Available list to the Selected list.
-
In the navigation panel, select Partition Definitions and click Add
. 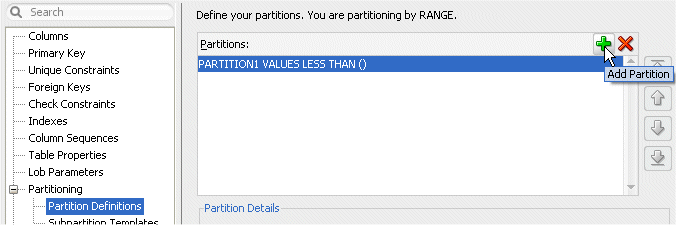
-
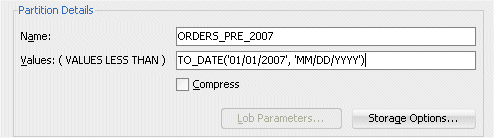
In the Partition Details section, enter ORDERS_PRE_2007 for the name and TO_DATE('01/01/2007', 'MM/DD/YYYY') for the values.
-
Click Add
to add a second partition definition. Enter ORDERS_2007 for the name and TO_DATE('01/01/2008', 'MM/DD/YYYY') for the values.
. 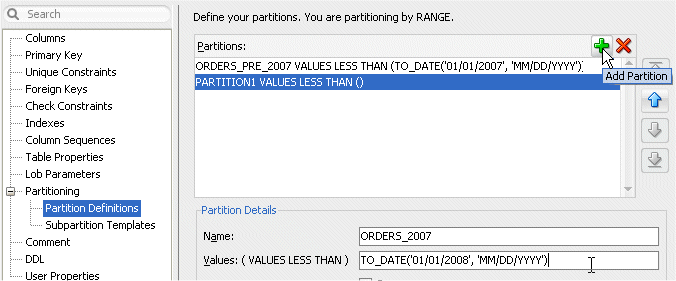
Click OK.
-
Click Save All
to save your work. -
The Application Navigator displays the new ORDERS table that was created:
-
From the Application Navigator, drag ORDERS onto the diagram.

Notice that since you defined a Foreign Key between Orders and Persons in the Edit Table Properties dialog, it is automatically drawn on the diagram when you drop the Orders table.
Range, Hash, List, Composite Range-Hash and Range-List partitioning is supported for both tables and indexes.
Read more...
In this example, two range partitions of the ORDERS table were created to partition orders with an order date before 1 January 2007 and for the year 2007. You can review these by double-clicking ORDERS in the Application Navigator to open the Edit Table dialog.
You can connect to any database for which you have connection details. If you can connect as a user with DBA privileges, follow the steps in this card to create an IDE database connection and then create a new database user with the name DBDEMO.
Read more...
Then you can proceed with the steps near the end of this card to create a DBDEMO connection.
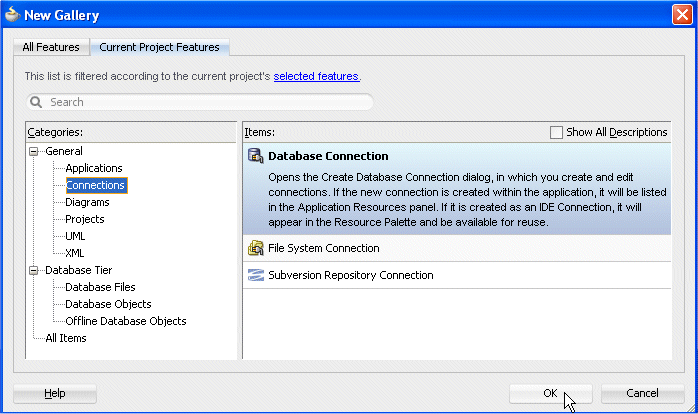
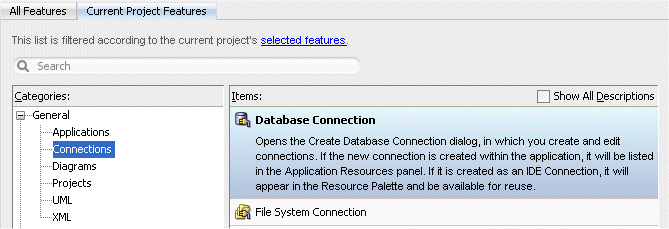
To begin creating a database connection, you will open the Create Database Connection dialog. To open the dialog, choose File | New. In the New Gallery, select Connections in the Categories tree and Database Connection in the Items list. Then click OK.
When you create a database connection, you specify a username and password to authenticate the connection. You may use any valid username and password and connect to any schema. If you are connecting to the database to create other users, you must enter a username that has been granted DBA privileges.
-
From the main menu, select File | New to open the New Gallery. Select General | Connections | Database Connection.
Click OK.
-
If you can connect as a user with DBA privileges, follow steps 3 through 14 to create an IDE database connection and then create a new database user with the name DBDEMO. If you don't have DBA privileges, ask your DBA to create a DBDEMO database user with the Roles and System privileges as specified in this tutorial. Then proceed to step 16 to create a DBDEMO connection.
-
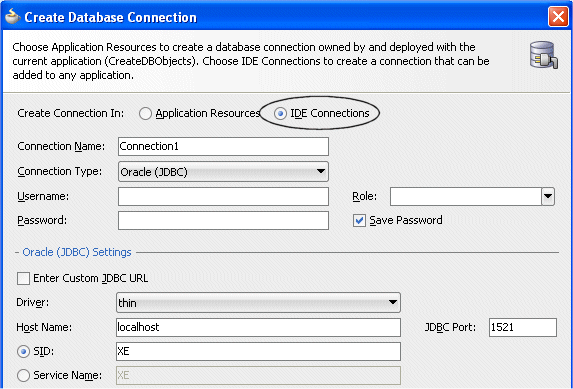
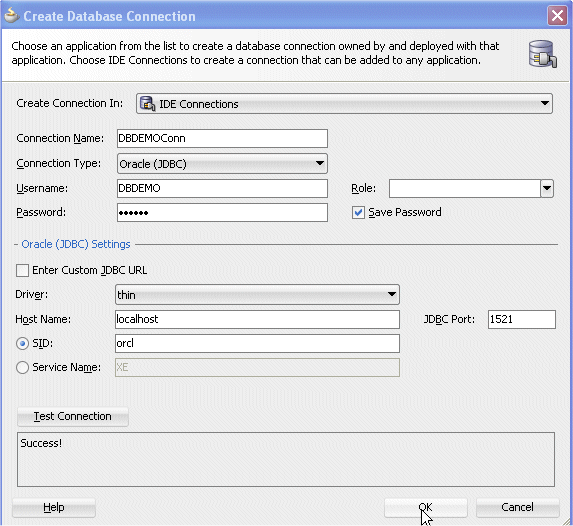
In the Create Database Connection dialog, select IDE Connections if it is not selected as the Create Connection In option.
-
Enter a name for the connection TutorialConn and select the connection type. Then enter your username and password for connecting to the database. You must have DBA privileges if you (and not your DBA) will be creating a new database user. Select the JDBC Driver, and enter the Host Name, SID or Service Name, and JDBC Port . If you're not sure what driver to use, accept the default ( thin).
-
Click Test Connection to confirm that you can connect.
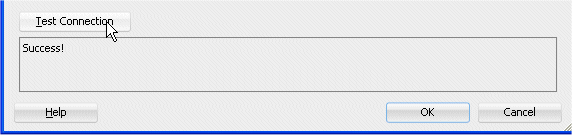
Click OK if the connection was successful.
-
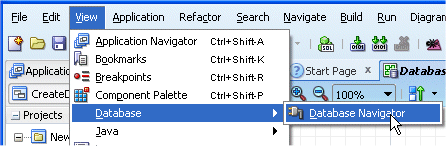
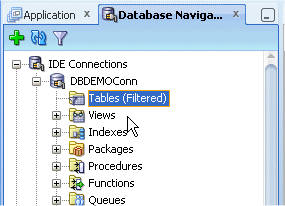
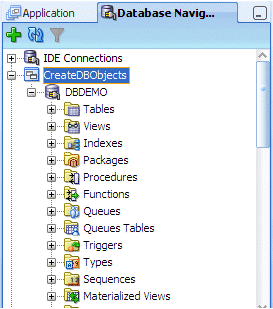
From the View menu option, choose Database --> Database Navigator.
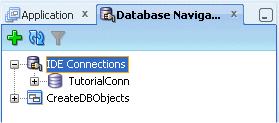
 When you create the IDE database connection, the Database Navigator should look similar to this, when you expand the IDE Connections node:Read more...
The Database Navigator provides you with a complete editing environment for online databases. You can create, update and delete database objects using the navigator.
The database connection is added under the IDE Connections node (for example, TutorialConn). To expand the database connection and see the schema and database objects, click the + icons.

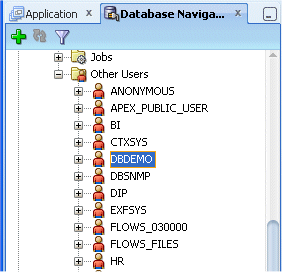
If you have DBA privileges, you can proceed to create a new database user and grant that new user specific Roles and Privileges.
-
Expand the IDE Connections node and the TutorialConn connection node you created.
-
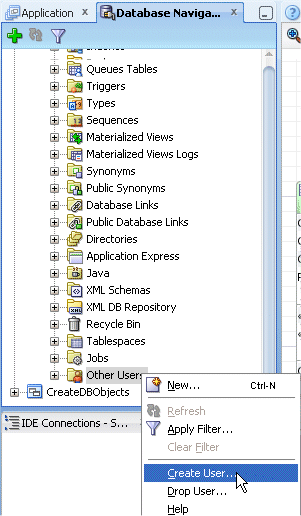
Right-click the Other Users node and choose Create User.
-
In the Create/Edit User dialog, enter DBDEMO as the name for the new user, then enter a password and confirm it.
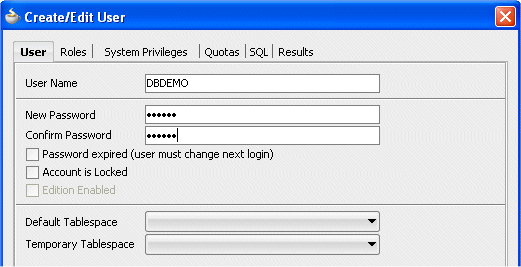
-
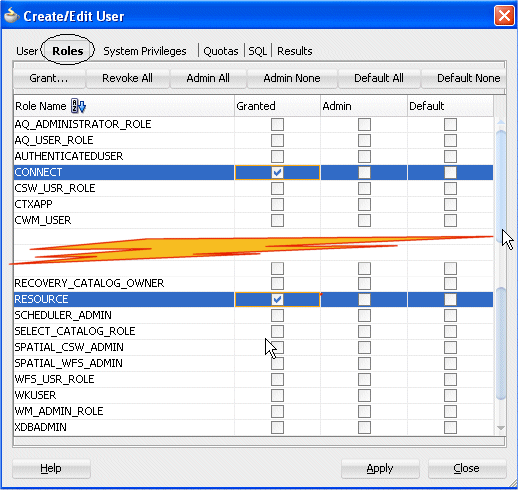
Click the Roles tab and select Granted for the following roles: CONNECT, RESOURCE.
-
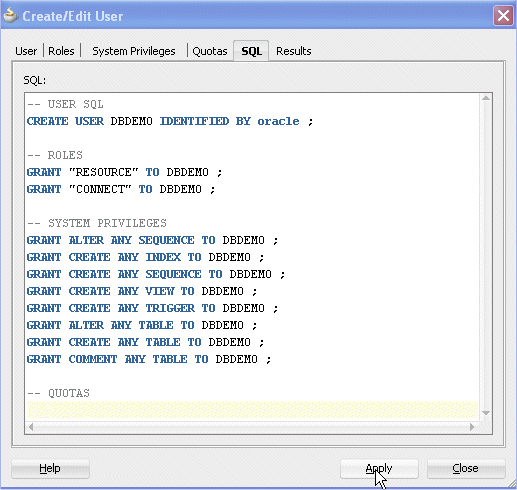
Click the System Privileges tab and select Granted for the following roles: ALTER ANY SEQUENCE, ALTER ANY TABLE, COMMENT ANY TABLE, CREATE ANY INDEX, CREATE ANY SEQUENCE, CREATE ANY TABLE, CREATE ANY TRIGGER, CREATE ANY VIEW.

-
Click the SQL tab and review the SQL script to create the new user, then click Apply .
-
Review the results of the SQL execution.
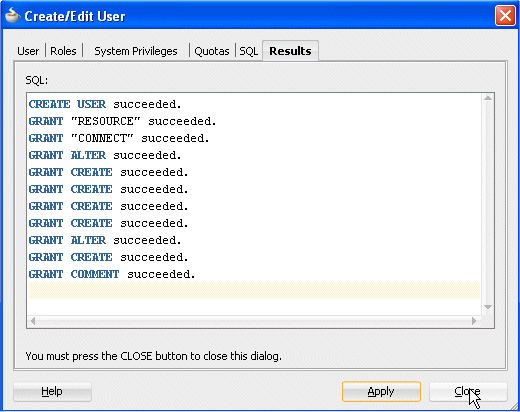
Click Close.
-
From the Main menu, select File | New. In the New Gallery, select General > Connections > Database Connection again to create a DBDEMO connection for the DBDEMO user you added earlier.
Click OK.
-
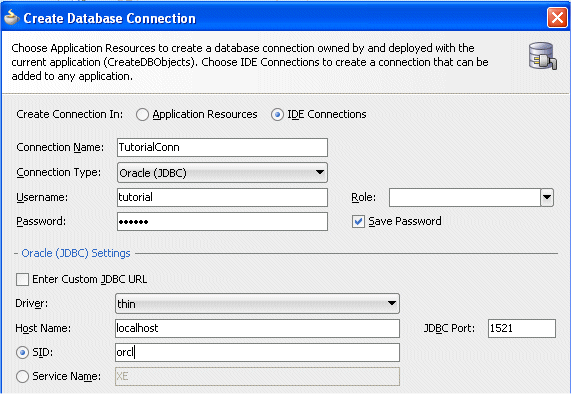
Create a DBDEMO connection for the DBDEMO user you added earlier. Enter DBDEMOConn as the connection name, and DBDEMO for the user name. Then enter the password and connection details. (If your DBA created the DBDEMO user, get the password and connection details from your DBA.). Click Test Connection to confirm that you can connect.
Click OK if the connection was successful.
-
Click Save All
to save your work.
Read more...
To see the DBDEMO connection you created, expand Connections | Database.
If you created the new database user, in the Database Navigator, the Other Users node should include the user DBDEMO and look like this:
If you created the IDE database connection, the Resource Palette should look like this, when you open it:
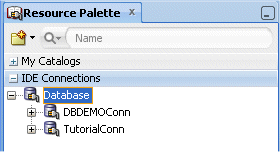
The IDE connection you created is added under the Database node. To see the schema and database objects, click the + icons. The Resource Palette is used to manage catalogs and repository connections. Users working in a collaborative environment can share resources using catalogs. Users working alone can access the resources or groups of resources in a catalog where they are available in one place, for use with all applications.
You can use JDeveloper to generate DDL for any offline objects you have created. You can choose the objects to include, whether you need CREATE, REPLACE or ALTER keywords, and other options for the DDL. You can choose to generate the DDL straight into a specific database or to generate a .sql script, using the Generate SQL from Database Objects wizard.
-
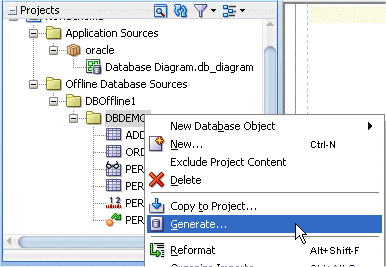
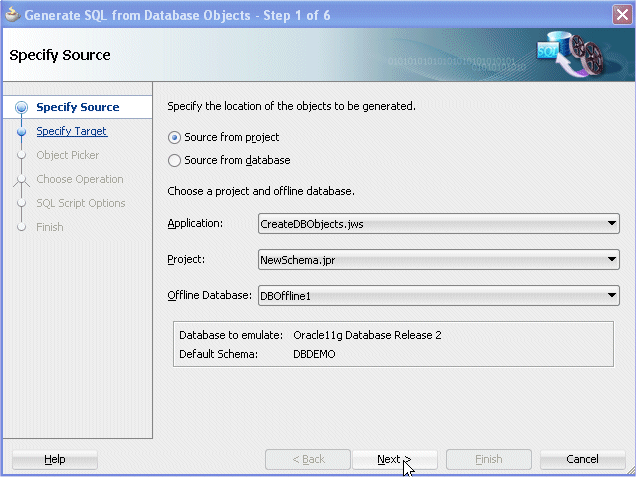
In the Application Navigator, under Offline Database Sources | DBOffline1, right-click the DBDEMO node, and choose Generate to launch the Generate SQL from Database Objects wizard.
-
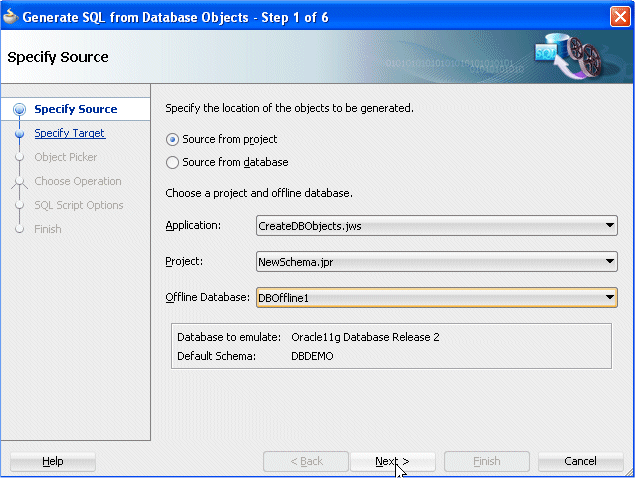
On step 1, make sure Source from project is selected. Click Next .
-
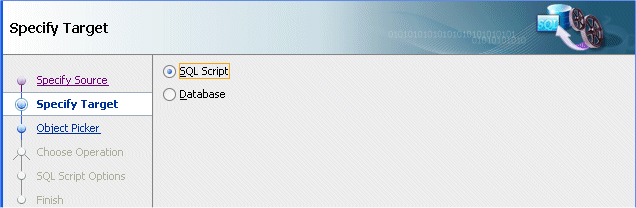
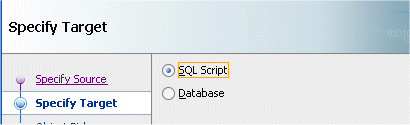
On step 2, confirm that SQL Script is selected. Click Next.
-
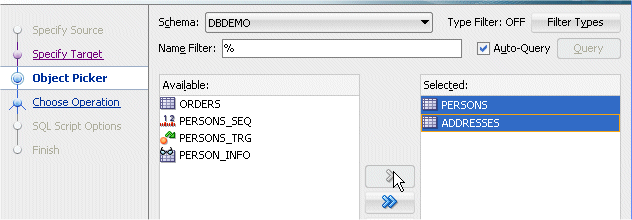
On step 3, shuttle the offline database objects from the Available list to the Selected list. Then click Next .
If you have been following along with the example, the database objects created emulate an Oracle 11g database, and you can shuttle all the offline database objects to the Selected list.
Read more...
If you have created objects that emulate another database type, for example an Oracle XE database, shuttle all objects except ORDERS to the Selected list. This is because table partitions have been defined in ORDERS, which are not supported in XE databases. After selecting database objects in step 3 of the wizard, no additional action is needed in subsequent steps.
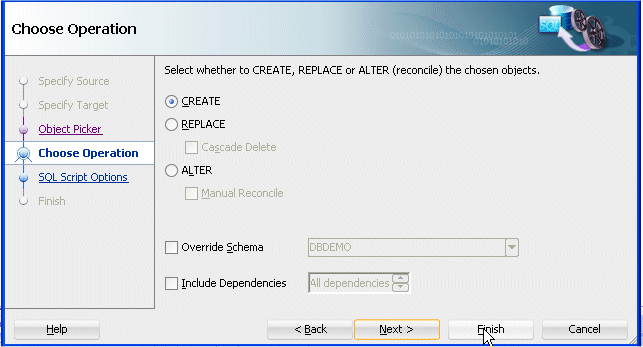
In Step 4 of the wizard you can select whether to CREATE, REPLACE or ALTER the chosen objects. In this example you are creating new objects so the default of CREATE can be accepted. Step 5 allows you to specify the name and directory of the SQL script to be generated and other options such as prefixing the object name with the schema name. Step 6 summarizes the options chosen in the wizard and lets you save this set of options for reuse. -
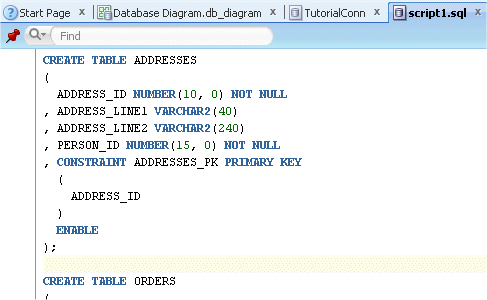
On step 4, confirm that CREATE is selected. Then click Finish to generate the DDL script.
-
The script1.sql file opens in the editor.
-
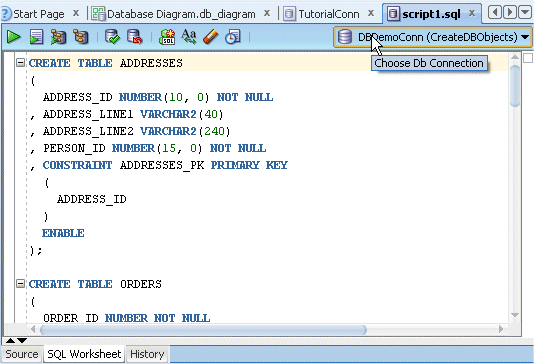
In the editor window, click the SQL Worksheet bottom tab.

-
In the SQL Worksheet, select the connection DBDEMOConn from the dropdown list on the right of the toolbar.
 You can use the SQL Worksheet to enter and execute SQL, PL/SQL and SQL*Plus statements.Read more...
You can specify any actions that can be processed by the database connection associated with the worksheet, such as creating a table, inserting data, creating and editing a trigger, selecting data from a table, and saving that data to a file.
Make sure that the database in which you are creating the objects supports all your offline database types. For instance if you are using an Oracle XE Database, note that it does not support table partitions. If you choose a database that does not support table partitions and you have been following along with this example, the range partitions for the ORDERS table should be deleted from the script as they cannot be added to an XE database.
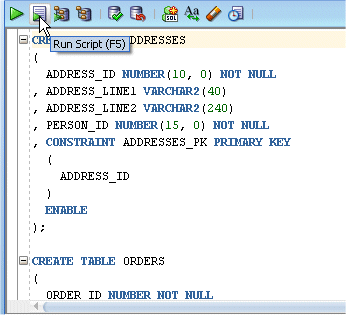
In the SQL Worksheet toolbar, Run Script executes all the statements in the Enter SQL Statement box. To run a specific statement, select the statement and click Execute Statement
  . Other toolbar icons allow for operations such as History that displays a dialog with information about SQL statements that you have executed, and Explain Plan that generates the execution plan for the statement.
-
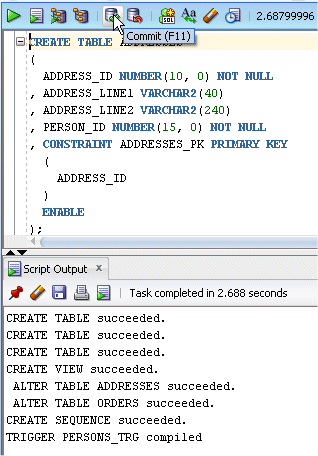
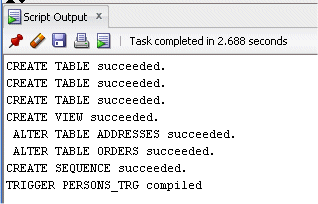
Click Run Script and review the output displayed.
-
In the SQL Worksheet toolbar, click Commit.
-
From the main menu, choose View | Database -->Database Navigator to open the Database Navigator. Click the Refresh button.
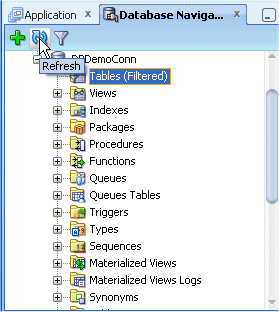
-
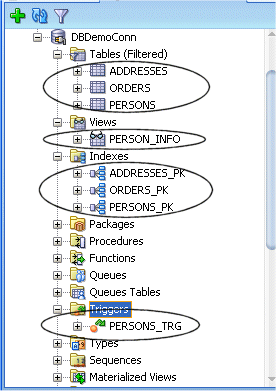
Fully expand the DBDEMO node and its subnodes to see the new database objects.
 When you run the SQL script, the output displays in the Script Output page of the SQL Worksheet:Read more...
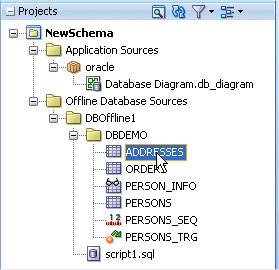
The Database Navigator lets you view and edit database objects directly in your database. Database connections that are owned by the IDE (available to all applications) are displayed under an IDE Connections node. If a connection is owned by an application, it is displayed under a node for the owning application, for example CreateDBObjects. The DBDEMO connection under CreateDBObjects contains the database objects you have just generated.
Read more...
To open the dialog, you will double-click the table in the Application Navigator. You will then use the Generate SQL from Database Objects wizard to generate a SQL script to update the live database definitions.
-
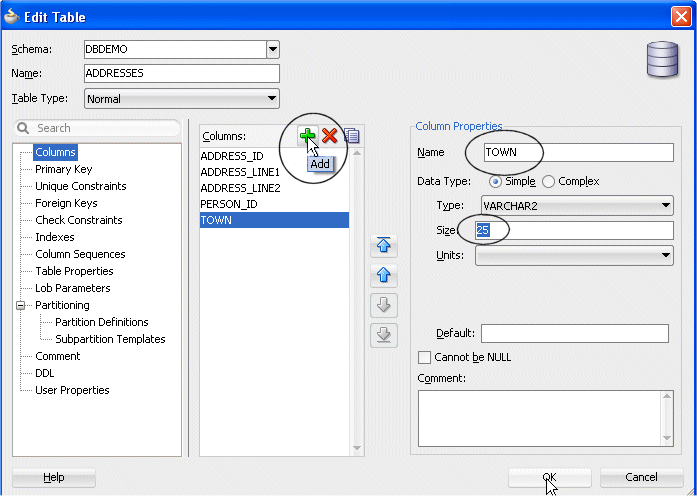
In the Application Navigator, under Offline Database Sources | DBOffline1 | DBDEMO , double-click the ADDRESSES node to open the Edit Table dialog.
-
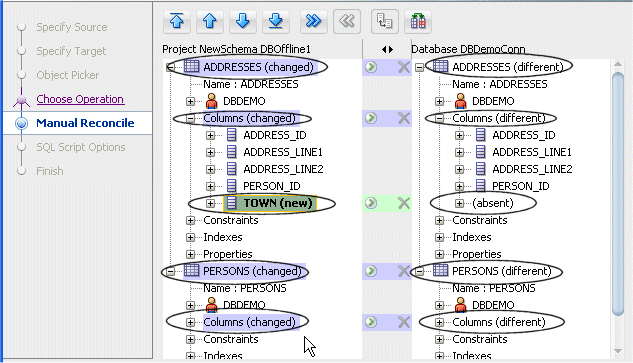
Click Add to add a new default column. Then change the name to TOWN and the size of type VARCHAR2 to 25. Then click OK.
-
In the Application Navigator, double-click the PERSONS node to open the Edit Table dialog.
-
In the Columns list, select GENDER and then select Cannot be NULL.
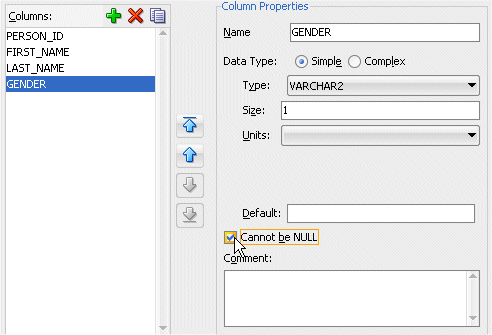
-
In the Comment box, enter a 3 way flag (M)ale (F)emale (D)eclined to answer.
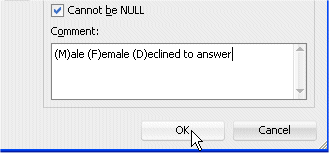
Click OK.
-
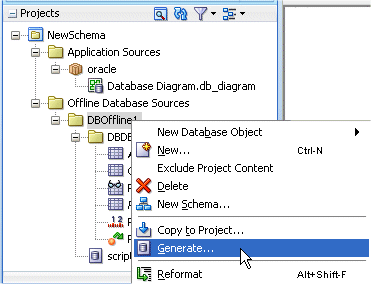
In the Application Navigator, under Offline Database Sources, right-click the DBOffline1 node, and choose Generate to launch the Generate SQL from Database Objects wizard.
-
On step 1, make sure Source from project is selected. Click Next .
-
On step 2, confirm that SQL Script is selected. Click Next .
-
On step 3, shuttle PERSONS and ADDRESSES from the Available list to the Selected list. Then click Next .
-
On step 4, select ALTER and Manual Reconcile. Confirm that DBDEMO is the selected connection. Then click Next .
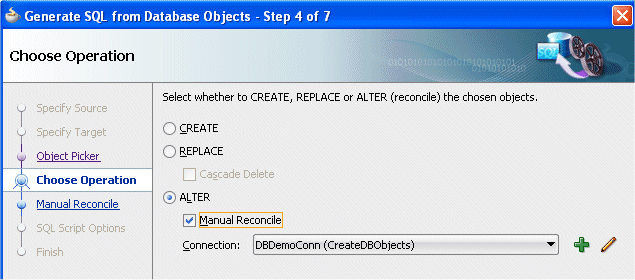 Using ALTER and Manual Reconcile allows you to review the differences between the offline object definition and the object definition in the database.Read more...
You are then able to specify which of the differences should be included in the generated DDL.
The left panel of the Manual Reconcile page shows the offline definition of the objects in your project. Objects that differ from the live database version of the same object are highlighted. You can select Only Show Differences to remove from view those items that have not changed.
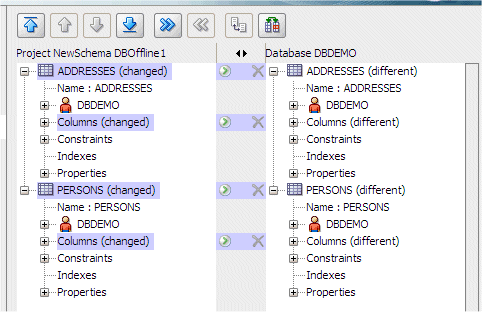
By shuttling differences to the right panel you are specifying that these changes should be included in the DDL to be generated. If there is any text that has been changed (such as the addition of the comment on the GENDER column in this example), highlighting the text node will enable the Compare Text button so that you can compare the full text. -
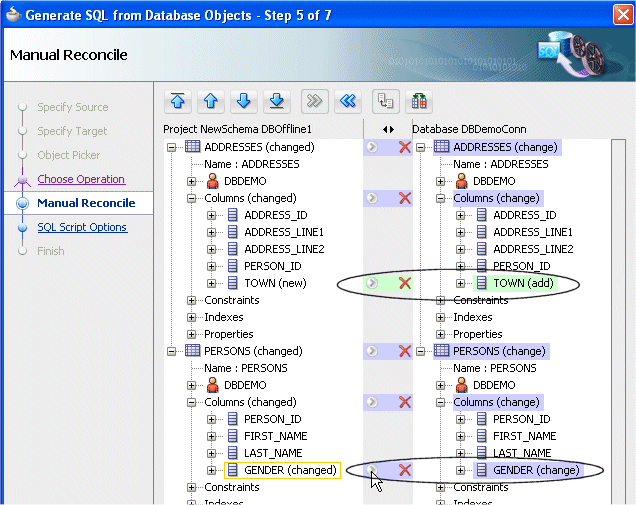
On step 5, expand the PERSONS and ADDRESSES nodes to review the differences, which are highlighted in the left panel.
-
Shuttle the differences to the online DBDEMO user on the right.
-
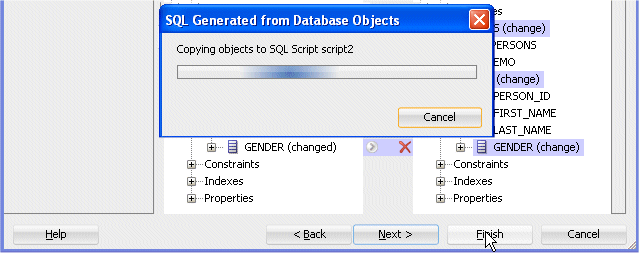
Click Finish to generate the DDL script.
-
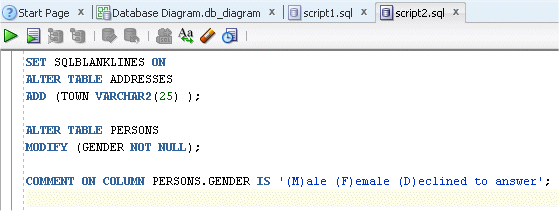
After completing the wizard, the new script script2.sql displays in the DBOffline1 node in the Application Navigator.
-
The file opens in the SQL Worksheet source editor.
-
Click Save All
to save your work..
In many application development projects, the starting point is an existing database. JDeveloper gives you the ability to reverse engineer any existing objects in the database into your application. From there you can edit, delete and create new offline definitions prior to generating new SQL scripts.
Read more...
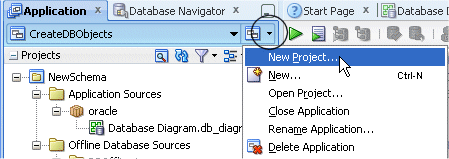
You will create a new project in your application for the reversed-engineered database objects.
To begin creating a new project, you will open the Create Generic Project dialog. To open the dialog, in the Application Navigator, open the Application Navigator dropdown menu and choose New Project.
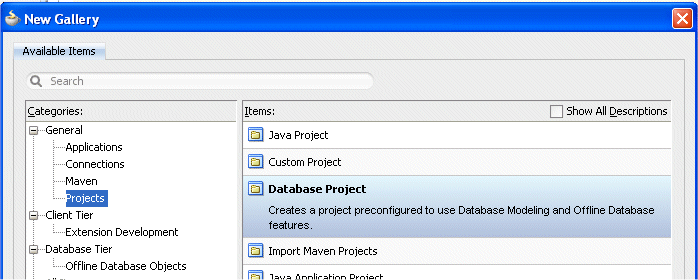
You will then reverse engineer database objects into the project using the Copy Database Objects to a Project wizard. To launch this wizard, choose File | New . In the New Gallery, expand Database Tier and select Offline Database Objects in the Categories tree. Then select Copy Database Objects to a Project in the Items list and click OK.
-
Click the Application Navigator dropdown menu and select New Project from context.
-
In the New Gallery, select General | Projects | Database Project.
-
Enter DBRevEng as the project name.
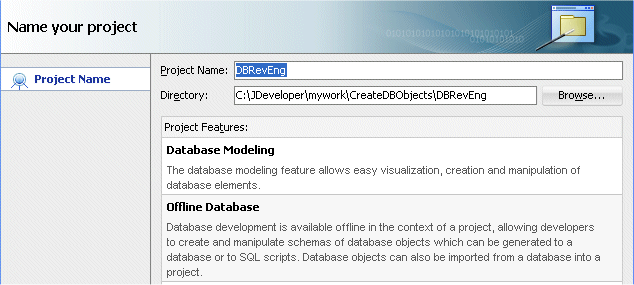
Click Finish .
-
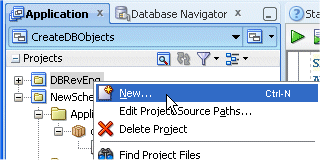
In the Application Navigator, right-click the DBRevEng project and select New from context.
-
In the New Gallery, select Database Tier | Offline Database Objects| Copy Database Objects to a Project.
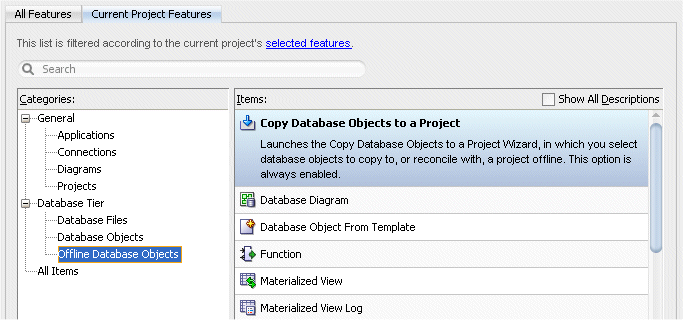
Click OK.
-
On step 1 of the Copy Database Objects to a Project dialog, confirm that the application connection you created earlier, DBDemoConn, is selected in the dropdown list.
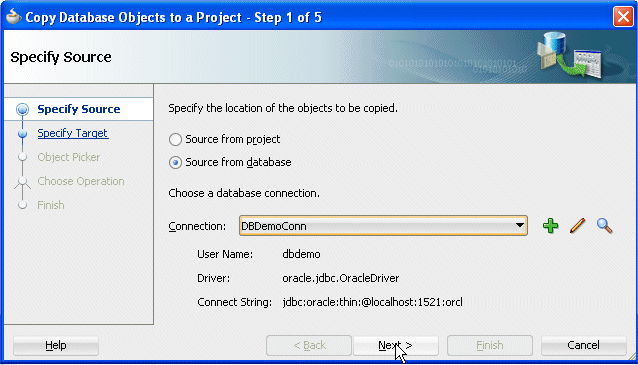
Click Next.
-
On step 2, click the New button to the right of the Offline Database field to create a new offline database.
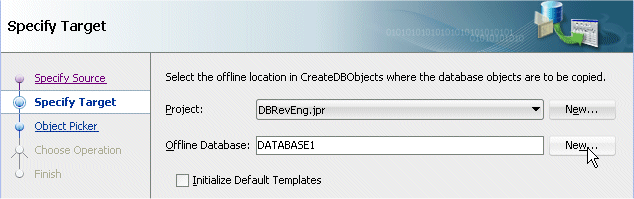
-
Enter DBDemoReverse as the name and DBDEMO as the default schema.
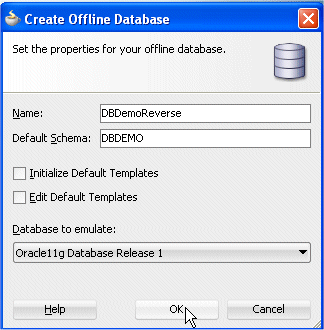
Click OK. Then click Next.
-
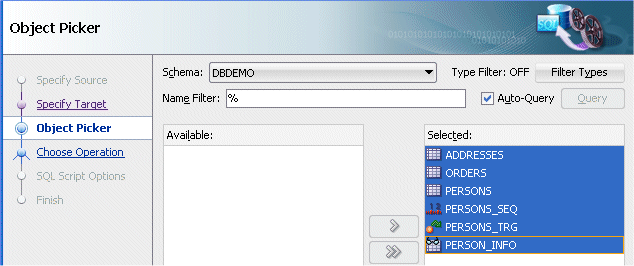
On step 3, click Query to display all available database objects. Then shuttle the database objects from the Available list to the Selected list.
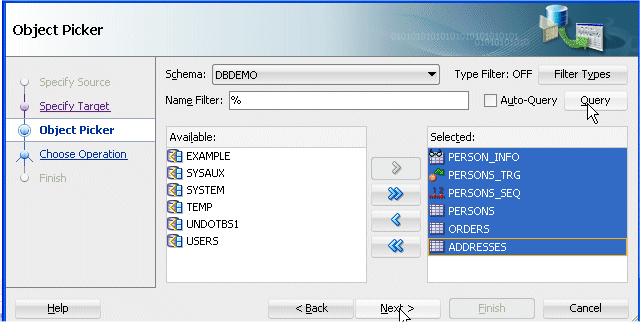
Click Next and then click Finish to generate the database objects.
-
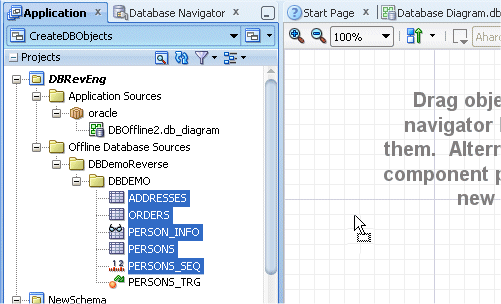
The generated objects are displayed in the Application Navigator.

You will create a new database diagram and add the generated objects to the new diagram.
-
In the Application Navigator, right-click the DBRevEng project and select New from context.
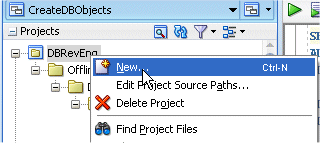
-
In the New Gallery, select Database Tier | Offline Database Objects | Database Diagram.
Click OK.
-
Enter DBOffline2 as the diagram name, and confirm that oracle is entered as the package name.
Click OK.
-
In the Application Navigator, select all the generated objects that have been reverse engineered into the project (except the trigger one that doesn't display on a database diagram) then drag and drop them onto the diagram.
-
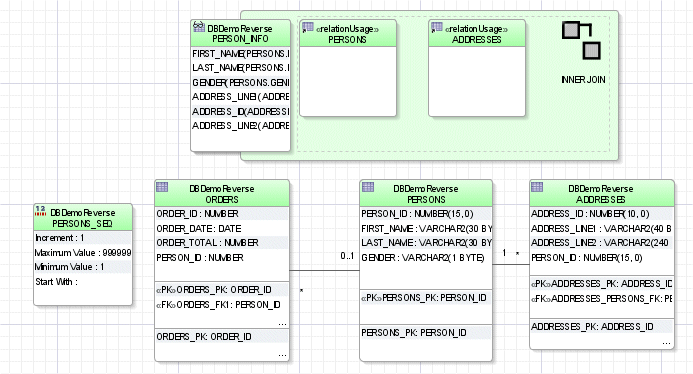
The new database diagram shows the reverse-engineered objects, which were generated into the project and then dragged onto the diagram.
 An alternative way to achieve the same end result.Read more...
First create a new diagram, expand the Application Resources panel in the Application Navigator and navigate to the live database objects, then select the required objects and drag them directly onto the diagram.
This generates the offline objects and adds them to the diagram in one movement. -
Click Save All
to save your work.
You've successfully performed this tutorial.
- Create a database diagram and add offline database tables
- Create offline database views
- Add a sequence to the diagram
- Create a table with partitions
- Create a database user and a database connection
- Generate a DDL script
- Reconcile the database
- Reverse-engineer database objects
- Using Logical Models in UML for Database Development
- "Getting Started with Working with Databases" in User's Guide for Oracle JDeveloper