| C H A P T E R 13 |
|
Testing the Solaris x86 Blade Memory (DIMMs) |
This chapter tells you how to run memory diagnostic tests on a B100x or B200x blade.
This chapter contains the following sections:
This chapter tells you how to run memory diagnostic tests on a blade. The utility for testing blade memory is provided on the Sun Fire B1600 Blade Platform Documentation, Drivers, and Installation CD and on the following website:
http://www.sun.com/servers/entry/b100x/
If the test suite finds memory errors, then swap out the defective DIMMs by following the instructions in the Sun Fire B1600 Blade System Chassis Administration Guide.
1. On a workstation connected to the network, either:
2. Use FTP to transfer the memdiag-02.tar to the /tftpboot directory on the system you are using as the DHCP server for your network.
3. Become root on the DHCP server, and extract the contents of the
memdiag-02.tar file.
To extract the contents of the memdiag-02.tar file, type:
4. Start the DHCP Manager GUI by typing:
where mydisplay is the name of the system (for example, a desktop workstation) that you are using to display the DHCP Manager's GUI (Graphical User Interface).
5. Use the DHCP Manager to prevent the blade (temporarily) from booting with the Solaris network install image:
a. In the DHCP manager main window click on the Macros tab and select the blade's configuration macro by selecting the entry that matches the blade's Client Id.
b. Select Properties from the Edit menu.
c. Make a note of the macro name (so that you can restore it when you have finished testing the memory DIMMs).
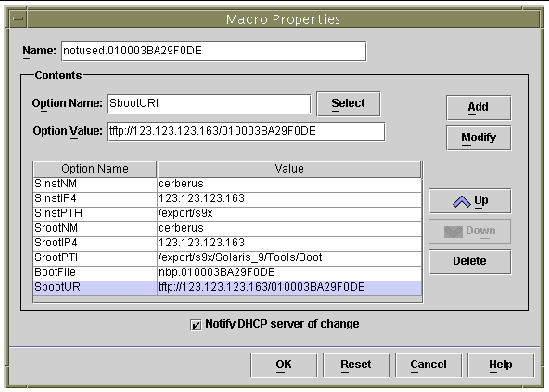
d. In the Macro Properties window, rename the macro by changing the contents of the name field (see FIGURE 13-1).
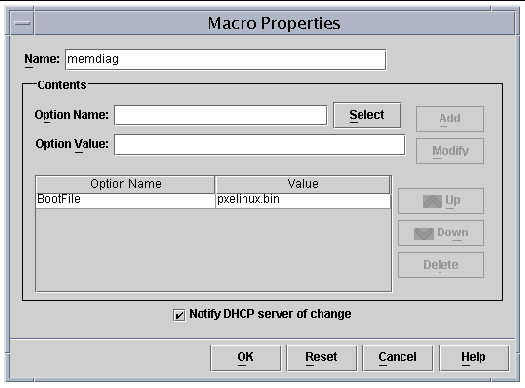
6. Create a new macro called memdiag containing an option called
BootFile that has the value pxelinux.bin (see FIGURE 13-2).
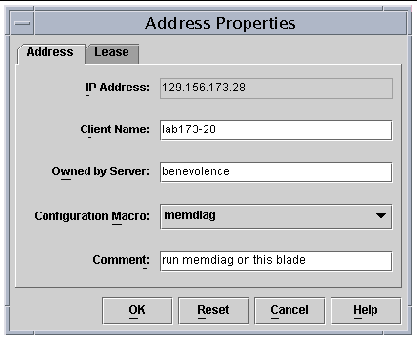
7. In the DHCP manager window, click the Addresses tab, and select the entry for the blade you want to test.
8. From the Configuration Macro drop-down menu, select the memdiag macro.
9. Log into the active System Controller by following the instructions in Chapter 2 of the Sun Fire B1600 Blade System Chassis Software Setup Guide, if you are logging into a brand new chassis in its factory default state.
Otherwise log in using the user name and password assigned to you by your system administrator.
10. Connect to the blade's console and shutdown the blades operating system.
where n is the slot number of the blade.
b. At the blade's operating system prompt, type:
11. Type the following command at the System Controller's sc> prompt to cause the blade to boot from the network:
where n is the number of the slot containing the blade you are testing.
12. To monitor the test output, access the console of the blade you are testing:
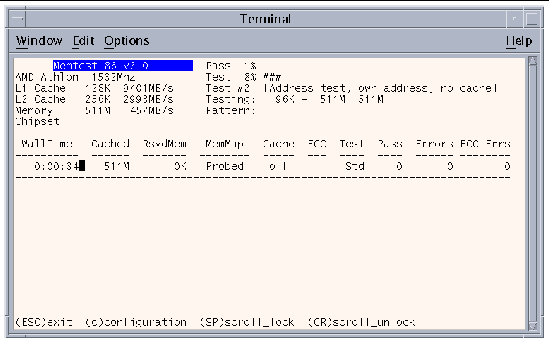
13. To interrupt the memory tests, press the [Escape] key or reset the blade.
14. When you have finished testing the memory, restore the blade's DHCP configuration by following the instructions in Section 13.4, Restoring the Blade's DHCP Configuration.
The time it takes to perform a memory test depends on the hardware characteristics of the blade; specifically, it is determined by the processor speed, memory size, memory controller, and memory speed.
The number of errors detected by the test suite is provided in the Errors column (see FIGURE 13-4). Each time the suite completes a test cycle it increments the Pass counter.
The memory tests will continue to run until you interrupt them by pressing the escape key or by resetting the blade.
Normally two complete test cycles will be enough to detect the problem with a faulty DIMM. However, you might want to perform the tests for a longer period, for example, overnight.
The memtest86 utility detects whether the memory on the blade is corrupted. The example in FIGURE 13-5 shows an error that has occurred at address 0x14100000 (321MB). The screen output in FIGURE 13-5 differs from the output in FIGURE 13-4, because in FIGURE 13-5 an error is reported. The following information is provided:
Tst: the number of the test that detected the error
Pass: the number of the test cycle during which the error was detected
Failing Address: the physical address at which the error occurred
Good: the expected content of the memory location being tested
Bad: the actual content of the tested memory location
Err-Bits: the bit position of the error within the double-word being tested
Count: the number of times this error has been detected during all passes of the test
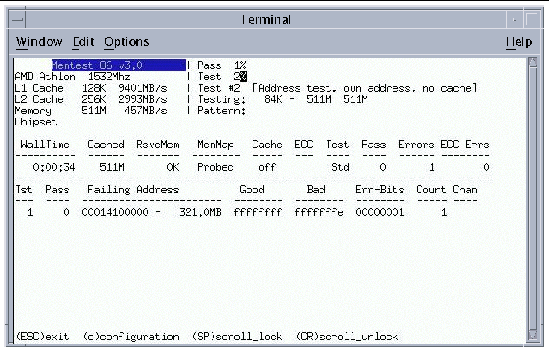
When you have noted the physical address at which an error occurred, you can derive the number of the DIMM that needs replacing.
On a B100x blade, the memory controller maps the lowest address range to the lowest numbered DIMM, the next address range to the next DIMM, and so on (see TABLE 13-2).
On a B200x blade the memory controller maps the lowest address range to the lowest numbered DIMM pair. On a B200x blade you can only isolate a memory error to a pair of DIMMs.
When you have finished running the memory test utility you can restore the blade's DHCP settings to enable it to boot once again using the Solaris x86 network install image. This is not necessary if the operating system is already installed on the blade's hard disk. However, if you want the blade to boot again from the network to re-install Solaris x86, do the following:
1. In the DHCP manger window click on the Macros tab and select the blade's configuration macro.
This is the macro that you renamed in Step 5 (see Section 13.1, Running the Memory Diagnostics Utility).
2. Select Properties from the Edit menu.
3. Restore the macro name to the blade's Client Id.
You noted the orginal macro name in Step 5 (see Section 13.1, Running the Memory Diagnostics Utility).
When you have restored the macro name, the blade is able to boot from the Solaris x86 network install image.
4. In the DHCP manager's main window, click the Addresses tab, and select the entry for the blade.
5. From the Configuration drop-down menu, select the Client Id for the blade.
The blade is now ready to be booted from the network.
This utility is a version of the memtest86 tool that has been configured by Sun for use on the B100x and B200x blades.
For full information about the range of tests you can perform and the different algorithms used by the memory diagnostic test suite, contact your Sun Solutions Center.
Copyright © 2004, Sun Microsystems, Inc. All rights reserved.