| Sun Intel Adaptec RAID User’s Guide |
| C H A P T E R 21 |
|
Creating a RAID Array |
This chapter describes how to use the ARCU to create a RAID array. You can also use the procedure in this chapter to create single-drive volumes. A volume, by definition, consists of a single drive.
|
Use the following procedure to create a RAID array.
2. During power up, type Ctrl-A to bring up the ARCU.
A message appears, then the ARCU opens. See FIGURE 21-1.
FIGURE 21-1 Adaptec RAID Controller Utility (ARCU) Initial View
 initial view.")
3. Select Array Configuration Utility.
The Array Configuration Utility appears.
FIGURE 21-2 Array Configuration Utility View
 initial view.")
FIGURE 21-3 shows an example of a system with multiple drives.
 initial view.")
5. Select drives to initialize.
| Note - You can select many drives, and initialize them all at once, even if they are going to be in different volumes or arrays. |
6. When you have selected all the drives to be initialized, press Enter.
A message warns you that initializing a drive erases array information from it.
The utility initializes the selected drives, and the main screen appears.
FIGURE 21-4 Array Configuration Utility View
 initial view.")
8. Select Create Array from the main menu.
A list of drives appears, as shown in FIGURE 21-5.
FIGURE 21-5 List of Drives to Include in Array
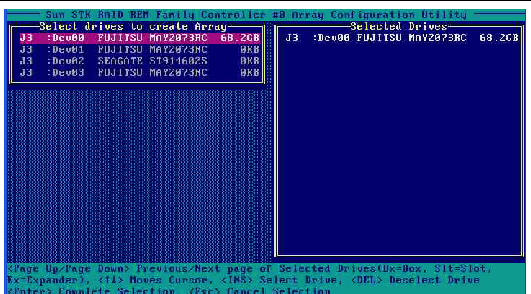
9. Select the drives to be included in the array or volume.
If you are going to create a volume, select the drive to be included in the volume. If you are going to create an array, select all the drives to be included in the array. Repeat Step 9 through Step 13 for each subsequent array or volume.
10. After you make your selections, press Enter.
The Array Properties view appears, as shown in FIGURE 21-6.
FIGURE 21-6 Array Properties View
 initial view.")
11. Make the following selections:
12. Press Enter or click Done to proceed.
Depending on the Write Caching selection, a number of warnings might appear:
FIGURE 21-7 Write Cache Warning
 initial view.")
The utility initializes the array.
| Sun Intel Adaptec RAID User’s Guide | 820-4708-13 |
Copyright © 2006, 2007 by LSI Logic Corporation. All rights reserved. © 2009 Sun Microsystems, Inc. All rights reserved.
 To Create a RAID Array