| C H A P T E R 2 |
|
Setting Up the Server Software |
This chapter describes how to configure and access the Sun Integrated Lights Out Manager software, and how to set up the platform operating system and driver software.
This chapter contains these topics:
The Integrated Lights Out Manager (ILOM) is a built-in system management software that enables you to monitor and manage the components installed in your chassis and server modules. In ILOM, you can configure network information, view and edit hardware configurations, monitor vital system information and manage user accounts.
You can access ILOM through several interfaces, such as web browsers, command-line interface (CLI), SNMP interface, as well as IPMI interface.
|
Note - This chapter describes how to access the ILOM through the command line interface and web browsers. For other methods, see the Integrated Lights Out Manager Administration Guide. |
A service processor is a board that operates independently of the other hardware in the system. It has its own IP address and MAC address and is capable of operating regardless of the state of the other system hardware. In a server module, the service processor can operate whether the server module is fully operational, powered down, or somewhere in between.
The chassis and every server module in the chassis has its own service processor.
Note the following terms used in this book:
Note that other server modules might have different service processors.
The server module is shipped with a preconfigured administrator account:
The preconfigured Administrator account, known as root, cannot be deleted or changed, other than changing its password. This account offers built-in administrative privileges (read and write access) to all service processor features and commands.
|
Note - The CMM ILOM is shipped with an identical preconfigured administrator account, with user name root and the default password set to changeme. |
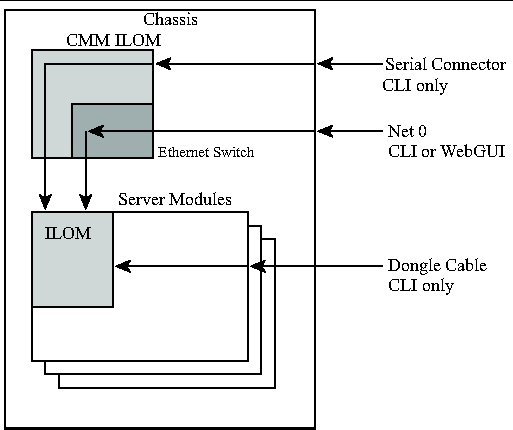
FIGURE 2-1 shows the connections to the server module ILOM.

Before you continue installing the server module, you must ensure that you can connect to the ILOM.
You can connect to the server module ILOM using one of several methods listed below and described in the corresponding sections.
|
Note - Option 1 and option 2 allow you to connect to the ILOM without knowing the ILOM's IP address. They provide access to the ILOM's Command Line Interface (CLI) only. Option 3 requires you to know the ILOM's IP address, but supports CLI and WebGUI access. Most users configure the ILOM' s IP address, then connect to it using Option 3.
|
The following sections describe each of these methods.
The chassis serial connector connects to the CMM ILOM, which provides a command to connect to the server module ILOM.
You can access the CMM ILOM at any time by connecting a terminal or a PC running terminal emulation software to the RJ-45 serial port on the chassis. The CMM ILOM's Command Line Interface (CLI) allows you to connect to the server module ILOM.
Before completing this connection, the server module must be installed in the chassis.
1. Verify that your terminal, laptop, or terminal server is operational.
2. Configure that terminal device or the terminal emulation software to use the following settings:
3. Connect a serial cable from the serial port on the chassis to a terminal device.
Refer to the chassis documentation for the location of the serial port.
|
Note - The serial port requires the following pin assignments. Note that these are the same as the serial cable connector for the Sun Advanced Lights Out Manager (ALOM) or Remote System Control (RSC). See TABLE 2-1. |
4. Press Enter on the terminal device.
This establishes the connection between the terminal device and the CMM ILOM.
|
Note - If you connect a terminal or emulator to the serial port before it has been powered up or during its power up sequence, you will see bootup messages. |
When the system has booted, the CMM ILOM displays its login prompt:
The first string in the prompt is the default host name. It consists of the prefix SUNCMM and the CMM ILOM's MAC address. The MAC address for each service processor is unique.
a. Type the default user name, root.
b. Type the default password, changeme.
Once you have successfully logged in, the CMM ILOM displays its default command prompt:
You are now connected to the CMM ILOM CLI.
6. Navigate to the server module ILOM by typing this command:
Where n is 0 through 9 for server modules 0 through 9 respectively.
8. Enter y to continue or n to cancel.
If you entered y, the server module ILOM prompts for its password.
|
Note - The CMM ILOM logs on to the server module ILOM using the username in the user target under /CH/BLn/SP/cli (where n is the server module number). |
9. Enter the password when prompted.
The server module ILOM prompt appears.
10. When you are done, type exit.
The server module ILOM exits and the CMM CLI prompt appears.
The following display shows an example of the login screen:
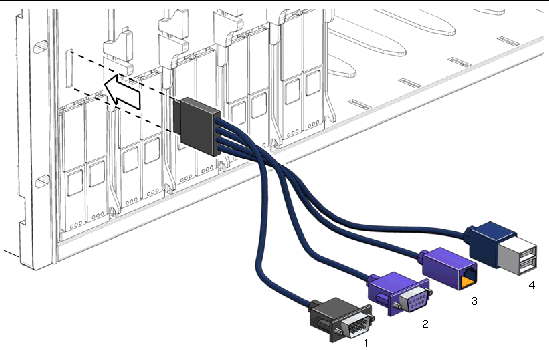
A dongle cable allows you to connect a terminal directly to the ILOM. FIGURE 2-2 shows a dongle cable connected to a server module. TABLE 2-2 shows the dongle cable pinouts.

The following table shows the DB9 dongle pinout.
1. Connect a dongle cable to the server module.
2. Connect a terminal or terminal emulator to the DB9 connector (labeled as 2 in the figure) on the dongle cable.
|
Tip - The chassis ships with both a dongle cable and a DB9 to RJ-45 serial adapter for your convenience. |
The ILOM login prompt appears.
3. Enter the user name and password when prompted.
The default user is root and the default password is changeme.
The server module ILOM prompt appears.
4. When you are done, exit the ILOM by typing:
The chassis ethernet ports provide the most robust method of connecting to the ILOM. This connection supports both the CLI and the WebGUI.
You can connect to the ILOM through either the RJ-45 NET MGT 0 Ethernet port or the corresponding Network Express Module (NEM) port.
Before you can use the Ethernet connection, you must know the ILOM's IP address.
|
Note - To configure the ILOM IP address, see Configuring the ILOM IP Address. |
The ILOM supports SSH access to the CLI over the Ethernet.
2. To log in to the ILOM, type:
3. Type your password when prompted.
|
Note - The default user name is root, and the default password is changeme. |
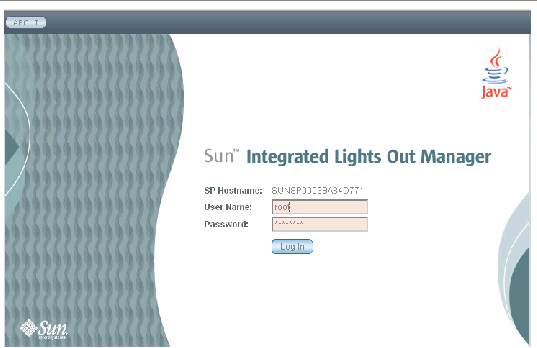
1. To log in to the WebGUI, type the IP address of the ILOM into your web browser.

2. Type your user name and password.
When you first try to access the WebGUI, it prompts you to type the default user name and password. The default user name and password are:
The default user name and password are in lowercase characters.
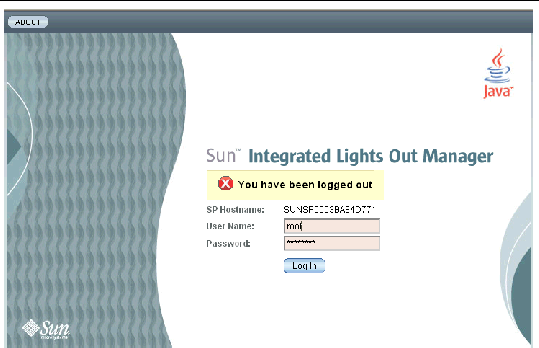
4. To log out of the WebGUI, click the Log Out button at the top right of the WebGUI.

|
Caution - Do not use the Log Out button in your web browser to log out from the WebGUI. |

This section describes how to view and set the ILOM IP Address. It includes the following sections:
1. Log on to the ILOM CLI using any of the methods described in Connecting to the Server Module ILOM.
To use the Ethernet SSH connection, you must already know the IP address.
2. Type these commands from the root directory.
a. To see all the IP address-related information, type:
-> show /SP/network
b. To see only the IP address, type:
-> show /SP/network/ipaddress
The BIOS Setup Utility allows you to set the ILOM IP address. It allows you to configure it manually or use DHCP to configure it.
2. Start the BIOS Setup Utility.
b. Watch the boot messages. You will see a line that says you can press F2 to enter BIOS setup.
c. After you see the message, press F2.
After some messages and screen changes, the BIOS Setup Utility appears.
4. Highlight IPMI 2.0 Configuration in the list, then select Enter.
The IPMI 2.0 Configuration page appears.
5. Highlight LAN Configuration then select Enter.
The LAN Configuration page appears.
6. On the LAN Configuration page, under IP Assignment, select DHCP or Static.
If you selected Static, fill in the IP address, subnet mask and default gateway at the bottom of the page.
7. Select Commit to save your changes.
The BIOS utility automatically updates the address fields.
|
Caution - You must select Commit to save the changes on this page. Using F10 will not save your changes. |
8. To find the IP address that DHCP assigned to the server module ILOM, either:
Typically, DHCP log file entries are individual lines with the following comma-separated fields:
ID, Date, Time, Description, IP Address, Host Name, MAC Address
Locate the MAC address of your ILOM in the MAC Address (seventh) field of the correct DHCP file entry, and record the corresponding value of the IP Address (fifth) field. This is the IP address that you must use to access the WebGUI and the remote console.
This procedure uses DHCP to assign the ILOM an IP address.
1. Verify that your DHCP server is configured to accept new media access control (MAC) addresses.
2. Obtain the server module ILOM MAC address from one of the following locations:
MAC addresses are 12-digit hexadecimal strings in the format xx:xx:xx:xx:xx:xx where x represents a single hexadecimal letter (0-9, A-F, a-f). Write down the address for future reference.
3. Connect an Ethernet cable to the NEM port corresponding to the server module.
Refer to your chassis documentation for the location of the NEM port.
4. Reset the server module ILOM.
a. Log into the server module ILOM as described in Option 1: Connecting to ILOM Through the Chassis Serial Connector or Option 3: Connecting to ILOM Through the Ethernet Port.
DHCP automatically assigns the ILOM an IP address when it restarts.
5. Find the IP address that DHCP assigned to the server module ILOM.
See Step 8 in Configuring the ILOM IP Address Using BIOS Setup Utility.
This procedure allows you to manually configure the ILOM IP address using the CLI.
1. Connect to the server module ILOM using one of the following methods:
2. To see the IP address, type show /SP/network/ipaddress (optional).
-> show /SP/network/ipaddress /SP/network Targets: Properties: ipaddress = 10.6.153.148 Commands: show -> |
3. Navigate to /SP/network by typing the following command:
4. Type the following commands:
set pendingipaddress=xxx.xxx.xx.xx
set pendingipnetmask=yyy.yyy.yyy.y
set pendingipgateway=zzz.zzz.zz.zzz
where xxx.xxx.xx.xx, yyy.yyy.yyy.y and zzz.zzz.zz.zzz are the IP address, netmask, and gateway for your ILOM and network configuration. To determine these addresses, see your system administrator.
5. When you are done, exit the ILOM by typing exit.
If you connected to the server module ILOM through the CMM ILOM, you will be returned to the CMM ILOM.
If you connected to the ILOM using SSH, you will be disconnected automatically, because you logged in under a different IP address.
The following display shows a typical session where the user looks at static settings, configures them to be dynamic, then looks at the new settings.
After configuring the server module ILOM network settings, you can configure the preinstalled Solaris 10 operating system or install a supported Linux or Windows platform operating system and drivers.
Copyright © 2007, Sun Microsystems, Inc. All Rights Reserved.