Configure the JavaRConsole System
|
This chapter describes how to set up the JavaRConsole system to deliver the mass storage drivers and Windows Server 2003 or Windows Server 2008 media for operating system installation.
| Note - If you have chosen both the Floppy Disk Local (only required for Windows Server 2003 installations) and Windows Local delivery methods in Chapter 3, proceed to Chapter 6.
|
- You will need to set up a JavaRConsole system if you have chosen any one of the following mass storage driver or Windows Server 2003 or Windows Server 2008 media delivery methods described in Chapter 3:
- Floppy Disk Remote
- Floppy Image (Only available for server modules supporting ILOM. This method can not be used for server modules using ELOM.)
- Windows Remote
- Windows Image
| Note - This procedure does not provide detailed instructions for setting up the JavaRConsole hardware. For Sun Blade server modules with ILOM, see the Integrated Lights Out Manager (ILOM) Administration Guide for further information. For Sun Blade server modules with ELOM, see the Embedded Lights Out Manager Administration Guide for further information. Note that there are multiple versions of LOM, be sure to refer to the guide that matches your server’s installed version.
|
JavaRConsole System Requirements
The requirements for the JavaRConsole system are:
- Solaris, Linux, or Windows operating system is installed.
- The system must be connected to a network that has access to the Sun Blade server module Ethernet management port.
- Java Runtime Environment (JRE) 6.0 or later is installed.
- If the JavaRConsole system is running on Solaris, volume management must be disabled for JavaRConsole to access the physical floppy and/or CD/DVD-ROM drives.
- If the JavaRConsole system is running on Windows Server 2003 or Windows Server 2008, Internet Explorer Enhanced Security must be disabled.
- The JavaRConsole system and ILOM or ELOM service processor has been set up.
Setting Up the JavaRConsole System
This section describes how to setup the JavaRConsole system to deliver the mass storage drivers and operating system distribution media during a remote Windows installation. Follow the instructions that match your server’s configuration:
 To Set Up the JavaRConsole System for Servers With ILOM To Set Up the JavaRConsole System for Servers With ILOM
|
This section describes how to setup the JavaRConsole system using ILOM to deliver the mass storage drivers and Windows operating system distribution media during a remote Windows installation.
| Note - This procedure assumes that the JavaRConsole system and ILOM service processor have been set up according to the instructions in the Integrated Lights Out Manager (ILOM) Administration Guide for your Sun Blade server module.
|
1. Start the remote console application by typing the IP address of the Integrated Lights Out Manager (ILOM) service processor into a browser on the JavaRConsole system.
FIGURE 5-1 URL Sample

The Security Alert dialog box displays.
FIGURE 5-2 Security Alert Dialog Box
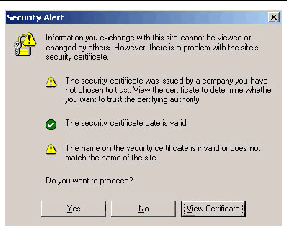
2. Click Yes.
The ILOM login screen appears.
FIGURE 5-3 Login Screen
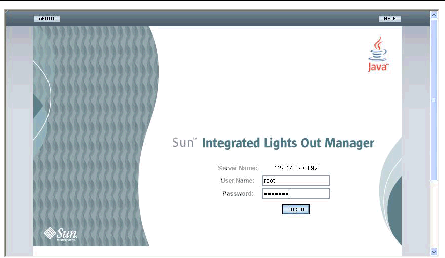
3. Enter the user name and password and click Log In.
The default user name is root and default password is changeme.
The ILOM Version Information screen appears.
FIGURE 5-4 ILOM WebGUI Interface Version Information Screen
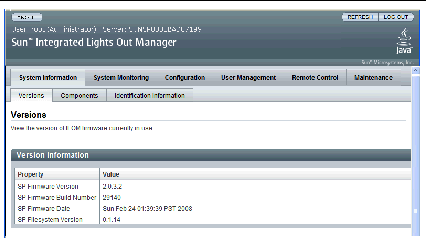
4. Click the Remote Control tab in the ILOM WebGUI.
The Launch Redirection screen appears.
| Note - Make sure that the mouse mode is set to Absolute mode in the Mouse Mode Settings tab.
|
FIGURE 5-5 ILOM WebGUI Launch Redirection Screen
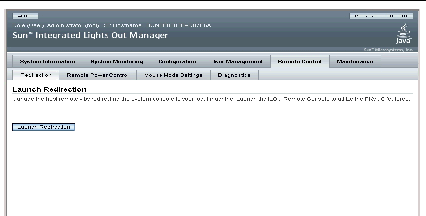
5. Click Launch Redirection.
| Note - When using Windows for JavaRConsole system redirection, an additional warning appears after clicking Launch Redirection. If the Hostname Mismatch dialog box is displayed, click the Yes button.
|
FIGURE 5-6 Hostname Mismatch Dialog Box
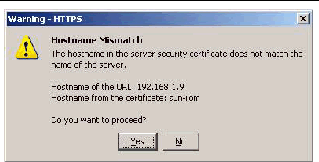
The Remote Control dialog box appears.
FIGURE 5-7 Remote Control Login Dialog Box
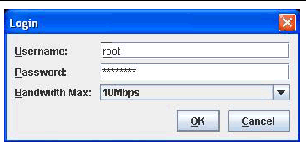
6. In the Remote Control Login dialog box, enter your user name and password and click OK.
The default user name is root and password is changeme.
After the login is successful, the JavaRConsole screen appears.
FIGURE 5-8 JavaRConsole Devices Menu
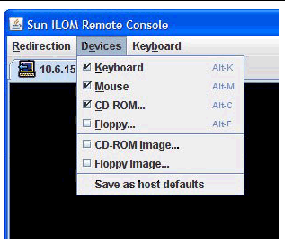
7. From the Devices menu, select Floppy and/or CD-ROM according to the delivery method you have chosen.
- Floppy Disk Remote: Select Floppy to redirect the server to the contents of the physical floppy drive attached to the JavaRConsole system.
- Floppy Image: Select Floppy Image to redirect the server to the mass storage drivers floppy image file located on the JavaRConsole system.
- CD-ROM Remote: Select CD-ROM to redirect the server to the operating system software CD/DVD contents from the CD/DVD-ROM drive attached to the JavaRConsole system.
- CD-ROM Image: Select CD-ROM Image to redirect the server to the operating system software .iso image file located on the JavaRConsole system.

|
Caution - Using the CD-ROM Remote or CD-ROM Image options to install the Windows Server 2003 or Windows Server 2008 will significantly increase the time necessary to perform the installation as the content of the CD-ROM is accessed over the network. The installation duration will depend on the network connectivity and traffic.
|
When done, proceed to the appropriate chapter for additional operating system installation instructions.
- To install Windows Server 2003, proceed to Chapter 6.
- To install Windows Server 2008, proceed to Chapter 7.
 To Set Up the JavaRConsole System for Servers With ELOM To Set Up the JavaRConsole System for Servers With ELOM
|
Use this procedure to start the remote console application from a browser by accessing the ELOM’s web GUI. You might be presented with a series of questions. In each case, select Run.
| Note - Each new ELOM system is delivered with DHCP set as the default. If an IP address is not found within 5 seconds, the system defaults to the IP address 192.168.1.2 to allow instant web access.
|
1. Open your web browser.
2. In the address bar, type the IP address of the Sun Blade X6250 server module’s ELOM.
The login screen appears.
3. Type the default user name and password.
Username: root
Password: changeme
4. Click Login.
The ELOM displays the System Information screen.
The following tabs are displayed: System Information, System Monitoring, Configuration, User Management, Remote Control, and Maintenance.
5. Click the Remote Control tab.
6. Select Redirection.
The screen displays a Launch Redirection button.
7. Click Launch Redirection.
A hostname mismatch message appears.
8. Click Run.
Other security messages might appear.
9. Click Run, OK, or Yes, as appropriate.
| Note - For systems using Firefox and Mozilla web browsers, the Java RTE must be version 1.6 or later.
|
The web browser downloads the embedded remote control application automatically, and the Remote Console screen appears. If the remote console does not appear, it might be blocked by web browser security controls. Reduce security configuration to allow the remote console to display.
The remote console application supports the redirection of the following types of devices:
- Video display - the server’s video output is automatically displayed on the local console screen.
- Keyboard and mouse devices - Standard keyboards, mouse, and other pointing devices. Keyboard and mouse redirection is enabled by default.
- Storage devices - CD/DVD drives, Flash, DVD-ROM or floppy drives, hard drives, NFS. or ISO files.
10. Select Storage from the menu bar and click Mount Device.
The Device Configuration Window displays. This enables the corresponding local storage device to connect to the remote server as though it were a storage device attached directly to that remote server.
FIGURE 5-9 Device Configuration Window
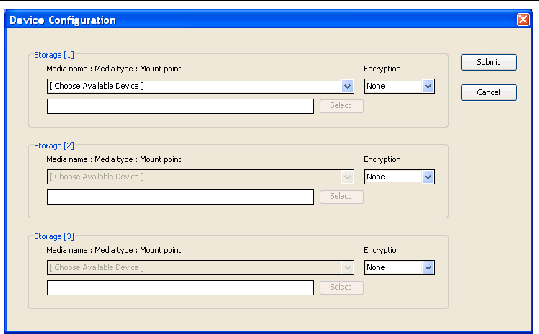
11. From the Device Configuration window, select Floppy and/or CD-ROM according to the delivery method you have chosen.
- Floppy Disk Remote: Select Floppy to redirect the server to the contents of the physical floppy drive attached to the JavaRConsole system. This method may be used if you are installing the Windows Server 2003 on a Sun Blade X6250 server module equipped with a REM.
- CD-ROM Remote: Select CD-ROM to redirect the server to the operating system software CD/DVD contents from the CD/DVD-ROM drive attached to the JavaRConsole system.
- CD-ROM Image: Select CD-ROM Image to redirect the server to the operating system software .iso image file located on the JavaRConsole system.

|
Caution - Using the CD-ROM Remote or CD-ROM Image options to install the Windows Server 2003 or Windows Server 2008 will significantly increase the time necessary to perform the installation as the content of the CD-ROM is accessed over the network. The installation duration will depend on the network connectivity and traffic.
|
12. When you have made your selections, click Submit.
The devices are mounted and ready for the Windows install.
Proceed to the appropriate chapter for additional operating system installation instructions.
- To install Windows Server 2003, proceed to Chapter 6.
- To install Windows Server 2008, proceed to Chapter 7.
| Sun Blade X6250 Server Module Windows Operating System Installation Guide
|
820-1184-14
|
   
|
Copyright © 2008 Sun Microsystems, Inc. All Rights Reserved.


