| C H A P T E R 2 |
|
Firmware Update Procedures |
This chapter provides procedures for updating (flashing) the firmware that resides on:
It also provides procedures for recovering the BIOS or ILOM images.
TABLE 2-1 shows the tasks, the methods used, and the sections that describe them.
| Note - The ILOM is also known as the service processor (SP), and it is sometimes referred to in the user interface as the BMC. |
To ensure proper operation, it is recommended that you synchronize your firmware updates, so that if you update one, you should update the others as well.
This section describes how to use the service processor to update the ILOM and BIOS.
| Note - The procedures in this section also update the CPLD. |
Use the procedures in this section to update the BIOS and the SP firmware. This section can be used when you need to:
Use the following sections, in order:
1. Obtain the IP address of the Service Processor. See Getting the Service Processor’s IP Address.
2. Log on to the Service Processor ILOM to check the versions of firmware you have. See Determining Your Current Firmware Versions.
3. Use the ILOM to download the new versions of firmware. See Downloading Firmware File.
4. Use the ILOM to install the new firmware. See Updating the ILOM/BIOS Firmware.
| Note - Alternately, you can use the Sun xVM Ops Center. |
5. Reset the Service Processor. See Resetting the Service Processor.
You use the Service Processor (SP) on your server for various firmware update tasks and you must use its IP address to access it. If you do not already know the Service Processor’s IP address, you must determine it.
There are several different methods you can use to locate ILOM SPs and their IP addresses.
1. DHCP server. Refer to the ILOM documentation for your ILOM version for instructions on how to determine the IP address of an SP.
2. Linux and Solaris open-source nmap command. The open-source nmap command provides a -p port option to scan for port 623, which can be used to quickly detect IPMI-enabled devices (such as your server’s SP) on a network. For example:
nmap -p 623 10.6.154.1/24 Interesting ports on net.address (623 10.6.154.1/24): PORT STATE SERVICE 623/tcp closed unknown |
3. Chassis Monitoring Module (CMM). See To Display the Service Processor’s IP Address Using the CMM.
| Note - This procedure can be used for ELOM as well as ILOM 2.0 and ILOM 3.0. |
1. Log in to the CMM ILOM CLI.
where n is the server module number or chassis slot ID.
The CMM ILOM displays information about the server module, including its IP address and MAC address. For example:
There are three alternate procedures in this section that you can use:
See the Sun Blade X6250 Embedded Lights Out Manager Administration Guide for more detailed information on this procedure.
1. Connect an RJ-45 Ethernet cable to the NET MGT Ethernet port on the chassis CMM.
Establish an SSH connection using the following command:
where sp_ip is the IP address of the server’s Service Processor.
Enter the default password when you are prompted:
2. After you have successfully logged in, the SP displays its default command prompt:
3. Type the version command, which returns output similar to the following:
-> version SP firmware version: 2.0.2.6 SP firmware build number: 36279 SP firmware date: Tue Aug 26 14:02:37 PDT 2008 SP filesystem version: 0.1.17 |
The ILOM (SP) firmware version and build number are listed above.
1. Configure your terminal device or the terminal emulation software running on a laptop or PC to the following settings:
8N1: eight data bits, no parity, one stop bit 9600 baud Disable hardware flow control (CTS/RTS) Disable software flow control (XON/XOFF) |
2. Connect a dongle cable to the server module.
3. Connect a serial cable from the RJ-45 SER MGT port on the server module dongle to your terminal device or PC.
4. Press Enter on the terminal device to establish a connection between that terminal device and the server’s SP.
The SP displays a login prompt.
Here, 0003BA84D777 is the Ethernet MAC address of the SP. This will be different for each server.
5. Log in to the ILOM SP and type the default user name (root) with the default password (changeme).
After you have successfully logged in, the SP displays its default command prompt:
6. Type the version command, which returns output similar to the following:
-> version SP firmware version: 2.0.2.6 SP firmware build number: 36279 SP firmware date: Tue Aug 26 14:02:37 PDT 2008 SP filesystem version: 0.1.17 |
The ILOM firmware version and build number are listed above.
1. Connect to the ILOM Web interface by entering the IP address of the server’s SP in your browser’s address field. Use https://. For example:
2. Log in to the ILOM SP and type the default user name (root) with the default password (changeme).
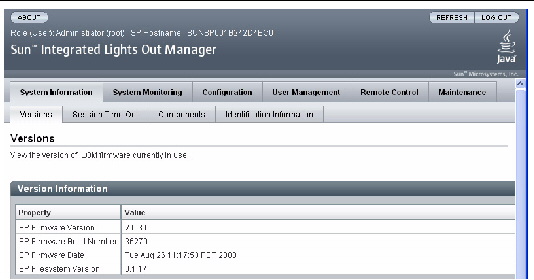
The first Web page presented is the System Information -> Versions page, which includes the firmware version and build number.
FIGURE 2-1 ILOM Versions Window

Download the firmware image .pkg file using these steps:
1. Browse to http://www.sun.com/download/
3. Click X64 Servers and Workstations in the Hardware Drivers area.
4. Click the link for the desired server module and software release.
6. Enter your Username and Password.
If you do not have a Username and Password, you can register free of charge by clicking Register Now.
7. Click Accept License Agreement.
8. Click the appropriate firmware image file name:
This is the procedure that actually updates the firmware, replacing the existing images with the new images from the .pkg file you downloaded previously.
During the firmware loading process, the OK to Remove LED remains OFF.
This section describes two methods of updating the ILOM/BIOS firmware:
| Note - You can also use the Sun xVM Ops Center if it is available. Online documentation for Sun xVM Ops Center can be found at:
http://wikis.sun.com/display/xvmOC1dot1/Home |
1. Log into the ILOM interface by pointing your browser at the IP address of the Service Processor. Use https://. For example:
2. Select the Maintenance tab.
3. Select the Firmware Upgrade tab.
4. Click the Enter Upgrade Mode button.
5. Browse for the firmware image file.

|
Caution - Power off the host before proceeding. If the host is powered on when you click the Upload button, the ILOM will shut down the host, and any open files might be corrupted. |
FIGURE 2-2 Firmware Upgrade Screen

1. Log onto the ILOM CLI through the Management Ethernet Port (see Using the CLI Through the Management Ethernet Port) or the serial port (see Using the CLI Through the Serial Port).
2. From the ILOM CLI, use the following command:
load -source tftp://tftpserver/ilom.firmware.pkg
where tftpserver is the trivial file-transfer protocol (TFTP) server that contains the update and ilom.firmware.pkg is the firmware image file, for example:
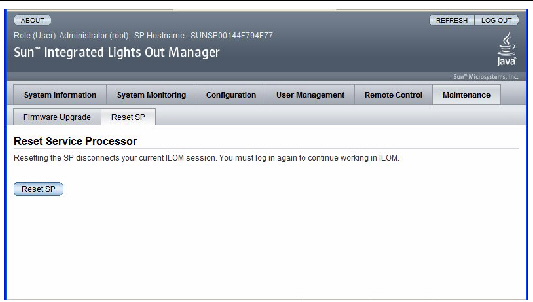
After updating the ILOM/BIOS firmware, you must reset the ILOM SP.
To reset the ILOM SP, you can do any of the following:
FIGURE 2-3 ILOM Reset Service Processor Window

ipmitool -U root -P password -H SP-IP bmc reset cold
where SP-IP is the IP address of the service processor.
For complete details, see the ILOM documentation for your server.
If you cannot get output to your serial console after the firmware update, you might have to clear CMOS settings. This is because your default CMOS settings might have been changed by the new BIOS upgrade.
To clear CMOS settings, use the following commands (in this example, the default username, root, and the default password, changeme, are used):
ipmitool -U root -P changeme -H SP-IP chassis power off ipmitool -U root -P changeme -H SP-IP chassis bootdev disk clear-cmos=yes |
where SP-IP is the IP address of the service processor.
| Note - The -P option might not be available on the Windows and Solaris versions of IPMItool. Instead, IPMItool prompts for a password. |
Use the following procedure to recover the BIOS firmware, for example if the BIOS image becomes corrupt, or if the update process fails..
1. Copy the following files to a bootable USB flash device.
| Note - S90-3B11.ROM is an example. If you have a later file, use it. |
2. Connect the USB flash device to the USB connector on the dongle.
4. Press F8 to enter display a list of bootable devices.
5. Select the USB flash device from the list.
6. Fun the following command from the DOS prompt.
Afudos S90-3B11.ROM /P /B /K /C /X
The BIOS is updated and the server module restarts.
Use the following procedure to recover the ILOM firmware, for example, if the upgrade fails, or if the firmware image becomes corrupt.
1. Copy all the files from the Sun Download area, or Tools and Drivers CD, to a bootable USB flash device.
The files are located in the BMCrecovery directory, on the Tools and Drivers CD. They consist of:
Where number is a build number, for example 2.0.3.6-r36158.
| Note - Use the binary (.bin) file, not a .pkg file. |
2. Set up your server module to respond to POST messages and boot prompts.
3. Remove AC power from the system to be updated.
4. Insert the bootable flash drive into the USB port.
5. Connect AC power, and power on the system.
a. A message appears stating that the BMC was not found.
The system takes up to five minutes to boot.
b. Press F8 to get a list of boot devices.
c. Choose the flash device to boot from.
6. Once the flash device is booted, run the following commands:
socflash -p 1 -f sp-binary-file
7. After a successful firmware update, use the -r option to reset the SP:
8. Access the BIOS Setup Utility to confirm that the BIOS does not report that the BMC was not found.
Copyright © 2009 Sun Microsystems, Inc. All rights reserved.