| Sun StorageTek RAID Manager Software User’s Guide |
| C H A P T E R 6 |
|
Managing Logical Drives and Hot-Spares |
This chapter explains how to manage logical drives and hot-spares associated with RAID host bus adapters (HBAs). For detailed information about creating a logical drive, see Building a Storage Space.
The chapter contains the following sections:
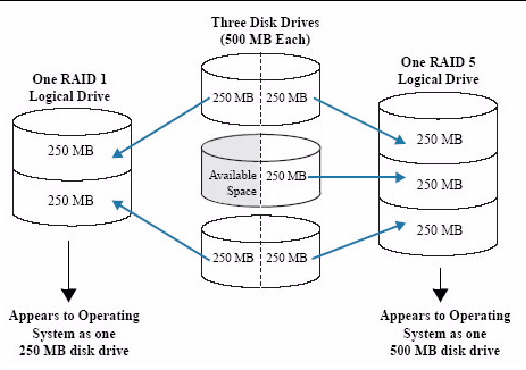
A logical drive is a group of physical disk drives that appears to your operating system as a single drive that can be used for storing data.
A logical drive can comprise one or more disk drives and can use part or all of each disk drive’s capacity.
It is possible to include the same disk drive in two different logical drives by using just a portion of the space on the disk drive in each, as shown in the following figure.
FIGURE 6-1 How Physical Drives Are Used for Logical Drives
Disk drive space that has been assigned to a logical drive is called a segment. A segment can include all or just a portion of a disk drive’s space. A disk drive with one segment is part of one logical drive, a disk drive with two segments is part of two logical drives, and so on. A segment can be part of only one logical drive. When a logical drive is deleted, the segments that comprised it revert to available space (or free segments).
A logical drive can include redundancy, depending on the RAID level assigned to it. (See Selecting the Best RAID Level for more information.)
Once a logical drive has been created, you can change its RAID level or increase its capacity to meet changing requirements. You can also protect your logical drives by assigning one or more hot-spares to them. (See Working With Hot-Spares for more information.)
For basic instructions for creating logical drives, see Building a Storage Space.
This section describes three additional scenarios for creating logical drives:
|
The Sun StorageTek RAID Manager software automatically sets the size of a new logical drive to maximize the capacity of the disk drives that it comprises. However, you can choose to set the size for a new logical drive. You may want to do this to maximize the available disk drive space, or allocate available space to more than one logical drive.
1. Complete Step 1 through Step 6 in Custom Configuration (Advanced).
The maximum size of the logical drive appears in the Size (GB) box.
3. Enter the new size for the logical drive.
The size you enter must be less than or equal to the maximum size.
5. Review the logical drive settings, click Apply, then click Yes.
The Sun StorageTek RAID Manager software builds the logical drive. The configuration is saved in the Sun HBA and in the physical drives.
If the disk drives you used to create this logical drive have available space left over, you can use them to create a new logical drive (see To Create a Logical Drive Using Free Segments on Disk Drives), or to expand an existing logical drive (see Increasing the Capacity of a Logical Drive).
You can combine disk drives of different sizes in the same logical drive. If the logical drive includes redundancy, however, the size of each segment can be no larger than the size of the smallest disk drive. (See Selecting the Best RAID Level for more information about redundancy.)
To create a logical drive with disk drives of different sizes, follow the instructions in Building a Storage Space. When the logical drive is created, it is displayed in a similar fashion to the following example. In this example, a RAID 5 logical drive includes two 16.95 GB disk drives and two 9.77 GB disk drives.
FIGURE 6-2 RAID 5 Logical Drive

The Full Size Capacity View of the same RAID 5 logical drive shows that the two larger disk drives still have available space (free segments are indicated in light-blue) that is not part of a logical drive.
FIGURE 6-3 RAID 5 in Full Size Capacity View

You can include the available space on a disk drive in a new logical drive (see To Create a Logical Drive Using Free Segments on Disk Drives), or add it to an existing logical drive (see Increasing the Capacity of a Logical Drive).
|
Free segments on a disk drive can be used to create a new logical drive. (A segment can only be used in one logical drive at a time.)
1. Complete Step 1 through Step 5 in Custom Configuration (Advanced).
2. In the Physical Devices panel, select the disk drives and/or free disk drive segments you want to use in the logical drive.
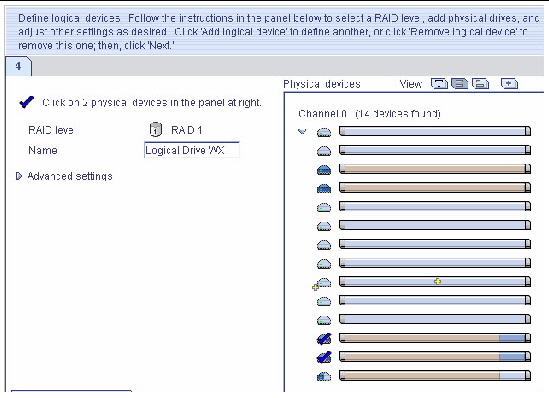
In this example, two free disk drive segments (indicated in blue) are used to create a RAID 1 logical drive.
FIGURE 6-4 RAID 1 Logical Drive
4. Review the logical drive settings.
5. Click Apply, then click Yes.
The Sun StorageTek RAID Manager software builds the logical drive. The configuration is saved in the Sun StorageTek SAS RAID HBA and in the physical drives.
You can fine-tune a new or existing logical drive to meet your needs by changing its name or adjusting the Advanced settings described in this section. (Not all options are available for all HBAs or all RAID levels.)
|
1. In the Enterprise View, click the HBA associated with the logical drive.
2. In the Logical Devices View, click the logical drive.
3. In the menu bar, choose Actions > Change logical device name.
FIGURE 6-5 Renaming a Logical Drive

4. Type the new name, and click OK.
The logical drive is updated with its new name.
|
1. Open the list of Advanced settings.
2. If you are creating a new logical drive, follow the instructions in Step 6.
3. If you are modifying an existing logical drive do the following:
a. In the Enterprise View, click the HBA associated with the logical drive.
b. In the Logical Devices View, click the logical drive.
c. In the menu bar, choose Actions > Expand or change logical device .
d. Click Next, then click Advanced settings.
4. Modify the available settings as required for your logical drive (not all options are available for all HBAs or all RAID levels):
6. To apply the changes immediately, click Apply.
To schedule the changes for later, click Schedule, then set the date and time. (For more information, see Scheduling a Task.)
The stripe size is the amount of data (in KB) written to one partition before the HBA moves to the next partition in a logical drive.
Stripe size options vary, depending on your HBA. Normally, the default stripe size provides the best performance.
For RAID 6 and RAID 60 logical drives, the more disk drives there are in the logical drive, the fewer the stripe size options.
The write cache setting determines when data is stored on a disk drive and when the HBA communicates with the operating system.
| Note - (RAID 10, 50, and 60 only) All logical drives within a RAID 10/50/60 logical drive must have the same write cache setting--either all write-through or all write-back. |
1. Click the logical drive you want.
2. In the menu bar, choose Actions > Configure write cache > Enabled or Disabled, as required.
The write cache setting is changed.
When read caching is enabled, the HBA monitors the read access to a logical drive and, if it sees a pattern, pre-loads the cache with data that seems most likely to be read next, increasing performance.
1. Click the logical drive you want.
2. In the menu bar, choose Actions > Configure read cache > Enabled or Disabled,as required.
The read cache setting is changed.
The Initialize Priority setting determines the priority for the initialization of the logical drive. The default setting is High, which means that the logical drive is initialized as quickly as possible.
The Initialize Method setting determines how a logical drive is initialized (prepared for reading and writing), and how long initialization will take. The settings are presented in order of slowest to fastest method.
The Sun StorageTek RAID Manager software performs build initialization in the background; you can use the logical drive immediately.
To ensure that there are no data problems on your logical drives, it is important to verify them. When you verify a logical drive, the Sun StorageTek RAID Manager software checks it for inconsistent or bad data and then fixes any problems. (You can also choose to verify a logical drive without fixing it.)
Logical drives with no redundancy (for instance, RAID 0 logical drives) do not need to be verified.
In the Sun StorageTek RAID Manager software, logical drive verification can occur like so:
|
Right-click the HBA in the Enterprise View and click Properties.
|
 Right-click the HBA in the Enterprise View, then click Properties.
To enable or disable background consistency check, see To Enable or Disable Background Consistency Checking.
| Note - If your HBA doesn’t support background consistency checking, verify its logical drives weekly. Follow the instructions in To Verify and Fix a Logical Drive. |
|
| Note - To verify a logical drive without fixing it, see To Verify a Logical Drive Without Fixing It. |
While the Sun StorageTek RAID Manager software verifies and fixes a logical drive, you can’t complete any other tasks on the HBA. Because the verification can take a long time to complete, you may want to schedule it as a task to be completed overnight or on a weekend.
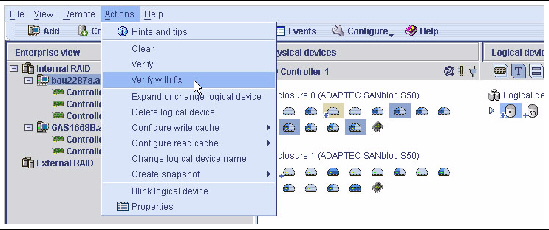
1. In the Enterprise View, click the HBA associated with the logical drive.
2. In the Logical Devices View, click the logical drive.
3. In the menu bar, choose Actions, > Verify with fix.
4. To begin the verification immediately, click Yes.
To schedule the verification, click Schedule, then set the date and time. You can also choose to set the verification as a recurring task. (For more information, see Scheduling a Task.)
| Note - Don’t power off the system while the verification is in progress. If you do, the verification will stop. |
While the verification is in progress, the logical drive is shown as an animated icon to indicate that the task is in progress.

When the verification is complete, an event notice is generated in the local system’s event log (and broadcast to other systems, if you have event notification set up--see Using Notifications to Monitor Status).
You can now continue working on the HBA.
|
| Note - To verify and fix a logical drive, see To Verify and Fix a Logical Drive. |
While the Sun StorageTek RAID Manager software verifies a logical drive, you cannot complete any other tasks on the HBA associated with that logical drive. Because verification takes a long time to complete, you may want to schedule it as a task to be completed overnight or on a weekend.
1. In the Enterprise View, click the HBA associated with the logical drive.
2. In the Logical Devices View, click the logical drive.
3. In the menu bar, choose Actions > Verify.
4. To begin the verification immediately, click Yes.
To schedule the verification for later, click Schedule, set the date and time, then click Apply. You can also set the verification to recur. (For more information, see Scheduling a Task.)
While the verification is in progress, the logical drive is shown as an animated icon.

When the verification is complete, an event notice is generated in the local system’s event log (and broadcast to other systems, if you have event notification set up--see Using Notifications to Monitor Status).
You can now continue working on the HBA.
|
If your HBA supports background consistency checking, the Sun StorageTek RAID Manager software continually and automatically checks your logical drives once they’re in use. (To confirm that your HBA supports background consistency checking, right-click the HBA in the Enterprise View, then click Properties.)
1. In the Enterprise View, click the HBA.
2. In the menu bar, choose Actions > Enable (Disable) background consistency check.
The HBA is updated with the new setting.
You can add more disk drive space to a logical drive to increase its capacity (or expand it).
| Note - The maximum size of a logical drive varies by HBA. Refer to your HBA’s documentation for more information. |
The expanded logical drive must have a capacity that’s greater than or equal to the original logical drive.
|
1. In the Enterprise View, click the HBA associated with the logical drive.
2. In the Logical Devices View, click the logical drive.
3. In the menu bar, choose Actions > Expand or change logical device.
A wizard opens to help you modify the logical drive.
5. Click on the disk drive(s) or disk drive segments you want to add to the logical drive.
FIGURE 6-6 Increasing the Capacity of a Logical Drive

If you want to remove a specific disk drive or segment and replace it with another one (for instance, replace a smaller disk drive with a larger one), click on the disk drive you want to remove.
An X indicates that the selected disk drive will be removed from the logical drive, and you are prompted to select another disk drive (of greater or equal size) to replace it.
FIGURE 6-7 Replacing a Device That is Part of a Logical Drive

6. Modify the Advanced Settings, if required.
See Fine-Tuning Logical Drives.
8. Review the new logical drive settings.
| Note - Some operating systems have size limitations for logical drives. Before you save the configuration, verify that the size of the logical drive is appropriate for your operating system. |
9. To update the logical drive immediately, click Apply, then click Yes.
To schedule the changes for later, click Schedule, set the date and time, then click Apply. (For more information, see Scheduling a Task.)
(Windows 2003, Windows XP, and Windows 2000 only) If you have expanded a logical drive, you can extend the partition on that logical drive to use the newly added space. Refer to your operating system instructions for more information.
As your requirements change, you can change the RAID level of your logical drives to suit your needs. You may want to do this to add redundancy to protect your data, or improve data availability for speedier access to your data. See Selecting the Best RAID Level for more information.
Changing the RAID level normally requires one or more disk drives to be added to or removed from the logical drive. The Sun StorageTek RAID Manager software won’t allow you to continue unless you have the right number of disk drives available.
|
1. In the Enterprise View, click the HBA associated with the logical drive.
2. In the Logical Devices View, click the logical drive.
3. In the menu bar, choose Actions > Expand or change logical device.
A wizard opens to help you change the RAID level.
4. Select a new RAID level, then click Next.
Only valid options are offered.
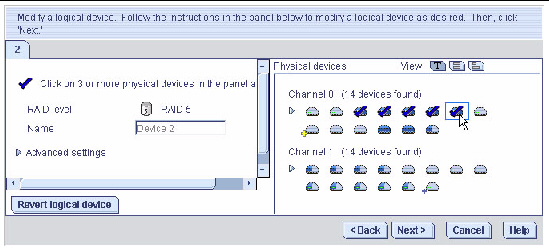
In the following example, a RAID 1 logical drive is being changed to a RAID 5 logical drive.
FIGURE 6-8 Changing the RAID Level of a Logical Drive

5. In the Logical Devices panel, select the disk drives you want to use in the modified logical drive.
The Sun StorageTek RAID Manager software prompts you to select the correct number of disk drives. In the following example, you must select three disk drives.
FIGURE 6-9 Choosing the Correct Number of Devices for a Logical Drive
If you want to remove a specific disk drive and replace it with another one (for instance, replace a smaller disk drive with a larger one), click on the disk drive you want to remove. An X indicates that the selected disk drive will be removed from the logical drive.
6. Modify the Advanced Settings, if required.
See Fine-Tuning Logical Drives.
8. Review the new logical drive settings.
| Note - Some operating systems have size limitations for logical drives. Before you save the configuration, verify that the size of the logical drive is appropriate for your operating system. |
9. To update your logical drive immediately, click Apply, then click Yes.
To schedule the changes for later, click Schedule, set the date and time, then click Apply. (For more information, see Scheduling a Task.)

|
Caution - When you delete a logical drive, you lose all data stored on that logical drive. |
|
1. Ensure that you no longer need the data stored on the logical drive.
2. In the Enterprise View, click on the HBA associated with the logical drive.
3. In the Logical Devices View, click the logical drive.
4. In the menu bar, choose Actions > Delete logical device.
FIGURE 6-10 Deleting a Logical Drive

5. When prompted, click Yes to delete the device, or No to cancel the deletion.
If you click Yes, the logical drive is deleted. The disk drives or drive segments included in the logical drive become available, and can be used to create a new logical drive (see To Create a Logical Drive Using Free Segments on Disk Drives), or to expand an existing logical drive (see Increasing the Capacity of a Logical Drive).
A hot-spare is a disk drive that automatically replaces any failed drive in a logical drive, and can subsequently be used to rebuild that logical drive. (For more information on recovering from a disk drive failure, see Recovering From a Disk Drive Failure.)
A global hot-spare is not assigned to a specific logical drive and will protect any logical drive on the HBA (except RAID 0 logical drives). You can designate a global hot-spare before or after you build logical drives on a HBA; you can also designate a global hot-spare while you’re creating a logical drive. To designate a global hot-spare, see To Designate a Global Hot-Spare.
A dedicated hot-spare is assigned to one or more specific logical drives and will only protect those logical drives. (A dedicated hot-spare that has been assigned to protect more than one logical drive is called a pool spare.) You must create the logical drive before you can assign a dedicated hot-spare. If you create the logical drive using the BIOS utility, you must wait until the build is complete before you can assign a dedicated hot-spare. To assign a dedicated hot-spare or pool hot-spare, see To Assign a Dedicated or Pool Hot-Spare.
|
This section describes how to designate a global hot-spare before or after you build a logical drive.
| Note - To designate a global hot-spare while you are creating a logical drive, see Step 6. |
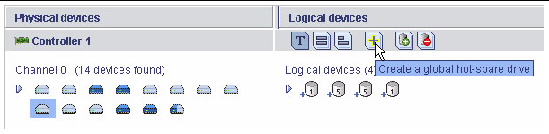
1. In the Enterprise View, click the HBA on which you want a global hot-spare.
2. In the Physical Devices View, click the disk drive you want to designate as a hot-spare.
See Hot-Spare Limitations for help selecting a disk drive.
3. Click the Create global hot-spare drive button.

A plus sign is displayed beside the selected disk drive, indicating that it’s designated as a hot-spare. (A yellow plus sign indicates an error. See About the Hot-Spare Icons for help solving the problem.)
FIGURE 6-11 Identifying a Global Hot-Spare - The Icon With The Plus Sign Next To It

Any other logical drives created on the HBA will automatically be protected by that global hot-spare.
|
A dedicated hot-spare is assigned to one or more specific logical drives. (A dedicated hot-spare that has been assigned to protect more than one logical drive is called a pool hot-spare.)
1. In the Enterprise View, click the HBA on which you want a dedicated hot-spare.
2. In the Physical Devices View, click the disk drive you want to designate as a hot-spare.
See Hot-Spare Limitations for help selecting a disk drive.
3. In the menu bar, choose Actions > Create dedicated hot-spare drive for > name-of-the-logical-drive.
FIGURE 6-12 Creating a Dedicated Hot-Spare Drive

A plus sign is displayed next to the selected disk drive, indicating that it is designated as a dedicated hot-spare. (A yellow plus sign indicates an error. See About the Hot-Spare Icons for more information.)
FIGURE 6-13 Identifying a Designated Hot-Spare

4. To use the same dedicated hot-spare to protect another logical drive (create a pool hot-spare), repeat Step 2 and Step 3.
|
|
||
|
|
||
|
|
Hot-spare has been built into a logical drive after disk drive failure |
Designate replacement or other available disk drive as new hot-spare; remove ‘hot-spare’ designation from disk drive (see To Remove or Delete a Dedicated Hot-Spare) |
|
You can delete a dedicated hot-spare or remove it from a logical drive. You may want to do this to:
1. In the Enterprise View, click the HBA associated with the hot-spare.
2. In the Physical Devices View, click the hot-spare.
3. In the menu bar, choose either of these options:
FIGURE 6-14 Removing a Dedicated Hot-Spare Drive From a Logical Drive

The hot-spare is deleted or removed, and the disk drive becomes available for other uses in your storage space.
|
You can delete a global hot-spare. You may want to do this to:
1. In the Enterprise View, click the HBA associated with the hot-spare.
2. In the Physical Devices View, click the hot-spare.
3. In the menu bar, choose Actions > Delete hot-spare drive.
FIGURE 6-15 Deleting a Hot-Spare Drive

The hot-spare is deleted and the disk drive becomes available for other uses in your storage space.
|
When a logical drive is rebuilt using a hot-spare (see Failed Disk Drive Protected by a Hot-Spare), data from the failed drive is transferred to the hot-spare. When copyback is enabled, data is moved back to its original location once the HBA detects that the failed drive has been replaced. Once the data is copied back, the hot-spare becomes available again. Copyback is disabled by default.
2. Choose Enable or Disable copy back mode.
| Sun StorageTek RAID Manager Software User’s Guide | 820-1177-13 |
Copyright © 2009 Sun Microsystems, Inc. All rights reserved.
 To Set the Size of a Logical Drive