| Sun Installation Assistant for Windows and Linux User’s Guide |
| A P P E N D I X A |
|
Creating a Bootable SIA USB Flash Drive |
This appendix describes how to prepare a USB flash drive (also known as USB thumb drive, USB key drive, etc.) for booting SIA and how to boot the SIA USB flash drive to perform SIA deployment and recovery tasks.
Preparing and booting an SIA USB flash drive is described in the following sections:
This section describes where to get the syslinux and SIA software. You must have the syslinux software to prepare the USB flash drive in order to boot SIA. You can use either a Windows or Linux machine to download the syslinux and SIA software and prepare the USB flash drive for booting.
|
1. Go to the SIA main page on the Sun web site:
http://www.sun.com/systemmanagement/sia.jsp
2. Navigate to your server’s download page.
3. Select and download the following files to a convenient file folder on a Windows XP or Linux (Red Hat or SUSE) system.
| Note - These files may be available separately or bundled in a single package. |
This section describes how to prepare the USB flash drive in order to use it to run the SIA software on your server. You can use either a Windows or a Linux system to prepare the USB flash drive. The procedure is different for Windows and Linux systems; both procedures are described below.
|
1. Extract (unzip) the contents of the downloaded syslinux-version.zip archive file.
Where version represents the Syslinux version number.
2. Insert the USB flash drive into a USB 2.0 port.
3. After Windows has found the new hardware, double-click on My Computer from the desktop.
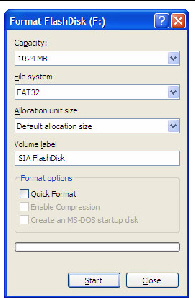
4. Right-click on the flashdisk icon in the list of hard disk drives, and then click Format.
The format dialog box will be displayed.
5. From the File system drop-down menu, select FAT32 and enter a descriptive volume label (such as “SIA FlashDisk”).
7. After the formatting has completed, click the Close button.
8. Click the Start button from the Windows taskbar, and then click Run.
The Run dialog box is displayed.
9. Run the syslinux executable using the -ma option to make the drive bootable by entering the following command:
path\syslinux\win32\syslinux.exe -ma X:
Where path is the folder to which you extracted syslinux and X is the drive letter for your USB flash drive (for example, A:, B:, etc.)
This creates a file ldlinux.sys onto the drive and make it bootable.
10. Extract (unzip) the contents of the downloaded SIA-version.zip archive file to the USB flash drive.
Where version represents the SIA version number.
11. To remove the USB flash drive, click the Safe to Remove Hardware icon and remove the flash drive from the system.
The USB flash drive is now ready to boot SIA. To begin the OS installation using the SIA USB flash drive, see Setting BIOS Parameters and Booting Off the SIA USB Flash Drive.”
|
This procedure requires the use of parted utility version 1.8.6 or later. Do not use earlier versions of parted.
1. Extract (unzip) the contents of the syslinux-version.zip archive file.
Where version represents the Syslinux version number.
2. Insert the USB flash drive into a working USB 2.0 port.
3. Use the tail command to identify the USB flash drive’s device name.
You should see the device name (such as, sda or sdb). Example output is shown below:
4. Create a single bootable partition on the USB flash drive using parted, as follows:
| Note - This procedure requires the use of parted utility version 1.8.6 or later. Do not use earlier versions of parted. |
| Note - These steps require superuser (su - root) access. |
a. If Linux has automounted the device, unmount it first.
Where X is the drive letter for the USB flash drive (for example, /dev/sda or /dev/sdb), and 1 indicates the first partition.
b. Use parted to delete all partitions and create a new bootable FAT32 partition:
Where X is the drive letter for the USB flash drive (for example, /dev/sda or /dev/sdb).
The parted command prompt displays.
c. Enter the following commands in the order listed and follow the prompts to create your bootable primary partition:
You will be prompted to create a disk label type. If msdos is not listed as the default, you will need to enter msdos at the appropiate prompt, as shown in the example below:
Warning: The existing disk label on /dev/sdX will be destroyed and all data on this disk will be lost. Do you want to continue? Yes/No? yes New disk label type? msdos |
Creates a new partition on the disk. Answer the prompts to confirm that this will be the primary partition, fat32 format, spanning the entire disk minus the last megabyte (starting at 1, and ending at -1). Example output is shown below:
Sets the boot flag for this partition.
Sets the lba (Linear Block Addressing) flag for this partition.
Displays the current settings for the new partition. Example output is shown below:
5. Navigate to the Syslinux mbr directory:
Where path is the folder to which you extracted syslinux.
6. Locate the Syslinux master boot record file mbr.bin in the mbr directory and write it to the disk using the following command:
Where X is the drive letter for the USB flash drive (for example, /dev/sda or /dev/sdb).
7. Navigate to the Syslinux unix directory:
Where path is the folder to which you extracted syslinux.
| Note - For later versions of Syslinux, the unix directory might be replaced with a linux directory. If so, replace the unix directory name with linux. |
Where X is the drive letter for the USB flash drive (for example, /dev/sda or /dev/sdb), and 1 indicates the first partition.
9. Mount the drive onto your desired mount point:
# mount -t vfat /dev/sdX1 /mnt
Where X is the drive letter for the USB flash drive (for example, /dev/sda or /dev/sdb), and 1 indicates the first partition. For this example, the mount point is /mnt.
10. Extract the contents of the SIA-version.zip archive file to the USB flash drive by entering the following command:
# unzip -d /mnt ~/path/SIA-version.zip -x “source/*”
Where path represents the path to the directory where the .zip file is located, and version represents the SIA version number. The “source/*” parameter excludes the source files from the extraction to save time and disk space.
11. Unmount the USB flash drive:
12. Remove the flash drive from client machine.
The USB flash drive is now ready to boot SIA. To begin the OS installation using the SIA USB flash drive, see the next section, Setting BIOS Parameters and Booting Off the SIA USB Flash Drive.”
This section describes how to set the BIOS parameters on your server and boot SIA off the USB flash drive. The procedures in this section refer to the server upon which you are installing an OS.
| Note - You must be set up to view the system console boot messages. |
|
Check the Product Notes for your server for any issues related to USB support. Note any restrictions before attempting this procedure.
1. Insert the SIA USB flash drive into an available USB 2.0 port.
| Note - Some servers might not have USB 2.0 support on all of their USB ports. To ensure the best performance, check your server documentation to make sure you use a port that supports USB 2.0. |
2. Reboot the system, watch the display for the BIOS prompt, and when prompted enter the BIOS setup.
The BIOS Setup screen appears.
3. Navigate to the Advanced -> USB Configuration -> USB controller setup screen, and configure the controller for USB 2.0 (high speed) mode.
4. Navigate to the Boot -> Hard Disk setup screen, and make your USB flash drive the first boot device.
The USB flash drive must be the first listed boot device.
5. To save your changes and boot SIA, select Save and Exit.
The system exits the BIOS setup and will then boot from the SIA USB flash drive.
6. Proceed to Chapter 2 for instructions on how to use SIA.
| Sun Installation Assistant for Windows and Linux User’s Guide | 820-3357-19 |
Copyright © 2009 Sun Microsystems, Inc. All rights reserved.
 To Get the Syslinux and SIA Software
