Chapter 5 Installing in Stealth Mode
This chapter explains how to install a remotely administered Screen in stealth mode. Using only local administration of a SunScreen running in stealth mode provides no method to retrieve debug information and is not a supported configuration.
If you are installing on a system without a monitor, the procedures for installation using the command line are described in " Command Line Installation."
Topics covered include:
-
Installing SunScreen in stealth mode
-
Installing the software on the Administration Station
-
Installing certificates on the Administration Station
-
Installing the software on the Screen
-
Using SKIP for encrypted communication
Note -If you have used the SunScreen SPF-200 product, the installation method has changed considerably. Please read this entire chapter before proceeding with installation in stealth mode.
Before installing, review the SunScreen Release Notes for the latest information about this product.
Stealth Mode Overview
SunScreen operating in stealth mode acts much like a bridge in that no IP interfaces are exposed to the public or private network, and packets are transparently filtered by the Screen. When operating in stealth mode, the firewall cannot be directly attacked except by a denial of service attack. The Screen cannot be seen or detected through traceroute or similar network tools.
Before you begin, configure only the network interface that you will use for remote administration. See the documentation accompanying the Solaris operating environment, if needed.
Note -
In this procedure, you are asked if you want to harden the Screen. Hardening is optional and if chosen, is an automated removal of Solaris files and packages that might otherwise make the Screen vulnerable to an attack. Once you have hardened your Screen, it becomes a dedicated firewall and the machine cannot be used for any other purpose without first reinstalling the Solaris operating environment.
Installation Overview
The following procedures explain how to install SunScreen in stealth mode using either self-generated or issued certificate technology. This installation is basically the same as the one described in "Installing in Routing Mode With Remote Administration."
This type of installation requires several steps to complete. You proceed in the following order:
-
On the Administration Station
Install the SunScreen administration software. This step installs the required SKIP packages on the Administration Station (see "To Install the Administrationn Software on theAdministration Station").
-
On the Administration Station
Install the Administration Station's certificate (see "To Install a Self-Generated Certificate" or "To Install an Issued Certificate").
-
On the Screen
Install the SunScreen software. This procedure requires the Administration Station's certificate ID and installs the Screen's certificate (see "Installing the Software on the Screen").
-
On the Administration Station
-
Install the Screen's certificate ID.
-
Start encrypted communication by enabling SKIP (see "To Set Up SKIP on the Administration Station").
Note -The installation procedure requires that you reboot your machine when indicated. Do not perform any other tasks on the machine while installing the software, as a delay in rebooting the machine can affect installation and cause your system to hang
-
Do not begin this procedure until you have read the information in "Installation Considerations."
Installing the Administration Software
These tasks are the same as those described in the previous chapter. Accordingly, you will be directed to that chapter for installation specifics. Please return to this chapter when you have completed them.
To Install the Software on the Administration Station
-
See the procedure described in "To Install the Administration Software on the Administration Station."
-
When you finish that task, go to the next section in that chapter, "Installing Certificates on the Administration Station."
-
When both these tasks are complete, go to the next section, "Installing the Software on the Screen."
Installing the Software on the Screen
The next step is to install the SunScreen software on the machine that serves as the Screen. If you have a monitor and a keyboard attached to your Screen, you can use the installation wizard. If you are operating the Screen without a monitor, you must either temporarily attach a monitor and keyboard, or install the software through the command line (see "Command Line Installation").
Before starting this next step, make sure that all network interfaces you plan on using for stealth are not configured. You should only configure the interface used for administration. If you configure a network interface and later set it to stealth mode, the Screen hangs upon activation. If this happens, you must first reboot the Screen in single user mode; then, remove the file /etc/hostname.interface_name, which will unconfigure that interface. To finish, reboot again.
To Install the Software on the Screen
Note -
In this procedure, you need the Administration Station's certificate ID (MKID) from "To Install a Self-Generated Certificate" or an issued certificate diskette.
-
On the Screen, open a terminal window and become root.
-
Insert the SunScreen CD-ROM into the Screen's CD-ROM drive.
A File Manager window appears listing the CD contents.
-
After the install wizard's Welcome window appears, click Next to continue.
-
Proceed through the installation windows accepting the default choices.
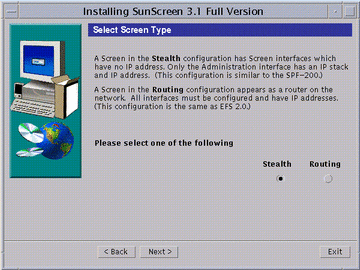
When the Select Screen Type window appears, you are given the choice of Stealth or Routing with Routing as the default. Change the choice to Stealth (as shown in the following figure).
Figure 5-1 Select Screen Type Window
-
Select Stealth and click Next.
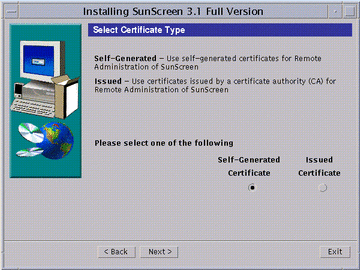
Continue to click Next to continue the installation accepting the defaults until the Select Certificate Type window appears (as shown in the following figure), you have to make a choice whether you are going to use self-generated certificates or issued certificates. Self-generated certificate is the default.
Figure 5-2 Select Certificate Type Window
-
If you are using self-generated certificates, follow instructions a-i through iii then go to Step 8. If you are using issued certificates, follow instructions b-i through iv then go to Step 8.
-
Self-Generated Certificate only:
Accept the default (Self-Generated Certificate) and click Next.
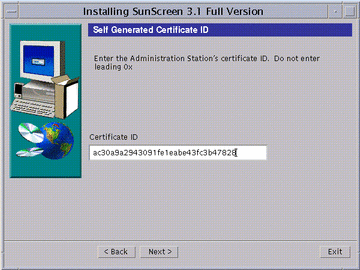
The Self-Generated Certificate ID window appear (as shown in the following figure).
Figure 5-3 Self Generated Certificate ID Window
Self-Generated Certificate only:
-
Type the Administration Station's 32-character certificate ID (MKID), obtained in "To Install a Self-Generated Certificate." Do not type the leading two characters: 0x. After you type the ID, click Next.
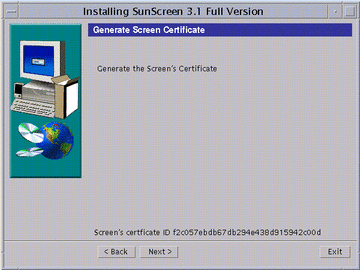
The Generate Screen Certificate window appears. Wait while the Screen's certificate ID is generated. When completed, the Screen's 32-character certificate ID appears at the bottom of the window, as shown in the following figure.
Figure 5-4 Generate Screen Certificate Window With Screen's Certificate ID
-
Write down the Screen's 32-character certificate ID (MKID) that appears at the bottom of the window.
-
Go to Step 8.
-
-
Issued Certificate only:
From the Select Certificate Type window, select Issued Certificate and click Next.
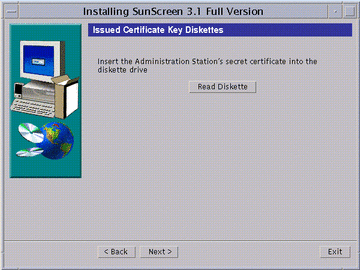
The Issued Certificate Key Diskettes window next appears (as shown in the following figure).
Figure 5-5 Issued Certificate Key Diskettes Window
-
Insert the Administration Station's Key and Certificate diskette and click Read Diskette.
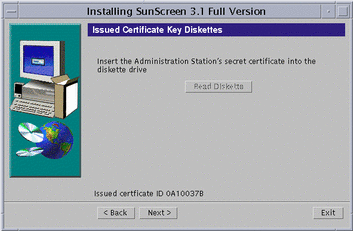
Wait until the issued certificate ID appears at the bottom of the window, as shown in the following figure.
Figure 5-6 Issued Certificate Key Diskettes Window With Issued Certificate ID
-
Write down the Administration Station's eight-character certificate ID, and click Next.
The Issued Certificate Key Diskettes window re-appears, and prompts you to use the Screen's certificate ID diskette.
-
Insert the Screen's certificate ID diskette into the diskette drive and click Read Diskette.
The issued certificate ID for the Screen appears at the bottom of the window.
-
Write down the Screen's eight-character certificate ID then go to Step 8.
-
-
-
Click Next, the Select Administrative Interface window appears.
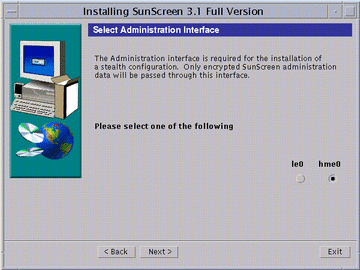
This window (as shown in the following figure) lets you select the interface that will use SKIP to communicate with the remote Administration Station.
Note -The interfaces shown are already plumbed with IP and cannot be used as stealth interfaces. You configure your stealth interfaces after you complete the software installation.
The other interfaces not selected for administration do not have Screen modules pushed onto them and as a result are left unprotected after installation. One of your first tasks should be to configure these interfaces and remove this potential vulnerability.
Figure 5-7 Select Administrative Interface Window
-
Select an administrative interface and click Next.
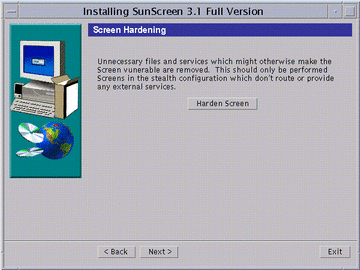
After the interface configures, the Screen Hardening window appears (as shown in the following figure).
Figure 5-8 Optional Screen Hardening Window
 Caution -
 Hardening is optional and if chosen, is an automated removal of Solaris files and packages that might otherwise make the Screen vulnerable to an attack. Once you have hardened your Screen, it becomes a dedicated firewall and the machine cannot be used for another purpose without first reinstalling the Solaris operating environment.
-
To finish without hardening your Screen, click Next. Optionally, to harden your Screen, click the Harden Screen button then click Next.
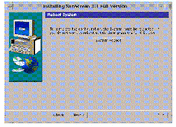
The Reboot System window appears (as shown in the following figure).
Figure 5-9 Reboot System Window
-
Click the System Reboot button to finish the installation.
The installation wizard disappears.
Note -You must reboot the machine at this time in order to complete the installation process. If you wish to delay rebooting your machine, click Next instead of System Reboot. An Installation Summary window appears from which you can exit the installation.
To Finish the Installation
Now return to the Administration Station to finish the installation. Please see the instructions in "Finishing the Screen Installation."
To Launch the Administration GUI
-
To configure and manage your Screen from your Administration Station, run a Java-enabled Web browser by typing the following URL:
http://Name_of_Screen:3852/
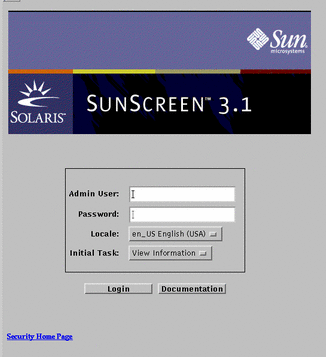
The administration GUI appears, as shown in the following figure.
Figure 5-10 Administration GUI Login Page
-
To login, type the following and click Login:
User Name: admin
Password: admin
You next configure your stealth interfaces and manage your Screen with the administration GUI. See the SunScreen Administration Guide for further instructions.
Note -
One of your first administration tasks should be to change the default User Name and Password to something more secure so you can reduce the risk of compromising the administration traffic.
- © 2010, Oracle Corporation and/or its affiliates
