Chapter 3 Working with Common Objects
Common objects are the smallest building blocks you will work with when managing your SunScreen. Common objects are used by (common to) all existing policies so any modification to these objects affects the operation of all policies.
This chapter describes:
-
The Policy Rules page
-
Adding a Common Object
-
Searching for a Common Object
-
Editing a Common Object
-
Viewing and Editing details of a Common Object
-
Deleting a Common Object
-
Renaming a Common Object
-
Adding a host address
-
Adding ranges and groups of addresses
-
Adding services and service groups
-
Adding and editing Interfaces
-
Adding a Screen
-
Adding and deleting SNMP alert receivers
-
Adding a Time object
-
Adding, generating, and loading Screen Certificates
The following information describes using the administration GUI. Appendix A contains information about the command line interface.
The Policy Rules Page
You add and modify the Common Objects from the Policy Rules page of the administration GUI.
To Move to the Policy Rules Page
-
Choose the policy "Initial" in the Policies List page.
-
Click the Edit... button.
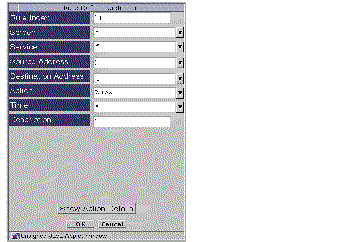
The Policy Rules page appears.
Figure 3-1 Policy Rules Page
Common Objects
You add common objects in the Common Objects area of the Policy Rules page (see FIGURE 2-6.) You construct policy rules using the common objects defined here. The currently active policy is not affected by any changes to common objects until you activate the changed policy.
The following table lists the common objects used in SunScreen.
Table 3-1 Common Object Descriptions|
Common Object |
Use |
|---|---|
|
describes Screen objects and their relationships |
|
|
Proxy User | |
|
describes an administrator for your Screen administration |
|
|
creates a user identity/authentication mechanism |
|
|
Time |
Figure 3-2 Common Objects Area

The Screen Field and Common Objects
The Screen field is a way to define the object or rule in a Screen-specific manner. It has no effect on a standalone Screen-administration scenario. Objects with the same name can be defined multiple times if they have different Screen objects selected. They can have different parameters, as well. Such objects are interpreted locally by the Screen to which they refer.
An object with All Screen objects selected applies to all Screens. This is the default, and is recommended for all objects, unless there is a need to define multiple definitions for a single name.
Similarly, rules with a blank Screen field apply to all Screens. Rules with a Screen object selected apply only to the Screen referred to in the rule.
To Add a Common Object
You use the same steps to add all common objects; the dialog windows displayed vary according to the common object selected.
-
Select the common object in the Type choice list.
-
Click the Add New button to display the choices.
-
Type the necessary information in the dialog window that appears.
-
Click the OK button.
To Search for a Common Object
-
Select a common object type in the Type choice list.
-
(Optional) Enter a character string that partly matches the name of the desired common object in the Search String field.
-
Click the Search button or click Enter in the Search String field.
The results that return depend on whether or not the common object matches one of the three search criteria for the selected type. The search criteria are:
-
Search String: This field restricts the search to names that match a specified character pattern. Leaving the field blank returns all names.
-
Search on Screen: This field returns all objects when set to "All." When a specific Screen is selected, it returns all objects that have a Screen object selected.
-
Search Subtype: This field returns all objects when set to "All." If you select a specific subtype, the search returns those objects that match the subtype.
-
-
Select a result from the Results field to retrieve and display its properties in the Detail field.
After you retrieve the common object, you can edit, rename, or delete it.
To Edit a Common Object
-
Select the Common Object in the Type choice list.
-
Select the search criteria.
-
Click the Search button.
-
From the Results list, highlight the name of the common object to edit.
The details for the common object selected appears.
-
Click the Edit button.
The dialog window for the object appears.
-
Make the changes you wish in the common object dialog window.
-
Click the OK button.
To View and Edit the Details of a Common Object From the Policy Rules Table
Click once on the cell in the Policy Rules Table containing the object to be viewed or edited. The dialog window for the chosen object appears.
Note -
Because different Common Objects can have the same name, sometimes it may not be possible to display the details for a cell. You must must then search for desired object, and select it.
To Delete a Common Object
When you delete a named common object (such as, address, service, Certificate, and so on), SunScreen checks to see whther the named common object is being used in a policy object. If the common object is being used, SunScreen presents a warning message before it deletes the object.
-
Select the Common Object in the Type choice list.
-
Select the search criteria.
-
From the Results list, highlight the name of the common object to delete.
-
Click the Delete button.
-
Click Yes in the Delete Rule dialog window.
Note -Be careful not to remove your Administration Station's address accidentally from its interface address group. If you do, you will be unable to administer your Screen after you activate the next policy.
To Rename a Common Object
-
Select the Common Object in the Type choice list.
-
Click the Search button.
-
From the Results list, highlight the name of the common object to be renamed.
-
The Rename dialog window is appears.
-
Type the new name in the Please enter the new name field.
-
Click the OK button.
Renaming a common object with no Screen object also renames all references to the object in the current policy, if the renamed object contains no references to a Screen object (that is, the object definition is not specific to any Screen).
Address Objects
SunScreen identifies network elements--networks, subnetworks, and individual hosts--by mapping a named address object to one or more IP addresses. Address objects are used to define the network elements that make up the policy. These address objects are then used in defining the network interfaces and as the source and destination addresses for Policy rules and for NAT. An address object can represent a single computer or a whole network. You can gather address objects representing individual and network addresses together to form address groups. You may define address objects that specifically include or exclude other address objects (single IP hosts, ranges of contiguous IP addresses, or groups of discontiguous IP addresses). Some addresses are already defined.
Each rule must have a source address and a destination address.
An individual host is identified by linking its unique IP address to an address object, which can use the name or IP address of the host or some other identifier.
Note -
Do not change the admin address (le0, qe0, hme0, and the like), the admin certificate, the local certificate, or the admin-group certificate. If you change these items, you risk losing your connectivity from the Administration Station to the Screen. Reestablishing your connectivity is difficult and requires that you log into the Screen directly or use an Administration Station that is still working. It also requires exchanging encryption information.
To Add a Host Address
-
Click New Host... from the Add New choice list.
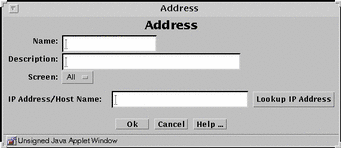
The Address dialog window appears.
Figure 3-3 Host Address Dialog Window
-
Type the name for this new address in the Name field, for example:
NewAddr
-
(Optional) Type a description in the Description field.
The description appears in the Address Details field that is displayed when you choose an address or address group for a rule using the Rule Definition dialog window.
-
(Optional) Select a Screen from the Screen choice list.
-
Type the IP address in the IP Address/Host Name field, for example:
100.100.20.10
-
Click the OK button.
To Add a Range of Addresses
An address range is a set of numerically contiguous IP addresses. Networks and subnetworks are typically identified by an IP address range name. You use the beginning and ending addresses to identify an IP address range. You can set up an address object to represent an address range.
-
Select Address in the Type choice list.
-
Click New Range... from the Add New choice list.
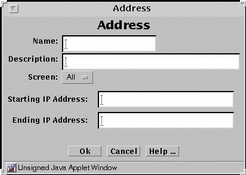
The Address dialog window appears.
Figure 3-4 Address Range Dialog Window
-
Type the name for this new address range in the Name field, for example:
AddrRange
-
(Optional) Type a description in the Description field.
The description appears in the Address Details field that is displayed when you choose an address or address group for a rule using the Rule Definition dialog window.
-
(Optional) Select All from the Screen choice list.
-
Type the Starting IP address in the Starting IP Address field, for example:
100.100.20.10
-
Type the Ending IP address in Ending IP Address field, for example:
100.100.20.90
-
Click the OK button.
To Add a Group of Addresses
-
Click New Group... from the Add New choice list.
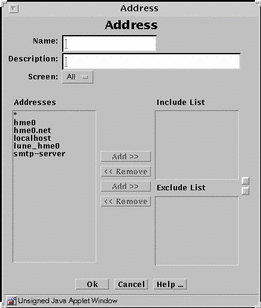
The Address dialog window appears.
Figure 3-5 Address Group Dialog Window
-
Type the name for this new address group in the Name field, for example:
GroupName
-
(Optional) Type a description in the Description field.
The description appears in the Address Details field that is displayed when you choose an address or address group for a rule using the Rule Definition dialog window.
-
Highlight the address in the Address list.
-
Click the top Add button to move to the Include list, or the bottom Add button to move to the Exclude list.
Use the corresponding Remove button to remove addresses from the lists.
-
Continue to build the intended address group by adding to the Include lists.
-
Click the OK button.
Service and Service Group Objects
Part of setting up your network security policy is to define the network services available to hosts on your internal network and to hosts on the external network. Generally, most sites need to determine or set up policy rules that govern the basic services.
SunScreen provides a number of predefined network services and service groups such as http, ftp, telnet, dns, and rsh. You can change the default values of a service or add a new service.as needed.
SunScreen lets you define single services and service groups. Service groups consist of the single services that you want to use together. The services that are available for use in the policies were installed as part of the SunScreen software.
Besides the basic services, every TCP/IP implementation provides services such as echo, discard, daytime, chargen, and time. For services such as ftp, you may want to allow anyone in the internal corporate network to send outbound traffic, but only allow inbound traffic in this protocol to go to the FTP server. This requires two rules: one for the outbound traffic and one for the inbound traffic going to the public server.
Each service uses a state engine, a sort of protocol checker. For example, the FTP state engine checks port numbers when the ftp service is being used. For more information on state engines, see the SunScreen Reference Manual.
To Add a Service
Note -
Although you may change the default values for a service, to make any troubleshooting easier, it is better to add a new service with the new values.
-
Select Service in the Type choice list.
-
Click New Single... from the Add New choice list
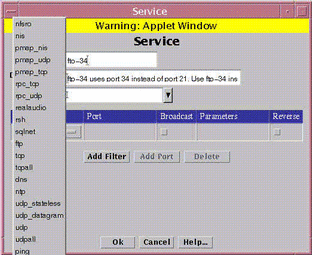
The Service dialog window appears.
Figure 3-6 Service Dialog Window
-
Type the name for this new service in the Name field, for example:
ftp-34
-
(Optional) Type a description for this service in the Description field, for example:
ftp-34 uses port 34 instead of port 21. Use ftp-34 instead of the supplied ftp service.
The description appears in the Service Details field that displays when you choose a service or service group for a rule.
-
(Optional) Select a Screen from the Screen choice list.
-
Click the down arrow of the Add Filter button on the Service panel to display the service filter choice list.
-
Select a filter from the Filter choice list.
-
Click the select box in the Filter field to display the list of service filter engines.
Figure 3-7 List of Filter Engines

For each filter desired, follow the steps below:
-
Type the port number for the new service in the Port field. If you have too many ports, follow the steps below to delete them:
You can use the Add Port button as necessary to get the number of ports that you need for a particular filter.
-
(Optional) Change the default values by typing the ones that you want to use, if you want to override the default values for the filter that you have selected.
-
Click the Broadcast button if the service sends IP broadcast packets.
If the service sends both broadcast and non-broadcast packets (for example, the standard rip service), you will need two ports: one with the broadcast box checked and one with the broadcast box unchecked.
-
Type the required number of parameters, separated by spaces, if you want to override the default parameters for the filter that you have selected.
You only need to type in parameters if you do not want to use the default values. The information for the default values for these fields is in the SunScreen Reference Manual.
-
Click Reverse check box if the service operates in the reverse direction.
-
Click the OK button to place this service definition in the policy file.
The service ftp-34 now appears in the list of services.
-
Repeat the above steps until you have added all the services necessary for your policy.
To Add a Service Group
Note -
Although SunScreen lets you modify the default services in service groups, to make any troubleshooting easier, it is better to add a new service group that contains the services that you want.
-
Select Service in the Type choice list.
-
Select New Group... from the Add New choice list.
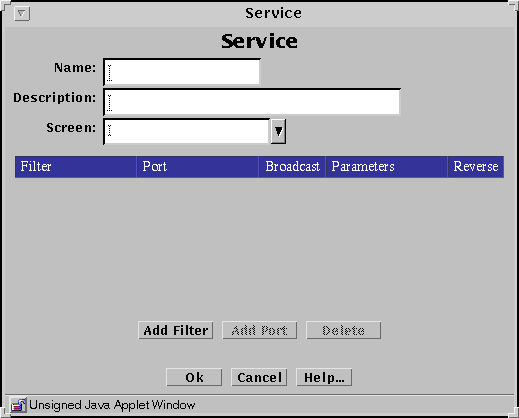
The Service dialog window is displayed.
Figure 3-8 Add New Group Service Dialog Window
-
Type the name for the new service group in the Name field in the Service dialog window.
-
(Optional) Type a description for this new service group in the Description field.
The description appears in the Service Details field that displays when you choose a service or service group for a rule.
-
Click and highlight the service or service group that you want to include in this new service group.
-
Click the Add button to move the chosen service or service group to the Members list.
-
Click the OK button.
-
Repeat the above steps until you have added all the service groups required.
Interface Objects
A network interface is a network connection coming into a Screen through which one or more IP addresses are accessible. During installation in Routing mode, empty address groups for all available network interfaces were defined. After you have completed the installation, you can add interfaces and redefine the addressees for the network interfaces, and set up High Availability. For each interface, specify the address group you have defined that contains all the addresses that can be reached through that interface.
Stealth Interfaces
The stealth interfaces have optional Router entries. Use these entries to define all accessible routers on your subnet that are reachable from this interface. These routers are required if your policy uses NAT or tunneling, and recommended otherwise.
You need to create address groups that accurately reflect all the hosts available from each stealth interface. You must associate these address groups with stealth interfaces when you define them.
Additional information can be found in the SunScreen Reference Manual.
Note -
Define only the physical interface through the administration GUI if you are using a machine with logical (virtual) interfaces.
Note -
Before you can configure a new routing interface, in the routing mode only, you must first configure it on your system using the documentation for your operating system. Do not do this for stealth interfaces.
To Add or Edit Interfaces
You must define the address group that an interface will use in the policy before you add a new interface.
Note -
Any added interfaces, or edits to interfaces, take effect the next time you Activate the policy rule that includes those interfaces.
-
Choose Interface in the Type choice list.
-
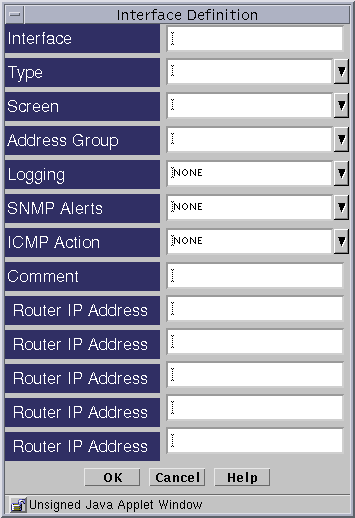
Choose New... from the Add New choice list beside the Interfaces area to display the Interface Definition dialog window.
Figure 3-9 Interface Definition Dialog Window
-
Type the name of the interface that you want to add in the Interface field.
-
Click the down arrow on the Type field to display the list of the interfaces and highlight the type that you want.
The type of interface appears in the Interface Type field.
-
Click the down arrow on the Screen field to display the list of Screens and highlight the Screen that you want.
-
Click the down arrow on the Address Group field to display the scrolling list of addresses and address lists and highlight the address that you want.
The address appears in the Address Group field.
-
Click the button to the right of the Logging field to display the list of kinds of logging available and highlight the type of logging that you want.
The type of logging appears in the Logging field.
-
Click the down arrow on the SNMP Alerts field to elect whether you want an SNMP alert and highlight the type of SNMP alert that you want.
The type of SNMP alert appears in the SNMP Alerts field.
-
Click the down arrow on the ICMP Action field to display the list of kinds of reject actions available and highlight the type of ICMP action that you want.
The type of reject action appears in the Reject Action field.
-
Click the OK button on the Interface Definition dialog window to save your interface definition.
-
Repeat the above steps until you have added all the interfaces that you require.
Screen Objects
You need to add a Screen if you are configuring HA or Centralized Management Groups. For the standalone configuration, you may edit the Screen for adding SNMP or modifying miscellaneous properties.
If you are running in stealth or mixed mode, you must modify the Screen object in order to define the stealth network and netmask for the network the Screen is subdividing.
To Add a Screen
-
Choose Screen in the Type choice list.
-
Choose New... from the Add New choice list.
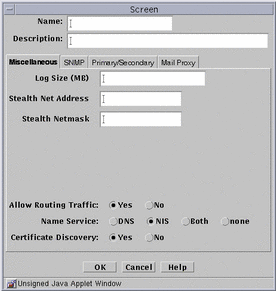
The Miscellaneous area in the Screen dialog window appears.
Figure 3-10 Screen Dialog Window, Miscellaneous Tab
-
In the Name field, type the name of the Administrative Interface of the Screen as it appears in the naming service or the host file.
-
Type a number in the Log Size (MB) field, to set the total size for log files (default is 100 Mb).
-
The Stealth Network Address and Stealth Netmask (of the network the Screen partitions) fields apply only if the Screen has any Stealth interfaces.
-
Click the Yes or No radio button to allow or deny Routing Traffic (RIP).
-
Click a Name Service radio button to choose the name service the Screen will rely on, to define the host address.
You can use also use both DNS and NIS or no name service at all.
-
Click the Yes or No radio button for Certificate Discovery.
This action allows the Screen itself to participate (or not) in a certificate discovery exchange. Selecting Yes does not allow CDP traffic to go through the Screen.
-
Click the OK button.
SNMP Alert Receivers
You set actions that generate SNMP alerts as part of a security policy.
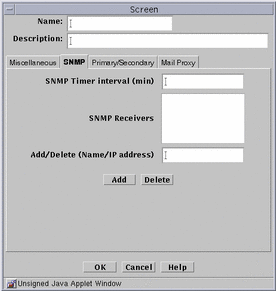
You use the SNMP tab in the Screen dialog window to:
-
Add a new SNMP trap receiver
-
Delete an SNMP trap receiver
-
Set the timer for the timed status indicator
A management information base (MIB) that describes the SNMP trap is included with the SunScreen CD-ROM, as part of the SUNWicgSA package. It is installed as: /opt/SUNWicg/SunScreenAdmin/etc/sunscreen.mib. Load this MIB into your SNMP manager to enable it to use the SNMP trap generated by the Screen.
Note -
The machine that you want to receive SNMP trap alerts must not be a remote Administration Station. SNMP alert packets are sent in the clear and the communication between the remote Administration Station and Screen is encrypted; any packets sent in the clear are dropped.
The recipients of SNMP messages are controlled on a Screen-by-Screen basis. The Screen object has a place for an optional list of IP addresses, which are the hosts to which it sends the SNMP packets.
Setting SNMP in a packet filtering rule's "Action," or in the default Reject Action of an interface causes the SNMP packets to be sent.
SNMP alerts are described in the SunScreen Reference Manual.
The following information describes using the administration GUI. For the command line interface, see Appendix A.
To Add a New SNMP Alert Receiver
-
Click the SNMP tab in the Screen dialog window.
The SNMP area is displayed.
Figure 3-11 Screen Dialog Window SNMP Area
-
Type the name or IP address of the recipient of the SNMP trap in the Name field.
-
Click the Add button.
A list of SNMP alert receivers appears. You can define up to five receivers. SunScreen sends each generated alert to all receivers.
-
Click the OK button when you are finished.
To Delete an SNMP Alert Receiver
-
Click the SNMP tab in the Screen dialog window for the Screen.
The SNMP area appears.
-
Choose an entry in the SNMP Receivers field.
If the name of the SNMP Receiver to delete is not listed (that is, only the IP address is listed), type the name in the Add/Delete field.
-
Click the Delete button.
Click the OK button when you are finished with this Screen object.
Timed-Status Indicator Field
You use the SNMP_TIMER field in the SNMP tab to specify the time interval between the health-update packets that are emitted by the Screen. If you do not specify any Alert receivers, no health-update packets are issued.
If you set the SNMP_TIMER field is set to zero (or lesvr it empty) and there are Alert receivers, no health-update packets issued, although other SNMP alerts are sent to the Alert receivers.
Time Objects
You can control when rules are in effect by defining time objects for them.
To Create Timed Rules
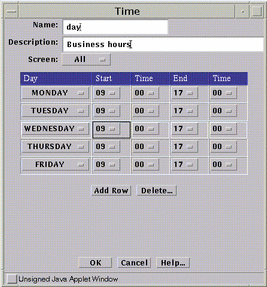
The Time dialog window appears.
Figure 3-12 Time Dialog Window
-
Enter a name in the Name field.
Example: day
-
(Optional) Enter a description in the Description field.
Example: Business hours
-
(Optional) Choose a Screen from the Screen choice list.
-
Choose Add Row.
-
Choose the following;
-
Click the OK button.
Time Object Example
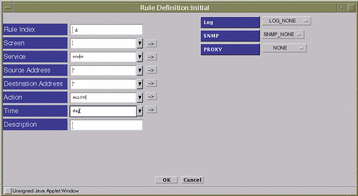
This Rule Definition dialog window shows use of the time object in a rule that allows all "www" service traffic during the "day" time (where "day" was defined in the Time dialog window). By choosing a predefined Time object, this rule is applicable only for the time defined.
Figure 3-13 Example Time Object in a Rule
Certificate Objects
If you are using remote administration, the certificate for the Screen and the certificate for the remote Administration Station were already created and the hashes exchanged during the installation procedure.
If you want to use encryption for traffic from the Screen (source address), you must either create a self-generated certificate, or use an existing certificate, and add a certificate for each address (destination address) to which the Screen will send traffic.
If you want to use encryption for traffic to the Screen (destination address) from an address on another network (source address), you must add the issued public key for each address (source address) from which the Screen will receive traffic. The hash or public key must be sent to the destination address so that the traffic from the Screen can be decrypted.
Certificates can be combined into groups for ease of use and convenience.
Note -
Store the diskette that contains the certificate safely and securely. It contains sensitive information that is not encrypted.
To Generate Screen Certificates
Note -
Use the Installed On field in the Certificate dialog window to choose the Screen where you want to add the certificate to the SKIP database. The default choice is the Screen to which users are connected. This is the choice you should use if you are using Centralized Management Groups.
Self-generated private keys use the SKIP NSID 8, signifying that the public value for that key has not been signed. To validate the public value, the hash of the public value associated with that private key is used as the certificate ID. When the certificate is added either manually or through Certificate Discovery Protocol (CDP), the public value can be certified by comparing the hash of the public value in the certificate with the certificate ID. Unsigned Diffie-Hellman certificates are described in the SunScreen Reference Manual.
-
Choose Certificate in the Type choice list.
-
Choose Generate Screen Certificate... in the Add New choice list.
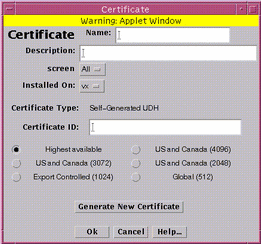
The Certificate dialog window is displayed.
Figure 3-14 Generating a New Certificate
-
Type a name in the Name field.
-
(Optional) Type a description in the Description field.
-
(Optional) Choose the Screen from the Screen choice list.
-
(Optional) Type the name of the Screen on which the Certificate is installed in the Installed On field.
-
Click the radio button to specify the level of encryption the Screen uses.
-
Click the Generate New Certificate button.
The Certificate ID field displays the Certificate ID.
-
Click the OK button.
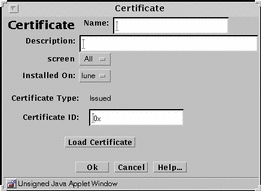
To Load an Issued Certificate
Note -
Because Netscape Navigator and Internet Explorer do not support the Java mechanism for applet signing, the administration GUI cannot access your system's local resources. (Browser security mechanisms prevent this type of access to local system resources.) See "Accessing Local System Resources" on page 34.
You can add new key pairs and local identities by using a SunScreen Key and Certificate diskette that is available a Certificate Authority. Contact. This type of key and certificate is known as an issued certificate. Certificates are described in the SunScreen Reference Manual.
You also can add new private keys from a directory that contains only one set of private key and certificate files.
-
Choose Certificate in the Type choice list.
-
Choose Load Issued Key Certificate... from the Add New choice list.
The Certificate dialog window appears.
Figure 3-15 Loading an Issued Certificate
-
Type a name in the Name field.
-
(Optional) Type a description in the Description field.
-
(Optional) Choose the Screen from the Screen choice list.
-
(Optional) Choose the Screen the certificate is installed on from the Installed On choice list.
-
Click the Load Certificate button.
-
In the File dialog window:
-
Click the OK button.
To Associate Certificate IDs
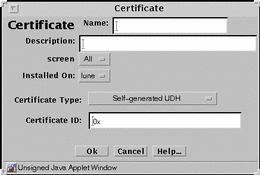
Associate Certificate ID lets you assign a name to a Certificate that exists on another Screen. You associate a Certificate ID when you want to encrypt communication between two screens or between a Screen and an Administration Station.
Note -
Self-Generated certificates are validated by a telephone call between two people who know each other and recognize each other's voice.
-
Choose Certificate in the Type choice list.
-
Choose Associate MKID... from the Add New choice list.
The Certificate dialog window appears.
Figure 3-16 Associating an MKID
-
Type a name in the Name field.
-
(Optional) Type a description in the Description field.
-
(Optional) Choose the Screen from the Screen choice list.
-
Choose the Screen the certificate is installed on from the Installed On choice list.
-
Choose the type of certificate from the Certificate Type choice list.
-
Type the Certificate ID for the certificate.
-
Click the OK button.
To Add a Certificate Group
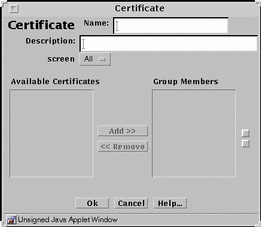
After you have named Certificate IDs, you can group them into logical groups, so that you can use a group instead of single names in a policy object.
-
Choose Certificate in the Type choice list.
-
Choose New Group... from the Add New choice list.
The Certificate dialog window appears.
Figure 3-17 Adding a Certificate Group
-
Type a name in the Name field.
-
(Optional) Type a description in the Description field.
-
(Optional) Choose a Screen from the Screen choice list.
-
Click the Add >> button to add selections from the Available Certificates Area to the Group Members area.
-
Click the << Remove button to remove selections from the Group Members area to the Available Certificates area.
-
Click the OK button.
- © 2010, Oracle Corporation and/or its affiliates
