Interface Objects
A network interface is a network connection coming into a Screen through which one or more IP addresses are accessible. During installation in Routing mode, empty address groups for all available network interfaces were defined. After you have completed the installation, you can add interfaces and redefine the addressees for the network interfaces, and set up High Availability. For each interface, specify the address group you have defined that contains all the addresses that can be reached through that interface.
Stealth Interfaces
The stealth interfaces have optional Router entries. Use these entries to define all accessible routers on your subnet that are reachable from this interface. These routers are required if your policy uses NAT or tunneling, and recommended otherwise.
You need to create address groups that accurately reflect all the hosts available from each stealth interface. You must associate these address groups with stealth interfaces when you define them.
Additional information can be found in the SunScreen Reference Manual.
Note -
Define only the physical interface through the administration GUI if you are using a machine with logical (virtual) interfaces.
Note -
Before you can configure a new routing interface, in the routing mode only, you must first configure it on your system using the documentation for your operating system. Do not do this for stealth interfaces.
To Add or Edit Interfaces
You must define the address group that an interface will use in the policy before you add a new interface.
Note -
Any added interfaces, or edits to interfaces, take effect the next time you Activate the policy rule that includes those interfaces.
-
Choose Interface in the Type choice list.
-
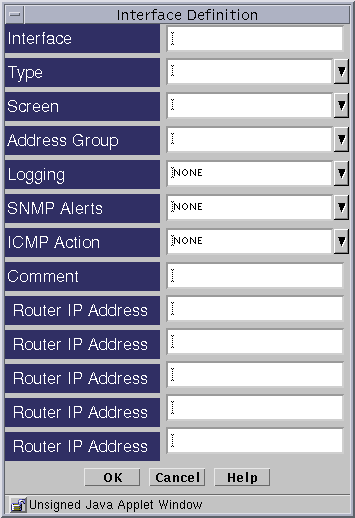
Choose New... from the Add New choice list beside the Interfaces area to display the Interface Definition dialog window.
Figure 3-9 Interface Definition Dialog Window

-
Type the name of the interface that you want to add in the Interface field.
-
Click the down arrow on the Type field to display the list of the interfaces and highlight the type that you want.
The type of interface appears in the Interface Type field.
-
Click the down arrow on the Screen field to display the list of Screens and highlight the Screen that you want.
-
Click the down arrow on the Address Group field to display the scrolling list of addresses and address lists and highlight the address that you want.
The address appears in the Address Group field.
-
Click the button to the right of the Logging field to display the list of kinds of logging available and highlight the type of logging that you want.
The type of logging appears in the Logging field.
-
Click the down arrow on the SNMP Alerts field to elect whether you want an SNMP alert and highlight the type of SNMP alert that you want.
The type of SNMP alert appears in the SNMP Alerts field.
-
Click the down arrow on the ICMP Action field to display the list of kinds of reject actions available and highlight the type of ICMP action that you want.
The type of reject action appears in the Reject Action field.
-
Click the OK button on the Interface Definition dialog window to save your interface definition.
-
Repeat the above steps until you have added all the interfaces that you require.
- © 2010, Oracle Corporation and/or its affiliates
