Administrative Access Rules
You use administrative access rules to:
-
Provide access to the Screen from additional remote Administration Stations
-
Provide access for local administration from the administration GUI.
You can add new users that you have created, re-add users for whom new passwords have been defined, or change SecurID assigned names on the Administrative Access page. You can also add an access rule for users and change the encryption parameters.
You must activate a new policy for any changes to take effect.
The fields of the Administrative access rules tab are described in the SunScreen 3.2 Administrator's Overview.
The following information describes using the administration GUI. Chapter 10, Using the Command Line Interface contains information about the command line interface.
To Add or Change an Administrative Access Rule for Local Administration
-
Execute the steps in "To Modify Rules".
-
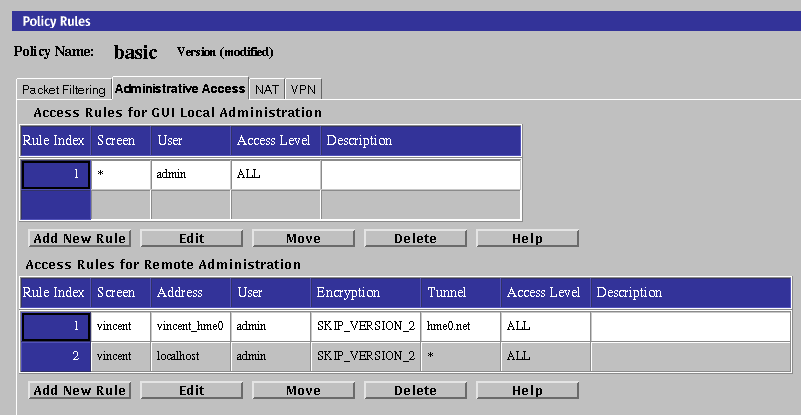
Click the Administrative Access tab to display the Administrative Access area.
-
Click the Add New Rule button, or Edit button, below the Access Rules for GUI Local Administration area.
The Local Access Rules dialog box appears.
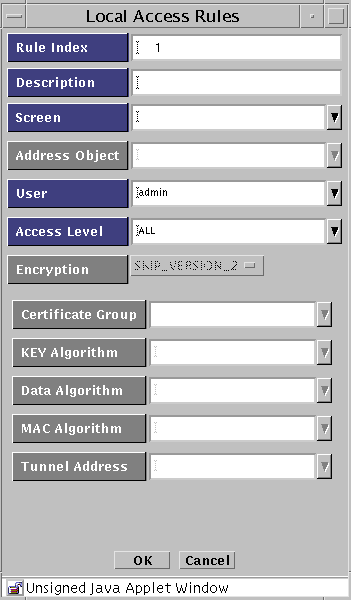
The following table describes the controls for the Local Access Rules dialog box.
Table 3-3 Controls for the Local Access Rules Dialog Box
To Add or Change an Administrative Access Rule for Remote Administration
If you are adding an additional remote Administration Station, you must add a rule for it.
Note -
If you change the encryption parameters, make a note of them; they have to match the encryption parameters on the remote Administration Station.
-
Execute the steps in "To Modify Rules".
-
Click the Administrative Access tab in the Policy Rules area.

-
Click the Add New Rule button in the Access Rules for Remote Administration area.
The Remote Access Rule dialog box appears.
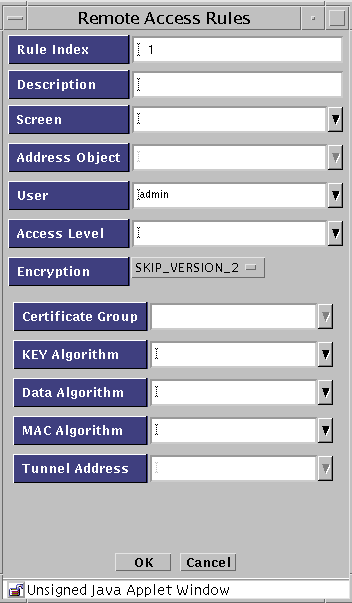
The following table describes the controls for the Remote Access Rules dialog box.
Table 3-4 Controls for the Remote Access Rules Dialog Box -
Select the user or group of administration users to which this access rule applies.
-
To associate this entry with a specific Screen, choose a Screen from the Screen list.
Note -If you are using the CMG (centralized management group) feature, and this field is left blank or contains an asterisk ("*"), the access rule being defined will, by default, allow access to all Screens in the cluster.
-
Select the address you want to use from the Address Object list.
-
Select the type of encryption you want to use from the Encryption list.
To use IPsec IKE, see "To Specify a SKIP/IPsec/IKE Action on a Remote Access Rule".
To use SKIP (Simple Key-Management for Internet Protocol), follow these substeps:
-
Select the version of SKIP you want to use from the Encryption list.
Use SKIP_VERSION_1 for communicating with an SPF-100. For later versions, choose SKIP_VERSION_2.
The required fields for SKIP_VERSION_1 are:
-
Certificate Group
-
Key Algorithm
-
Data Algorithm
The required fields for SKIP_VERSION_2 are:
-
MAC Algorithm
-
Certificate Group
-
Key Algorithm
-
Data Algorithm
-
-
Select the certificate group that you want to use from the Certificate Group list.
Specify the Screen's certificate or certificate group (in this case, the certificate or certificate group that includes the remote Administration Station's certificate) and administration IP address in the Screen's Administration Certificate field.
-
Select the key algorithm that you want to use from the Key Algorithm list.
-
Select the data algorithm you want to use from the Data Algorithm list.
-
(For SKIP_VERSION_2 only) Select the MAC algorithm that you want to use from the list of MAC algorithms.
-
(Optional) Select the tunnel address of the remote Administration Station from the Tunnel list.
-
-
Type a description in the Description field.
-
Select the level of access you wish to authorize for this user from the Access Level list.
There are five access levels for remote administrators:
ALL --The administrator can display and modify all settings for the Screen.
STATUS -- The administrator can display status information (logs, statistics, status) but cannot display or modify management settings
READ -- The administrator can view both the Information and Policy. This level also allows the user to save and clear logs on the information page. With this access level users cannot modify any Policy data
WRITE --The administrator can perform all operations except modifying the Administration Access rules for any Policy.
NONE (Default) -- The administrator does not have access.
-
Click the OK button.
-
Repeat the previous steps until you have added all the access rules for remote administration.
-
Click the Save Changes button.
-
Add the Screen's certificate MKID in the SKIP database of the remote Administration Station, and configure it to use SKIP to communicate with the Screen.
To Specify a SKIP/IPsec/IKE Action on a Remote Access Rule
-
Execute the steps in "To Modify Rules".
-
Select the Administration Access tab in the Policy Rules area.
The Administration Access panel appears.

-
Click Add New Rule under the Access Rules for Remote Administration
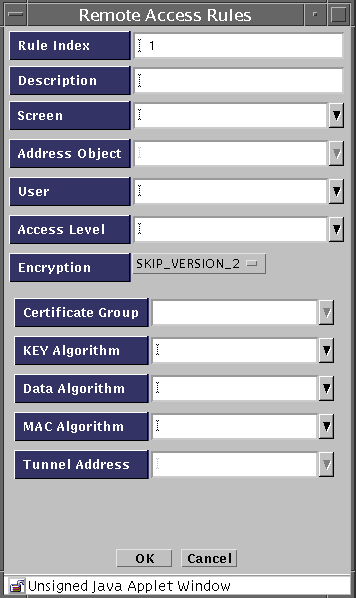
The Remote Access Rules panel appears.
-
Select IPSEC IKE from the Encryption pulldown.
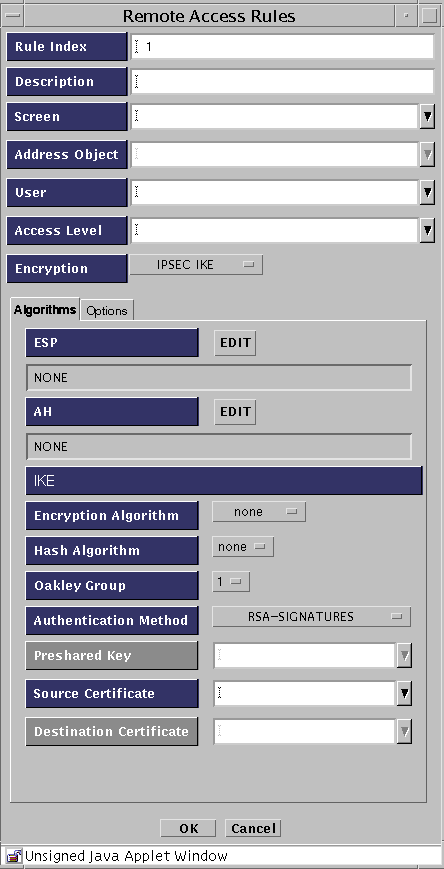
The Remote Access Rules panel for IPsec/IKE appears.
-
(Optional) Type a brief description for this rule.
-
Select the user or group of administration users to which this access rule applies.
-
To associate this entry with a specific Screen, choose a Screen from the Screen list.
Note -If you are using the CMG (centralized management group) feature, and this field is left blank or contains an asterisk ("*"), the access rule being defined will, by default, allow access to all Screens in the cluster.
-
Select the address you want to use from the Address Object list,
-
Select the level of access you wish to authorize for this user from the Access Level list.
There are five access levels for remote administrators:
ALL. Master administrators, who have the access level ALL, grant the various access levels to the other administrators.
STATUS. Status administrators, who have the access level STATUS, can monitor SunScreens, but cannot view the policies.
READ. Local administrators, who have the access level READ, are users responsible for reviewing their individual Screen's policy. Local Administrators are allowed to read policies, but cannot change them; to do so they must make a request for changes to executive or master administrators.
WRITE. Executive administrators, who have the access level WRITE, can define and change policies.
NONE (Default--obviously not for remote administrators)
-
If you are using IPsec, follow Step 11 through Step 17. If you are using IKE, follow Step 18 through Step 23.
Note -You must complete Step 11 through Step 17 plus Step 18 through Step 23 to perform remote administration for IKE.
-
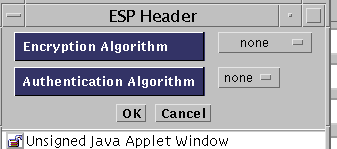
(IPsec) To define the ESP, click the Edit button.
The ESP Header panel appears.
-
(IPsec) Select the Encryption Algorithm to be used. The options are none, Null, DES, 3DES, BLOWFISH, and AES.
-
(IPsec) Select the Authentication Algorithm to be used. The options are none, MD5, and SHA1.
-
(IPsec) Click the OK button
-
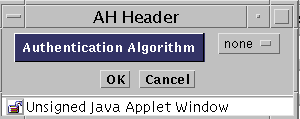
(IPsec) To define the authentication header (AH), click the Edit button.
The AH header appears.
-
(IPsec) Select the Authentication Algorithm to be used. The options are none, MD5, and SHA1.
-
(IPsec) Click the OK button
-
(IKE) Select the Encryption Algorithm to be used. The options are none, Null, DES, 3DES, BLOWFISH, and AES.
-
(IKE) Select the Hash Algorithm to be used. The options are none, MD5, and SHA1.
-
(IKE) Select the Oakley Group. The options are 1, 2, and 5.
-
(IKE) Select the Authentication Method to be used. The options are:
- RSA-SIGNATURES
- RSA-ENCRYPTION
- DSS-SIGNATURES
-
(IKE) Select the name of the Source Certificate. You can click on the arrow to see a list of certificates that are defined.
-
(IKE) Click the OK button.
- © 2010, Oracle Corporation and/or its affiliates
