
Static NAT Example
Configure Static NAT
-
Install and configure the Screen in either stealth or routing mode.
In our example, sf-screen1 is configured in routing mode with sf-host4 as a remote Administration Station. For instructions on configuring a Screen with remote administration, refer to "Setting Up Remote Administration with SKIP".
-
Create an Address HOST object for the private, unregistered host.
In this example, the unregistered host sf-host1 is defined as 10.0.1.1.
-
Create an Address HOST object for the public, registered IP address and give it a name.
In this example, the you would name the address object sf-host-static and assign it an address of 192.168.2.101.
-
Create an Address GROUP object that contains everything but the Screen.
In this example this object is defined as internet-static. You would create this object by including * and excluding localhost(the Screen).
-
Check that you created Packet Filtering rules to allow appropriate traffic to through the Screen.
In this example, you would allow http traffic from any host (*) to sf-host1 through the Screen as shown in the following figure.
Figure 3-2 Rule for HTTP Traffic

-
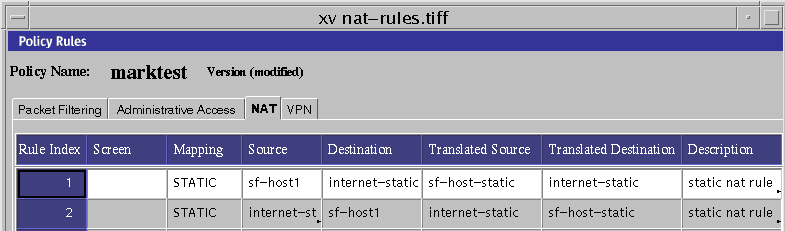
Create a STATIC NAT rule to translate the internal address to the legal address.
Rule 1 in Figure 3-3 maps internal address sf-host1 to legal address sf-host-static. This rule enables the internal host to initiate connections to any host on the internet (provided they are allowed by packet filtering rules.)
Because the SunScreen firewall keeps state information about NAT connections, return packets destined for the NAT address (sf-host-static) are translated back to the original internal address before entering the internal network
-
Create a STATIC NAT rule to translate the legal address to the internal address.
Rule 2 in Figure 3-3 is needed for hosts on the internet to initiate connections to the internal host. The rule translates the legal address (sf-host-static) to the internal address (sf-host1) .
Figure 3-3 STATIC NAT Rules
-
Add an arp entry on the Screen so it can respond to ARP requests from the external router.
Note -If you configured the Screen in stealth mode, this step is not required.
Use the following command as a model.
# arp -s translated-ip-addr screen-ethernet-addr pub
where translated-ip-addr is the public, registered IP address (192.168.2.101 for this example) and screen-ethernet-addr is the Ethernet address of the external interface of the Screen (qe1 in this example.)
Run this arp command for each legal IP address that the Screen uses for NAT .
Place this command in a start-up script to run each time the system boots because the arp entry is only valid until the Screen is rebooted.
The following shows an example of an arp start-up script used for STATIC and DYNAMIC NAT (see the following section on DYNAMIC NAT):
# /etc/rc2.d/S72sunscreenARP
#!/bin/sh
# startup script example to publish ARP entries
# for IP addresses sunscreen performs NAT on
#
# STATIC NAT mappings
arp -s 192.168.2.101 8:0:20:a3:ec:27 pub
# DYNAMIC NAT mappings
arp -s 192.168.2.102 8:0:20:a3:ec:27 pub
arp -s 192.168.2.103 8:0:20:a3:ec:27 pub
arp -s 192.168.2.104 8:0:20:a3:ec:27 pub
-
Save and activate your policy.
-
Verify that connections work to and from the host being translated, and that the translation is actually taking place.
For example, run snoop both inside and outside the Screen and try a ping from the Screen to the router. If the configuration is set up correctly, the result should be that the router is alive, and the snoop output should look similar to the following examples:
Inside the Screen:
sf-host1 -> sf-router 	ICMP Echo request
sf-router -> sf-host1 	ICMP Echo reply
Outside the Screen:
192.168.2.101 -> sf-router 	ICMP Echo request
sf-router -> 192.168.2.101 	ICMP Echo reply
- © 2010, Oracle Corporation and/or its affiliates