How to Boot the Target System from Flash Memory Using bootMonitor
In order to boot the target from flash memory you must perform the following procedures.
Placing the System Image on the Boot Server
See the ChorusOS 4.0 Installation Guide for Solaris Hosts for instructions on how to configure the boot server.
-
Copy the system image to the boot server.
For example, on a Solaris host workstation:
$ rcp chorus.RAM boot_server:/tftpboot
-
Verify that everyone has at least read access to the system image on the boot server.
For example:
$ rlogin boot_server
Password: password_for_user
$ ls -l /tftpboot/chorus.RAM
-rwxr-xr-x   1 user    group     1613824 Dec 15 17:33 chorus.RAM*
-
(Optional) While logged in to the boot server, create a configuration file for the target.
For a target system with IP address 129.157.173.199 using a boot server with IP address 129.157.173.144, the configuration file contains the following:
AUTOBOOT=YES
BOOTFILE=chorus.RAM
BOOTSERVER=129.157.173.144
The configuration file is named /tftpboot/819DADC7.ChorusOS.4.0, which is constructed from the target system IP address 129.157.173.199 as a concatenation of the following:
-
129 in decimal translates to 81 in hexadecimal
-
157 in decimal translates to 9D in hexadecimal
-
173 in decimal translates to AD in hexadecimal
-
199 in decimal translates to C7 in hexadecimal
-
(optional) .ChorusOS.4.0 identifies the release, and is appended to the concatenation of the IP address expressed in hexadecimal.
Note -The system first attempts to find the configuration file with the .ChorusOS.4.0 extension. If it fails to find one, however, it attempts to find a configuration file without the .ChorusOS.4.0 extension.
-
Creating a bootMonitor
Image
See bootMonitor(1CC)
for details about how bootMonitor
works.
-
Create a build directory where you will build a
bootMonitorimage:
$ mkdir bootmon
$ cd bootmon
Note that this build directory is different from the directory where you build system images.
-
Configure the
bootMonitorbuild directory based on the binary distribution:
$ configure -b $DIR/kernel \
$DIR/os \
$DIR/tools \
-s $DIR/src/nucleus/bsp/drv \
$DIR/src/nucleus/bsp/powerpc \
$DIR/src/nucleus/bsp/powerpc/mcp8260ADS \
$DIR/src/iom
-
Generate the build environment:
$ make
-
Edit the special bootmon/conf/mini profile so that it reads:
#
#	Mini Profile
#

#
#	Kernel features
#
-set USER_MODE=false
-set VIRTUAL_ADDRESS_SPACE=false
-set SEM=false
-set EVENT=false
-set MONITOR=false
-set TIMER=false
-set DATE=false
-set RTC=false
-set PERF=false
-set IPC=false
-set MIPC=false
-set LAPBIND=true # Change this from 'false' to 'true'
-set LAPSAFE=true # Change this from 'false' to 'true'
-set MON=false
-set LOG=false
-
Configure the build environment for
bootMonitor:
$ configurator -p conf/mini
$ configurator -set BOOT_MODE=ROM
$ configurator -set ETHER_ADDR=xx:xx:xx:xx:xx:xx
As you enter the commands above, replace xx:xx:xx:xx:xx:xx with the target system Ethernet address.
-
Build a
bootMonitorimage:
$ make bootMonitor
The resulting system image file is located in the build directory, bootmon and is called bootMonitor.ROM.
Flashing the Target System with the bootMonitor Image
-
Start the
visionXDtool. -
Click the terminal button to display a terminal window with the >BKM> prompt.
-
Enter in at the >BKM> prompt to set initialization values for the target system registers.
>BKM> in
-
Enter cs at the >BKM> prompt to check that the SDRAM configuration as coded in the trampoline.s source file used to build the
bootMonitorimage corresponds to the initialization values set using the in command.
>BKM> cs
-
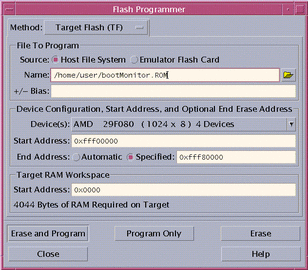
Select Program Flash... from the Tasks menu.
The Flash Programmer window is displayed. Use the information in the table below to fill in the necessary fields in the window.
Figure 1-1 Configuring the Flash Programmer

Click the Erase and Program button to write the
bootMonitorimage to flash. -
Click Extract in the dialog box that is displayed.
-
Click OK to confirm the download into flash memory.
Booting the Target System
Restart the target system to boot from flash.
- © 2010, Oracle Corporation and/or its affiliates
