Installing a StorEdge A5x00
This section provides the procedure for an initial installation of an StorEdge A5x00 disk array. The following table lists the steps involved in an initial installation of an StorEdge A5x00 disk array.
Table 6-1 Task Map: Installing a StorEdge A5x00|
Task |
For Instructions, Go To... |
|---|---|
|
Install the host adapters |
The documentation that shipped with your nodes |
|
Cable and configure the disk array |
Sun StorEdge A5000 Installation and Service Manual |
|
Check the hardware firmware levels, and install any required firmware updates |
Sun Cluster 3.0 Release Notes |
How to Install a StorEdge A5x00
Use this procedure to install an StorEdge A5x00 disk array. Perform the steps in this procedure in conjunction with the procedures in Sun Cluster 3.0 Installation Guide and your server hardware manual.
-
Install host adapters in the nodes that will be connected to the disk array.
For the procedure on installing host adapters, see the documentation that shipped with your network adapters and nodes.
Note -To ensure maximum redundancy, put each host adapter on a separate I/O board if possible.
-
Cable, power on, and configure the disk array.
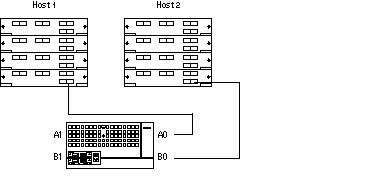
Figure 6-1 shows a sample disk array configuration.
For more information on cabling and configuring disk arrays, see Sun StorEdge A5000 Installation and Service Manual.
Figure 6-1 Sample StorEdge A5x00 Disk Array Configuration

-
Check the hardware firmware levels, and install any required firmware updates.
For the location of patches and installation instructions, see Sun Cluster 3.0 Release Notes.
Where to Go From Here
To install software, follow the procedures in Sun Cluster 3.0 Installation Guide.
- © 2010, Oracle Corporation and/or its affiliates
