How to Add a StorEdge A5x00 Disk Array to an Existing Cluster
Use this procedure to install a StorEdge A5x00 disk array in an existing cluster. Perform the steps in this procedure in conjunction with the procedures in Sun Cluster 3.0 System Administration Guide and your server hardware manual.
-
Determine if the StorEdge A5x00 disk array packages need to be installed on the nodes to which you are connecting the disk array. The following packages are required.
# pkginfo | egrep Wlux
system 				SUNWluxd 					Sun Enterprise Network Array sf Device Driver
system 				SUNWluxdx					Sun Enterprise Network Array sf Device Driver (64-bit)
system 				SUNWluxl 					Sun Enterprise Network Array socal Device Driver
system 				SUNWluxlx 					Sun Enterprise Network Array socal Device Driver (64-bit)
system 				SUNWluxop 					Sun Enterprise Network Array firmware and utilities
-
On each node, install any needed packages for the Solaris operating environment.
The disk array packages are located in the Product directory of the CD-ROM. Use the pkgadd command to add any necessary packages.
# pkgadd -d path_to_Solaris/Product Pkg1 Pkg2 Pkg3 ... PkgN
- path_to_Solaris
-
Path to the Solaris operating environment
- Pkg1 Pkg2
-
The packages to be added
-
Shut down and power off any node connected to the disk array.
# scswitch -S -h nodename
# shutdown -y -g 0
Refer to Sun Cluster 3.0 System Administration Guide for more information.
-
Install host adapters in the node that will be connected to the disk array.
For the procedure on installing host adapters, see the documentation that shipped with your network adapters and nodes.
-
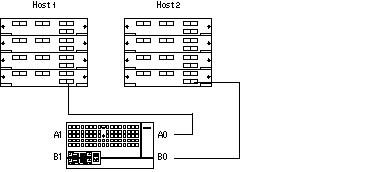
Cable, configure, and power on the disk array.
For more information, see the documentation that shipped with your disk array.
Figure 6-2 shows a sample disk array configuration.
Figure 6-2 Sample StorEdge A5x00 Disk Array Configuration

-
Power on and boot the node.
# boot -r
For the procedures on powering on and booting a node, see Sun Cluster 3.0 System Administration Guide.
-
Determine if any patches need to be installed on the node(s) that will be connected to the disk array.
For a list of Sun Cluster-specific patches, see Sun Cluster 3.0 Release Notes.
-
Obtain and install any needed patches on the nodes that will be connected to the disk array.
For procedures on applying patches, see Sun Cluster 3.0 System Administration Guide.
 Caution -
 Read any README files that accompany the patches before you begin this installation. Some patches must be installed in a specific order.
-
If required by the patch README instructions, shut down and reboot the node.
# scswitch -S -h nodename
# shutdown -y -g 0 -i 6
-
Perform Step 3 through Step 9 for each node attached to the disk array.
-
Perform volume management administration to add the disk drives in the array to the volume management configuration.
For more information, see your Solstice DiskSuite or VERITAS Volume Manager documentation.
- © 2010, Oracle Corporation and/or its affiliates
