Chapter 4 Installing and Maintaining a Sun StorEdge MultiPack Enclosure
This chapter provides the procedures for installing and maintaining a Sun StorEdgeTM MultiPack enclosure.
This chapter contains the following procedures:
-
"How to Add Disk Drive to StorEdge Multipack Enclosure in a Running Cluster"
-
"How to Replace a Disk Drive in StorEdge MultiPack Enclosure in a Running Cluster"
-
"How to Remove a Disk Drive From a StorEdge MultiPack Enclosure in Running Cluster"
-
"How to Add a StorEdge MultiPack Enclosure to a Running Cluster"
-
"How to Replace a StorEdge MultiPack Enclosure in a Running Cluster"
-
"How to Remove a StorEdge MultiPack Enclosure From a Running Cluster"
For conceptual information on multihost disks, see the Sun Cluster 3.0 U1 Concepts document.
Installing a StorEdge MultiPack Enclosure
This section describes the procedure for an initial installation of a StorEdge MultiPack enclosure.
How to Install a StorEdge MultiPack Enclosure
Use this procedure for an initial installation of a StorEdge MultiPack enclosure, prior to installing the Solaris operating environment and Sun Cluster software. Perform this procedure in conjunction with the procedures in the Sun Cluster 3.0 U1 Installation Guide and your server hardware manual.
Multihost storage in clusters uses the multi-initiator capability of the Small Computer System Interface (SCSI) specification. For conceptual information on multi-initiator capability, see the Sun Cluster 3.0 U1 Concepts document.
SCSI-reservations failures have been observed when clustering StorEdge MultiPack enclosures that contain a particular model of Quantum disk drive: SUN4.2G VK4550J. Avoid the use of this particular model of Quantum disk drive for clustering with StorEdge MultiPack enclosures. If you do use this model of disk drive, you must set the scsi-initiator-id of the "first node" to 6. If you are using a six-slot StorEdge MultiPack enclosure, you must also set the enclosure for the 9-through-14 SCSI target address range. For more information, see the Sun StorEdge MultiPack Storage Guide.
-
Ensure that each device in the SCSI chain has a unique SCSI address.
The default SCSI address for host adapters is 7. Reserve SCSI address 7 for one host adapter in the SCSI chain. This procedure refers to node that has SCSI address 7 as the "second node."
To avoid conflicts, in Step 7 you change the scsi-initiator-id of the remaining host adapter in the SCSI chain to an available SCSI address. This procedure refers to the node that has an available SCSI address as the "first node."
For a partial list of nvramrc editor and nvedit keystroke commands, see Appendix B, NVRAMRC Editor and NVEDIT Keystroke Commands of this guide. For a full list of commands, see the OpenBoot 3.x Command Reference Manual.
Note -Even though a slot in the StorEdge MultiPack enclosure might not be in use, do not set the scsi-initiator-id for the first node to the SCSI address for that disk slot. This precaution minimizes future complications if you install additional disk drives.
-
Install the host adapters in the nodes that will be connected to the StorEdge MultiPack enclosure.
For the procedure on installing a host adapter, see the documentation that shipped with your host adapter and node hardware.
-
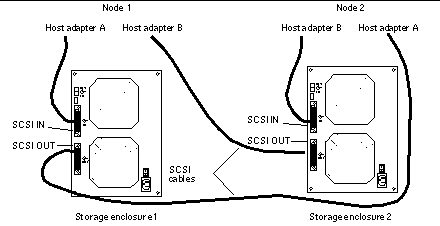
Connect the cables to the StorEdge MultiPack enclosure, as shown in Figure 4-1.
Make sure that the entire SCSI bus length to each StorEdge MultiPack enclosure is less than 6 m. This measurement includes the cables to both nodes, as well as the bus length internal to each StorEdge MultiPack enclosure, node, and host adapter. Refer to the documentation that shipped with the StorEdge MultiPack enclosure for other restrictions about SCSI operation.
Figure 4-1 Example of a StorEdge MultiPack Enclosure Mirrored Pair
-
Connect the AC power cord for each StorEdge MultiPack enclosure of the mirrored pair to a different power source.
-
Power on the first node but do not allow it to boot. If necessary, halt the node to continue with OpenBootTM PROM (OBP) Monitor tasks. The first node is the node with an available SCSI address.
-
Find the paths to the host adapters.
{0} ok show-disks
a) /pci@1f,4000/pci@4/SUNW,isptwo@4/sd
b) /pci@1f,4000/pci@2/SUNW,isptwo@4/sd
Identify and record the two controllers that are to be connected to the storage devices, and record these paths. Use this information to change the SCSI addresses of these controllers in the nvramrc script in Step 7. Do not include the /sd directories in the device paths.
-
Edit the nvramrc script to set the scsi-initiator-id for the host adapters on the first node.
For a partial list of nvramrc editor and nvedit keystroke commands, see Appendix B, NVRAMRC Editor and NVEDIT Keystroke Commands. For a full list of commands, see the OpenBoot 3.x Command Reference Manual.
The following example sets the scsi-initiator-id to 6. The OpenBoot PROM Monitor prints the line numbers (0:, 1:, and so on).
Note -Insert exactly one space after the first quotation mark and before scsi-initiator-id.
{0} ok nvedit 0: probe-all 1: cd /pci@1f,4000/pci@4/SUNW,isptwo@4 2: 6 " scsi-initiator-id" integer-property 3: device-end 4: cd /pci@1f,4000/pci@2/SUNW,isptwo@4 5: 6 " scsi-initiator-id" integer-property 6: device-end 7: install-console 8: banner <Control C> {0} ok -
Store the changes.
The changes you make through the nvedit command are recorded on a temporary copy of the nvramrc script. You can continue to edit this copy without risk. After you complete your edits, save the changes. If you are not sure about the changes, discard them.
-
To store the changes, type:
{0} ok nvstore {0} ok -
To discard the changes, type:
{0} ok nvquit
{0} ok
-
-
Verify the contents of the nvramrc script you created in Step 7, as shown in the following example.
If the contents of the nvramrc script are incorrect, use the nvedit command to make corrections.
{0} ok printenv nvramrc nvramrc = probe-all cd /pci@1f,4000/pci@4/SUNW,isptwo@4 6 " scsi-initiator-id" integer-property device-end cd /pci@1f,4000/pci@2/SUNW,isptwo@4 6 " scsi-initiator-id" integer-property device-end install-console banner {0} ok -
Instruct the OpenBoot PROM Monitor to use the nvramrc script.
{0} ok setenv use-nvramrc? true use-nvramrc? = true {0} ok -
Power on the second node but do not allow it to boot. If necessary, halt the node to continue with OpenBoot PROM Monitor tasks. The second node is the node that has SCSI address 7.
-
Verify that the scsi-initiator-id for the host adapter on the second node is set to 7.
Use the show-disks command to find the paths to the host adapters connected to these enclosures (as in Step 6). Select each host adapter's device tree node, and display the node's properties to confirm that the scsi-initiator-id for each host adapter is set to 7, as shown in the following example.
{0} ok cd /pci@1f,4000/pci@4/SUNW,isptwo@4 {0} ok .properties ... scsi-initiator-id 00000007 ... {0} ok cd /pci@1f,4000/pci@2/SUNW,isptwo@4 {0} ok .properties ... scsi-initiator-id 00000007 -
Continue with the Solaris operating environment, Sun Cluster software, and volume management software installation tasks.
For software installation procedures, see the Sun Cluster 3.0 U1 Installation Guide.
Maintaining a StorEdge MultiPack
This section provides the procedures for maintaining a StorEdge MultiPack enclosure. The following table lists these procedures.
Table 4-1 Task Map:Maintaining a StorEdge MultiPack Enclosure|
Task |
For Instructions, Go To |
|---|---|
|
Add a disk drive |
"How to Add Disk Drive to StorEdge Multipack Enclosure in a Running Cluster" |
|
Replace a disk drive |
"How to Replace a Disk Drive in StorEdge MultiPack Enclosure in a Running Cluster" |
|
Remove a disk drive |
"How to Remove a Disk Drive From a StorEdge MultiPack Enclosure in Running Cluster" |
|
Add a StorEdge MultiPack enclosure |
"How to Add a StorEdge MultiPack Enclosure to a Running Cluster" |
|
Replace a StorEdge MultiPack enclosure |
"How to Replace a StorEdge MultiPack Enclosure in a Running Cluster" |
|
Remove a StorEdge MultiPack enclosure |
"How to Remove a StorEdge MultiPack Enclosure From a Running Cluster" |
How to Add Disk Drive to StorEdge Multipack Enclosure in a Running Cluster
Use this procedure to add a disk drive to a running cluster. Perform the steps in this procedure in conjunction with the procedures in the Sun Cluster 3.0 U1 System Administration Guide and your server hardware manual. "Example--Adding a StorEdge MultiPack Disk Drive" shows how to apply this procedure.
For conceptual information on quorums, quorum devices, global devices, and device IDs, see the Sun Cluster 3.0 U1 Concepts document.
SCSI-reservations failures have been observed when clustering StorEdge MultiPack enclosures that contain a particular model of Quantum disk drive: SUN4.2G VK4550J. Avoid the use of this particular model of Quantum disk drive for clustering with StorEdge MultiPack enclosures. If you do use this model of disk drive, you must set the scsi-initiator-id of the "first node" to 6. If you are using a six-slot StorEdge MultiPack enclosure, you must also set the enclosure for the 9-through-14 SCSI target address range. For more information, see the Sun StorEdge MultiPack Storage Guide.
-
Locate an empty disk slot in the StorEdge MultiPack enclosure for the disk drive you want to add.
Identify the empty slots either by observing the disk drive LEDs on the front of the StorEdge MultiPack enclosure, or by removing the side-cover of the unit. The target address IDs that correspond to the slots appear on the middle partition of the drive bay.
-
Install the disk drive.
For detailed instructions, see the documentation that shipped with your StorEdge MultiPack enclosure.
-
On all nodes that are attached to the StorEdge MultiPack enclosure, configure the disk drive.
# cfgadm -c configure cN
# devfsadm
-
On all nodes, ensure that entries for the disk drive have been added to the /dev/rdsk directory.
# ls -l /dev/rdsk
-
If necessary, use the format(1M) command or the fmthard(1M) command to partition the disk drive.
-
From any node, update the global device namespace.
If a volume management daemon such as vold is running on your node, and you have a CD-ROM drive that is connected to the node, a device busy error might be returned even if no disk is in the drive. This error is an expected behavior.
# scgdevs
-
On all nodes, verify that a device ID (DID) has been assigned to the disk drive.
# scdidadm -l
Note -As shown in "Example--Adding a StorEdge MultiPack Disk Drive", the DID 35 that is assigned to the new disk drive might not be in sequential order in the StorEdge MultiPack enclosure.
-
Perform volume management administration to add the new disk drive to the configuration.
For more information, see your Solstice DiskSuiteTM or VERITAS Volume Manager documentation.
Example--Adding a StorEdge MultiPack Disk Drive
The following example shows how to apply the procedure for adding a StorEdge MultiPack enclosure disk drive.
# scdidadm -l
16       phys-circinus-3:/dev/rdsk/c2t0d0 /dev/did/rdsk/d16
17       phys-circinus-3:/dev/rdsk/c2t1d0 /dev/did/rdsk/d17
18       phys-circinus-3:/dev/rdsk/c2t2d0 /dev/did/rdsk/d18
19       phys-circinus-3:/dev/rdsk/c2t3d0 /dev/did/rdsk/d19
...
26       phys-circinus-3:/dev/rdsk/c2t12d0 /dev/did/rdsk/d26
30       phys-circinus-3:/dev/rdsk/c1t2d0 /dev/did/rdsk/d30
31       phys-circinus-3:/dev/rdsk/c1t3d0 /dev/did/rdsk/d31
32       phys-circinus-3:/dev/rdsk/c1t10d0 /dev/did/rdsk/d32
33       phys-circinus-3:/dev/rdsk/c0t0d0 /dev/did/rdsk/d33
34       phys-circinus-3:/dev/rdsk/c0t6d0 /dev/did/rdsk/d34
8190     phys-circinus-3:/dev/rmt/0     /dev/did/rmt/2
# cfgadm -c configure c1
# devfsadm
# scgdevs
Configuring DID devices
Could not open /dev/rdsk/c0t6d0s2 to verify device id.
        Device busy
Configuring the /dev/global directory (global devices)
obtaining access to all attached disks
reservation program successfully exiting
# scdidadm -l
16       phys-circinus-3:/dev/rdsk/c2t0d0 /dev/did/rdsk/d16
17       phys-circinus-3:/dev/rdsk/c2t1d0 /dev/did/rdsk/d17
18       phys-circinus-3:/dev/rdsk/c2t2d0 /dev/did/rdsk/d18
19       phys-circinus-3:/dev/rdsk/c2t3d0 /dev/did/rdsk/d19
...
26       phys-circinus-3:/dev/rdsk/c2t12d0 /dev/did/rdsk/d26
30       phys-circinus-3:/dev/rdsk/c1t2d0 /dev/did/rdsk/d30
31       phys-circinus-3:/dev/rdsk/c1t3d0 /dev/did/rdsk/d31
32       phys-circinus-3:/dev/rdsk/c1t10d0 /dev/did/rdsk/d32
33       phys-circinus-3:/dev/rdsk/c0t0d0 /dev/did/rdsk/d33
34       phys-circinus-3:/dev/rdsk/c0t6d0 /dev/did/rdsk/d34
35       phys-circinus-3:/dev/rdsk/c2t13d0 /dev/did/rdsk/d35
8190     phys-circinus-3:/dev/rmt/0     /dev/did/rmt/2
|
Where to Go From Here
To configure a disk drive as a quorum device, see the Sun Cluster 3.0 U1 System Administration Guide for the procedure on adding a quorum device.
How to Replace a Disk Drive in StorEdge MultiPack Enclosure in a Running Cluster
Use this procedure to replace a StorEdge MultiPack enclosure disk drive. "Example--Replacing a StorEdge MultiPack Disk Drive" shows how to apply this procedure. Perform the steps in this procedure in conjunction with the procedures in Sun Cluster 3.0 U1 System Administration Guide and your server hardware manual. Use the procedures in your server hardware manual to identify a failed disk drive.
For conceptual information on quorums, quorum devices, global devices, and device IDs, see the Sun Cluster 3.0 U1 Concepts document.
SCSI-reservations failures have been observed when clustering StorEdge MultiPack enclosures that contain a particular model of Quantum disk drive: SUN4.2G VK4550J. Avoid the use of this particular model of Quantum disk drive for clustering with StorEdge MultiPack enclosures. If you do use this model of disk drive, you must set the scsi-initiator-id of the "first node" to 6. If you are using a six-slot StorEdge MultiPack enclosure, you must also set the enclosure for the 9-through-14 SCSI target address range (for more information, see the Sun StorEdge MultiPack Storage Guide).
-
Identify the disk drive that needs replacement.
If the disk error message reports the drive problem by device ID (DID), use the scdidadm -l command to determine the Solaris logical device name. If the disk error message reports the drive problem by the Solaris physical device name, use your Solaris documentation to map the Solaris physical device name to the Solaris logical device name. Use this Solaris logical device name and DID throughout this procedure.
# scdidadm -l deviceID
-
Determine if the disk drive you want to replace is a quorum device.
# scstat -q
-
If the disk drive you want to replace is a quorum device, put the quorum device into maintenance state before you go to Step 3. For the procedure on putting a quorum device into maintenance state, see the Sun Cluster 3.0 U1 System Administration Guide.
-
If the disk is not a quorum device, go to Step 3.
-
-
If possible, back up the metadevice or volume.
For more information, see your Solstice DiskSuite or VERITAS Volume Manager documentation.
-
Perform volume management administration to remove the disk drive from the configuration.
For more information, see your Solstice DiskSuite or VERITAS Volume Manager documentation.
-
Identify the failed disk drive's physical DID.
Use this physical DID in Step 12 to verify that the failed disk drive has been replaced with a new disk drive.
# scdidadm -o diskid -l cNtXdY
-
If you are using Solstice DiskSuite as your volume manager, save the disk partitioning for use when you partition the new disk drive.
If you are using VERITAS Volume Manager, skip this step and go to Step 7.
# prtvtoc /dev/rdsk/cNtXdYsZ > filename
Note -Do not save this file under /tmp because you will lose this file when you reboot. Instead, save this file under /usr/tmp.
-
Replace the failed disk drive.
For more information, see the Sun StorEdge MultiPack Storage Guide.
-
On one node that is attached to the StorEdge MultiPack enclosure, run the devfsadm(1M) command to probe all devices and to write the new disk drive to the /dev/rdsk directory.
Depending on the number of devices connected to the node, the devfsadm command can require at least five minutes to complete.
# devfsadm
-
If you are using Solstice DiskSuite as your volume manager, from any node that is connected to the StorEdge MultiPack enclosure, partition the new disk drive by using the partitioning you saved in Step 6.
If you are using VERITAS Volume Manager, skip this step and go to Step 10.
# fmthard -s filename /dev/rdsk/cNtXdYsZ
-
One at a time, shut down and reboot the nodes that are connected to the StorEdge MultiPack enclosure.
# scswitch -S -h nodename
# shutdown -y -g0 -i6
For more information, see the Sun Cluster 3.0 U1 System Administration Guide.
-
From any node that is connected to the disk drive, update the DID database.
# scdidadm -R deviceID
-
From any node, confirm that the failed disk drive has been replaced by comparing the new physical DID to the physical DID that was identified in Step 5.
If the new physical DID is different from the physical DID in Step 5, you successfully replaced the failed disk drive with a new disk drive.
# scdidadm -o diskid -l cNtXdY
-
On all connected nodes, upload the new information to the DID driver.
If a volume management daemon such as vold is running on your node, and you have a CD-ROM drive that is connected to the node, a device busy error might be returned even if no disk is in the drive. This error is an expected behavior.
# scdidadm -ui
-
Perform volume management administration to add the disk drive back to its diskset or disk group.
For more information, see your Solstice DiskSuite or VERITAS Volume Manager documentation.
-
If you want this new disk drive to be a quorum device, add the quorum device.
For the procedure on adding a quorum device, see the Sun Cluster 3.0 U1 System Administration Guide.
Example--Replacing a StorEdge MultiPack Disk Drive
The following example shows how to apply the procedure for replacing a StorEdge MultiPack enclosure disk drive.
# scdidadm -l d20 20 phys-schost-2:/dev/rdsk/c3t2d0 /dev/did/rdsk/d20 # scdidadm -o diskid -l c3t2d0 5345414741544520393735314336343734310000 # prtvtoc /dev/rdsk/c3t2d0s2 > /usr/tmp/c3t2d0.vtoc ... # devfsadm # fmthard -s /usr/tmp/c3t2d0.vtoc /dev/rdsk/c3t2d0s2 # scswitch -S -h node1 # shutdown -y -g0 -i6 ... # scdidadm -R d20 # scdidadm -o diskid -l c3t2d0 5345414741544520393735314336363037370000 # scdidadm -ui |
How to Remove a Disk Drive From a StorEdge MultiPack Enclosure in Running Cluster
Use this procedure to remove a disk drive from a StorEdge MultiPack enclosure. Perform the steps in this procedure in conjunction with the procedures in the Sun Cluster 3.0 U1 System Administration Guide and your server hardware manual.
For conceptual information on quorum, quorum devices, global devices, and device IDs, see the Sun Cluster 3.0 U1 Concepts document.
-
Determine if the disk drive you want to remove is a quorum device.
# scstat -q
-
If the disk drive you want to replace is a quorum device, put the quorum device into maintenance state before you go to Step 2. For the procedure on putting a quorum device into maintenance state, see the Sun Cluster 3.0 U1 System Administration Guide.
-
If the disk is not a quorum device, go to Step 2.
-
-
Perform volume management administration to remove the disk drive from the configuration.
For more information, see your Solstice DiskSuite or VERITAS Volume Manager documentation.
-
Identify the disk drive that needs to be removed and the slot from which the disk drive needs to be removed.
If the disk error message reports the drive problem by DID, use the scdidadm -l command to determine the Solaris device name.
# scdidadm -l deviceID
# cfgadm -al
-
Remove the disk drive.
For more information on the procedure for removing a disk drive, see the Sun StorEdge MultiPack Storage Guide.
-
On all nodes, remove references to the disk drive.
# cfgadm -c unconfigure cN::dsk/cNtXdY
# devfsadm -C
# scdidadm -C
How to Add a StorEdge MultiPack Enclosure to a Running Cluster
Use this procedure to install a StorEdge MultiPack enclosure in a running cluster. Perform the steps in this procedure in conjunction with the procedures in the Sun Cluster 3.0 U1 Installation Guide and your server hardware manual.
For conceptual information on multi-initiator SCSI and device IDs, see the Sun Cluster 3.0 U1 Concepts document.
Quorum failures have been observed when clustering StorEdge Multipack enclosures that contain a particular model of Quantum disk drive: SUN4.2G VK4550J. Avoid the use of this particular model of Quantum disk drive for clustering with StorEdge Multipack enclosures. If you do use this model of disk drive, you must set the scsi-initiator-id of the "first node" to 6. If you are using a six-slot StorEdge Multipack, you must also set the enclosure for the 9-through-14 SCSI target address range (for more information, see the Sun StorEdge MultiPack Storage Guide).
-
Ensure that each device in the SCSI chain has a unique SCSI address.
The default SCSI address for host adapters is 7. Reserve SCSI address 7 for one host adapter in the SCSI chain. This procedure refers to the node with SCSI address 7 as the "second node."
To avoid conflicts, in Step 9 you change the scsi-initiator-id of the remaining host adapter in the SCSI chain to an available SCSI address. This procedure refers to the node with an available SCSI address as the "first node."
For a partial list of nvramrc editor and nvedit keystroke commands, see Appendix B, NVRAMRC Editor and NVEDIT Keystroke Commands of this guide. For a full list of commands, see the OpenBoot 3.x Command Reference Manual.
Note -Even though a slot in the StorEdge MultiPack enclosure might not be in use, do not set the scsi-initiator-id for the first node to the SCSI address for that disk slot. This precaution minimizes future complications if you install additional disk drives.
-
Shut down and power off the first node.
# scswitch -S -h nodename
# shutdown -y -g0 -i0
For more information, see the Sun Cluster 3.0 U1 System Administration Guide.
-
Install the host adapters in the first node.
For the procedure on installing a host adapter, see the documentation that shipped with your host adapter and node.
-
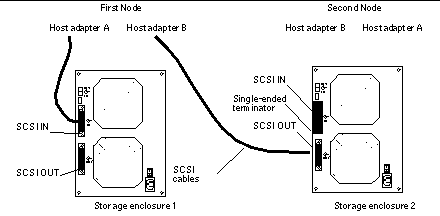
Connect the single-ended SCSI cable between the node and the StorEdge MultiPack enclosures, as shown in Figure 4-2.
Make sure that the entire SCSI bus length to each StorEdge MultiPack enclosure is less than 6 m. This measurement includes the cables to both nodes, as well as the bus length internal to each StorEdge MultiPack enclosure, node, and host adapter. Refer to the documentation that shipped with the StorEdge MultiPack enclosure for other restrictions about SCSI operation.
Figure 4-2 Example of a StorEdge MultiPack Enclosure Mirrored Pair
-
Temporarily install a single-ended terminator on the SCSI IN port of the second StorEdge MultiPack enclosure, as shown in Figure 4-2.
-
Connect each StorEdge MultiPack enclosure of the mirrored pair to different power sources.
-
Power on the first node and the StorEdge MultiPack enclosures.
-
Find the paths to the host adapters.
{0} ok show-disks
a) /pci@1f,4000/pci@4/SUNW,isptwo@4/sd
b) /pci@1f,4000/pci@2/SUNW,isptwo@4/sd
Identify and record the two controllers that are to be connected to the storage devices, and record these paths. Use this information to change the SCSI addresses of these controllers in the nvramrc script in Step 9. Do not include the /sd directories in the device paths.
-
Edit the nvramrc script to set the scsi-initiator-id for the host adapters on the first node.
For a partial list of nvramrc editor and nvedit keystroke commands, see Appendix B, NVRAMRC Editor and NVEDIT Keystroke Commands. For a full list of commands, see the OpenBoot 3.x Command Reference Manual.
The following example sets the scsi-initiator-id to 6. The OpenBoot PROM Monitor prints the line numbers (0:, 1:, and so on).
 Caution -
 Insert exactly one space after the first quotation mark and before scsi-initiator-id.
{0} ok nvedit 0: probe-all 1: cd /pci@1f,4000/pci@4/SUNW,isptwo@4 2: 6 " scsi-initiator-id" integer-property 3: device-end 4: cd /pci@1f,4000/pci@2/SUNW,isptwo@4 5: 6 " scsi-initiator-id" integer-property 6: device-end 7: install-console 8: banner <Control C> {0} ok -
Store the changes.
The changes you make through the nvedit command are recorded on a temporary copy of the nvramrc script. You can continue to edit this copy without risk. After you complete your edits, save the changes. If you are not sure about the changes, discard them.
-
To store the changes, type:
{0} ok nvstore {0} ok -
To discard the changes, type:
{0} ok nvquit
{0} ok
-
-
Verify the contents of the nvramrc script you created in Step 9, as shown in the following example.
If the contents of the nvramrc script are incorrect, use the nvedit command to make corrections.
{0} ok printenv nvramrc nvramrc = probe-all cd /pci@1f,4000/pci@4/SUNW,isptwo@4 6 " scsi-initiator-id" integer-property device-end cd /pci@1f,4000/pci@2/SUNW,isptwo@4 6 " scsi-initiator-id" integer-property device-end install-console banner {0} ok -
Instruct the OpenBoot PROM Monitor to use the nvramrc script, as shown in the following example.
{0} ok setenv use-nvramrc? true use-nvramrc? = true {0} ok -
Boot the first node and wait for it to join the cluster.
{0} ok boot -rFor more information, see the Sun Cluster 3.0 U1 System Administration Guide.
-
On all nodes, verify that the DIDs have been assigned to the disk drives in the StorEdge MultiPack enclosure.
# scdidadm -l
-
Shut down and power off the second node.
# scswitch -S -h nodename
# shutdown -y -g0 -i0
-
Install the host adapters in the second node.
For the procedure on installing a host adapter, see the documentation that shipped with your host adapter and node.
-
Remove the SCSI terminator you installed in Step 5.
-
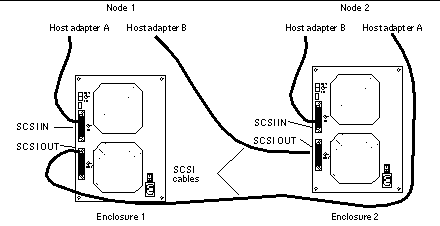
Connect the StorEdge MultiPack enclosures to the host adapters by using single-ended SCSI cables.
Figure 4-3 Example of a StorEdge MultiPack Enclosure Mirrored Pair
-
Power on the second node but do not allow it to boot. If necessary, halt the node to continue with OpenBoot PROM Monitor tasks.
-
Verify that the second node checks for the new host adapters and disk drives.
{0} ok show-disks -
Verify that the scsi-initiator-id for the host adapter on the second node is set to 7.
Use the show-disks command to find the paths to the host adapters that are connected to these enclosures. Select each host adapter's device tree node, and display the node's properties to confirm that the scsi-initiator-id for each host adapter is set to 7.
{0} ok cd /pci@1f,4000/pci@4/SUNW,isptwo@4 {0} ok .properties ... scsi-initiator-id 00000007 ... {0} ok cd /pci@1f,4000/pci@2/SUNW,isptwo@4 {0} ok .properties ... scsi-initiator-id 00000007 -
Boot the second node and wait for it to join the cluster.
{0} ok boot -r -
On all nodes, verify that the DIDs have been assigned to the disk drives in the StorEdge MultiPack enclosure.
# scdidadm -l
-
Perform volume management administration to add the disk drives in the StorEdge MultiPack enclosure to the volume management configuration.
For more information, see your Solstice DiskSuite or VERITAS Volume Manager documentation.
How to Replace a StorEdge MultiPack Enclosure in a Running Cluster
Use this procedure to replace a StorEdge MultiPack enclosure in a running cluster. This procedure assumes that you are retaining the disk drives in the StorEdge MultiPack enclosure that you are replacing and that you are retaining the references to these same disk drives.
If you want to replace your disk drives, see "How to Replace a Disk Drive in StorEdge MultiPack Enclosure in a Running Cluster".
-
If possible, back up the metadevices or volumes that reside in the disk array.
For more information, see your Solstice DiskSuite or VERITAS Volume Manager documentation.
-
Perform volume management administration to remove the disk array from the configuration.
For more information, see your Solstice DiskSuite or VERITAS Volume Manager documentation.
-
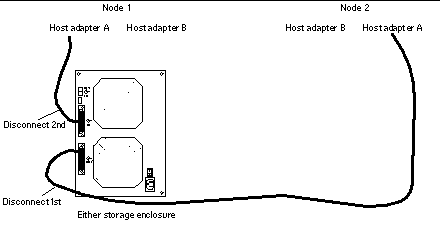
Disconnect the SCSI cables from the StorEdge MultiPack enclosure, disconnecting the cable on the SCSI OUT connector first, then the cable on the SCSI IN connector second (see Figure 4-4).
Figure 4-4 Disconnecting the SCSI Cables
-
Power off, and disconnect the StorEdge MultiPack enclosure from the AC power source.
For more information, see the documentation that shipped with your StorEdge MultiPack enclosure and the labels inside the lid of the StorEdge MultiPack enclosure.
-
Connect the new StorEdge MultiPack enclosure to an AC power source.
Refer to the documentation that shipped with the StorEdge MultiPack enclosure and the labels inside the lid of the StorEdge MultiPack enclosure.
-
Connect the SCSI cables to the new StorEdge MultiPack enclosure, reversing the order in which you disconnected them (connect the SCSI IN connector first, then the SCSI OUT connector second). See Figure 4-4.
-
Move the disk drives one at a time from the old StorEdge MultiPack enclosure to the same slots in the new StorEdge MultiPack enclosure.
-
Power on the StorEdge MultiPack enclosure.
-
On all nodes that are attached to the StorEdge MultiPack enclosure, run the devfsadm(1M) command.
# devfsadm
-
One at a time, shut down and reboot the nodes that are connected to the StorEdge MultiPack enclosure.
# scswitch -S -h nodename
# shutdown -y -g0 -i6
For more information on shutdown(1M), see the Sun Cluster 3.0 U1 System Administration Guide.
-
Perform volume management administration to add the StorEdge MultiPack enclosure to the configuration.
For more information, see your Solstice DiskSuite or VERITAS Volume Manager documentation.
How to Remove a StorEdge MultiPack Enclosure From a Running Cluster
Use this procedure to remove a StorEdge MultiPack enclosure from a cluster. This procedure assumes that you want to remove the references to the disk drives in the enclosure.
-
Perform volume management administration to remove the StorEdge MultiPack enclosure from the configuration.
For more information, see your Solstice DiskSuite or VERITAS Volume Manager documentation.
-
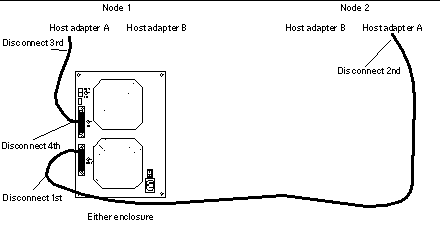
Disconnect the SCSI cables from the StorEdge MultiPack enclosure, disconnecting them in the order that is shown in Figure 4-5.
Figure 4-5 Disconnecting the SCSI Cables
-
Power off, and disconnect the StorEdge MultiPack enclosure from the AC power source.
For more information, see the documentation that shipped with the StorEdge MultiPack enclosure and the labels inside the lid of the StorEdge MultiPack enclosure.
-
Remove the StorEdge MultiPack enclosure.
For the procedure on removing an enclosure, see the Sun StorEdge MultiPack Storage Guide.
-
Identify the disk drives you need to remove from the cluster.
# cfgadm -al
-
On all nodes, remove references to the disk drives that were in the StorEdge MultiPack enclosure you removed in Step 4.
# cfgadm -c unconfigure cN::dsk/cNtXdY
# devfsadm -C
# scdidadm -C
-
If necessary, remove any unused host adapters from the nodes.
For the procedure on removing a host adapter, see the documentation that shipped with your host adapter and node.
- © 2010, Oracle Corporation and/or its affiliates
