Installing StorEdge T3/T3+ Disk Trays
This section contains the procedure for an initial installation of new StorEdge T3 or StorEdge T3+ disk trays.
How to Install StorEdge T3/T3+ Disk Trays
Use this procedure to install and configure new StorEdge T3 or StorEdge T3+ disk trays in a cluster that is not running. Perform the steps in this procedure in conjunction with the procedures in the Sun Cluster 3.0 U1 Installation Guide and your server hardware manual.
-
Install the host adapters in the nodes that are to be connected to the StorEdge T3/T3+ disk trays.
For the procedure on installing host adapters, see the documentation that shipped with your host adapters and nodes.
-
Install the Sun StorEdge FC-100 hubs.
For the procedure on installing Sun StorEdge FC-100 hubs, see the FC-100 Hub Installation and Service Manual.
-
Set up a Reverse Address Resolution Protocol (RARP) server on the network you want the new StorEdge T3/T3+ disk trays to reside on.
This RARP server enables you to assign an IP address to the new StorEdge T3/T3+ disk trays by using each StorEdge T3/T3+ disk tray's unique MAC address.
For the procedure on setting up a RARP server, see the Sun StorEdge T3 Installation, Operation, and Service Manual.
-
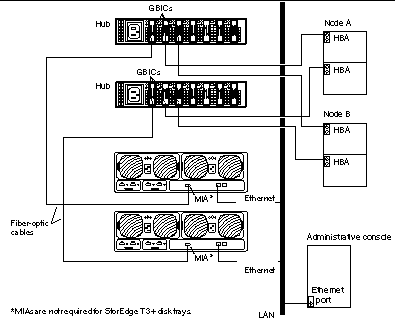
(Skip this step if you are installing a StorEdge T3+ disk tray) Install the media interface adapters (MIAs) in the StorEdge T3 disk trays you are installing, as shown in Figure C-1.
For the procedure on installing a media interface adapter (MIA), see the Sun StorEdge T3 Configuration Guide.
-
If necessary, install gigabit interface converters (GBICs) in the Sun StorEdge FC-100 hubs, as shown in Figure C-1.
The GBICs let you connect the Sun StorEdge FC-100 hubs to the StorEdge T3/T3+ disk trays you are installing. For the procedure on installing an FC-100 hub GBIC, see the FC-100 Hub Installation and Service Manual.
-
Install fiber-optic cables between the Sun StorEdge FC-100 hubs and the StorEdge T3/T3+ disk trays as shown in Figure C-1.
For the procedure on installing a fiber-optic cable, see the Sun StorEdge T3 Configuration Guide.
-
Install fiber-optic cables between the Sun StorEdge FC-100 hubs and the cluster nodes as shown in Figure C-1.
-
Install the Ethernet cables between the StorEdge T3/T3+ disk trays and the Local Area Network (LAN), as shown in Figure C-1.
-
Install power cords to each disk tray you are installing.
-
Power on the StorEdge T3/T3+ disk trays and confirm that all components are powered on and functional.
Note -The StorEdge T3/T3+ disk trays might require a few minutes to boot.
For the procedure on powering on a StorEdge T3/T3+ disk tray, see the Sun StorEdge T3 Installation, Operation, and Service Manual.
Figure C-1 Cabling StorEdge T3/T3+ Disk Trays in a Single-Controller Configuration

Note -Although Figure C-1 shows a single-controller configuration, two disk trays are shown to illustrate how two non-interconnected disk trays are typically cabled in a cluster to allow data sharing and host-based mirroring.
-
(Optional) Configure the StorEdge T3/T3+ disk trays with logical volumes.
For the procedure on configuring the StorEdge T3/T3+ disk tray with logical volumes, see the Sun StorEdge T3 Disk Tray Administrator's Guide.
-
Telnet to each StorEdge T3/T3+ disk tray you are adding and install the required StorEdge T3/T3+ disk tray controller firmware.
See the Sun Cluster 3.0 U1 Release Notes for information about accessing Sun's EarlyNotifier web pages, which list information about any required patches or firmware levels that are available for download. For the procedure on applying any host adapter firmware patch, see the firmware patch README file.
-
Ensure that this new StorEdge T3/T3+ disk tray has a unique target address.
For the procedure on verifying and assigning a target address, see the Sun StorEdge T3 Configuration Guide.
-
Reset the StorEdge T3/T3+ disk tray.
For the procedure on rebooting or resetting a StorEdge T3/T3+ disk tray, see the Sun StorEdge T3 Installation, Operation, and Service Manual.
-
Install to the cluster nodes the Solaris operating environment, and apply any required Solaris patches for Sun Cluster software and StorEdge T3/T3+ disk tray support.
For the procedure on installing the Solaris operating environment, see the Sun Cluster 3.0 U1 Installation Guide. For the location of required Solaris patches and installation instructions for Sun Cluster software support, see the Sun Cluster 3.0 U1 Release Notes. For a list of required Solaris patches for StorEdge T3/T3+ disk tray support, see the Sun StorEdge T3 Disk Tray Release Notes.
Where to Go From Here
To continue with Sun Cluster software installation tasks, see the Sun Cluster 3.0 U1 Installation Guide.
- © 2010, Oracle Corporation and/or its affiliates
