Installing StorEdge 3900 or 6900 Series Systems
Note -
This section contains the procedure for an initial installation of StorEdge 3900 or 6900 Series systems in a new Sun Cluster that is not running. If you are adding systems to an existing cluster, use the procedure in "How to Add StorEdge 3900 or 6900 Series Systems to a Running Cluster".
How to Install StorEdge 3900 and 6900 Series Systems
Perform the steps in this procedure in conjunction with the procedures in the Sun Cluster 3.0 12/01 Software Installation Guide and your server hardware manual.
-
Install host adapters in the nodes that will be connected to the system.
For the procedure on installing host adapters, see the documentation that shipped with your host adapters and nodes.
-
Unpack, place, and level the system cabinet.
For instructions, see the Sun StorEdge 3900 and 6900 Series Cabinet Installation and Service Manual.
-
Install cables in the following order.
-
Install the system power cord.
-
Install the system grounding strap.
-
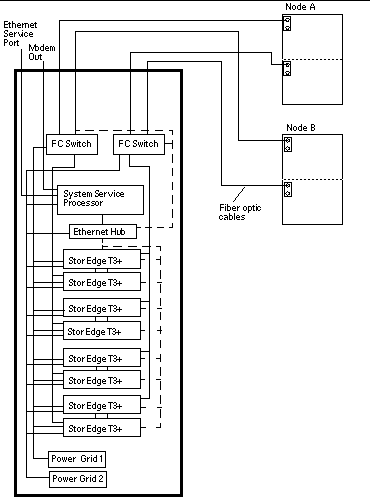
Install the cables from the FC switches to the cluster nodes (see Figure C-1 for an example).
-
Install the Ethernet cable to the local area network (LAN).
For instructions on cabling, see the Sun StorEdge 3900 and 6900 Series Cabinet Installation and Service Manual.
Figure C-1 Sample Cabling to Cluster Nodes (Sun StorEdge 3910 Shown)

-
-
Power on the StorEdge 3900 or 6900 Series system and the cluster nodes.
For instructions on powering on the system, see the Sun StorEdge 3900 and 6900 Series Cabinet Installation and Service Manual. For instructions on powering on a node, see the documentation that came with your node hardware.
-
Set the host name, IP address, date, and timezone for the system's storage service processor.
For detailed instructions, see the initial field installation instructions in the Sun StorEdge 3900 and 6900 Series Reference Manual.
-
For StorEdge 3900 Series systems only: Remove the preconfigured, default hard zoning from the system's FC switches.
Note -For StorEdge 3900 Series only: To configure the StorEdge 3900 Series system for use with Sun Cluster host-based mirroring, the default hard zones must be removed from the system's FC switches. See the SANbox-8/16 Switch Management User's Manual for instructions on using the installed SANsurfer interface for removing the preconfigured hard zones from all Sun StorEdge Network FC Switch-8 and Switch-16 switches.
-
Install the Solaris operating environment to the cluster nodes and apply the required Solaris patches for Sun Cluster software and StorEdge T3+ array support.
For the procedure on installing the Solaris operating environment, see the Sun Cluster 3.0 12/01 Software Installation Guide.
See the Sun Cluster 3.0 12/01 Release Notes for information about accessing Sun's EarlyNotifier web pages, which list information about any required patches or firmware levels that are available for download. For the procedure on applying any host adapter firmware patch, see the firmware patch README file.
-
Install any required patches or software for Sun StorEdge Traffic Manager software support to the cluster nodes from the Sun Download Center Web site, http://www.sun.com/storage/san/.
For instructions on installing the software, see the information on the web site.
-
Activate the Sun StorEdge Traffic Manager software functionality in the software you installed to the cluster nodes in Step 8.
To activate the Sun StorEdge Traffic Manager software functionality, manually edit the /kernel/drv/scsi_vhci.conf file that is installed on the node to change the mpxio-disable parameter to no:
mpxio-disable="no"
-
Shutdown the entire cluster.
# scshutdown -y -g0
For the full procedure on shutting down a cluster, see the Sun Cluster 3.0 12/01 System Administration Guide.
-
Perform a reconfiguration boot on all nodes to create the new Solaris device files and links.
{0} ok boot -r -
On all nodes, update the /devices and /dev entries:.
# devfsadm -C
# devfsadm
-
On all nodes, update the paths to the DID instances
.
# scdidadm -C
# scdidadm -r
-
For StorEdge 6900 Series systems only: On any cluster node, use the cfgadm command as shown below to view the virtualization engine (VE) controller status and to enable the VE controllers.
# cfgadm -al
# cfgadm -c configure <c::controller id>
See the cfgadm(1M) man page for more information about the command and its options.
-
On all nodes, use the luxadm probe command to confirm that all arrays you installed are now visible.
# luxadm probe
Where to Go From Here
To continue with Sun Cluster software installation tasks, see the Sun Cluster 3.0 12/01 Software Installation Guide.
- © 2010, Oracle Corporation and/or its affiliates
