There are multiple versions of the administration server (2.x and 3.x), and various SuiteSpot servers are configured using different versions. Because of the different versions, this chapter lists suggestions to follow before installing two servers that use different versions of the administration server. For a list of the servers that use the different versions of the administration server, see the printed Quick Start card that comes with SuiteSpot. If you have an individual server, check its documentation for the administration server version it uses.
http://myserver.mozilla.com:12345
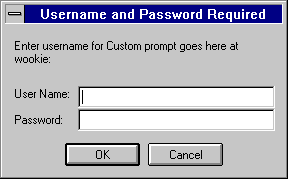
Before you can get to any forms, the administration server prompts you to authenticate yourself. This means you need to type a user name and password. You set up the "superuser" user name and password when you install the first SuiteSpot server and administration server on your computer. After installation, you can use distributed administration to give multiple people access to different forms in the administration server.
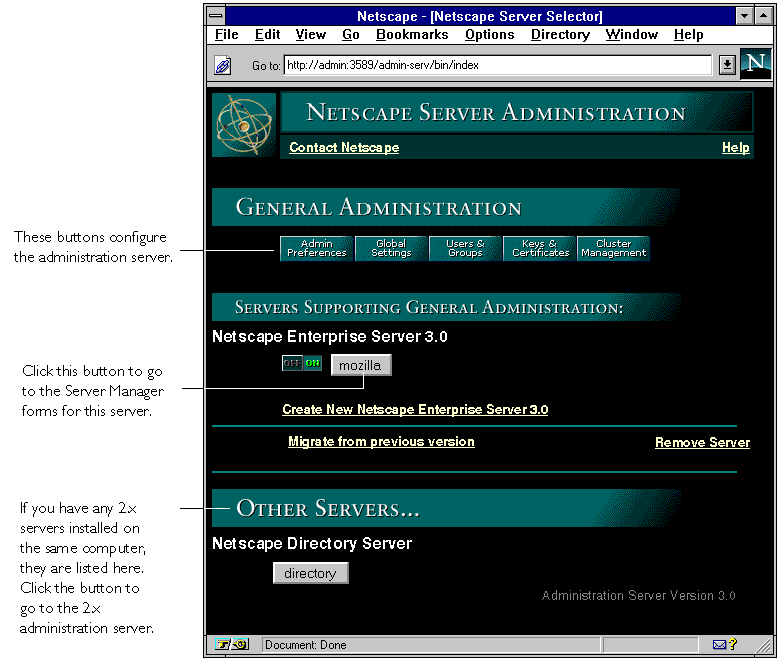
The first page you see when you access the administration server is called the Server Administration page (Figure J.4). The Server Administration page has three or four sections, depending on the servers you have installed. Figure J.4 shows all four sections, which are described here:
"Other Servers" appears only if your computer contains both 2.x and 3.x versions of the administration servers. This might occur, for example, if you install Netscape Directory Server 1.02, which uses the 2.x administration server, and Netscape Enterprise Server 3.0, which uses the 3.x administration server.
Chapter 3: Controlling access to your server
You can control who accesses the administration server forms. This chapter discusses the various methods you can use to determine who has access to forms in the administration server. For example, you can specify who has full control of all the servers installed on a computer and who has partial control of one or more servers. Before you can use access control on the administration server, you must enable distributed administration and set up an administrators group in your LDAP directory. This chapter assumes you've already configured distributed administration and have entries in the users and groups directory.What is access control?
Figure J.2 Users see this window when authenticating themselves to the server.
If your server doesn't use SSL encryption, the username and password that the
end user types are sent unencrypted across the network. Someone could
intercept the network packets and read the username and password being sent
to the administration server. For this reason, User-Group authentication is most
effective when combined with SSL encryption or Host-IP authentication, or
both.
Host-IP authentication
You can limit access to forms on your administration server by making them available only to people using specific computers. You specify hostnames or IP addresses for the computers that you want to allow or deny. You can use wildcard patterns to specify multiple computers or entire networks. If you want to use this feature, you must have DNS running in your network and your computer must be configured to use it.
Note
It's possible for more than one person to have access to a particular computer.
For this reason, Host-IP authentication is most effective when combined with
User-Group authentication. If both methods of authentication are used, the end
user will have to enter a username and password before getting access.
Access control files
When you use access control on your administration server, the settings are stored in a file with the extension .acl. Access control files are stored in the directory <server_root>/<server_type>acl where <server_type> is the name of the server. For example, the administration server uses the directory adminacl. Netscape Enterprise server uses httpacl. The administration server uses three ACL files, all located in the directory <server_root>/adminacl:
admin-defaults.acl is the first level of access control. This file contains the restrictions set using the distributed administration form. That is, it contains the administrators group information.
admin-serv.acl is the main ACL file for the administration server. It contains any restrictions you set up using the Restrict Access forms.
user-environment.acl is the ACL file that determines access for end users. There is no way to edit this file from the administration server forms. By default, this forms gives access to the end-user forms to anyone in the LDAP directory or local database (depending on which one your administration server uses).
https-www.acl.
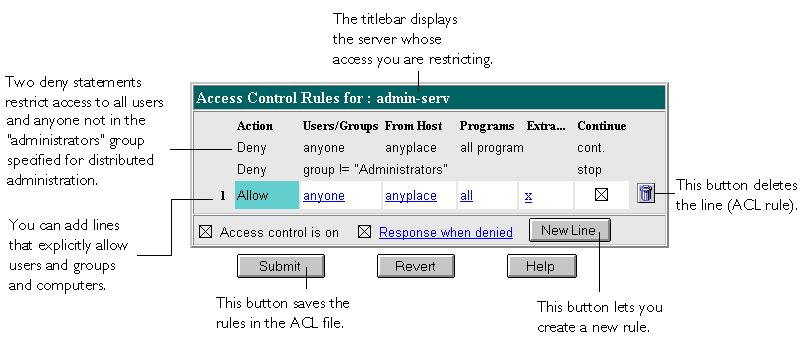
Version 3.0;The first line that starts with "deny" tells the server what file to return if a user isn't allowed access to the server. The second deny message denies everyone access, but because the rule isn't absolute (like the next one), the server continues down the list to see if the user is allowed in a subsequent line. The third line is an absolute statement that denies anyone who isn't in the "admin" group in the LDAP directory. In this case, the "admin" group is the group specified for distributed administration. The last rule explicitly allows access to the forms in the Admin Preferences section of the administration server to anyone in the "admin-reduced" group.
acl "admin-serv" deny with file = "/usr/suitespot/adminacl/admin-denymsg.html"; deny (all)
(user = "anyone"); deny absolute (all)
group != "admin"; allow (all)
(group = "admin-reduced") and
(program = "Admin Preferences")
New Line button. This adds a default ACL rule to the bottom row of the table. You can use the up and down arrows in the left column to move the rule, if needed.
Check the option you want, and then click
Update.
anyone link listed under the Users/Groups column. The bottom frame displays a form for configuring User-Group authentication. By default, there is no authentication, meaning anyone can access the server.
Check the options you want, and then click
Update.
anyplace link. The bottom frame displays a form where you can enter wildcard patterns of host names or IP address to allow or deny.
Check the options you want, and then click
Update.
distacl in the Program Items field. For more information, see the "Access to programs" section later in this chapter.
Click Update to add the programs options to the rules for the line you're
editing.
X under the Extra column. This area is useful if you use the access control API to customize ACLs.
The following sections describe the options that appear in the bottom frame of the access-control window.
Specifying users and groups
You can restrict access to your administration server based on the user who requests a form. The administration server uses a list of users in the administrators group (the group you set up for distributed administration) to determine access rights for the user requesting a resource. The list of users are stored either in a database on the server computer or in an LDAP server, such as Netscape Directory Server. You should make sure the database has users and the administrators group in it before you set access control.
You can allow or deny access to everyone in the administrators group, or you can allow or deny specific people by using wildcard patterns or lists of users.
To configure access control with users and groups, follow the general directions for restricting access. When you click the Users/Groups field, a form appears in the bottom frame. The following list describes the options in the form.
Anyone (No Authentication) is the default and means anyone in the administrators group that you specified with distributed administration can access the form. However, the user might be denied access based on other settings, such as host name or IP address.
Authenticated people only lets you restrict users within the administrators group. If the username they enter isn't in the administrators group in the database, the access-control rule won't apply to them.
All in the authentication database matches any user who has an entry in the administrators group in the database.
Only the following people lets you specify certain users to match. You can list the users and groups of users individually by separating the entries with commas. Or, you can enter a wildcard pattern.
Group matches all users in the groups you specify. The users in the groups you specify must also be in the "administrators" group you specified for distributed administration.
User matches the individual users you specify.
Prompt for authentication lets you specify message text that appears in the authentication window. You can use this text to describe what the user needs to enter. Depending on the operating system the user has, they will see about the first 40 characters of the prompt. Netscape Navigator and Netscape Communicator cache the username and password and associate them with the prompt text. This means that if the user accesses areas of the server that have the same prompt, they won't have to retype their usernames and passwords. Conversely, if you want to force users to reauthenticate for various areas, you simply need to change the prompt for the ACL on that resource.
*.netscape.com.
This setting doesn't affect the Host/IP setting for the administration server's superuser. That is, you can set different hostnames and IP addresses that the superuser must use when accessing the administration server.
To specify users from hostnames or IP addresses, follow the general directions for restricting access. When you click the From Host field (the link called anyplace), a form appears in the bottom frame. Check the Only from option and then type either a wildcard pattern or a comma-separated list of hostnames and IP addresses. Restricting by hostname is more flexible than by IP address--if a user's IP address changes, you won't have to update this list. Restricting by IP address, however, is more reliable--if a DNS lookup fails for a connected client, hostname restriction cannot be used.
The hostname and IP addresses should be specified with a wildcard pattern or a comma-separated list. The wildcard notations you can use are specialized; you can only use the *. Also, for the IP address, the * must replace an entire byte in the address. That is, 198.95.251.* is acceptable, but 198.95.251.3* is not. When the * appears in an IP address, it must be the right-most character. For example, 198.* is acceptable, but 198.*.251.30 is not.
For hostnames, the * must also replace an entire component of the name. That is, *.netscape.com is acceptable, but *sers.netscape.com is not. When the * appears in a hostname, it must be the left-most character. For example, *.netscape.com is acceptable, but users.*.com is not.
Access to programs
You can select areas of the administration server that administrators can access. You can choose groups of forms that appear in the top frame of the Server Manager (such as Cluster Management), or you can choose specific forms that appear as links in the left frame of the Server Manager (such as "New User" under User & Groups).
Access to programs affects the server you choose when restricting access. For example, if your administration server contains a Netscape Enterprise Server and a Netscape Collabra Server, you choose the server you want to restrict, and then you set up the access control rules for that server. In this case, you could allow some administrators to configure agents in the Netscape Enterprise Server, and then you could allow a different set of administrators to configure newsgroups in the Netscape Collabra Server.
To control access to a program in a server,
When you select a server to restrict, you are restricting who can view the
Server Manager forms and which forms they can use to configure that
server. For example, you might allow some administrators to configure the
Users & Groups section of the administration server and not allow them
access to the Global Settings. After you choose a server, click Edit ACL. The
two-frame access-control forms appear.
The Program Groups listed use the same name as the buttons in the top
frame of the Server Manager for the server type you selected. For example,
in the administration server, there are buttons labeled Admin Preferences,
Global Settings, and so on. When an administrator accesses the
administration server, the server uses their username, host, and IP to
determine what forms they'll see. If they have access to only one or two
forms, they will only see those forms.
To determine the name of a form, place your pointer over the link in the
left frame of the Server Manager and then view the text in the status bar of
your browser. The last word after the + is the name for that form.

dsconfig in the Program Items name.
Writing customized expressions
You can enter custom expressions for an ACL. You can use this feature if you are familiar with the syntax and structure of ACL files. There are a few features available only by editing the ACL file or creating custom expressions. For example, you can restrict access to your server depending on the time of day, day of the week, or both.
The following customized expression shows how you could restrict access by time of day and day of the week. This example assumes you have two groups in your LDAP directory: the "regular" group gets access Monday through Friday, 8:00am to 5:00pm. The "critical" group gets access all the time.
allow (read)For more information on valid syntax and ACL files, see the on-line help.
{
(group=regular and dayofweek="mon,tue,wed,thu,fri");
(group=regular and (timeofday>=0800 and timeofday<=1700));
(group=critical)
}
Figure J.4 The Server Administration page lets you manage your Netscape servers.
Using the Server Manager forms
As stated earlier, the collection of forms used to configure a single server is called the Server Manager. The administration server contains a Server Manager for each Netscape server installed on the computer, including one for the administration server itself.
The Server Administration page, shown in Figure J.4, contains links to each Server Manager.


Figure J.5 The administration server's Server Manager forms appear in a three-frame page.

 To return to the Server Administration page (Figure J.4), click the Server Administration button in the top frame of the Server Manager.
 Before you install or configure your servers
This section describes the issues you need to resolve before you install your Netscape SuiteSpot servers. You should also read the Administrator's Guide for each server before installation, because they might include other special considerations specific to that server type.
Setting up the SuiteSpot user and group
If you plan on installing multiple SuiteSpot servers on a single computer, create a SuiteSpot system group that includes the system user account you plan to use for each server installed on the computer. (During installation, you specify the user account you want the SuiteSpot server to use.) This gives any servers installed on the computer read and execute permissions to the files or directories owned by other servers (for example, the local directory of users and groups used in access control).
For example, if you're installing Netscape Messaging Server and Netscape Enterprise Server on the same computer, you might create a group called suitespot with system users mail and web.
Note
Creating the user and group is more important on UNIX systems, but you can also do this on Windows NT systems.
When you create these accounts, you should create them so that no other system users or groups have write access to the files owned by the servers. In particular, you'll want to write-protect the administration server's password file located at <server_root>/admin-serv/config/admpw. And you should consider protecting any encryption key-pair files and certificates (in the directory <server_root>/alias), and the local database (in the directory <server_root>/userdb).
Logging in to the administration server
When you first connect to the administration server, you must provide a user name and a password. If the administration server uses distributed administration, the forms that you see and the administrative privileges that you have depend on the user name you use when logging in.
Distributed administration lets multiple people log in to the administration server. Access control rules determine what forms each person can use. There are three general levels of users:
<server_root>/admin-serv/config/admpw. This is the user name (and password) you specified during installation. This user has full access to all features in the administration server and sees all forms in the administration server except the Users & Groups forms, which depend on the superuser having a valid account in an LDAP server such as Netscape Directory Server. If you use the local database, superuser will always have access to the Users & Groups forms.
If you want to check different areas of the administration server, create a group and user for distributed administration and then create an end-user. To log in as different users and see what they get, insert the username in the URL for the administration server. For example, http://user1@myserver.mozilla.com:12345. If you don't insert the user's name, most web browsers will authenticate you using the last password you entered for that URL. (Netscape Navigator and Netscape Communicator cache the user name, password, and URL for a single-session, so when you close the application, the information is discarded.)
When distributed administration is off
When distributed administration is turned off, you can only log in to the administration server using its superuser name and password. You configure this user name and password when you first install your administration server.
Logging in as the superuser gives you full access to all the forms and servers running under the administration server. The exception to this is the Users & Groups area of the administration server. Although you have full access to the Users & Groups forms, you might not have the appropriate permissions set in the directory that allow you to manage users. This is an issue only if you are using a directory server to manage users and groups--if you are using the local directory, you automatically have full access to directory management because the local directory does not support access control lists.
Warning
If you are using a directory server to manage users and groups, then make sure
to create a user entry in your directory that corresponds to your administration
server superuser, and grant that entry full read, write, search, and compare
permissions for the directory. Netscape Directory Server version 1.02 or later
has the ability to automatically create the minimum required superuser user
name and access-control information. For more information, see the on-lineon-
line documentation that is available with your Netscape Directory Server.
When distributed administration is on
If you enabled distributed administration, then you can log in as the superuser, an administrator, or an end user. The administration server identifies what type of a user you are by using the following process:
User IDs are not case sensitive in the directory server. Therefore, a user ID
of bjensen is the same as BJENSEN.
Note
If you are using a directory server to manage users and groups, then make
sure to create a user entry in your directory that corresponds to your
administration server superuser. Also make sure to create the appropriate
administrators group (discussed below) and grant that group full read,
write, search, and compare permissions for the directory. Finally, make sure
you add your administration server's superuser to the administrator's group.
Netscape Directory Server version 1.02 or later has the ability to
automatically perform these minimum actions for you. For more
information, see the on-line documentation that is available with your
Netscape Directory Server.
For information on distinguished names, directory services and how to use them with your administration server, and how to configure your administration server to use directory services, see the chapter "Chapter 5: User and group management."
For detailed information on binding to the directory server, creating directory server users and groups, setting directory server access control privileges, and performing directory searches, see the Netscape Directory Server Administrator's Guide.
Stopping the administration server
If you enable end-user access to the administration server, you should keep the administration server running as often as possible. If you don't enable end-user access, consider shutting down the administration server when you aren't using it. This minimizes chances of a break in, which could happen if someone learns any of your superuser or administrator passwords.
To shut down the administration server from the Server Manager:
You can also stop and restart the administration server service or daemon, depending on the computer operating system you use:
UNIX
To stop the administration server, go to your server root directory and type./stop-admin. To start the server, type ./start-admin. If the server is already running, you can type ./restart-admin.
NT
To stop the administration server, go to Control Panel|Services. Select the "Netscape Administration Server 3.5" service and click Stop. To restart it, click Start.
What to do next
Before you read the rest of this book, you need to install at least one of your SuiteSpot servers. The following six steps offer installation guidelines to follow.
Chapter 5: User and group management
The Netscape administration server lets you manage the users and groups that access the services provided by your Netscape servers. Because you manage users and groups from the administration server, you use the same interface for user and group management regardless of the type of servers, or the number of servers, that you are running at your site. This common management scheme provides simplified server administration by letting you maintain a single directory of users for all your Netscape servers.
This chapter contains basic information about the differences between using a local database and a director service such as Netscape Directory Server. The on-line help contains directions for creating and managing users and groups from the administration server forms.
The directory service
The Users & Groups area of the administration server is actually an interface to a directory service. Directory services are a type of software that allows you to maintain information, such as contact information or identification information for the people in your organization. You use a directory service in the administration server to store user information, such as user IDs, email addresses, certificates and so forth. This information is typically used when controlling access to a server.
You have a choice of the type of directory service you can use with your administration server: You can use a Netscape Directory Server or you can use the local database.
Netscape Directory Server
Based on an open-systems server protocol called the Lightweight Directory Access Protocol (LDAP), Netscape Directory Server is a robust, scalable server designed to manage an enterprise-wide directory of users and resources. Using the directory server, you can manage all of your user information from a single source. You can also configure the directory server to allow your users to retrieve directory information from multiple, easily accessible network locations.
The use of a directory server to manage your servers' users and groups is recommended for large organizations consisting of up to a million users. Directory server is also ideal for organizations spread across physically different locations, and for organizations where balancing the access load to their directory is important. Finally, the directory server is recommended for those organizations interested in enhancing directory availability by placing their directory services on multiple servers.
For more information about the directory server, or about directory services in general, see the Netscape Directory Server Administrator's Guide, which comes with Netscape Directory Server.
The local directory
The Netscape local directory is bundled with every administration server, and it provides many of the core directory functions available from the directory server. The local directory is intended for sites running a stand-alone Netscape server (such as a enterprise or messaging server).
The local directory has the following limitations when compared to the Netscape Directory Server:
Command-line clients
Both the directory server and the Netscape local directory offer command-line tools that allow you to search the directory and perform directory modifications from the command line. This allows you to create custom shell scripts or batch files to perform routine, automated tasks on your directory.
Netscape Directory Server provides many command-line tools to help you administer and maintain your directory. The local directory, however, provides two tools for your use: ldapmodify and ldapsearch. These are actually identical to the ldapmodify and ldapsearch command-line tools shipped with the directory server, except that the -C option has been added so that they can work with the local directory.
For more information on the ldapmodify and ldapsearch command-line tools bundled with your administration server, see the on-line documentation. For more information on the command-line tools bundled with the directory server, see the Netscape Directory Server Administrator's Guide.
Authenticating users to directory services
Any time you perform an operation on a directory service, you must identify yourself to the service. This identification process is known as authentication. You can also think of this process as logging into the directory service.
Authentication allows a directory service to know if you have sufficient permissions to perform operations in the directory. Examples of directory operations are:
Traditionally, a DN consists of the following items in this order:
cn=common name, [street=address, l=locality, st = state or province, ou=organizational unit, o=organization], c=country nameA DN can consist of virtually any attributes you want to use. However, if you are using the Netscape Directory Server and schema checking is turned on, then the attributes must be recognized by the directory server, and the attribute must be allowed by the entry's object classes.
(For more information on object classes and attributes, and your directory server's schema, see Appendix A of the on-line documentation.)
Generally, however, a DN begins with a specific common name and gives increasingly broader areas of identification, ending with the country name. Note, however, that the DN attributes you use, and the order in which you organize them, is up to you. The only requirement is that DN attributes must be separated by a comma and can optionally use a space following the separator.
Using uid-based distinguished names
One common variation on the traditional distinguished name identified here is to use a user ID (uid) in the place of a common name (cn). Because user IDs are typically unique values across an enterprise, basing your distinguished name on user IDs allows you to avoid cn collision problems caused by people who share the same name. By default, the administration server uses cn-based distinguished names, but you can change this behavior so that it creates uid-based distinguished names instead. You do this by editing the file:
<server_root>/admin-serv/config/dsgw-orgperson.confand setting the useUidForDN variable to true.
cn=Ralph Swenson, ou=Accounting, o=Ace Industry, c=USAlso, distinguished names representing branch points in the directory do not typically begin with a common name value. Rather, they usually begin with some subelement in the directory path. For example, if your directory contained entries of the form:
cn=Ralph Swenson, o=Ace Industry, ou=Accounting, c=US
cn=name, ou=Marketing, o=Ace Industry, c=USthen your directory would also contain the entries:
o=Ace Industry, c=USThese two entries must appear in the directory before the entries represented by a common name can appear. For more information on your directory's organization, see "Planning your directory structure."
ou=Marketing, o=Ace Industry, c=US
Distinguished name examples
The following are some examples of distinguished names:
cn=Wally Henderson,ou=Product Development,o=Bait and Tackle Inc, st=Minnesota,c=US


cn=Retch Sweeny, ou=Product Test, o=Bait and Tackle Inc, st=Michigan, c=US
cn=printer3b, l=room 308, o=Acme Programming Ltd, c=US
Using commas in distinguished names
If a distinguished name contains a comma, then the part of the name that uses the comma must also be enclosed in double-quotation marks. For example, to include the string Ace Industry, Corp in your distinguished name, you would quote it as follows:
o="Ace Industry, Corp", c=US
An example of a suffix that you could enter here is:
o=your company name, c=US.
Using a directory server
If you want to configure a Netscape Directory Server:
For information on SSL, see the Netscape Directory Server Administrator's
Guide.
An example of a base DN that you could enter here is:
o=your company name, c=US.
Note
This bind DN is used only to initially search for the User Name you entered
to the administration server authentication dialog box. Once the entry
corresponding to this user name is located, the administration server
rebinds to the directory server using the retrieved entry. Therefore, if the
user name you supplied when you first logged into the administration
server does not have access to the directory server, you will not have any
access to the directory server, regardless of the bind DN information
provided in this field.
Warning
If you change directory service from a local file to a directory server and vice-versa, you need to restart all SuiteSpot servers, including the administration server.
Converting a database
All 3.x administration servers use either a local database or an LDAP directory to store user and group information. You can upgrade a 2.0 user database by using one of two procedures:
<server_root>/authdb/<dbname, where <dbname> is the name of the 2.x database. The following LDIF files are created:
UserDel.ldif and GroupDel.ldif contain all of the new user and group entries created in the LDAP directory. You can use this file with the LDIF command-line tools to delete the entries that were created during the upgrade.
User.ldif and Group.ldif contain the same entries as the UserDel.ldif and GroupDel.ldif files, but the format is one that you can use to recreate the user entries. You might need to use this file if you have specific entries you need to edit before adding them to the directory. For example, you could delete the entries that were automatically added to the directory, and then edit the User.ldif and Group.ldif files. After you edit the files, you would use them to add the new entries to your directory.
UserDup.ldif and GroupDup.ldif contain any entries that couldn't be added to the directory for some reason. The entries could be duplicates of ones already in the LDAP directory.
GroupMod.ldif contains group membership information for user entries that weren't created. You can use this file along with the UserDup.ldif file to make sure all the correct users and groups were added to the directory.
importdb is an LDIF script that you can use to import one of the generated .ldif files to the LDAP directory. You need to edit this script to include the .ldif file name. You might also have to add the directory administrators password.
/usr/ns-home.
The administration server runs a program that creates the various LDIF files and adds them to your default LDAP directory (this is the directory specified in the "Configure Directory Service" form).
Migrating a server configuration
If you have both 2.x and 3.x servers running on a single computer, you can migrate the configuration from an older (2.x) server to the newer (3.x) server. When you migrate a server, all entries in the databases on the 2.x server are converted and added to your 3.x LDAP directory. If you use the local database, the entries are added starting from the top of the tree. If you're using an LDAP directory, the entries are added starting at the Base DN you specified when you configured the directory service. If you want the entries to start at a different branch, temporarily change the default Base DN while you do the migration.