Sun WorkShop Debugging Windows
Sun WorkShop simplifies the debugging task by providing you with an intuitive, easy-to-use interface. When you start debugging, the Debugging window and a text editor window (see "Editor Window") are displayed. If you have created custom buttons (see "Using the Button Editor"), the Custom Buttons window is also displayed.
Debugging Window
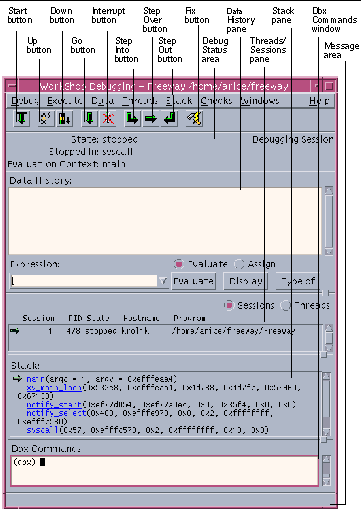
You perform most debugging operations from the Debugging window, shown in Figure 5-1, and the windows you can access from it.
Figure 5-1 Sun WorkShop Debugging Window

|
Debug menu |
Provides commands to debug a program, process, or core file; customize options; and manage sessions. |
|
Execute menu |
Provides commands to run or single-step through lines of code. |
|
Data menu |
Provides commands to evaluate the selection in the Debugging window. |
|
Threads menu |
Provides commands to hide and expose threads in the Threads/Sessions pane. |
|
Stack menu |
Provides commands to move up, down, and pop the stack. |
|
Checks menu |
Provides commands to enable and use runtime checking. |
|
Windows menu |
Provides commands to open the Breakpoints, Data Display, and other debugging windows. |
|
Help menu |
Provides commands to display online help. |
|
Start button |
Runs the program from the beginning. |
|
Up button |
Moves up the call stack one function. |
|
Down button |
Moves down the call stack one function. |
|
Go button |
Runs the program from the current location. |
|
Interrupt button |
Interrupts the program; equivalent to the dbx command Ctrl+C. |
|
Step Into button |
Single-steps into a function. |
|
Step Over button |
Single-steps over the current function. |
|
Step Out button |
Steps past the end of the current function. |
|
Fix button |
Recompiles all changed files and continue debugging. |
|
Debug Status area |
Displays information about the state of your program. |
|
Data History pane |
Displays history when evaluating expressions, querying for type, and modifying values. |
|
Threads/Sessions pane |
If the Threads radio button is selected, lists information about the threads in a multithreaded program. If the Sessions radio button is selected, lists current debugging sessions. |
|
Stack pane |
Shows you the current state of the call stack and lets you move to different stack frames. |
|
Dbx Commands window |
Lets you enter and view the output of dbx commands (displayed only if Show Dbx Commands Window in a separate window is set to No in the Window Layout Category in the Debugging Options dialog box). |
|
Message area |
Displays messages about operations in the window. |
Editor Window
The integration of Sun WorkShop with three text editors (vi, GNU Emacs, and XEmacs) allows you to edit a program's source code while using full debugging functionality.
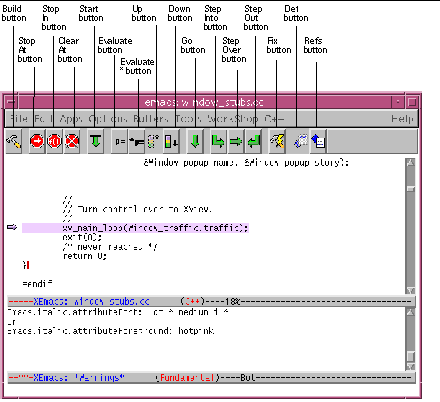
You can perform basic debugging operations from a text editor window displaying the source code. Figure 5-2 shows the XEmacs editor window displaying source code during debugging. In the editor window, you can view and modify source code. When you start a debugging session, Sun WorkShop automatically displays the programs's main routine in an editor window. You can change the colors used to highlight lines in the source code displayed in the editor window (current function, breakpoint, and so on) by editing the WORKSHOP resource file (see "Highlight Colors in Editor Windows").
The editor window tool bar provides access to common debugging operations, especially those that use a source component as an argument, plus buttons from other parts of Sun WorkShop.
For information on choosing the editor for a Sun WorkShop session, see "Selecting and Using Text Editors".
Figure 5-2 Emacs Editor Window Displaying Source Code

Custom Buttons Window
The Custom Buttons window contains custom buttons you create using the Button Editor or the dbx command button. If you have created custom buttons, the window opens automatically when you start Sun WorkShop.
If you used a previous version of the debugger and your .dbxrc file includes commands to create custom buttons, these buttons automatically appear in the Custom Buttons window.
You can resize the Custom Buttons window and position the window wherever you want, but you must close it separately.
Using the Button Editor
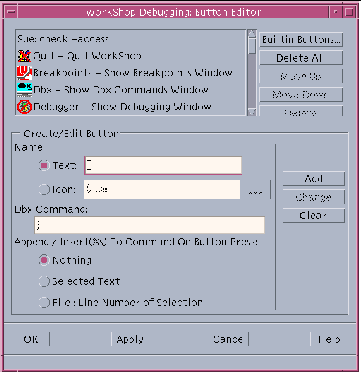
You can use the Button Editor (see Figure 5-3) to add, remove, or edit buttons in the Custom Buttons window. Buttons you add to the Custom Buttons window are stored in your Sun WorkShop options file. You no longer need to store buttons in your .dbxrc file. You cannot add buttons to, or remove buttons from, your .dbxrc file with the Button Editor.
Figure 5-3 Button Editor Window

To open the Button Editor, choose Windows > Button Editor in the Debugging window.
You can add buttons from the button list to the Custom Buttons window. If you want to add a button that is not on the button list, you must first import the button, if it already exists (see "Adding Builtin Buttons to the Button Editor""), or create the button using the Create/Edit Button panel in the Button Editor (see "Adding a Button to the Button Editor"").
Adding Builtin Buttons to the Button Editor
To import buttons to the Button Editor:
-
Click Builtin Buttons to display the Button Palette.
The builtin button list in the Button Palette lists:
-
All the buttons that populate the tool bars in the Debugger window
-
A number of buttons that access functionality available only from the menus (such as the Breakpoints button to open the Breakpoints window)
-
Some buttons that offer functionality not available on the tool bar or the menus (such as the Dump button to print local variables)
-
-
Select the buttons you want to import to the Button Editor and click OK.
The buttons are added to the button list in the Button Editor.
Adding a Button to the Button Editor
To add a button to the Button Editor:
-
Decide whether you want to put text or an icon on the button.
-
To put text on the button, click the Text radio button and type the text in the corresponding text box.
-
To put an icon on the button, click the Icon radio button, and type the file name of an icon.
Click the browse button to display a dialog box you can use to choose an icon file. The icon file must be in the .xpm file format. Sun WorkShop tool bar icons are 20x20 pixels, and use only colors from the Sun WorkShop palette.
Tip -You can use the CDE application dticon to create an .xpm file. Most graphics programs can also save files in .xpm format.
-
In the Dbx Command text box, type the dbx command you want executed when the button is clicked.
Tip -Type commands in the Dbx Commands window to see what commands are available.
-
If you want the button to execute a dbx command that takes an argument, you must select one of the radio buttons under Append/Insert(%s) To Command On Button Press to specify the text to append to the command.
-
The Nothing radio button is selected by default indicating that no text is to be added to the command.
-
If you click the Selected Text radio button, the current Sun WorkShop selection is appended to the command.
-
If you click the File: Line Number radio button, the file name and line number of the selection are appended to the command.
-
-
If you want the argument embedded in the command rather than appended to it, type %s in the command string to indicate the position of the argument.
For example, if you type the following command string in the Dbx Command text box
stop at %s -temp and select the File: Line Number of Selection radio button, the button will execute the following command if it is clicked when line 25 in main.cc is selected:
stop at "main.cc":25 -temp
Note -The command string should contain only one %s, and it cannot contain an escape sequence. For example, stop %%s -temp produces stop %"main.cc":25.
-
Click Add and the button is added to the button list.
Adding the Buttons to the Custom Buttons Window
You can add the buttons in the button list in the Button Editor to the Custom Buttons window.
To add a button to the Custom Buttons window, click Apply to add the new button to the Custom Buttons window.
Editing an Existing Button
To edit an existing button in the Button Editor:
-
Select the button in the button list.
-
Edit its properties using the text boxes and radio buttons in the Create/Edit Button panel, as described in "Adding a Button to the Button Editor".
-
Click Change to apply the new properties to the button.
-
Click Apply to replace the button in the Custom Buttons window with the edited button.
Rearranging Buttons
You can change the position of a button in the Custom Buttons window by moving it up or down on the button list in the Button Editor.
To rearrange the buttons:
-
In the button list, select the button you want to move.
-
Click Move Up or Move Down until the button's position in the button list corresponds to where you want it to be displayed in the Custom Buttons window.
-
Click Apply and the button is displayed in its new position in the Custom buttons window.
Removing a Button
You can remove a button from the Custom Buttons window by deleting it from the button list in the Button Editor.
To remove a button:
-
In the button list, select the button you want to delete.
-
Click Delete and the button is deleted from the button list.
-
To remove the button from the Custom Buttons window, click Apply.
Note -You can also remove a button from the Custom Buttons window using the dbx unbutton command.
Note -You cannot permanently delete a button stored in your .dbxrc file using the Button Editor. The button will reappear in your next debugging session. You can remove such a button by editing your .dbxrc file.
- © 2010, Oracle Corporation and/or its affiliates
