Chapter 1 Installing and Setting Up Solaris Container Manager 3.6
This chapter describes how to install SolarisTM Container Manager 3.6. This chapter assumes that the product has not been installed before.
This chapter has the following topics:
-
Sun Management Center and Solaris Container Manager Requirements
-
Installing Solaris Container Manager 3.6 With Sun Management Center
-
Setting Up Solaris Container Manager 3.6 With Sun Management Center
Installing the Product
Solaris Container Manager 3.6 is an add-on product to the SunTM Management Center 3.6 release. Sun Management Center is the base software or framework on which Solaris Container Manager works.
Sun Management Center has three main components, called base layers, that need to be installed: server, agent, and JavaTM Console. The server is a collection of processes on a central host that enables management services. The agent is a process that runs on each monitored host. The Java Console is the window through which you monitor and manage the agents. The Java Console is the main user interface to the Sun Management Center product, but is not required for Solaris Container Manager.
Before you can use Solaris Container Manager, you must install Sun Management Center 3.6 on the following layers:
-
Server – On at least one machine.
Note –When the server is installed, the Sun Management Center agent is installed on the server machine as well.
-
Agent – On any machine you want to monitor.
-
Java Console – On any machine from which users log in to Sun Management Center. This layer is optional. However, if you want to manage alarms, you must install the Java Console.
The Solaris Container Manager add-on needs to be installed on the following:
-
The Sun Management Center agents, which are monitored by the Sun Management Center server.
-
The Sun Management Center server.
The user interface for Solaris Container Manager is based on the browser interface called the Java Web Console, which is shipped with Sun Management Center. Do not confuse the Java Web Console that is used by Solaris Container Manager with the Java Console layer of Sun Management Center.
In planning your installation, you need to consider the following issues:
-
On which machine do you want to run the Sun Management Center server?
-
In addition to the Solaris Container Manager 3.6 add-on, you might also want to install the Performance Reporting Manager add-on. The Performance Reporting Manager add-on enables you to create reports detailing the status of your machines. If this add-on is not installed, the resource utilization graphs of Solaris Container Manager will not be available.
In addition to installing the product components and the add-ons, you must set up the product components and add-ons before you can start the product.
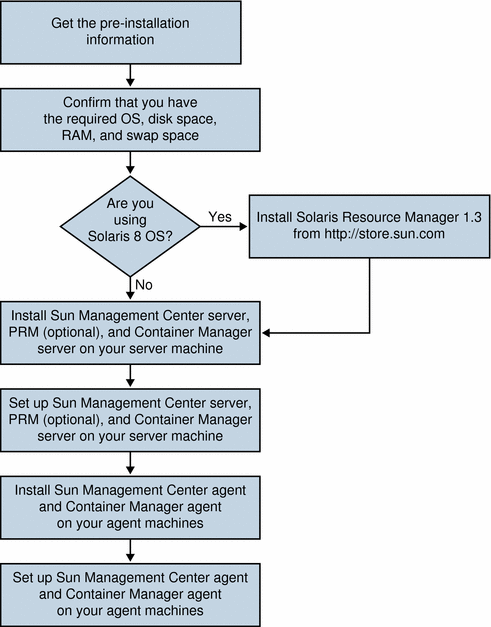
The following flowchart depicts the stages required to install and set up Solaris Container Manager.
Figure 1–1 Stages in Installation
Preinstallation Information
The following table lists the prerequisite information that you need before installing the product.
Table 1–1 Information Needed Before Installing|
Installation Item |
Description |
|---|---|
|
Environment |
Choose the production environment. |
|
Base Layers (Components) |
Determine the machines on which you install each component, for example, server, agent, and console. |
|
Languages |
Determine which, if any, additional languages (French, Traditional Chinese, Simplified Chinese, Korean, or Japanese) you want. The documentation for Solaris Container Manager 3.6 is not available on the media. Go to http://docs.sun.com for documentation in English and the supported languages. |
|
Add-on Products |
Review the add-on supplements to determine which add-ons you want to install. For a list of add-on supplements, see Chapter 2, Installation Overview, in Sun Management Center 3.6 Installation and Configuration Guide. Add-on products are installed on the same machine as the server and agent. |
|
Space Needed |
If the machine does not have enough space in the default /opt directory, you might need to perform one of the following adjustments:
|
|
Permissions |
You must have permission to write to the /var/opt and /opt/SUNWsymon directories as root on each machine. You also need privileges to run commands such as chmod. |
After installing the product and its add-ons, you need to set up the product and its add-ons. The following table lists the prerequisite information that you need before setting up the product.
Table 1–2 Information Needed Before Setting Up|
Setup Item |
Description |
|---|---|
|
Administrator user name |
A valid user name for the Solaris Operating System (Solaris OS) is required for assignment as the Sun Management Center administrator on Sun Management Center server machines. |
|
Network Addressing Mode |
Sun Management Center uses two types of addressing for communication between the server and agent: IP addressing, and Network Address Translation (NAT). You must have the following information:
See Chapter 6, Installing and Updating Agents and Installing on Microsoft Windows, in Sun Management Center 3.6 Installation and Configuration Guide for further information. |
|
Sun Management Center Password to Generate Security Key |
Sun Management Center requires an encrypted security key for communication between processes. The security key is generated, based on a unique password you provide. Store the password securely. You need the password if you modify your Sun Management Center installation. |
|
SNMPv1 Community String |
Sun Management Center requires an SNMPv1 community string for security. The default is public. You have the option of specifying a more secure custom string. Store the SNMPv1 string securely. You need the SNMPv1 security string if you modify your Sun Management Center installation. |
|
Information to Generate Web Server Security Key |
The Sun Management Center Web server requires an encrypted security key. The security key is generated, based on your organization name and location. Store the organization name and location securely. You need this information if you modify your Sun Management Center Web server. |
|
Ports |
Determine the assignments for the following ports:
See Chapter 6, Installing and Updating Agents and Installing on Microsoft Windows, in Sun Management Center 3.6 Installation and Configuration Guide for further information. |
Sun Management Center and Solaris Container Manager Requirements
The following table provides a summary of Sun Management Center and Solaris Container Manager requirements.
For specific information about determining the total amount of resources needed, see Appendix C, Determining Hardware Resources, in Sun Management Center 3.6 Installation and Configuration Guide.
Table 1–3 Sun Management Center and Solaris Container Manager System Requirements
The default maximum heap size for the Sun Management Center console and the Sun Management Center server is 64 Mbytes each.
You can customize the maximum heap size for the console and server as described in Chapter 8, Starting and Stopping Sun Management Center, in Sun Management Center 3.6 Installation and Configuration Guide.
Installing the Required JDK Version
Sun Management Center 3.6 requires JDKTM 1.4.2, which is available on the /<DiskMountDir>/jdk_dir directory, where jdk_dir is the name of the JDK directory on the CD.
 To Install the Required JDK Version
Steps
-
Install the JDK from CD 1 of 2 using the pkgadd command.
Type the command pkgadd -d /<DiskMountDir>/jdk_dir/Solaris.
Press Return to install all of the packages. The JDK packages are installed in the /usr/j2se directory.
-
Reset the JAVA_HOME environment variable to /usr/j2se.
-
In a C shell environment, type:
# setenv JAVA_HOME /usr/j2se
-
In a Bourne or Korn shell environment, type:
# JAVA_HOME=/usr/j2se
# export JAVA_HOME
Tip –Set the JAVA_HOME environment variable in your .login or .cshrc file.
-
Installing Solaris Container Manager 3.6 With Sun Management Center
Note –
(Solaris 10 only) Install Solaris Container Manager in a global zone.
This section describes how to install Solaris Container Manager 3.6 with Sun Management Center 3.6 on the Solaris platform using the graphical user interface (GUI).
For information about using the command-line installation script, see Appendix B, Using the Command Line for Uninstall, Install, and Setup, in Sun Management Center 3.6 Installation and Configuration Guide.
This installation procedure assumes that you are installing Solaris Container Manager 3.6 from a image directory on your network.
For information about creating an installation image, see Chapter 4, Preparing Systems for Sun Management Center Upgrade and Installation, in Sun Management Center 3.6 Installation and Configuration Guide.
 To Install Solaris Container Manager 3.6 With Sun
Management Center
Steps
-
Set up the installation environment.
-
If you are installing the product remotely, grant access to the X server by typing the command xhost + machine in a terminal window.
machine is the name of the machine where you want to install the product.
-
Log in to the machine. If you are installing the product remotely, type the command ssh machine and type the password.
-
Log in as root by typing su - root and the root password.
-
If you prefer a specific UNIX shell, type the command to use the shell, for example, csh.
-
If you are installing the product remotely, ensure that the DISPLAY environment variable is set to the machine's display.
For example, setenv DISPLAY local-machine:0.0.
-
Ensure that the group entry in the /etc/nsswitch.conf has files as the first token.
group: files nis
-
To change to the cd-image directory, type:
# cd /net/machine/cd-image/disk1/sbin
where machine is the machine where you created the installation image, and cd-image is the root directory containing the installation images.
-
Review /disk1/sbin/README.INSTALL and disk1/sbin/INSTALL_README.HWDS.
-
-
Change to the directory disk1/sbin.
-
To start the installation, type:
# ./es-guiinst
The welcome screen appears.
-
Install the Sun Management Center components.
-
To accept the default /opt installation directory, click Next or click Browse to choose another directory.
-
Select the production environment.
-
Select the components you want to install.
This procedure assumes that you are installing the Server, Agent, and Console components.
-
Review the Server Layer Binary Code License and use the scrollbar to scroll down to the end of the text.
-
To agree to the terms of the license, select I Agree and click Next.
-
If you want to install help and support files in additional languages, select the additional languages and click Next.
-
If you want to install the documentation, click the box and then click Next.
Note –The documentation for Solaris Container Manager 3.6 is not available on the media. For the documentation for Solaris Container Manager 3.6, go to http://docs.sun.com/app/docs/coll/810.4.
The progress bar appears.
-
-
Install Solaris Container Manager and other appropriate add-ons.
-
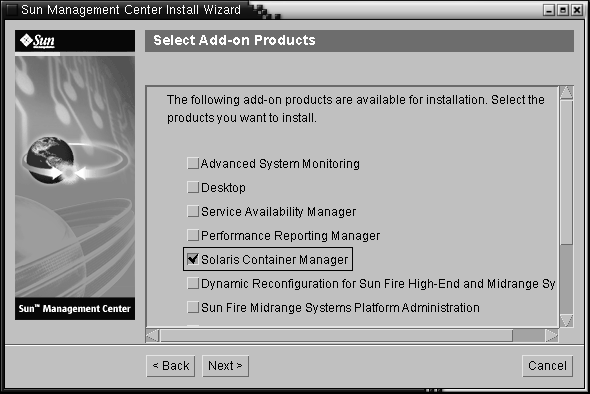
Select Solaris Container Manager 3.6 and any other add-ons.
Figure 1–2 Add-on Products Screen
-
If you selected add-on products that have optional components, select the appropriate optional components and click Next.
-
Review the add-on products binary license and use the scrollbar to scroll down to the end of the text.
-
To agree to the terms of the license, select I Agree and click Next.
The Checking Disk Space progress bar appears. If the machine does not have enough disk space, you are asked to provide an alternate file system.
Tip –In a terminal window on the machine where you are installing Sun Management Center, type df -ak to list the amount of used and free space for each file system on the machine.
-
Confirm the installation selections and click Next.
Note –The installation process can take from a few minutes to half an hour or more, depending on the products that are selected.
If the installation failed, a summary screen is displayed.
Review the installation log in /var/opt/SUNWsymon/install to determine why the installation failed, and correct the problem.
-
To continue the setup, click Next. To run setup later, click Close.
You cannot run the product until you have set it up.
-
Setting Up Solaris Container Manager 3.6 With Sun Management Center
You use the graphical setup wizard to set up your Solaris Container Manager 3.6 installation.
For information about using the command-line setup script, see Appendix B, Using the Command Line for Uninstall, Install, and Setup, in Sun Management Center 3.6 Installation and Configuration Guide.
 To Set Up Solaris Container Manager 3.6 With Sun
Management Center
Steps
-
Set up the installation environment. For more information, see Step 1 in To Install Solaris Container Manager 3.6 With Sun Management Center.
-
To change to the Sun Management Center sbin directory, type:
# cd /opt/SUNWsymon/sbin
If you installed Sun Management Center in a directory other than /opt, go to /installdir/SUNWsymon/sbin, where installdir is the directory you specified.
-
To run the setup, type:
# ./es-guisetup
The Setup screen appears.
-
Choose whether to create a setup response file.
-
To create a setup response file, select Store Response Data and then click Next.
The setup responses are stored in the file /var/opt/SUNWsymon/install/setup-responses-file. The setup-responses-file file is useful if you need to duplicate the setup on the current machine on other machines.
-
To continue setup without creating the setup response file, click Next.
-
-
To generate the Sun Management Center security key, type a password in both fields and click Next.
The password must be between one and eight characters long and contain no spaces. Entries that are greater than eight characters are truncated to eight characters.
An encrypted security key is needed for communications between all Sun Management Center processes. The key is generated, based on the password.
Note –Record in a secure location the password that you use to generate the security key for this machine. You might need to regenerate the key for the machine later. You can also change the security key later, as described in Chapter 9, Sun Management Center Administration, in Sun Management Center 3.6 Installation and Configuration Guide.
-
Choose whether to use the default SNMPv1 community string or specify a custom community string.
The community string is used for SNMP security.
-
To use the default SNMPv1 community string, click Next.
The default value is public.
-
To specify a custom community string, select Use Custom Community String. Type the same community string in both fields, and then click Next.
The community string can be up to 255 characters and must not contain any spaces or blanks.
Specify the community string to a value other than public or private to provide better SNMP security.
 Caution –
 The same SNMP community string must be used on all of the machines on which you install Sun Management Center. If you use different community strings on each machine, SNMP communications between the machines and Sun Management Center components will not work.
-
-
Type a valid Solaris user name as the UNIX administrator account and click Next.
The setup process checks whether the SNMP port is in use.
If the SNMP port is in use, the SNMP Port Conflict screen appears.
-
If the SNMP Port Conflict screen appears, resolve the port conflict.
In most cases, port 161 is the default port assigned to and used by the SNMP daemon. However, other processes or daemons, such as the System Management Agent (SMA) for Solaris 10 systems, could be using port 161. Several third-party replacements and enhancements for the SNMP daemon exist and could be installed on your system. The Sun Management Center agent is such a daemon.
-
To assign a different port number to Sun Management Center, select Use a Different Port Number. Type the port number, for example, 1161, in the Port ID field and click Next.
For instructions on how to determine whether a port is used, see Chapter 9, Sun Management Center Administration, in Sun Management Center 3.6 Installation and Configuration Guide.
Note –Record this alternate port number. You need this number if you install agents later using JumpStart or update the Sun Management Center agents using the agent update-image tools.
-
To use port 161, select Use Port 161 and click Next.
-
-
(Solaris 8 and 9) If you use port 161, you are prompted to stop and disable the SNMP daemon snmpdx. (Solaris 10) If you use port 161, review the warning dialog box that appears.
-
To stop and disable the SNMP daemon snmpdx automatically, ensure that Stop and Disable SNMP Daemon snmpdx has been selected, and then click Next.
 Caution –
 Stopping and disabling the system SNMP daemon does not guarantee that you have stopped the actual process using port 161. To determine the actual daemon process that uses port 161, you must manually review all /etc/rcN and /etc/rcN.d files, where N is 0 through 6 and S. When you have identified the file that defines the process using port 161, you can disable the process by renaming the file. For example:
/etc/rc3.d# mv S76snmpdx s76snmpdx
You must stop all other processes that use port 161 before you can start Sun Management Center.
-
-
If any Sun Management Center ports are in use, you are prompted to resolve the port conflict. Type an unused port number in the field, and then click Next.
The ports are checked in the following order: trap service, event service, topology service, configuration service, platform agent, cst service, metadata service, database, look-up service, Web server default port, and Web server secure port.
-
To generate the Web server security key, type the name of your organization and the name of your location and click Next.
For example, you could type admin in the Name of Your Organization field and headquarters in the Name of Your Location field.
An encrypted security key is needed for the Sun Management Center Web server. The key is generated, based on the name of your organization and the name of your location. The names that you provide must not contain any spaces or blanks.
Note –If you need to regenerate the key for a particular machine later, record in a secure location the entries that you use to generate the security key.
-
Confirm the setup of Sun Management Center and set up Solaris Container Manager.
-
Confirm the setup selections and click Next.
The setup process can take from a few minutes to half an hour or more, depending on the products that are selected.
If the base product setup failed, you are informed that the setup of the base product was not successful. You are directed to see the log file for more details. The name of the log file is provided.
-
If base product setup is successful, click Next.
-
The Select Add-on Products dialog box appears.
Figure 1–3 Add-on Products Screen
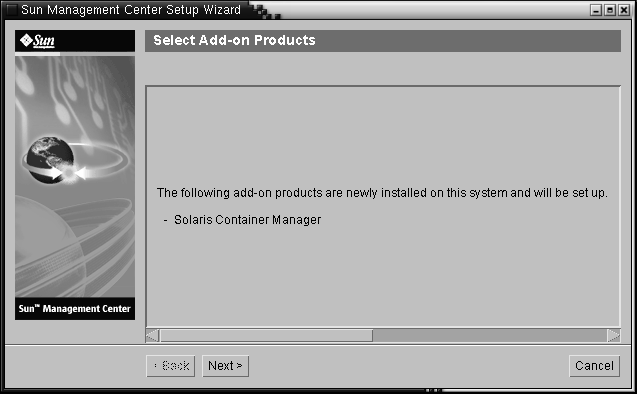
Click Next. The progress bar appears.
The Add-on Products Setup dialog box appears, informing you that Solaris Container Manager 3.6 has been set up.
-
-
Start the various Sun Management Center Components.
Launching Solaris Container Manager
After installation and setup is complete, you can log in to the Solaris Container Manager through a Java Web Console.
 To Launch the Container Manager GUI
Steps
-
Ensure that your user ID is a Sun Management Center administrative user.
You are considered an administrator if your user ID is a member of the esadm UNIX user group.
-
Launch a browser.
-
To reach the Container Manager GUI, type:
https://sunmc-server_machine_name:6789
sunmc-server_machine_name is the machine where you have installed and set up Solaris Container Manager.
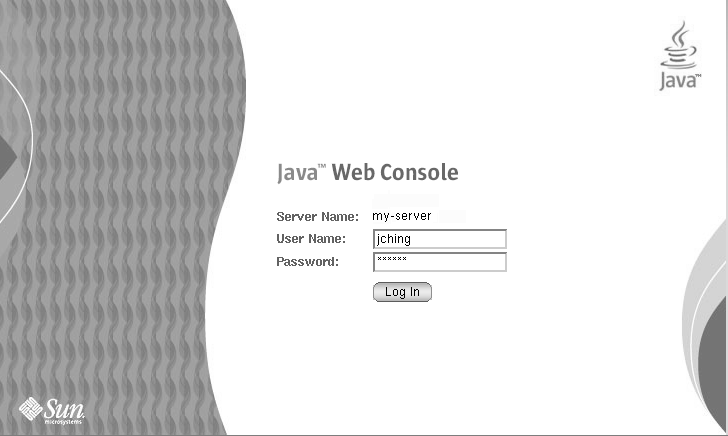
The Java Web Console login page appears.
Figure 1–4 Java Web Console Login Page
Note –If the login page does not appear, you might need to restart the Java Web Console. For instructions, see To Restart Java Web Console.
-
Log in to the Java Web Console using your UNIX user ID and password.
A screen appears that has five categories: Systems, Storage, Services, Desktop Applications, and Other.
-
Select the Solaris Container Manager 3.6 link in Systems category.
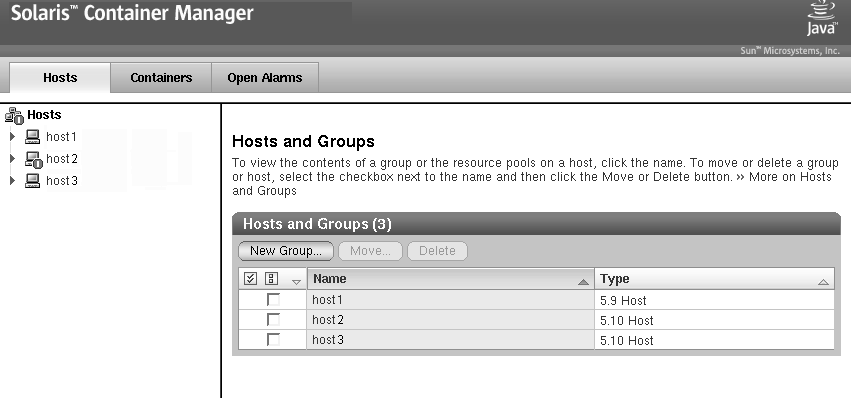
The Container Manager GUI appears. The screen has three tabs: Hosts, Containers, and Alarms.
Figure 1–5 Container Manager Main Page
For information about using Container Manager, see Installing and Administering Solaris Container Manager 3.6.
 To Restart Java Web Console
If you are unable to access the Java Web Console, use this command to restart it.
Step
As superuser (su -), restart the Java Web Console by typing:
# /usr/sbin/smcwebserver restart |
Solaris Container Manager 3.6 Documentation Resources
The following table lists the documentation resources that are available for the product. The most current versions of the documentation can be found at http://docs.sun.com/app/docs/coll/810.6.
Table 1–4 Documentation Resources|
Task |
Resource |
|---|---|
|
To install and administer Solaris Container Manager 3.6 |
Installing and Administering Solaris Container Manager 3.6 |
|
To install Sun Management Center 3.6 and its add-on products, including Container Manager |
Sun Management Center 3.6 Installation and Configuration Guide |
|
To find installation issues, runtime issues, late-breaking news (including supported hardware) and documentation issues |
Sun Management Center 3.6 Release Notes |
|
To obtain information about Performance Reporting Manager, the optional add-on, which works with Container Manager |
Sun Management Center 3.5 Update 2 Performance Reporting Manager User’s Guide |
|
To obtain information about Solaris Resource Manager |
Solaris Resource Manager 1.3 Installation Guide Solaris Resource Manager 1.3 Release Notes Solaris Resource Manager 1.3 System Administration Guide |
|
To get information about Solaris containers and Solaris zones |
System Administration Guide: Solaris Containers-Resource Management and Solaris Zones |
- © 2010, Oracle Corporation and/or its affiliates
