Container Manager GUI
Standard command-line commands in Solaris software resource management are not supported by the Container Manager software. You should manage the containers from the Container Manager graphical user interface (GUI). The GUI is started from the Java Web Console by using a browser. The following browsers are supported:
-
Netscape NavigatorTM 4.7x, 6.2x, and 7.x on Solaris releases 8 and 9
-
Netscape Navigator 4.7x, 6.2x, and 7.x on Microsoft Windows (98/2000/XP)
-
MozillaTM 1.4 and higher
-
Internet Explorer 5.0 and higher (including 6.x) on Microsoft Windows (98/2000/XP)
 To Start the Container Manager GUI
Steps
-
If your UNIX user ID is not present in the /var/opt/SUNWsymon/cfg/esusers file, create this entry.
You must also be assigned to either esadm or esdomadm group.
For instructions about creating an entry and assigning to a group, see Setting Up Users in Sun Management Center 3.6 Installation and Configuration Guide.
-
Start a browser.
For a list of supported browsers, see Container Manager GUI.
-
To reach the Container Manager GUI, type:
https://sunmc-server_machine_name:6789/containers
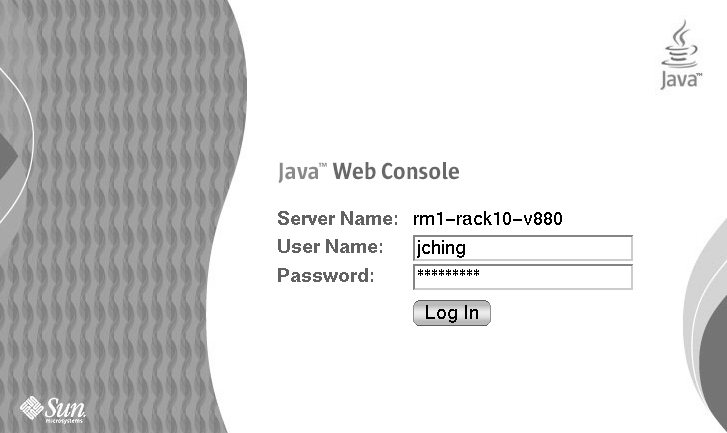
The Java Web Console login page appears.
Figure 3–3 Java Web Console Login Page

If the login page does not appear, you might need to restart Java Web Console. For instructions, see To Restart Java Web Console.
Tip –If you reach the Console page, click the Solaris Container Manager 3.6.1 link beneath the Systems section to access the GUI.
-
Log in to the Java Web Console by using your UNIX user ID and password.
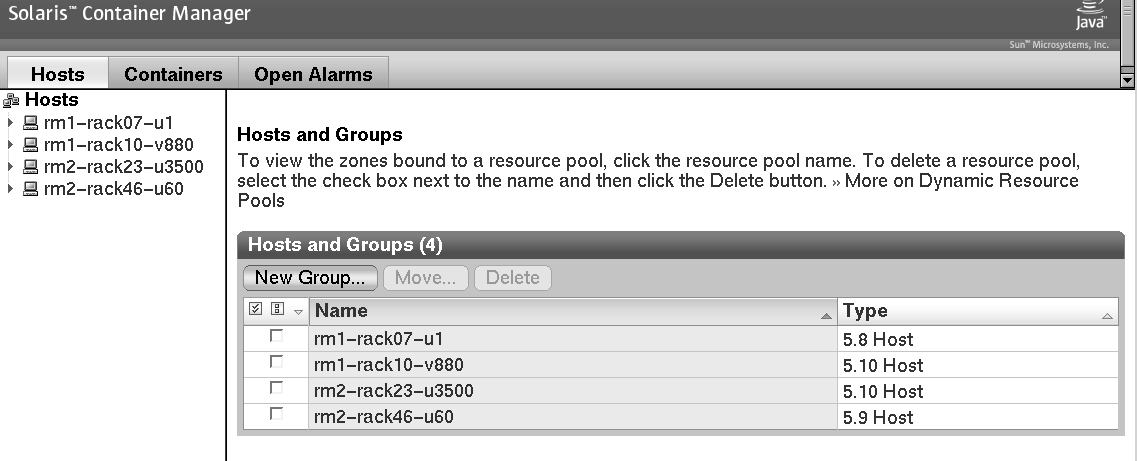
The Container Manager GUI appears. The screen has three tabs: Hosts, Containers, and Open Alarms.
Figure 3–4 Container Manager Main Page

 To Restart Java Web Console
If you are unable to access the Java Web Console, use this command to restart it.
Step
As superuser (su -), restart the Java Web Console by typing:
# /usr/sbin/smcwebserver restart |
Container Manager GUI Tabs
The following table provides information about the tabs that appear in the right pane of Container Manager GUI.
Table 3–1 Container Manager GUI Tabs|
Tab |
Tab Name |
Contents |
|---|---|---|
|
Host (view) |
Contents |
Provides information about the resource pools on the selected host. |
|
Properties |
Provides information about the properties of the selected host, zone, project, or resource pool. |
|
|
Utilization |
Provides information about a host's, zone's, project's, or pool's daily, weekly, or monthly resource utilization. Real-time utilization data is available for active projects. This tab is visible only if Performance Reporting Manager software is installed. |
|
|
Projects |
Provides information about the projects that are associated with a host. |
|
|
Zones |
Provides information about the zones associated with a host. |
|
|
Containers (view) |
Contents |
Provides information about projects. |
|
Properties |
Provides information about the properties of the selected host, container, project, or resource pool. |
|
|
Utilization |
Provides information about a host's, zone's, project's, or pool's's daily, weekly, or monthly resource utilization. Real-time utilization data is available for active projects. This tab is visible only if Performance Reporting Manager software is installed. |
|
|
Jobs (Resource Change Jobs) |
Provides information about scheduled resource change jobs. You can also create a new resource change job from this tab. Note that default containers cannot have resource change jobs associated with them. |
|
|
Open Alarms |
Provides information about open alarms, including severity, message, managed object, start time, and acknowledgment. |
|
|
Resource Pool (drill down) |
Contents |
Provides information about the zones on the selected resource pool. |
|
Properties |
Provides information about the properties of the selected resource pool. |
|
|
Utilization |
Provides information about a pool's daily, weekly, or monthly resource utilization. This tab is visible only if Performance Reporting Manager software is installed. |
|
|
Projects |
Provides information about the projects that are associated with the selected resource pool. |
|
|
Zone (drill down) |
Contents |
Provides information about the projects on the selected zone. |
|
Properties |
Provides information about the properties of the selected zone. |
|
|
Utilization |
Provides information about a zone's daily, weekly, or monthly resource utilization. This tab is visible only if Performance Reporting Manager software is installed. |
|
|
Project (drill down) |
Properties |
Provides information about the properties of the selected project. |
|
Utilization |
Provides information about a project's daily, weekly, or monthly resource utilization. This tab is visible only if Performance Reporting Manager software is installed. |
|
|
Processes |
Provides information about the processes of the selected project. |
|
|
Alarm Thresholds |
Used to set or remove alarm thresholds. |
Hosts View
The Hosts view organizes information from the host perspective. All agent machines that you are managing appear in the navigation window. The resource pools that are available for each host are shown when you click the expansion triangle beside the host name. You can also manage the containers that are associated with the host from this view.
All agent hosts that have the software installed are automatically discovered and added to the Hosts view. This view is accessed from the left tab in the navigation window. All agent hosts that are discovered are initially placed under a default group titled Hosts. You can further organize this view by creating new groups and moving the hosts to relevant groups.
Note –
Only those agent machines that are part of the Sun Management Center server context and that have Solaris Container Manager 3.6 installed are loaded into the Hosts view. For more information about server context, see Sun Management Center Architecture in Sun Management Center 3.6.1 User’s Guide.
The tabs and information that are available in the Hosts view are listed in Table 3–1.
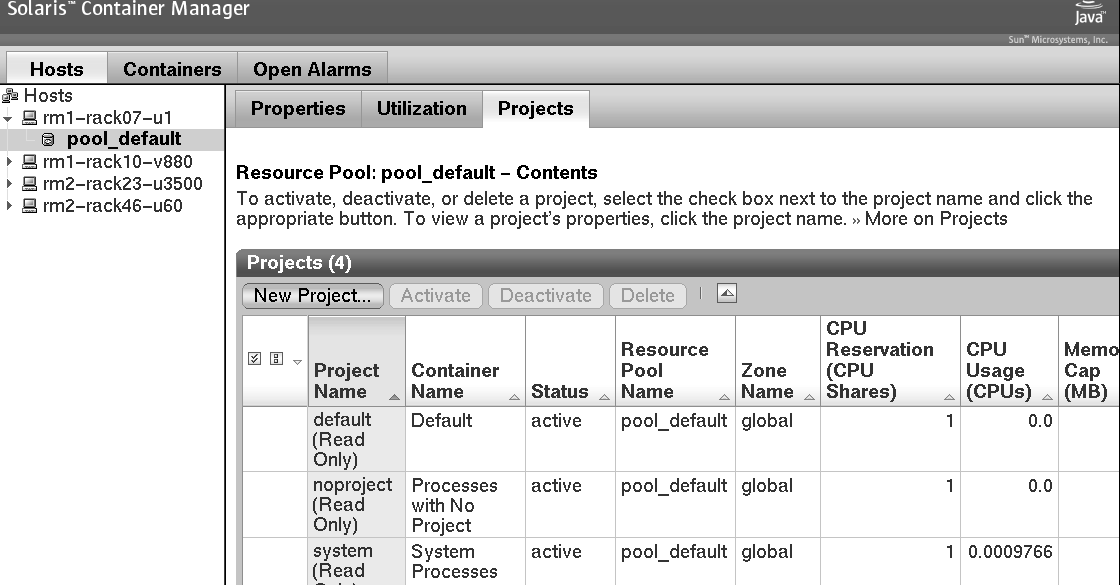
Information about every project instance that is associated with a host is listed in the Project table.
The following figure shows the Hosts view with the project table that is associated with the default pool.
Figure 3–5 Sample: Hosts View Showing the Project Table

The Project table provides information about each project, detailing one project per row. The Project table provides the following data:
- Project Name
-
Name of the project
- Container Name
-
Name of the container
- Status
-
State of the project: active and inactive
- Resource Pool Name
-
Resource pool to which the project is bound
- Zone Name
-
Name of the zone where the project resides. For Solaris 8 and Solaris 9 hosts, the zone name is always global.
- CPU Reservation (CPU shares)
-
Minimum CPU shares set for the project
- CPU Usage (CPUs)
-
Amount of CPU the project is using
- Memory Cap (MB)
-
Maximum memory limit in megabytes
- Memory Usage (MB)
-
Memory used by the project in megabytes
- Shared Memory (MB)
-
Total amount of memory that is allowed to be used by the processes that run within this project in megabytes
The Resource Pool table provides information about each resource pool. The Resource Pool table provides the following data:
- Resource Pool Name
-
Name of the resource pool
- Current CPU(s)
-
Number of CPUs currently set for the resource pool
- Unreserved CPU Shares
-
CPU shares that are not assigned to the zones or projects in the resource pool
- Scheduler
-
Scheduler set for the resource pool: time-sharing scheduler or fair share scheduler
- CPU Shares
-
CPU shares set for the resource pool
- Minimum CPU Reservation
-
Minimum number of CPUs set for the resource pool
- Maximum CPU Reservation
-
Maximum number of CPUs set for the resource pool
The Zone table provides information about each zone. The Zone table provides the following data:
- Zone Name
-
Name of the zone
- Zone State
-
State of the zone: configured, incomplete, installed, ready, running, shutting down, or down
- Zone Host Name
-
Unique name for the zone as a virtual host
- Zone Path
-
Absolute path that starts from the root (/) directory
- IP Address
-
IP address for the zone
- Project CPU Shares
-
Number of CPU shares that is allocated to the projects in the zone
- Unreserved CPU Shares
-
Number of CPU shares available for allocation to projects associated with this zone
- Reserved CPU Shares
-
Number of CPU shares that is allocated to this zone in the resource pool
- Resource Pool
-
Resource pool for the zone
Containers View
The Containers view organizes information from the container perspective. All containers and projects appear in the navigation window. Because containers can be used repeatedly to make new projects, you can readily access the containers from this view, as well as perform other management tasks.
After installation and setup are complete, the Containers view automatically adds the Containers group as a default. Containers are managed from the Containers view.
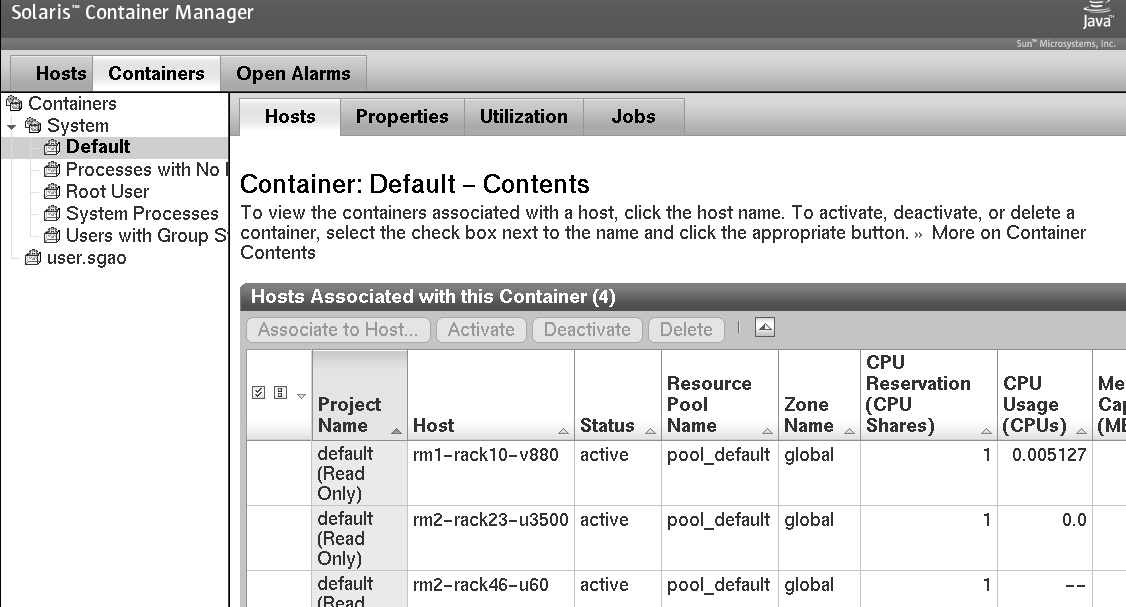
The following figure shows the Containers view.
Figure 3–6 Sample: Containers View Showing the Hosts Associated With the Default Container

The information that is available in the Containers view is listed in Table 3–1.
Organizing Hosts and Containers With Groups
The Hosts view contains the default group Hosts. All hosts that are discovered after installation of the software are placed in this group. Likewise, the Containers view has a default group named Default in which all the default containers of a host are placed. You can create additional groups in each view for organizing the hosts and containers.
You might use groups to organize the ten or hundreds of systems you have in a data center. For example, you might put hosts located together in a group. You might put containers owned by the same customer (internal or external) or department in a group. Likewise, you might put containers with a similar application in a group.
 To Create a Container Group or Host Group
Steps
-
If the Container Manager GUI is not already open, access it as described in To Start the Container Manager GUI.
-
Select the appropriate view from the navigation window.
-
For a new container group, select the Containers view. The Container table is displayed in the right pane.
-
For a new host group, select the Hosts view. The Hosts and Groups table is displayed in the right pane.
-
-
Click the New Group button.
A dialog box appears.
-
Provide a name for the group, and click OK.
The name cannot exceed 32 characters.
The new group appears in the selected view.
 To Move a Container or Host to a
Different Group
Steps
-
If the Container Manager GUI is not already open, access it as described in To Start the Container Manager GUI.
-
Select the appropriate view from the navigation window.
-
To move a container to a different group, select the Containers view. The Containers table is displayed in the right pane.
-
To move a host to a different group, select the Hosts view. The Hosts and Groups table is displayed in the right pane.
-
-
To enable the Move button in the table, select the check box for the container or host that is to be moved.
-
In the right pane, click the Move button.
A dialog box lists the available groups.
-
Select the group to which the container or host is to be moved.
-
Click OK.
The container or host is moved to the selected group.
- © 2010, Oracle Corporation and/or its affiliates
