| C H A P T E R 3 |
|
Installing Sun MTP |
This chapter contains the following topics:
Before installing Sun MTP, you must install the prerequisite software described in Chapter 1 and review the information in Chapter 2.
|
1. Read the Sun Mainframe Transaction Processing Software Release Notes.
2. Create the installation directory.
3. Create a setup file that sets the environment variables you need to install the software and build the Sun MTP executables.
4. Extract the Sun MTP files from the distribution media.
6. Build the Sun MTP executables.
7. Change the ownership and mode of the kixclean, unikixstrt, and unikixl modules.
If you are creating an installation directory directly under the root (/), you must log in as root or use the su command to become the root user. Do not install Sun MTP directly under the root directory.
|
2. Create the directory where the Sun MTP software will be installed.
If the directory already exists, skip this step.
To install software and build the Sun MTP executables, you must create a setup file that defines your working environment. The following procedure describes how to create a Bourne or Korn shell setup file. The Sun Mainframe Transaction Processing Software Configuration Guide contains a list of environment variables used in the Sun MTP environment, as well as information about setting environment variables in C shell.
|
1. Using a text editor, such as vi, create a file. For example:
2. Set the UNIKIX environment variable to contain the path name of the directory where you plan to install Sun MTP.
If your system has a previous version of the software, reset $UNIKIX to identify the directory of the new version.
pkgs/mtp: Identifies the installation directory.
MTP8.0.0: Indicates the version. The name of this directory comes from the label on the distribution media. When you extract the files from the CD-ROM, this directory is created.
3. Set the KIXLICDIR environment variable to the directory for your license key file.
4. Set the TMPDIR environment variable to the directory for temporary files.
5. Set the LD_LIBRARY_PATH environment variable to include $UNIKIX/lib.
If you are using COBOL, $LD_LIBRARY_PATH must also include the $COBDIR/lib directory.
If you are using Sun MAT, you must add the location of the JVM.
6. Set the environment variables for the application languages you are using.
If you are using COBOL, you must set $COBDIR, the COBOL installation directory, $COBCPY, the location of COBOL copybooks, and $COBMODE, to specify 32-bit mode.
COBDIR=/opt/cobol/2.1;export COBDIR COBCPY=/opt/cobol/2.1/cpylib:$UNIKIX/copy;export COBCPY COBMODE=32;export COBMODE |
7. If you are using an RDBMS or other third-party products, set their environment variables.
Refer to your third-party documentation.
8. Set your PATH environment variable to include $UNIKIX, $UNIKIX/bin, and $COBDIR/bin.
Make sure you include the location of the UNIX make facility, as well. The make facility is used to build the Sun MTP executables.
9. You can add other environment variables to this file later.
10. Save the file to a known location, such as the region's bin directory.
See the Sun Mainframe Transaction Processing Software Configuration Guide, which describes a region's directory structure.
11. Make sure that the setup file is executable by setting the permissions. For example:
12. At the command prompt, source the setup file, which executes setup in the current shell, to set your environment.
Make sure to type a space after the first period. For example:
After setting up the installation directory and executing the setup file, mount the distribution media and extract the Sun MTP files.
|
The volume manager is normally started as part of the operating environment initialization, which means that you can use the standard mount commands to access the CD-ROM.
2. Change the directory to the installation directory you created in To Create the Installation Directory.
3. Extract the contents of the zip file on the CD-ROM to the installation directory.
Refer to the unzip(1) man page for information about the command options.
After you install the software, the $UNIKIX directory contains the files and directories listed in the following table.
Before you can use the software, you must have a valid license file in the $KIXLICDIR directory. After you obtain the software enabling key, you can create the license file.
|
1. If you have not done so, execute the setup file to set your environment.
2. Change to the directory for your license file.
3. Determine the host identifier for your system by typing the following command:
4. Using any text editor, create a file named xxx.lic, where xxx is the host identifier for your system.
Type the following information, making sure not to type extra line returns or spaces:
b. System serial number or customer number
c. Your system's host identifier
d. The 25-character software enabling key
Before you can execute application programs, you must prepare your environment and build the Sun MTP executables.
|
1. Make sure you have installed all the software your application environment requires.
2. Verify that $UNIKIX and all other environment variables needed for application languages, RDBMS, and third-party products are set.
See Creating the Sun MTP Setup File.
You can display all the environment variables you set by typing env at the command prompt.
3. Change to the Sun MTP source directory:
4. Ensure that Sun MTP is not currently active by typing:
If Sun MTP is running, execute the CSMT SHUT,YES transaction on a blank transaction screen.
5. If you are using COBOL, follow these steps:
a. At the command prompt, type:
This command verifies that the environment is correctly set to find the COBOL directories that are needed for compilations done by the Configuration Utility.
Verify that the COBDIR environment variable points to the directory where the COBOL software is installed.
6. If you are using COBOL, execute the following command to verify that COBOL will run in 32-bit mode:
|
Note - Adding the COBMODE variable to your region setup file is the preferred method. See To Create a Setup File. |
|
|
Note - This procedure has many steps, which you must complete to successfully build the executables. |
1. Type the kixinstall command at the command prompt to start the Configuration Utility.
When the menu is displayed, you can type D to display the current configuration.
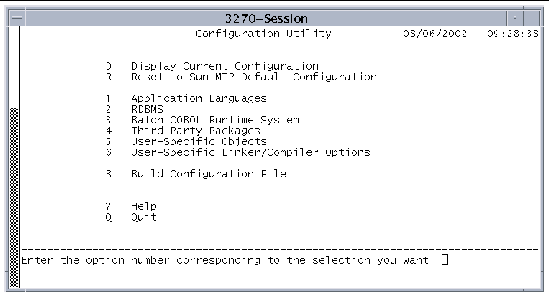 [ D ]
[ D ]
2. Type R on the Configuration Utility main menu, then press Return, to remove the current configuration.
This ensures that Sun MTP is set to the default configuration. A make clean is automatically executed.
3. If you need help at any time, type a question mark (?) to display the help file, which provides a brief description of each menu selection.
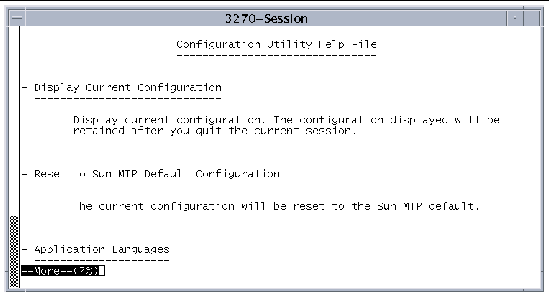
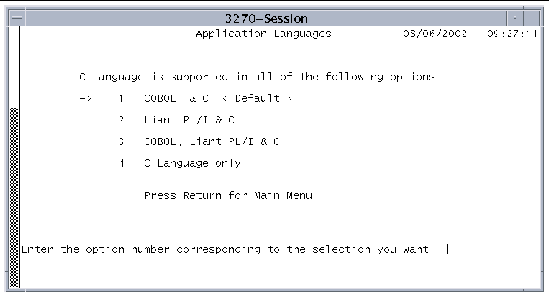
4. Select 1 on the Configuration Utility main menu and press Return to display the Application Languages screen.
Then type a number to select the application language(s) you are using and press Return to display the main menu.
If the environment variables for the selected language(s) are not set, an error message is displayed, indicating that you must set them before you can continue.
 [ D ]
[ D ]
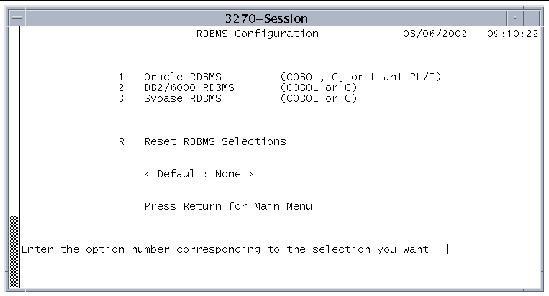
5. To select an RDBMS, type 2 on the Configuration Utility main menu and press Return.
Then type the option number of the RDBMS you are using.
To deselect the RDBMS selection(s), press R and Return.
If the environment variables for the RDBMS are not set, an error message is displayed, indicating that you must set them before you can continue. Refer to the Sun Mainframe Transaction Processing Software Configuration Guide and your RDBMS documentation for more information about the environment variables you need to set.
 [ D ]
[ D ]
6. If you installed Sun MBM and want to build the COBOL runtime system, type 3 on the Configuration Utility main menu and press Return.
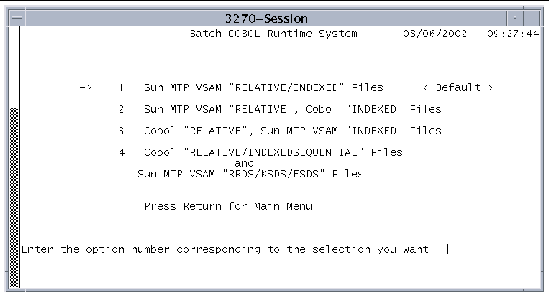
For additional information about accessing VSAM and COBOL files in application programs, refer to the Sun Mainframe Batch Manager Software Migration Guide.
Press Return to accept your selection and display the main menu.
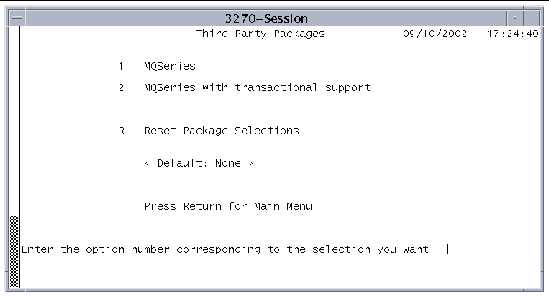
7. To integrate a third party package, select option 4 from the Configuration Utility main menu, and press Return to display the Third Party Packages screen.
Select the MQSeries Messaging and Queueing option you want and press Return. Refer to the Sun Mainframe Transaction Processing Software Developer's Guide for information about these options.
If the environment variables for the third-party packages are not set, an error message is displayed, indicating that you must set them before you can continue. Refer to the Sun Mainframe Transaction Processing Software Configuration Guide and your third-party documentation for information about the required environment variables.
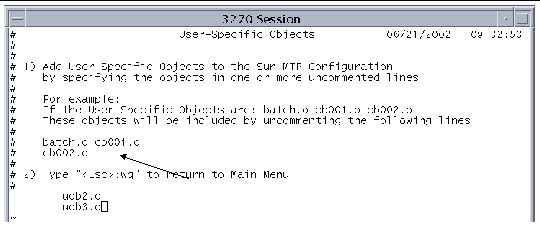
8. To add user-specific objects, select option 5 on the Configuration Utility main menu and press Return.
This opens a file in the vi editor.
a. Type the names of the objects you require. The arrow points to an example.
If you are not familiar with the vi editor, refer to the vi(1) man page.
b. To end the session, press the Esc key and type :wq, which saves the file and exits the vi session.
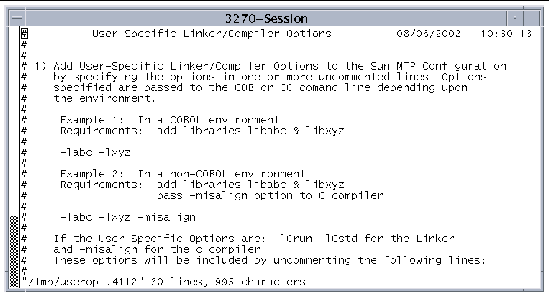
9. To add user-specific linker and compiler options, select 6 on the Configuration Utility main menu and press Return.
This opens a file in the vi editor (FIGURE 3-8).
a. Type the linker and compiler options you want applied to the user-specific objects you specified in Step 8.
Refer to the C compiler documentation or the COBOL documentation for the cob command for information about the linker and compiler options.
b. To end the session, press the Esc key and type :wq. The main menu is displayed.
10. To build the configuration file, type B on the Configuration Utility main menu and press Return.
This selection builds the configuration file based on your selections. When the message on the screen indicates, press Return to continue.
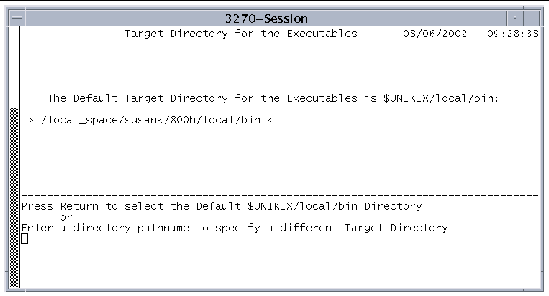
11. On the Target Directory for the Executables screen, accept the default or provide a different directory path.
In FIGURE 3-9, the target directory is the default $UNIKIX/local/bin. Alternatively, you can type a directory path name to specify another region. It is possible to define multiple Sun MTP configurations, depending on the options you select in the Configuration Utility.
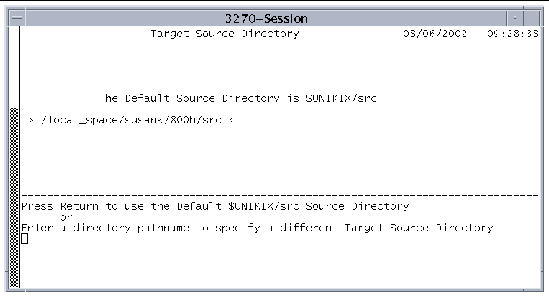
12. On the Target Source Directory screen, accept the default or provide a different directory path.
In FIGURE 3-10, the target source directory is the default $UNIKIX/src. Accept the default or type a directory path name to specify another target source directory. If you select a different directory, the configuration makefile is created in the new target source directory.
13. Messages are displayed at the bottom of the screen. When the makefile is built, a prompt is displayed asking if you want to build the Sun MTP executables.
Creating Configuration File /local_space/susank/800/src/makefile # # Configuration File /local_space/susank/800/src/makefile Created # Do you want to build the Sun MTP executables ? [Y/N] |
If the location of the make facility is not in your path, error messages are displayed.
14. When you choose not to build the Sun MTP executables, messages similar to the following are displayed at the bottom of the screen.
Follow the on-screen directions.
15. To exit the Configuration Utility type Q.
If you did not execute the Build Configuration File selection (B), messages notify you that the configuration file was not built and prompt you to continue.
16. After you exit, these messages are displayed:
This is the path name of the log file that was created during this configuration session. The ##### symbols represent a numeric value assigned to the log file. You can view this file using any text editor. You can send a copy of it to your authorized service provider if you are experiencing any installation problems.
18. Change the ownership and mode of the Sun MTP executables in $UNIKIX/bin for kixclean, unikixstrt, and unikixl so they run as root.
This procedure sets the owner-id bit, which ensures that when the processes are run, the effective user ID at execution time is the owner of the file.
# cd $UNIKIX/bin # chown root kixclean # chmod 4755 kixclean # chown root unikixstrt # chmod 4755 unikixstrt # chown root unikixl # chmod 4755 unikixl |
19. Log out as root and log back in as the user who installed Sun MTP.
You are now ready to verify the installation. See Chapter 5.
Copyright © 2004, Sun Microsystems, Inc. All rights reserved.