| C H A P T E R 9 |
|
Sun Mainframe Security Facility (Sun MSF) |
This chapter describes Sun MSF and includes detailed procedures for implementing the software. The topics include:
For an overview of external security, see Chapter 8.
Sun MSF provides the administration and runtime services of an ESM for Sun MTP Secure, and is delivered as the default ESM enabled with Sun MTP Secure. Sun MSF provides a Role Based Access Control (RBAC) security model, in which permissions to resources are associated with roles, and users are assigned to appropriate roles. Sun MSF uses an inclusive permissions model--that is, all resources must be defined in the security repository and permissions must be granted for any user or role that needs to access them. If a resource is not defined in the security repository, it cannot be accessed by any user or role.
Sun MSF provides the following entities in its security model:
Principal. Individual user defined to the security system.
Role. A group of users with common responsibilities, such as a test group.
Resource Domain. A group of resources that have common access permission requirements.
Resource. A named component of a specified type, such as a file or program, that is accessed when a user executes a transaction or performs other work.
Permissions to Resource Domains are granted to Principals and Roles.
The following illustration shows how the Sun MSF components interact with one another.
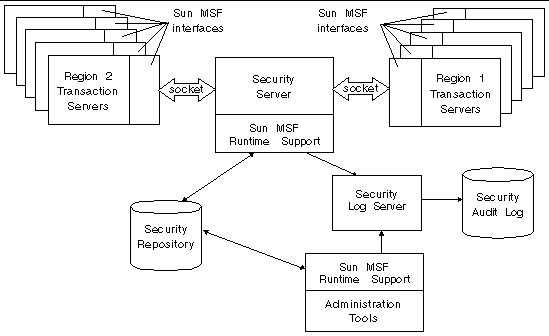
Security repository. The repository is a third-party relational database management system (RDBMS) that contains the Principals, Roles, Resource Domains, and Resources that are managed by Sun MSF. It also contains the permissions, or rules, for accessing domains and resources. The repository can be on the same host as the Sun MSF runtime or on a different one. However, in this release, it must at least reside behind the system's security firewall. See Setting Up the Security Repository.
Administration tool set. These command line tools are used initialize and manage the security repository. See To Create the Security Administrator and Initialize the Repository and SecAdmin Tool. Note that the SecAdmin tool collects all changes being made by the administrator and only updates the security repository with those changes when the administrator requests a commit. See commit.
Security Server. The Security Server is a process that manages the interactions for authentication and authorization between the Sun MTP regions and the security repository. It maintains a cache of security rules for all active Sun MTP users, and provides a refresh function to allow updated security rules from the repository to be used.
Sun MSF runtime support. These services allow the Security Server and administration tools to communicate with the repository.
Sun MSF interfaces to the Security Server. These interfaces are used by the region's transaction servers to communicate with the Security Server. These interfaces also maintain a local results cache that optimizes access to the Security Server. This cache is repopulated after a CEMT PERFORM SECURITY REBUILD is executed. See Security Access Results Caching.
Each region will use the security runtime through its Sun MSF interfaces, for user authentication and for resource access control decisions. The Sun MSF interfaces use a socket interface to the centralized Security Server.
Security Log Server. The Security Log server collects all audit messages generated by the Sun MSF runtime support services and writes those messages to the Security Audit Log file. This log server is started with the SecurityLogs command. See Managing the Security Log Collection and Logging Security Events.
There are three categories of users of the security system:
The Super Administrator can create and destroy the security repository. The Super Administrator is the only person who can run the MakeAnAdministrator tool, and therefore, would have UNIX file permissions to use the Sun MSF software installation. See Initializing the Repository and Creating the Security Administrator.
The Security Administrator is responsible for maintaining the security repository using the SecAdmin tool, and therefore, would have UNIX file permissions to use the Sun MSF software installation. The Security Administrator will create and maintain the Principals, Roles, Resource Domains, and Resources with their associated permission rules. The Super Administrator creates the Security Administrator using the MakeAnAdministrator tool.
The Security Administrator is also responsible for organizing the repository. Usually, the administrator will analyze the requirements as follows:
1. Identify the users and resources.
2. Determine what the users have to do and use this information to establish Roles. Users with common access requirements are grouped in a Role.
3. Determine what access rights those Roles need to resources, and establish Resource Domains based on those rights.
4. Assign resources to Resource Domains.
5. Assign permissions to Roles (and Principals, if required) to access the various Resource Domains.
After this analysis is complete, the Security Administrator can begin populating the repository.
|
Note - The EMPSECURITY environment variable must be set in the Security Administrator's environment to use the Sun MSF tools. |
Sun MTP users are the community of Principals in the security repository that have non-administrative permissions. These are normal users who sign on with a user name and password to a specific region to run business applications. These also are Sun MTP region administrators with permissions to start, stop, and administer those regions. Because these users do not need to use any of the Sun MSF tools, they would not have UNIX file permissions to use the Sun MSF software installation.
When the user is authenticated, the Sun MSF establishes the user's permissions to resources through their Roles and Resource Domains. When the user submits work, the security runtime checks the permissions for each resource the user attempts to access. The user is granted or denied access based on the permissions.
This procedure describes at a high level the tasks you must perform to implement Sun MSF for a Sun MTP region.
1. Define a security policy for your application environment.
This policy will probably be developed in conjunction with your site's security administrator. The policy should define all the security requirements for your application.
2. Make sure that the database that will be used for the security repository is configured.
See Setting Up the Security Repository.
3. Install the Sun MSF software.
See Installing the Sun MSF Software.
4. Configure the Sun MSF software.
See Configuring the Sun MSF Software.
See Managing the Security Log Collection.
6. Run the MakeAnAdministrator tool to initialize the security repository and create the Security Administrator.
See Initializing the Repository and Creating the Security Administrator.
7. Populate the repository based on your security policy.
See Security Management Tasks.
8. Bring up the Security Server.
See Starting the Security Server.
9. Set up the region (these tasks can be done at the same time as the previous ones):
a. Define the default user in the Sign-on Table (SNT).
b. Define any pre-defined terminals in the Terminal Control Table (TCT) and SNT.
c. In the region setup file, set the Security Server environment variables.
See Setting the Region's Environment Variables.
d. In the region setup file, set the Sun MTP Secure environment variables.
Refer to the Sun Mainframe Transaction Processing Software Configuration Guide for descriptions of these variables.
11. Execute the new setup file to set the region's environment to use Sun MTP Secure with Sun MSF.
The RDBMS's database administrator (DBA) must establish the security repository using the database tools. The DBA creates a Super Administrator, a Security Administrator with permissions to only read and write database tables in the security repository, and should also create a non-privileged user who can log in with only read access to all the security tables plus write access only to the User table.
The database vendor must provide the appropriate Java data base connector (JDBC) classes. These JDBC classes must be added to the administrator's CLASSPATH environment variable and to the java.policy and jaas.policy files.
This section provides an example of how to create the table space and user IDs for an Oracle database that will be used as the security repository. The tools or utilities used to perform these tasks can be different based on the Oracle release you are using.
|
Note - To use the following command, the /opt/database directory must exist. |
 Employing an Oracle user with DBA authority, execute the following command:
CREATE TABLESPACE secure_ts DATAFILE `/opt/database/file01.dbf' SIZE 100M MINIMUM EXTENT 500K DEFAULT STORAGE ( INITIAL 400K NEXT 400K MINEXTENTS 1 MAXEXTENTS 200 PCTINCREASE 0 ) PERMANENT ONLINE ; |
In this example, the super administrator name is SECURITY, the security administrator name is ADMIN, and the user name is ENDUSER. The passwords will initially match the names.
 Execute the following commands:
This section provides an example of how to set up a Sybase database that will be used as the security repository. Your Sybase administrator can create the security database using the following procedure. The tools or utilities used to perform these tasks can be different based on the Sybase release you are using.
1. Determine the database device(s) where you want the security database to be stored.
A database can be stored on more than one database device, with a different amount of space on each. For example, to view the logical names of default database devices:
2. Create the database using the following command syntax:
For example, employing a Sybase user name with DBA authority:
3. Assign database ownership and set default database for all three security users:
This creates the logins and ties them to the SECURITY database. At this point, these users have no permissions in the database. The Sun MSF software will issue the grant or revoke SQL commands using JDBC calls in the MakeAnAdministrator tool.
The Sun MSF software is a set of Java Archive (JAR) files located in the $EMPSECURITY/lib directory. To use the software, you must also install the Java Development Kit (JDK ) 1.4, which includes JAAS 1.0 and the JAAS Sample Authentication Module, specifically the jaasmod.jar file.
This section describes how to install Sun MSF on UNIX platforms.
Sun MSF software is distributed as a zip file named MSF1.0.0.zip. Install it on each system where you need to run Sun MSF tools, such as SecurityServer and SecAdmin.
Follow these guidelines when installing Sun MSF:
|
1. Create the top-level installation directory:
2. Change to the installation directory:
3. Extract the zip archive. For example:
Refer to the unzip(1) man page for information on command options.
This will create the following directory structure:
MSF1.0.0 indicates the version of Sun MSF that you have installed.
The Sun MSF is the default external security manager for Sun MTP, but it is not enabled. The following configuration tasks must be completed before you can enable and run the Sun MSF
A set of configuration files control how Sun MSF functions. These files are:
The java.policy file is installed with the JDK. You must merge the contents of the $EMPSECURITY/lib/java.policy, which contains values required for Sun MSF, with the java.policy file located in the Java-home/lib/security directory.
You must also add a grant directive for your JDBC classes file (JAR, zip files) to the java.policy and jaas.policy files under $EMPSECURITY/lib, specifying java.security.AllPermissions. The Java policy tool application can be used to add this entry.
The contents of the java.security configuration file must be updated to include the following login and authorization providers:
login.config.url.1=file:MSF-install-path/lib/jaas.config auth.policy.url.1=file:MSF-install-path/lib/jaas.policy |
In addition, to ensure security is enforced by disabling a command-line override of the security policy set in the java.policy file, comment out the following line in the java.security file:
# whether or not we allow an extra policy to be passed on the # command line with -Djava.security.policy=somefile. Comment out # this line to disable this feature. #policy.allowSystemProperty=true |
|
|
1. Review the statements in the MSFconfig.properties configuration file (TABLE 9-1) and modify them if necessary for your site.
2. Make sure there is a valid value in the com.sun.emp.security.serverPortNumber statement of the MSFconfig.properties file.
3. You must also provide valid values for com.sun.emp.security.logTracePort and com.sun.emp.security.logMessagePort; there are no default values for these properties.
4. You must also configure all the com.sun.emp.security.adapterxxx properties required for the selected adapterType and adapterBrand.
The following table describes each property in the file and the valid values.
Before performing any tasks related to Sun MSF, your environment must be set.
1. Create a setup file in a text editor, for example, secsetup.
2. Add the following to the setup file:
The following shows an example of the setup file format.
Sun MSF depends on its Security Log collection server(s) to be present and operational in order to run any Sun MSF applications. By default, the message logger, which performs audit and message logging, is enabled and can be used by those applications. The trace logger can also be enabled. The following properties in the MSFconfig.properties file influence the behavior of the log servers:
|
Identifies the directory that message and trace logs write to. |
|
|
Defines the length of time in hours between log file switchover. |
|
Note - The com.sun.emp.security.logPeriod property defines a period in hours between log file switchover. Setting this property to any integer value between 1-24 causes the log server to automatically start writing a new file after the specified hours have elapsed. For example, if the property is set to 12, a new file is opened and the old file is closed every 12 hours. Setting a value of 0 (zero) for this property indicates that file swapping is not performed. See Changing the Security Log Server Files Within the Same Directory for information about manually switching over to a new file. |
The Security Log collection servers are controlled by the SecurityLogs command.
SecurityLogs -s|-t|-p|-f|-d directory
|
Changes the directory where the generated collection files are to be created. |
The SecurityLogs command generates the collection files with a unique file name containing the date and time. See Logging Security Events for examples of the audit messages logged to the collection file.
The Security Log collection server should be left running at all times to collect audit messages.
Before the Security Log servers can be started, the message logger--and optionally, the trace logger--must be enabled in the MSFconfig.properties file. The logger port numbers must also be set in the properties file.
The Security Administrator starts the Security Log servers using the following command:
The following messages are displayed if both message and trace logs are started:
[SecurityLogs] Message logger started successfully on port:pm
[SecurityLogs] Trace logger started successfully on port:pt
where pm is the value configured for com.sun.emp.security.logMessagePort and pt is the value configured for com.sun.emp.security.logTracePort in the MSFconfig.properties file.
If it becomes necessary to terminate the Security Log servers, first shut down all applications that are using security logging. Then use the following command to shut down the Security Log servers:
The following messages are displayed:
[SecurityLogs]:The Message logger has successfully terminated!
[SecurityLogs]:The Trace logger has successfully terminated!
If, because of disk space constraints or other reasons, it is necessary to change the directory where the logs are being written, run the following command:
where directory is the new directory for the logs. This directory must have write permissions and must be different from the current directory. After this command is executed, the current log file or files are closed, and new files with a new time stamp are opened in the new directory. If the command completes successfully, the following messages are displayed:
[SecurityLogs]:Message logger has changed directories!
[SecurityLogs]:Trace logger has changed directories!
From time to time, it might be necessary to change the current log file to a new log file with a new name, still in the same logging directory. This process is sometimes referred to as flipping the files. Run the following command to flip files:
The old file is closed, and the new file is opened. The following message or messages are displayed:
[SecurityLogs]:Message logger has flipped files!
[SecurityLogs]:Trace logger has flipped files!
To display the full path name and port number of the Security Log servers, run the following command:
In the next step in the configuration process, the Super Administrator uses the MakeAnAdministrator tool to initialize the security repository and create the Security Administrator, who will be responsible for populating and maintaining the repository.
|
|
1. Make sure that the MSFconfig.properties file contains the correct values.
2. Set the Super Administrator's environment by sourcing the setup file.
3. At a command prompt, execute the MakeAnAdministrator command:
The following messages and prompts will be displayed while MakeAnAdministrator runs:
4. When prompted for the schema password, type the password provided by the database administrator.
5. When prompted for the end user password, type the password provided by the database administrator.
6. When prompted for the admin password, type the password provided by the database administrator.
7. The following prompt is displayed if a repository already exists.
(SecSvc_213) [MakeAnAdministrator] Repository not empty; ... do you want to destroy current contents and reinitialize (yes/no)? |
All the following messages will display even if you are initializing the repository for the first time.
The Security Administrator can now invoke the SecAdmin tool. See SecAdmin Tool.
When the repository is initialized, a predefined set of entries are created. These are:
After the repository is initialized, the Security Administrator normally performs the tasks described in this section. Before the Security Administrator can execute any Sun MSF commands or utilities, the environment must be set. See To Set the Environment.
When adding a Principal to the repository, you must specify the user name and password. Optionally, you can specify the maximum and minimum days the password is active, a password expiration date, and whether the user is suspended. You can also include a description of the Principal.
If you do not specify the maximum and minimum days the password is active, the password expiration date, or the suspend state, the Principal is added to the repository with the settings defined in the MSFconfig.properties file.
See createPrincipal.
After a Principal is in the repository, you can:
After you determine what the Principals need to do and decide how to group the Principals into Roles, you can start creating Roles. When you create a Role, you must specify a name and a description. See createRole.
After you create a role, you can:
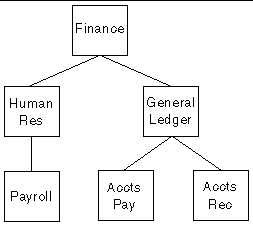
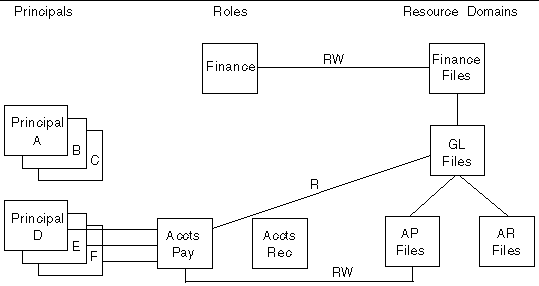
FIGURE 9-2 shows Role hierarchical relationships. In this illustration, the Finance role is the parent of both the Human Resources and General Ledger roles. The General Ledger role has two subsidiary roles: Accounts Payable and Accounts Receivable. Principals belonging to either of these roles only have the permissions of the role, while Principals belonging to the General Ledger role have the permissions of that role, as well as the permissions of the subsidiary roles.
To add a Resource to the repository, you must specify a resource type, a resource name, and a description.
When the security repository is initialized, a set of Resource Types are included by default. The following table lists the Resource Types and their corresponding Sun MTP Secure resource class. It also shows each Sun MTP Secure environment variable that controls whether checking is done for that resource class.
The KIX_* resource types are described in TABLE 8-1. To define your own Resource Type, see createResourceType.
|
Note - Only KIX_* resource types are recognized and usable for Sun MTP resources. |
After you create a Resource, you must add it to a Resource Domain, so that permissions can be assigned.
A Resource Domain is a collection of resources that have common access permission requirements. When you create a Resource Domain, you specify the domain name and a description.
After you create a domain, you can:
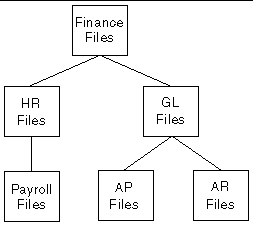
FIGURE 9-3 shows Resource Domain hierarchical relationships. In this illustration, the Finance Files resource domain is the parent of both the HR Files and GL Files resource domains. The GL Files resource domain has two subsidiary resource domains: AP Files and AR Files. Principals or Roles with permissions to either of these resource domains only have access to the resources of that resource domain, while Principals or Roles with permissions to the GL Files resource domain have the access to the resources of that resource domain, as well as access to the resources of the subsidiary resource domains.
When you add permissions to Principals or Roles you are giving them specific access rights to a Resource Domain. These access rights are made up of one or more permission types. A default set of permission types is added to the repository when it is initialized. These types are: read, write, execute, and manage. You can also create your own permission types. See createPermissionType.
To add permissions to a Principal or Role, you must specify the name of the Principal or Role, the name of the Resource Domain, and one or more permission types.
There are times when you might need to add many objects to the repository at once. The SecAdmin loadFile command will read in a text file of SecAdmin commands and add the objects to the repository.
For example, when you are first populating the repository, add all the users in the SNT. You can make each entry at the SecAdmin prompt, or you can use the following procedure.
1. Open the SNT and export the table.
This produces an ASCII file named snt.lst.
2. Edit the file so that each entry contains the correct createPrincipal syntax.
Rename the file so it doesn't get overwritten if you export the SNT again.
3. At a SecAdmin prompt, type the loadFile command with the name of the text file.
The SNT entries are added to the repository. See loadFile.
The text file does not have to contain the same types of entries. For example, if your company is deploying a new application, you can create a text file that contains the commands to add Resource Domains and Resources. If you do this, make sure the commands to create the Resource Domains appear before the commands to add Resources to them.
When you make changes to the repository using the SecAdmin tool, your changes stay in memory and are not active until you commit them, or decide to discard the changes entirely and roll them back. The SecAdmin tool's commit and rollback commands allow you to do this. If you are making many changes, commit them periodically so they are not lost if an unexpected failure occurs.
The SecAdmin tool has a set of commands that allow you to list the objects in the repository by type, and to display text diagrams of Roles and Resource Domains. The list* commands, with the exception of listPrincipalsWithNoRole and listResourcesWithNoDomain, allow you to request a complete list or provide a search string. The detail level of the output varies, depending on what you are listing. The list* commands are:
The print* commands display hierarchical text diagrams of the Roles and Resource Domains in the repository.
When you delete an object from the repository, it can still exist in your region configuration, for example, a file in the FCT or a program in the PPT. Removing the object from the repository means it is no longer accessible as a resource in any region using the Sun MSF.
If you have established Role and Resource Domain hierarchies, be careful about deleting interdependent Roles or Resource Domains.
Deleting a Role from a hierarchy disconnects the Role from its parent role and from all its child roles. It also eliminates that Role membership from any Principals, and thus any Permissions it provided are lost. FIGURE 9-4 illustrates an interdependent set of Principals, Roles, and Resource Domains.
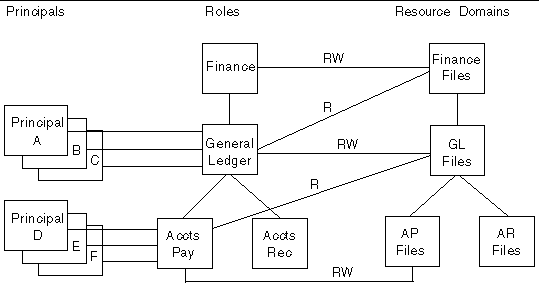
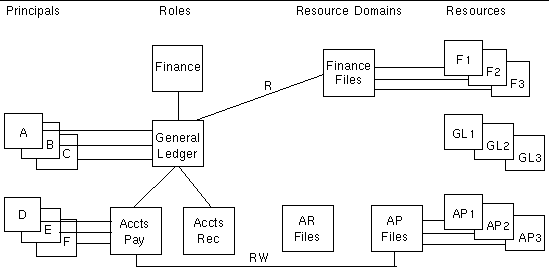
Deleting the General Ledger Role would cause Principals A, B, and C to lose that Role and thus lose read-write permission to the GL Files domain and all its child domains, and read permission to the Finance Files domain. FIGURE 9-5 shows the results of deleting the General Ledger Role. It is the Administrator's responsibility to reconnect the orphaned child roles to a parent role if needed, and reassign any Principals to new roles. The listPrincipalsWithNoRole command can be used to locate Principals that have no Role.
Deleting a Resource Domain from a hierarchy also disconnects the Resource Domain from all its child domains as well as from its parent domain. It also eliminates that domain membership from any Resources, and thus the Permissions to those Resources that any Principal or Role might have had through that Resource Domain. FIGURE 9-6 illustrates an interdependent set of Principals, Roles, Resource Domains, and Resources.
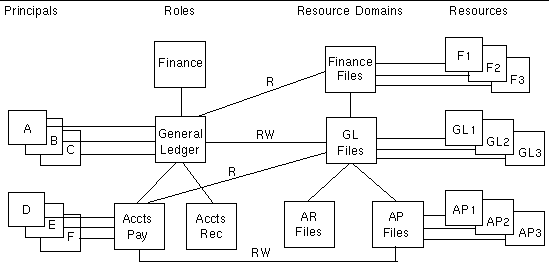
Deleting the GL Files Domain would cause all Principals to lose Permissions to VSAM datasets GL1, GL2, and GL3. Principals A, B, and C would also lose Permissions to the child AP Files Resources: VSAM datasets AP1, AP2, and AP3. However, Principals D, E, and F would retain their Permissions to AP Files because their Role has an explicit Permission to the AP Files Domain. Resources GL1, GL2, and GL3 are now inaccessible unless they are in another domain. FIGURE 9-7 shows the results of deleting the GL Files Domain. It is the Administrator's responsibility to reconnect those orphaned child Domains to a parent Domain, if needed, and to reassign the orphaned Resources to a domain to make them accessible with a Permission from a Role or Principal. The listResourcesWithNoDomain command can be used to locate these types of orphaned resources.
The SecAdmin tool allows the Security Administrator to add, modify, delete, and list all configured components in the security repository. This section describes the SecAdmin commands and provides examples of the output of each command.
|
1. Set your environment, making sure that the EMPSECURITY environment variable is set to the Sun MSF installation directory.
2. Type the following command:
3. When the MSF Login username prompt is displayed, type the Security Administrator's user name.
4. When the MSF Login password prompt is displayed, type the Security Administrator's password.
If the user name or password is not valid, the tool terminates with the following message:
[SecAdmin] Username or password provided is not valid
If the user name and password are valid, SecAdmin displays the following header and a prompt:
You can now submit commands. When the command is complete, you are returned to the SecAdmin prompt.
In the following command descriptions, an abbreviated form of the command is also shown. The SecAdmin prompt is not shown.
Terminates the SecAdmin session. The command abbreviation is q.
Lists the available SecAdmin commands. The command abbreviation is ?.
Provides a summary list of the top-level configured components: Roles, Principals, Resources, Resource Types, Permission Types, and Resource Domains. The command abbreviation is ls.
Loads a file of commands to create and configure security components. The command abbreviation is lf.
For example, the file /home/secureguy/sec_input.txt contains commands to create a Principal, a Role, and a Resource Domain.
createPrincipal,doreen,password,2002-12-31,100,10,F,Principal abcxyz1 createRole,rolexyz,Role X-Y-Z createResourceDomain,resDom1,This is Resource Domain #1 |
Issuing the loadFile command with the sec_input.txt input file results in the following output:
The listPrincipals command, like all list commands, can provide three different functions:
|
Note - In this release, the asterisk (*) is the only supported wild card character. |
The command abbreviation is lpr.
listPrincipals[,principalname|searchstring]
The following example shows the output of the listPrincipals command.
The following example shows the output of the listPrincipals,steve command. If the principal exists in the repository, the command displays details about the principal.
The last example shows the output of the listPrincipals command with a search string. The search string can be a partial name. For example, listPrincipals,s* will locate all Principals whose name begins with s.
Lists one or more Principals who are not assigned to a Role. The command abbreviation is lpwnr.
[SecAdmin]: listPrincipalsWithNoRole Principals With No Role: ======================================== angie dennis linda |
Creates an entry for a Principal in the repository. The command abbreviation is cpr.
createPrincipal,principalname,password,[p/w exp date],[p/w max days],
[p/w min days],[T|F],description
If the Principal was successfully created, the following message is displayed:
Success creating principal: principalname
If the Principal could not be created, one of the following messages appear:
ERROR:principal ExpDate should be: YYYY-MM-DD
ERROR:principal: principalname already exists (try a different name)
Invalid suspend state (use T or F)
ERROR: Password format is not acceptable for principal: principalname
Sets a new password in a Principal's entry. The command abbreviation is rpw.
resetPassword,principalname,newPassword
If the password was successfully reset, the following message is displayed:
Principal principalname successfully updated with new password
If the password reset failed, one of the following messages is displayed:
ERROR: Principal principalname not found
ERROR: Password format is not acceptable for principal: principalname
Resets the password duration in a Principal's entry. The command abbreviation is rpd.
resetPasswordDuration,principalname,max_days_valid,min_days_in_force
If the command was successful, the following message is displayed:
Principal principalname successfully updated with new values
If the command failed, the following message is displayed:
Principal not found principalname
ERROR: max)days)valid,min_days_in_force must both be numbers, not these:max...,min...
Modifies the expiration date of a Principal's password. The command abbreviation is med.
modifyExpDate,principalname,newdate
newdate must use the following format: yyyy-mm-dd.
If the command was successful, the following message is displayed:
New date successfully set for principal: principalname
is: yyyy-mm-dd
If the command failed, one of the following messages is displayed:
Please use this date format: YYYY-MM-DD
Principal: principalname not found
Suspends a Principal entry, disallowing that Principal from successfully logging in. The command abbreviation is susp.
suspendPrincipal,principalname
If the command was successful, the following message is displayed:
Success suspending Principal: principalname
If the command failed, one of the following messages is displayed:
Principal not found: principalname
Principal: principalname already suspended
Changes a Principal's state from suspended to enabled, thereby allowing the Principal to successfully log in. The command abbreviation is epr.
If the command was successful, the following message is displayed:
Principal: principalname successfully un-suspended
If the command failed, one of the following messages is displayed:
Principal principalname not found
Principal: principalname already enabled
Deletes a Principal entry from the repository, and removes any relationships to Roles and Permissions. The command abbreviation is dpr.
If the command was successful, the following message is displayed:
Success deleting Principal: principalname
If the command failed, the following message is displayed:
Principal not found: principalname
Sets the Principal's primary Role. The command abbreviation is spr.
To unset the Principal's primary Role, execute the command with no value for rolename.
setPrimaryRole,principalname[,rolename]
If the command was successful, one of the following messages is displayed:
Role: rolename now set to primary role for principal principalname
Role: null now set to primary role for principal principalname
If the command failed, one of the following messages is displayed:
Principal not found: principalname
If the primary role was already set, the following message is displayed:
WARNING:Primary role already set for principal,role was:formerrole
Lists one or more Role entries. The command abbreviation is lrol.
listRoles[,rolename|searchstring]
If you do not specify a role name or search string, listRoles returns a list of all Roles.
If you specify a role name, the following output is displayed:
If you specify a role name using a search string, such as role*, the following output is displayed:
If no matching names are found, there is no output.
Creates a Role entry in the repository. The command abbreviation is crol.
createRole,rolename,description
If the command was successful, the following message is displayed:
Success creating role: rolename
If the command failed, the following message is displayed:
Role: rolename already exists (try a different name)
Deletes a Role entry from the repository and removes any relationships to Principals, Roles, and Permissions. The command abbreviation is drol.
If the command was successful, the following message is displayed:
Success deleting role: rolename
If the command failed, the following message is displayed:
If you are trying to delete a Role that has children, the following message is displayed:
[SecAdmin]:This role has children! Delete anyway? [y|n]
Sets the parent Role for the specified Role. The command abbreviation is srp.
setRoleParent,rolename,parentrolename
If the command was successful, the following message is displayed:
Role: parentrolename successfully set as parent to: rolename
If the command failed, one of the following messages is displayed:
Role not found: parentrolename
If you are trying to set a parent Role for a Role that has a parent, the following message is displayed:
[SecAdmin]:This role has a parent! Set anyway? [y|n]
Displays a text version of the Role Tree, starting at the root roles, or at the Role specified in the command line. The command abbreviation is prt.
The output recursively displays the tree at each subordinate level with a summary list of that Role's Principals.
Role Tree: role1-->|linda|steve newrole-->|doug|steve role4-->|wally role2-->|dennis|angie|shanan role3-->|dennis|shanan |
Provides a summary list of one or more Resource Domain entries. The command abbreviation is lrd.
listResourceDomains[,resourcedomain|searchstring]
The listResourceDomains command with no parameters generates a list similar to the following:
Executing the command with the name of a domain as a parameter results in output similar to the following:
Executing the command with a search string, such as lrd,*i*, will display output similar to the following:
If you specify a search string and no matching domain is found, the following message is displayed:
ResourceDomain: resourcedomain not found
Creates a Resource Domain entry in the repository. The command abbreviation is crd.
createResourceDomain,resourcedomain,description
If the command is successful, the following message is displayed:
ResourceDomain resourcedomain successfully created
If the command fails, the following message is displayed:
ResourceDomain: resourcedomain already exists (try a different name)
Deletes a Resource Domain entry, and removes any relationships to Resources, parent or child Resource Domains, and Permissions. The command abbreviation is drd.
deleteResourceDomain,resourcedomain
If the command is successful, the following message is displayed:
Success deleting ResourceDomain: resourcedomain
If the command fails, the following message is displayed:
ResourceDomain: resourcedomain not found
If you are trying to delete a domain that has children the following message is displayed:
[SecAdmin]:This resource domain has children! Delete anyway? [y|n]
Sets the parent Resource Domain for the specified Resource Domain. The command abbreviation is srdp.
setResourceDomainParent,resourcedomain,parentresourcedomain
If the command is successful, the following message is displayed:
Resource Domain parentresourcedomain successfully set as parent to resourcedomain
If the command fails, one of the following messages is displayed:
Resource Domain resourcedomain not found
Resource Domain parentresourcedomain not found
If you are trying to set a parent for a Resource Domain that has a parent, the following message is displayed:
[SecAdmin]:This resource domain has a parent! Set anyway? [y|n]
Displays a text version of the Resource Domain Tree, starting at the root domains, or at the domain specified in the command line. The command abbreviation is pdt.
printDomainTree[,resourcedomain]
The output recursively displays the tree at each subordinate node with a summary list of each Resource Domain's resources:
Resource Domain Tree: rd1--> KIX-FILE,resource77| KIX-START-TRANS,resource88 rd2--> KIX-START-MTP,resource2 rd3--> KIX-FILE,resource2 rd4--> KIX-ATTACH-TRANS,resource1 |
Lists all Resource types in the repository. The command abbreviation is lrt.
If no resource types are found, there is no output.
Lists Resources that have not been assigned to a domain. The command abbreviation is lrwnd.
Resources with no Resource Domain: =========================================== TSQUEUE,Q1PT TSQUEUE,Q333 combinator resource,Q1PT description resource,Q1PT permission resource,Q1PT |
In the output, the words to the left of the comma are the resource type and the words on the right of the comma are the resource name. Collectively, they form a Resource.
Creates a new Resource Type. The command abbreviation is crt.
createResourceType,resourcetypename,description
If the command is successful, the following message is displayed:
Success creating resource type: resourcetypename
If this type of resource is already in the repository, the following message is displayed:
Resource type already exists (try a different name)
|
Note - In this release, user-defined Resource Types are not supported. |
Deletes a Resource Type. The command abbreviation is drst.
deleteResourceType,resourcetypename
If the command is successful, the following message is displayed:
Success deleting resource type: resourcetypename
If this type of resource is not in the repository, the following message is displayed:
Resource type not found: resourcetypename
Displays a list of one or more Resource entries. The command abbreviation is lres.
listResources[,{resourcetype|searchstring},{resourcename|searchstring}]
If you do not specify any parameters, listResources returns a list of all resources.
The two search strings can specify a partial name to search. For example, B* in the resource type search string and A* in the resource name search string will locate all resources whose type begins with B and whose name begins with A. If the exact type and name are found, the resource details will be listed. If no matches are found, there is no output.
Creates a Resource entry in the repository. The command abbreviation is crs.
createResource,resourcetype,resourcename,description
If the command is successful, the following message is displayed:
Success creating resource resourcetype, resourcename
If the command fails, the following message is displayed:
Resource already exists (try a different name)
resourcetype can be one of the following text strings:
KIX-FILE
KIX-START-TRANS
KIX-ATTACH-TRANS
KIX-PROGRAM
KIX-TERMINAL
KIX-TDQUEUE
KIX-TSQUEUE
KIX-JOURNAL
KIX-COMMAND
KIX-REGION
ObjectReference
Group
Role
Principal
ResourceDomain
or any valid user-defined resourcetype
Deletes a Resource entry and removes any relationships to Principals, Roles, Resource Domains, and Permissions. The command abbreviation is drs.
deleteResource,resourcetype,resourcename
If the command is successful, the following message is displayed:
Success deleting resource: resourcetype,resourcename
If the command fails, one of the following messages is displayed:
Resource type not found: resourcetype
Resource not found: resourcetype,resourcename
Adds a Resource to a Resource Domain. The command abbreviation is ard.
addResourceToDomain,resourcetype,resourcename,resourcedomain
If the command is successful, the following message is displayed:
Success adding resource: resourcetype,resourcename to domain: resourcedomain
If the command fails, one of the following messages is displayed:
Resource not found: resourcetype,resourcename
Resource type not found: resourcetype
Removes the Resource from the Resource Domain to which it belongs. The command abbreviation is rrfd.
removeResourceFromDomain,resourcetype,resourcename,resourcedomain
If the command is successful, the following message is displayed:
Success removing resource resourcetype,resourcename from domain: resourcedomain
If the command fails, one of the following messages is displayed:
Resource not found: resourcename
Resource Domain not found: resourcedomain
Resource type not found: resourcetype
Adds access permission types for the Principal to the specified Resource Domain. The command abbreviation is app.
addPrincipalPermissions,principalname,resourcedomain,perm1,..,permN
If the command is successful, the following message is displayed:
Success adding Principal Permission for resourcedomain successfully added to Principal principalname
If the command fails, one of the following messages is displayed:
Principal not found: principalname
Resource Domain not found: resourcedomain
Removes all permissions the Principal has for the specified Resource Domain. The command abbreviation is rpp.
removePrincipalPermissions,principalname,resourcedomain
If the command is successful, the following message is displayed:
Success removing permissions for principal: principalname from domain: resourcedomain
If the command fails, one of the following messages is displayed:
Principal: principalname not found.
Resource Domain: resourcedomain not found.
Adds access permission types for the Role to the specified Resource Domain. The command abbreviation is arp.
addRolePermissions,rolename,resourcedomain,perm1,..,permN
If the command is successful, the following message is displayed:
Success adding permissions for role: rolename to domain: resourcedomain
If the command fails, one of the following messages is displayed:
Resource Domain: resourcedomain not found.
Permission Type: permissiontype not found.
Removes all permissions the Role has for the specified Resource Domain. The command abbreviation is rrp.
removeRolePermissions,rolename,resourcedomain
If the command is successful, the following message is displayed:
Success removing permissions for Role rolename from domain: resourcedomain
If the command fails, one of the following messages is displayed:
ResourceDomain: resourcedomain not found
Provides a summary list of all Permission Type entries. The command abbreviation is lpt.
[SecAdmin]: listPermissionTypes Permission Types: ========================================= EXECUTE MANAGE READ WRITE |
If no Permission Types are found, there is no output.
Creates a new Permission Type. The command abbreviation is cpt.
createPermissionType,permissiontype,description
If the command is successful, the following message is displayed:
Success creating permission type: permissiontype
If the Permission Type is already in the repository, the following message is displayed:
Permission type: permissiontype already exists (try a different name)
Deletes a Permission Type from the repository. The command abbreviation is dpt.
deletePermissionType,permissiontype
If the command is successful, the following message is displayed:
Success deleting permission type: permissiontype
If the permission type is not in the repository, the following message is displayed:
Permission type not found: permissiontype
Commands that generate updates to the repository, such as adding a Principal, are held as pending changes until the are committed. This allows the administrator to keep all related security changes pending and activate them together. The commit command posts all pending changes to the repository and activates them. The command abbreviation is com.
If the command is successful, the following message is displayed:
If the command fails, the following message is displayed:
Exception exceptiontype was thrown
If the administrator attempts to quit the SecAdmin tool with pending updates, the following warning message is displayed:
[SecAdmin]WARNING:You have uncommitted changes! Do you really want to quit?
[SecAdmin]Enter 'y' to exit WITHOUT committing,
[SecAdmin]Enter 'n' to return to command line,
[SecAdmin]Enter 'c' to commit and exit
If the administrator types an n, the SecAdmin tool returns to its prompt and waits for other commands. If the administrator types a y, the SecAdmin tool discards (rolls back) the pending changes and terminates. If the administrator types a c, SecAdmin will commit the changes and exit.
Rolls back, or nullifies all pending changes to the repository. The command abbreviation is roll.
If the command is successful, the following message is displayed:
If the command fails, the following message is displayed:
Exception exceptiontype was thrown
Before a region can take advantage of the authentication and authorization services provided by the Sun MSF software, you must modify the region setup file to add two environment variables, and you must start the Security Server.
Because the Sun MSF uses a socket connection to the security server, you must include the following environment variables in your region's setup file to specify the security server's host name or IP address and a socket port number:
KIXSEC_SERVERHOST=[hostname | IP-address]
As shown in FIGURE 9-1, the Security Server provides centralized access to the security repository for the regions that require Sun MSF support. The Security Server must be started prior to bringing up any of the regions. The Security Administrator starts the Security Server using the following command:
where user-name must be the Security Administrator's user name as defined with the MakeAnAdminstrator command.
The Security Server will then display the following message:
where n is the value configured for com.sun.emp.security.serverPortNumber in the MSFconfig.properties file. This number must also match the port number in the region's KIXSEC_SERVERPORT environment variable.
Should it become necessary to terminate the Security Server, shut down all regions that are using Sun MSF. The Security Administrator must then issue the following command:
where user-name must be the Security Administrator user. The Security Server will display the following message and terminate:
If the Security Administrator shuts down the Security Server while regions are running, all authentication and authorization requests requiring the Security Server will fail, and error messages will be written to each region's unikixmain.log file.
Restarting the Security Server with active regions will allow those regions to reconnect and resume authentication and authorization. However, all users previously logged on to the region will be forced to log in again in order to recover their security rules.
|
Note - Shutting down the Security Server automatically logs off all users. |
Sun MSF maintains its security rules in the security repository. When a user logs on, the Security Server loads that user's access rules into a system-wide area of memory in the Security Server. These security rules stay in memory as long as the user is logged on. When the user logs off, the user's rules are cleared. When the security rules change, this area of memory is not automatically updated. To refresh the Security Server, the Security Administrator must issue the following command:
The Security Administrator can display a summary of the Security Server requests, active users, and Sun MTP regions. To display these statistics, the Security Administrator must execute the following command:
The statistics report will be similar to the following example:
A user connects to a region with a login transaction (CESN or CSSN). The Security Server authenticates that the user is registered in the security repository. The CESN transaction can also be used to change password once the user is authenticated.
The user then submits transactions on that authenticated connection to the region. The Security Server will be contacted to check the security rules loaded for the user to determine if the user has permissions to access the needed resources.
Sun MSF security audit messages are collected and written to log files by the Security Log server, which is started by the SecurityLogs command. The Sun MSF software generates audit messages to record security events and categorizes the event with one of the following severity levels:
Security audit log messages are also time-stamped and qualified by a message number. You can look up the message number in the Sun Mainframe Transaction Processing Software Message Guide for additional information.
The following messages are related to the log server and show an example of the generated file name created by the SecurityLogs command for the collection file:
The following messages are related to a Principal's authentication:
The following messages are displayed when the Security Administrator adds changes to the security repository.
The following example shows the log messages for the Principal named tester1. The first message shows a failed validation attempt. The subsequent messages show a successful authentication and messages indicating that access to certain resources have been granted or denied.
This section contains diagrammatic conceptual examples that show the use of Sun MSF. Additionally, an example security configuration for the Sun MTP Primer sample application is shipped with Sun MSF in the $EMPSECURITY/test directory. This configuration supports running the Primer application with external security enabled. Refer to the README.doc file in the $EMPSECURITY/test directory for instructions on using this configuration.
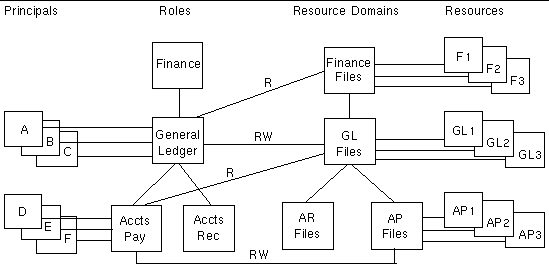
The examples in this section require that the super administrator has created the security repository with the MakeAnAdministrator tool and populated it with the established security policy rules. The user who starts the region must have a Principal entry in the security repository. FIGURE 9-8 illustrates a set of security policy rules that are used in this example.
|
2. Create a default user ID in the region's SNT.
For this example, the default user ID is F.
4. Modify the region's setup file as follows:
a. Define the KIXSECDFLTUSER environment variable; in this example, $KIXSECDFLTUSER=F
b. Because this configuration example only contains one kind of Resource (VSAM datasets), specify the following Sun MTP Secure environment variables, which will enable Sun MTP Secure and specify that only VSAM datasets are to have access checking done.
c. Because the Security Server will be awaiting connections on its configured socket port number; for example, 8084, set the following environment variables; for this example:
5. Start the Security Server on port 8084 for this example.
Users A, B, C, D, and E will log in to the region using the CESN transaction.
User A successfully runs a transaction that does a read from VSAM dataset F1 and reads and updates VSAM dataset GL2.
User B fails attempting to run a transaction that tries to write to VSAM dataset F1 because user B does not have that permission. The failure is written to the region's unikixmain.log file and in the Sun MSF audit log as an access denial.
User D fails attempting to run a transaction that tries to write to VSAM dataset GL2 after successfully reading VSAM dataset AP3, because user D does not have that permission. That failure is written to both logs.
User C logs off, then successfully runs a transaction (as the default user) that reads VSAM dataset AP1, because the default user F has permission. User C could not have accessed the dataset logged on as user C, because user C does not have read permission to the AP1 dataset.
Copyright © 2004, Sun Microsystems, Inc. All rights reserved.