| Sun StorEdge 2 Gb FC Entry-Level PCI-X Single Channel Host Bus Adapter Installation Guide |
| Sun StorEdge 2 Gb FC Entry-Level PCI-X Single Channel Host Bus Adapter Installation Guide |
|
Sun StorEdge 2 Gb FC Entry-Level PCI-X Single Channel Host Bus Adapter Installation Guide |
This guide describes how to install and configure your new Sun StorEdge 2 Gb FC Entry-Level PCI-X Single Channel host bus adapter (HBA) in three simple steps. This guide also describes how to update the Sun StorEdge 2 Gb FC Entry-Level
PCI-X Single Channel HBA drivers.
Your system must have the following functionality to support the Sun StorEdge 2 Gb FC Entry-Level PCI-X Single Channel HBA:
 m fiber or 62.5 m fiber) and connectors (LC duplex)
Follow these steps to install the Sun StorEdge 2 Gb FC Entry-Level PCI-X Single Channel HBA in your system.
|
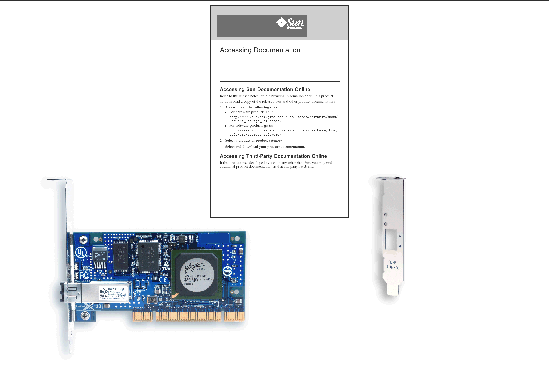
 Verify that the Sun StorEdge 2 Gb FC Entry-Level PCI-X Single Channel HBA is shipped with the following items (see FIGURE 1):
|
To install the Sun StorEdge 2 Gb FC Entry-Level PCI-X Single Channel HBA hardware, you need to open the computer and identify an empty PCI slot (32 or 64 bit). If necessary, consult your computer system manual for instructions to remove the computer cover.
|
Note - If you are installing the Sun StorEdge 2 Gb FC Entry-Level PCI-X Single Channel HBA in a Windows system, see Step 4 of To Download and Install the Windows HBA Driver before installing the HBA into your system. |

|
Caution - Damage to the HBA can occur as the result of careless handling or electrostatic discharge (ESD). Always handle the HBA with care to avoid damage to electrostatic sensitive components. |
To minimize the possibility of ESD-related damage, Sun strongly recommends using both a workstation antistatic mat and an ESD wrist strap. You can get an ESD wrist strap from any reputable electronics store or from Sun as part number #250-1007. Observe the following precautions to avoid ESD-related problems:
1. Power off the computer, then disconnect the power cable.
2. Remove the computer cover and find an empty PCI slot.
3. Pull out the slot cover (if any) by removing the screw or releasing the lever.
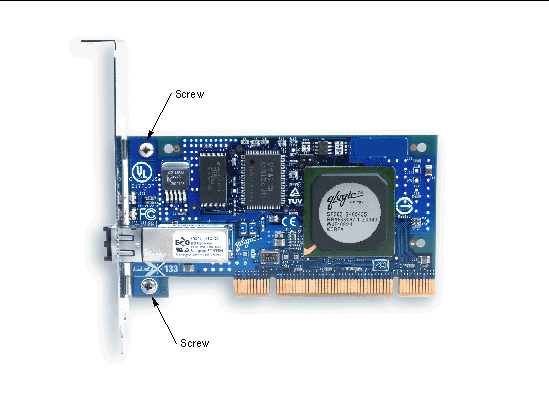
4. Optionally, perform the following steps to replace the PCI bracket.
a. Remove the two screws that attach the current bracket to the HBA using a #2 cross-head screwdriver. Save the screws.
b. Remove the existing bracket.
c. Position the new bracket over the transceiver housings.
d. Align the screw holes of the HBA and the bracket, then insert and tighten the screws to a torque of 3.6 in-lbs.
5. Grasp the HBA by the top edge and seat it firmly into the PCI slot.
6. Refasten the retaining bracket of the HBA by using the existing screw or lever.
8. Plug in the power cable and turn on the computer.

After you have completed the hardware installation and turned on the computer, follow the instructions listed below for your operating system.
This section contain the following topics:
You must install Sun Solaris 10 Operating System (OS) for x86 Platforms and then download and install patch 119131-xx for the Sun StorEdge 2 Gb FC Entry-Level PCI-X Single Channel HBA driver.
|
Install Sun Solaris 10 x86 OS per the documentation that is included with your system.
|
2. Click Downloads in the left side column.
4. Under Product Name, click Solaris and other Patches.
5. In the PatchFinder section, type in the patch number (119131), and click Find Patch.
6. Click the FTP or HTTP link to download the patch into a desired directory.
7. Access the directory and unzip the patch.
8. Use the patchadd command to install the patch.
|
Note - Refer to the product Release Notes, 819-1671-xx, for the latest information on software requirements. |
Booting from a disk attached via the Sun StorEdge 2 Gb FC Entry-Level PCI-X Single Channel HBA is not supported in a Solaris x86 environment.
Diagnostic support for the Sun StorEdge 2 Gb FC Entry-Level PCI-X Single Channel HBA is available beginning with SunVTS 6.0 software.
Install SunVTS 6.0 software per instructions from your Solaris 10 distribution. Patch 119275 is required for the SunVTS 6.0 to support the Sun StorEdge 2 Gb FC Entry-Level PCI-X Single Channel HBA.
1. Access SunSolve at: http://sunsolve.sun.com.
2. Click the Patchfinder link under Patch Portal.
3. Enter the patch number (including revision) in the "Find Patch" box.
4. Follow the install instructions in the patch description.
The HBA diagnostics are supported by the qlctest.
|
Note - The Internal Loopback Tests and the MailboxTests are not supported. |
The Red Hat Enterprise Server 3 and the SuSE Linux Enterprise Server 8 operating systems are supported on the Sun StorEdge 2 Gb FC Entry-Level PCI-X Single Channel HBA. Before installing the drivers for Linux you must have the relevant Linux OS installed on your hard disk. The driver source is available for download at the QLogic web page dedicated for Sun products, as a .tgz package. Instructions to install such drivers, and to create a bootable device connected to this HBA, are also given in the Readme document associated with this driver at the QLogic download page.
|
The driver source is applicable to both IA32 and AMD64 hardware architectures.
1. Go to the QLogic download site for Sun Microsystems:
www.qlogic.com/support/oem_detail_all.asp?oemid=124.
2. By scrolling, you will see four or more tables on this page. Find the table titled:
Sun Recommended Entry-Level Fibre Channel HBA software.
3. Scroll down this table to locate the following in the Name column:
Red Hat Enterprise Linux 3, SuSE SLES 8 Driver for SG-(X)PCI1FC-QLC (IA32 and AMD64).
4. Click Download in the right column.
5. Click the Readme and locate the install steps for using the .tgz source package.
6. Follow the instructions and download the driver source by clicking the associated Download.
|
Diagnostics for the Sun StorEdge 2 Gb FC Entry-Level PCI-X Single Channel HBA is provided in the SANsurfer FC HBA Manager for Linux utility which is available for download at the QLogic web page dedicated for Sun products.
1. Go to the QLogic download site for Sun Microsystems:
www.qlogic.com/support/oem_detail_all.asp?oemid=124.
2. By scrolling, you will see four or more tables on this page. Find the table titled:
Sun Recommended Entry-Level Fibre Channel HBA software.
3. Scroll down this table to locate the following in the Name column:
SANsurfer FC HBA CLI for Linux (IA32 and AMD64).
4. Click Download in the right column.
5. Click the Readme for the download and install instructions.
|
1. Connect the disk to the Sun StorEdge 2 Gb FC Entry-Level PCI-X Single Channel HBA.
2. Go to the QLogic download site for Sun Microsystems:
www.qlogic.com/support/oem_detail_all.asp?oemid=124
3. By scrolling, you will see four or more tables on this page. Find the table titled:
Sun Recommended Entry-Level Fibre Channel HBA software.
4. Scroll down this table to locate the following in the Name column:
Linux DD Disk for [Red Hat or SuSE] (IA32 and AMD64).
5. Click Download in the right column.
6. Follow the instructions in the ReadMe.
Make sure that the following preliminaries are in effect before proceeding:
|
2. Install the Sun StorEdge 2 Gb FC Entry-Level PCI-X Single Channel HBA into a PCI slot (see To Install the HBA Hardware).
3. Power up the system and allow Windows to boot.
4. When the Found New Hardware wizard comes up, click Cancel.
5. Go to QLogic download site for Sun Microsystems:
www.qlogic.com/support/oem_detail_all.asp?oemid=124
6. By scrolling, you will see four or more tables on this page. Find the table titled:
Sun Recommended Entry-Level Fibre Channel HBA Software.
7. Scroll down this table to locate the following in the Name column:
Install Wizard for Windows (IA32).
8. Click Download in the right column.
Save the qlflzip.exe file to a directory of your choice.
9. Click on the qlflzip.exe file to open it.
The SANsurfer Install Wizard opens.
10. Make the following selections from the SANsurfer HBA Install Wizard:
HBA Configuration Update  Update Driver?
11. The Select Driver screen is displayed.
Select Default Driver and click Next.
12. Click Next again on the following two screens.
If a Caution popup window appears, click Continue.
13. When the Driver Updated Successfully message is displayed, click Next.
14. Click Quit on the following screen.
|
The SANsurfer HBA Install Wizard starts.
2. Select the Performance Diagnostic.
5. Select the HBA for diagnostic.
Be sure the HBA you selected for diagnostics is connected to an active fiber link (storage or switch fabric) or to a loop back cable.
8. Click Next to return to the SANsurfer HBA Install Wizard window (main).
|
The QLogic SANsurfer FC HBA Manager provides configuration management utilities and diagnostics for the Sun StorEdge 2 Gb FC Entry-Level PCI-X Single Channel HBA.
1. Go to the QLogic download site for Sun Microsystems:
www.qlogic.com/support/oem_detail_all.asp?oemid=124
2. By scrolling, you will see four or more tables on this page. Find the table titled:
Sun Recommended Entry-Level Fibre Channel HBA software.
3. Scroll down this table to locate the following in the Name column:
SANsurfer FC HBA Manager for Windows (IA32).
4. Click Download in the right column.
|
1. Connect the disk to the Sun StorEdge 2 Gb FC Entry-Level PCI-X Single Channel HBA.
2. Go to the QLogic download site for Sun Microsystems:
www.qlogic.com/support/oem_detail_all.asp?oemid=124
3. By scrolling, you will see four or more tables on this page. Find the table titled:
Sun Recommended Entry-Level Fibre Channel HBA software.
4. Scroll down this table to locate the following in the Name column:
Windows Server 2003 SCSI Miniport Driver (IA32).
5. Click Download in the right column.
6. Follow the instructions in the ReadMe.
| Sun StorEdge 2 Gb FC Entry-Level PCI-X Single Channel Host Bus Adapter Installation Guide | 819-1670-12 |
Copyright © 2007, Sun Microsystems, Inc. All Rights Reserved.

 To Verify the Packaging Contents