Setting up a WAN and a LAN Link on a PC Running X.25
This section describes how to configure a WAN and a LAN link on a PC running Solstice X.25. The configuration described in this chapter uses the default values provided with the product.
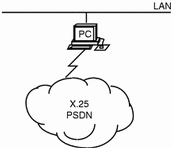
Figure 8-18 Setting up a WAN and a LAN Link on a PC Running X.25

The configuration process is identical to that used for the SPARC version of the product, but the device names change.
To configure Solstice X.25 to be used over the WAN, you need to:
-
Configure some information about the link
-
Change the logical channel ranges used by the Solstice X.25 software to match those used by your PSDN
Before you start, make sure you know the following information:
-
The logical channel ranges used by the PSDN
To configure the LAN link, you only need to configure the link to the LAN. The default parameters used at both the Packet layer and the LLC2 layer should work in almost all LAN configurations.
Installing Your WAN Card
In order to run Solstice X.25 9.2 over the WAN, the PC must have an appropriate WAN card installed. Install this as described in the manufacturers instructions. You must use a different interrupt setting for each card that you install--consult your PC manufacturer's documentation for instructions on finding out which interrupts and i/o addresses are available.
Creating the LAN and WAN links.
By default, there are two template links already configured, one WAN link and one LAN link.
First, you will configure a single WAN link by editing the WAN template.
-
In the x25tool window, make sure the entry for Link 0 in the scrolling list is highlighted. Select Modify.
The Link Editor window appears.
-
Set the Device type and Port Number.
The example uses the default expx device, which is the device type for the SCiiExpress-X card. Currently, this is the only available device for WAN links:
-
Make sure the Interface is set as DTE.
The only time you will need to set the Interface as DCE is if you are running two machines back-to-back, for example for testing.
-
Set the LAP Mode to LAPB, unless you are sure your PSDN uses a different LAP Mode.
LAP and LAPBE are used very rarely.
-
Set the Local Address.
Type in the address of port 0 in this field. This is the X.121 address assigned to you by your supplier. This address is often referred to as an X.25 address. Your service supplier should tell you this address.
Note -The Full Address and Extended Address parameters are not used when the product is in normal operation. You only need to enter these if you are using an application that expects to read them. If this is the case with your PSDN, your service provider will tell you what you need to enter here.
-
Select the Version.
Pull down the Version menu and choose the version of the X.25 recommendation used by your PSDN.
-
Set the Logical Channel Range.
Your PSDN will tell you which values to use here. Contact them if you require this information. If you are configuring a private network, all machines on the network must use the same logical channel ranges. In this case, you can choose any values that comply with the X.25 Recommendations.
-
Click on Apply to confirm your changes.
Next create the LAN link.
Using link 1 as a template, configure the values for your LAN link. You can keep almost all of the default values. The device type depends on the type of Ethernet card used by your PC. The default ELX-0 applies to the 3Com® Etherlink® III card. If you are not sure of the device type used by your PC, enter the following command:
hostname% ifconfig -a
Included in the information returned by this command is the name of the device that IP is running over. Use this same device type for X.25.
The Local Address is the MAC address of your machine. You can find it out by entering the following command:
hostname% arp machinename
-
Click on Apply.
-
In the x25tool main window, pull down the File menu and select Save.
This makes sure your changes will be used next time you start X.25.
Note -For a default configuration, you do not need to configure the Datalink layer parameters; the defaults should be adequate.
-
Start X.25 by pulling down the Network menu and clicking on Start X.25.
To check that the configuration is valid, make a PAD call to yourself. To do this, enter the pad command at a command line, followed by your own X.121 address:
hostname% pad X.121 address
Once you have created a link that works, you can fine-tune it, or configure the application(s) you want to run over it. The procedure for doing so is the same as for the SPARC version of the product.
- © 2010, Oracle Corporation and/or its affiliates
