| C H A P T E R 2 |
|
Installation and Configuration |
After you have familiarized yourself with the features and components of the Sun Blade T6300 server module, use the instructions in this chapter to install the server into the chassis.
This chapter contains the following topics:
Electronic equipment is susceptible to damage by static electricity. Use a grounded antistatic wriststrap, footstrap, or equivalent safety equipment to prevent electrostatic damage (ESD) when you install the Sun Blade T6300 server module.
This section contains instructions for installing the module into the chassis.
|
1. Ensure that you have the MAC address and serial number from the labels on the shipping container and server module.
2. Locate the desired slot in the chassis.
3. Remove the filler panel if applicable.
4. Attach the dongle cable to the server module.
5. Attach an serial cable from the terminal server to the virtual console connector on the dongle cable.
You must connect the terminal server to the dongle cable before you insert the server module so that you can see the boot messages for the ALOM CMT software.
6. Position the server module vertically so that the ejectors are on the right.
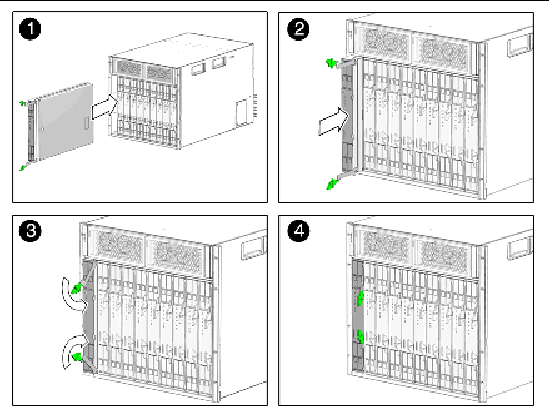
The following illustration shows the server module being inserted into the chassis.

7. Push the server module into the slot until the module is about two inches from the chassis front.
8. Push the ejectors down until they snap into place.
The server module goes into standby mode and the ALOM CMT system controller initializes as soon as you insert the server module into the chassis.
After the system controller boots, the system controller login prompt is displayed on the serial console. Use the instructions in this section to log in to the system controller and to power on the server module.
|
1. Log in to the system controller as the default admin user.
2. Press Enter at the password promt.
By default, the server module is shipped with no password for the admin account. Before you power on the server module, you should set the password with the password command.
3. Use the password command to set the admin password.
4. Issue the poweron -c command.
You see an sc> alert message on the system console. This indicates that the system has reset. After you issue the poweron command, the CPU and memory controllers initialize, and eventually the OpenBoot PROM firmware initializes. After a number of system messages, you will see the ok prompt.
The basic configuration of the Sun Blade T6300 server module ships with or without empty hard drives. If you ordered an optional hard drive and want to install the Solaris OS on the hard drive in slot 0, you must install the operating system from your network.
For instructions on how to install the operating system from the network, refer to the Solaris 10 6/06 Installation Guide: Network-Based Installations. You can obtain this guide at:
You can use a JumpStart server to install the OS. A JumpStart server consists of several components:
The boot image is architecture independent, providing basic operating system services to all hardware supported by that operating system release. The Boot Server provides RARP, TFTP and bootparam services.
Partition sizes, lists of software components to install, begin and finish scripts, and more are specified in a profile served by the configuration server.
|
Note - The boot server, configuration server, and install server can be one server. They do not need to be physically separate servers. |
Specific instructions on how to configure a JumpStart server are out of the scope of this document. However, configuring the JumpStart server consists of the following tasks:
2. Create the configuration server
3. Create the configuration files
4. Verify the configuration file syntax
5. Share the installation directory
7. Configure the client access
The configuration and use of the JumpStart server depends on the configuration of your network. For a full explanation of these steps and instructions on how to configure the JumpStart server, refer to the following documents:
 OnLine, February 2005
You can obtain these documents from the following site:
Copyright © 2007, Sun Microsystems, Inc. All Rights Reserved.