Table of Contents
- 21.1. MySQL Connector/ODBC
- 21.2. MySQL Connector/NET
- 21.2.1. Connector/NET Versions
- 21.2.2. Connector/NET Installation
- 21.2.3. Connector/NET Visual Studio Integration
- 21.2.4. Connector/NET Tutorials
- 21.2.5. Connector/NET Programming
- 21.2.6. Connector/NET Connection String Options Reference
- 21.2.7. Connector/NET API Reference
- 21.2.8. Connector/NET Support
- 21.2.9. Connector/NET FAQ
- 21.3. MySQL Connector/J
- 21.4. MySQL Connector/MXJ
- 21.5. MySQL Connector/C++
- 21.5.1. MySQL Connector/C++ Binary Installation
- 21.5.2. MySQL Connector/C++ Source Installation
- 21.5.3. MySQL Connector/C++ Building Windows applications with Microsoft Visual Studio
- 21.5.4. MySQL Connector/C++ Building Linux applications with NetBeans
- 21.5.5. MySQL Connector/C++ Getting Started: Usage Examples
- 21.5.6. MySQL Connector/C++ Tutorials
- 21.5.7. MySQL Connector/C++ Debug Tracing
- 21.5.8. MySQL Connector/C++ Usage Notes
- 21.5.9. MySQL Connector/C++ Known Bugs and Issues
- 21.5.10. MySQL Connector/C++ Feature requests
- 21.5.11. MySQL Connector/C++ Support
- 21.5.12. MySQL Connector/C++ FAQ
- 21.6. MySQL Connector/C
- 21.7. MySQL Connector/OpenOffice.org
- 21.8. libmysqld, the Embedded MySQL Server Library
- 21.9. MySQL C API
- 21.9.1. C API Data Structures
- 21.9.2. C API Function Overview
- 21.9.3. C API Function Descriptions
- 21.9.4. C API Prepared Statements
- 21.9.5. C API Prepared Statement Data Structures
- 21.9.6. C API Prepared Statement Function Overview
- 21.9.7. C API Prepared Statement Function Descriptions
- 21.9.8. C API Threaded Function Descriptions
- 21.9.9. C API Embedded Server Function Descriptions
- 21.9.10. Common Questions and Problems When Using the C API
- 21.9.11. Controlling Automatic Reconnection Behavior
- 21.9.12. C API Support for Multiple Statement Execution
- 21.9.13. C API Prepared Statement Problems
- 21.9.14. C API Prepared Statement Handling of Date and Time Values
- 21.9.15. C API Support for Prepared
CALLStatements - 21.9.16. Building Client Programs
- 21.10. MySQL PHP API
- 21.11. MySQL Perl API
- 21.12. MySQL Python API
- 21.13. MySQL Ruby APIs
- 21.14. MySQL Tcl API
- 21.15. MySQL Eiffel Wrapper
MySQL Connectors provide connectivity to the MySQL server for client programs. APIs provide low-level access to the MySQL protocol and MySQL resources. Both Connectors and the APIs enable you to connect and execute MySQL statements from another language or environment, including Java (JDBC), ODBC, Perl, Python, PHP, Ruby, and native C and embedded MySQL instances.
Connector version numbers do not correlate with MySQL Server version numbers. See also Table 21.2, “MySQL Connector Versions and MySQL Server Versions”.
A number of connectors are developed by MySQL:
Connector/ODBC provides driver support for connecting to a MySQL server using the Open Database Connectivity (ODBC) API. Support is available for ODBC connectivity from Windows, Unix and Mac OS X platforms.
Connector/NET enables developers to create .NET applications that use data stored in a MySQL database. Connector/NET implement a fully functional ADO.NET interface and provides support for use with ADO.NET aware tools. Applications that want to use Connector/NET can be written in any of the supported .NET languages.
The MySQL Visual Studio Plugin works with Connector/NET and Visual Studio 2005. The plugin is a MySQL DDEX Provider, which means that you can use the schema and data manipulation tools within Visual Studio to create and edit objects within a MySQL database.
Connector/J provides driver support for connecting to MySQL from a Java application using the standard Java Database Connectivity (JDBC) API.
Connector/MXJ is a tool that enables easy deployment and management of MySQL server and database through your Java application.
Connector/C++ is a tool that enables easy deployment and management of MySQL server and database through your C++ application.
Connector/C is a stand-alone replacement for the MySQL Client Library (
libmysql).Connector/OpenOffice.org is a tool that enables OpenOffice.org applications to connect to MySQL server.
There are two direct access methods for using MySQL natively within a C application:
The C API provides low-level access to the MySQL protocol through the
libmysqlclient library; this is the primary method used to connect to an instance of the MySQL server, and is used both by MySQL command line clients and many of the APIs also detailed in this section. MySQL Connector/C can now also be used for this purpose.libmysqldis an embedded MySQL server library that enables you to embed an instance of the MySQL server into your C applications.
If you need to access MySQL from a C application, or build an interface to MySQL for a language not supported by the Connectors or APIs in this chapter, the C API is where you would start. A number of programmers utilities are available to help with the process, and also covered in this section.
The remaining APIs provide an interface to MySQL from specific application langauges. These solutions are not developed or supported by MySQL. Basic information on their usage and abilities is provided here for reference purposes only.
All the language APIs are developed using one of two methods, using
libmysql or by building a native
driver. The two solutions offer different benefits:
Using
libmysqloffers complete compatibility with MySQL as it uses the same libraries as the MySQL client applications. However, the feature set is limited to the implementation and interfaces exposed throughlibmysqland the performance may be lower as data is copied between the native langiage, and the MySQL API components. MySQL Connector/C is a possible alternative to usinglibmysql.Native drivers are an implementation of the MySQL network protocol entirely within the host language or environment. Native drivers are fast, as there is less copying of data between components, and they can offer advanced functionality not available through the standard MySQL API. Native drivers are also easier to build and deploy, as you do not need a copy of the MySQL client libraries to build the native driver components.
A list of many of the libraries and interfaces available for MySQL are shown in the table. See Table 21.1, “MySQL APIs and Interfaces”.
Table 21.1. MySQL APIs and Interfaces
| Environment | API | Type | Notes |
|---|---|---|---|
| Ada | MySQL Bindings for GNU Ada | libmysql | See MySQL Bindings for GNU Ada |
| C | Connector/C | Replacement for libmysql | See Section 21.6, “MySQL Connector/C”. |
| C++ | Connector/C++ | libmysql | See Section 21.5, “MySQL Connector/C++”. |
| MySQL++ | libmysql | See MySQL++ Web site. | |
| MySQL wrapped | libmysql | See MySQL wrapped. | |
| Cocoa | MySQL-Cocoa | libmysql | Compatible with the Objective-C Cocoa environment. See http://mysql-cocoa.sourceforge.net/ |
| D | MySQL for D | libmysql | See MySQL for D. |
| Eiffel | Eiffel MySQL | libmysql | See Section 21.15, “MySQL Eiffel Wrapper”. |
| Erlang | erlang-mysql-driver | libmysql | See
erlang-mysql-driver. |
| Haskell | Haskell MySQL Bindings | Native Driver | See Brian O'Sullivan's pure Haskell MySQL bindings. |
hsql-mysql | libmysql | See MySQL driver for Haskell . | |
| Java/JDBC | Connector/J | Native Driver | See Section 21.3, “MySQL Connector/J”. |
| Kaya | MyDB | libmysql | See MyDB. |
| Lua | LuaSQL | libmysql | See LuaSQL. |
| .NET/Mono | Connector/NET | Native Driver | See Section 21.2, “MySQL Connector/NET”. |
| Objective Caml | MySQL Bindings for OBjective Caml | libmysql | See MySQL Bindings for Objective Caml. |
| Octave | Database bindings for GNU Octave | libmysql | See Database bindings for GNU Octave. |
| ODBC | Connector/ODBC | libmysql | See Section 21.1, “MySQL Connector/ODBC”. |
| OpenOffice | MySQL Connector/OpenOffice.org | libmysql | Direct connectivity, without using JDBC/ODBC. See Section 21.7, “MySQL Connector/OpenOffice.org”. |
| Perl | DBI/DBD::mysql | libmysql | See Section 21.11, “MySQL Perl API”. |
Net::MySQL | Native Driver | See
Net::MySQL
at CPAN | |
| PHP | mysql, ext/mysql interface
(deprecated) | libmysql | See Section 21.10.1, “MySQL”. |
mysqli, ext/mysqli interface | libmysql | See Section 21.10.2, “MySQL Improved Extension (Mysqli)”. | |
PDO_MYSQL | libmysql | See Section 21.10.4, “MySQL Functions (PDO_MYSQL)”. | |
| PDO mysqlnd | Native Driver | See PHP PDO
mysqlnd. | |
| Python | MySQLdb | libmysql | See Section 21.12, “MySQL Python API”. |
| Ruby | MySQL/Ruby | libmysql | Uses libmysql. See
Section 21.13.1, “The MySQL/Ruby API”. |
| Ruby/MySQL | Native Driver | See Section 21.13.2, “The Ruby/MySQL API”. | |
| Scheme | Myscsh | libmysql | See
Myscsh. |
| SPL | sql_mysql | libmysql | See
sql_mysql
for SPL. |
| Tcl | MySQLtcl | libmysql | See Section 21.14, “MySQL Tcl API”. |
Table 21.2. MySQL Connector Versions and MySQL Server Versions
| Connector | Connector version | MySQL Server version |
|---|---|---|
| Connector/C++ | 1.0.5 GA | 5.1, 5.4, 5.5, 5.6 |
| Connector/OpenOffice.org | 1.0 GA | 5.0, 5.1, 5.4, 5.5, 5.6 |
| Connector/J | 5.1.8 | 4.1, 5.0, 5.1, 5.4, 5.5, 5.6 |
| Connector/NET | 1.0 (No longer supported) | 4.0, 5.0 |
| Connector/NET | 5.2 | 5.0, 5.1, 5.4, 5.5, 5.6 |
| Connector/NET | 6.0 | 5.0, 5.1, 5.4, 5.5, 5.6 |
| Connector/NET | 6.1 | 5.0, 5.1, 5.4, 5.5, 5.6 |
| Connector/ODBC | 3.51 (Unicode not supported) | 4.1, 5.0, 5.1, 5.4, 5.5, 5.6 |
| Connector/ODBC | 5.1 | 4.1.1+, 5.0, 5.1, 5.4, 5.5, 5.6 |
The MySQL Connector/ODBC is the name for the family of MySQL ODBC drivers (previously called MyODBC drivers) that provide access to a MySQL database using the industry standard Open Database Connectivity (ODBC) API. This reference covers Connector/ODBC 3.51 and Connector/ODBC 5.1. Both releases provide an ODBC compliant interface to MySQL Server.
MySQL Connector/ODBC provides both driver-manager based and native interfaces to the MySQL database, which full support for MySQL functionality, including stored procedures, transactions and, with Connector/ODBC 5.1, full Unicode compliance.
For more information on the ODBC API standard and how to use it, refer to http://support.microsoft.com/kb/110093.
The application development part of this reference assumes a good working knowledge of C, general DBMS knowledge, and finally, but not least, familiarity with MySQL. For more information about MySQL functionality and its syntax, refer to http://dev.mysql.com/doc/.
Typically, you need to install Connector/ODBC only on Windows machines. For Unix and Mac OS X you can use the native MySQL network or named pipe to communicate with your MySQL database. You may need Connector/ODBC for Unix or Mac OS X if you have an application that requires an ODBC interface to communicate with the database. Applications that require ODBC to communicate with MySQL include ColdFusion, Microsoft Office, and Filemaker Pro.
Key topics:
For help installing Connector/ODBC see Section 21.1.3, “Connector/ODBC Installation”.
For information on the configuration options, see Section 21.1.4.2, “Connector/ODBC Connection Parameters”.
For more information on connecting to a MySQL database from a Windows host using Connector/ODBC see Section 21.1.5.2, “Step-by-step Guide to Connecting to a MySQL Database through Connector/ODBC”.
If you want to use Microsoft Access as an interface to a MySQL database using Connector/ODBC see Section 21.1.5.4, “Using Connector/ODBC with Microsoft Access”.
General tips on using Connector/ODBC, including obtaining the last auto-increment ID see Section 21.1.7.1, “Connector/ODBC General Functionality”.
For tips and common questions on using Connector/ODBC with specific application see Section 21.1.7.2, “Connector/ODBC Application Specific Tips”.
For a general list of Frequently Asked Questions see Section 21.1.7.3, “Connector/ODBC Errors and Resolutions (FAQ)”.
Additional support when using Connector/ODBC is available, see Section 21.1.8, “Connector/ODBC Support”.
There are currently two version of Connector/ODBC available:
Connector/ODBC 5.1, currently in GA status, is a partial rewrite of the of the 3.51 code base and is designed to work with all versions of MySQL from 4.1.1. It does not work with versions of MySQL Server prior to 4.1.1.
Connector/ODBC 5.1 also includes the following changes and improvements over the 3.51 release:
Improved support on Windows 64-bit platforms.
Full Unicode support at the driver level. This includes support for the
SQL_WCHARdata type, and support for Unicode login, password and DSN configurations. For more information,. see Microsoft Knowledgebase Article #716246.Support for the
SQL_NUMERIC_STRUCTdata type, which provides easier access to the precise definition of numeric values. For more information, see Microsoft Knowledgebase Article #714556Native Windows setup library. This replaces the Qt library based interface for configuring DSN information within the ODBC Data Sources application.
Support for the ODBC descriptor, which improves the handling and metadata of columns and parameter data. For more information, see Microsoft Knowledgebase Article #716339.
Connector/ODBC 3.51 is the current release of the 32-bit ODBC driver, also known as the MySQL ODBC 3.51 driver. Connector/ODBC 3.51 has support for ODBC 3.5x specification level 1 (complete core API + level 2 features) to continue to provide all functionality of ODBC for accessing MySQL.
The manual for versions of Connector/ODBC older than 3.51 can be located in the corresponding binary or source distribution. Please note that versions of Connector/ODBC earlier than the 3.51 revision were not fully compliant with the ODBC specification.
From this section onward, the primary focus of this guide is the Connector/ODBC 3.51 and Connector/ODBC 5.1 drivers.
Version numbers for MySQL products are formatted as X.X.X. However, Windows tools (Control Panel, properties display) may show the version numbers as XX.XX.XX. For example, the official MySQL formatted version number 5.0.9 may be displayed by Windows tools as 5.00.09. The two versions are the same; only the number display format is different.
ODBC (Open Database Connectivity) provides a way for client programs to access a wide range of databases or data sources. ODBC is a standardized API that enables connections to SQL database servers. It was developed according to the specifications of the SQL Access Group and defines a set of function calls, error codes, and data types that can be used to develop database-independent applications. ODBC usually is used when database independence or simultaneous access to different data sources is required.
For more information about ODBC, refer to http://support.microsoft.com/kb/110093.
Open Database Connectivity (ODBC) is a widely accepted application-programming interface (API) for database access. It is based on the Call-Level Interface (CLI) specifications from X/Open and ISO/IEC for database APIs and uses Structured Query Language (SQL) as its database access language.
A survey of ODBC functions supported by Connector/ODBC is given at Section 21.1.6.1, “Connector/ODBC API Reference”. For general information about ODBC, see http://support.microsoft.com/kb/110093.
The Connector/ODBC architecture is based on five components, as shown in the following diagram:
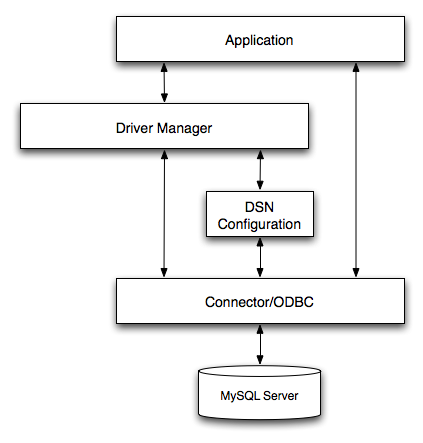
Application:
The Application uses the ODBC API to access the data from the MySQL server. The ODBC API in turn uses the communicates with the Driver Manager. The Application communicates with the Driver Manager using the standard ODBC calls. The Application does not care where the data is stored, how it is stored, or even how the system is configured to access the data. It needs to know only the Data Source Name (DSN).
A number of tasks are common to all applications, no matter how they use ODBC. These tasks are:
Selecting the MySQL server and connecting to it
Submitting SQL statements for execution
Retrieving results (if any)
Processing errors
Committing or rolling back the transaction enclosing the SQL statement
Disconnecting from the MySQL server
Because most data access work is done with SQL, the primary tasks for applications that use ODBC are submitting SQL statements and retrieving any results generated by those statements.
Driver manager:
The Driver Manager is a library that manages communication between application and driver or drivers. It performs the following tasks:
Resolves Data Source Names (DSN). The DSN is a configuration string that identifies a given database driver, database, database host and optionally authentication information that enables an ODBC application to connect to a database using a standardized reference.
Because the database connectivity information is identified by the DSN, any ODBC compliant application can connect to the data source using the same DSN reference. This eliminates the need to separately configure each application that needs access to a given database; instead you instruct the application to use a pre-configured DSN.
Loading and unloading of the driver required to access a specific database as defined within the DSN. For example, if you have configured a DSN that connects to a MySQL database then the driver manager will load the Connector/ODBC driver to enable the ODBC API to communicate with the MySQL host.
Processes ODBC function calls or passes them to the driver for processing.
Connector/ODBC Driver:
The Connector/ODBC driver is a library that implements the functions supported by the ODBC API. It processes ODBC function calls, submits SQL requests to MySQL server, and returns results back to the application. If necessary, the driver modifies an application's request so that the request conforms to syntax supported by MySQL.
DSN Configuration:
The ODBC configuration file stores the driver and database information required to connect to the server. It is used by the Driver Manager to determine which driver to be loaded according to the definition in the DSN. The driver uses this to read connection parameters based on the DSN specified. For more information, Section 21.1.4, “Connector/ODBC Configuration”.
MySQL Server:
The MySQL database where the information is stored. The database is used as the source of the data (during queries) and the destination for data (during inserts and updates).
An ODBC Driver Manager is a library that manages communication between the ODBC-aware application and any drivers. Its main functionality includes:
Resolving Data Source Names (DSN).
Driver loading and unloading.
Processing ODBC function calls or passing them to the driver.
Both Windows and Mac OS X include ODBC driver managers with the operating system. Most ODBC Driver Manager implementations also include an administration application that makes the configuration of DSN and drivers easier. Examples and information on these managers, including Unix ODBC driver managers are listed below:
Microsoft Windows ODBC Driver Manager (
odbc32.dll), http://support.microsoft.com/kb/110093.Mac OS X includes
ODBC Administrator, a GUI application that provides a simpler configuration mechanism for the Unix iODBC Driver Manager. You can configure DSN and driver information either through ODBC Administrator or through the iODBC configuration files. This also means that you can test ODBC Administrator configurations using theiodbctestcommand. http://www.apple.com.unixODBCDriver Manager for Unix (libodbc.so). See http://www.unixodbc.org, for more information. TheunixODBCDriver Manager includes the Connector/ODBC driver 3.51 in the installation package, starting with versionunixODBC2.1.2.iODBCODBC Driver Manager for Unix (libiodbc.so), see http://www.iodbc.org, for more information.
- 21.1.3.1. Installing Connector/ODBC from a Binary Distribution on Windows
- 21.1.3.2. Installing Connector/ODBC from a Binary Distribution on Unix
- 21.1.3.3. Installing Connector/ODBC from a Binary Distribution on Mac OS X
- 21.1.3.4. Installing Connector/ODBC from a Source Distribution on Windows
- 21.1.3.5. Installing Connector/ODBC from a Source Distribution on Unix
- 21.1.3.6. Installing Connector/ODBC from the Development Source Tree
You can install the Connector/ODBC drivers using two different methods, a binary installation and a source installation. The binary installation is the easiest and most straightforward method of installation. Using the source installation methods should only be necessary on platforms where a binary installation package is not available, or in situations where you want to customize or modify the installation process or Connector/ODBC drivers before installation.
Where to Get Connector/ODBC
You can get a copy of the latest version of Connector/ODBC binaries and sources from our Web site at http://dev.mysql.com/downloads/connector/odbc/.
For more information about Connector/ODBC, visit http://www.mysql.com/products/myodbc/.
For more information about licensing, visit http://www.mysql.com/company/legal/licensing/.
Supported Platforms
Connector/ODBC can be used on all major platforms supported by MySQL. You can install it on:
Windows 95, 98, Me, NT, 2000, XP, and 2003
All Unix-like Operating Systems, including: AIX, Amiga, BSDI, DEC, FreeBSD, HP-UX 10/11, Linux, NetBSD, OpenBSD, OS/2, SGI Irix, Solaris, SunOS, SCO OpenServer, SCO UnixWare, Tru64 Unix
Mac OS X and Mac OS X Server
Using a binary distribution offers the most straightforward method for installing Connector/ODBC. If you want more control over the driver, the installation location and or to customize elements of the driver you will need to build and install from the source.
If a binary distribution is not available for a particular
platform build the driver from the original source code. You can
contribute the binaries you create to MySQL by sending a mail
message to <myodbc@lists.mysql.com>, so that it
becomes available for other users.
On all non-Windows platforms except Mac OS X, the driver is
built against unixODBC and is expecting a
2-byte SQLWCHAR, not 4 bytes as
iODBC is using. For this reason, the binaries
are only compatible with
unixODBC and you will need to recompile the
driver against iODBC if you wish to use them
together. For further information see
Section 21.1.2.1.2, “ODBC Driver Managers”.
For further instructions:
| Platform | Binary | Source |
|---|---|---|
| Windows | Installation Instructions | Build Instructions |
| Unix/Linux | Installation Instructions | Build Instructions |
| Mac OS X | Installation Instructions |
Before installing the Connector/ODBC drivers on Windows you should ensure that your Microsoft Data Access Components (MDAC) are up to date. You can obtain the latest version from the Microsoft Data Access and Storage Web site.
There are three available distribution types to use when installing for Windows. The contents in each case are identical, it is only the installation method which is different.
Zipped installer consists of a Zipped package containing a standalone installation application. To install from this package, you must unzip the installer, and then run the installation application. See Section 21.1.3.1.1, “Installing the Windows Connector/ODBC Driver using an installer” to complete the installation.
MSI installer, an installation file that can be used with the installer included in Windows 2000, Windows XP and Windows Server 2003. See Section 21.1.3.1.1, “Installing the Windows Connector/ODBC Driver using an installer” to complete the installation.
Zipped DLL package, containing the DLL files that need must be manually installed. See Section 21.1.3.1.2, “Installing the Windows Connector/ODBC Driver using the Zipped DLL package” to complete the installation.
An OLEDB/ODBC driver for Windows 64-bit is available from Microsoft Downloads.
The installer packages offer a very simple method for installing the Connector/ODBC drivers. If you have downloaded the zipped installer then you must extract the installer application. The basic installation process is identical for both installers.
You should follow these steps to complete the installation:
Double-click the standalone installer that you extracted, or the MSI file you downloaded.
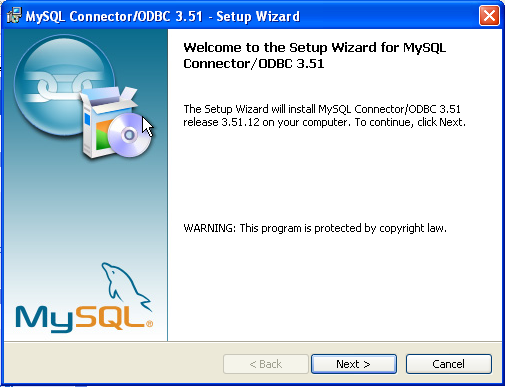
The MySQL Connector/ODBC 3.51 - Setup Wizard will start. Click the button to begin the installation process.
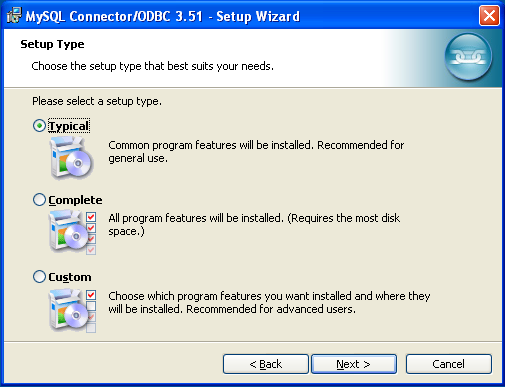
You will need to choose the installation type. The Typical installation provides the standard files you will need to connect to a MySQL database using ODBC. The Complete option installs all the available files, including debug and utility components. It is recommended you choose one of these two options to complete the installation. If choose one of these methods, click and then proceed to step 5.
You may also choose a Custom installation, which enables you to select the individual components that you want to install. You have chosen this method, click and then proceed to step 4.
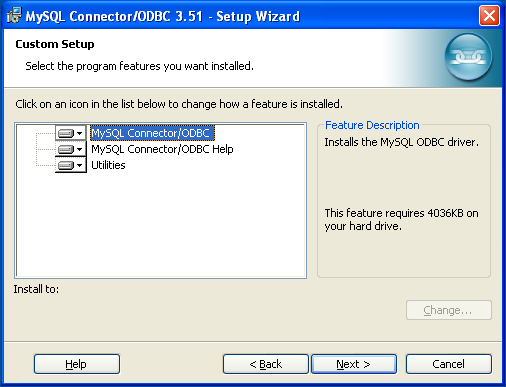
If you have chosen a custom installation, use the pop-ups to select which components to install and then click to install the necessary files.
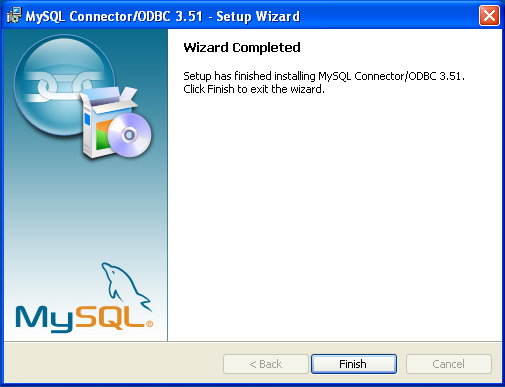
Once the files have copied to your machine, the installation is complete. Click to exit the installer.
Now the installation is complete, you can continue to configure your ODBC connections using Section 21.1.4, “Connector/ODBC Configuration”.
If you have downloaded the Zipped DLL package then you must install the individual files required for Connector/ODBC operation manually. Once you have unzipped the installation files, you can either perform this operation by hand, executing each statement individually, or you can use the included Batch file to perform an installation to the default locations.
The following instructions will only work for 32-bit Windows systems. If you have a 64-bit Windows system you are advised to use the MSI installer, which will install both the 32-bit and 64-bit drivers to the correct locations.
To install using the Batch file:
Unzip the Connector/ODBC Zipped DLL package.
Open a Command Prompt.
Change to the directory created when you unzipped the Connector/ODBC Zipped DLL package.
Run
Install.bat:C:\>
Install.batThis will copy the necessary files into the default location, and then register the Connector/ODBC driver with the Windows ODBC manager.
If you want to copy the files to an alternative location - for example, to run or test different versions of the Connector/ODBC driver on the same machine, then you must copy the files by hand. It is however not recommended to install these files in a nonstandard location. To copy the files by hand to the default installation location use the following steps:
Unzip the Connector/ODBC Zipped DLL package.
Open a Command Prompt.
Change to the directory created when you unzipped the Connector/ODBC Zipped DLL package.
Copy the library files to a suitable directory. The default is to copy them into the default Windows system directory
\Windows\System32:C:\>
copy lib\myodbc3S.dll \Windows\System32C:\>copy lib\myodbc3S.lib \Windows\System32C:\>copy lib\myodbc3.dll \Windows\System32C:\>copy lib\myodbc3.lib \Windows\System32Copy the Connector/ODBC tools. These must be placed into a directory that is in the system
PATH. The default is to install these into the Windows system directory\Windows\System32:C:\>
copy bin\myodbc3i.exe \Windows\System32C:\>copy bin\myodbc3m.exe \Windows\System32C:\>copy bin\myodbc3c.exe \Windows\System32Optionally copy the help files. For these files to be accessible through the help system, they must be installed in the Windows system directory:
C:\>
copy doc\*.hlp \Windows\System32Finally, you must register the Connector/ODBC driver with the ODBC manager:
C:\> myodbc3i -a -d -t"MySQL ODBC 3.51 Driver;\
  DRIVER=myodbc3.dll;SETUP=myodbc3S.dll"
You must change the references to the DLL files and command location in the above statement if you have not installed these files into the default location.
There are two methods available for installing Connector/ODBC on Unix from a binary distribution. For most Unix environments you will need to use the tarball distribution. For Linux systems, there is also an RPM distribution available.
To install Connector/ODBC 5.1 on Unix you require unixODBC 2.2.12 or later to be installed.
To install the driver from a tarball distribution
(.tar.gz file), download the latest
version of the driver for your operating system and follow
these steps that demonstrate the process using the Linux
version of the tarball:
shell>su rootshell>gunzip mysql-connector-odbc-3.51.11-i686-pc-linux.tar.gzshell>tar xvf mysql-connector-odbc-3.51.11-i686-pc-linux.tarshell>cd mysql-connector-odbc-3.51.11-i686-pc-linux
Read the installation instructions in the
INSTALL file and execute these commands.
Then proceed on to
Section 21.1.4.5, “Configuring a Connector/ODBC DSN on Unix”, to
configure the DSN for Connector/ODBC. For more information,
refer to the INSTALL file that comes with
your distribution.
To install or upgrade Connector/ODBC from an RPM distribution
on Linux, simply download the RPM distribution of the latest
version of Connector/ODBC and follow the instructions below.
Use su root to become
root, then install the RPM file.
If you are installing for the first time:
shell>su rootshell>rpm -ivh mysql-connector-odbc-3.51.12.i386.rpm
If the driver exists, upgrade it like this:
shell>su rootshell>rpm -Uvh mysql-connector-odbc-3.51.12.i386.rpm
If there is any dependency error for MySQL client library,
libmysqlclient, simply ignore it by
supplying the --nodeps option, and then make
sure the MySQL client shared library is in the path or set
through LD_LIBRARY_PATH.
This installs the driver libraries and related documents to
/usr/local/lib and
/usr/share/doc/MyODBC, respectively.
Proceed onto
Section 21.1.4.5, “Configuring a Connector/ODBC DSN on Unix”.
To uninstall the driver,
become root and execute an
rpm command:
shell>su rootshell>rpm -e mysql-connector-odbc
Mac OS X is based on the FreeBSD operating system, and you can normally use the MySQL network port for connecting to MySQL servers on other hosts. Installing the Connector/ODBC driver enables you to connect to MySQL databases on any platform through the ODBC interface. You should only need to install the Connector/ODBC driver when your application requires an ODBC interface. Applications that require or can use ODBC (and therefore the Connector/ODBC driver) include ColdFusion, Filemaker Pro, 4th Dimension and many other applications.
Mac OS X includes its own ODBC manager, based on the
iODBC manager. Mac OS X includes an
administration tool that provides easier administration of ODBC
drivers and configuration, updating the underlying
iODBC configuration files.
The method for installing Connector/ODBC on Mac OS X depends on
the version on Connector/ODBC you are using. For Connector/ODBC
3.51.14 and later, the package is provided as a compressed tar
archive that you must manually install. For Connector/ODBC
3.51.13 and earlier the software was provided on a compressed
disk image (.dmg) file and included an
installer.
In either case, the driver is designed to work with the iODBC driver manager included with Mac OS X.
To install Connector/ODBC 3.51.14 and later:
Download the installation file. Note that versions are available for both PowerPC and Intel platforms.
Extract the archive:
shell> tar zxf mysql-connector-odbc-
3.51.16-osx10.4-x86-32bit.tar.gzThe directory created will contain two subdirectories,
libandbin. You need to copy these to a suitable location such as/usr/local:shell> cp bin/* /usr/local/bin shell> cp lib/* /usr/local/lib
Finally, you must register the driver with iODBC using the myodbc3i tool you just installed:
shell> myodbc3i -a -d -t"MySQL ODBC 3.51 Driver;Driver=/usr/local/lib/libmyodbc3.so;Setup=/usr/local/lib/libmyodbc3S.so"
You can verify the installed drivers either by using the ODBC Administrator application or the myodbc3i utility:
shell> myodbc3i -q -d
To install Connector/ODBC 3.51.13 and earlier, follow these steps:
Download the file to your computer and double-click the downloaded image file.
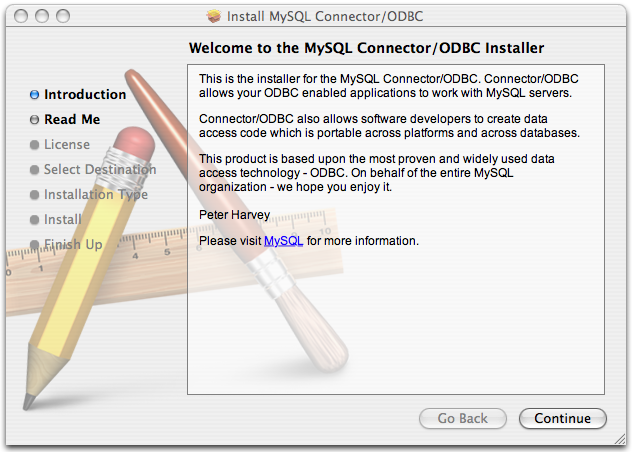
Within the disk image you will find an installer package (with the
.pkgextension). Double-click on this file to start the Mac OS X installer.You will be presented with the installer welcome message. Click the button to begin the installation process.
Please take the time to read the Important Information as it contains guidance on how to complete the installation process. Once you have read the notice and collected the necessary information, click .

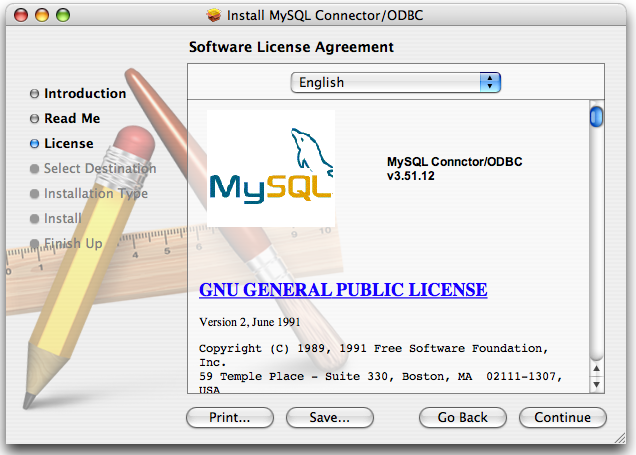
Connector/ODBC drivers are made available under the GNU General Public License. Please read the license if you are not familiar with it before continuing installation. Click to approve the license (you will be asked to confirm that decision) and continue the installation.
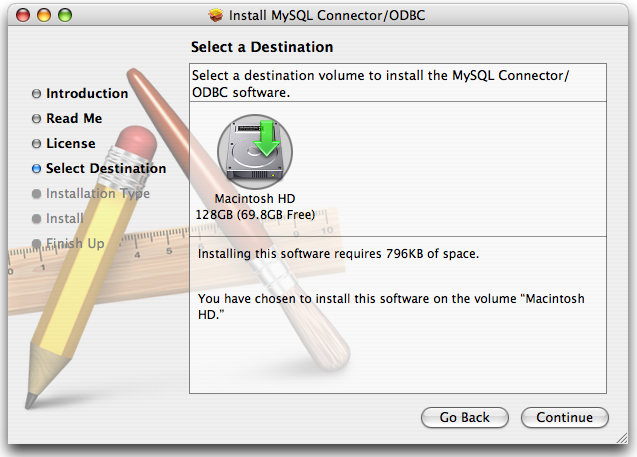
Choose a location to install the Connector/ODBC drivers and the ODBC Administrator application. You must install the files onto a drive with an operating system and you may be limited in the choices available. Select the drive you want to use, and then click .
The installer will automatically select the files that need to be installed on your machine. Click to continue. The installer will copy the necessary files to your machine. A progress bar will be shown indicating the installation progress.
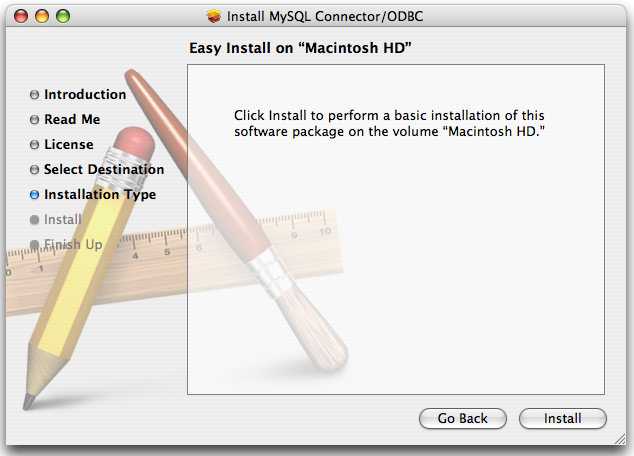
When installation has been completed you will get a window like the one shown below. Click to close and quit the installer.

You should only need to install Connector/ODBC from source on Windows if you want to change or modify the source or installation. If you are unsure whether to install from source, please use the binary installation detailed in Section 21.1.3.1, “Installing Connector/ODBC from a Binary Distribution on Windows”.
Installing Connector/ODBC from source on Windows requires a number of different tools and packages:
MDAC, Microsoft Data Access SDK from http://support.microsoft.com/kb/110093.
Suitable C compiler, such as Microsoft Visual C++ or the C compiler included with Microsoft Visual Studio.
Compatible
maketool. Microsoft'snmakeis used in the examples in this section.MySQL client libraries and include files from MySQL 4.0.0 or higher. (Preferably MySQL 4.0.16 or higher). This is required because Connector/ODBC uses new calls and structures that exist only starting from this version of the library. To get the client libraries and include files, visit http://dev.mysql.com/downloads/.
Connector/ODBC source distributions include
Makefiles that require the
nmake or other make
utility. In the distribution, you can find
Makefile for building the release version
and Makefile_debug for building debugging
versions of the driver libraries and DLLs.
To build the driver, use this procedure:
Download and extract the sources to a folder, then change directory into that folder. The following command assumes the folder is named
myodbc3-src:C:\>
cd myodbc3-srcEdit
Makefileto specify the correct path for the MySQL client libraries and header files. Then use the following commands to build and install the release version:C:\>
nmake -f MakefileC:\>nmake -f Makefile installnmake -f Makefile builds the release version of the driver and places the binaries in subdirectory called
Release.nmake -f Makefile install installs (copies) the driver DLLs and libraries (
myodbc3.dll,myodbc3.lib) to your system directory.To build the debug version, use
Makefile_Debugrather thanMakefile, as shown below:C:\>
nmake -f Makefile_debugC:\>nmake -f Makefile_debug installYou can clean and rebuild the driver by using:
C:\>
nmake -f Makefile cleanC:\>nmake -f Makefile install
Make sure to specify the correct MySQL client libraries and header files path in the Makefiles (set the
MYSQL_LIB_PATHandMYSQL_INCLUDE_PATHvariables). The default header file path is assumed to beC:\mysql\include. The default library path is assumed to beC:\mysql\lib\optfor release DLLs andC:\mysql\lib\debugfor debug versions.For the complete usage of nmake, visit http://msdn.microsoft.com/library/default.asp?url=/library/en-us/dv_vcce4/html/evgrfRunningNMAKE.asp.
If you are using the Subversion tree for compiling, all Windows-specific
Makefilesare named asWin_Makefile*.
- 21.1.3.5.1. Typical configure Options
- 21.1.3.5.2. Additional configure Options
- 21.1.3.5.3. Building and Compilation
- 21.1.3.5.4. Building Shared Libraries
- 21.1.3.5.5. Installing Driver Libraries
- 21.1.3.5.6. Testing Connector/ODBC on Unix
- 21.1.3.5.7. Building Connector/ODBC from Source on Mac OS X
- 21.1.3.5.8. Building Connector/ODBC from Source on HP-UX
- 21.1.3.5.9. Building Connector/ODBC from Source on AIX
You need the following tools to build MySQL from source on Unix:
A working ANSI C++ compiler. gcc 2.95.2 or later, SGI C++, and SunPro C++ are some of the compilers that are known to work.
A good make program. GNU make is always recommended and is sometimes required.
MySQL client libraries and include files from MySQL 4.0.0 or higher. (Preferably MySQL 4.0.16 or higher). This is required because Connector/ODBC uses new calls and structures that exist only starting from this version of the library. To get the client libraries and include files, visit http://dev.mysql.com/downloads/.
If you have built your own MySQL server or client libraries from source, you must have used the
--enable-thread-safe-clientoption toconfigurewhen the libraries were built.You should also ensure that the
libmysqlclientlibrary were built and installed as a shared library.A compatible ODBC manager must be installed. Connector/ODBC is known to work with the
iODBCandunixODBCmanagers. See Section 21.1.2.1.2, “ODBC Driver Managers”, for more information.If you are using a character set that isn't compiled into the MySQL client library then you need to install the MySQL character definitions from the
charsetsdirectory intoSHAREDIR(by default,/usr/local/mysql/share/mysql/charsets). These should be in place if you have installed the MySQL server on the same machine. See Section 9.1, “Character Set Support”, for more information on character set support.
Once you have all the required files, unpack the source files to a separate directory, you then have to run configure and build the library using make.
The configure script gives you a great deal of control over how you configure your Connector/ODBC build. Typically you do this using options on the configure command line. You can also affect configure using certain environment variables. For a list of options and environment variables supported by configure, run this command:
shell> ./configure --help
Some of the more commonly used configure options are described here:
To compile Connector/ODBC, you need to supply the MySQL client include and library files path using the
--with-mysql-path=option, whereDIRDIRis the directory where MySQL is installed.MySQL compile options can be determined by running
DIR/bin/mysql_configSupply the standard header and library files path for your ODBC Driver Manager (
iODBCorunixODBC).If you are using
iODBCandiODBCis not installed in its default location (/usr/local), you might have to use the--with-iodbc=option, whereDIRDIRis the directory whereiODBCis installed.If the
iODBCheaders do not reside inDIR/include--with-iodbc-includes=option to specify their location.INCDIRThe applies to libraries. If they are not in
DIR/lib--with-iodbc-libs=option.LIBDIRIf you are using
unixODBC, use the--with-unixODBC=option (case sensitive) to make configure look forDIRunixODBCinstead ofiODBCby default,DIRis the directory whereunixODBCis installed.If the
unixODBCheaders and libraries aren't located inDIR/includeDIR/lib--with-unixODBC-includes=andINCDIR--with-unixODBC-libs=options.LIBDIR
You might want to specify an installation prefix other than
/usr/local. For example, to install the Connector/ODBC drivers in/usr/local/odbc/lib, use the--prefix=/usr/local/odbcoption.
The final configuration command looks something like this:
shell>./configure --prefix=/usr/local \--with-iodbc=/usr/local \--with-mysql-path=/usr/local/mysql
There are a number of other options that you need, or want, to set when configuring the Connector/ODBC driver before it is built.
To link the driver with MySQL thread safe client libraries
libmysqlclient_r.soorlibmysqlclient_r.a, you must specify the following configure option:--enable-thread-safe
and can be disabled (default) using
--disable-thread-safe
This option enables the building of the driver thread-safe library
libmyodbc3_r.sofrom by linking with MySQL thread-safe client librarylibmysqlclient_r.so(The extensions are OS dependent).If the compilation with the thread-safe option fails, it may be because the correct thread-libraries on the system could not be located. You should set the value of
LIBSto point to the correct thread library for your system.LIBS="-lpthread" ./configure ..
You can enable or disable the shared and static versions of Connector/ODBC using these options:
--enable-shared[=yes/no]
--disable-shared
--enable-static[=yes/no]
--disable-static
By default, all the binary distributions are built as nondebugging versions (configured with
--without-debug).To enable debugging information, build the driver from source distribution and use the
--with-debugoption when you run configure.This option is available only for source trees that have been obtained from the Subversion repository. This option does not apply to the packaged source distributions.
By default, the driver is built with the
--without-docsoption. If you would like the documentation to be built, then execute configure with:--with-docs
To build the driver libraries, you have to just execute make.
shell> make
If any errors occur, correct them and continue the build
process. If you aren't able to build, then send a detailed
email to <myodbc@lists.mysql.com> for further
assistance.
On most platforms, MySQL does not build or support
.so (shared) client libraries by default.
This is based on our experience of problems when building
shared libraries.
In cases like this, you have to download the MySQL distribution and configure it with these options:
--without-server --enable-shared
To build shared driver libraries, you must specify the
--enable-shared option for
configure. By default,
configure does not enable this option.
If you have configured with the
--disable-shared option, you can build the
.so file from the static libraries using
the following commands:
shell>cd mysql-connector-odbc-3.51.01shell>makeshell>cd drivershell>CC=/usr/bin/gcc \$CC -bundle -flat_namespace -undefined error \-o .libs/libmyodbc3-3.51.01.so \catalog.o connect.o cursor.o dll.o error.o execute.o \handle.o info.o misc.o myodbc3.o options.o prepare.o \results.o transact.o utility.o \-L/usr/local/mysql/lib/mysql/ \-L/usr/local/iodbc/lib/ \-lz -lc -lmysqlclient -liodbcinst
Make sure to change -liodbcinst to
-lodbcinst if you are using
unixODBC instead of
iODBC, and configure the library paths
accordingly.
This builds and places the
libmyodbc3-3.51.01.so file in the
.libs directory. Copy this file to the
Connector/ODBC library installation directory
(/usr/local/lib (or the
lib directory under the installation
directory that you supplied with the
--prefix).
shell>cd .libsshell>cp libmyodbc3-3.51.01.so /usr/local/libshell>cd /usr/local/libshell>ln -s libmyodbc3-3.51.01.so libmyodbc3.so
To build the thread-safe driver library:
shell>CC=/usr/bin/gcc \$CC -bundle -flat_namespace -undefined error-o .libs/libmyodbc3_r-3.51.01.socatalog.o connect.o cursor.o dll.o error.o execute.ohandle.o info.o misc.o myodbc3.o options.o prepare.oresults.o transact.o utility.o-L/usr/local/mysql/lib/mysql/-L/usr/local/iodbc/lib/-lz -lc -lmysqlclient_r -liodbcinst
To install the driver libraries, execute the following command:
shell> make install
That command installs one of the following sets of libraries:
For Connector/ODBC 3.51:
libmyodbc3.solibmyodbc3-3.51.01.so, where 3.51.01 is the version of the driverlibmyodbc3.a
For thread-safe Connector/ODBC 3.51:
libmyodbc3_r.solibmyodbc3-3_r.51.01.solibmyodbc3_r.a
For more information on build process, refer to the
INSTALL file that comes with the source
distribution. Note that if you are trying to use the
make from Sun, you may end up with errors.
On the other hand, GNU gmake should work
fine on all platforms.
To run the basic samples provided in the distribution with the libraries that you built, use the following command:
shell> make test
Before running the tests, create the DSN 'myodbc3' in
odbc.ini and set the environment variable
ODBCINI to the correct
odbc.ini file; and MySQL server is
running. You can find a sample odbc.ini
with the driver distribution.
You can even modify the
samples/run-samples script to pass the
desired DSN, UID, and PASSWORD values as the command-line
arguments to each sample.
To build the driver on Mac OS X (Darwin), make use of the following configure example:
shell>./configure --prefix=/usr/local--with-unixODBC=/usr/local--with-mysql-path=/usr/local/mysql--disable-shared--enable-gui=no--host=powerpc-apple
The command assumes that the unixODBC and
MySQL are installed in the default locations. If not,
configure accordingly.
On Mac OS X, --enable-shared builds
.dylib files by default. You can build
.so files like this:
shell>makeshell>cd drivershell>CC=/usr/bin/gcc \$CC -bundle -flat_namespace -undefined error-o .libs/libmyodbc3-3.51.01.so *.o-L/usr/local/mysql/lib/-L/usr/local/iodbc/lib-liodbcinst -lmysqlclient -lz -lc
To build the thread-safe driver library:
shell>CC=/usr/bin/gcc \$CC -bundle -flat_namespace -undefined error-o .libs/libmyodbc3-3.51.01.so *.o-L/usr/local/mysql/lib/-L/usr/local/iodbc/lib-liodbcinst -lmysqlclienti_r -lz -lc -lpthread
Make sure to change the -liodbcinst to
-lodbcinst in case of using
unixODBC instead of
iODBC and configure the libraries path
accordingly.
In Apple's version of GCC, both cc and gcc are actually symbolic links to gcc3.
Copy this library to the $prefix/lib
directory and symlink to libmyodbc3.so.
You can cross-check the output shared-library properties using this command:
shell> otool -LD .libs/libmyodbc3-3.51.01.so
To build the driver on HP-UX 10.x or 11.x, make use of the following configure example:
If using cc:
shell>CC="cc" \CFLAGS="+z" \LDFLAGS="-Wl,+b:-Wl,+s" \./configure --prefix=/usr/local--with-unixodbc=/usr/local--with-mysql-path=/usr/local/mysql/lib/mysql--enable-shared--enable-thread-safe
If using gcc:
shell>CC="gcc" \LDFLAGS="-Wl,+b:-Wl,+s" \./configure --prefix=/usr/local--with-unixodbc=/usr/local--with-mysql-path=/usr/local/mysql--enable-shared--enable-thread-safe
Once the driver is built, cross-check its attributes using
chatr .libs/libmyodbc3.sl to determine
whether you need to have set the MySQL client library path
using the SHLIB_PATH environment variable.
For static versions, ignore all shared-library options and run
configure with the
--disable-shared option.
To build the driver on AIX, make use of the following configure example:
shell>./configure --prefix=/usr/local--with-unixodbc=/usr/local--with-mysql-path=/usr/local/mysql--disable-shared--enable-thread-safe
For more information about how to build and set up the static and shared libraries across the different platforms refer to ' Using static and shared libraries across platforms'.
You should read this section only if you are interested in helping us test our new code. If you just want to get MySQL Connector/ODBC up and running on your system, you should use a standard release distribution.
To obtain the most recent development source tree, you first need to download and install Bazaar. You can obtain Bazaar from the Bazaar VCS Web site. Bazaar is supported by any platform that supports Python, and is therefore compatible with any Linux, Unix, Windows or Mac OS X host. Instructions for downloading and installing Bazaar on the different platforms are available on the Bazaar Web site.
To build from the source trees, you need the following tools:
autoconf 2.52 (or newer)
automake 1.4 (or newer)
libtool 1.4 (or newer)
m4
The most recent development source tree is available from our public Subversion trees at http://dev.mysql.com/tech-resources/sources.html.
To check out out the Connector/ODBC sources, change to the directory where you want the copy of the Connector/ODBC tree to be stored, then use the following command:
shell> bzr branch lp:myodbc
You should now have a copy of the entire Connector/ODBC source
tree in the directory connector-odbc3. To
build from this source tree on Unix or Linux follow these steps:
shell>cd myodbcshell>aclocalshell>autoheadershell>libtoolize -c -fshell>autoconfshell>automake;shell>./configure # Add your favorite options hereshell>make
For more information on how to build, refer to the
INSTALL file located in the same directory.
For more information on options to configure,
see
Section 21.1.3.5.1, “Typical configure Options”
When the build is done, run make install to install the Connector/ODBC 3.51 driver on your system.
If you have gotten to the make stage and the
distribution does not compile, please report it to
<myodbc@lists.mysql.com>.
On Windows, make use of Windows Makefiles
WIN-Makefile and
WIN-Makefile_debug in building the driver.
For more information, see
Section 21.1.3.4, “Installing Connector/ODBC from a Source Distribution on Windows”.
After the initial checkout operation to get the source tree, you should run bzr pull periodically to update your source according to the latest version.
- 21.1.4.1. Data Source Names
- 21.1.4.2. Connector/ODBC Connection Parameters
- 21.1.4.3. Configuring a Connector/ODBC DSN on Windows
- 21.1.4.4. Configuring a Connector/ODBC DSN on Mac OS X
- 21.1.4.5. Configuring a Connector/ODBC DSN on Unix
- 21.1.4.6. Connecting Without a Predefined DSN
- 21.1.4.7. ODBC Connection Pooling
- 21.1.4.8. Getting an ODBC Trace File
Before you connect to a MySQL database using the Connector/ODBC driver you must configure an ODBC Data Source Name. The DSN associates the various configuration parameters required to communicate with a database to a specific name. You use the DSN in an application to communicate with the database, rather than specifying individual parameters within the application itself. DSN information can be user specific, system specific, or provided in a special file. ODBC data source names are configured in different ways, depending on your platform and ODBC driver.
A Data Source Name associates the configuration parameters for communicating with a specific database. Generally a DSN consists of the following parameters:
- Name
- Host Name
- Database Name
- Login
- Password
In addition, different ODBC drivers, including Connector/ODBC, may accept additional driver-specific options and parameters.
There are three types of DSN:
A System DSN is a global DSN definition that is available to any user and application on a particular system. A System DSN can normally only be configured by a systems administrator, or by a user who has specific permissions that let them create System DSNs.
A User DSN is specific to an individual user, and can be used to store database connectivity information that the user regularly uses.
A File DSN uses a simple file to define the DSN configuration. File DSNs can be shared between users and machines and are therefore more practical when installing or deploying DSN information as part of an application across many machines.
DSN information is stored in different locations depending on your platform and environment.
You can specify the parameters in the following tables for
Connector/ODBC when configuring a DSN. Users on Windows can use
the Options and Advanced panels when configuring a DSN to set
these parameters; see the table for information on which options
relate to which fields and checkboxes. On Unix and Mac OS X, use
the parameter name and value as the keyword/value pair in the
DSN configuration. Alternatively, you can set these parameters
within the InConnectionString argument in the
SQLDriverConnect() call.
| Parameter | Default Value | Comment |
|---|---|---|
user | ODBC | The user name used to connect to MySQL. |
uid | ODBC | Synonymous with user. Added in 3.51.16. |
server | localhost | The host name of the MySQL server. |
database | The default database. | |
option | 0 | Options that specify how Connector/ODBC should work. See below. |
port | 3306 | The TCP/IP port to use if server is not
localhost. |
initstmt | Initial statement. A statement to execute when connecting to MySQL. In
version 3.51 the parameter is called
stmt. Note, the driver supports the
initial statement being executed only at the time of the
initial connection. | |
password | The password for the user account on
server. | |
pwd | Synonymous with password. Added in 3.51.16. | |
socket | The Unix socket file or Windows named pipe to connect to if
server is
localhost. | |
sslca | The path to a file with a list of trust SSL CAs. Added in 3.51.16. | |
sslcapath | The path to a directory that contains trusted SSL CA certificates in PEM format. Added in 3.51.16. | |
sslcert | The name of the SSL certificate file to use for establishing a secure connection. Added in 3.51.16. | |
sslcipher | A list of permissible ciphers to use for SSL encryption. The cipher list
has the same format as the openssl
ciphers command Added in 3.51.16. | |
sslkey | The name of the SSL key file to use for establishing a secure connection. Added in 3.51.16. | |
charset | The character set to use for the connection. Added in 3.51.17. | |
sslverify | If set to 1, the SSL certificate will be verified when used with the MySQL connection. If not set, then the default behavior is to ignore SSL certificate verification. | |
readtimeout | The timeout in seconds for attempts to read from the server. Each
attempt uses this timeout value and there are retries if
necessary, so the total effective timeout value is three
times the option value. You can set the value so that a
lost connection can be detected earlier than the TCP/IP
Close_Wait_Timeout value of 10
minutes. This option works only for TCP/IP connections,
and only for Windows prior to MySQL 5.1.12. Corresponds
to the MYSQL_OPT_READ_TIMEOUT option
of the MySQL Client Library. This option was added in
Connector/ODBC 3.51.27. | |
writetimeout | The timeout in seconds for attempts to write to the server. Each attempt
uses this timeout value and there are
net_retry_count retries if necessary,
so the total effective timeout value is
net_retry_count times the option
value. This option works only for TCP/IP connections,
and only for Windows prior to MySQL 5.1.12. Corresponds
to the MYSQL_OPT_WRITE_TIMEOUT option
of the MySQL Client Library. This option was added in
Connector/ODBC 3.51.27. |
The SSL configuration parameters can also be automatically
loaded from a my.ini or
my.cnf file.
The option argument is used to tell
Connector/ODBC that the client isn't 100% ODBC compliant. On
Windows, you normally select options by toggling the checkboxes
in the connection screen, but you can also select them in the
option argument. The following options are
listed in the order in which they appear in the Connector/ODBC
connect screen.
| Value | Flagname | GUI Option | Description |
|---|---|---|---|
| 1 | FLAG_FIELD_LENGTH | Do not Optimize Column Width | The client cannot handle that Connector/ODBC returns the real width of a column. This option was removed in 3.51.18. |
| 2 | FLAG_FOUND_ROWS | Return Matching Rows | The client cannot handle that MySQL returns the true value of affected rows. If this flag is set, MySQL returns “found rows” instead. You must have MySQL 3.21.14 or newer to get this to work. |
| 4 | FLAG_DEBUG | Trace Driver Calls To myodbc.log | Make a debug log in C:\myodbc.log on Windows, or
/tmp/myodbc.log on Unix variants.
This option was removed in Connector/ODBC 3.51.18. |
| 8 | FLAG_BIG_PACKETS | Allow Big Results | Do not set any packet limit for results and bind parameters. Without this option, parameter binding will be truncated to 255 characters. |
| 16 | FLAG_NO_PROMPT | Do not Prompt Upon Connect | Do not prompt for questions even if driver would like to prompt. |
| 32 | FLAG_DYNAMIC_CURSOR | Enable Dynamic Cursor | Enable or disable the dynamic cursor support. |
| 64 | FLAG_NO_SCHEMA | Ignore # in Table Name | Ignore use of database name in
db_name.tbl_name.col_name. |
| 128 | FLAG_NO_DEFAULT_CURSOR | User Manager Cursors | Force use of ODBC manager cursors (experimental). |
| 256 | FLAG_NO_LOCALE | Do not Use Set Locale | Disable the use of extended fetch (experimental). |
| 512 | FLAG_PAD_SPACE | Pad Char To Full Length | Pad CHAR columns to full column length. |
| 1024 | FLAG_FULL_COLUMN_NAMES | Return Table Names for SQLDescribeCol | SQLDescribeCol() returns fully qualified column
names. |
| 2048 | FLAG_COMPRESSED_PROTO | Use Compressed Protocol | Use the compressed client/server protocol. |
| 4096 | FLAG_IGNORE_SPACE | Ignore Space After Function Names | Tell server to ignore space after function name and before
“(” (needed by
PowerBuilder). This makes all function names keywords. |
| 8192 | FLAG_NAMED_PIPE | Force Use of Named Pipes | Connect with named pipes to a mysqld server running on NT. |
| 16384 | FLAG_NO_BIGINT | Change BIGINT Columns to Int | Change BIGINT columns to
INT columns (some
applications cannot handle
BIGINT). |
| 32768 | FLAG_NO_CATALOG | No Catalog | Forces results from the catalog functions, such as
SQLTables, to always return
NULL and the driver to report that
catalogs are not supported. |
| 65536 | FLAG_USE_MYCNF | Read Options From my.cnf | Read parameters from the [client] and
[odbc] groups from
my.cnf. |
| 131072 | FLAG_SAFE | Safe | Add some extra safety checks. |
| 262144 | FLAG_NO_TRANSACTIONS | Disable transactions | Disable transactions. |
| 524288 | FLAG_LOG_QUERY | Save queries to myodbc.sql | Enable query logging to
c:\myodbc.sql(/tmp/myodbc.sql)
file. (Enabled only in debug mode.) |
| 1048576 | FLAG_NO_CACHE | Do not Cache Result (forward only cursors) | Do not cache the results locally in the driver, instead read from server
(mysql_use_result()).
This works only for forward-only cursors. This option is
very important in dealing with large tables when you do
not want the driver to cache the entire result set. |
| 2097152 | FLAG_FORWARD_CURSOR | Force Use Of Forward Only Cursors | Force the use of Forward-only cursor type. In case of
applications setting the default static/dynamic cursor
type, and one wants the driver to use noncache result
sets, then this option ensures the forward-only cursor
behavior. |
| 4194304 | FLAG_AUTO_RECONNECT | Enable auto-reconnect. | Enables auto-reconnection functionality. You should not use this option with transactions, since a auto reconnection during a incomplete transaction may cause corruption. Note that an auto-reconnected connection will not inherit the same settings and environment as the original. This option was added in Connector/ODBC 3.51.13. |
| 8388608 | FLAG_AUTO_IS_NULL | Flag Auto Is Null |
When
When Thus, omitting the flag disables the compatibility option and forces SQL standard behavior.
See |
| 16777216 | FLAG_ZERO_DATE_TO_MIN | Flag Zero Date to Min | Translates zero dates (XXXX-00-00) into the minimum
date values supported by ODBC,
XXXX-01-01. This resolves an issue
where some statements will not work because the date
returned and the minimum ODBC date value are
incompatible. This option was added in Connector/ODBC
3.51.17. |
| 33554432 | FLAG_MIN_DATE_TO_ZERO | Flag Min Date to Zero | Translates the minimum ODBC date value (XXXX-01-01)
to the zero date format supported by MySQL
(XXXX-00-00). This resolves an issue
where some statements will not work because the date
returned and the minimum ODBC date value are
incompatible. This option was added in Connector/ODBC
3.51.17. |
| 67108864 | FLAG_MULTI_STATEMENTS | Allow multiple statements | Enables support for batched statements. This option was added in Connector/ODBC 3.51.18. |
| 134217728 | FLAG_COLUMN_SIZE_S32 | Limit column size to 32-bit value | Limits the column size to a signed 32-bit value to prevent problems with larger column sizes in applications that do not support them. This option is automatically enabled when working with ADO applications. This option was added in Connector/ODBC 3.51.22. |
| 268435456 | FLAG_NO_BINARY_RESULT | Always handle binary function results as character data | When set this option disables charset 63 for columns with an empty
org_table. This option was added in
Connector/ODBC 3.51.26. |
To select multiple options, add together their values. For
example, setting option to 12 (4+8) gives you
debugging without packet limits.
From version of MySQL Connector/ODBC 5.1.6 onwards, it is possible to use
the flag name directly as a parameter in the connection
string, by using the flag name without the FLAG_ prefix. So,
in addition to using the options parameter
with various flags set, it is now possible to use the flags
directly as parameters. For example,
FIELD_LENGTH, FOUND_ROWS
and DEBUG could all be used as parameters.
The following table shows some recommended
option values for various configurations.
| Configuration | Option Value |
|---|---|
| Microsoft Access, Visual Basic | 3 |
| Driver trace generation (Debug mode) | 4 |
| Microsoft Access (with improved DELETE queries) | 35 |
| Large tables with too many rows | 2049 |
| Sybase PowerBuilder | 135168 |
| Query log generation (Debug mode) | 524288 |
| Generate driver trace as well as query log (Debug mode) | 524292 |
| Large tables with no-cache results | 3145731 |
The ODBC Data Source Administrator within
Windows enables you to create DSNs, check driver installation
and configure ODBC systems such as tracing (used for debugging)
and connection pooling.
Different editions and versions of Windows store the
ODBC Data Source Administrator in different
locations depending on the version of Windows that you are
using.
To open the ODBC Data Source Administrator in
Windows Server 2003:
Because it is possible to create DSN using either the 32-bit
or 64-bit driver, but using the same DNS identifier, it is
advisable to include the driver being used within the DSN
identifier. This will help you to identify the DSN when using
it from applications such as Excel that are only compatible
with the 32-bit driver. For example, you might add
Using32bitCODBC to the DSN identifier for
the 32-bit interface and Using64bitCODBC
for those using the 64-bit Connector/ODBC driver.
On the
Startmenu, chooseAdministrative Tools, and then clickData Sources (ODBC).
To open the ODBC Data Source Administrator in
Windows 2000 Server or Windows 2000 Professional:
On the
Startmenu, chooseSettings, and then clickControl Panel.In
Control Panel, clickAdministrative Tools.In
Administrative Tools, clickData Sources (ODBC).
To open the ODBC Data Source Administrator on
Windows XP:
On the
Startmenu, clickControl Panel.In the
Control Panelwhen inCategory ViewclickPerformance and Maintenanceand then clickAdministrative Tools.. If you are viewing theControl PanelinClassic View, clickAdministrative Tools.In
Administrative Tools, clickData Sources (ODBC).
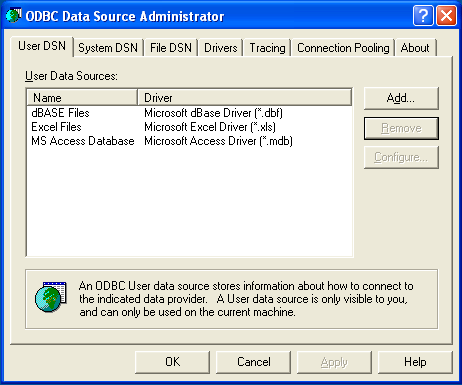
Irrespective of your Windows version, you should be presented
the ODBC Data Source Administrator window:
Within Windows XP, you can add the Administrative
Tools folder to your menu
to make it easier to locate the ODBC Data Source Administrator.
To do this:
Right-click the menu.
Select
Properties.Click .
Select the tab.
Within
Start menu items, within theSystem Administrative Toolssection, selectDisplay on the All Programs menu.
Within both Windows Server 2003 and Windows XP you may want to
permanently add the ODBC Data Source
Administrator to your
menu. To do this, locate the Data Sources
(ODBC) icon using the methods shown, then right-click
on the icon and then choose .
The interfaces for the 3.51 and 5.1 versions of the Connector/ODBC driver are different, although the fields and information that you need to enter remain the same.
To configure a DSN using Connector/ODBC 3.51.x or Connector/ODBC 5.1.0, see Section 21.1.4.3.1, “Configuring a Connector/ODBC 3.51 DSN on Windows”.
To configure a DSN using Connector/ODBC 5.1.1 or later, see Section 21.1.4.3.2, “Configuring a Connector/ODBC 5.1 DSN on Windows”.
To add and configure a new Connector/ODBC data source on
Windows, use the ODBC Data Source
Administrator:
Open the
ODBC Data Source Administrator.To create a System DSN (which will be available to all users) , select the
System DSNtab. To create a User DSN, which will be unique only to the current user, click the button.You will need to select the ODBC driver for this DSN.
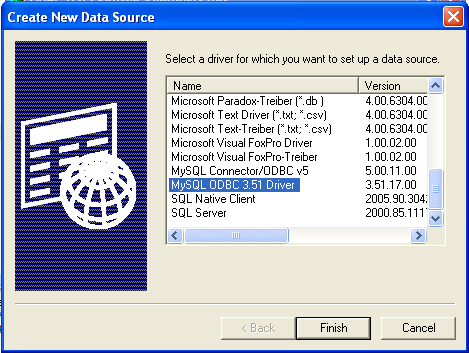
Select
MySQL ODBC 3.51 Driver, then click .You now need to configure the specific fields for the DSN you are creating through the
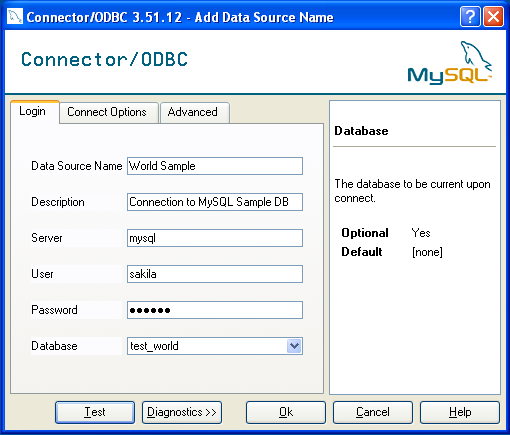
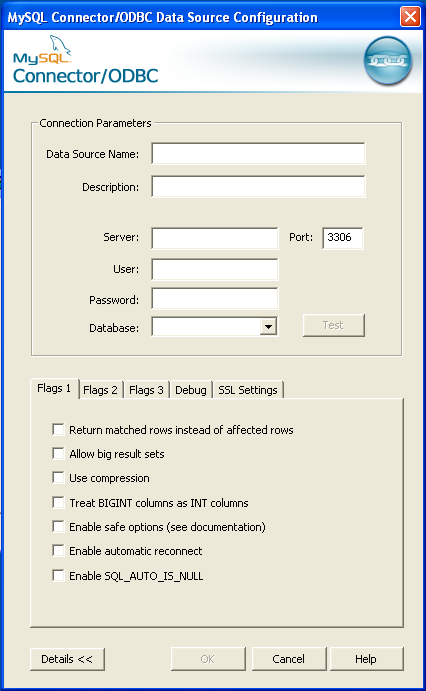
Add Data Source Namedialog.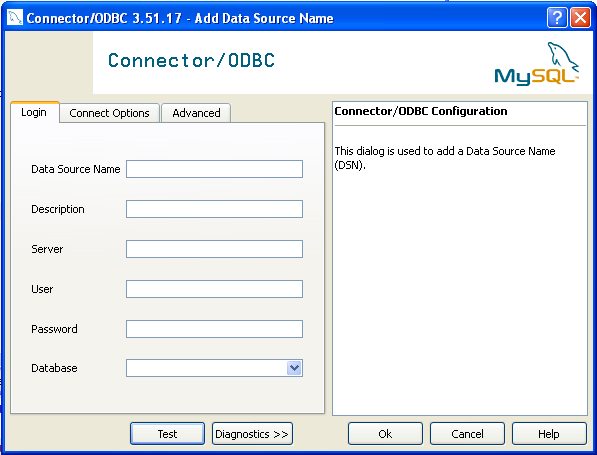
In the Data Source Name box, enter the name of the data source you want to access. It can be any valid name that you choose.
In the Description box, enter some text to help identify the connection.
In the Server field, enter the name of the MySQL server host that you want to access. By default, it is
localhost.In the User field, enter the user name to use for this connection.
In the Password field, enter the corresponding password for this connection.
The Database pop-up should automatically populate with the list of databases that the user has permissions to access.
Click to save the DSN.
A completed DSN configuration may look like this:
You can verify the connection using the parameters you have
entered by clicking the button. If
the connection could be made successfully, you will be
notified with a Success; connection was
made! dialog.
If the connection failed, you can obtain more information on the test and why it may have failed by clicking the button to show additional error messages.
You can configure a number of options for a specific DSN by using either the or tabs in the DSN configuration dialog.
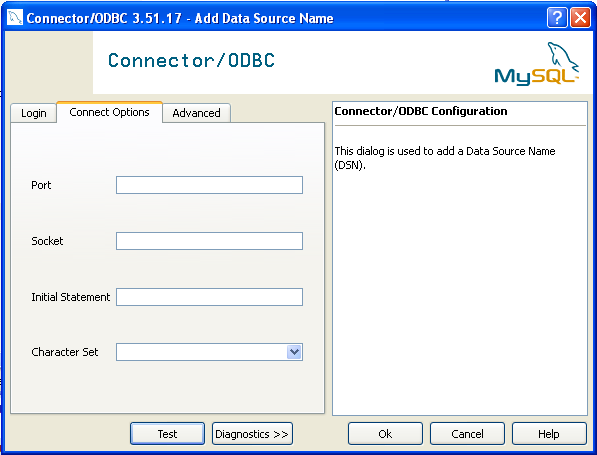
The three options you can configure are:
Port sets the TCP/IP port number to use when communicating with MySQL. Communication with MySQL uses port 3306 by default. If your server is configured to use a different TCP/IP port, you must specify that port number here.
Socket sets the name or location of a specific socket or Windows pipe to use when communicating with MySQL.
Initial Statement defines an SQL statement that will be executed when the connection to MySQL is opened. You can use this to set MySQL options for your connection, such as disabling autocommit.
Character Set is a pop-up list from which you can select the default character set to be used with this connection. The Character Set option was added in 3.5.17.
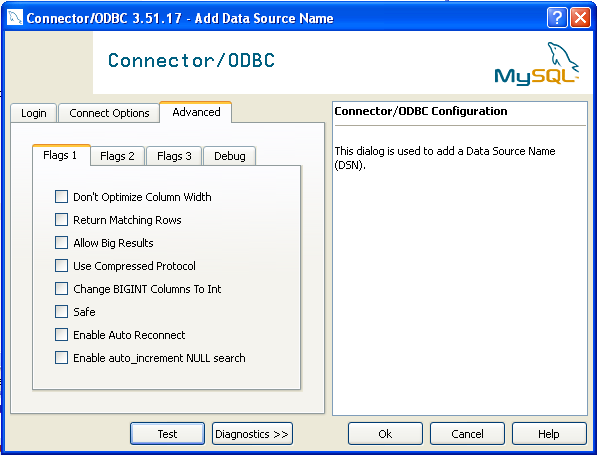
The tab enables you to configure Connector/ODBC connection parameters. Refer to Section 21.1.4.2, “Connector/ODBC Connection Parameters”, for information about the meaning of these options.
The DSN configuration when using Connector/ODBC 5.1.1 and later has a slightly different layout. Also, due to the native Unicode support within Connector/ODBC 5.1, you no longer need to specify the initial character set to be used with your connection.
To configure a DSN using the Connector/ODBC 5.1.1 or later driver:
Open the
ODBC Data Source Administrator.To create a System DSN (which will be available to all users) , select the System DSN tab. To create a User DSN, which will be unique only to the current user, click the button.
You will need to select the ODBC driver for this DSN.
Select
MySQL ODBC 5.1 Driver, then click .You now need to configure the specific fields for the DSN you are creating through the
Connection Parametersdialog.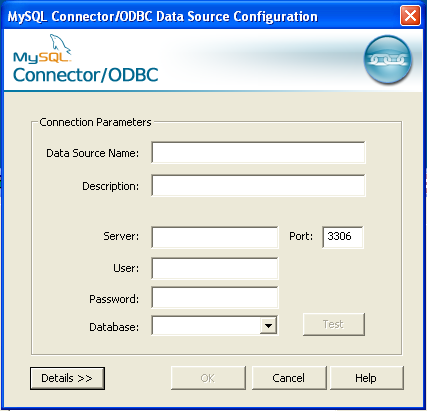
In the Data Source Name box, enter the name of the data source you want to access. It can be any valid name that you choose.
In the Description box, enter some text to help identify the connection.
In the Server field, enter the name of the MySQL server host that you want to access. By default, it is
localhost.In the User field, enter the user name to use for this connection.
In the Password field, enter the corresponding password for this connection.
The Database pop-up should automatically populate with the list of databases that the user has permissions to access.
To communicate over a different TCP/IP port than the default (3306), change the value of the Port.
Click to save the DSN.
You can verify the connection using the parameters you have
entered by clicking the button. If
the connection could be made successfully, you will be
notified with a Success; connection was
made! dialog.
You can configure a number of options for a specific DSN by using the button.
The Details button opens a tabbed display which enables you to set additional options:
Flags 1, Flags 2, and Flags 3 enable you to select the additional flags for the DSN connection. For more information on these flags, see Section 21.1.4.2, “Connector/ODBC Connection Parameters”.
Debug enables you to enable ODBC debugging to record the queries you execute through the DSN to the
myodbc.sqlfile. For more information, see Section 21.1.4.8, “Getting an ODBC Trace File”.SSL Settings configures the additional options required for using the Secure Sockets Layer (SSL) when communicating with MySQL server. Note that you must have enabled SSL and configured the MySQL server with suitable certificates to communicate over SSL.
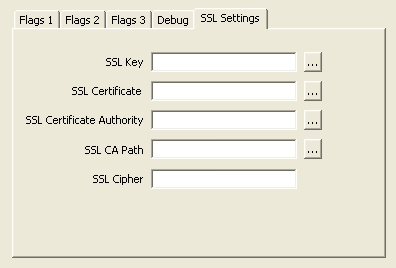
The tab enables you to configure Connector/ODBC connection parameters. Refer to Section 21.1.4.2, “Connector/ODBC Connection Parameters”, for information about the meaning of these options.
This section answers Connector/ODBC connection-related questions.
While configuring a Connector/ODBC DSN, a
Could Not Load Translator or Setup Libraryerror occursFor more information, refer to MS KnowledgeBase Article(Q260558). Also, make sure you have the latest valid
ctl3d32.dllin your system directory.On Windows, the default
myodbc3.dllis compiled for optimal performance. If you want to debug Connector/ODBC 3.51 (for example, to enable tracing), you should instead usemyodbc3d.dll. To install this file, copymyodbc3d.dllover the installedmyodbc3.dllfile. Make sure to revert back to the release version of the driver DLL once you are done with the debugging because the debug version may cause performance issues. Note that themyodbc3d.dllisn't included in Connector/ODBC 3.51.07 through 3.51.11. If you are using one of these versions, you should copy that DLL from a previous version (for example, 3.51.06).
To configure a DSN on Mac OS X you can either use the
myodbc3i utility, edit the
odbc.ini file within the
Library/ODBC directory of the user or the
should use the ODBC Administrator. If you have Mac OS X 10.2 or
earlier, refer to
Section 21.1.4.5, “Configuring a Connector/ODBC DSN on Unix”. Select
whether you want to create a User DSN or a System DSN. If you
want to add a System DSN, you may need to authenticate with the
system. You must click the padlock and enter a user and password
with administrator privileges.
For correct operation of ODBC Administrator, you should ensure
that the /Library/ODBC/odbc.ini file used
to set up ODBC connectivity and DSNs are writable by the
admin group. If this file is not writable by
this group then the ODBC Administrator may fail, or may appear
to have worked but not generated the correct entry.
There are known issues with the OS X ODBC Administrator and
Connector/ODBC that may prevent you from creating a DSN using
this method. In this case you should use the command-line or
edit the odbc.ini file directly. Note
that existing DSNs or those that you create using the
myodbc3i or
myodbc-installer tool can still be checked
and edited using ODBC Administrator.
To create a DSN using the myodbc3i utility, you need only specify the DSN type and the DSN connection string. For example:
shell> myodbc3i -a -s -t"DSN=mydb;DRIVER=MySQL ODBC 3.51 Driver;SERVER=mysql;USER=username;PASSWORD=pass"
To use ODBC Administrator:
Open the ODBC Administrator from the
Utilitiesfolder in theApplicationsfolder.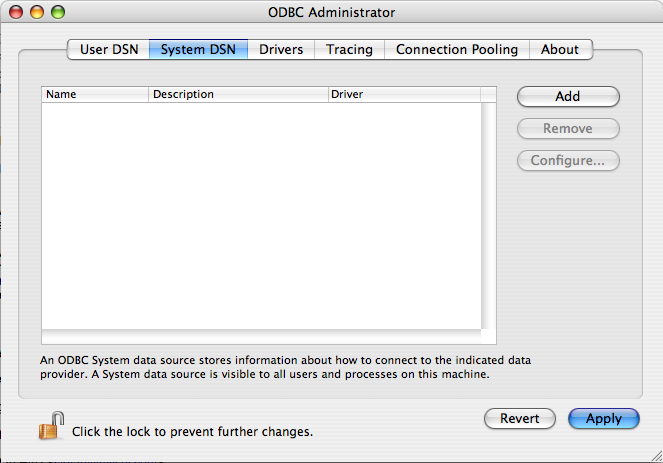
On the User DSN or System DSN panel, click
Select the Connector/ODBC driver and click .
You will be presented with the
Data Source Namedialog. Enter TheData Source Nameand an optionalDescriptionfor the DSN.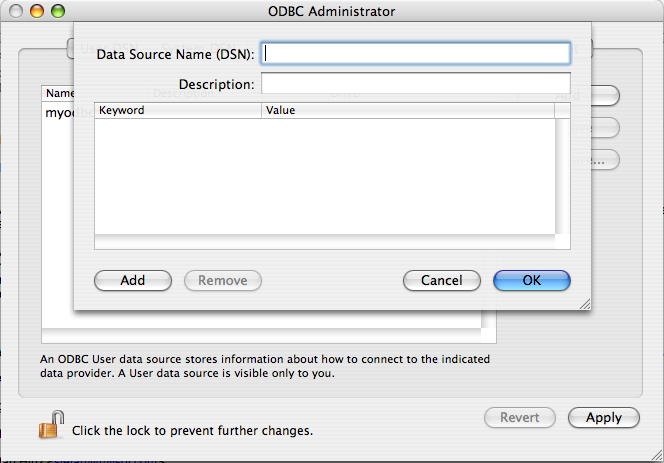
Click to add a new keyword/value pair to the panel. You should configure at least four pairs to specify the
server,username,passwordanddatabaseconnection parameters. See Section 21.1.4.2, “Connector/ODBC Connection Parameters”.Click to add the DSN to the list of configured data source names.
A completed DSN configuration may look like this:
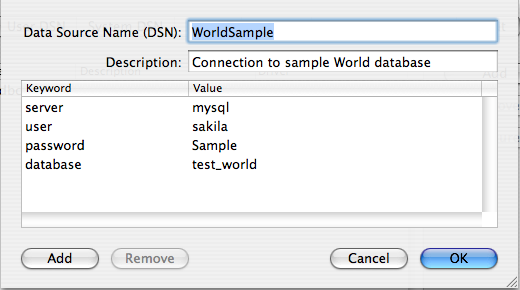
You can configure other ODBC options in your DSN by adding further keyword/value pairs and setting the corresponding values. See Section 21.1.4.2, “Connector/ODBC Connection Parameters”.
On Unix, you configure DSN entries directly
in the odbc.ini file. Here is a typical
odbc.ini file that configures
myodbc3 as the DSN name for Connector/ODBC
3.51:
; ; odbc.ini configuration for Connector/ODBC and Connector/ODBC 3.51 drivers ; [ODBC Data Sources] myodbc3 = MyODBC 3.51 Driver DSN [myodbc3] Driver = /usr/local/lib/libmyodbc3.so Description = Connector/ODBC 3.51 Driver DSN SERVER = localhost PORT = USER = root Password = Database = test OPTION = 3 SOCKET = [Default] Driver = /usr/local/lib/libmyodbc3.so Description = Connector/ODBC 3.51 Driver DSN SERVER = localhost PORT = USER = root Password = Database = test OPTION = 3 SOCKET =
Refer to the Section 21.1.4.2, “Connector/ODBC Connection Parameters”, for the list of connection parameters that can be supplied.
If you are using unixODBC, you can use the
following tools to set up the DSN:
ODBCConfig GUI tool(HOWTO: ODBCConfig)
odbcinst
In some cases when using unixODBC, you might
get this error:
Data source name not found and no default driver specified
If this happens, make sure the ODBCINI and
ODBCSYSINI environment variables are pointing
to the right odbc.ini file. For example, if
your odbc.ini file is located in
/usr/local/etc, set the environment
variables like this:
export ODBCINI=/usr/local/etc/odbc.ini export ODBCSYSINI=/usr/local/etc
You can connect to the MySQL server using SQLDriverConnect, by
specifying the DRIVER name field. Here are
the connection strings for Connector/ODBC using DSN-Less
connections:
For Connector/ODBC 3.51:
ConnectionString = "DRIVER={MySQL ODBC 3.51 Driver};\
SERVER=localhost;\
DATABASE=test;\
USER=venu;\
PASSWORD=venu;\
OPTION=3;"If your programming language converts backslash followed by whitespace to a space, it is preferable to specify the connection string as a single long string, or to use a concatenation of multiple strings that does not add spaces in between. For example:
ConnectionString = "DRIVER={MySQL ODBC 3.51 Driver};"
"SERVER=localhost;"
"DATABASE=test;"
"USER=venu;"
"PASSWORD=venu;"
"OPTION=3;"Note. Note that on Mac OS X you may need to specify the full path to the Connector/ODBC driver library.
Refer to the Section 21.1.4.2, “Connector/ODBC Connection Parameters”, for the list of connection parameters that can be supplied.
Connection pooling enables the ODBC driver to re-use existing connections to a given database from a pool of connections, instead of opening a new connection each time the database is accessed. By enabling connection pooling you can improve the overall performance of your application by lowering the time taken to open a connection to a database in the connection pool.
For more information about connection pooling: http://support.microsoft.com/default.aspx?scid=kb;EN-US;q169470.
If you encounter difficulties or problems with Connector/ODBC,
you should start by making a log file from the ODBC
Manager and Connector/ODBC. This is called
tracing, and is enabled through the ODBC
Manager. The procedure for this differs for Windows, Mac OS X
and Unix.
To enable the trace option on Windows:
The
Tracingtab of the ODBC Data Source Administrator dialog box enables you to configure the way ODBC function calls are traced.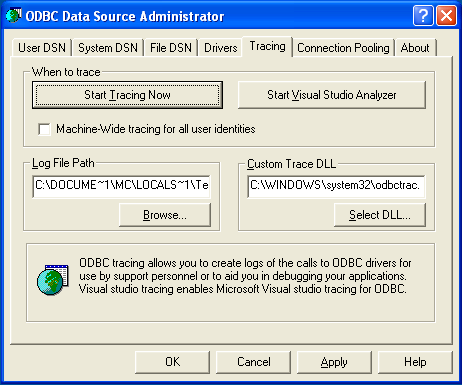
When you activate tracing from the
Tracingtab, theDriver Managerlogs all ODBC function calls for all subsequently run applications.ODBC function calls from applications running before tracing is activated are not logged. ODBC function calls are recorded in a log file you specify.
Tracing ceases only after you click
Stop Tracing Now. Remember that while tracing is on, the log file continues to increase in size and that tracing affects the performance of all your ODBC applications.
To enable the trace option on Mac OS X 10.3 or later you
should use the Tracing tab within
ODBC Administrator .
Open the ODBC Administrator.
Select the
Tracingtab.
Select the
Enable Tracingcheckbox.Enter the location where you want to save the Tracing log. If you want to append information to an existing log file, click the button.
To enable the trace option on Mac OS X 10.2 (or earlier) or
Unix you must add the trace option to the
ODBC configuration:
On Unix, you need to explicitly set the
Traceoption in theODBC.INIfile.Set the tracing
ONorOFFby usingTraceFileandTraceparameters inodbc.inias shown below:TraceFile = /tmp/odbc.trace Trace = 1
TraceFilespecifies the name and full path of the trace file andTraceis set toONorOFF. You can also use1orYESforONand0orNOforOFF. If you are using ODBCConfig fromunixODBC, then follow the instructions for tracingunixODBCcalls at HOWTO-ODBCConfig.
To generate a Connector/ODBC log, do the following:
Within Windows, enable the
Trace Connector/ODBCoption flag in the Connector/ODBC connect/configure screen. The log is written to fileC:\myodbc.log. If the trace option is not remembered when you are going back to the above screen, it means that you are not using themyodbcd.dlldriver, see Section 21.1.4.3.3, “Errors and Debugging”.On Mac OS X, Unix, or if you are using DSN-Less connection, then you need to supply
OPTION=4in the connection string or set the corresponding keyword/value pair in the DSN.Start your application and try to get it to fail. Then check the Connector/ODBC trace file to find out what could be wrong.
If you need help determining what is wrong, see Section 21.1.8.1, “Connector/ODBC Community Support”.
- 21.1.5.1. Basic Connector/ODBC Application Steps
- 21.1.5.2. Step-by-step Guide to Connecting to a MySQL Database through Connector/ODBC
- 21.1.5.3. Connector/ODBC and Third-Party ODBC Tools
- 21.1.5.4. Using Connector/ODBC with Microsoft Access
- 21.1.5.5. Using Connector/ODBC with Microsoft Word or Excel
- 21.1.5.6. Using Connector/ODBC with Crystal Reports
- 21.1.5.7. Connector/ODBC Programming
Once you have configured a DSN to provide access to a database, how you access and use that connection is dependent on the application or programming language. As ODBC is a standardized interface, any application or language that supports ODBC can use the DSN and connect to the configured database.
Interacting with a MySQL server from an applications using the Connector/ODBC typically involves the following operations:
Configure the Connector/ODBC DSN
Connect to MySQL server
Initialization operations
Execute SQL statements
Retrieve results
Perform Transactions
Disconnect from the server
Most applications use some variation of these steps. The basic application steps are shown in the following diagram:
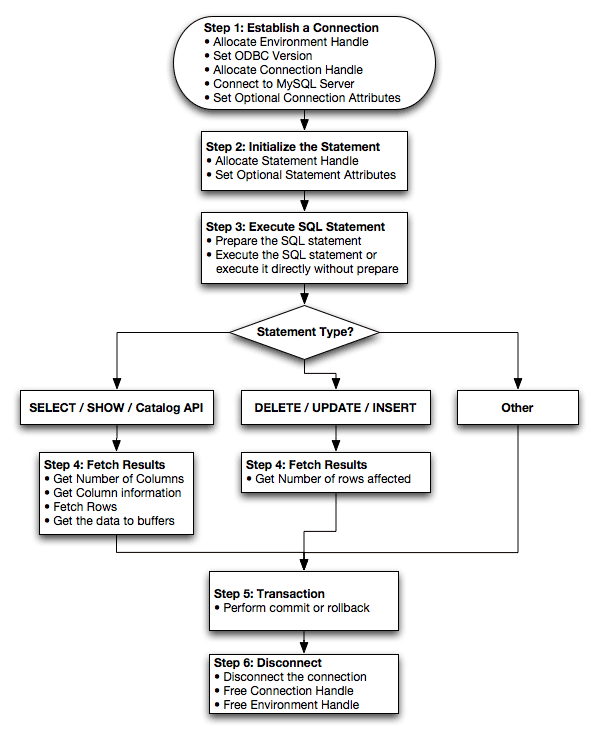
A typical installation situation where you would install Connector/ODBC is when you want to access a database on a Linux or Unix host from a Windows machine.
As an example of the process required to set up access between
two machines, the steps below take you through the basic steps.
These instructions assume that you want to connect to system
ALPHA from system BETA with a user name and password of
myuser and mypassword.
On system ALPHA (the MySQL server) follow these steps:
Start the MySQL server.
Use
GRANTto set up an account with a user name ofmyuserthat can connect from system BETA using a password ofmyuserto the databasetest:GRANT ALL ON test.* to 'myuser'@'BETA' IDENTIFIED BY 'mypassword';
For more information about MySQL privileges, refer to Section 5.5, “MySQL User Account Management”.
On system BETA (the Connector/ODBC client), follow these steps:
Configure a Connector/ODBC DSN using parameters that match the server, database and authentication information that you have just configured on system ALPHA.
Parameter Value Comment DSN remote_test A name to identify the connection. SERVER ALPHA The address of the remote server. DATABASE test The name of the default database. USER myuser The user name configured for access to this database. PASSWORD mypassword The password for myuser.Using an ODBC-capable application, such as Microsoft Office, connect to the MySQL server using the DSN you have just created. If the connection fails, use tracing to examine the connection process. See Section 21.1.4.8, “Getting an ODBC Trace File”, for more information.
Once you have configured your Connector/ODBC DSN, you can access your MySQL database through any application that supports the ODBC interface, including programming languages and third-party applications. This section contains guides and help on using Connector/ODBC with various ODBC-compatible tools and applications, including Microsoft Word, Microsoft Excel and Adobe/Macromedia ColdFusion.
Connector/ODBC has been tested with the following applications.
| Publisher | Application | Notes |
|---|---|---|
| Adobe | ColdFusion | Formerly Macromedia ColdFusion |
| Borland | C++ Builder | |
| Builder 4 | ||
| Delphi | ||
| Business Objects | Crystal Reports | |
| Claris | Filemaker Pro | |
| Corel | Paradox | |
| Computer Associates | Visual Objects | Also known as CAVO |
| AllFusion ERwin Data Modeler | ||
| Gupta | Team Developer | Previously known as Centura Team Developer; Gupta SQL/Windows |
| Gensym | G2-ODBC Bridge | |
| Inline | iHTML | |
| Lotus | Notes | Versions 4.5 and 4.6 |
| Microsoft | Access | |
| Excel | ||
| Visio Enterprise | ||
| Visual C++ | ||
| Visual Basic | ||
| ODBC.NET | Using C#, Visual Basic, C++ | |
| FoxPro | ||
| Visual Interdev | ||
| OpenOffice.org | OpenOffice.org | |
| Perl | DBD::ODBC | |
| Pervasive Software | DataJunction | |
| Sambar Technologies | Sambar Server | |
| SPSS | SPSS | |
| SoftVelocity | Clarion | |
| SQLExpress | SQLExpress for Xbase++ | |
| Sun | StarOffice | |
| SunSystems | Vision | |
| Sybase | PowerBuilder | |
| PowerDesigner | ||
| theKompany.com | Data Architect |
If you know of any other applications that work with
Connector/ODBC, please send mail to
<myodbc@lists.mysql.com> about them.
You can use MySQL database with Microsoft Access using Connector/ODBC. The MySQL database can be used as an import source, an export source, or as a linked table for direct use within an Access application, so you can use Access as the front-end interface to a MySQL database.
To export a table of data from an Access database to MySQL, follow these instructions:
When you open an Access database or an Access project, a Database window appears. It displays shortcuts for creating new database objects and opening existing objects.
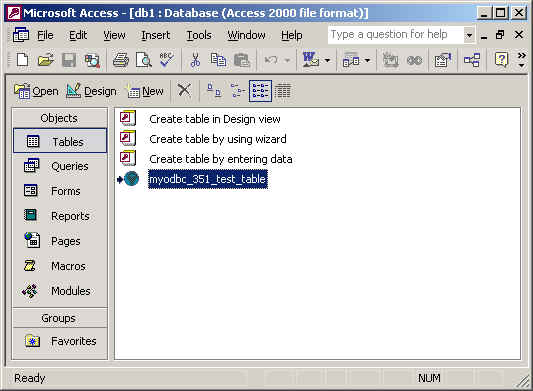
Click the name of the
tableorqueryyou want to export, and then in theFilemenu, selectExport.In the
Export Object Typedialog box, in theObject nameToSave As Typebox, selectODBC Databases ()as shown here: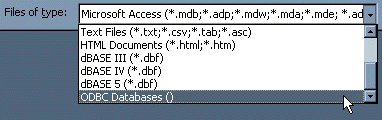
In the
Exportdialog box, enter a name for the file (or use the suggested name), and then selectOK.The Select Data Source dialog box is displayed; it lists the defined data sources for any ODBC drivers installed on your computer. Click either the File Data Source or Machine Data Source tab, and then double-click the Connector/ODBC or Connector/ODBC 3.51 data source that you want to export to. To define a new data source for Connector/ODBC, please Section 21.1.4.3, “Configuring a Connector/ODBC DSN on Windows”.
Ensure that the information that you are exporting to the MySQL table is valid for the corresponding MySQL data types. Values that are outside of the supported range of the MySQL data type but valid within Access may trigger an “overflow” error during the export.
Microsoft Access connects to the MySQL Server through this data source and exports new tables and or data.
To import a table or tables from MySQL to Access, follow these instructions:
Open a database, or switch to the Database window for the open database.
To import tables, on the
Filemenu, point toGet External Data, and then clickImport.In the
Importdialog box, in the Files Of Type box, select ODBC Databases (). The Select Data Source dialog box lists the defined data sources The Select Data Source dialog box is displayed; it lists the defined data source names.If the ODBC data source that you selected requires you to log on, enter your login ID and password (additional information might also be required), and then click
OK.Microsoft Access connects to the MySQL server through
ODBC data sourceand displays the list of tables that you canimport.Click each table that you want to
import, and then clickOK.
You can use Microsoft Access as a front end to a MySQL database by linking tables within your Microsoft Access database to tables that exist within your MySQL database. When a query is requested on a table within Access, ODBC is used to execute the queries on the MySQL database instead.
To create a linked table:
Open the Access database that you want to link to MySQL.
From the , choose .
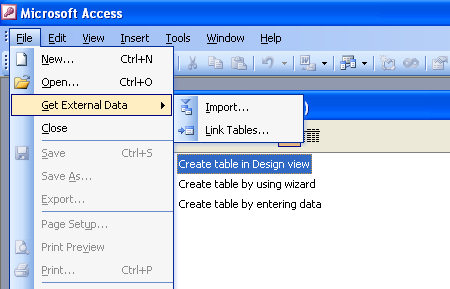
From the browser, choose ODBC Databases () from the Files of type pop-up.
In the Select Data Source window, choose an existing DSN, either from a File Data Source or Machine Data Source.You can also create a new DSN using the button. For more information on creating a DSN see Section 21.1.4.3, “Configuring a Connector/ODBC DSN on Windows”.
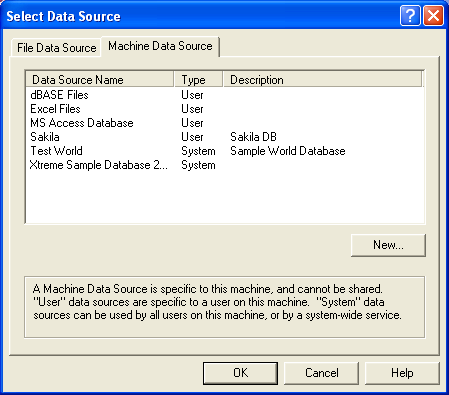
In the Link Tables dialog, select one or more tables from the MySQL database. A link will be created to each table that you select from this list.
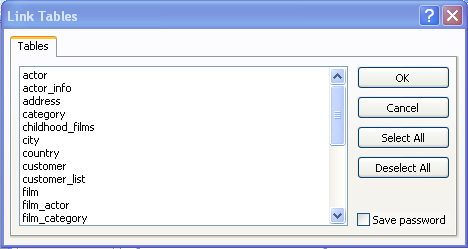
If Microsoft Access is unable to determine the unique record identifier for a table automatically then it may ask you to confirm the column, or combination of columns, to be used to uniquely identify each row from the source table. Select the columns you want to use and click .
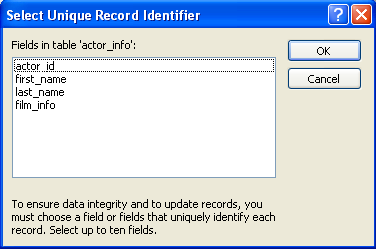
Once the process has been completed, you can now build interfaces and queries to the linked tables just as you would for any Access database.
Use the following procedure to view or to refresh links when the structure or location of a linked table has changed. The Linked Table Manager lists the paths to all currently linked tables.
To view or refresh links:
Open the database that contains links to MySQL tables.
On the
Toolsmenu, point toAdd-ins(Database Utilitiesin Access 2000 or newer), and then clickLinked Table Manager.Select the check box for the tables whose links you want to refresh.
Click OK to refresh the links.
Microsoft Access confirms a successful refresh or, if the
table wasn't found, displays the Select New Location
of <table name> dialog box in which you can
specify its the table's new location. If several selected
tables have moved to the new location that you specify, the
Linked Table Manager searches that location for all selected
tables, and updates all links in one step.
To change the path for a set of linked tables:
Open the database that contains links to tables.
On the
Toolsmenu, point toAdd-ins(Database Utilitiesin Access 2000 or newer), and then clickLinked Table Manager.Select the
Always Prompt For A New Locationcheck box.Select the check box for the tables whose links you want to change, and then click
OK.In the
Select New Location of<table name> dialog box, specify the new location, clickOpen, and then clickOK.
You can use Microsoft Word and Microsoft Excel to access information from a MySQL database using Connector/ODBC. Within Microsoft Word, this facility is most useful when importing data for mailmerge, or for tables and data to be included in reports. Within Microsoft Excel, you can execute queries on your MySQL server and import the data directly into an Excel Worksheet, presenting the data as a series of rows and columns.
With both applications, data is accessed and imported into the application using Microsoft Query , which enables you to execute a query though an ODBC source. You use Microsoft Query to build the SQL statement to be executed, selecting the tables, fields, selection criteria and sort order. For example, to insert information from a table in the World test database into an Excel spreadsheet, using the DSN samples shown in Section 21.1.4, “Connector/ODBC Configuration”:
Create a new Worksheet.
From the
Datamenu, chooseImport External Data, and then selectNew Database Query.Microsoft Query will start. First, you need to choose the data source, by selecting an existing Data Source Name.
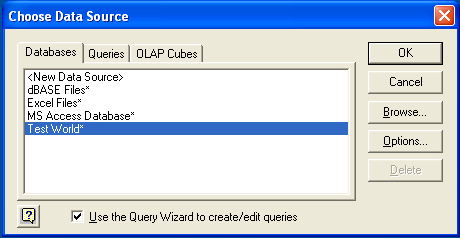
Within the
Query Wizard, you must choose the columns that you want to import. The list of tables available to the user configured through the DSN is shown on the left, the columns that will be added to your query are shown on the right. The columns you choose are equivalent to those in the first section of aSELECTquery. Click to continue.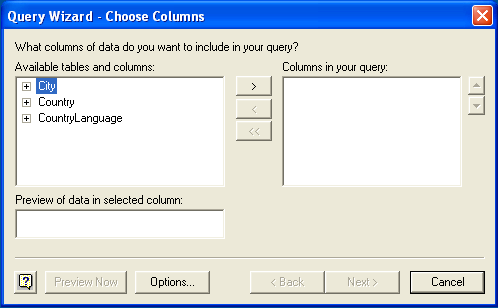
You can filter rows from the query (the equivalent of a
WHEREclause) using theFilter Datadialog. Click to continue.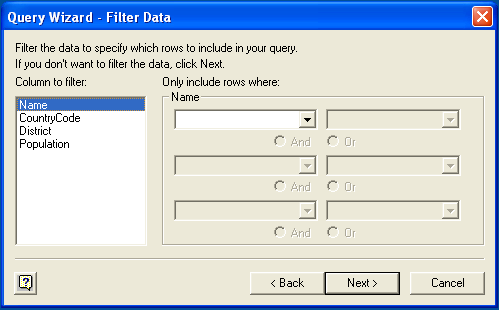
Select an (optional) sort order for the data. This is equivalent to using a
ORDER BYclause in your SQL query. You can select up to three fields for sorting the information returned by the query. Click to continue.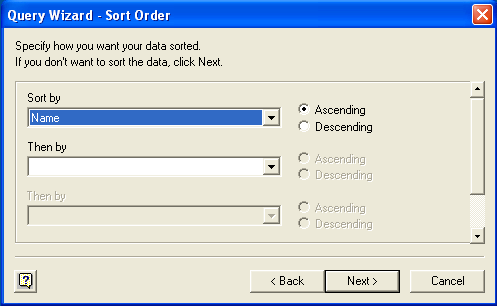
Select the destination for your query. You can select to return the data Microsoft Excel, where you can choose a worksheet and cell where the data will be inserted; you can continue to view the query and results within Microsoft Query, where you can edit the SQL query and further filter and sort the information returned; or you can create an OLAP Cube from the query, which can then be used directly within Microsoft Excel. Click .
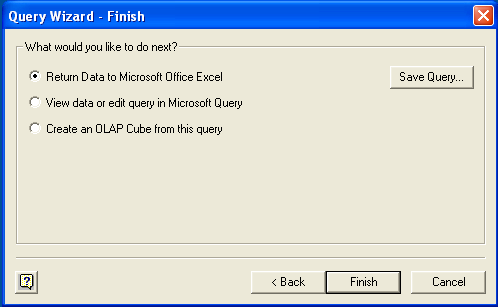
The same process can be used to import data into a Word document, where the data will be inserted as a table. This can be used for mail merge purposes (where the field data is read from a Word table), or where you want to include data and reports within a report or other document.
Crystal Reports can use an ODBC DSN to connect to a database from which you to extract data and information for reporting purposes.
There is a known issue with certain versions of Crystal Reports where the application is unable to open and browse tables and fields through an ODBC connection. Before using Crystal Reports with MySQL, please ensure that you have update to the latest version, including any outstanding service packs and hotfixes. For more information on this issue, see the Business) Objects Knowledgebase for more information.
For example, to create a simple crosstab report within Crystal Reports XI, you should follow these steps:
Create a DSN using the
Data Sources (ODBC)tool. You can either specify a complete database, including user name and password, or you can build a basic DSN and use Crystal Reports to set the user name and password.For the purposes of this example, a DSN that provides a connection to an instance of the MySQL Sakila sample database has been created.
Open Crystal Reports and create a new project, or an open an existing reporting project into which you want to insert data from your MySQL data source.
Start the Cross-Tab Report Wizard, either by clicking the option on the Start Page. Expand the Create New Connection folder, then expand the ODBC (RDO) folder to obtain a list of ODBC data sources.
You will be asked to select a data source.
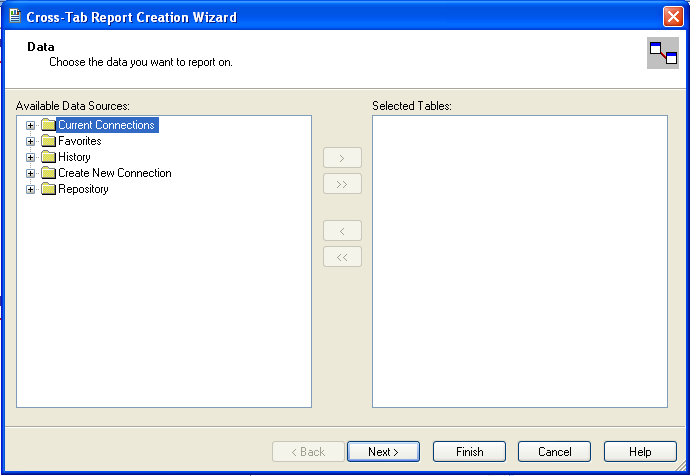
When you first expand the ODBC (RDO) folder you will be presented the Data Source Selection screen. From here you can select either a pre-configured DSN, open a file-based DSN or enter and manual connection string. For this example, the Sakila DSN will be used.
If the DSN contains a user name/password combination, or you want to use different authentication credentials, click to enter the user name and password that you want to use. Otherwise, click to continue the data source selection wizard.
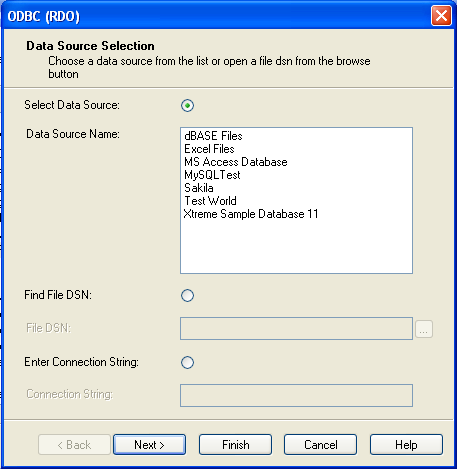
You will be returned the Cross-Tab Report Creation Wizard. You now need to select the database and tables that you want to include in your report. For our example, we will expand the selected Sakila database. Click the
citytable and use the button to add the table to the report. Then repeat the action with thecountrytable. Alternatively you can select multiple tables and add them to the report.Finally, you can select the parent Sakila resource and add of the tables to the report.
Once you have selected the tables you want to include, click to continue.
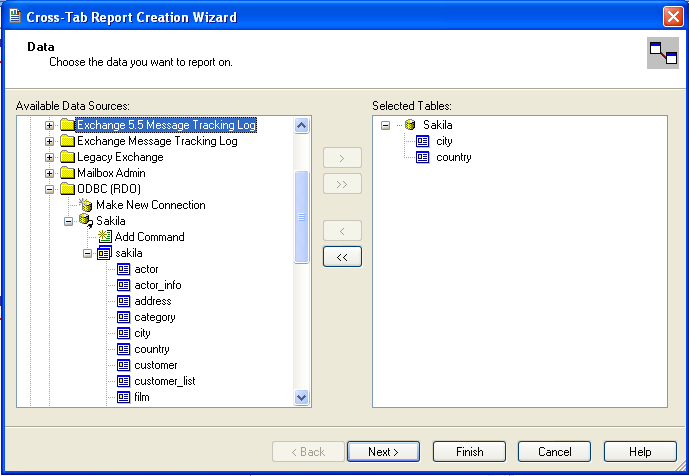
Crystal Reports will now read the table definitions and automatically identify the links between the tables. The identification of links between tables enables Crystal Reports to automatically lookup and summarize information based on all the tables in the database according to your query. If Crystal Reports is unable to perform the linking itself, you can manually create the links between fields in the tables you have selected.
Click to continue the process.
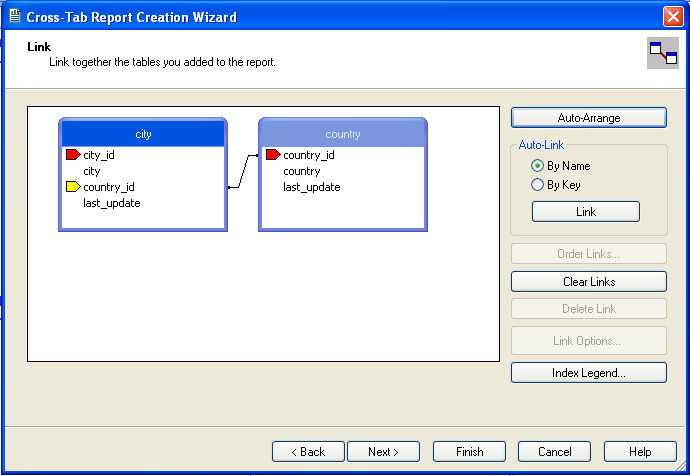
You can now select the columns and rows that you wish to include within the Cross-Tab report. Drag and drop or use the buttons to add fields to each area of the report. In the example shown, we will report on cities, organized by country, incorporating a count of the number of cities within each country. If you want to browse the data, select a field and click the button.
Click to create a graph of the results. Since we are not creating a graph from this data, click to generate the report.
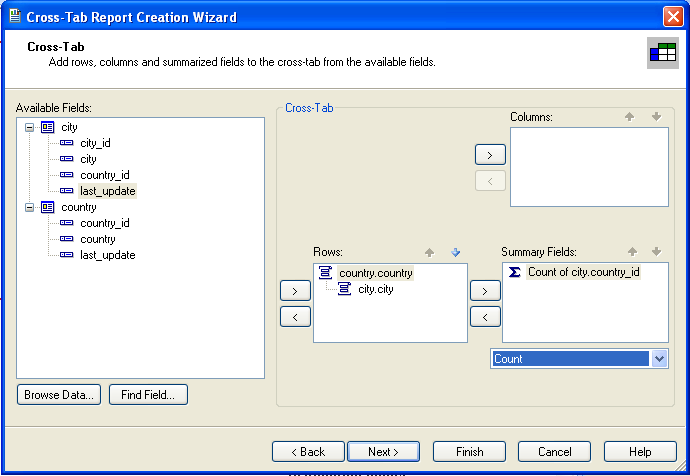
The finished report will be shown, a sample of the output from the Sakila sample database is shown below.

Once the ODBC connection has been opened within Crystal Reports, you can browse and add any fields within the available tables into your reports.
With a suitable ODBC Manager and the Connector/ODBC driver installed, any programming language or environment that can support ODBC should be able to connect to a MySQL database through Connector/ODBC.
This includes, but is certainly not limited to, Microsoft support languages (including Visual Basic, C# and interfaces such as ODBC.NET), Perl (through the DBI module, and the DBD::ODBC driver).
This section contains simple examples of the use of MySQL ODBC 3.51 Driver with ADO, DAO and RDO.
The following ADO (ActiveX Data Objects) example creates a
table my_ado and demonstrates the use of
rs.addNew, rs.delete,
and rs.update.
Private Sub myodbc_ado_Click()
Dim conn As ADODB.Connection
Dim rs As ADODB.Recordset
Dim fld As ADODB.Field
Dim sql As String
'connect to MySQL server using MySQL ODBC 3.51 Driver
Set conn = New ADODB.Connection
conn.ConnectionString = "DRIVER={MySQL ODBC 3.51 Driver};"_
& "SERVER=localhost;"_
& " DATABASE=test;"_
& "UID=venu;PWD=venu; OPTION=3"
conn.Open
'create table
conn.Execute "DROP TABLE IF EXISTS my_ado"
conn.Execute "CREATE TABLE my_ado(id int not null primary key, name varchar(20)," _
& "txt text, dt date, tm time, ts timestamp)"
'direct insert
conn.Execute "INSERT INTO my_ado(id,name,txt) values(1,100,'venu')"
conn.Execute "INSERT INTO my_ado(id,name,txt) values(2,200,'MySQL')"
conn.Execute "INSERT INTO my_ado(id,name,txt) values(3,300,'Delete')"
Set rs = New ADODB.Recordset
rs.CursorLocation = adUseServer
'fetch the initial table ..
rs.Open "SELECT * FROM my_ado", conn
Debug.Print rs.RecordCount
rs.MoveFirst
Debug.Print String(50, "-") & "Initial my_ado Result Set " & String(50, "-")
For Each fld In rs.Fields
Debug.Print fld.Name,
Next
Debug.Print
Do Until rs.EOF
For Each fld In rs.Fields
Debug.Print fld.Value,
Next
rs.MoveNext
Debug.Print
Loop
rs.Close
'rs insert
rs.Open "select * from my_ado", conn, adOpenDynamic, adLockOptimistic
rs.AddNew
rs!Name = "Monty"
rs!txt = "Insert row"
rs.Update
rs.Close
'rs update
rs.Open "SELECT * FROM my_ado"
rs!Name = "update"
rs!txt = "updated-row"
rs.Update
rs.Close
'rs update second time..
rs.Open "SELECT * FROM my_ado"
rs!Name = "update"
rs!txt = "updated-second-time"
rs.Update
rs.Close
'rs delete
rs.Open "SELECT * FROM my_ado"
rs.MoveNext
rs.MoveNext
rs.Delete
rs.Close
'fetch the updated table ..
rs.Open "SELECT * FROM my_ado", conn
Debug.Print rs.RecordCount
rs.MoveFirst
Debug.Print String(50, "-") & "Updated my_ado Result Set " & String(50, "-")
For Each fld In rs.Fields
Debug.Print fld.Name,
Next
Debug.Print
Do Until rs.EOF
For Each fld In rs.Fields
Debug.Print fld.Value,
Next
rs.MoveNext
Debug.Print
Loop
rs.Close
conn.Close
End Sub
The following DAO (Data Access Objects) example creates a
table my_dao and demonstrates the use of
rs.addNew, rs.update,
and result set scrolling.
Private Sub myodbc_dao_Click()
Dim ws As Workspace
Dim conn As Connection
Dim queryDef As queryDef
Dim str As String
'connect to MySQL using MySQL ODBC 3.51 Driver
Set ws = DBEngine.CreateWorkspace("", "venu", "venu", dbUseODBC)
str = "odbc;DRIVER={MySQL ODBC 3.51 Driver};"_
& "SERVER=localhost;"_
& " DATABASE=test;"_
& "UID=venu;PWD=venu; OPTION=3"
Set conn = ws.OpenConnection("test", dbDriverNoPrompt, False, str)
'Create table my_dao
Set queryDef = conn.CreateQueryDef("", "drop table if exists my_dao")
queryDef.Execute
Set queryDef = conn.CreateQueryDef("", "create table my_dao(Id INT AUTO_INCREMENT PRIMARY KEY, " _
& "Ts TIMESTAMP(14) NOT NULL, Name varchar(20), Id2 INT)")
queryDef.Execute
'Insert new records using rs.addNew
Set rs = conn.OpenRecordset("my_dao")
Dim i As Integer
For i = 10 To 15
rs.AddNew
rs!Name = "insert record" & i
rs!Id2 = i
rs.Update
Next i
rs.Close
'rs update..
Set rs = conn.OpenRecordset("my_dao")
rs.Edit
rs!Name = "updated-string"
rs.Update
rs.Close
'fetch the table back...
Set rs = conn.OpenRecordset("my_dao", dbOpenDynamic)
str = "Results:"
rs.MoveFirst
While Not rs.EOF
str = " " & rs!Id & " , " & rs!Name & ", " & rs!Ts & ", " & rs!Id2
Debug.Print "DATA:" & str
rs.MoveNext
Wend
'rs Scrolling
rs.MoveFirst
str = " FIRST ROW: " & rs!Id & " , " & rs!Name & ", " & rs!Ts & ", " & rs!Id2
Debug.Print str
rs.MoveLast
str = " LAST ROW: " & rs!Id & " , " & rs!Name & ", " & rs!Ts & ", " & rs!Id2
Debug.Print str
rs.MovePrevious
str = " LAST-1 ROW: " & rs!Id & " , " & rs!Name & ", " & rs!Ts & ", " & rs!Id2
Debug.Print str
'free all resources
rs.Close
queryDef.Close
conn.Close
ws.Close
End Sub
The following RDO (Remote Data Objects) example creates a
table my_rdo and demonstrates the use of
rs.addNew and
rs.update.
Dim rs As rdoResultset
Dim cn As New rdoConnection
Dim cl As rdoColumn
Dim SQL As String
'cn.Connect = "DSN=test;"
cn.Connect = "DRIVER={MySQL ODBC 3.51 Driver};"_
& "SERVER=localhost;"_
& " DATABASE=test;"_
& "UID=venu;PWD=venu; OPTION=3"
cn.CursorDriver = rdUseOdbc
cn.EstablishConnection rdDriverPrompt
'drop table my_rdo
SQL = "drop table if exists my_rdo"
cn.Execute SQL, rdExecDirect
'create table my_rdo
SQL = "create table my_rdo(id int, name varchar(20))"
cn.Execute SQL, rdExecDirect
'insert - direct
SQL = "insert into my_rdo values (100,'venu')"
cn.Execute SQL, rdExecDirect
SQL = "insert into my_rdo values (200,'MySQL')"
cn.Execute SQL, rdExecDirect
'rs insert
SQL = "select * from my_rdo"
Set rs = cn.OpenResultset(SQL, rdOpenStatic, rdConcurRowVer, rdExecDirect)
rs.AddNew
rs!id = 300
rs!Name = "Insert1"
rs.Update
rs.Close
'rs insert
SQL = "select * from my_rdo"
Set rs = cn.OpenResultset(SQL, rdOpenStatic, rdConcurRowVer, rdExecDirect)
rs.AddNew
rs!id = 400
rs!Name = "Insert 2"
rs.Update
rs.Close
'rs update
SQL = "select * from my_rdo"
Set rs = cn.OpenResultset(SQL, rdOpenStatic, rdConcurRowVer, rdExecDirect)
rs.Edit
rs!id = 999
rs!Name = "updated"
rs.Update
rs.Close
'fetch back...
SQL = "select * from my_rdo"
Set rs = cn.OpenResultset(SQL, rdOpenStatic, rdConcurRowVer, rdExecDirect)
Do Until rs.EOF
For Each cl In rs.rdoColumns
Debug.Print cl.Value,
Next
rs.MoveNext
Debug.Print
Loop
Debug.Print "Row count="; rs.RowCount
'close
rs.Close
cn.Close
End SubThis section contains simple examples that demonstrate the use of Connector/ODBC drivers with ODBC.NET.
The following sample creates a table
my_odbc_net and demonstrates its use in
C#.
/**
* @sample : mycon.cs
* @purpose : Demo sample for ODBC.NET using Connector/ODBC
* @author : Venu, <myodbc@lists.mysql.com>
*
* (C) Copyright MySQL AB, 1995-2006
*
**/
/* build command
*
* csc /t:exe
* /out:mycon.exe mycon.cs
* /r:Microsoft.Data.Odbc.dll
*/
using Console = System.Console;
using Microsoft.Data.Odbc;
namespace myodbc3
{
class mycon
{
static void Main(string[] args)
{
try
{
//Connection string for Connector/ODBC 3.51
string MyConString = "DRIVER={MySQL ODBC 3.51 Driver};" +
"SERVER=localhost;" +
"DATABASE=test;" +
"UID=venu;" +
"PASSWORD=venu;" +
"OPTION=3";
//Connect to MySQL using Connector/ODBC
OdbcConnection MyConnection = new OdbcConnection(MyConString);
MyConnection.Open();
Console.WriteLine("\n !!! success, connected successfully !!!\n");
//Display connection information
Console.WriteLine("Connection Information:");
Console.WriteLine("\tConnection String:" +
MyConnection.ConnectionString);
Console.WriteLine("\tConnection Timeout:" +
MyConnection.ConnectionTimeout);
Console.WriteLine("\tDatabase:" +
MyConnection.Database);
Console.WriteLine("\tDataSource:" +
MyConnection.DataSource);
Console.WriteLine("\tDriver:" +
MyConnection.Driver);
Console.WriteLine("\tServerVersion:" +
MyConnection.ServerVersion);
//Create a sample table
OdbcCommand MyCommand =
new OdbcCommand("DROP TABLE IF EXISTS my_odbc_net",
MyConnection);
MyCommand.ExecuteNonQuery();
MyCommand.CommandText =
"CREATE TABLE my_odbc_net(id int, name varchar(20), idb bigint)";
MyCommand.ExecuteNonQuery();
//Insert
MyCommand.CommandText =
"INSERT INTO my_odbc_net VALUES(10,'venu', 300)";
Console.WriteLine("INSERT, Total rows affected:" +
MyCommand.ExecuteNonQuery());;
//Insert
MyCommand.CommandText =
"INSERT INTO my_odbc_net VALUES(20,'mysql',400)";
Console.WriteLine("INSERT, Total rows affected:" +
MyCommand.ExecuteNonQuery());
//Insert
MyCommand.CommandText =
"INSERT INTO my_odbc_net VALUES(20,'mysql',500)";
Console.WriteLine("INSERT, Total rows affected:" +
MyCommand.ExecuteNonQuery());
//Update
MyCommand.CommandText =
"UPDATE my_odbc_net SET id=999 WHERE id=20";
Console.WriteLine("Update, Total rows affected:" +
MyCommand.ExecuteNonQuery());
//COUNT(*)
MyCommand.CommandText =
"SELECT COUNT(*) as TRows FROM my_odbc_net";
Console.WriteLine("Total Rows:" +
MyCommand.ExecuteScalar());
//Fetch
MyCommand.CommandText = "SELECT * FROM my_odbc_net";
OdbcDataReader MyDataReader;
MyDataReader = MyCommand.ExecuteReader();
while (MyDataReader.Read())
{
if(string.Compare(MyConnection.Driver,"myodbc3.dll") == 0) {
//Supported only by Connector/ODBC 3.51
Console.WriteLine("Data:" + MyDataReader.GetInt32(0) + " " +
MyDataReader.GetString(1) + " " +
MyDataReader.GetInt64(2));
}
else {
//BIGINTs not supported by Connector/ODBC
Console.WriteLine("Data:" + MyDataReader.GetInt32(0) + " " +
MyDataReader.GetString(1) + " " +
MyDataReader.GetInt32(2));
}
}
//Close all resources
MyDataReader.Close();
MyConnection.Close();
}
catch (OdbcException MyOdbcException) //Catch any ODBC exception ..
{
for (int i=0; i < MyOdbcException.Errors.Count; i++)
{
Console.Write("ERROR #" + i + "\n" +
"Message: " +
MyOdbcException.Errors[i].Message + "\n" +
"Native: " +
MyOdbcException.Errors[i].NativeError.ToString() + "\n" +
"Source: " +
MyOdbcException.Errors[i].Source + "\n" +
"SQL: " +
MyOdbcException.Errors[i].SQLState + "\n");
}
}
}
}
}
The following sample creates a table
my_vb_net and demonstrates the use in VB.
' @sample : myvb.vb
' @purpose : Demo sample for ODBC.NET using Connector/ODBC
' @author : Venu, <myodbc@lists.mysql.com>
'
' (C) Copyright MySQL AB, 1995-2006
'
'
'
' build command
'
' vbc /target:exe
' /out:myvb.exe
' /r:Microsoft.Data.Odbc.dll
' /r:System.dll
' /r:System.Data.dll
'
Imports Microsoft.Data.Odbc
Imports System
Module myvb
Sub Main()
Try
'Connector/ODBC 3.51 connection string
Dim MyConString As String = "DRIVER={MySQL ODBC 3.51 Driver};" & _
"SERVER=localhost;" & _
"DATABASE=test;" & _
"UID=venu;" & _
"PASSWORD=venu;" & _
"OPTION=3;"
'Connection
Dim MyConnection As New OdbcConnection(MyConString)
MyConnection.Open()
Console.WriteLine("Connection State::" & MyConnection.State.ToString)
'Drop
Console.WriteLine("Dropping table")
Dim MyCommand As New OdbcCommand()
MyCommand.Connection = MyConnection
MyCommand.CommandText = "DROP TABLE IF EXISTS my_vb_net"
MyCommand.ExecuteNonQuery()
'Create
Console.WriteLine("Creating....")
MyCommand.CommandText = "CREATE TABLE my_vb_net(id int, name varchar(30))"
MyCommand.ExecuteNonQuery()
'Insert
MyCommand.CommandText = "INSERT INTO my_vb_net VALUES(10,'venu')"
Console.WriteLine("INSERT, Total rows affected:" & _
MyCommand.ExecuteNonQuery())
'Insert
MyCommand.CommandText = "INSERT INTO my_vb_net VALUES(20,'mysql')"
Console.WriteLine("INSERT, Total rows affected:" & _
MyCommand.ExecuteNonQuery())
'Insert
MyCommand.CommandText = "INSERT INTO my_vb_net VALUES(20,'mysql')"
Console.WriteLine("INSERT, Total rows affected:" & _
MyCommand.ExecuteNonQuery())
'Insert
MyCommand.CommandText = "INSERT INTO my_vb_net(id) VALUES(30)"
Console.WriteLine("INSERT, Total rows affected:" & _
MyCommand.ExecuteNonQuery())
'Update
MyCommand.CommandText = "UPDATE my_vb_net SET id=999 WHERE id=20"
Console.WriteLine("Update, Total rows affected:" & _
MyCommand.ExecuteNonQuery())
'COUNT(*)
MyCommand.CommandText = "SELECT COUNT(*) as TRows FROM my_vb_net"
Console.WriteLine("Total Rows:" & MyCommand.ExecuteScalar())
'Select
Console.WriteLine("Select * FROM my_vb_net")
MyCommand.CommandText = "SELECT * FROM my_vb_net"
Dim MyDataReader As OdbcDataReader
MyDataReader = MyCommand.ExecuteReader
While MyDataReader.Read
If MyDataReader("name") Is DBNull.Value Then
Console.WriteLine("id = " & _
CStr(MyDataReader("id")) & " name = " & _
"NULL")
Else
Console.WriteLine("id = " & _
CStr(MyDataReader("id")) & " name = " & _
CStr(MyDataReader("name")))
End If
End While
'Catch ODBC Exception
Catch MyOdbcException As OdbcException
Dim i As Integer
Console.WriteLine(MyOdbcException.ToString)
'Catch program exception
Catch MyException As Exception
Console.WriteLine(MyException.ToString)
End Try
End SubThis section provides reference material for the Connector/ODBC API, showing supported functions and methods, supported MySQL column types and the corresponding native type in Connector/ODBC, and the error codes returned by Connector/ODBC when a fault occurs.
This section summarizes ODBC routines, categorized by functionality.
For the complete ODBC API reference, please refer to the ODBC Programmer's Reference at http://msdn.microsoft.com/en-us/library/ms714177.aspx.
An application can call SQLGetInfo function
to obtain conformance information about Connector/ODBC. To
obtain information about support for a specific function in the
driver, an application can call
SQLGetFunctions.
For backward compatibility, the Connector/ODBC 3.51 driver supports all deprecated functions.
The following tables list Connector/ODBC API calls grouped by task:
Connecting to a data source
| Function name | C/ODBC 3.51 | Standard | Purpose |
|---|---|---|---|
SQLAllocHandle | Yes | ISO 92 | Obtains an environment, connection, statement, or descriptor handle. |
SQLConnect | Yes | ISO 92 | Connects to a specific driver by data source name, user ID, and password. |
SQLDriverConnect | Yes | ODBC | Connects to a specific driver by connection string or requests that the Driver Manager and driver display connection dialog boxes for the user. |
SQLAllocEnv | Yes | Deprecated | Obtains an environment handle allocated from driver. |
SQLAllocConnect | Yes | Deprecated | Obtains a connection handle |
Obtaining information about a driver and data source
| Function name | C/ODBC 3.51 | Standard | Purpose |
|---|---|---|---|
SQLDataSources | No | ISO 92 | Returns the list of available data sources, handled by the Driver Manager |
SQLDrivers | No | ODBC | Returns the list of installed drivers and their attributes, handles by Driver Manager |
SQLGetInfo | Yes | ISO 92 | Returns information about a specific driver and data source. |
SQLGetFunctions | Yes | ISO 92 | Returns supported driver functions. |
SQLGetTypeInfo | Yes | ISO 92 | Returns information about supported data types. |
Setting and retrieving driver attributes
| Function name | C/ODBC 3.51 | Standard | Purpose |
|---|---|---|---|
SQLSetConnectAttr | Yes | ISO 92 | Sets a connection attribute. |
SQLGetConnectAttr | Yes | ISO 92 | Returns the value of a connection attribute. |
SQLSetConnectOption | Yes | Deprecated | Sets a connection option |
SQLGetConnectOption | Yes | Deprecated | Returns the value of a connection option |
SQLSetEnvAttr | Yes | ISO 92 | Sets an environment attribute. |
SQLGetEnvAttr | Yes | ISO 92 | Returns the value of an environment attribute. |
SQLSetStmtAttr | Yes | ISO 92 | Sets a statement attribute. |
SQLGetStmtAttr | Yes | ISO 92 | Returns the value of a statement attribute. |
SQLSetStmtOption | Yes | Deprecated | Sets a statement option |
SQLGetStmtOption | Yes | Deprecated | Returns the value of a statement option |
Preparing SQL requests
| Function name | C/ODBC 3.51 | Standard | Purpose |
|---|---|---|---|
SQLAllocStmt | Yes | Deprecated | Allocates a statement handle |
SQLPrepare | Yes | ISO 92 | Prepares an SQL statement for later execution. |
SQLBindParameter | Yes | ODBC | Assigns storage for a parameter in an SQL statement. |
SQLGetCursorName | Yes | ISO 92 | Returns the cursor name associated with a statement handle. |
SQLSetCursorName | Yes | ISO 92 | Specifies a cursor name. |
SQLSetScrollOptions | Yes | ODBC | Sets options that control cursor behavior. |
Submitting requests
| Function name | C/ODBC 3.51 | Standard | Purpose |
|---|---|---|---|
SQLExecute | Yes | ISO 92 | Executes a prepared statement. |
SQLExecDirect | Yes | ISO 92 | Executes a statement |
SQLNativeSql | Yes | ODBC | Returns the text of an SQL statement as translated by the driver. |
SQLDescribeParam | Yes | ODBC | Returns the description for a specific parameter in a statement. |
SQLNumParams | Yes | ISO 92 | Returns the number of parameters in a statement. |
SQLParamData | Yes | ISO 92 | Used in conjunction with SQLPutData to supply
parameter data at execution time. (Useful for long data
values.) |
SQLPutData | Yes | ISO 92 | Sends part or all of a data value for a parameter. (Useful for long data values.) |
Retrieving results and information about results
| Function name | C/ODBC 3.51 | Standard | Purpose |
|---|---|---|---|
SQLRowCount | Yes | ISO 92 | Returns the number of rows affected by an insert, update, or delete request. |
SQLNumResultCols | Yes | ISO 92 | Returns the number of columns in the result set. |
SQLDescribeCol | Yes | ISO 92 | Describes a column in the result set. |
SQLColAttribute | Yes | ISO 92 | Describes attributes of a column in the result set. |
SQLColAttributes | Yes | Deprecated | Describes attributes of a column in the result set. |
SQLFetch | Yes | ISO 92 | Returns multiple result rows. |
SQLFetchScroll | Yes | ISO 92 | Returns scrollable result rows. |
SQLExtendedFetch | Yes | Deprecated | Returns scrollable result rows. |
SQLSetPos | Yes | ODBC | Positions a cursor within a fetched block of data and enables an application to refresh data in the rowset or to update or delete data in the result set. |
SQLBulkOperations | Yes | ODBC | Performs bulk insertions and bulk bookmark operations, including update, delete, and fetch by bookmark. |
Retrieving error or diagnostic information
| Function name | C/ODBC 3.51 | Standard | Purpose |
|---|---|---|---|
SQLError | Yes | Deprecated | Returns additional error or status information |
SQLGetDiagField | Yes | ISO 92 | Returns additional diagnostic information (a single field of the diagnostic data structure). |
SQLGetDiagRec | Yes | ISO 92 | Returns additional diagnostic information (multiple fields of the diagnostic data structure). |
Obtaining information about the data source's system tables (catalog functions) item
| Function name | C/ODBC 3.51 | Standard | Purpose |
|---|---|---|---|
SQLColumnPrivileges | Yes | ODBC | Returns a list of columns and associated privileges for one or more tables. |
SQLColumns | Yes | X/Open | Returns the list of column names in specified tables. |
SQLForeignKeys | Yes | ODBC | Returns a list of column names that make up foreign keys, if they exist for a specified table. |
SQLPrimaryKeys | Yes | ODBC | Returns the list of column names that make up the primary key for a table. |
SQLSpecialColumns | Yes | X/Open | Returns information about the optimal set of columns that uniquely identifies a row in a specified table, or the columns that are automatically updated when any value in the row is updated by a transaction. |
SQLStatistics | Yes | ISO 92 | Returns statistics about a single table and the list of indexes associated with the table. |
SQLTablePrivileges | Yes | ODBC | Returns a list of tables and the privileges associated with each table. |
SQLTables | Yes | X/Open | Returns the list of table names stored in a specific data source. |
Performing transactions
| Function name | C/ODBC 3.51 | Standard | Purpose |
|---|---|---|---|
SQLTransact | Yes | Deprecated | Commits or rolls back a transaction |
SQLEndTran | Yes | ISO 92 | Commits or rolls back a transaction. |
Terminating a statement
| Function name | C/ODBC 3.51 | Standard | Purpose |
|---|---|---|---|
SQLFreeStmt | Yes | ISO 92 | Ends statement processing, discards pending results, and, optionally, frees all resources associated with the statement handle. |
SQLCloseCursor | Yes | ISO 92 | Closes a cursor that has been opened on a statement handle. |
SQLCancel | Yes | ISO 92 | Cancels an SQL statement. |
Terminating a connection
| Function name | C/ODBC 3.51 | Standard | Purpose |
|---|---|---|---|
SQLDisconnect | Yes | ISO 92 | Closes the connection. |
SQLFreeHandle | Yes | ISO 92 | Releases an environment, connection, statement, or descriptor handle. |
SQLFreeConnect | Yes | Deprecated | Releases connection handle |
SQLFreeEnv | Yes | Deprecated | Releases an environment handle |
The following table illustrates how driver maps the server data types to default SQL and C data types.
| Native Value | SQL Type | C Type |
|---|---|---|
bigint unsigned | SQL_BIGINT | SQL_C_UBIGINT |
bigint | SQL_BIGINT | SQL_C_SBIGINT |
bit | SQL_BIT | SQL_C_BIT |
bit | SQL_CHAR | SQL_C_CHAR |
blob | SQL_LONGVARBINARY | SQL_C_BINARY |
bool | SQL_CHAR | SQL_C_CHAR |
char | SQL_CHAR | SQL_C_CHAR |
date | SQL_DATE | SQL_C_DATE |
datetime | SQL_TIMESTAMP | SQL_C_TIMESTAMP |
decimal | SQL_DECIMAL | SQL_C_CHAR |
double precision | SQL_DOUBLE | SQL_C_DOUBLE |
double | SQL_FLOAT | SQL_C_DOUBLE |
enum | SQL_VARCHAR | SQL_C_CHAR |
float | SQL_REAL | SQL_C_FLOAT |
int unsigned | SQL_INTEGER | SQL_C_ULONG |
int | SQL_INTEGER | SQL_C_SLONG |
integer unsigned | SQL_INTEGER | SQL_C_ULONG |
integer | SQL_INTEGER | SQL_C_SLONG |
long varbinary | SQL_LONGVARBINARY | SQL_C_BINARY |
long varchar | SQL_LONGVARCHAR | SQL_C_CHAR |
longblob | SQL_LONGVARBINARY | SQL_C_BINARY |
longtext | SQL_LONGVARCHAR | SQL_C_CHAR |
mediumblob | SQL_LONGVARBINARY | SQL_C_BINARY |
mediumint unsigned | SQL_INTEGER | SQL_C_ULONG |
mediumint | SQL_INTEGER | SQL_C_SLONG |
mediumtext | SQL_LONGVARCHAR | SQL_C_CHAR |
numeric | SQL_NUMERIC | SQL_C_CHAR |
real | SQL_FLOAT | SQL_C_DOUBLE |
set | SQL_VARCHAR | SQL_C_CHAR |
smallint unsigned | SQL_SMALLINT | SQL_C_USHORT |
smallint | SQL_SMALLINT | SQL_C_SSHORT |
text | SQL_LONGVARCHAR | SQL_C_CHAR |
time | SQL_TIME | SQL_C_TIME |
timestamp | SQL_TIMESTAMP | SQL_C_TIMESTAMP |
tinyblob | SQL_LONGVARBINARY | SQL_C_BINARY |
tinyint unsigned | SQL_TINYINT | SQL_C_UTINYINT |
tinyint | SQL_TINYINT | SQL_C_STINYINT |
tinytext | SQL_LONGVARCHAR | SQL_C_CHAR |
varchar | SQL_VARCHAR | SQL_C_CHAR |
year | SQL_SMALLINT | SQL_C_SHORT |
The following tables lists the error codes returned by the driver apart from the server errors.
| Native Code | SQLSTATE 2 | SQLSTATE 3 | Error Message |
|---|---|---|---|
| 500 | 01000 | 01000 | General warning |
| 501 | 01004 | 01004 | String data, right truncated |
| 502 | 01S02 | 01S02 | Option value changed |
| 503 | 01S03 | 01S03 | No rows updated/deleted |
| 504 | 01S04 | 01S04 | More than one row updated/deleted |
| 505 | 01S06 | 01S06 | Attempt to fetch before the result set returned the first row set |
| 506 | 07001 | 07002 | SQLBindParameter not used for all parameters |
| 507 | 07005 | 07005 | Prepared statement not a cursor-specification |
| 508 | 07009 | 07009 | Invalid descriptor index |
| 509 | 08002 | 08002 | Connection name in use |
| 510 | 08003 | 08003 | Connection does not exist |
| 511 | 24000 | 24000 | Invalid cursor state |
| 512 | 25000 | 25000 | Invalid transaction state |
| 513 | 25S01 | 25S01 | Transaction state unknown |
| 514 | 34000 | 34000 | Invalid cursor name |
| 515 | S1000 | HY000 | General driver defined error |
| 516 | S1001 | HY001 | Memory allocation error |
| 517 | S1002 | HY002 | Invalid column number |
| 518 | S1003 | HY003 | Invalid application buffer type |
| 519 | S1004 | HY004 | Invalid SQL data type |
| 520 | S1009 | HY009 | Invalid use of null pointer |
| 521 | S1010 | HY010 | Function sequence error |
| 522 | S1011 | HY011 | Attribute can not be set now |
| 523 | S1012 | HY012 | Invalid transaction operation code |
| 524 | S1013 | HY013 | Memory management error |
| 525 | S1015 | HY015 | No cursor name available |
| 526 | S1024 | HY024 | Invalid attribute value |
| 527 | S1090 | HY090 | Invalid string or buffer length |
| 528 | S1091 | HY091 | Invalid descriptor field identifier |
| 529 | S1092 | HY092 | Invalid attribute/option identifier |
| 530 | S1093 | HY093 | Invalid parameter number |
| 531 | S1095 | HY095 | Function type out of range |
| 532 | S1106 | HY106 | Fetch type out of range |
| 533 | S1117 | HY117 | Row value out of range |
| 534 | S1109 | HY109 | Invalid cursor position |
| 535 | S1C00 | HYC00 | Optional feature not implemented |
| 0 | 21S01 | 21S01 | Column count does not match value count |
| 0 | 23000 | 23000 | Integrity constraint violation |
| 0 | 42000 | 42000 | Syntax error or access violation |
| 0 | 42S02 | 42S02 | Base table or view not found |
| 0 | 42S12 | 42S12 | Index not found |
| 0 | 42S21 | 42S21 | Column already exists |
| 0 | 42S22 | 42S22 | Column not found |
| 0 | 08S01 | 08S01 | Communication link failure |
Here are some common notes and tips for using Connector/ODBC within different environments, applications and tools. The notes provided here are based on the experiences of Connector/ODBC developers and users.
This section provides help with common queries and areas of functionality in MySQL and how to use them with Connector/ODBC.
Obtaining the value of column that uses
AUTO_INCREMENT after an
INSERT statement can be
achieved in a number of different ways. To obtain the value
immediately after an INSERT,
use a SELECT query with the
LAST_INSERT_ID() function.
For example, using Connector/ODBC you would execute two
separate statements, the INSERT
statement and the SELECT query
to obtain the auto-increment value.
INSERT INTO tbl (auto,text) VALUES(NULL,'text'); SELECT LAST_INSERT_ID();
If you do not require the value within your application, but
do require the value as part of another
INSERT, the entire process can
be handled by executing the following statements:
INSERT INTO tbl (auto,text) VALUES(NULL,'text'); INSERT INTO tbl2 (id,text) VALUES(LAST_INSERT_ID(),'text');
Certain ODBC applications (including Delphi and Access) may have trouble obtaining the auto-increment value using the previous examples. In this case, try the following statement as an alternative:
SELECT * FROM tbl WHERE auto IS NULL;
This alternative method requires that
sql_auto_is_null variable is
not set to 0. See Section 5.1.4, “Server System Variables”.
See also Section 21.9.10.3, “How to Get the Unique ID for the Last Inserted Row”.
Support for the dynamic cursor is provided
in Connector/ODBC 3.51, but dynamic cursors are not enabled by
default. You can enable this function within Windows by
selecting the Enable Dynamic Cursor
checkbox within the ODBC Data Source Administrator.
On other platforms, you can enable the dynamic cursor by
adding 32 to the OPTION
value when creating the DSN.
The Connector/ODBC driver has been optimized to provide very fast performance. If you experience problems with the performance of Connector/ODBC, or notice a large amount of disk activity for simple queries, there are a number of aspects you should check:
Ensure that
ODBC Tracingis not enabled. With tracing enabled, a lot of information is recorded in the tracing file by the ODBC Manager. You can check, and disable, tracing within Windows using the panel of the ODBC Data Source Administrator. Within Mac OS X, check the panel of ODBC Administrator. See Section 21.1.4.8, “Getting an ODBC Trace File”.Make sure you are using the standard version of the driver, and not the debug version. The debug version includes additional checks and reporting measures.
Disable the Connector/ODBC driver trace and query logs. These options are enabled for each DSN, so make sure to examine only the DSN that you are using in your application. Within Windows, you can disable the Connector/ODBC and query logs by modifying the DSN configuration. Within Mac OS X and Unix, ensure that the driver trace (option value 4) and query logging (option value 524288) are not enabled.
For more information on how to set the query timeout on Microsoft Windows when executing queries through an ODBC connection, read the Microsoft knowledgebase document at http://support.microsoft.com/default.aspx?scid=kb%3Ben-us%3B153756.
- 21.1.7.2.1. Using Connector/ODBC with Microsoft Applications
- 21.1.7.2.2. Using Connector/ODBC with Borland Applications
- 21.1.7.2.3. Using Connector/ODBC with ColdFusion
- 21.1.7.2.4. Using Connector/ODBC with OpenOffice.org
- 21.1.7.2.5. Using Connector/ODBC with Sambar Server
- 21.1.7.2.6. Using Connector/ODBC with Pervasive Software DataJunction
- 21.1.7.2.7. Using Connector/ODBC with SunSystems Vision
Most programs should work with Connector/ODBC, but for each of those listed here, there are specific notes and tips to improve or enhance the way you work with Connector/ODBC and these applications.
With all applications you should ensure that you are using the latest Connector/ODBC drivers, ODBC Manager and any supporting libraries and interfaces used by your application. For example, on Windows, using the latest version of Microsoft Data Access Components (MDAC) will improve the compatibility with ODBC in general, and with the Connector/ODBC driver.
- 21.1.7.2.1.1. Microsoft Access
- 21.1.7.2.1.2. Microsoft Excel and Column Types
- 21.1.7.2.1.3. Microsoft Visual Basic
- 21.1.7.2.1.4. Microsoft Visual InterDev
- 21.1.7.2.1.5. Visual Objects
- 21.1.7.2.1.6. Microsoft ADO
- 21.1.7.2.1.7. Using Connector/ODBC with Active Server Pages (ASP)
- 21.1.7.2.1.8. Using Connector/ODBC with Visual Basic (ADO, DAO and RDO) and ASP
The majority of Microsoft applications have been tested with Connector/ODBC, including Microsoft Office, Microsoft Access and the various programming languages supported within ASP and Microsoft Visual Studio.
To improve the integration between Microsoft Access and MySQL through Connector/ODBC:
For all versions of Access, you should enable the Connector/ODBC
Return matching rowsoption. For Access 2.0, you should additionally enable theSimulate ODBC 1.0option.You should have a
TIMESTAMPcolumn in all tables that you want to be able to update. For maximum portability, do not use a length specification in the column declaration (which is unsupported within MySQL in versions earlier than 4.1).You should have a primary key in each MySQL table you want to use with Access. If not, new or updated rows may show up as
#DELETED#.Use only
DOUBLEfloat fields. Access fails when comparing with single-precision floats. The symptom usually is that new or updated rows may show up as#DELETED#or that you cannot find or update rows.If you are using Connector/ODBC to link to a table that has a
BIGINTcolumn, the results are displayed as#DELETED#. The work around solution is:Have one more dummy column with
TIMESTAMPas the data type.Select the
Change BIGINT columns to INToption in the connection dialog in ODBC DSN Administrator.Delete the table link from Access and re-create it.
Old records may still display as
#DELETED#, but newly added/updated records are displayed properly.If you still get the error
Another user has changed your dataafter adding aTIMESTAMPcolumn, the following trick may help you:Do not use a
tabledata sheet view. Instead, create a form with the fields you want, and use thatformdata sheet view. You should set theDefaultValueproperty for theTIMESTAMPcolumn toNOW(). It may be a good idea to hide theTIMESTAMPcolumn from view so your users are not confused.In some cases, Access may generate SQL statements that MySQL cannot understand. You can fix this by selecting
"Query|SQLSpecific|Pass-Through"from the Access menu.On Windows NT, Access reports
BLOBcolumns asOLE OBJECTS. If you want to haveMEMOcolumns instead, you should changeBLOBcolumns toTEXTwithALTER TABLE.Access cannot always handle the MySQL
DATEcolumn properly. If you have a problem with these, change the columns toDATETIME.If you have in Access a column defined as
BYTE, Access tries to export this asTINYINTinstead ofTINYINT UNSIGNED. This gives you problems if you have values larger than 127 in the column.If you have very large (long) tables in Access, it might take a very long time to open them. Or you might run low on virtual memory and eventually get an
ODBC Query Failederror and the table cannot open. To deal with this, select the following options:Return Matching Rows (2)
Allow BIG Results (8).
These add up to a value of 10 (
OPTION=10).
Some external articles and tips that may be useful when using Access, ODBC and Connector/ODBC:
Optimizing Access ODBC Applications
For a list of tools that can be used with Access and ODBC data sources, refer to http://www.mysql.com/portal/software/convertors/ section for list of available tools.
If you have problems importing data into Microsoft Excel, particularly numeric, date, and time values, this is probably because of a bug in Excel, where the column type of the source data is used to determine the data type when that data is inserted into a cell within the worksheet. The result is that Excel incorrectly identifies the content and this affects both the display format and the data when it is used within calculations.
To address this issue, use the
CONCAT() function in your
queries. The use of CONCAT()
forces Excel to treat the value as a string, which Excel
will then parse and usually correctly identify the embedded
information.
However, even with this option, some data may be incorrectly
formatted, even though the source data remains unchanged.
Use the Format Cells option within Excel
to change the format of the displayed information.
To be able to update a table, you must define a primary key for the table.
Visual Basic with ADO cannot handle big integers. This means
that some queries like SHOW
PROCESSLIST do not work properly. The fix is to
use OPTION=16384 in the ODBC connect
string or to select the Change BIGINT columns to
INT option in the Connector/ODBC connect screen.
You may also want to select the Return matching
rows option.
If you have a BIGINT in your
result, you may get the error [Microsoft][ODBC
Driver Manager] Driver does not support this
parameter. Try selecting the Change
BIGINT columns to INT option in the Connector/ODBC
connect screen.
When you are coding with the ADO API and Connector/ODBC, you
need to pay attention to some default properties that aren't
supported by the MySQL server. For example, using the
CursorLocation Property as
adUseServer returns a result of –1
for the RecordCount Property. To have the
right value, you need to set this property to
adUseClient, as shown in the VB code
here:
Dim myconn As New ADODB.Connection Dim myrs As New Recordset Dim mySQL As String Dim myrows As Long myconn.Open "DSN=MyODBCsample" mySQL = "SELECT * from user" myrs.Source = mySQL Set myrs.ActiveConnection = myconn myrs.CursorLocation = adUseClient myrs.Open myrows = myrs.RecordCount myrs.Close myconn.Close
Another workaround is to use a SELECT
COUNT(*) statement for a similar query to get the
correct row count.
To find the number of rows affected by a specific SQL
statement in ADO, use the RecordsAffected
property in the ADO execute method. For more information on
the usage of execute method, refer to
http://msdn.microsoft.com/library/default.asp?url=/library/en-us/ado270/htm/mdmthcnnexecute.asp.
For information, see ActiveX Data Objects(ADO) Frequently Asked Questions.
You should select the Return matching
rows option in the DSN.
For more information about how to access MySQL through ASP using Connector/ODBC, refer to the following articles:
A Frequently Asked Questions list for ASP can be found at http://support.microsoft.com/default.aspx?scid=/Support/ActiveServer/faq/data/adofaq.asp.
Some articles that may help with Visual Basic and ASP:
MySQL BLOB columns and Visual Basic 6 by Mike Hillyer (
<mike@openwin.org>).How to map Visual basic data type to MySQL types by Mike Hillyer (
<mike@openwin.org>).
With all Borland applications where the Borland Database Engine (BDE) is used, follow these steps to improve compatibility:
Update to BDE 3.2 or newer.
Enable the
Don't optimize column widthsoption in the DSN.Enabled the
Return matching rowsoption in the DSN.
When you start a query, you can use the
Active property or the
Open method. Note that
Active starts by automatically issuing a
SELECT * FROM ... query. That may not be
a good thing if your tables are large.
Also, here is some potentially useful Delphi code that sets
up both an ODBC entry and a BDE entry for Connector/ODBC.
The BDE entry requires a BDE Alias Editor that is free at a
Delphi Super Page near you. (Thanks to Bryan Brunton
<bryan@flesherfab.com> for this):
fReg:= TRegistry.Create;
fReg.OpenKey('\Software\ODBC\ODBC.INI\DocumentsFab', True);
fReg.WriteString('Database', 'Documents');
fReg.WriteString('Description', ' ');
fReg.WriteString('Driver', 'C:\WINNT\System32\myodbc.dll');
fReg.WriteString('Flag', '1');
fReg.WriteString('Password', '');
fReg.WriteString('Port', ' ');
fReg.WriteString('Server', 'xmark');
fReg.WriteString('User', 'winuser');
fReg.OpenKey('\Software\ODBC\ODBC.INI\ODBC Data Sources', True);
fReg.WriteString('DocumentsFab', 'MySQL');
fReg.CloseKey;
fReg.Free;
Memo1.Lines.Add('DATABASE NAME=');
Memo1.Lines.Add('USER NAME=');
Memo1.Lines.Add('ODBC DSN=DocumentsFab');
Memo1.Lines.Add('OPEN MODE=READ/WRITE');
Memo1.Lines.Add('BATCH COUNT=200');
Memo1.Lines.Add('LANGDRIVER=');
Memo1.Lines.Add('MAX ROWS=-1');
Memo1.Lines.Add('SCHEMA CACHE DIR=');
Memo1.Lines.Add('SCHEMA CACHE SIZE=8');
Memo1.Lines.Add('SCHEMA CACHE TIME=-1');
Memo1.Lines.Add('SQLPASSTHRU MODE=SHARED AUTOCOMMIT');
Memo1.Lines.Add('SQLQRYMODE=');
Memo1.Lines.Add('ENABLE SCHEMA CACHE=FALSE');
Memo1.Lines.Add('ENABLE BCD=FALSE');
Memo1.Lines.Add('ROWSET SIZE=20');
Memo1.Lines.Add('BLOBS TO CACHE=64');
Memo1.Lines.Add('BLOB SIZE=32');
AliasEditor.Add('DocumentsFab','MySQL',Memo1.Lines);
The following information is taken from the ColdFusion documentation:
Use the following information to configure ColdFusion Server
for Linux to use the unixODBC driver with
Connector/ODBC for MySQL data sources. You can download
Connector/ODBC at
http://dev.mysql.com/downloads/connector/odbc/.
ColdFusion version 4.5.1 enables you to use the ColdFusion
Administrator to add the MySQL data source. However, the
driver is not included with ColdFusion version 4.5.1. Before
the MySQL driver appears in the ODBC data sources drop-down
list, you must build and copy the Connector/ODBC driver to
/opt/coldfusion/lib/libmyodbc.so.
The Contrib directory contains the program
mydsn-
which enables you to build and remove the DSN registry file
for the Connector/ODBC driver on ColdFusion applications.
xxx.zip
For more information and guides on using ColdFusion and Connector/ODBC, see the following external sites:
Open Office (http://www.openoffice.org) How-to: MySQL + OpenOffice. How-to: OpenOffice + MyODBC + unixODBC.
Sambar Server (http://www.sambarserver.info) How-to: MyODBC + SambarServer + MySQL.
The following section details some common errors and their suggested fix or alternative solution. If you are still experiencing problems, use the Connector/ODBC mailing list; see Section 21.1.8.1, “Connector/ODBC Community Support”.
Many problems can be resolved by upgrading your Connector/ODBC drivers to the latest available release. On Windows, you should also make sure that you have the latest versions of the Microsoft Data Access Components (MDAC) installed.
Questions
22.1.7.3.1: I have installed Connector/ODBC on Windows XP x64 Edition or Windows Server 2003 R2 x64. The installation completed successfully, but the Connector/ODBC driver does not appear in
ODBC Data Source Administrator.22.1.7.3.2: When connecting or using the button in
ODBC Data Source AdministratorI get error 10061 (Cannot connect to server)22.1.7.3.3: The following error is reported when using transactions:
Transactions are not enabled22.1.7.3.4: Access reports records as
#DELETED#when inserting or updating records in linked tables.22.1.7.3.5: How do I handle Write Conflicts or Row Location errors?
22.1.7.3.6: Exporting data from Access 97 to MySQL reports a
Syntax Error.22.1.7.3.7: Exporting data from Microsoft DTS to MySQL reports a
Syntax Error.22.1.7.3.8: Using ODBC.NET with Connector/ODBC, while fetching empty string (0 length), it starts giving the SQL_NO_DATA exception.
22.1.7.3.9: Using
SELECT COUNT(*) FROMwithin Visual Basic and ASP returns an error.tbl_name22.1.7.3.10: Using the
AppendChunk()orGetChunk()ADO methods, theMultiple-step operation generated errors. Check each status valueerror is returned.22.1.7.3.11: Access Returns
Another user had modified the record that you have modifiedwhile editing records on a Linked Table.22.1.7.3.12: When linking an application directly to the Connector/ODBC library under Unix/Linux, the application crashes.
22.1.7.3.13: Applications in the Microsoft Office suite are unable to update tables that have
DATEorTIMESTAMPcolumns.22.1.7.3.14: When connecting Connector/ODBC 5.x (Beta) to a MySQL 4.x server, the error
1044 Access denied for user 'xxx'@'%' to database 'information_schema'is returned.22.1.7.3.15: When calling
SQLTables, the errorS1T00is returned, but I cannot find this in the list of error numbers for Connector/ODBC.22.1.7.3.16: When linking to tables in Access 2000 and generating links to tables programmatically, rather than through the table designer interface, you may get errors about tables not existing.
22.1.7.3.17: When I try to use batched statements, the excution of the batched statements fails.
22.1.7.3.18: When connecting to a MySQL server using ADODB and Excel, occasionally the application fails to communicate with the server and the error
Got an error reading communication packetsappears in the error log.22.1.7.3.19: When using some applications to access a MySQL server using C/ODBC and outer joins, an error is reported regarding the Outer Join Escape Sequence.
22.1.7.3.20: I can correctly store extended characters in the database (Hebrew/CJK) using C/ODBC 5.1, but when I retrieve the data, the text is not formatted correctly and I get garbled characters.
22.1.7.3.21: I have a duplicate MySQL Connector/ODBC entry within my Installed Programs list, but I cannot delete one of them.
22.1.7.3.22: When submitting queries with parameter binding using
UPDATE, my field values are being truncated to 255 characters.22.1.7.3.23: Is it possible to disable data-at-execution using a flag?
22.1.7.3.24: When you call
SQLColumns()for a table column that isAUTO_INCREMENT, theNULLABLEcolumn of the result set is alwaysSQL_NULLABLE (1).
Questions and Answers
22.1.7.3.1:
I have installed Connector/ODBC on Windows XP x64 Edition
or Windows Server 2003 R2 x64. The installation completed
successfully, but the Connector/ODBC driver does not
appear in ODBC Data Source
Administrator.
This is not a bug, but is related to the way Windows x64
editions operate with the ODBC driver. On Windows x64
editions, the Connector/ODBC driver is installed in the
%SystemRoot%\SysWOW64 folder.
However, the default ODBC Data Source
Administrator that is available through the
Administrative Tools or
Control Panel in Windows x64 Editions
is located in the
%SystemRoot%\system32 folder, and
only searches this folder for ODBC drivers.
On Windows x64 editions, you should use the ODBC
administration tool located at
%SystemRoot%\SysWOW64\odbcad32.exe,
this will correctly locate the installed Connector/ODBC
drivers and enable you to create a Connector/ODBC DSN.
This issue was originally reported as Bug#20301.
22.1.7.3.2:
When connecting or using the
button in ODBC Data Source
Administrator I get error 10061 (Cannot connect
to server)
This error can be raised by a number of different issues,
including server problems, network problems, and firewall
and port blocking problems. For more information, see
Section C.5.2.2, “Can't connect to [local] MySQL server”.
22.1.7.3.3:
The following error is reported when using transactions:
Transactions are not enabled
This error indicates that you are trying to use
transactions with a MySQL table that does not support
transactions. Transactions are supported within MySQL when
using the InnoDB database engine. In
versions of MySQL before Mysql 5.1 you may also use the
BDB engine.
You should check the following before continuing:
Verify that your MySQL server supports a transactional database engine. Use
SHOW ENGINESto obtain a list of the available engine types.Verify that the tables you are updating use a transaction database engine.
Ensure that you have not enabled the
disable transactionsoption in your DSN.
22.1.7.3.4:
Access reports records as #DELETED#
when inserting or updating records in linked tables.
If the inserted or updated records are shown as
#DELETED# in the access, then:
If you are using Access 2000, you should get and install the newest (version 2.6 or higher) Microsoft MDAC (
Microsoft Data Access Components) from http://support.microsoft.com/kb/110093. This fixes a bug in Access that when you export data to MySQL, the table and column names aren't specified.You should also get and apply the Microsoft Jet 4.0 Service Pack 5 (SP5) which can be found at http://support.microsoft.com/default.aspx?scid=kb;EN-US;q239114. This fixes some cases where columns are marked as
#DELETED#in Access.For all versions of Access, you should enable the Connector/ODBC
Return matching rowsoption. For Access 2.0, you should additionally enable theSimulate ODBC 1.0option.You should have a timestamp in all tables that you want to be able to update.
You should have a primary key in the table. If not, new or updated rows may show up as
#DELETED#.Use only
DOUBLEfloat fields. Access fails when comparing with single-precision floats. The symptom usually is that new or updated rows may show up as#DELETED#or that you cannot find or update rows.If you are using Connector/ODBC to link to a table that has a
BIGINTcolumn, the results are displayed as#DELETED. The work around solution is:Have one more dummy column with
TIMESTAMPas the data type.Select the
Change BIGINT columns to
                    INT
option in the connection dialog in ODBC DSN Administrator.Delete the table link from Access and re-create it.
Old records still display as
#DELETED#, but newly added/updated records are displayed properly.
22.1.7.3.5: How do I handle Write Conflicts or Row Location errors?
If you see the following errors, select the
Return Matching Rows option in the DSN
configuration dialog, or specify
OPTION=2, as the connection parameter:
Write Conflict. Another user has changed your data. Row cannot be located for updating. Some values may have been changed since it was last read.
22.1.7.3.6:
Exporting data from Access 97 to MySQL reports a
Syntax Error.
This error is specific to Access 97 and versions of Connector/ODBC earlier than 3.51.02. Update to the latest version of the Connector/ODBC driver to resolve this problem.
22.1.7.3.7:
Exporting data from Microsoft DTS to MySQL reports a
Syntax Error.
This error occurs only with MySQL tables using the
TEXT or
VARCHAR data types. You can
fix this error by upgrading your Connector/ODBC driver to
version 3.51.02 or higher.
22.1.7.3.8: Using ODBC.NET with Connector/ODBC, while fetching empty string (0 length), it starts giving the SQL_NO_DATA exception.
You can get the patch that addresses this problem from http://support.microsoft.com/default.aspx?scid=kb;EN-US;q319243.
22.1.7.3.9:
Using SELECT COUNT(*) FROM
within
Visual Basic and ASP returns an error.
tbl_name
This error occurs because the
COUNT(*) expression is
returning a BIGINT, and ADO
cannot make sense of a number this big. Select the
Change BIGINT columns to INT option
(option value 16384).
22.1.7.3.10:
Using the AppendChunk() or
GetChunk() ADO methods, the
Multiple-step operation generated errors. Check
each status value error is returned.
The GetChunk() and
AppendChunk() methods from ADO
doesn't work as expected when the cursor location is
specified as adUseServer. On the other
hand, you can overcome this error by using
adUseClient.
A simple example can be found from http://www.dwam.net/iishelp/ado/docs/adomth02_4.htm
22.1.7.3.11:
Access Returns Another user had modified the
record that you have modified while editing
records on a Linked Table.
In most cases, this can be solved by doing one of the following things:
Add a primary key for the table if one doesn't exist.
Add a timestamp column if one doesn't exist.
Only use double-precision float fields. Some programs may fail when they compare single-precision floats.
If these strategies do not help, you should start by making a log file from the ODBC manager (the log you get when requesting logs from ODBCADMIN) and a Connector/ODBC log to help you figure out why things go wrong. For instructions, see Section 21.1.4.8, “Getting an ODBC Trace File”.
22.1.7.3.12: When linking an application directly to the Connector/ODBC library under Unix/Linux, the application crashes.
Connector/ODBC 3.51 under Unix/Linux is not compatible with direct application linking. You must use a driver manager, such as iODBC or unixODBC to connect to an ODBC source.
22.1.7.3.13:
Applications in the Microsoft Office suite are unable to
update tables that have
DATE or
TIMESTAMP columns.
This is a known issue with Connector/ODBC. You must ensure
that the field has a default value (rather than
NULL and that the default value is
nonzero (that is, the default value is not
0000-00-00 00:00:00).
22.1.7.3.14:
When connecting Connector/ODBC 5.x (Beta) to a MySQL 4.x
server, the error 1044 Access denied for user
'xxx'@'%' to database 'information_schema' is
returned.
Connector/ODBC 5.x is designed to work with MySQL 5.0 or
later, taking advantage of the
INFORMATION_SCHEMA database to
determine data definition information. Support for MySQL
4.1 is planned for the final release.
22.1.7.3.15:
When calling SQLTables, the error
S1T00 is returned, but I cannot find
this in the list of error numbers for Connector/ODBC.
The S1T00 error indicates that a
general timeout has occurred within the ODBC system and is
not a MySQL error. Typically it indicates that the
connection you are using is stale, the server is too busy
to accept your request or that the server has gone away.
22.1.7.3.16: When linking to tables in Access 2000 and generating links to tables programmatically, rather than through the table designer interface, you may get errors about tables not existing.
There is a known issue with a specific version of the
msjet40.dll that exhibits this issue.
The version affected is 4.0.9025.0. Reverting to an older
version will enable you to create the links. If you have
recently updated your version, check your
WINDOWS directory for the older
version of the file and copy it to the drivers directory.
22.1.7.3.17: When I try to use batched statements, the excution of the batched statements fails.
Batched statement support was added in 3.51.18. Support
for batched statements is not enabled by default. You must
enable option FLAG_MULTI_STATEMENTS,
value 67108864, or select the Allow multiple
statements flag within a GUI configuration.
22.1.7.3.18:
When connecting to a MySQL server using ADODB and Excel,
occasionally the application fails to communicate with the
server and the error Got an error reading
communication packets appears in the error log.
This error may be related to Keyboard Logger 1.1 from PanteraSoft.com, which is known to interfere with the network communication between MySQL Connector/ODBC and MySQL.
22.1.7.3.19: When using some applications to access a MySQL server using C/ODBC and outer joins, an error is reported regarding the Outer Join Escape Sequence.
This is a known issue with MySQL Connector/ODBC which is
not correctly parsing the "Outer Join Escape Sequence", as
per the specs at
Microsoft
ODBC Specs. Currently, Connector/ODBC will return
value > 0 when asked for
SQL_OJ_CAPABILITIES even though no
parsing takes place in the driver to handle the outer join
escape sequence.
22.1.7.3.20: I can correctly store extended characters in the database (Hebrew/CJK) using C/ODBC 5.1, but when I retrieve the data, the text is not formatted correctly and I get garbled characters.
When using ASP and UTF8 characters you should add the following to your ASP files to ensure that the data returned is correctly encoded:
Response.CodePage = 65001 Response.CharSet = "utf-8"
22.1.7.3.21: I have a duplicate MySQL Connector/ODBC entry within my Installed Programs list, but I cannot delete one of them.
This problem can occur when you upgrade an existing Connector/ODBC installation, rather than removing and then installing the updated version.
To fix the problem you should use any working uninstallers to remove existing installations and then may have to edit the contents of the registry. Make sure you have a backup of your registry information before attempting any editing of the registry contents.
22.1.7.3.22:
When submitting queries with parameter binding using
UPDATE, my field values are
being truncated to 255 characters.
You should ensure that the
FLAG_BIG_PACKETS option is set for your
connection. This removes the 255 character limitation on
bound parameters.
22.1.7.3.23: Is it possible to disable data-at-execution using a flag?
If you do not wish to use data-at-execution, simply remove the corresponding calls. For example:
SQLLEN ylen = SQL_LEN_DATA_AT_EXEC(10); SQLBindCol(hstmt,2,SQL_C_BINARY, buf, 10, &ylen);
Would become:
SQLBindCol(hstmt,2,SQL_C_BINARY, buf, 10, NULL);
Note that in the call to SQLBindCol(),
&ylen has been replaced by NULL.
For further information please refer to the
MSDN
documentation for SQLBindCol().
22.1.7.3.24:
When you call SQLColumns() for a table
column that is AUTO_INCREMENT, the
NULLABLE column of the result set is
always SQL_NULLABLE (1).
This is because MySQL reports the
DEFAULT value for such a column as
NULL. It means, if you insert a
NULL value into the column, you will
get the next integer value for the table's
auto_increment counter.
There are many different places where you can get support for using Connector/ODBC. You should always try the Connector/ODBC Mailing List or Connector/ODBC Forum. See Section 21.1.8.1, “Connector/ODBC Community Support”, for help before reporting a specific bug or issue to MySQL.
Oracle provides assistance to the user community by means of its
mailing lists. For Connector/ODBC-related issues, you can get
help from experienced users by using the
<myodbc@lists.mysql.com> mailing list. Archives are
available online at
http://lists.mysql.com/myodbc.
For information about subscribing to MySQL mailing lists or to browse list archives, visit http://lists.mysql.com/. See Section 1.6.1, “MySQL Mailing Lists”.
Community support from experienced users is also available through the ODBC Forum. You may also find help from other users in the other MySQL Forums, located at http://forums.mysql.com. See Section 1.6.2, “MySQL Community Support at the MySQL Forums”.
If you encounter difficulties or problems with Connector/ODBC,
you should start by making a log file from the ODBC
Manager (the log you get when requesting logs from
ODBC ADMIN) and Connector/ODBC. The procedure
for doing this is described in
Section 21.1.4.8, “Getting an ODBC Trace File”.
Check the Connector/ODBC trace file to find out what could be
wrong. You should be able to determine what statements were
issued by searching for the string
>mysql_real_query in the
myodbc.log file.
You should also try issuing the statements from the
mysql client program or from
admndemo. This helps you determine whether
the error is in Connector/ODBC or MySQL.
If you find out something is wrong, please only send the
relevant rows (maximum 40 rows) to the myodbc
mailing list. See Section 1.6.1, “MySQL Mailing Lists”. Please never
send the whole Connector/ODBC or ODBC log file!
You should ideally include the following information with the email:
Operating system and version
Connector/ODBC version
ODBC Driver Manager type and version
MySQL server version
ODBC trace from Driver Manager
Connector/ODBC log file from Connector/ODBC driver
Simple reproducible sample
Remember that the more information you can supply to us, the more likely it is that we can fix the problem!
Also, before posting the bug, check the MyODBC mailing list archive at http://lists.mysql.com/myodbc.
If you are unable to find out what is wrong, the last option is
to create an archive in tar or Zip format
that contains a Connector/ODBC trace file, the ODBC log file,
and a README file that explains the
problem. You can send this to ftp://ftp.mysql.com/pub/mysql/upload/.
Only MySQL engineers have access to the files you upload, and we
are very discreet with the data.
If you can create a program that also demonstrates the problem, please include it in the archive as well.
If the program works with another SQL server, you should include an ODBC log file where you perform exactly the same SQL statements so that we can compare the results between the two systems.
Remember that the more information you can supply to us, the more likely it is that we can fix the problem.
You can send a patch or suggest a better solution for any
existing code or problems by sending a mail message to
<myodbc@lists.mysql.com>.
The Connector/ODBC Change History (Changelog) is located with the main Changelog for MySQL. See Section D.3, “MySQL Connector/ODBC (MyODBC) Change History”.
- 21.2.1. Connector/NET Versions
- 21.2.2. Connector/NET Installation
- 21.2.3. Connector/NET Visual Studio Integration
- 21.2.4. Connector/NET Tutorials
- 21.2.5. Connector/NET Programming
- 21.2.6. Connector/NET Connection String Options Reference
- 21.2.7. Connector/NET API Reference
- 21.2.8. Connector/NET Support
- 21.2.9. Connector/NET FAQ
Connector/NET enables developers to easily create .NET applications that require secure, high-performance data connectivity with MySQL. It implements the required ADO.NET interfaces and integrates into ADO.NET aware tools. Developers can build applications using their choice of .NET languages. Connector/NET is a fully managed ADO.NET driver written in 100% pure C#.
Connector/NET includes full support for:
Features provided by MySQL Server up to and including MySQL Server version 5.5.
Large-packet support for sending and receiving rows and BLOBs up to 2 gigabytes in size.
Protocol compression which enables compressing the data stream between the client and server.
Support for connecting using TCP/IP sockets, named pipes, or shared memory on Windows.
Support for connecting using TCP/IP sockets or Unix sockets on Unix.
Support for the Open Source Mono framework developed by Novell.
Fully managed, does not utilize the MySQL client library.
This document is intended as a user's guide to Connector/NET and
includes a full syntax reference. Syntax information is also
included within the Documentation.chm file
included with the Connector/NET distribution.
If you are using MySQL 5.0 or later, and Visual Studio as your development environment, you may want also want to use the MySQL Visual Studio Plugin. The plugin acts as a DDEX (Data Designer Extensibility) provider, enabling you to use the data design tools within Visual Studio to manipulate the schema and objects within a MySQL database. For more information, see Section 21.2.3, “Connector/NET Visual Studio Integration”.
Connector/NET 5.1.2 and later include the Visual Studio Plugin by default.
MySQL Connector/NET supports full versions of Visual Studio 2005, 2008, and 2010, although certain features are only available in Visual Studio 2010 when using MySQL Connector/NET version 6.3.2 and later. Note that MySQL Connector/NET does not currently support Express versions of Microsoft products, including Microsoft Visual Web Developer.
Key topics:
For connection string properties when using the
MySqlConnectionclass, see Section 21.2.6, “Connector/NET Connection String Options Reference”.
There are several versions of Connector/NET available:
Connector/NET 1.0 includes support for MySQL Server 4.0, 4.1, and 5.0 features, and full compatibility with the ADO.NET driver interface.
This version of Connector/NET is no longer supported.
Connector/NET 5.0 includes support for MySQL Server 4.0, 4.1, 5.0 and 5.1 features. Connector/NET 5.0 also includes full support for the ADO.Net 2.0 interfaces and subclasses, includes support for the usage advisor and performance monitor (PerfMon) hooks.
This version of Connector/NET is no longer supported.
Connector/NET 5.1 includes support for MySQL Server 4.0, 4.1, 5.0, 5.1, 5.4 and 5.5 features. Connector/NET 5.1 also includes support for a new membership/role provider, Compact Framework 2.0, a new stored procedure parser and improvements to
GetSchema. Connector/NET 5.1 also includes the Visual Studio Plugin as a standard installable component.This version of Connector/NET is no longer supported.
Connector/NET 5.2 includes support for MySQL Server 4.1, 5.0, 5.1, 5.4, and 5.5 features. Connector/NET 5.2 also includes support for a new membership/role provider, Compact Framework 2.0, a new stored procedure parser and improvements to
GetSchema. Connector/NET 5.2 also includes the Visual Studio Plugin as a standard installable component.This version of Connector/NET is no longer supported.
Connector/NET 6.0 includes support for MySQL Server 4.1, 5.0, 5.1, 5.4 and 5.5.
This version of Connector/NET is no longer supported.
Connector/NET 6.1 includes support for MySQL Server 4.1, 5.0, 5.1, 5.4, and 5.5. Important new features include the MySQL Website Configuration Tool and a Session State Provider.
Connector/NET 6.2 includes support for MySQL Server 4.1, 5.0, 5.1, 5.4, and 5.5. Important new features include a new logging system and client SSL certificates. Connector/NET 6.2 is currently available as a Beta release.
Connector/NET 6.3 includes support for MySQL Server 5.0, 5.1, 5.4, and 5.5. Important new features include integration with Visual Studio 2010, such as availability of DDL T4 template for Entity Framework, and a custom MySQL SQL Editor. Other features include refactored transaction scope: Connector/NET now supports nested transactions in a scope where they use the same connection string. Connector/NET 6.3 is available as a Beta release.
The latest source code for Connector/NET can be downloaded from the MySQL public Subversion server. For further details see Section 21.2.2.3, “Installing Connector/NET from the source code”.
The following table shows the .NET Framework version required, and MySQL Server version supported by Connector/NET:
| Connector/NET version | ADO.NET version supported | .NET Framework version required | MySQL Server version supported | Currently supported |
|---|---|---|---|---|
| 1.0 | 1.x | 1.x | 4.0, 4.1, 5.0 | No |
| 5.0 | 2.x+ | 2.x+ | 4.0, 4.1, 5.0 | No |
| 5.1 | 2.x+ | 2.x+ | 4.0, 4.1, 5.0, 5.1, 5.4, 5.5 | No |
| 5.2 | 2.x+ | 2.x+ | 4.1, 5.0, 5.1, 5.4, 5.5 | No |
| 6.0 | 2.x+ | 2.x+ | 4.1, 5.0, 5.1, 5.4, 5.5 | Critical issues only |
| 6.1 | 2.x+ | 2.x+ | 4.1, 5.0, 5.1, 5.4, 5.5 | Yes |
| 6.2 | 2.x+ | 2.x+ | 4.1, 5.0, 5.1, 5.4, 5.5 | Yes |
| 6.3 | 2.x+ | 2.x+, 4.x+ for VS 2010 support | 5.0, 5.1, 5.4, 5.5 | Yes |
Version numbers for MySQL products are formatted as X.Y.Z, where Z=0 indicates alpha, Z=1 indicates beta, and Z>=2 indicates GA. However, Windows tools (Control Panel, properties display) may show the version numbers as XX.YY.ZZ. For example, the official MySQL formatted version number 5.0.9 may be displayed by Windows tools as 5.00.09. The two versions are the same; only the number display format is different.
Connector/NET runs on any platform that supports the .NET framework. The .NET framework is primarily supported on recent versions of Microsoft Windows, and is supported on Linux through the Open Source Mono framework (see http://www.mono-project.com).
Connector/NET is available for download from http://dev.mysql.com/downloads/connector/net/5.2.html.
On Windows, installation is supported either through a binary installation process or by downloading a Zip file with the Connector/NET components.
Before installing, you should ensure that your system is up to date, including installing the latest version of the .NET Framework.
Using the installer is the most straightforward method of installing Connector/NET on Windows and the installed components include the source code, test code and full reference documentation.
Connector/NET is installed through the use of a Windows
Installer (.msi) installation package, which
can be used to install Connector/NET on all Windows operating
systems. The MSI package in contained within a ZIP archive named
mysql-connector-net-,
where version.zipversion indicates the
Connector/NET version.
To install Connector/NET:
Double-click the MSI installer file extracted from the Zip you downloaded. Click to start the installation.
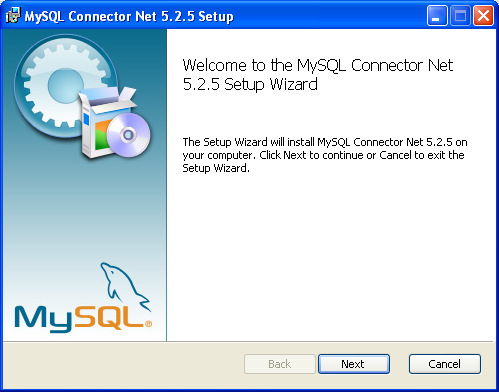
You must choose the type of installation that you want to perform.
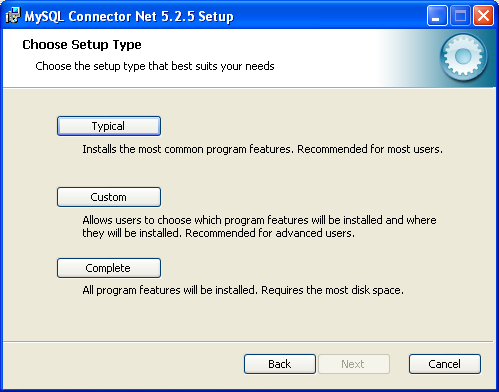
For most situations, the Typical installation will be suitable. Click the button and proceed to Step 5. A Complete installation installs all the available files. To conduct a Complete installation, click the button and proceed to step 5. If you want to customize your installation, including choosing the components to install and some installation options, click the button and proceed to Step 3.
The Connector/NET installer will register the connector within the Global Assembly Cache (GAC) - this will make the Connector/NET component available to all applications, not just those where you explicitly reference the Connector/NET component. The installer will also create the necessary links in the Start menu to the documentation and release notes.
If you have chosen a custom installation, you can select the individual components that you want to install, including the core interface component, supporting documentation (a CHM file) samples and examples and the source code. Select the items, and their installation level, and then click to continue the installation.
NoteFor Connector/NET 1.0.8 or lower and Connector 5.0.4 and lower the installer will attempt to install binaries for both 1.x and 2.x of the .NET Framework. If you only have one version of the framework installed, the connector installation may fail. If this happens, you can choose the framework version to be installed through the custom installation step.
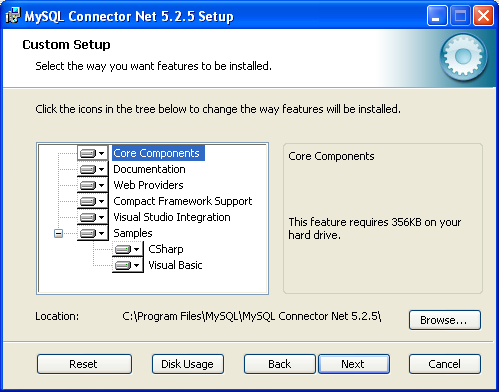
You will be given a final opportunity to confirm the installation. Click to copy and install the files onto your machine.
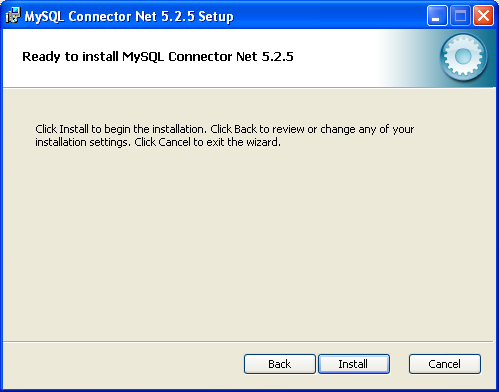
Once the installation has been completed, click to exit the installer.
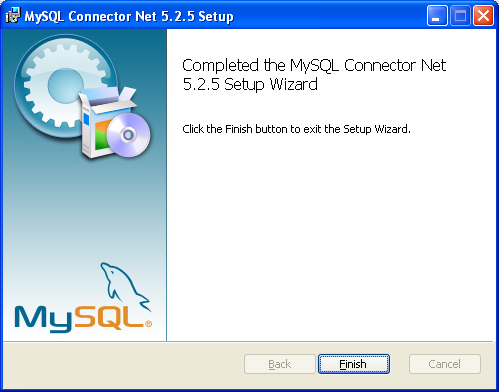
Unless you choose otherwise, Connector/NET is installed in
C:\Program Files\MySQL\MySQL Connector Net
, where
X.X.XX.X.X is replaced with the version of
Connector/NET you are installing. New installations do not
overwrite existing versions of Connector/NET.
Depending on your installation type, the installed components will include some or all of the following components:
bin- Connector/NET MySQL libraries for different versions of the .NET environment.docs- contains a CHM of the Connector/NET documentation.samples- sample code and applications that use the Connector/NET component.src- the source code for the Connector/NET component.
You may also use the /quiet or
/q command-line option with the
msiexec tool to install the Connector/NET
package automatically (using the default options) with no
notification to the user. Using this method the user cannot
select options. Additionally, no prompts, messages or dialog
boxes will be displayed.
C:\> msiexec /package conector-net.msi /quiet
To provide a progress bar to the user during automatic
installation, use the /passive option.
If you are having problems running the installer, you can
download a Zip file without an installer as an alternative. That
file is called
mysql-connector-net-.
Once downloaded, you can extract the files to a location of your
choice.
version-noinstall.zip
The file contains the following directories:
bin- Connector/NET MySQL libraries for different versions of the .NET environment.Docs- contains a CHM of the Connector/NET documentation.Samples- sample code and applications that use the Connector/NET component.
Connector/NET 6.0.x has a different directory structure:
Assemblies- contains a collection of DLLs that make up the connector functionality.Documentation- contains the Connector/NET documentation as a CHM file.Samples- sample code and applications that use the Connector/NET component.
There is also another Zip file available for download called
mysql-connector-net-.
This file contains the source code distribution.
version-src.zip
The file contains the following directories:
Documentation- This folder contains the source files to build the documentation into the compiled HTML (CHM) format.Installer- This folder contains the source files to build the Connector/NET installer program.MySql.Data- This folder contains the source files for the core data provider.MySql.VisualStudio- This folder contains the source files for the Microsoft Visual Studio extensions.MySql.Web- This folder contains the source files for the web providers. This includes code for the membership provider, role provider and profile provider. These are used in ASP.NET web sites.Samples- This folder contains the source files for several example applications.Tests- Ths folder contains a spreadsheet listing test cases.VisualStudio- Contains resources used by the Visual Studio plug in.
Finally, you need to ensure that
MySql.Data.dll is accessible to your
program at build time (and run time). If using Microsoft Visual
Studio you will need to add MySql.Data as a
Reference to your project.
If using MySQL Connector/NET 6.3.5 and above, the
MySql.Data file provided will work with
both .NET Framework 2.x and 4.x.
There is no installer available for installing the Connector/NET component on your Unix installation. Before installing, please ensure that you have a working Mono project installation. You can test whether your system has Mono installed by typing:
shell> mono --version
The version of the Mono JIT compiler will be displayed.
To compile C# source code you will also need to make sure a Mono
C# compiler, is installed. Note that there are two Mono C#
compilers available, mcs, which accesses the
1.0-profile libraries, and gmcs, which acesses
the 2.0-profile libraries.
To install Connector/NET on Unix/Mono:
Download the
mysql-connector-net-and extract the contents to a directory of your choice, for example:version-noinstall.zip~/connector-net/.In the directory where you unzipped the connector to, change into the
bindirectory. Ensure the fileMySql.Data.dllis present.You must register the Connector/NET component,
MySql.Data, in the Global Assembly Cache (GAC). In the current directory enter thegacutilcommand:root-shell> gacutil /i MySql.Data.dll
This will register
MySql.Datainto the GAC. You can check this by listing the contents of/usr/lib/mono/gac, where you will findMySql.Dataif the registration has been successful.
You are now ready to compile your application. You must ensure
that when you compile your application you include the
Connector/NET component using the -r:
command-line option. For example:
shell> gmcs -r:System.dll -r:System.Data.dll -r:MySql.Data.dll HelloWorld.cs
Note, the assemblies that need to be referenced will depend on the
requirements of the application, but applications using
Connector/NET will need to provide -r:MySql.Data
as a minimum.
You can further check your installation by running the compiled program, for example:
shell> mono HelloWorld.exe
You should read this section only if you are interested in helping us test our new code. If you just want to get Connector/NET up and running on your system, you should use a standard release distribution.
Obtaining the source code
To obtain the most recent development source tree, you first need to download and install Bazaar. You can obtain Bazaar from the Bazaar VCS Website. Bazaar is supported by any platform that supports Python, and is therefore compatible with any Linux, Unix, Windows or Mac OS X host. Instructions for downloading and installing Bazaar on the different platforms are available on the Bazaar Web site.
The most recent development source tree is available from our public Subversion trees at http://dev.mysql.com/tech-resources/sources.html.
To check out out the Connector/NET sources, change to the directory where you want the copy of the Connector/NET tree to be stored, then use the following command:
shell> bzr branch lp:connectornet/trunk
To download a specific version of Connector/NET, specify the
version number instead of trunk. For example,
to obtain a copy of the 6.0 version of the source tree:
shell> bzr branch lp:connectornet/6.0
Source packages are also available on the downloads page.
Building the source code on Windows
The following procedure can be used to build the connector on Microsoft Windows.
Obtain the source code, either from the Subversion server, or through one of the prepared source code packages.
Navigate to the root of the source code tree.
A Microsoft Visual Studio 2005 solution file is available to build the connector, this is called
MySQL-VS2005.sln. Click this file to load the solution into Visual Studio.Select , from the main menu to build the solution.
Building the source code on Unix
Support for building Connector/NET on Mono/Unix is currently not available.
- 21.2.3.1. Making a connection
- 21.2.3.2. Editing Tables
- 21.2.3.3. Editing Views
- 21.2.3.4. Editing Stored Procedures and Functions
- 21.2.3.5. Editing Triggers
- 21.2.3.6. Editing User Defined Functions (UDF)
- 21.2.3.7. Cloning Database Objects
- 21.2.3.8. Dropping Database Objects
- 21.2.3.9. Using the ADO.NET Entity Framework
- 21.2.3.10. MySQL Website Configuration Tool
- 21.2.3.11. MySQL SQL Editor
- 21.2.3.12. DDL T4 Template Macro
When MySQL Connector/NET is installed on Microsoft Windows, Visual Studio integration components are also installed and initialized. This enables the developer to work seamlessly with MySQL Connector/NET in the familiar Visual Studio environment, as described in the following sections of the manual.
MySQL Connector/NET supports Visual Studio versions 2005, 2008, and 2010. However, only MySQL Connector/NET version 6.3 fully integrates with Visual Studio 2010, although applications using earlier versions of the connector can be built with the Visual Studio 2010 environment using .NET 2.x frameworks.
Visual Studio 2010 support was introduced with MySQL Connector/NET 6.3.2. From
version 6.3.2 the connector ships with both .NET 2.x and .NET 4.x
versions of the entity framework support files,
mysql.data.ef.dll and
mysql.visualstudio.dll. The .NET 4.x versions need to be
shipped to enable new integration features supported in Visual
Studio 2010, including:
New DDL T4 template for the Entity Framework (EF) - This enables developers to design an EF model from scratch and use the native Visual Studio 2010 facility to generate MySQL DDL from that model. This is done by creating the model, and with the model open, choosing the SSDLToMySQL template in the properties window. The correct DDL is then generated. The developer can then save this code as a
.mysqlfile in their project and execute it against the MySQL server.New SQL Editor - A new SQL editor has been included that enables connections to servers to execute SQL. This is activated by creating a new file with a
.mysqlextension. A new template is also included to allow creation of this file type using the Visual Studio 2010 main menu item , . Note that the MySQL SQL Editor is also available in 2005 and 2008.
Once the connector is installed, you can use it to create, modify, and delete connections to MySQL databases. To create a connection with a MySQL database, perform the following steps:
Start Visual Studio, and open the Server Explorer window (, option in the main Visual Studio menu, or Ctrl+W, L hot keys).
Right-click the Data Connections node, and choose the menu item.
Add Connection dialog opens. Press the button to choose MySQL Database as a data source.
Change Data Source dialog opens. Choose MySQL Database in the list of data sources (or the
<other>option, if MySQL Database is absent), and then choose .NET Framework Data Provider for MySQL in the combo box of data providers.Input the connection settings: the server host name (for example, localhost if the MySQL server is installed on the local machine), the user name, the password, and the default schema name. Note that you must specify the default schema name to open the connection.
You can also set the port to connect with the MySQL server by pressing the button. To test connection with the MySQL server, set the server host name, the user name, and the password, and press the button. If the test succeeds, the success confirmation dialog opens.
After you set all settings and test the connection, press . The newly created connection is displayed in Server Explorer. Now you can work with the MySQL server through standard Server Explorer GUI.
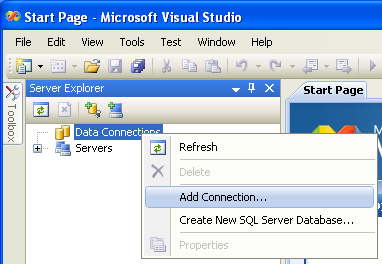
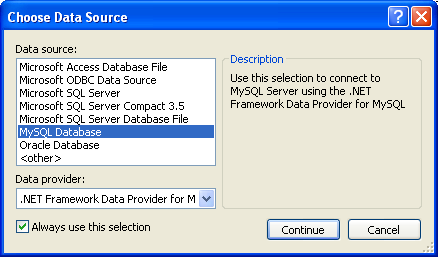
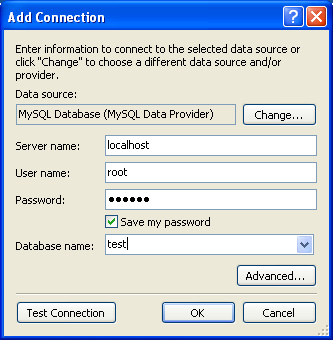
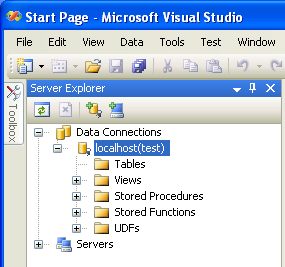
After the connection is successfully established, all settings are saved for future use. When you start Visual Studio for the next time, just open the connection node in Server Explorer to establish a connection to the MySQL server again.
To modify and delete a connection, use the Server Explorer context menu for the corresponding node. You can modify any of the settings just by overwriting the existing values with new ones. Note that the connection may be modified or deleted only if no active editor for its objects is opened: otherwise you may loose your data.
Connector/Net contains a table editor, which enables the visual creation and modification of tables.
The Table Designer can be accessed through a mouse action on table-type node of Server Explorer. To create a new table, right-click the Tables node (under the connection node) and choose the command from the context menu.
To modify an existing table, double-click the node of the table you wish to modify, or right-click this node and choose the item from the context menu. Either of the commands opens the Table Designer.
The table editor is implemented in the manner of the well-known Query Browser Table Editor, but with minor differences.
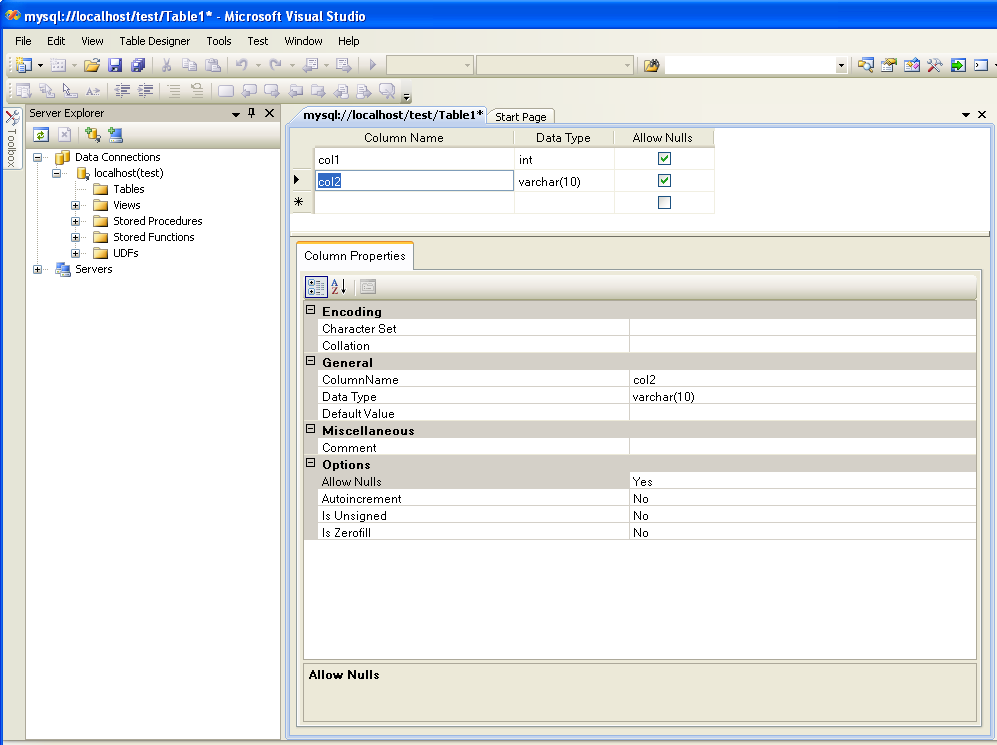
Table Designer consists of the following parts:
Columns Editor - a data grid on top of the Table Designer. Use the Columns grid for column creation, modification, and deletion.
Indexes tab - a tab on bottom of the Table Designer. Use the Indexes tab for indexes management.
Foreign Keys tab - a tab on bottom of the Table Designer. Use the Foreign Keys tab for foreign keys management.
Column Details tab - a tab on bottom of the Table Designer. Use the Column Details tab to set advanced column options.
Properties window - a standard Visual Studio Properties window, where the properties of the edited table are displayed. Use the Properties window to set the table properties.
Each of these areas is discussed in more detail in subsequent sections.
To save changes you have made in the Table Designer, use either or button of the Visual Studio main toolbar, or just press Ctrl+S. If you have not already named the table you will be prompted to do so.
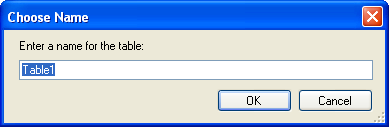
Once created you can view the table in the Server Explorer.
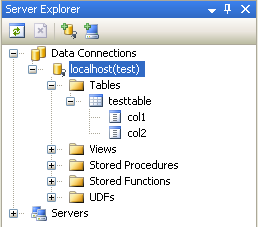
The Table Designer main menu enables you to set a Primary Key column, edit Relationships such as Foreign Keys, and create Indexes.
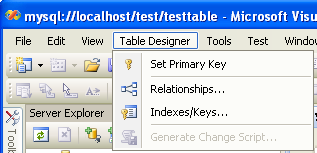
You can use the Column Editor to set or change the name, data type, default value, and other properties of a table column. To set the focus to a needed cell of a grid, use the mouse click. Also you can move through the grid using Tab and Shift+Tab keys.
To set or change the name, data type, default value and comment of a column, activate the appropriate cell and type the desired value.
To set or unset flag-type column properties (NOT
NULL, auto incremented, flags), check or uncheck the
corresponding check boxes. Note that the set of column flags
depends on its data type.
To reorder columns, index columns or foreign key columns in the Column Editor, select the whole column you wish to reorder by clicking the selector column on the left of the column grid. Then move the column by using Ctrl+Up (to move the column up) or Ctrl+Down (to move the column down) keys.
To delete a column, select it by clicking the selector column on the left of the column grid, then press the Delete button on a keyboard.
Indexes management is performed using the Indexes/Keys dialog.
To add an index, select , from the main menu, and click to add a new index. You can then set the index name, index kind, index type, and a set of index columns.
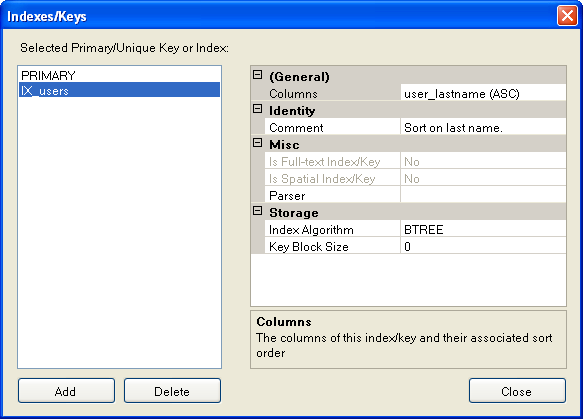
To remove an index, select it in the list box on the left, and click the button.
To change index settings, select the needed index in the list box on the left. The detailed information about the index is displayed in the panel on the right hand side. Change the desired values.
Foreign Keys management is performed using the Foreign Key Relationships dialog.
To add a foreign key, select , from the main menu. This displays the Foreign Key Relationship dialog. Click . You can then set the foreign key name, referenced table name, foreign key columns, and actions upon update and delete.
To remove a foreign key, select it in the list box on the left, and click the button.
To change foreign key settings, select the required foreign key in the list box on the left. The detailed information about the foreign key is displayed in the right hand panel. Change the desired values.
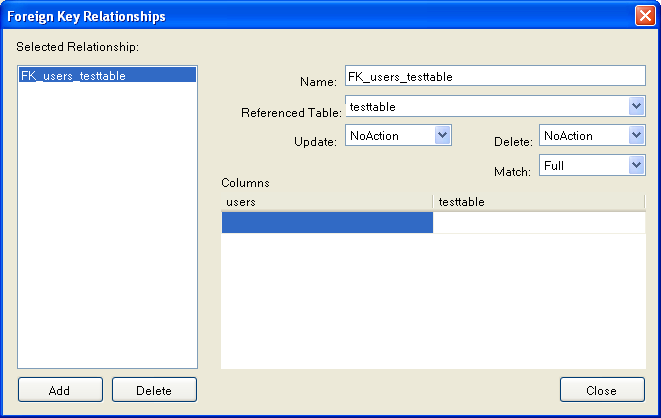
The Column Properties tab can be used to set column options. In addition to the general column properties presented in the Column Editor, in the Column Properties tab you can set additional properties such as Character Set, Collation and Precision.
To bring up Table Properties select the table and right-click to activate the context menu. Select . The Table Properties dockable window will be displayed.
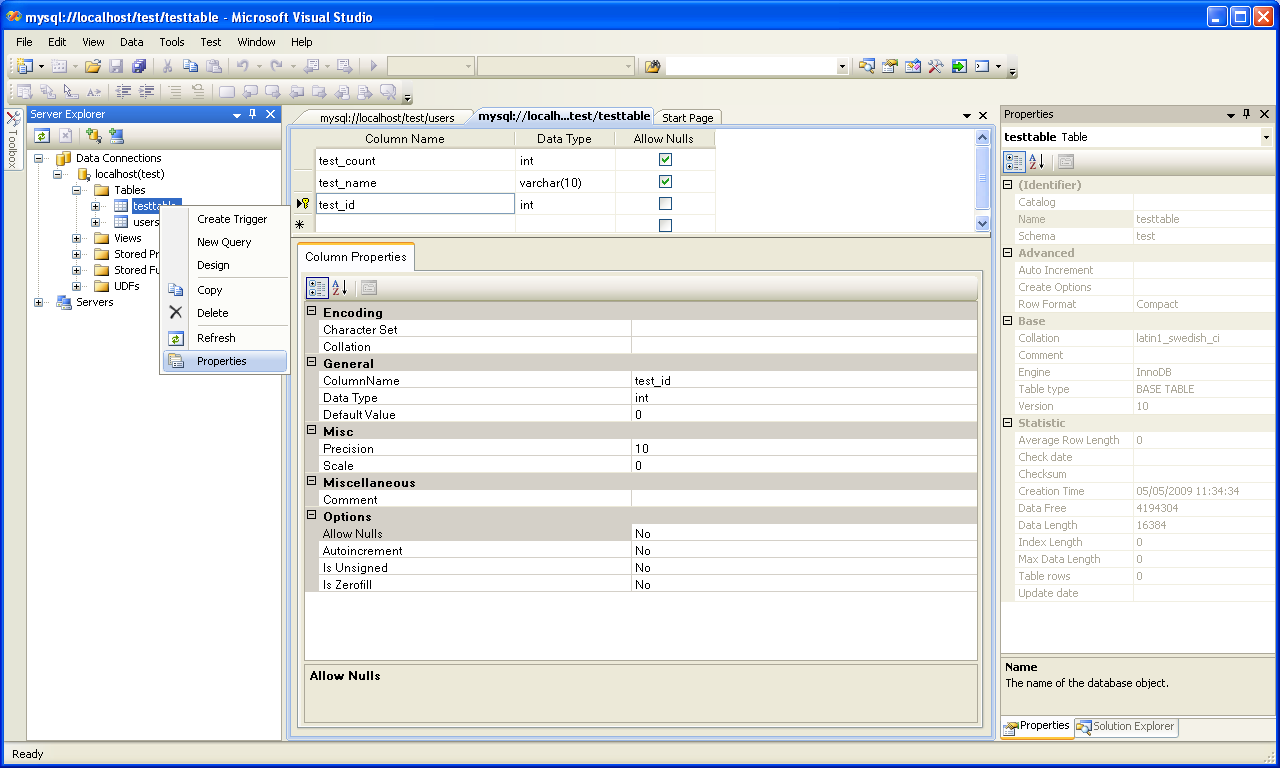
The following table properties can be set:
Auto Increment
Average Row Length
Character Set
Collation
Comment
Data Directory
Index Directory
Maximum Rows
Minimum Rows
Name
Row Format
Schema
Storage Engine
The property Schema is read only.
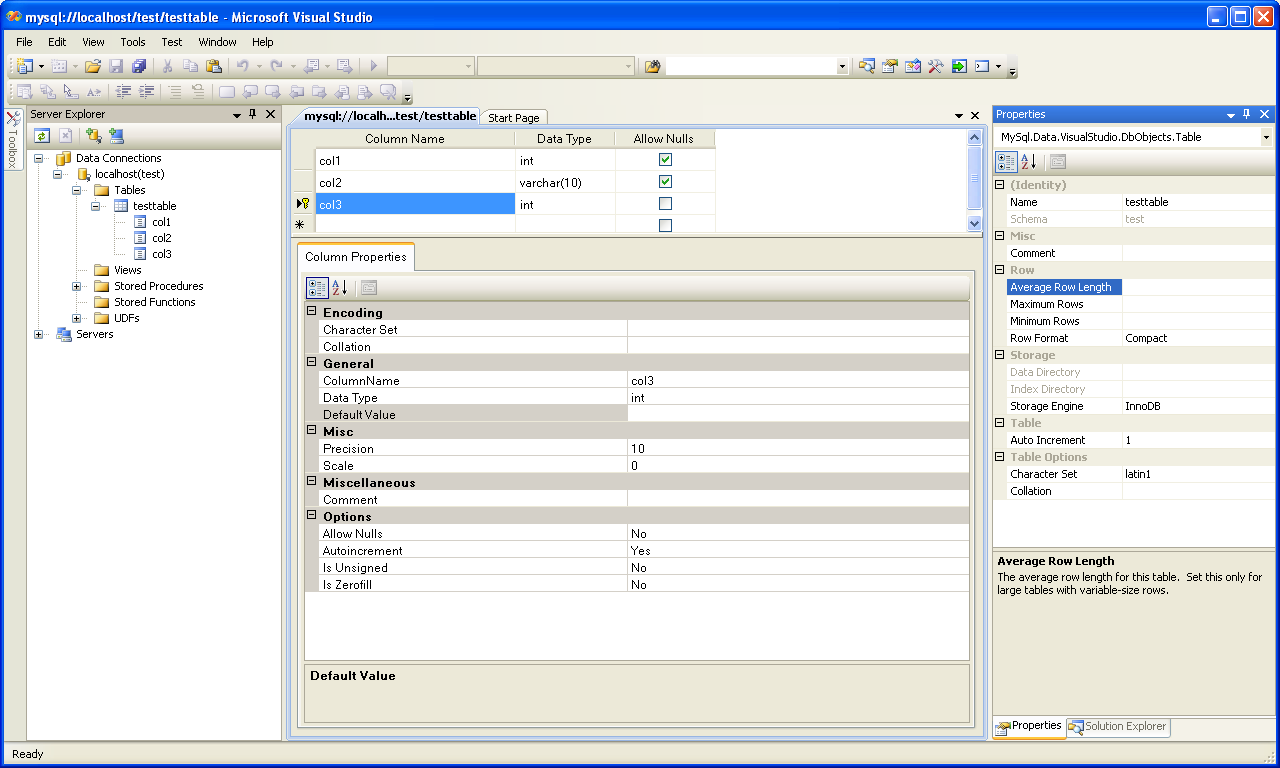
To create a new view, right-click the Views node under the connection node in Server Explorer. From the node's context menu, choose the command. This command opens the SQL Editor.

You can then enter the SQL for your view.

To modify an existing view, double-click a node of the view you wish to modify, or right-click this node and choose the command from a context menu. Either of the commands opens the SQL Editor.
All other view properties can be set in the Properties window. These properties are:
Catalog
Check Option
Definer
Definition
Definer
Is Updateable
Name
Schema
Security Type
Some of these properties can have arbitrary text values, others accept values from a predefined set. In the latter case you set the desired value with an embedded combobox.
The properties Is Updatable and
Schema are readonly.
To save changes you have made, use either or buttons of the Visual Studio main toolbar, or just press Ctrl+S.
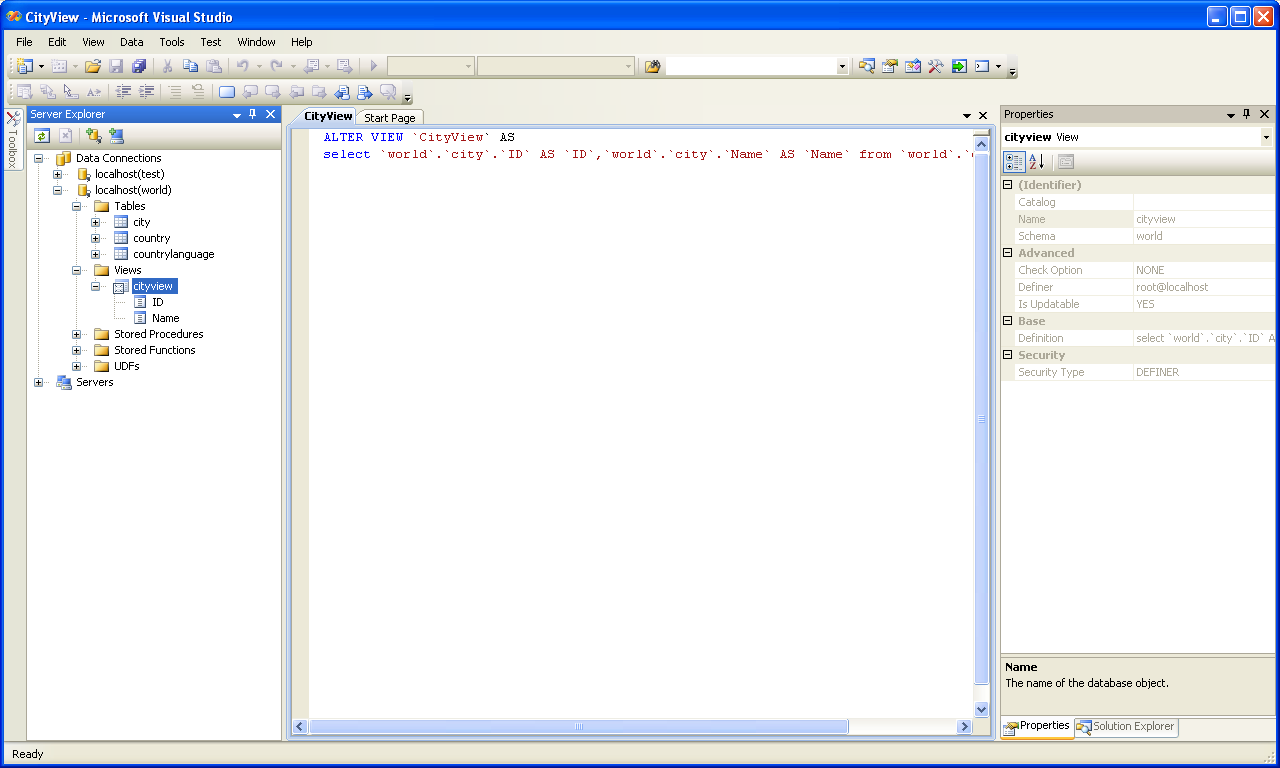
To create a new stored procedure, right-click the Stored Procedures node under the connection node in Server Explorer. From the node's context menu, choose the Create Routine command. This command opens the SQL Editor.
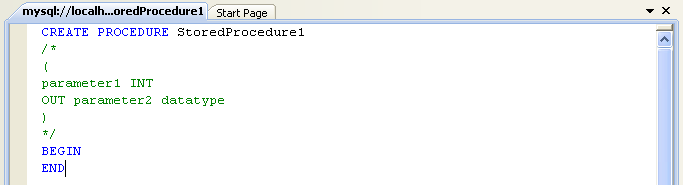
To create a new stored function, right-click the Functions node under the connection node in Server Explorer. From the node's context menu, choose the Create Routine command.
To modify an existing stored routine (procedure or function), double-click the node of the routine you wish to modify, or right-click this node and choose the Alter Routine command from the context menu. Either of the commands opens the SQL Editor.
To create or alter the routine definition using SQL Editor, type this definition in the SQL Editor using standard SQL. All other routine properties can be set in the Properties window. These properties are:
Body
Catalog
Comment
Creation Time
Data Access
Definer
Definition
External Name
External Language
Is Deterministic
Last Modified
Name
Parameter Style
Returns
Schema
Security Type
Specific Name
SQL Mode
SQL Path
Type
Some of these properties can have arbitrary text values, others accept values from a predefined set. In the latter case set the desired value using the embedded combo box.
You can also set all the options directly in the SQL Editor, using
the standard CREATE PROCEDURE or
CREATE FUNCTION statement. However, it is
recommended to use the Properties window instead.
To save changes you have made, use either Save or Save All buttons of the Visual Studio main toolbar, or just press Ctrl+S.
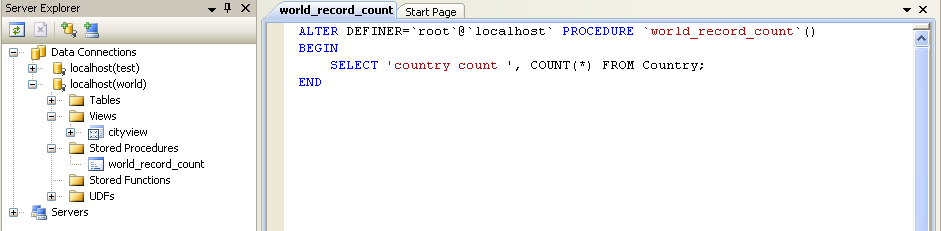
To create a new trigger, right-click the node of the table, for which you wish to add a trigger. From the node's context menu, choose the Create Trigger command. This command opens the SQL Editor.
To modify an existing trigger, double-click the node of the trigger you wish to modify, or right-click this node and choose the Alter Trigger command from the context menu. Either of the commands opens the SQL Editor.
To create or alter the trigger definition using SQL Editor, type the trigger statement in the SQL Editor using standard SQL.
You should enter only the trigger statement, that is, the part
of the CREATE TRIGGER query that is placed
after the FOR EACH ROW clause.
All other trigger properties are set in the Properties window. These properties are:
Definer
Event Manipulation
Name
Timing
Some of these properties can have arbitrary text values, others accept values from a predefined set. In the latter case set the desired value using the embedded combo box.
The properties Event Table,
Schema, and Server in the
Properties window are read only.
To save changes you have made, use either or buttons of the Visual Studio main toolbar, or just press Ctrl+S. Before changes are saved, you will be asked to confirm the execution of the corresponding SQL query in a confirmation dialog.
To create a new User Defined Function (UDF), right-click the UDFs node under the connection node in Server Explorer. From the node's context menu, choose the command. This command opens the UDF Editor.
To modify an existing UDF, double-click the node of the UDF you wish to modify, or right-click this node and choose the command from the context menu. Either of the commands opens the UDF Editor.
The UDF editor enables you to set the following properties:
Name
So-name (DLL name)
Return type
Is Aggregate
There are text fields for both names, a combo box for the return type, and a check box to indicate if the UDF is aggregate. All these options are also accessible using the Properties window.
The property Server in the Properties window is
read only.
To save changes you have made, use either or buttons of the Visual Studio main toolbar, or just press Ctrl+S. Before changes are saved, you will be asked to confirm the execution of the corresponding SQL query in a confirmation dialog.
Tables, views, stored procedures, and functions can be cloned using the appropriate Clone command from the context menu: , , . The clone commands open the corresponding editor for a new object: the Table Editor for cloning a table, and the SQL Editor for cloning a view or a routine.
The editor is filled with values of the original object. You can modify these values in a usual manner.
To save the cloned object, use either Save or Save All buttons of the Visual Studio main toolbar, or just press Ctrl+S. Before changes are saved, you will be asked to confirm the execution of the corresponding SQL query in a confirmation dialog.
Tables, views, stored routines, triggers, and UDFs can be dropped with the appropriate Drop command selected from its context menu: , , , , .
You will be asked to confirm the execution of the corresponding drop query in a confirmation dialog.
Dropping of multiple objects is not supported.
Connector/NET 6.0 introduced support for the ADO.NET Entity Framework. ADO.NET Entity Framework was included with .NET Framework 3.5 Service Pack 1, and Visual Studio 2008 Service Pack 1. ADO.NET Entity Framework was released on 11th August 2008.
ADO.NET Entity Framework provides an Object Relational Mapping (ORM) service, mapping the relational database schema to objects. The ADO.NET Entity Framework defines several layers, these can be summarized as:
Logical - this layer defines the relational data and is defined by the Store Schema Definition Language (SSDL).
Conceptual - this layer defines the .NET classes and is defined by the Conceptual Schema Definition Language (CSDL)
Mapping - this layer defines the mapping from .NET classes to relational tables and associations, and is defined by Mapping Specification Language (MSL).
Connector/NET integrates with Visual Studio 2008 to provide a range of helpful tools to assist the developer.
A full treatment of ADO.NET Entity Framework is beyond the scope of this manual. You are encouraged to review the Microsoft ADO.NET Entity Framework documentation.
Tutorials on getting started with ADO.NET Entity Framework are available. See Section 21.2.4.5, “Tutorial: Using an Entity Framework Entity as a Windows Forms Data Source” and Section 21.2.4.6, “Tutorial: Databinding in ASP.NET using LINQ on Entities”.
MySQL Connector/NET 6.1 introduced the MySQL Website Configuration Tool. This
is a facility available in Visual Studio that enables you to
configure the Membership, Role, Session State and Profile
Provider, without having to resort to editing configuration files.
You simply run the tool, set your configuration options, and the
tool will modify your web.config file
accordingly.
The MySQL Website Configuration Tool appears as a small icon on the Solution Explorer toolbar in Visual Studio, as show by the following screenshot:
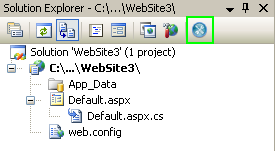
Clicking the Website Configuration Tool icon launches the wizard and displays the first screen:
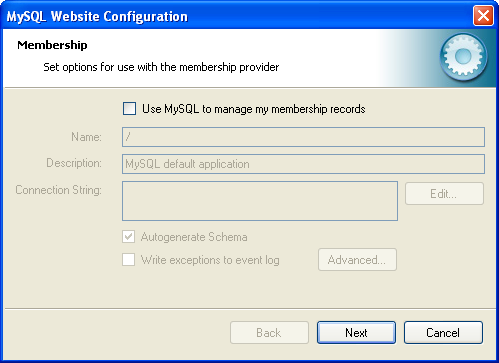
This allows you to enable use of the MySQL Membership Provider. Simply click the checkbox to enable this. You can now enter the name of the application that you are creating the configuration for. You can also enter a description for the application.
You can then click the button to launch the Connection String Editor:
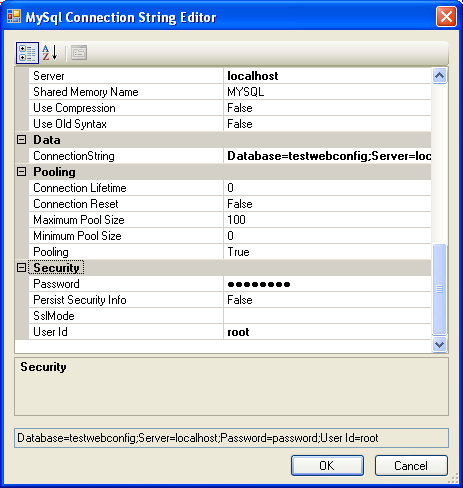
Note that if you have already defined a connection string for the
providers manually in web.config, or
previously using the tool, this will be automatically loaded and
displayed, and can then be modified in this dialog.
You can also ensure that the necessary schema are created automatically for you by selecting the Autogenerate Schema checkbox. These schema are used to store membership information. The database used to storage is the one specified in the connection string.
You can also ensure that exceptions generated by the application will be written to the event log by selecting the Write excpetions to event log checkbox.
Clicking the button launches a dialog that enables you to set Membership Options. These options dictate such variables as password length required when a user signs up, whether the password is encrypted and whether the user can reset their password or not.
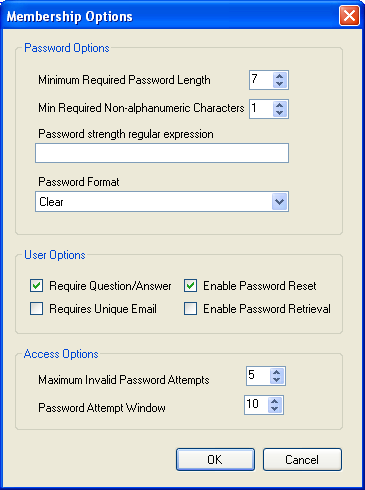
Once information has been set up as required for configuration of the Membership Provider the button can be clicked to display the Roles Provider screen:

Again the connection string can be edited, a description added and Autogenerate Schema can be enabled before clicking to go to the Profiles Provider screen:
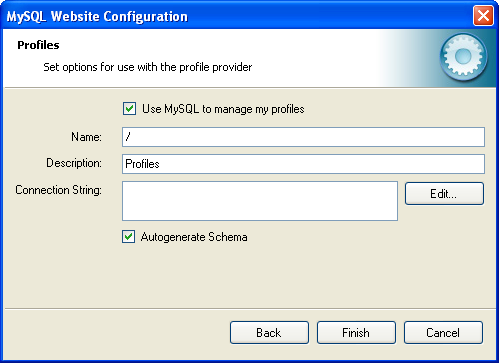
This screen display similar options to the previous screens.
Click to proceed to the Session State configuration page:
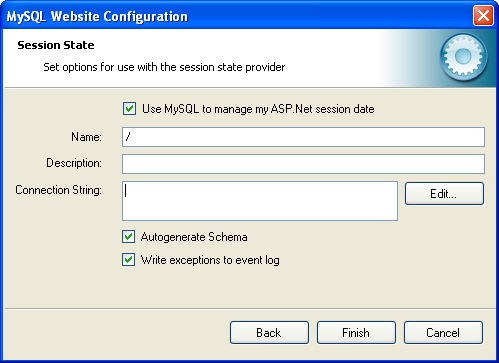
Once you have set up the Session State Provider as required, click to exit the wizard.
At this point it is necessary to select the Authentication Type to From Internet. This can be done by launching the ASP.NET Configuration Tool, and selecting the Security tab. Click the Select authentication type link and ensure that the From the internet radio button is selected. You can now examine the database you created to store membership information. All the necessary tables will have been created for you:
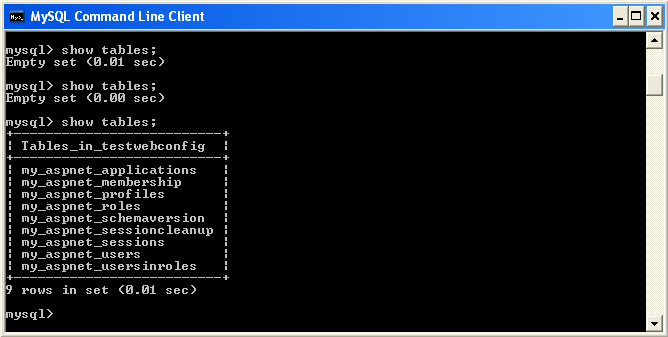
MySQL Connector/NET 6.3.2 introduced a new MySQL SQL Editor. The easiest way to invoke the editor is by selecting the , menu item from the Visual Studio main menu. This displays the New File dialog:
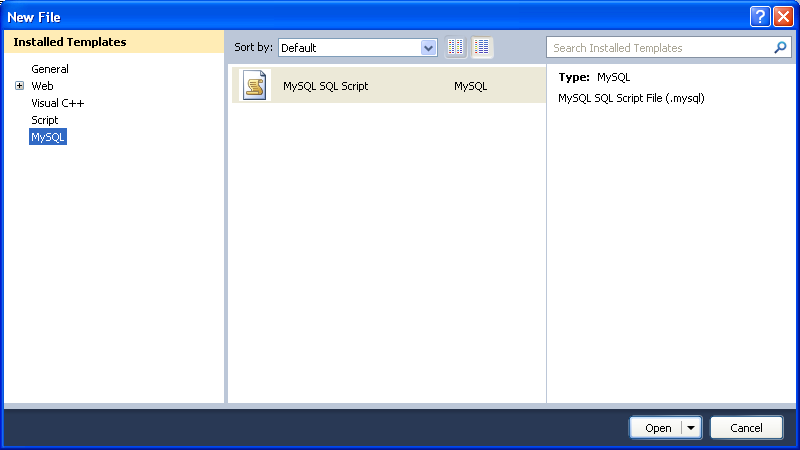
From the New File dialog select the MySQL template, and then double-click the MySQL SQL Script document, or click the button.
The MySQL SQL Editor will be displayed. You can now enter SQL code as required, or connect to a MySQL server. Click the button in the MySQL SQL Editor toolbar. You can enter the connection details into the Connect to MySQL dialog that is displayed. You can enter the server name, user id, password and database to connect to, or click the button to select other connection string options. Click the button to connect to the MySQL server. It is now possible to execute your SQL code against the server by clicking the button on the toolbar.
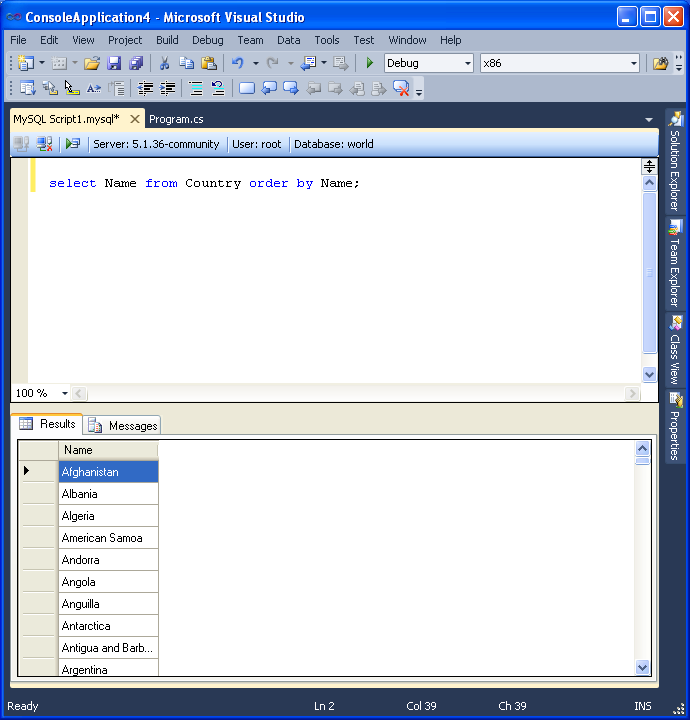
The results from any queries are displayed on the Results tab. Any errors are displayed on the Messages tab.
MySQL Connector/NET 6.3 introduced the ability to convert an Entity Framework model to MySQL DDL code. Starting with a blank model, an entity model can be developed in Visual Studio's designer. Once the model has been created, the model's properties can be selected, and in the Database Script Generation category of the model's properties, the property DDL Generation can be found. The value SSDLToMySQL.tt(VS) can then be selected from the drop-down listbox.
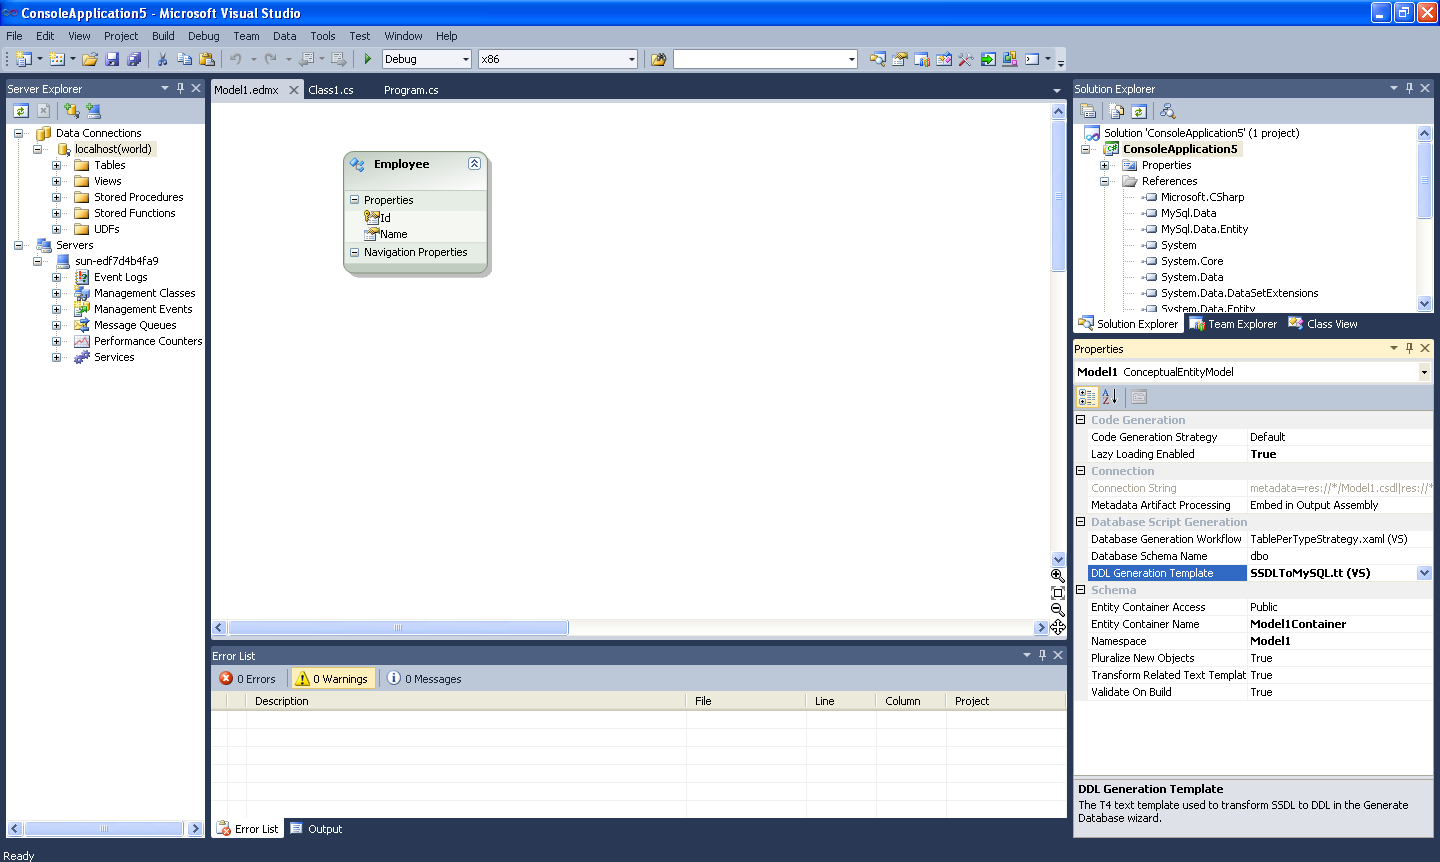
Right-clicking the model design area will display a context-sensitive menu. Selecting Generate Database from Model from the menu will display the Generate Database Wizard. The wizard can then be used to generate MySQL DDL code.
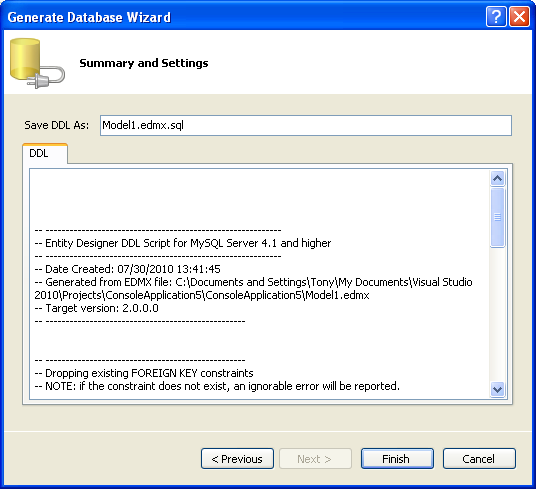
- 21.2.4.1. Tutorial: An Introduction to Connector/NET Programming
- 21.2.4.2. Tutorial: MySQL Connector/NET ASP.NET Membership and Role Provider
- 21.2.4.3. Tutorial: MySQL Connector/NET ASP.NET Session State Provider
- 21.2.4.4. Tutorial: MySQL Connector/NET ASP.NET Profile Provider
- 21.2.4.5. Tutorial: Using an Entity Framework Entity as a Windows Forms Data Source
- 21.2.4.6. Tutorial: Databinding in ASP.NET using LINQ on Entities
- 21.2.4.7. Tutorial: Using SSL with MySQL Connector/NET
- 21.2.4.8. Tutorial: Using MySqlScript
- 21.2.4.9. Tutorial: Generating MySQL DDL from an Entity Framework Model
This section provides a gentle introduction to programming with Connector/NET. The example code is written in C#, and is designed to work on both Microsoft .NET Framework and Mono.
This tutorial is designed to get you up and running with Connector/NET as quickly as possible, it does not go into detail on any particular topic. However, the following sections of this manual describe each of the topics introduced in this tutorial in more detail. In this tutorial you are encouraged to type in and run the code, modifying it as required for your setup.
This tutorial assumes you have MySQL and Connector/NET already installed. It also assumes that you have installed the World example database, which can be downloaded from the MySQL Documentation page. You can also find details on how to install the database on the same page.
Before compiling the example code make sure that you have added
References to your project as required. The References required
are System, System.Data and
MySql.Data.
For your Connector/NET application to connect to a MySQL database
it needs to establish a connection. This is achieved through the
use of a MySqlConnection object.
The MySqlConnection constructor takes a connection string as one of its parameters. The connection string provides necessary information to make the connection to the MySQL database. The connection string is discussed more fully in Section 21.2.5.1, “Connecting to MySQL Using Connector/NET”. A reference containing a list of supported connection string options can also be found in Section 21.2.6, “Connector/NET Connection String Options Reference”.
The following code shows how to create a connection object.
using System;
using System.Data;
using MySql.Data;
using MySql.Data.MySqlClient;
public class Tutorial1
{
public static void Main()
{
string connStr = "server=localhost;user=root;database=world;port=3306;password=******;";
MySqlConnection conn = new MySqlConnection(connStr);
try
{
Console.WriteLine("Connecting to MySQL...");
conn.Open();
// Perform databse operations
}
catch (Exception ex)
{
Console.WriteLine(ex.ToString());
}
conn.Close();
Console.WriteLine("Done.");
}
}
When the MySqlConnection constructor is invoked
it returns a connection object, which is used for subsequent
database operations. The first operation in this example is to
open the connection. This needs to be done before further
operations take place. Before the application exits the connection
to the database needs to be closed by calling
Close on the connection object.
Sometimes an attempt to perform an Open on a
connection object can fail, this will generate an exception that
can be handled using standard exception handling code.
In this section you have learned how to create a connection to a MySQL database, and open and close the corresponding connection object.
Once a connection has been established with the MySQL database,
the next step is do carry out the desired database operations.
This can be achieved through the use of the
MySqlCommand object.
You will see how to create a MySqlCommand
object. Once it has been created there are three main methods of
interest that you can call:
ExecuteReader - used to query the database. Results are usually returned in a
MySqlDataReaderobject, created byExecuteReader.ExecuteNonQuery - used to insert and delete data.
ExecuteScalar - used to return a single value.
Once a MySqlCommand object has been created,
you will call one of the above methods on it to carry out a
database operation, such as perform a query. The results are
usually returned into a MySqlDataReader object,
and then processed, for example the results might be displayed.
The following code demonstrates how this could be done.
using System;
using System.Data;
using MySql.Data;
using MySql.Data.MySqlClient;
public class Tutorial2
{
public static void Main()
{
string connStr = "server=localhost;user=root;database=world;port=3306;password=******;";
MySqlConnection conn = new MySqlConnection(connStr);
try
{
Console.WriteLine("Connecting to MySQL...");
conn.Open();
string sql = "SELECT Name, HeadOfState FROM Country WHERE Continent='Oceania'";
MySqlCommand cmd = new MySqlCommand(sql, conn);
MySqlDataReader rdr = cmd.ExecuteReader();
while (rdr.Read())
{
Console.WriteLine(rdr[0]+" -- "+rdr[1]);
}
rdr.Close();
}
catch (Exception ex)
{
Console.WriteLine(ex.ToString());
}
conn.Close();
Console.WriteLine("Done.");
}
}
When a connection has been created and opened, the code then
creates a MySqlCommand object. Note that the
SQL query to be executed is passed to the
MySqlCommand constructor. The
ExecuteReader method is then used to generate a
MySqlReader object. The
MySqlReader object contains the results
generated by the SQL executed on the command object. Once the
results have been obtained in a MySqlReader
object, the results can be processed. In this case the information
is simply printed out as part of a while loop.
Finally, the MySqlReader object is displosed of
by running its Close method on it.
In the next example you will see how to use the
ExecuteNonQuery method.
The procedure for performing an ExecuteNonQuery
method call is simpler, as there is no need to create an object to
store results. This is because ExecuteNonQuery
is only used for inserting, updating and deleting data. The
following example illustrates a simple update to the Country
table:
using System;
using System.Data;
using MySql.Data;
using MySql.Data.MySqlClient;
public class Tutorial3
{
public static void Main()
{
string connStr = "server=localhost;user=root;database=world;port=3306;password=******;";
MySqlConnection conn = new MySqlConnection(connStr);
try
{
Console.WriteLine("Connecting to MySQL...");
conn.Open();
string sql = "INSERT INTO Country (Name, HeadOfState, Continent) VALUES ('Disneyland','Mickey Mouse', 'North America')";
MySqlCommand cmd = new MySqlCommand(sql, conn);
cmd.ExecuteNonQuery();
}
catch (Exception ex)
{
Console.WriteLine(ex.ToString());
}
conn.Close();
Console.WriteLine("Done.");
}
}
The query is constructed, the command object created and the
ExecuteNonQuery method called on the command
object. You can access your MySQL database with the MySQL Client
program and verify that the update was carried out correctly.
Finally, you will see how the ExecuteScalar
method can be used to return a single value. Again, this is
straightforward, as a MySqlDataReader object is
not required to store results, a simple variable will do. The
following code illustrates how to use
ExecuteScalar:
using System;
using System.Data;
using MySql.Data;
using MySql.Data.MySqlClient;
public class Tutorial4
{
public static void Main()
{
string connStr = "server=localhost;user=root;database=world;port=3306;password=******;";
MySqlConnection conn = new MySqlConnection(connStr);
try
{
Console.WriteLine("Connecting to MySQL...");
conn.Open();
string sql = "SELECT COUNT(*) FROM Country";
MySqlCommand cmd = new MySqlCommand(sql, conn);
object result = cmd.ExecuteScalar();
if (result != null)
{
int r = Convert.ToInt32(result);
Console.WriteLine("Number of countries in the World database is: " + r);
}
}
catch (Exception ex)
{
Console.WriteLine(ex.ToString());
}
conn.Close();
Console.WriteLine("Done.");
}
}
This example uses a simple query to count the rows in the Country
table. The result is obtained by calling
ExecuteScaler on the command object.
Previously, when using MySqlDataReader, the connection to the database was continually maintained, unless explicitly closed. It is also possible to work in a manner where a connection is only established when needed. For example, in this mode, a connection could be established to read a chunk of data, the data could then be modified by the application as required. A connection could then be reestablished only if and when the application needs to write data back to the database. This decouples the working data set from the database.
This decouple mode of working with data is supported by Connector/NET. There are several parts involved in allowing this method to work:
Data Set - The Data Set is the area in which data is loaded to read or modify it. A
DataSetobject is instantiated, which can store multiple tables of data.Data Adapter - The Data Adapter is the interface between the Data Set and the database itself. The Data Adapter is responsible for efficiently managing connections to the database, opening and closing them as required. The Data Adapter is created by instantiating an object of the
MySqlDataAdapterclass. TheMySqlDataAdapterobject has two main methods:Fillwhich reads data into the Data Set, andUpdate, which writes data from the Data Set to the database.Command Builder - The Command Builder is a support object. The Command Builder works in conjunction with the Data Adapter. When a
MySqlDataAdapterobject is created it is typically given an initial SELECT statement. From this SELECT statement the Command Builder can work out the corresponding INSERT, UPDATE and DELETE statements that would be required should the database need to be updated. To create the Command Builder an object of the classMySqlCommandBuilderis created.
Each of these classes will now be discussed in more detail.
Instantiating a DataSet object
A DataSet object can be created simply, as
shown in the following example code snippet:
DataSet dsCountry; ... dsCountry = new DataSet();
Although this creates the DataSet object it has
not yet filled it with data. For that a Data Adapter is required.
Instantiating a MySqlDataAdapter object
The MySqlDataAdapter can be created as
illustrated by the following example:
MySqlDataAdapter daCountry; ... string sql = "SELECT Code, Name, HeadOfState FROM Country WHERE Continent='North America'"; daCountry = new MySqlDataAdapter (sql, conn);
Note, the MySqlDataAdapter is given the SQL
specifying the data you wish to work with.
Instantiating a MySqlCommandBuilder object
Once the MySqlDataAdapter has been created, it
is necessary to generate the additional statements required for
inserting, updating and deleting data. There are several ways to
do this, but in this tutorial you will see how this can most
easily be done with MySqlCommandBuilder. The
following code snippet ilustrates how this is done:
MySqlCommandBuilder cb = new MySqlCommandBuilder(daCountry);
Note that the MySqlDataAdapter object is passed
as a parameter to the command builder.
Filling the Data Set
To do anything useful with the data from your datbase, you need to
load it into a Data Set. This is one of the jobs of the
MySqlDataAdapter object, and is carried out
with its Fill method. The following example
code illustrates this:
DataSet dsCountry; ... dsCountry = new DataSet(); ... daCountry.Fill(dsCountry, "Country");
Note the Fill method is a
MySqlDataAdapter method, the Data Adapter knows
how to establish a connec tion with the database and retrieve the
required data, and then populates the Data Set when the
Fill method is called. The second parameter
“Country” is the table in the Data Set to update.
Updating the Data Set
The data in the Data Set can now be manipulated by the application
as required. At some point, changes to data will need to be
written back to the database. This is achieved through a
MySqlDataAdapter method, the
Update method.
daCountry.Update(dsCountry, "Country");
Again, the Data Set and the table within the Data Set to update are specified.
Working Example
The interactions between the DataSet,
MySqlDataAdapter and
MySqlCommandBuilder classes can be a little
confusing, so their operation can perhaps be best illustrated by
working code.
In this example, data from the World database is read into a Data Grid View control. Here, the data can be viewed and changed before clicking an update button. The update button then activates code to write changes back to the database. The code uses the principles explained above. The application was built using the Microsoft Visual Studio to place and create the user interface controls, but the main code that uses the key classes descibed above is shown below, and is portable.
using System;
using System.Collections.Generic;
using System.ComponentModel;
using System.Data;
using System.Drawing;
using System.Linq;
using System.Text;
using System.Windows.Forms;
using MySql.Data;
using MySql.Data.MySqlClient;
namespace WindowsFormsApplication5
{
public partial class Form1 : Form
{
MySqlDataAdapter daCountry;
DataSet dsCountry;
public Form1()
{
InitializeComponent();
}
private void Form1_Load(object sender, EventArgs e)
{
string connStr = "server=localhost;user=root;database=world;port=3306;password=******;";
MySqlConnection conn = new MySqlConnection(connStr);
try
{
label2.Text = "Connecting to MySQL...";
string sql = "SELECT Code, Name, HeadOfState FROM Country WHERE Continent='North America'";
daCountry = new MySqlDataAdapter (sql, conn);
MySqlCommandBuilder cb = new MySqlCommandBuilder(daCountry);
dsCountry = new DataSet();
daCountry.Fill(dsCountry, "Country");
dataGridView1.DataSource = dsCountry;
dataGridView1.DataMember = "Country";
}
catch (Exception ex)
{
label2.Text = ex.ToString();
}
}
private void button1_Click(object sender, EventArgs e)
{
daCountry.Update(dsCountry, "Country");
label2.Text = "MySQL Database Updated!";
}
}
}The application running is shown below:
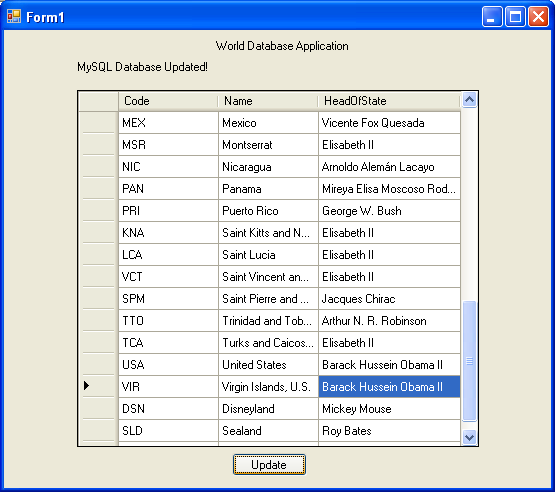
This part of the tutorial shows you how to use parameters in your Connector/NET application.
Although it is possible to build SQL query strings directly from user input, this is not advisable as it does not prevent erroneous or malicious information being entered. It is safer to use parameters as they will be processed as field data only. For example, imagine the following query was contructed from user input:
string sql = "SELECT Name, HeadOfState FROM Country WHERE Continent = "+user_continent;
If the string user_continent came from a Text
Box control, there would potentially be no control over the string
entered by the user. The user could enter a string that generates
a run time error, or in the worst case actually harms the system.
When using parameters it is not possible to do this because a
parameter is only ever treated as a field parameter, rather than
an arbitrary piece of SQL code.
The same query written user a parameter for user input would be:
string sql = "SELECT Name, HeadOfState FROM Country WHERE Continent = @Continent";
Note that the parameter is preceded by an '@' symbol to indicate it is to be treated as a parameter.
As well as marking the position of the parameter in the query string, it is necessary to add a parameter to the Command object. This is illustrated by the following code snippet:
cmd.Parameters.AddWithValue("@Continent", "North America");
In this example the string "North America" is supplied as the parameter value statically, but in a more practical example it would come from a user input control.
A further example illustrates the complete process:
using System;
using System.Data;
using MySql.Data;
using MySql.Data.MySqlClient;
public class Tutorial5
{
public static void Main()
{
string connStr = "server=localhost;user=root;database=world;port=3306;password=******;";
MySqlConnection conn = new MySqlConnection(connStr);
try
{
Console.WriteLine("Connecting to MySQL...");
conn.Open();
string sql = "SELECT Name, HeadOfState FROM Country WHERE Continent=@Continent";
MySqlCommand cmd = new MySqlCommand(sql, conn);
Console.WriteLine("Enter a continent e.g. 'North America', 'Europe': ");
string user_input = Console.ReadLine();
cmd.Parameters.AddWithValue("@Continent", user_input);
MySqlDataReader rdr = cmd.ExecuteReader();
while (rdr.Read())
{
Console.WriteLine(rdr["Name"]+" --- "+rdr["HeadOfState"]);
}
rdr.Close();
}
catch (Exception ex)
{
Console.WriteLine(ex.ToString());
}
conn.Close();
Console.WriteLine("Done.");
}
}In this part of the tutorial you have see how to use parameters to make your code more secure.
In this section you will see how to work with Stored Procedures. This section assumes you have a basic understanding of what a Stored Procedure is, and how to create one.
For the purposes of this tutorial, you will create a simple Stored Procedure to see how it can be called from Connector/NET. In the MySQL Client program, connect to the World database and enter the following Stored Procedure:
DELIMITER // CREATE PROCEDURE country_hos (IN con CHAR(20)) BEGIN SELECT Name, HeadOfState FROM Country WHERE Continent = con; END // DELIMITER ;
Test the Stored Procedure works as expected by typing the following into the MySQL Client program:
CALL country_hos('Europe');Note that The Stored Routine takes a single parameter, which is the continent you wish to restrict your search to.
Having confirmed that the Stored Procedure is present and correct you can now move on to seeing how it can be accessed from Connector/NET.
Calling a Stored Procedure from your Connector/NET application is
similar to techniques you have seen earlier in this tutorial. A
MySqlCommand object is created, but rather than
taking a SQL query as a parameter it takes the name of the Stored
Procedure to call. The MySqlCommand object also
needs to be set to the type of Stored Procedure. This is
illustrated by the following code snippet:
string rtn = "country_hos"; MySqlCommand cmd = new MySqlCommand(rtn, conn); cmd.CommandType = CommandType.StoredProcedure;
In this case you also need to pass a parameter to the Stored Procedure. This can be achieved using the techniques seen in the previous section on parameters, Section 21.2.4.1.4, “Working with Parameters”. This is shown in the following code snippet:
cmd.Parameters.AddWithValue("@con", "Europe");
The value of the parameter @con could more
realistically have come from a user input control, but for
simplicity it is set as a static string in this example.
At this point everything is set up and all that now needs to be
done is to call the routine. This can be achieved using techniques
also learned in earlier sections, but in this case the
ExecuteReader method of the
MySqlCommand object is used.
Complete working code for the Stored Procedure example is shown below:
using System;
using System.Data;
using MySql.Data;
using MySql.Data.MySqlClient;
public class Tutorial6
{
public static void Main()
{
string connStr = "server=localhost;user=root;database=world;port=3306;password=******;";
MySqlConnection conn = new MySqlConnection(connStr);
try
{
Console.WriteLine("Connecting to MySQL...");
conn.Open();
string rtn = "country_hos";
MySqlCommand cmd = new MySqlCommand(rtn, conn);
cmd.CommandType = CommandType.StoredProcedure;
cmd.Parameters.AddWithValue("@con", "Europe");
MySqlDataReader rdr = cmd.ExecuteReader();
while (rdr.Read())
{
Console.WriteLine(rdr[0] + " --- " + rdr[1]);
}
rdr.Close();
}
catch (Exception ex)
{
Console.WriteLine(ex.ToString());
}
conn.Close();
Console.WriteLine("Done.");
}
}In this section you have seen how to call a Stored Procedure from Connector/NET. For the moment, this concludes our introductory tutorial on programming with Connector/NET.
Many web sites feature the facility for the user to create a user account. They can then log into the web site and enjoy a personalized experience. This requires that the developer creates database tables to store user information, along with code to gather and process this data. This represents a burden on the developer, and there is the possibility for security issues to creep into the developed code. However, ASP.NET 2.0 introduced the Membership system. This system is designed around the concept of Membership, Profile and Role Providers, which together provide all of the functionality to implement a user system, that previously would have to have been created by the developer from scratch.
Currently, MySQL Connector/NET provides Membership, Role, Profile and Session State Providers.
This tutorial shows you how to set up your ASP.NET web application to use the MySQL Connector/NET Membership and Role Providers. It assumes that you have MySQL Server installed, along with MySQL Connector/NET and Microsoft Visual Studio. This tutorial was tested with MySQL Connector/NET 6.0.4 and Microsoft Visual Studio 2008 Professional Edition. It is recommmended you use 6.0.4 or above for this tutorial.
Create a new database in the MySQL Server using the MySQL Command Line Client program (
mysql), or other suitable tool. It does not matter what name is used for the database, but it should be noted down so that it can be specified in the connection string constructed later in this tutorial. This database will contain the tables, automatically created for you later, used to store data about users and roles.Create a new ASP.NET Web Site in Visual Studio. If you are not sure how to do this, refer to the following tutorial: Section 21.2.4.6, “Tutorial: Databinding in ASP.NET using LINQ on Entities”, which demonstrates how to create a simple ASP.NET web site.
Add References to
MySql.DataandMySql.Webto the web site project.Locate the
machine.configfile on your system, which is the configuration file for the .NET Framework.Search the
machine.configfile to find the membership providerMySQLMembershipProvider.Add the attribute
autogenerateschema="true". The appropriate section should now resemble the following (note: for the sake of brevity some information has been excluded):<membership> <providers> <add name="AspNetSqlMembershipProvider" type="System.Web.Security.SqlMembershipProvider" ... connectionStringName="LocalSqlServer" ... /> <add name="MySQLMembershipProvider" autogenerateschema="true" type="MySql.Web.Security.MySQLMembershipProvider, MySql.Web, Version=6.0.4.0, Culture=neutral, PublicKeyToken=c5687fc88969c44d" connectionStringName="LocalMySqlServer" ... /> </providers> </membership>Note that the name for the connection string to be used to connect to the server that contains the membership database is
LocalMySqlServer.The
autogenerateschema="true"attribute will cause MySQL Connector/NET to silently create, or upgrade, the schema on the database server, to contain the required tables for storing membership information.It is now necessary to create the connection string referenced in the previous step. Load the web site's
web.configfile into Visual Studio.Locate the section marked
<connectionStrings>. Add the following connection string information:<connectionStrings> <remove name="LocalMySqlServer"/> <add name="LocalMySqlServer" connectionString="Datasource=localhost;Database=users;uid=root;pwd=password;" providerName="MySql.Data.MySqlClient"/> </connectionStrings>The database specified is the one created in the first step. You could alternatively have used an existing database.
At this point build the solution to ensure no errors are present. This can be done by selecting , from the main menu, or pressing F6.
ASP.NET supports the concept of locally and remotely authenticated users. With local authentication the user is validated using their Windows credentials when they attempt to access the web site. This can be useful in an Intranet environment. With remote authentication a user is prompted for their login details when accessing the web site, and these credentials are checked aganst the membership information stored in a database server such as MySQL Server. You will now see how to choose this form of authentication.
Start the ASP.NET Web Site Administration Tool. This can be done quickly by clicking the small hammer/Earth icon in the Solution Explorer. You can also launch this tool by selecting , from the main menu.
In the ASP.NET Web Site Administration Tool click the Security tab.
Now click the User Authentication Type link.
Select the From the internet radio button. The web site will now need to provide a form to allow the user to enter their login details. These will be checked against membership information stored in the MySQL database.
You now need to specify the Role and Membership Provider to be used. Click the Provider tab.
Click the Select a different provider for each feature (advanced) link.
Now select the MySQLMembershipProvider and the MySQLRoleProvider radio buttons.
In Visual Studio rebuild the solution by selecting , from the main menu.
Check that the necessary schema has been created. This can be achieved using the MySQL Command Line Client program.
Assuming all is present and correct you can now create users and roles for your web application. The easiest way to do this is with the ASP.NET Web Site Administration Tool. However, many web applications contain their own modules for creating roles and users. For simplicity the ASP.NET Web Site Administration Tool will be used in this tutorial.
In the ASP.NET Web Site Administration Tool, click the Security tab. Now that both the Membership and Role Provider are enabled you will see links for creating roles and users. Click the Create or Manage Roles link.
You can now enter the name of a new Role and click to create the new Role. Create new Roles as required.
Click the button.
Click the Create User link. You can now fill in information about the user to be created, and also allocate that user to one or more Roles.
Using the MySQL Command Line Client program you can check that your database has been correctly populated with the Membership and Role data.
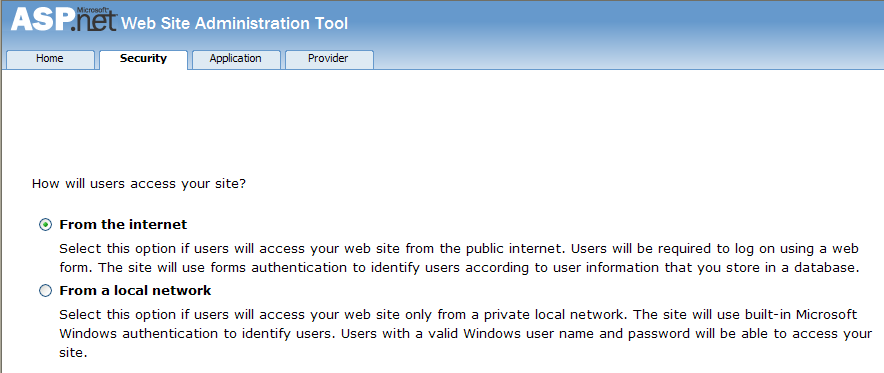
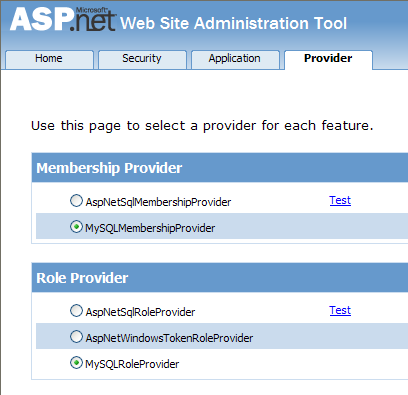
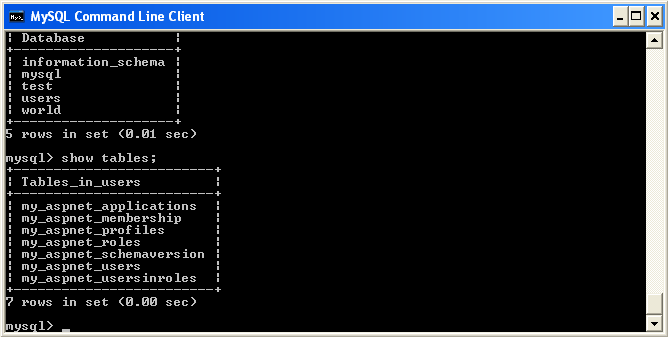
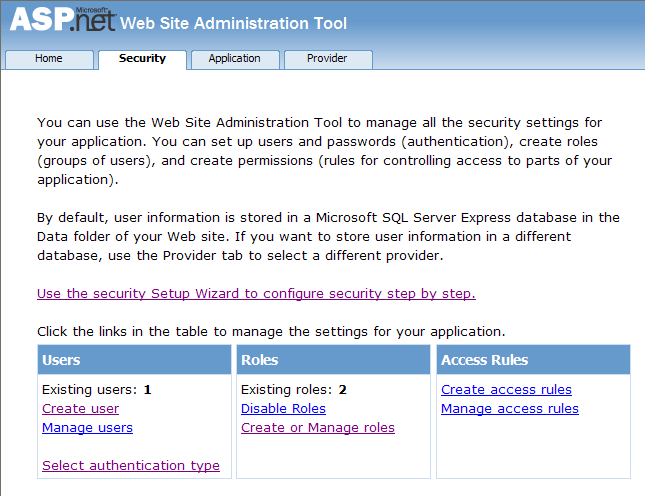
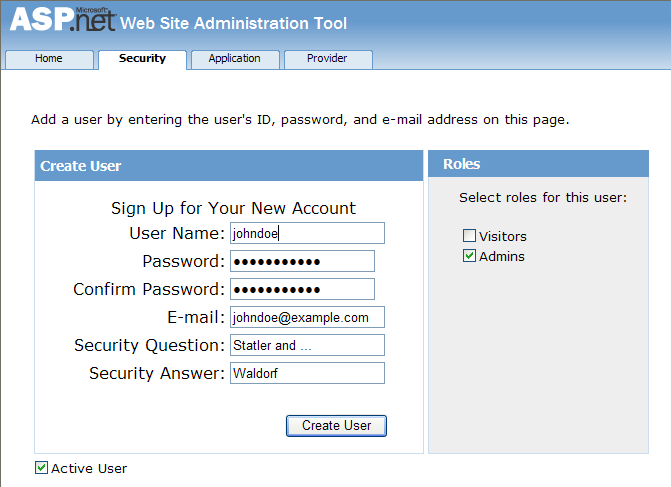

In this tutorial you have seen how to set up the MySQL Connector/NET Membership and Role Providers for use in your ASP.NET web application.
MySQL Connector/NET from version 6.1 has included a MySQL Session State
Provider. This provider enables you to store session state in a
MySQL database. The following tutorial shows you how to prepare to
use the MySQL Session State Provider, and then store session data
into the MySQL database. This tutorial uses Microsoft Visual
Studio 2008 Professional Edition, MySQL Connector/NET 6.1.1 and MySQL Server
5.1. This tutorial also assumes you have created an empty
database, for example test, where you will
store session data. You could do this using the MySQL Command Line
Client tool.
In Visual Studio create a new ASP.NET web site. If you are not sure how to do this refer to the tutorial Section 21.2.4.6, “Tutorial: Databinding in ASP.NET using LINQ on Entities” which demonstrates how to do this.
Launch the MySQL MySQL Website Configuration tool. Due to a bug in 6.1.1 this may not appear unless you are connected to a server in the Server Explorer. If you are unfamiliar with the MySQL Website Configuration tool it is suggested that you first work through the following tutorial Section 21.2.3.10, “MySQL Website Configuration Tool”.
Navigate through the wizard to the Session State page. Make sure the checkbox Use MySQL to manage my ASP.NET session data is seected.
On the same page configure the connection string to the database that will contain your session data. This database can be empty as MySQL Connector/NET will create the schema required to store session data.
Ensure that the checkbox Autogenerate Schema is selected so that MySQL Connector/NET will create the schema in your database to store the session data correctly.
Enter the name of your application.
Click . The MySQL Website Configuration tool will now update your application's
web.configfile with information about the connection string and default providers to be used. In this case we have selected the MySQL Session State Provider.
At this point you are ready to use the MySQL database to store session data. To test that the set up has worked you can write a simple program that uses session variables.
Open
Default.aspx.cs. In the Page_Load method add the following code:Session["SessionVariable1"] = "Test string";
Build your solution.
Run the solution (without debugging). When the application runs, the provider will autogenerate tables required in the database you chose when setting up the application.
Check that the schema was in fact created. Using the MySQL Command Line Client use the target database and then type
SHOW TABLES;. You will see that MySQL Connector/NET has created the required schema automatically, as we selected this to happen in the MySQL Website Configuration tool.Now view the contents of these tables by typing
SELECT * FROM my_aspnet_sessions;in the MySQL Command Line Client. This will display the session data our application used. Note that this is stored in binary format so some data may not display as expected.
At this point you have installed the Session State Provider and carried out a preliminary test of the installation. You will now work a bit more with the Session State Provider.
In this part of the tutorial you will set and retrieve a session variable. You can work with your existing project.
Select the
Default.aspxand switch to Design View. Add a text box and three buttons. Change the text property for the buttons to “Store Session Variable”, “Clear Textbox”, and “Show Session Variable”. These will beButton1,Button2andButton3respectively. Build your solution to ensure that no errors have been introduced.Still in the Design View, double-click
Button1. Now to theButton1_Clickevent handler add code some the handler resembles the following:protected void Button1_Click(object sender, EventArgs e) { Session["SessionString"] = TextBox1.Text; }You have created a new Session variable accessed using the key “SessionString”. This will be set to the text that was entered into the text box when
Button1is clicked.In Design View double-click
Button2to add its click event handler. This button needs to clear text from the text box. The code to do this is as follows:protected void Button2_Click(object sender, EventArgs e) { TextBox1.Text = ""; }The code simply assigns an empty string to the
Textproperty of the text box.In the Design View double-click
Button3and modify the click handler as follows:protected void Button3_Click(object sender, EventArgs e) { TextBox1.Text = (String)Session["SessionString"]; }This will retrieve the session string and display it in the text box.
Now modify the
Page_Loadmethod as follows:protected void Page_Load(object sender, EventArgs e) { if (!IsPostBack) { TextBox1.Text = "Enter some text"; } }This ensures that when the page loads the text box
Textproperty is reset.Ensure that the solution is saved and then rebuild the solution.
Run the solution without debugging.
The form will be displayed. Enter some text into the text box. Now click . At this point you have stored the string in a session variable.
Now click to clear the text box.
Now click to retrieve and display the session variable.
Refresh the page to destroy the form and display a new form.
Click the text box will display the stored session variable, demonstrating that the refreshing the page does not destroy the session variable.
This illustrates that the session state data is not destroyed when a page is reloaded.
This tutorial shows you how to use the MySQL Profile Provider to store user profile information in a MySQL database. The tutorial uses MySQL Connector/NET 6.1.1, MySQL Server 5.1 and Microsoft Visual Studio 2008 Professional Edition.
Many modern web sites allow the user to create a personal profile. This requires a significant amount of code, but ASP.NET reduces this considerable by including the functionality in its Profile classes. The Profile Provider provides an abstraction between these classes and a data source. The MySQL Profile Provider enables profile data to be stored in a MySQL database. This enables the profile properties to be written to a persistent store, and be retrieved when required. The Profile Provider also enables profile data to be managed effectively, for example it enables profiles that have not been accessed since a specific date to be deleted.
The following steps show you how you can select the MySQL Profile Provider.
Create a new ASP.NET web project.
Select the MySQL Website Configuration tool. Due to a bug in 6.1.1 you may have to first connect to a server in Server Explorer before the tool's icon will display in the toolbar of the Solution Explorer.
In the MySQL Website Configuration tool navigate through the tool to the Profiles page.
Select the Use MySQL to manage my profiles checkbox.
Select the Autogenerate Schema checkbox.
Click the button and configure a connection string for the database that will be used to store user profile information.
Navigate to the last page of the tool and click to save your changes and exit the tool.
At this point you are now ready to start using the MySQL Profile Provider. With the following steps you can carry out a preliminary test of your installation.
Open your
web.configfile.Add a simple profile such as the following:
<system.web> <anonymousIdentification enabled="true"/> <profile defaultProvider="MySQLProfileProvider"> ... <properties> <add name="Name" allowAnonymous="true"/> <add name="Age" allowAnonymous="true" type="System.UInt16"/> <group name="UI"> <add name="Color" allowAnonymous="true" defaultValue="Blue"/> <add name="Style" allowAnonymous="true" defaultValue="Plain"/> </group> </properties> </profile> ...Note that
anonymousIdentificationhas been set to true. This enables users who have not been authenticated to use profiles. They are identified by a GUID in a cookie rather than by user name.
Now that the simple profile has been defined in
web.config, the next step is to write some
code to test the profile.
In Design View design a simple page with the following controls:
These will allow the user to enter some profile information. The user can also use the buttons to save their profile, clear the page, and restore their profile data.
In the Code View add code as follows:
... protected void Page_Load(object sender, EventArgs e) { if (!IsPostBack) { TextBox1.Text = Profile.Name; TextBox2.Text = Profile.Age.ToString(); Label1.Text = Profile.UI.Color; } } // Store Profile protected void Button1_Click(object sender, EventArgs e) { Profile.Name = TextBox1.Text; Profile.Age = UInt16.Parse(TextBox2.Text); } // Clear Form protected void Button2_Click(object sender, EventArgs e) { TextBox1.Text = ""; TextBox2.Text = ""; Label1.Text = ""; } // Retrieve Profile protected void Button3_Click(object sender, EventArgs e) { TextBox1.Text = Profile.Name; TextBox2.Text = Profile.Age.ToString(); Label1.Text = Profile.UI.Color; } protected void DropDownList1_SelectedIndexChanged(object sender, EventArgs e) { Profile.UI.Color = DropDownList1.SelectedValue; } ...Save all files and build the solution to check that no errors have been introduced.
Run the application.
Enter your name, age and select a color from the listbox. Now store this information in your profile by clicking . Note that if you do not select a color from the listbox your profile will use the default color
Bluethat was specified in theweb.configfile.Click to clear text from the textboxes and the label that displays your chosen color.
Now click to restore your profile data from the MySQL database.
Now exit the browser to terminate the application.
Run the application again. Note that when the page loads your profile information is restored from the MySQL database.
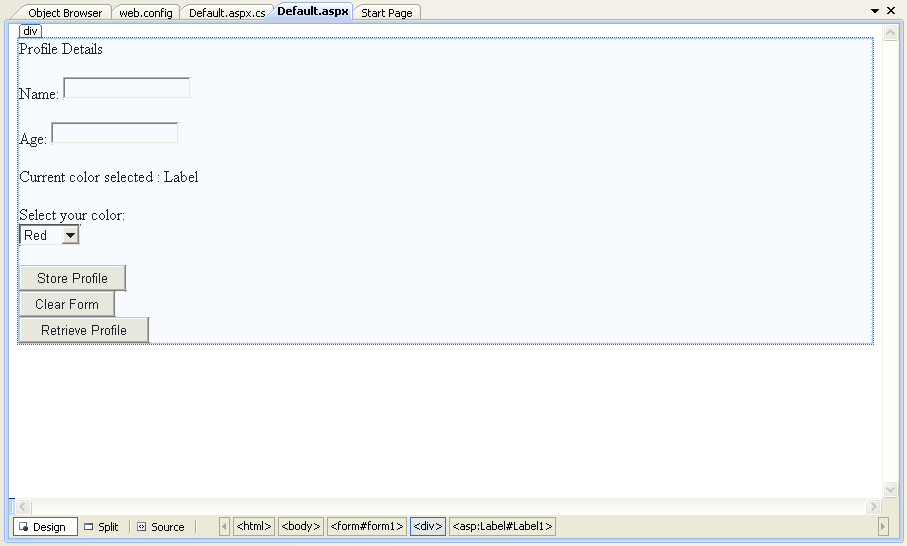
In this tutorial you have seen how to using the MySQL Profile Provider with MySQL Connector/NET.
In this tutorial you will learn how to create a Windows Forms Data Source from an Entity in an Entity Data Model. This tutorial assumes that you have installed the World example database, which can be downloaded from the MySQL Documentation page. You can also find details on how to install the database on the same page. It will also be convenient for you to create a connection to the World database after it is installed. For instructions on how to do this see Section 21.2.3.1, “Making a connection”.
Creating a new Windows Forms application
The first step is to create a new Windows Forms application.
In Visual Studio, select , , from the main menu.
Choose the Windows Forms Application installed template. Click . The solution is created.
Adding an Entity Data Model
You will now add an Entity Data Model to your solution.
In the Solution Explorer, right-click your application and select , . From Visual Studio installed templates select ADO.NET Entity Data Model. Click .
You will now see the Entity Data Model Wizard. You will use the wizard to generate the Entity Data Model from the world example database. Select the icon Generate from database. Click .
You can now select the connection you made earlier to the World database. If you have not already done so, you can create the new connection at this time by clicking . For further instructions on creating a connection to a database see Section 21.2.3.1, “Making a connection”.
Make a note of the entity connection settings to be used in App.Config, as these will be used later to write the necessary control code.
Click .
The Entity Data Model Wizard connects to the database. You are then presented with a tree structure of the database. From this you can select the object you would like to include in your model. If you had created Views and Stored Routines these will be displayed along with any tables. In this example you just need to select the tables. Click to create the model and exit the wizard.
Visual Studio will generate the model and then display it.
From the Visual Studio main menu select , , to ensure that everything compiles correctly so far.
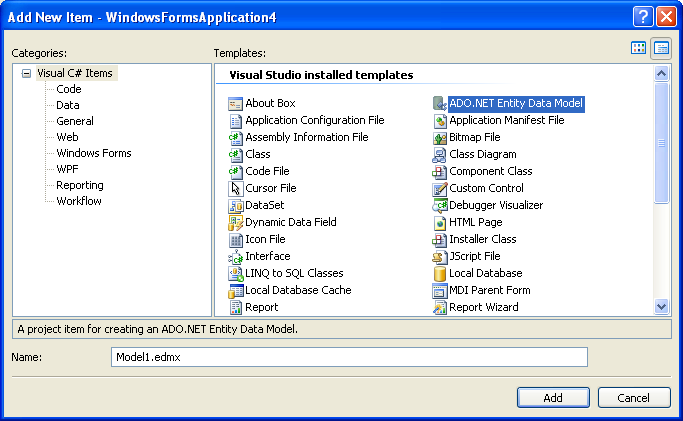
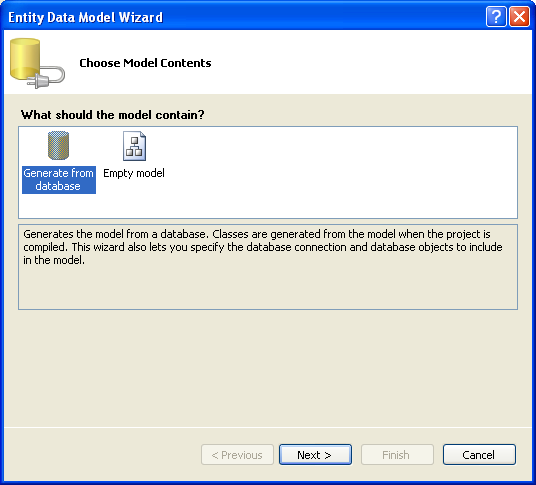
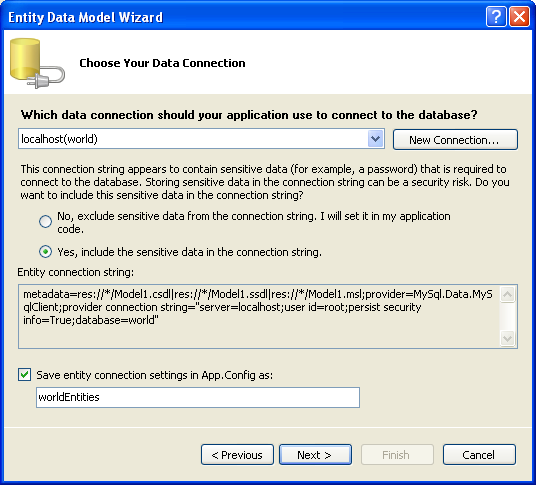
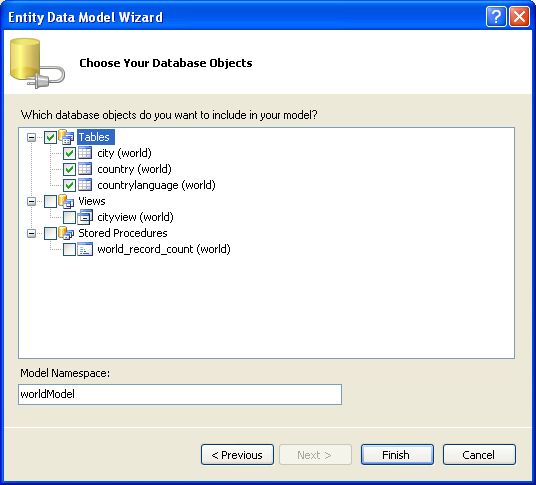
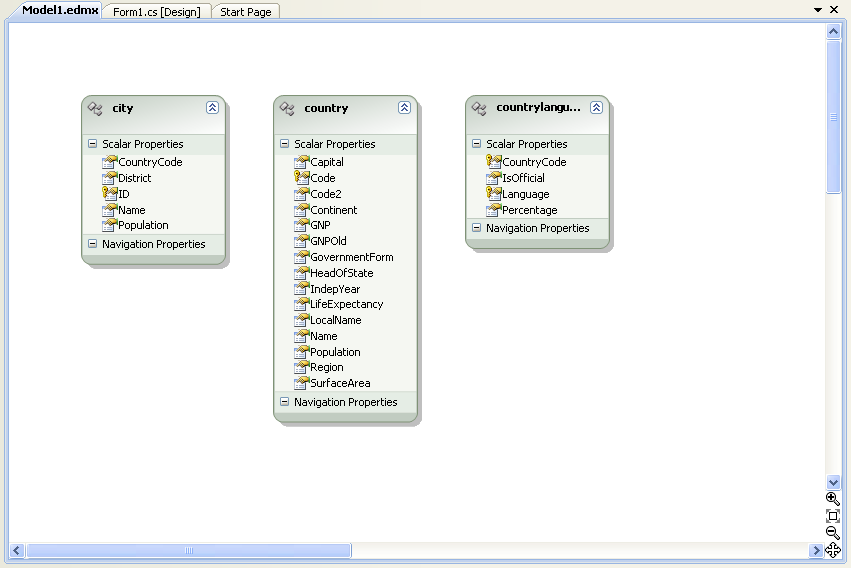
Adding a new Data Source
You will now add a new Data Source to your project and see how it can be used to read and write to the database.
From the Visual Studio main menu select , . You will be presented with the Data Source Configuration Wizard.
Select the Object icon. Click .
You will now select the Object you wish to bind to. Expand the tree. In this tutorial you will select the city table. Once the city table has been selected click .
The wizard will confirm that the city object is to be added. Click .
The city object will be display in the Data Sources panel. If the Data Sources panel is not displayed, select , from the Visual Studio main menu. The docked panel will then be displayed.
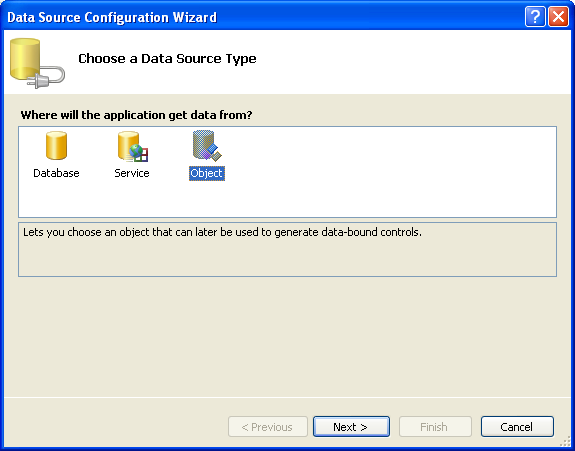
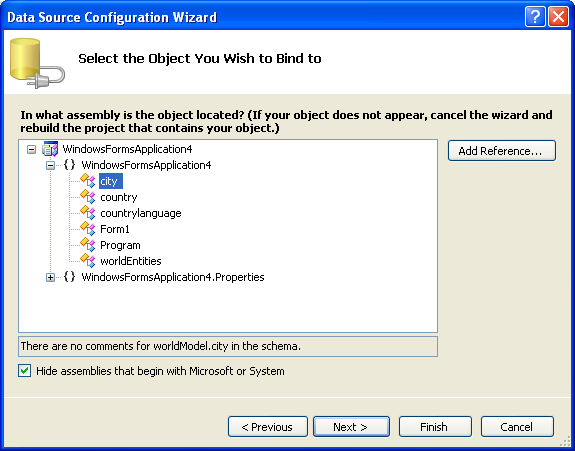
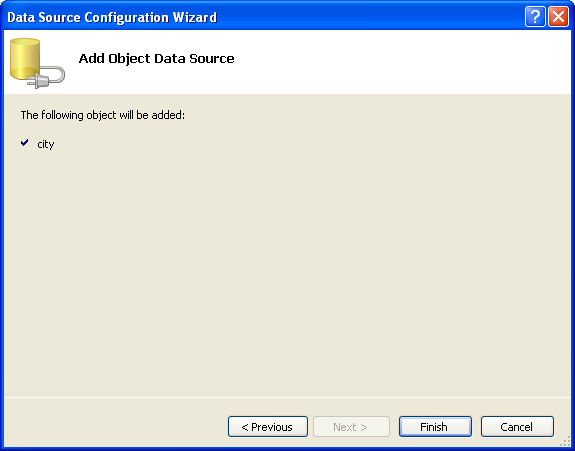
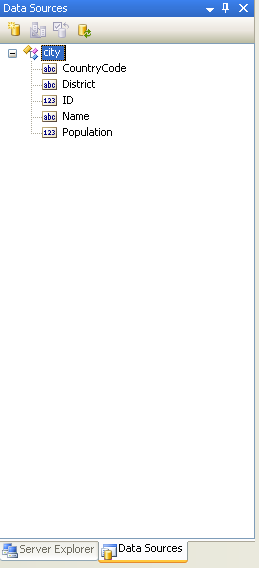
Using the Data Source in a Windows Form
You will now learn how to use the Data Source in a Windows Form.
In the Data Sources panel select the Data Source you just created and drag and drop it onto the Form Designer. By default the Data Source object will be added as a Data Grid View control. Note that the Data Grid View control is bound to the
cityBindingSourceand the Navigator control is bound tocityBindingNavigator.Save and rebuild the solution before continuing.
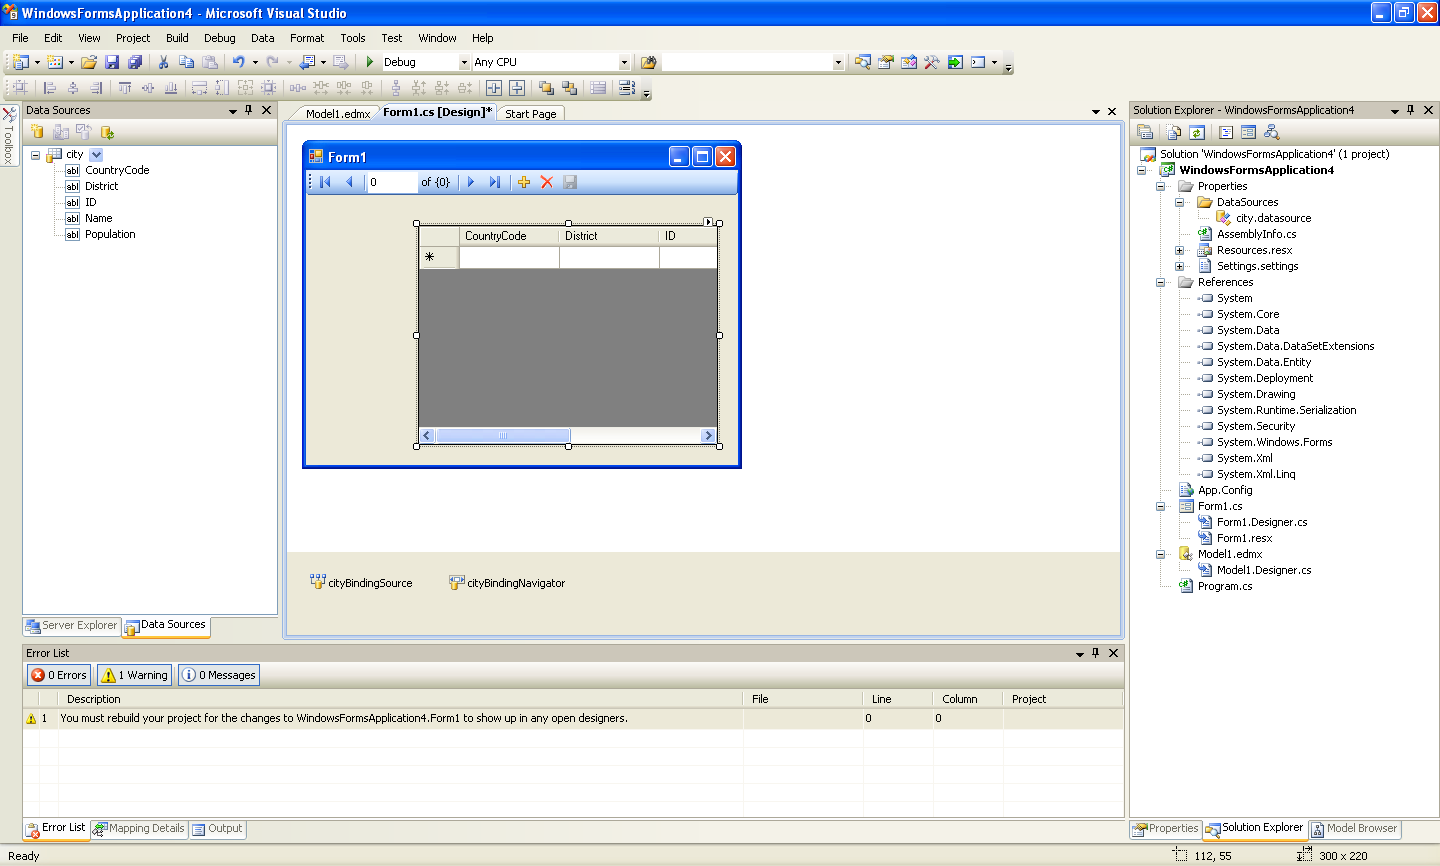
Adding Code to Populate the Data Grid View
You are now ready to add code to ensure that the Data Grid View control will be populated with data from the City database table.
Double-click the form to access its code.
Add code to instatiate the Entity Data Model's EntityContainer object and retrieve data from the database to populate the control.
Save and rebuild the solution.
Run the solution. Ensure the grid is populated and you can navigate the database.
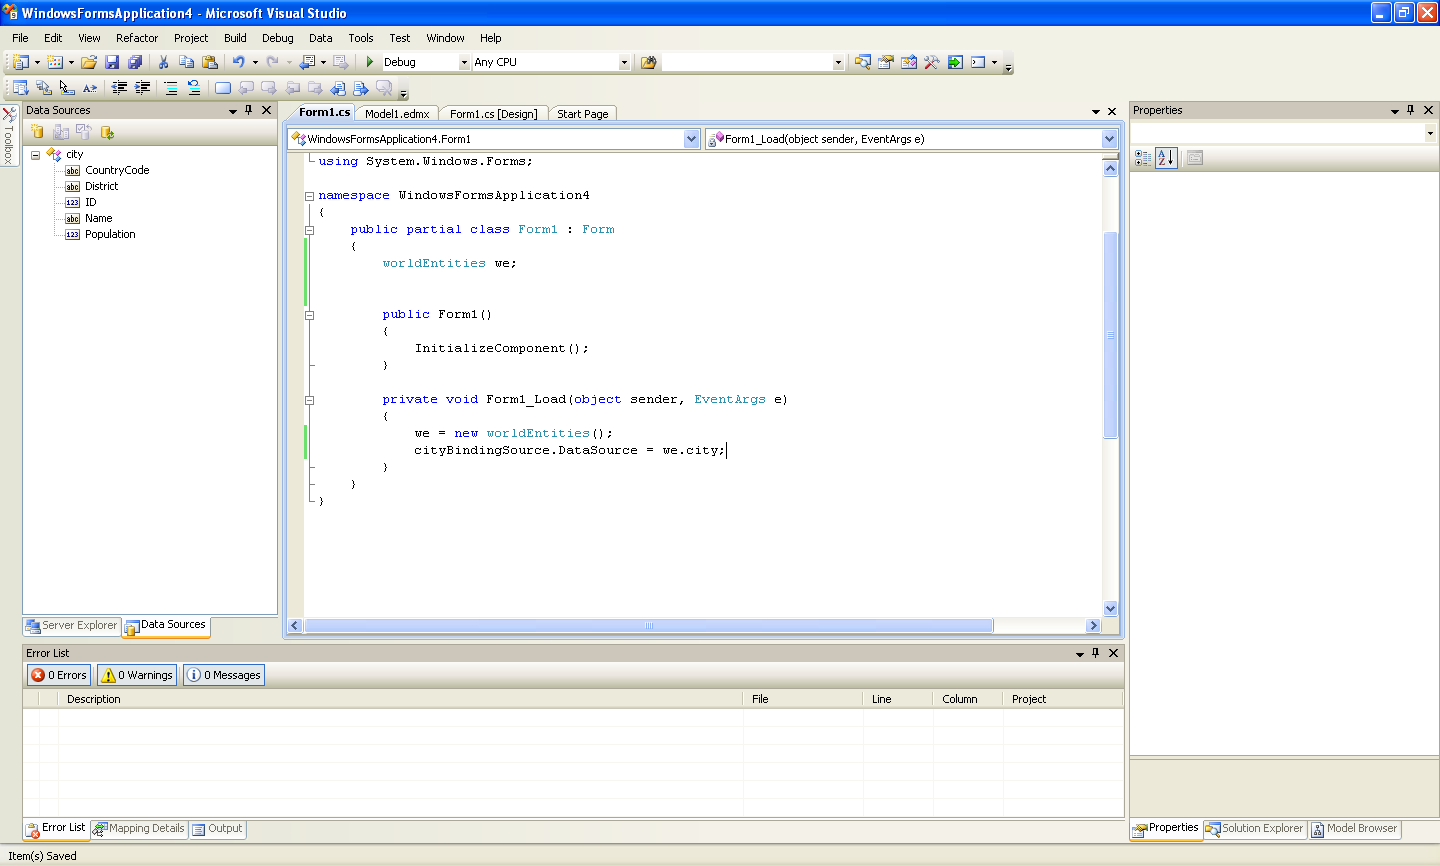
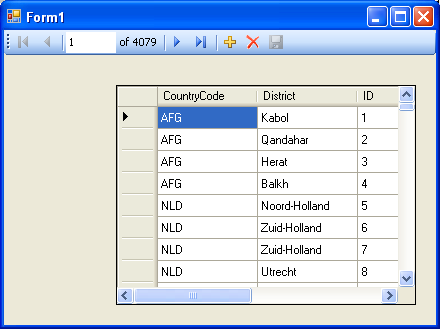
Adding Code to Save Changes to the Database
You will now add code to enable you to save changes to the database.
The Binding source component ensures that changes made in the Data Grid View control are also made to the Entity classes bound to it. However, that data needs to be saved back from the entities to the database itself. This can be achieved by the enabling of the Save button in the Navigator control, and the addition of some code.
In the Form Designer, click the Save icon in the Form toolbar and ensure that its Enabled property is set to True.
Double-click the Save icon in the Form toolbar to display its code.
You now need to add code to ensure that data is saved to the database when the save button is clicked in the application.
Once the code has been added, save the solution and rebuild it. Run the application and verify that changes made in the grid are saved.
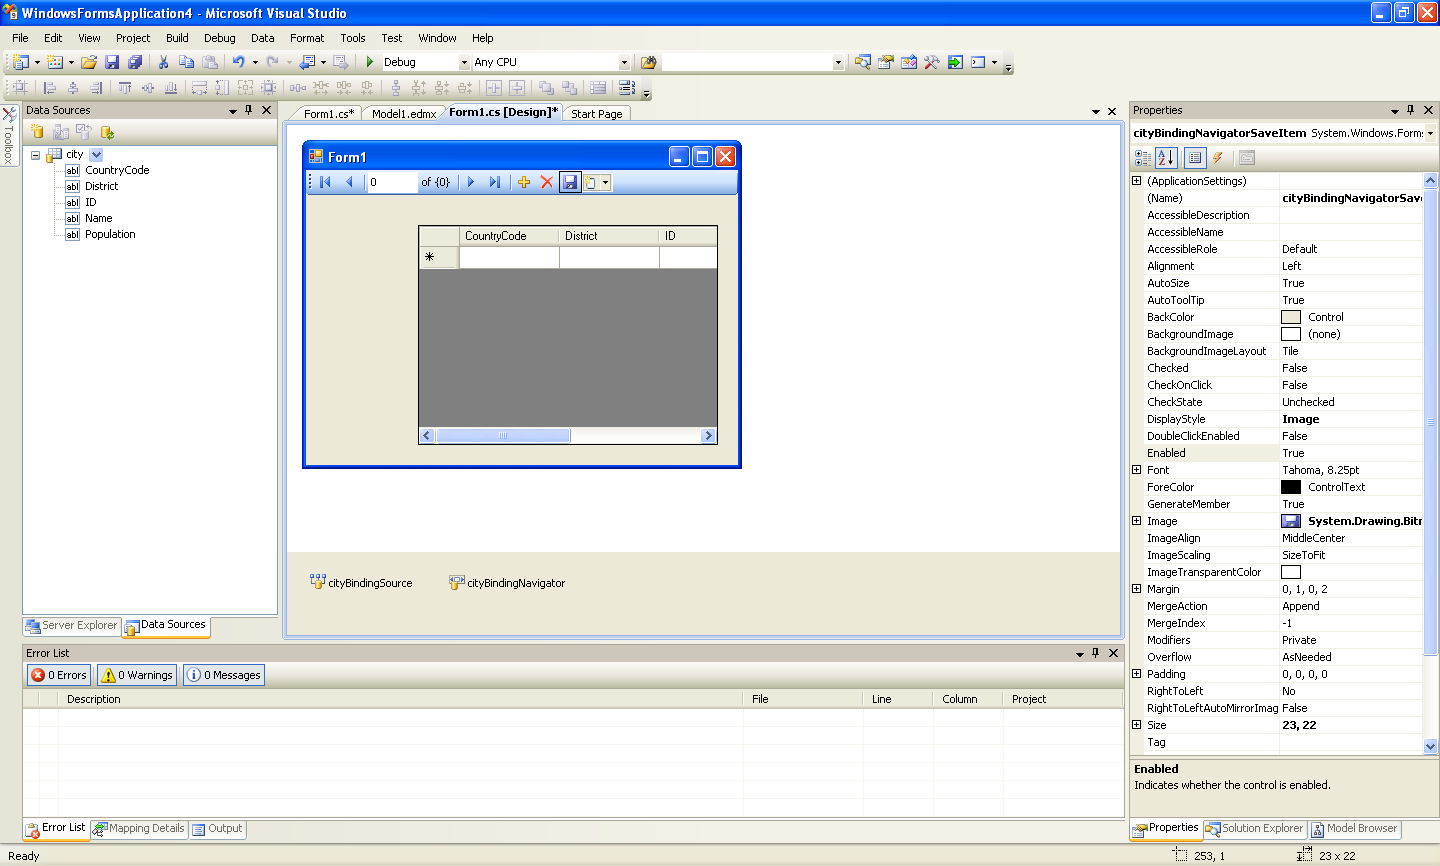

In this tutorial you create an ASP.NET web page that binds LINQ queries to entities using the Entity Framework mapping.
If you have not already done so, you should install the World example database prior to attempting this tutorial. Instructions on where to obtain the database and instructions on how to install it where given in the tutorial Section 21.2.4.5, “Tutorial: Using an Entity Framework Entity as a Windows Forms Data Source”.
Creating an ASP.NET web site
In this part of the tutorial you will create an ASP.NET web site. The web site will use the World database. The main web page will feature a drop down list from which you can select a country, data about that country's cities will then be displayed in a grid view control.
From the Visual Studio main menu select , , .
From the Visual Studio installed templates select ASP.NET Web Site. Click . You will be presented with the Source view of your web page by default.
Click the Design view tab situated underneath the Source view panel.
In the Design view panel, enter some text to decorate the blank web page.
Click Toolbox. From the list of controls select DropDownList. Drag and drop the control to a location beneath the text on your web page.
From the DropDownList control's context menu, ensure that the Enable AutoPostBack check box is enabled. This will ensure the control's event handler is called when an item is selected. The user's choice will in turn be used to populate the GridView control.
From the Toolbox select the GridView control.
Drag and drop the Grid Vew control to a location just below the Drop Down List you already placed.
At this point it is recommended that you save your solution, and build the solution to ensure that there are no errors.
If you run the solution you will see that the text and drop down list are displayed, but the list is empty. Also, the grid view does not appear at all. Adding this functionality is described in the following sections.
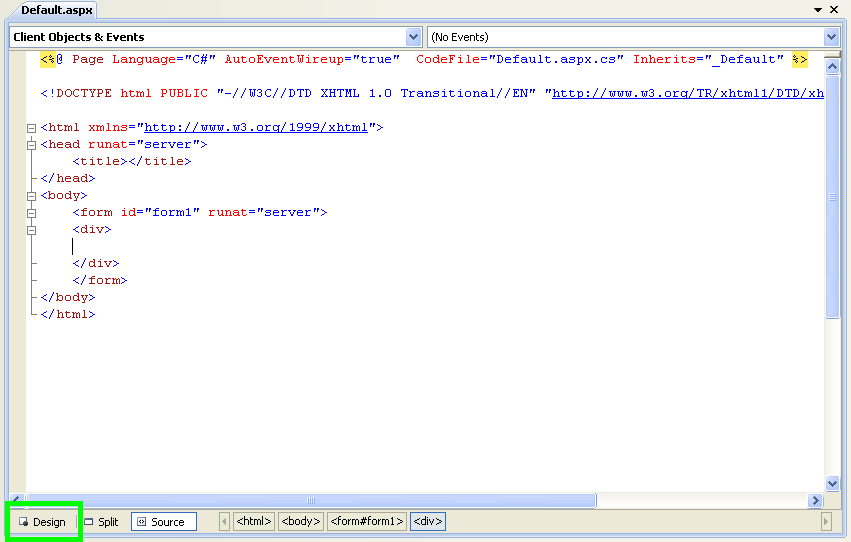
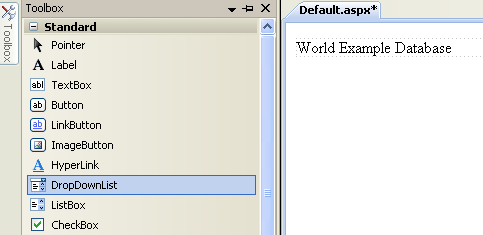
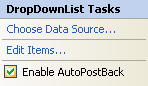
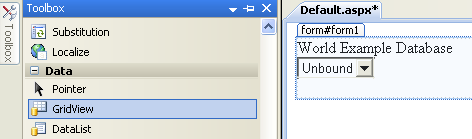
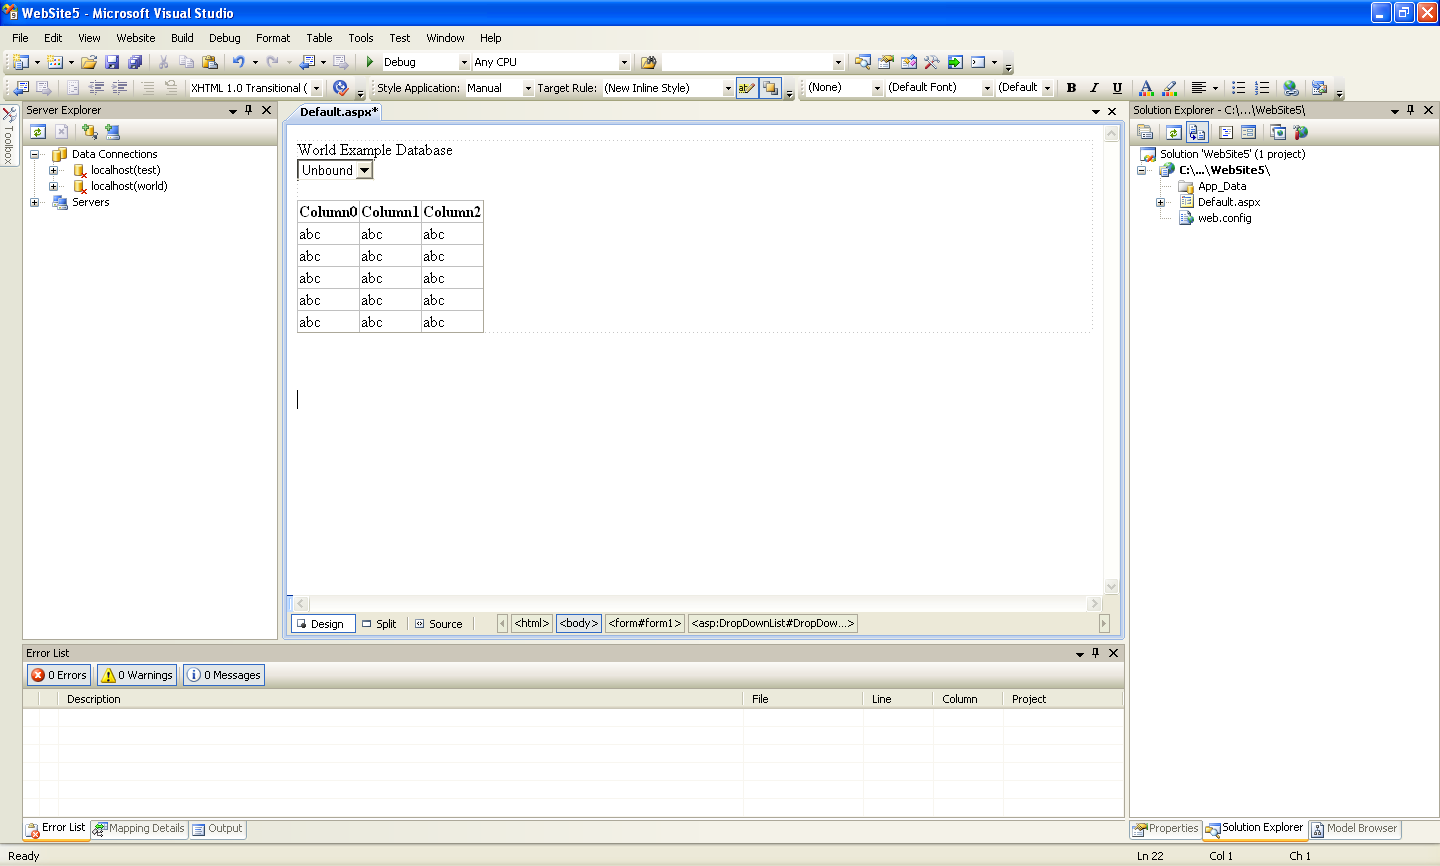
At this stage you have a web site that will build, but further functionality is required. The next step will be to use the Entity Framework to create a mapping from the World database into entities that you can control programmatically.
Creating an ADO.NET Entity Data Model
In this stage of the tutorial you will add an ADO.NET Entity Data Model to your project, using the World database at the storage level. The procedure for doing this is described in the tutorial Section 21.2.4.5, “Tutorial: Using an Entity Framework Entity as a Windows Forms Data Source”, and so will not be repeated here.
Populating a Drop Data List Box with using the results of a entity LINQ query
In this part of the tutorial you will write code to populate the DropDownList control. When the web page loads the data to populate the list will be achieved by using the results of a LINQ query on the model created previously.
In the Design view panel, double-click any blank area. This brings up the
Page_Loadmethod.Modify the relevant section of code according to the following listing:
... public partial class _Default : System.Web.UI.Page { worldModel.worldEntities we; protected void Page_Load(object sender, EventArgs e) { we = new worldModel.worldEntities(); if (!IsPostBack) { var countryQuery = from c in we.country orderby c.Name select new { c.Code, c.Name }; DropDownList1.DataValueField = "Code"; DropDownList1.DataTextField = "Name"; DropDownList1.DataSource = countryQuery; DataBind(); } } ...Note that the list control only needs to be populated when the page first loads. The conditional code ensures that if the page is subsequently reloaded, the list control is not repopulated, which would cause the user selection to be lost.
Save the solution, build it and run it. You should see the list control has been populated. You can select an item, but as yet the grid view control does not apear.
At this point you have a working Drop Down List control, populated by a LINQ query on your entity data model.
Populating a Grid View control using an entity LINQ query
In the last part of this tutorial you will populate the Grid View Control using a LINQ query on your entity data model.
In the Design view, double-click the DropDownList control. This causes its
SelectedIndexChangedcode to be displayed. This method is called when a user selects an item in the list control and thus fires an AutoPostBack event.Modify the relevant section of code accordingly to the following listing:
... protected void DropDownList1_SelectedIndexChanged(object sender, EventArgs e) { var cityQuery = from c in we.city where c.CountryCode == DropDownList1.SelectedValue orderby c.Name select new { c.Name, c.Population, c.CountryCode }; GridView1.DataSource = cityQuery; DataBind(); } ...The grid view control is populated from the result of the LINQ query on the entity data model.
As a check compare your code to that shown in the following screenshot:
Save, build and run the solution. As you select a country you will see its cities are displayed in the grid view control.
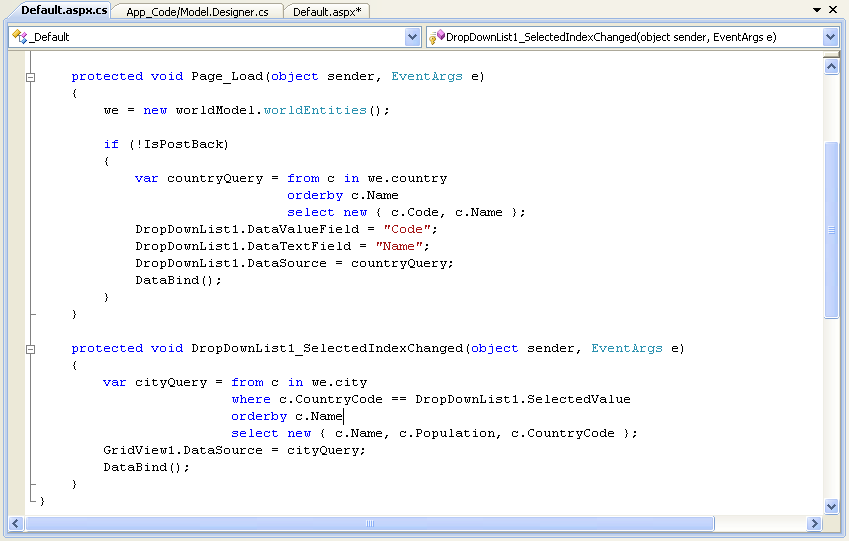

In this tutorial you have seen how to create an ASP.NET web site, you have also seen how you can access a MySQL database using LINQ queries on an entity data model.
In this tutorial you will learn how you can use MySQL Connector/NET to connect to a MySQL server configured to use SSL. Support for SSL client certificates was added with MySQL Connector/NET 6.2.
MySQL Server uses the PEM format for certificates and private keys.
This tutorial will use the test certificates from the server test
suite by way of example. You can obtain the MySQL Server source code
from
MySQL
Downloads. The certificates can be found in the directory
./mysql-test/std_data.
To carry out the steps in this tutorial you will also need to have Open SSL installed. This can be downloaded for Microsoft Windows at no charge from Shining Light Productions.
Further details on the connection string options used in this tutorial can be found at Section 21.2.6, “Connector/NET Connection String Options Reference”.
Configuring the MySQL Server to use SSL
In the MySQL Server configuration file, set the SSL parameters as follows:
ssl-ca=path/to/repo/mysql-test/std_data/cacert.pem ssl-cert=path/to/repo/mysql-test/std_data/server-cert.pem ssl-key=path/to/repo/mysql-test/std_data/server-key.pem
Adjust the directories according to the location in which you installed the MySQL source code.
In this step you create a test user and set the user to require SSL.
Using the MySQL Command Line Client, connect as root and create the user
sslclient.To set privileges and requirements, issue the following command:
GRANT ALL PRIVILEGES ON *.* TO sslclient@'%' REQUIRE SSL;
Creating a certificate file to use with the .NET client
The .NET client does not use the PEM file format, as .NET does not support this format natively. You will be using test client certificates from the same server repository, for the purposes of this example. You will need to convert these to PFX format first. This format is also known as PKCS#12. An article describing this procedure can be found at the Citrix website. From the directory
server-repository-root/mysql-test/std_dataopenssl pkcs12 -export -in client-cert.pem -inkey client-key.pem -certfile cacert.pem -out client.pfx
When asked for an export password, enter the password “pass”. The file
client.pfxwill be generated. This file is used in the remainder of the tutorial.
Connecting to the server using a file-based certificate
You will use PFX file,
client.pfxyou created in the previous step to authenticate the client. The following example demonstrates how to connect using theSSL Mode,CertificateFileandCertificatePasswordconnection string options:using (MySqlConnection connection = new MySqlConnection( "database=test;user=sslclient;" + "CertificateFile=H:\\bzr\\mysql-trunk\\mysqlest\\std_data\\client.pfx" + "CertificatePassword=pass;" + "SSL Mode=Required ")) { connection.Open(); }The path to the certificate file will need to be changed to reflect your individual installation.
Connecting to the server using a store-based certificate
The first step is to import the PFX file,
client.pfx, into the Personal Store. Double-click the file in Windows explorer. This launches the Certificate Import Wizard.Follow the steps dictated by the wizard, and when prompted for the password for the PFX file, enter “pass”.
Click to close the wizard and import the certificate into the personal store.
Examine certificates in the Personal Store
Start the Microsoft Management Console by entering
mmc.exeat a command prompt.Select , . Click . Select Certificates from the list of available snap-ins in the dialog.
Click button in the dialog, and select the My user account radio button. This is used for personal certificates.
Click the button.
Click to close the Add/Remove Snap-in dialog.
You will now have Certificates – Current User displayed in the left panel of the Microsoft Management Console. Expand the Certificates - Current User tree item and select Personal, Certificates. The right-hand panel will display a certificate issued to MySQL. This is the certificate that was previously imported. Double-click the certificate to display its details.
After you have imported the certificate to the Personal Store, you can use a more succint connection string to connect to the database, as illustrated by the following code:
using (MySqlConnection connection = new MySqlConnection( "database=test;user=sslclient;" + "Certificate Store Location=CurrentUser;" + "SSL Mode=Required")) { connection.Open(); }
Certificate Thumbprint Parameter
If you have a large number of certificates in your store, and many
have the same Issuer, this can be a source of confusion and result
in the wrong certificate being used. To alleviate this situation,
there is an optional Certificate Thumbprint parameter that can
additionally be specified as part of the connection string. As
mentioned before, you can double-click a certificate in the
Microsoft Management Console to display the certificate's details.
When the Certificate dialog is displayed click the
Details tab and scroll down to see the
thumbprint. The thumbprint will typically be a number such as
47 94 36 00 9a 40 f3 01 7a 14 5c f8 47 9e 76 94 d7 aa de
f0. This thumbprint can be used in the connection string,
as the following code illustrates:
using (MySqlConnection connection = new MySqlConnection(
"database=test;user=sslclient;" +
"Certificate Store Location=CurrentUser;" +
"Certificate Thumbprint=479436009a40f3017a145cf8479e7694d7aadef0;"+
"SSL Mode=Required"))
{
connection.Open();
}Spaces in the thumbprint parameter are optional and the value is case-insensitive.
In this tutorial you will learn how to use the
MySqlScript class. This class enables you to
execute a series of statements. Depending on the circumstances, this
can be more convenient than using the
MySqlCommand approach.
Further details of the MySqlScript class can
be found in the reference documentation supplied with MySQL Connector/NET.
If you wish to run the example programs in this tutorial, you will need to set up a simple test database and table. This can be achived using the MySQL Command Line Client or MySql Workbench. Commands for the MySQL Command Line Client are given here:
CREATE DATABASE TestDB;USE TestDB;CREATE TABLE TestTable (id INT NOT NULL PRIMARY KEY AUTO_INCREMENT, name VARCHAR(100));
The main method of the MySqlScript class is
the Execute method. This method causes the
script (sequence of statements) assigned to the
Query property of the MySqlScript object to be
executed. Note the Query property can be set
through the MySqlScript constructor or using
the Query property.
Execute returns the number of statements
executed.
The MySqlScript object will execute the
specified script on the connection set using the
Connection property. Again, this property can
be set directly or through the MySqlScript
constructor. The following code snipets illustrate this:
string sql = "SELECT * FROM TestTable"; ... MySqlScript script = new MySqlScript(conn, sql); ... MySqlScript script = new MySqlScript(); script.Query = sql; script.Connection = conn; ... script.Execute();
The MySqlScript class has several events associated with it. There are:
Error - generated in an error occurs.
ScriptCompleted - generated when the script successfully completes execution.
StatementExecuted - generated after each statement is executed.
It is possible to assign event handlers to each of these events. These user-provided routies will be called back should the connected event occur. The following code shows how the event handlers are set up.
script.Error += new MySqlScriptErrorEventHandler(script_Error); script.ScriptCompleted += new EventHandler(script_ScriptCompleted); script.StatementExecuted += new MySqlStatementExecutedEventHandler(script_StatementExecuted);
In VisualStudio you can use tab completion to fill out stub routines for you, to save typing. To do this start by typing, for example, “script.Error +=”. Then press TAB, and then press TAB again. The assignment will be completed, and a stub event handler created. A complete working example is shown below:
using System;
using System.Collections.Generic;
using System.Linq;
using System.Text;
using System.Data;
using MySql.Data;
using MySql.Data.MySqlClient;
namespace MySqlScriptTest
{
class Program
{
static void Main(string[] args)
{
string connStr = "server=localhost;user=root;database=TestDB;port=3306;password=******;";
MySqlConnection conn = new MySqlConnection(connStr);
try
{
Console.WriteLine("Connecting to MySQL...");
conn.Open();
string sql = "INSERT INTO TestTable(name) VALUES ('Superman');" +
"INSERT INTO TestTable(name) VALUES ('Batman');" +
"INSERT INTO TestTable(name) VALUES ('Wolverine');" +
"INSERT INTO TestTable(name) VALUES ('Storm');";
MySqlScript script = new MySqlScript(conn, sql);
script.Error += new MySqlScriptErrorEventHandler(script_Error);
script.ScriptCompleted += new EventHandler(script_ScriptCompleted);
script.StatementExecuted += new MySqlStatementExecutedEventHandler(script_StatementExecuted);
int count = script.Execute();
Console.WriteLine("Executed " + count + " statement(s).");
Console.WriteLine("Delimiter: " + script.Delimiter);
}
catch (Exception ex)
{
Console.WriteLine(ex.ToString());
}
conn.Close();
Console.WriteLine("Done.");
}
static void script_StatementExecuted(object sender, MySqlScriptEventArgs args)
{
Console.WriteLine("script_StatementExecuted");
}
static void script_ScriptCompleted(object sender, EventArgs e)
{
/// EventArgs e will be EventArgs.Empty for this method
Console.WriteLine("script_ScriptCompleted!");
}
static void script_Error(Object sender, MySqlScriptErrorEventArgs args)
{
Console.WriteLine("script_Error: " + args.Exception.ToString());
}
}
}
Note that in the script_ScriptCompleted
event handler, the EventArgs parameter
e will be EventArgs.Empty. In
the case of the ScriptCompleted event there is no
additional data to be obtained, which is why the event object is
EventArgs.Empty.
Depending on the nature of the script, you made need control of the delimiter used to separate the statements that will make up a script. The most common example of this is where you have a multi-statement stored routine as part of your script. In this case if the default delimiter of “;” is used you will get an error when you attempt to execute the script. For example, consider the following stored routine:
CREATE PROCEDURE test_routine()
BEGIN
SELECT name FROM TestTable ORDER BY name;
SELECT COUNT(name) FROM TestTable;
END
This routine actually needs to be executed on the MySQL Server as
a single statement. However, with the default delimiter of
“;”, the MySqlScript class
would interpret the above as two statements, the first being:
CREATE PROCEDURE test_routine()
BEGIN
SELECT name FROM TestTable ORDER BY name;
Executing this as a statement would generate an error. To solve
this problem MySqlScript supports the
ability to set a different delimiter. This is achieved through the
Delimiter property. For example, you could
set the delimiter to “??”, in which case the above
stored routine would no longer generate an error when executed.
Multiple statements can be delimited in the script, so for
example, you could have a three statement script such as:
string sql = "DROP PROCEDURE IF EXISTS test_routine??" +
"CREATE PROCEDURE test_routine() " +
"BEGIN " +
"SELECT name FROM TestTable ORDER BY name;" +
"SELECT COUNT(name) FROM TestTable;" +
"END??" +
"CALL test_routine()";
You can change the delimiter back at any point by setting the Delimiter property. The following code shows a complete working example:
using System;
using System.Collections.Generic;
using System.Linq;
using System.Text;
using MySql.Data;
using MySql.Data.MySqlClient;
namespace ConsoleApplication8
{
class Program
{
static void Main(string[] args)
{
string connStr = "server=localhost;user=root;database=TestDB;port=3306;password=******;";
MySqlConnection conn = new MySqlConnection(connStr);
try
{
Console.WriteLine("Connecting to MySQL...");
conn.Open();
string sql = "DROP PROCEDURE IF EXISTS test_routine??" +
"CREATE PROCEDURE test_routine() " +
"BEGIN " +
"SELECT name FROM TestTable ORDER BY name;" +
"SELECT COUNT(name) FROM TestTable;" +
"END??" +
"CALL test_routine()";
MySqlScript script = new MySqlScript(conn);
script.Query = sql;
script.Delimiter = "??";
int count = script.Execute();
Console.WriteLine("Executed " + count + " statement(s)");
script.Delimiter = ";";
Console.WriteLine("Delimiter: " + script.Delimiter);
Console.WriteLine("Query: " + script.Query);
}
catch (Exception ex)
{
Console.WriteLine(ex.ToString());
}
conn.Close();
Console.WriteLine("Done.");
}
}
}
In this tutorial you will learn how to create MySQL DDL from an Entity Framework model. You will need to use Visual Studio 2010 and MySQL Connector/NET 6.3 to carry out this tutorial.
Create a new console application in Visual Studio 2010.
Using the Solution Explorer add a reference to
MySql.Data.Entity.From the Solution Explorer select , . In the Add New Item dialog select Online Templates. Select ADO.NET Entity Data Model and click . The Entity Data Model dialog will be displayed.
In the Entity Data Model dialog select Empty Model. Click . A blank model will be created.
Create a simple model. A single Entity will do for the purposes of this tutorial.
In the Properties panel select from the drop-down listbox.
In the Properties panel, locate the DDL Generation Template in the category Database Script Generation.
For the DDL Generation property select from the drop-down listbox.
Save the solution.
Right-click an empty space in the model design area. The context-sensitive menu will be displayed.
From the context-sensitive menu select . The Generate Database Wizard dialog will be displayed.
In the Generate Database Wizard dialog select an existing connection, or create a new connection to a server. Select an appropriate radio button to show or hide sensitive data. For the purposes of this tutorial you can select Yes (although you may not want to do this for commercial applications).
Click . MySQL compatible DDL code will be generated. Click to exit the wizard.
You have seen how to create MySQL DDL code from an Entity Framework model.
- 21.2.5.1. Connecting to MySQL Using Connector/NET
- 21.2.5.2. Creating a Connection String
- 21.2.5.3. Using MySqlCommand
- 21.2.5.4. Using Connector/NET with Connection Pooling
- 21.2.5.5. Using the Connector/NET with Prepared Statements
- 21.2.5.6. Accessing Stored Procedures with Connector/NET
- 21.2.5.7. Handling BLOB Data With Connector/NET
- 21.2.5.8. Using Connector/NET with Crystal Reports
- 21.2.5.9. Handling Date and Time Information in Connector/NET
- 21.2.5.10. ASP.NET Provider Model
- 21.2.5.11. Binary/Nonbinary Issues
- 21.2.5.12. Character Sets
- 21.2.5.13. Working with medium trust
- 21.2.5.14. Using the MySQL Connector/NET Trace Source Object
- 21.2.5.15. Using the Bulk Loader
Connector/NET comprises several classes that are used to connect to the database, execute queries and statements, and manage query results.
The following are the major classes of Connector/NET:
MySqlCommand: Represents an SQL statement to execute against a MySQL database.MySqlCommandBuilder: Automatically generates single-table commands used to reconcile changes made to a DataSet with the associated MySQL database.MySqlConnection: Represents an open connection to a MySQL Server database.MySqlDataAdapter: Represents a set of data commands and a database connection that are used to fill a data set and update a MySQL database.MySqlDataReader: Provides a means of reading a forward-only stream of rows from a MySQL database.MySqlException: The exception that is thrown when MySQL returns an error.MySqlHelper: Helper class that makes it easier to work with the provider.MySqlTransaction: Represents an SQL transaction to be made in a MySQL database.
In the following sections you will learn about some common use cases for Connector/NET, including BLOB handling, date handling, and using Connector/NET with common tools such as Crystal Reports.
Introduction
All interaction between a .NET application and the MySQL server is
routed through a MySqlConnection object. Before
your application can interact with the server, a
MySqlConnection object must be instanced,
configured, and opened.
Even when using the MySqlHelper class, a
MySqlConnection object is created by the helper
class.
In this section, we will describe how to connect to MySQL using
the MySqlConnection object.
The MySqlConnection object is configured using
a connection string. A connection string contains sever key/value
pairs, separated by semicolons. Each key/value pair is joined with
an equal sign.
The following is a sample connection string:
Server=127.0.0.1;Uid=root;Pwd=12345;Database=test;
In this example, the MySqlConnection object is
configured to connect to a MySQL server at
127.0.0.1, with a user name of
root and a password of
12345. The default database for all statements
will be the test database.
The following options are available:
Using the '@' symbol for parameters is now the preferred approach although the old pattern of using '?' is still supported.
Please be aware however that using '@' can cause conflicts when
user variables are also used. To help with this situation please
see the documentation on the Allow User
Variables connection string option, which can be found
here:
Section 21.2.5.2, “Creating a Connection String”.
The Old Syntax connection string option has
now been deprecated.
Once you have created a connection string it can be used to open a connection to the MySQL server.
The following code is used to create a
MySqlConnection object, assign the connection
string, and open the connection.
Visual Basic Example
Dim conn As New MySql.Data.MySqlClient.MySqlConnection
Dim myConnectionString as String
myConnectionString = "server=127.0.0.1;" _
& "uid=root;" _
& "pwd=12345;" _
& "database=test;"
Try
conn.ConnectionString = myConnectionString
conn.Open()
Catch ex As MySql.Data.MySqlClient.MySqlException
MessageBox.Show(ex.Message)
End Try
C# Example
MySql.Data.MySqlClient.MySqlConnection conn;
string myConnectionString;
myConnectionString = "server=127.0.0.1;uid=root;" +
"pwd=12345;database=test;";
try
{
conn = new MySql.Data.MySqlClient.MySqlConnection();
conn.ConnectionString = myConnectionString;
conn.Open();
}
catch (MySql.Data.MySqlClient.MySqlException ex)
{
MessageBox.Show(ex.Message);
}
You can also pass the connection string to the constructor of
the MySqlConnection class:
Visual Basic Example
Dim myConnectionString as String
myConnectionString = "server=127.0.0.1;" _
& "uid=root;" _
& "pwd=12345;" _
& "database=test;"
Try
Dim conn As New MySql.Data.MySqlClient.MySqlConnection(myConnectionString)
conn.Open()
Catch ex As MySql.Data.MySqlClient.MySqlException
MessageBox.Show(ex.Message)
End Try
C# Example
MySql.Data.MySqlClient.MySqlConnection conn;
string myConnectionString;
myConnectionString = "server=127.0.0.1;uid=root;" +
"pwd=12345;database=test;";
try
{
conn = new MySql.Data.MySqlClient.MySqlConnection(myConnectionString);
conn.Open();
}
catch (MySql.Data.MySqlClient.MySqlException ex)
{
MessageBox.Show(ex.Message);
}
Once the connection is open it can be used by the other Connector/NET classes to communicate with the MySQL server.
Because connecting to an external server is unpredictable, it is
important to add error handling to your .NET application. When
there is an error connecting, the
MySqlConnection class will return a
MySqlException object. This object has two
properties that are of interest when handling errors:
Message: A message that describes the current exception.Number: The MySQL error number.
When handling errors, you can your application's response based on the error number. The two most common error numbers when connecting are as follows:
0: Cannot connect to server.1045: Invalid user name and/or password.
The following code shows how to adapt the application's response based on the actual error:
Visual Basic Example
Dim myConnectionString as String
myConnectionString = "server=127.0.0.1;" _
& "uid=root;" _
& "pwd=12345;" _
& "database=test;"
Try
Dim conn As New MySql.Data.MySqlClient.MySqlConnection(myConnectionString)
conn.Open()
Catch ex As MySql.Data.MySqlClient.MySqlException
Select Case ex.Number
Case 0
MessageBox.Show("Cannot connect to server. Contact administrator")
Case 1045
MessageBox.Show("Invalid username/password, please try again")
End Select
End Try
C# Example
MySql.Data.MySqlClient.MySqlConnection conn;
string myConnectionString;
myConnectionString = "server=127.0.0.1;uid=root;" +
"pwd=12345;database=test;";
try
{
conn = new MySql.Data.MySqlClient.MySqlConnection(myConnectionString);
conn.Open();
}
catch (MySql.Data.MySqlClient.MySqlException ex)
{
switch (ex.Number)
{
case 0:
MessageBox.Show("Cannot connect to server. Contact administrator");
case 1045:
MessageBox.Show("Invalid username/password, please try again");
}
}
Note that if you are using multilanguage databases you must
specify the character set in the connection string. If you do
not specify the character set, the connection defaults to the
latin1 charset. You can specify the
character set as part of the connection string, for example:
MySqlConnection myConnection = new MySqlConnection("server=127.0.0.1;uid=root;" +
"pwd=12345;database=test;Charset=latin1;");
The GetSchema() method of the connection
object can be used to retrieve schema information about the
database currently connected to. The schema information is
returned in the form of a DataTable. The
schema information is organised into a number of collections.
Different forms of the GetSchema() method can
be used depending on the information required. There are three
forms of the GetSchema() method:
GetSchema()- This call will return a list of available collections.GetSchema(String)- This call returns information about the collection named in the string parameter. If the string “MetaDataCollections” is used then a list of all available collections is returned. This is the same as callingGetSchema()without any parameters.GetSchema(String, String[])- In this call the first string parameter represents the collection name, and the second parameter represents a string array of restriction values. Restriction values limit the amount of data that will be returned. Restriction values are explained in more detail in the Microsoft .NET documentation.
The collections can be broadly grouped into two types: collections that are common to all data providers, and collections specific to a particular provider.
Common
The following collections are common to all data providers:
MetaDataCollections
DataSourceInformation
DataTypes
Restrictions
ReservedWords
Provider-specific
The following are the collections currently provided by MySQL Connector/NET, in addition to the common collections above:
Databases
Tables
Columns
Users
Foreign Keys
IndexColumns
Indexes
Foreign Key Columns
UDF
Views
ViewColumns
Procedure Parameters
Procedures
Triggers
Example Code
A list of available collections can be obtained using the following code:
using System;
using System.Data;
using System.Text;
using MySql.Data;
using MySql.Data.MySqlClient;
namespace ConsoleApplication2
{
class Program
{
private static void DisplayData(System.Data.DataTable table)
{
foreach (System.Data.DataRow row in table.Rows)
{
foreach (System.Data.DataColumn col in table.Columns)
{
Console.WriteLine("{0} = {1}", col.ColumnName, row[col]);
}
Console.WriteLine("============================");
}
}
static void Main(string[] args)
{
string connStr = "server=localhost;user=root;database=world;port=3306;password=******;";
MySqlConnection conn = new MySqlConnection(connStr);
try
{
Console.WriteLine("Connecting to MySQL...");
conn.Open();
DataTable table = conn.GetSchema("MetaDataCollections");
//DataTable table = conn.GetSchema("UDF");
DisplayData(table);
conn.Close();
}
catch (Exception ex)
{
Console.WriteLine(ex.ToString());
}
Console.WriteLine("Done.");
}
}
}
Further information on the GetSchema()
method and schema collections can be found in the
Microsoft
.NET documentation.
A MySqlCommand has the CommandText and
CommandType properties associated with it. The
CommandText will be handled differently
depending on the setting of CommandType.
CommandType can be one of:
Text - A SQL text command (default)
StoredProcedure - The name of a Stored Procedure
TableDirect - The name of a table (new in Connector/NET 6.2)
The default CommandType,
Text, is used for executing queries and other
SQL commands. Some example of this can be found in the following
section Section 21.2.4.1.2, “The MySqlCommand Object”.
If CommandType is set to
StoredProcedure, CommandText
should be set to the name of the Stored Procedure to access.
If CommandType is set to
TableDirect, all rows and columns of the named
table will be returned when you call one of the Execute methods.
In effect, this command performs a SELECT * on
the table specified. The CommandText property
is set to the name of the table you wish to query. This is
illustrated by the following code snippet:
...
MySqlCommand cmd = new MySqlCommand();
cmd.CommandText = "mytable";
cmd.Connection = someConnection;
cmd.CommandType = CommandType.TableDirect;
SqlDataReader reader = cmd.ExecuteReader();
while (reader.Read())
{
Console.WriteLn(reader[0], reader[1]...);
}
...Examples of using the CommandType of StoredProcedure can be found in the section Section 21.2.5.6, “Accessing Stored Procedures with Connector/NET”.
Commands can have a timeout associated with them. This is useful
as you may not want a situation were a command takes up an
excessive amount of time. A timeout can be set using the
CommandTimeout property. The following code
snippet sets a timeout of one minute:
MySqlCommand cmd = new MySqlCommand(); cmd.CommandTimeout = 60;
The default value is 30 secs. A value of 0 indicates an indefinite
wait and should be avoided. Note the default command timeout can
be changed using the connection string option Default
Command Timeout.
Prior to MySQL Connector/NET 6.2,
MySqlCommand.CommandTimeout included user
processing time, that is processing time not related to direct use
of the connector. Timeout was implemented through a .NET Timer,
that triggered after CommandTimeout seconds.
This timer consumed a thread.
MySQL Connector/NET 6.2 introduced timeouts that are aligned with how Microsoft
handles SqlCommand.CommandTimeout. This
property is the cumulative timeout for all network reads and
writes during command execution or processing of the results. A
timeout can still occur in the MySqlReader.Read
method after the first row is returned, and does not include user
processing time, only IO operations. The 6.2 implementation uses
the underlying stream timeout facility, so is more efficient in
that it does not require the additional timer thread as was the
case with the previous implementation.
Further details on this can be found in the relevant Microsoft documentation.
The Connector/NET supports connection pooling. This is enabled by default, but can be turned off using connection string options. See Section 21.2.5.2, “Creating a Connection String” for further information.
Connection pooling works by keeping the native connection to the
server live when the client disposes of a
MySqlConnection. Subsequently, if a new
MySqlConnection object is opened, it will be
created from the connection pool, rather than creating a new
native connection. This improves performance.
To work as designed, it is best to let the connection pooling
system manage all connections. You should not create a globally
accessible instance of MySqlConnection and then
manually open and close it. This interferes with the way the
pooling works and can lead to unpredictable results or even
exceptions.
One approach that simplifies things is to avoid manually creating
a MySqlConnection object. Instead use the
overloaded methods that take a connection string as an argument.
Using this approach, Connector/NET will automatically create,
open, close and destroy connections, using the connection pooling
system for best performance.
Typed Datasets and the MembershipProvider and
RoleProvider classes use this approach. Most
classes that have methods that take a
MySqlConnection as an argument, also have
methods that take a connection string as an argument. This
includes MySqlDataAdapter.
Instead of manually creating MySqlCommand
objects, you can use the static methods of the
MySqlHelper class. These take a connection
string as an argument, and they fully support connection pooling.
Starting with MySQL Connector/NET 6.2, there is a background job that runs every three minutes and removes connections from pool that have been idle (unused) for more than three minutes. The pool cleanup frees resources on both client and server side. This is because on the client side every connection uses a socket, and on the server side every connection uses a socket and a thread.
Prior to this change, connections were never removed from the
pool, and the pool always contained the peak number of open
connections. For example, a web application that peaked at 1000
concurrent database connections would consume 1000 threads and
1000 open sockets at the server, without ever freeing up those
resources from the connection pool. Note, connections, no matter
how old, will not be closed if the number of connections in the
pool is less than or equal to the value set by the Min
Pool Size connection string parameter.
Introduction
As of MySQL 4.1, it is possible to use prepared statements with Connector/NET. Use of prepared statements can provide significant performance improvements on queries that are executed more than once.
Prepared execution is faster than direct execution for statements executed more than once, primarily because the query is parsed only once. In the case of direct execution, the query is parsed every time it is executed. Prepared execution also can provide a reduction of network traffic because for each execution of the prepared statement, it is necessary only to send the data for the parameters.
Another advantage of prepared statements is that it uses a binary protocol that makes data transfer between client and server more efficient.
To prepare a statement, create a command object and set the
.CommandText property to your query.
After entering your statement, call the
.Prepare method of the
MySqlCommand object. After the statement is
prepared, add parameters for each of the dynamic elements in the
query.
After you enter your query and enter parameters, execute the
statement using the .ExecuteNonQuery(),
.ExecuteScalar(), or
.ExecuteReader methods.
For subsequent executions, you need only modify the values of
the parameters and call the execute method again, there is no
need to set the .CommandText property or
redefine the parameters.
Visual Basic Example
Dim conn As New MySqlConnection
Dim cmd As New MySqlCommand
conn.ConnectionString = strConnection
Try
conn.Open()
cmd.Connection = conn
cmd.CommandText = "INSERT INTO myTable VALUES(NULL, @number, @text)"
cmd.Prepare()
cmd.Parameters.AddWithValue("@number", 1)
cmd.Parameters.AddWithValue("@text", "One")
For i = 1 To 1000
cmd.Parameters("@number").Value = i
cmd.Parameters("@text").Value = "A string value"
cmd.ExecuteNonQuery()
Next
Catch ex As MySqlException
MessageBox.Show("Error " & ex.Number & " has occurred: " & ex.Message, "Error", MessageBoxButtons.OK, MessageBoxIcon.Error)
End Try
C# Example
MySql.Data.MySqlClient.MySqlConnection conn;
MySql.Data.MySqlClient.MySqlCommand cmd;
conn = new MySql.Data.MySqlClient.MySqlConnection();
cmd = new MySql.Data.MySqlClient.MySqlCommand();
conn.ConnectionString = strConnection;
try
{
conn.Open();
cmd.Connection = conn;
cmd.CommandText = "INSERT INTO myTable VALUES(NULL, @number, @text)";
cmd.Prepare();
cmd.Parameters.AddWithValue("@number", 1);
cmd.Parameters.AddWithValue("@text", "One");
for (int i=1; i <= 1000; i++)
{
cmd.Parameters["@number"].Value = i;
cmd.Parameters["@text"].Value = "A string value";
cmd.ExecuteNonQuery();
}
}
catch (MySql.Data.MySqlClient.MySqlException ex)
{
MessageBox.Show("Error " + ex.Number + " has occurred: " + ex.Message,
"Error", MessageBoxButtons.OK, MessageBoxIcon.Error);
}
Introduction
With the release of MySQL version 5 the MySQL server now supports stored procedures with the SQL 2003 stored procedure syntax.
A stored procedure is a set of SQL statements that can be stored in the server. Once this has been done, clients do not need to keep reissuing the individual statements but can refer to the stored procedure instead.
Stored procedures can be particularly useful in situations such as the following:
When multiple client applications are written in different languages or work on different platforms, but need to perform the same database operations.
When security is paramount. Banks, for example, use stored procedures for all common operations. This provides a consistent and secure environment, and procedures can ensure that each operation is properly logged. In such a setup, applications and users would not get any access to the database tables directly, but can only execute specific stored procedures.
Connector/NET supports the calling of stored procedures through
the MySqlCommand object. Data can be passed in
and out of a MySQL stored procedure through use of the
MySqlCommand.Parameters collection.
When you call a stored procedure, the command object makes an
additional SELECT call to
determine the parameters of the stored procedure. You must
ensure that the user calling the procedure has the
SELECT privilege on the
mysql.proc table to enable them to verify the
parameters. Failure to do this will result in an error when
calling the procedure.
This section will not provide in-depth information on creating Stored Procedures. For such information, please refer to http://dev.mysql.com/doc/mysql/en/stored-routines.html.
A sample application demonstrating how to use stored procedures
with Connector/NET can be found in the Samples
directory of your Connector/NET installation.
Stored procedures in MySQL can be created using a variety of
tools. First, stored procedures can be created using the
mysql command-line client. Second, stored
procedures can be created using MySQL Workbench. Finally, stored
procedures can be created using the
.ExecuteNonQuery method of the
MySqlCommand object.
It should be noted that, unlike the command-line and GUI clients, you are not required to specify a special delimiter when creating stored procedures in Connector/NET.
To call a stored procedure using Connector/NET, you create a
MySqlCommand object and pass the stored
procedure name as the .CommandText property.
You then set the .CommandType property to
CommandType.StoredProcedure.
After the stored procedure is named, you create one
MySqlCommand parameter for every parameter in
the stored procedure. IN parameters are
defined with the parameter name and the object containing the
value, OUT parameters are defined with the
parameter name and the data type that is expected to be
returned. All parameters need the parameter direction defined.
After defining the parameters, you call the stored procedure by
using the MySqlCommand.ExecuteNonQuery()
method.
Once the stored procedure is called, the values of the output
parameters can be retrieved by using the
.Value property of the
MySqlConnector.Parameters collection.
When a stored procedure is called using
MySqlCommand.ExecuteReader, and the stored
procedure has output parameters, the output parameters are
only set after the MySqlDataReader returned
by ExecuteReader is closed.
The following C# example code demonstrates the use of stored procedures. It assumes the database 'employees' has already been created:
using System;
using System.Collections.Generic;
using System.Linq;
using System.Text;
using System.Data;
using MySql.Data;
using MySql.Data.MySqlClient;
namespace UsingStoredRoutines
{
class Program
{
static void Main(string[] args)
{
MySqlConnection conn = new MySqlConnection();
conn.ConnectionString = "server=localhost;user=root;database=employees;port=3306;password=******;";
MySqlCommand cmd = new MySqlCommand();
try
{
Console.WriteLine("Connecting to MySQL...");
conn.Open();
cmd.Connection = conn;
cmd.CommandText = "DROP PROCEDURE IF EXISTS add_emp";
cmd.ExecuteNonQuery();
cmd.CommandText = "DROP TABLE IF EXISTS emp";
cmd.ExecuteNonQuery();
cmd.CommandText = "CREATE TABLE emp (empno INT UNSIGNED NOT NULL AUTO_INCREMENT PRIMARY KEY, first_name VARCHAR(20), last_name VARCHAR(20), birthdate DATE)";
cmd.ExecuteNonQuery();
cmd.CommandText = "CREATE PROCEDURE add_emp(" +
"IN fname VARCHAR(20), IN lname VARCHAR(20), IN bday DATETIME, OUT empno INT)" +
"BEGIN INSERT INTO emp(first_name, last_name, birthdate) " +
"VALUES(fname, lname, DATE(bday)); SET empno = LAST_INSERT_ID(); END";
cmd.ExecuteNonQuery();
}
catch (MySqlException ex)
{
Console.WriteLine ("Error " + ex.Number + " has occurred: " + ex.Message);
}
conn.Close();
Console.WriteLine("Connection closed.");
try
{
Console.WriteLine("Connecting to MySQL...");
conn.Open();
cmd.Connection = conn;
cmd.CommandText = "add_emp";
cmd.CommandType = CommandType.StoredProcedure;
cmd.Parameters.AddWithValue("@lname", "Jones");
cmd.Parameters["@lname"].Direction = ParameterDirection.Input;
cmd.Parameters.AddWithValue("@fname", "Tom");
cmd.Parameters["@fname"].Direction = ParameterDirection.Input;
cmd.Parameters.AddWithValue("@bday", "1940-06-07");
cmd.Parameters["@bday"].Direction = ParameterDirection.Input;
cmd.Parameters.AddWithValue("@empno", MySqlDbType.Int32);
cmd.Parameters["@empno"].Direction = ParameterDirection.Output;
cmd.ExecuteNonQuery();
Console.WriteLine("Employee number: "+cmd.Parameters["@empno"].Value);
Console.WriteLine("Birthday: " + cmd.Parameters["@bday"].Value);
}
catch (MySql.Data.MySqlClient.MySqlException ex)
{
Console.WriteLine("Error " + ex.Number + " has occurred: " + ex.Message);
}
conn.Close();
Console.WriteLine("Done.");
}
}
}
The following code shows the same application in Visual Basic:
Imports System
Imports System.Collections.Generic
Imports System.Linq
Imports System.Text
Imports System.Data
Imports MySql.Data
Imports MySql.Data.MySqlClient
Module Module1
Sub Main()
Dim conn As New MySqlConnection()
conn.ConnectionString = "server=localhost;user=root;database=world;port=3306;password=******;"
Dim cmd As New MySqlCommand()
Try
Console.WriteLine("Connecting to MySQL...")
conn.Open()
cmd.Connection = conn
cmd.CommandText = "DROP PROCEDURE IF EXISTS add_emp"
cmd.ExecuteNonQuery()
cmd.CommandText = "DROP TABLE IF EXISTS emp"
cmd.ExecuteNonQuery()
cmd.CommandText = "CREATE TABLE emp (empno INT UNSIGNED NOT NULL AUTO_INCREMENT PRIMARY KEY, first_name VARCHAR(20), last_name VARCHAR(20), birthdate DATE)"
cmd.ExecuteNonQuery()
cmd.CommandText = "CREATE PROCEDURE add_emp(" & "IN fname VARCHAR(20), IN lname VARCHAR(20), IN bday DATETIME, OUT empno INT)" & "BEGIN INSERT INTO emp(first_name, last_name, birthdate) " & "VALUES(fname, lname, DATE(bday)); SET empno = LAST_INSERT_ID(); END"
cmd.ExecuteNonQuery()
Catch ex As MySqlException
Console.WriteLine(("Error " & ex.Number & " has occurred: ") + ex.Message)
End Try
conn.Close()
Console.WriteLine("Connection closed.")
Try
Console.WriteLine("Connecting to MySQL...")
conn.Open()
cmd.Connection = conn
cmd.CommandText = "add_emp"
cmd.CommandType = CommandType.StoredProcedure
cmd.Parameters.AddWithValue("@lname", "Jones")
cmd.Parameters("@lname").Direction = ParameterDirection.Input
cmd.Parameters.AddWithValue("@fname", "Tom")
cmd.Parameters("@fname").Direction = ParameterDirection.Input
cmd.Parameters.AddWithValue("@bday", "1940-06-07")
cmd.Parameters("@bday").Direction = ParameterDirection.Input
cmd.Parameters.AddWithValue("@empno", MySqlDbType.Int32)
cmd.Parameters("@empno").Direction = ParameterDirection.Output
cmd.ExecuteNonQuery()
Console.WriteLine("Employee number: " & cmd.Parameters("@empno").Value)
Console.WriteLine("Birthday: " & cmd.Parameters("@bday").Value)
Catch ex As MySql.Data.MySqlClient.MySqlException
Console.WriteLine(("Error " & ex.Number & " has occurred: ") + ex.Message)
End Try
conn.Close()
Console.WriteLine("Done.")
End Sub
End Module
Introduction
One common use for MySQL is the storage of binary data in
BLOB columns. MySQL supports four
different BLOB data types:
TINYBLOB,
BLOB,
MEDIUMBLOB, and
LONGBLOB.
Data stored in a BLOB column can be accessed using Connector/NET and manipulated using client-side code. There are no special requirements for using Connector/NET with BLOB data.
Simple code examples will be presented within this section, and a
full sample application can be found in the
Samples directory of the Connector/NET
installation.
The first step is using MySQL with BLOB data is to configure the server. Let's start by creating a table to be accessed. In my file tables, I usually have four columns: an AUTO_INCREMENT column of appropriate size (UNSIGNED SMALLINT) to serve as a primary key to identify the file, a VARCHAR column that stores the file name, an UNSIGNED MEDIUMINT column that stores the size of the file, and a MEDIUMBLOB column that stores the file itself. For this example, I will use the following table definition:
CREATE TABLE file( file_id SMALLINT UNSIGNED AUTO_INCREMENT NOT NULL PRIMARY KEY, file_name VARCHAR(64) NOT NULL, file_size MEDIUMINT UNSIGNED NOT NULL, file MEDIUMBLOB NOT NULL);
After creating a table, you may need to modify the max_allowed_packet system variable. This variable determines how large of a packet (that is, a single row) can be sent to the MySQL server. By default, the server will only accept a maximum size of 1MB from our client application. If you do not intend to exceed 1MB, this should be fine. If you do intend to exceed 1MB in your file transfers, this number has to be increased.
The max_allowed_packet option can be modified using MySQL
Administrator's Startup Variables screen. Adjust the Maximum
permitted option in the Memory section of the Networking tab to
an appropriate setting. After adjusting the value, click the
button and restart the
server using the Service Control screen of
MySQL Administrator. You can also adjust this value directly in
the my.cnf file (add a line that reads max_allowed_packet=xxM),
or use the SET max_allowed_packet=xxM; syntax from within MySQL.
Try to be conservative when setting max_allowed_packet, as transfers of BLOB data can take some time to complete. Try to set a value that will be adequate for your intended use and increase the value if necessary.
To write a file to a database we need to convert the file to a
byte array, then use the byte array as a parameter to an
INSERT query.
The following code opens a file using a FileStream object, reads
it into a byte array, and inserts it into the
file table:
Visual Basic Example
Dim conn As New MySqlConnection
Dim cmd As New MySqlCommand
Dim SQL As String
Dim FileSize As UInt32
Dim rawData() As Byte
Dim fs As FileStream
conn.ConnectionString = "server=127.0.0.1;" _
& "uid=root;" _
& "pwd=12345;" _
& "database=test"
Try
fs = New FileStream("c:\image.png", FileMode.Open, FileAccess.Read)
FileSize = fs.Length
rawData = New Byte(FileSize) {}
fs.Read(rawData, 0, FileSize)
fs.Close()
conn.Open()
SQL = "INSERT INTO file VALUES(NULL, @FileName, @FileSize, @File)"
cmd.Connection = conn
cmd.CommandText = SQL
cmd.Parameters.AddWithValue("@FileName", strFileName)
cmd.Parameters.AddWithValue("@FileSize", FileSize)
cmd.Parameters.AddWithValue("@File", rawData)
cmd.ExecuteNonQuery()
MessageBox.Show("File Inserted into database successfully!", _
"Success!", MessageBoxButtons.OK, MessageBoxIcon.Asterisk)
conn.Close()
Catch ex As Exception
MessageBox.Show("There was an error: " & ex.Message, "Error", _
MessageBoxButtons.OK, MessageBoxIcon.Error)
End Try
C# Example
MySql.Data.MySqlClient.MySqlConnection conn;
MySql.Data.MySqlClient.MySqlCommand cmd;
conn = new MySql.Data.MySqlClient.MySqlConnection();
cmd = new MySql.Data.MySqlClient.MySqlCommand();
string SQL;
UInt32 FileSize;
byte[] rawData;
FileStream fs;
conn.ConnectionString = "server=127.0.0.1;uid=root;" +
"pwd=12345;database=test;";
try
{
fs = new FileStream(@"c:\image.png", FileMode.Open, FileAccess.Read);
FileSize = fs.Length;
rawData = new byte[FileSize];
fs.Read(rawData, 0, FileSize);
fs.Close();
conn.Open();
SQL = "INSERT INTO file VALUES(NULL, @FileName, @FileSize, @File)";
cmd.Connection = conn;
cmd.CommandText = SQL;
cmd.Parameters.AddWithValue("@FileName", strFileName);
cmd.Parameters.AddWithValue("@FileSize", FileSize);
cmd.Parameters.AddWithValue("@File", rawData);
cmd.ExecuteNonQuery();
MessageBox.Show("File Inserted into database successfully!",
"Success!", MessageBoxButtons.OK, MessageBoxIcon.Asterisk);
conn.Close();
}
catch (MySql.Data.MySqlClient.MySqlException ex)
{
MessageBox.Show("Error " + ex.Number + " has occurred: " + ex.Message,
"Error", MessageBoxButtons.OK, MessageBoxIcon.Error);
}
The Read method of the
FileStream object is used to load the file
into a byte array which is sized according to the
Length property of the FileStream object.
After assigning the byte array as a parameter of the
MySqlCommand object, the
ExecuteNonQuery method is called and the BLOB
is inserted into the file table.
Once a file is loaded into the file table, we
can use the MySqlDataReader class to retrieve
it.
The following code retrieves a row from the
file table, then loads the data into a
FileStream object to be written to disk:
Visual Basic Example
Dim conn As New MySqlConnection
Dim cmd As New MySqlCommand
Dim myData As MySqlDataReader
Dim SQL As String
Dim rawData() As Byte
Dim FileSize As UInt32
Dim fs As FileStream
conn.ConnectionString = "server=127.0.0.1;" _
& "uid=root;" _
& "pwd=12345;" _
& "database=test"
SQL = "SELECT file_name, file_size, file FROM file"
Try
conn.Open()
cmd.Connection = conn
cmd.CommandText = SQL
myData = cmd.ExecuteReader
If Not myData.HasRows Then Throw New Exception("There are no BLOBs to save")
myData.Read()
FileSize = myData.GetUInt32(myData.GetOrdinal("file_size"))
rawData = New Byte(FileSize) {}
myData.GetBytes(myData.GetOrdinal("file"), 0, rawData, 0, FileSize)
fs = New FileStream("C:\newfile.png", FileMode.OpenOrCreate, FileAccess.Write)
fs.Write(rawData, 0, FileSize)
fs.Close()
MessageBox.Show("File successfully written to disk!", "Success!", MessageBoxButtons.OK, MessageBoxIcon.Asterisk)
myData.Close()
conn.Close()
Catch ex As Exception
MessageBox.Show("There was an error: " & ex.Message, "Error", MessageBoxButtons.OK, MessageBoxIcon.Error)
End Try
C# Example
MySql.Data.MySqlClient.MySqlConnection conn;
MySql.Data.MySqlClient.MySqlCommand cmd;
MySql.Data.MySqlClient.MySqlDataReader myData;
conn = new MySql.Data.MySqlClient.MySqlConnection();
cmd = new MySql.Data.MySqlClient.MySqlCommand();
string SQL;
UInt32 FileSize;
byte[] rawData;
FileStream fs;
conn.ConnectionString = "server=127.0.0.1;uid=root;" +
"pwd=12345;database=test;";
SQL = "SELECT file_name, file_size, file FROM file";
try
{
conn.Open();
cmd.Connection = conn;
cmd.CommandText = SQL;
myData = cmd.ExecuteReader();
if (! myData.HasRows)
throw new Exception("There are no BLOBs to save");
myData.Read();
FileSize = myData.GetUInt32(myData.GetOrdinal("file_size"));
rawData = new byte[FileSize];
myData.GetBytes(myData.GetOrdinal("file"), 0, rawData, 0, FileSize);
fs = new FileStream(@"C:\newfile.png", FileMode.OpenOrCreate, FileAccess.Write);
fs.Write(rawData, 0, FileSize);
fs.Close();
MessageBox.Show("File successfully written to disk!",
"Success!", MessageBoxButtons.OK, MessageBoxIcon.Asterisk);
myData.Close();
conn.Close();
}
catch (MySql.Data.MySqlClient.MySqlException ex)
{
MessageBox.Show("Error " + ex.Number + " has occurred: " + ex.Message,
"Error", MessageBoxButtons.OK, MessageBoxIcon.Error);
}
After connecting, the contents of the file
table are loaded into a MySqlDataReader
object. The GetBytes method of the
MySqlDataReader is used to load the BLOB into a byte array,
which is then written to disk using a FileStream object.
The GetOrdinal method of the MySqlDataReader
can be used to determine the integer index of a named column.
Use of the GetOrdinal method prevents errors if the column order
of the SELECT query is changed.
Introduction
Crystal Reports is a common tool used by Windows application developers to perform reporting and document generation. In this section we will show how to use Crystal Reports XI with MySQL and Connector/NET.
When creating a report in Crystal Reports there are two options for accessing the MySQL data while designing your report.
The first option is to use Connector/ODBC as an ADO data source when designing your report. You will be able to browse your database and choose tables and fields using drag and drop to build your report. The disadvantage of this approach is that additional work must be performed within your application to produce a data set that matches the one expected by your report.
The second option is to create a data set in VB.NET and save it as XML. This XML file can then be used to design a report. This works quite well when displaying the report in your application, but is less versatile at design time because you must choose all relevant columns when creating the data set. If you forget a column you must re-create the data set before the column can be added to the report.
The following code can be used to create a data set from a query and write it to disk:
Visual Basic Example
Dim myData As New DataSet
Dim conn As New MySqlConnection
Dim cmd As New MySqlCommand
Dim myAdapter As New MySqlDataAdapter
conn.ConnectionString = "server=127.0.0.1;" _
& "uid=root;" _
& "pwd=12345;" _
& "database=world"
Try
conn.Open()
cmd.CommandText = "SELECT city.name AS cityName, city.population AS CityPopulation, " _
& "country.name, country.population, country.continent " _
& "FROM country, city ORDER BY country.continent, country.name"
cmd.Connection = conn
myAdapter.SelectCommand = cmd
myAdapter.Fill(myData)
myData.WriteXml("C:\dataset.xml", XmlWriteMode.WriteSchema)
Catch ex As Exception
MessageBox.Show(ex.Message, "Report could not be created", MessageBoxButtons.OK, MessageBoxIcon.Error)
End Try
C# Example
DataSet myData = new DataSet();
MySql.Data.MySqlClient.MySqlConnection conn;
MySql.Data.MySqlClient.MySqlCommand cmd;
MySql.Data.MySqlClient.MySqlDataAdapter myAdapter;
conn = new MySql.Data.MySqlClient.MySqlConnection();
cmd = new MySql.Data.MySqlClient.MySqlCommand();
myAdapter = new MySql.Data.MySqlClient.MySqlDataAdapter();
conn.ConnectionString = "server=127.0.0.1;uid=root;" +
"pwd=12345;database=test;";
try
{
cmd.CommandText = "SELECT city.name AS cityName, city.population AS CityPopulation, " +
"country.name, country.population, country.continent " +
"FROM country, city ORDER BY country.continent, country.name";
cmd.Connection = conn;
myAdapter.SelectCommand = cmd;
myAdapter.Fill(myData);
myData.WriteXml(@"C:\dataset.xml", XmlWriteMode.WriteSchema);
}
catch (MySql.Data.MySqlClient.MySqlException ex)
{
MessageBox.Show(ex.Message, "Report could not be created",
MessageBoxButtons.OK, MessageBoxIcon.Error);
}
The resulting XML file can be used as an ADO.NET XML datasource when designing your report.
If you choose to design your reports using Connector/ODBC, it can be downloaded from dev.mysql.com.
For most purposes the Standard Report wizard should help with the initial creation of a report. To start the wizard, open Crystal Reports and choose the New > Standard Report option from the File menu.
The wizard will first prompt you for a data source. If you are using Connector/ODBC as your data source, use the OLEDB provider for ODBC option from the OLE DB (ADO) tree instead of the ODBC (RDO) tree when choosing a data source. If using a saved data set, choose the ADO.NET (XML) option and browse to your saved data set.
The remainder of the report creation process is done automatically by the wizard.
After the report is created, choose the Report Options... entry of the File menu. Un-check the Save Data With Report option. This prevents saved data from interfering with the loading of data within our application.
To display a report we first populate a data set with the data needed for the report, then load the report and bind it to the data set. Finally we pass the report to the crViewer control for display to the user.
The following references are needed in a project that displays a report:
CrytalDecisions.CrystalReports.Engine
CrystalDecisions.ReportSource
CrystalDecisions.Shared
CrystalDecisions.Windows.Forms
The following code assumes that you created your report using a
data set saved using the code shown in
Section 21.2.5.8.1, “Creating a Data Source”,
and have a crViewer control on your form named
myViewer.
Visual Basic Example
Imports CrystalDecisions.CrystalReports.Engine
Imports System.Data
Imports MySql.Data.MySqlClient
Dim myReport As New ReportDocument
Dim myData As New DataSet
Dim conn As New MySqlConnection
Dim cmd As New MySqlCommand
Dim myAdapter As New MySqlDataAdapter
conn.ConnectionString = _
"server=127.0.0.1;" _
& "uid=root;" _
& "pwd=12345;" _
& "database=test"
Try
conn.Open()
cmd.CommandText = "SELECT city.name AS cityName, city.population AS CityPopulation, " _
& "country.name, country.population, country.continent " _
& "FROM country, city ORDER BY country.continent, country.name"
cmd.Connection = conn
myAdapter.SelectCommand = cmd
myAdapter.Fill(myData)
myReport.Load(".\world_report.rpt")
myReport.SetDataSource(myData)
myViewer.ReportSource = myReport
Catch ex As Exception
MessageBox.Show(ex.Message, "Report could not be created", MessageBoxButtons.OK, MessageBoxIcon.Error)
End Try
C# Example
using CrystalDecisions.CrystalReports.Engine;
using System.Data;
using MySql.Data.MySqlClient;
ReportDocument myReport = new ReportDocument();
DataSet myData = new DataSet();
MySql.Data.MySqlClient.MySqlConnection conn;
MySql.Data.MySqlClient.MySqlCommand cmd;
MySql.Data.MySqlClient.MySqlDataAdapter myAdapter;
conn = new MySql.Data.MySqlClient.MySqlConnection();
cmd = new MySql.Data.MySqlClient.MySqlCommand();
myAdapter = new MySql.Data.MySqlClient.MySqlDataAdapter();
conn.ConnectionString = "server=127.0.0.1;uid=root;" +
"pwd=12345;database=test;";
try
{
cmd.CommandText = "SELECT city.name AS cityName, city.population AS CityPopulation, " +
"country.name, country.population, country.continent " +
"FROM country, city ORDER BY country.continent, country.name";
cmd.Connection = conn;
myAdapter.SelectCommand = cmd;
myAdapter.Fill(myData);
myReport.Load(@".\world_report.rpt");
myReport.SetDataSource(myData);
myViewer.ReportSource = myReport;
}
catch (MySql.Data.MySqlClient.MySqlException ex)
{
MessageBox.Show(ex.Message, "Report could not be created",
MessageBoxButtons.OK, MessageBoxIcon.Error);
}
A new data set it generated using the same query used to generate the previously saved data set. Once the data set is filled, a ReportDocument is used to load the report file and bind it to the data set. The ReportDocument is the passed as the ReportSource of the crViewer.
This same approach is taken when a report is created from a single table using Connector/ODBC. The data set replaces the table used in the report and the report is displayed properly.
When a report is created from multiple tables using Connector/ODBC, a data set with multiple tables must be created in our application. This enables each table in the report data source to be replaced with a report in the data set.
We populate a data set with multiple tables by providing
multiple SELECT statements in our
MySqlCommand object. These SELECT
statements are based on the SQL query shown in Crystal Reports
in the Database menu's Show SQL Query option. Assume the
following query:
SELECT `country`.`Name`, `country`.`Continent`, `country`.`Population`, `city`.`Name`, `city`.`Population` FROM `world`.`country` `country` LEFT OUTER JOIN `world`.`city` `city` ON `country`.`Code`=`city`.`CountryCode` ORDER BY `country`.`Continent`, `country`.`Name`, `city`.`Name`
This query is converted to two
SELECT queries and displayed with
the following code:
Visual Basic Example
Imports CrystalDecisions.CrystalReports.Engine
Imports System.Data
Imports MySql.Data.MySqlClient
Dim myReport As New ReportDocument
Dim myData As New DataSet
Dim conn As New MySqlConnection
Dim cmd As New MySqlCommand
Dim myAdapter As New MySqlDataAdapter
conn.ConnectionString = "server=127.0.0.1;" _
& "uid=root;" _
& "pwd=12345;" _
& "database=world"
Try
conn.Open()
cmd.CommandText = "SELECT name, population, countrycode FROM city ORDER BY countrycode, name; " _
& "SELECT name, population, code, continent FROM country ORDER BY continent, name"
cmd.Connection = conn
myAdapter.SelectCommand = cmd
myAdapter.Fill(myData)
myReport.Load(".\world_report.rpt")
myReport.Database.Tables(0).SetDataSource(myData.Tables(0))
myReport.Database.Tables(1).SetDataSource(myData.Tables(1))
myViewer.ReportSource = myReport
Catch ex As Exception
MessageBox.Show(ex.Message, "Report could not be created", MessageBoxButtons.OK, MessageBoxIcon.Error)
End Try
C# Example
using CrystalDecisions.CrystalReports.Engine;
using System.Data;
using MySql.Data.MySqlClient;
ReportDocument myReport = new ReportDocument();
DataSet myData = new DataSet();
MySql.Data.MySqlClient.MySqlConnection conn;
MySql.Data.MySqlClient.MySqlCommand cmd;
MySql.Data.MySqlClient.MySqlDataAdapter myAdapter;
conn = new MySql.Data.MySqlClient.MySqlConnection();
cmd = new MySql.Data.MySqlClient.MySqlCommand();
myAdapter = new MySql.Data.MySqlClient.MySqlDataAdapter();
conn.ConnectionString = "server=127.0.0.1;uid=root;" +
"pwd=12345;database=test;";
try
{
cmd.CommandText = "SELECT name, population, countrycode FROM city ORDER " +
"BY countrycode, name; SELECT name, population, code, continent FROM " +
"country ORDER BY continent, name";
cmd.Connection = conn;
myAdapter.SelectCommand = cmd;
myAdapter.Fill(myData);
myReport.Load(@".\world_report.rpt");
myReport.Database.Tables(0).SetDataSource(myData.Tables(0));
myReport.Database.Tables(1).SetDataSource(myData.Tables(1));
myViewer.ReportSource = myReport;
}
catch (MySql.Data.MySqlClient.MySqlException ex)
{
MessageBox.Show(ex.Message, "Report could not be created",
MessageBoxButtons.OK, MessageBoxIcon.Error);
}
It is important to order the
SELECT queries in alphabetic
order, as this is the order the report will expect its source
tables to be in. One SetDataSource statement is needed for each
table in the report.
This approach can cause performance problems because Crystal Reports must bind the tables together on the client-side, which will be slower than using a pre-saved data set.
Introduction
MySQL and the .NET languages handle date and time information
differently, with MySQL allowing dates that cannot be represented
by a .NET data type, such as '0000-00-00
00:00:00'. These differences can cause problems if not
properly handled.
In this section we will demonstrate how to properly handle date and time information when using Connector/NET.
The differences in date handling can cause problems for
developers who use invalid dates. Invalid MySQL dates cannot be
loaded into native .NET DateTime objects,
including NULL dates.
Because of this issue, .NET DataSet objects
cannot be populated by the Fill method of the
MySqlDataAdapter class as invalid dates will
cause a System.ArgumentOutOfRangeException
exception to occur.
The best solution to the date problem is to restrict users from entering invalid dates. This can be done on either the client or the server side.
Restricting invalid dates on the client side is as simple as
always using the .NET DateTime class to
handle dates. The DateTime class will only
allow valid dates, ensuring that the values in your database are
also valid. The disadvantage of this is that it is not useful in
a mixed environment where .NET and non .NET code are used to
manipulate the database, as each application must perform its
own date validation.
Users of MySQL 5.0.2 and higher can use the new
traditional SQL mode to restrict invalid date
values. For information on using the
traditional SQL mode, see
Section 5.1.7, “Server SQL Modes”.
Although it is strongly recommended that you avoid the use of
invalid dates within your .NET application, it is possible to
use invalid dates by means of the
MySqlDateTime data type.
The MySqlDateTime data type supports the same
date values that are supported by the MySQL server. The default
behavior of Connector/NET is to return a .NET DateTime object
for valid date values, and return an error for invalid dates.
This default can be modified to cause Connector/NET to return
MySqlDateTime objects for invalid dates.
To instruct Connector/NET to return a
MySqlDateTime object for invalid dates, add
the following line to your connection string:
Allow Zero Datetime=True
Please note that the use of the MySqlDateTime
class can still be problematic. The following are some known
issues:
Data binding for invalid dates can still cause errors (zero dates like 0000-00-00 do not seem to have this problem).
The
ToStringmethod return a date formatted in the standard MySQL format (for example,2005-02-23 08:50:25). This differs from theToStringbehavior of the .NET DateTime class.The
MySqlDateTimeclass supports NULL dates, while the .NET DateTime class does not. This can cause errors when trying to convert a MySQLDateTime to a DateTime if you do not check for NULL first.
Because of the known issues, the best recommendation is still to use only valid dates in your application.
The .NET DateTime data type cannot handle
NULL values. As such, when assigning values
from a query to a DateTime variable, you must
first check whether the value is in fact
NULL.
When using a MySqlDataReader, use the
.IsDBNull method to check whether a value is
NULL before making the assignment:
Visual Basic Example
If Not myReader.IsDBNull(myReader.GetOrdinal("mytime")) Then
myTime = myReader.GetDateTime(myReader.GetOrdinal("mytime"))
Else
myTime = DateTime.MinValue
End If
C# Example
if (! myReader.IsDBNull(myReader.GetOrdinal("mytime")))
myTime = myReader.GetDateTime(myReader.GetOrdinal("mytime"));
else
myTime = DateTime.MinValue;
NULL values will work in a data set and can
be bound to form controls without special handling.
MySQL Connector/NET provides support for the ASP.NET 2.0 provider model. This model enables application developers to focus on the business logic of their application instead of having to recreate such boilerplate items as membership and roles support.
MySQL Connector/NET supplies the following providers:
Membership Provider
Role Provider
Profile Provider
Session State Provider (MySQL Connector/NET 6.1 and later)
The following tables show the supported providers, their default provider and the corresponding MySQL provider.
Membership Provider
| Default Provider | MySQL Provider |
|---|---|
| System.Web.Security.SqlMembershipProvider | MySql.Web.Security.MySQLMembershipProvider |
Role Provider
| Default Provider | MySQL Provider |
|---|---|
| System.Web.Security.SqlRoleProvider | MySql.Web.Security.MySQLRoleProvider |
Profile Provider
| Default Provider | MySQL Provider |
|---|---|
| System.Web.Profile.SqlProfileProvider | MySql.Web.Profile.MySQLProfileProvider |
SessionState Provider
| Default Provider | MySQL Provider |
|---|---|
| System.Web.SessionState.InProcSessionStateStore | MySql.Web.SessionState.MySqlSessionStateStore |
The MySQL Session State provider uses slightly different capitalization on the class name compared to the other MySQL providers.
Installing The Providers
The installation of Connector/Net 5.1 or later will install the
providers and register them in your machine's .NET configuration
file, machine.config. The additional entries
created will result in the system.web section
appearing similar to the following code:
<system.web>
<processModel autoConfig="true" />
<httpHandlers />
<membership>
<providers>
<add name="AspNetSqlMembershipProvider" type="System.Web.Security.SqlMembershipProvider, System.Web, Version=2.0.0.0, Culture=neutral, PublicKeyToken=b03f5f7f11d50a3a" connectionStringName="LocalSqlServer" enablePasswordRetrieval="false" enablePasswordReset="true" requiresQuestionAndAnswer="true" applicationName="/" requiresUniqueEmail="false" passwordFormat="Hashed" maxInvalidPasswordAttempts="5" minRequiredPasswordLength="7" minRequiredNonalphanumericCharacters="1" passwordAttemptWindow="10" passwordStrengthRegularExpression="" />
<add name="MySQLMembershipProvider" type="MySql.Web.Security.MySQLMembershipProvider, MySql.Web, Version=6.1.1.0, Culture=neutral, PublicKeyToken=c5687fc88969c44d" connectionStringName="LocalMySqlServer" enablePasswordRetrieval="false" enablePasswordReset="true" requiresQuestionAndAnswer="true" applicationName="/" requiresUniqueEmail="false" passwordFormat="Clear" maxInvalidPasswordAttempts="5" minRequiredPasswordLength="7" minRequiredNonalphanumericCharacters="1" passwordAttemptWindow="10" passwordStrengthRegularExpression="" />
</providers>
</membership>
<profile>
<providers>
<add name="AspNetSqlProfileProvider" connectionStringName="LocalSqlServer" applicationName="/" type="System.Web.Profile.SqlProfileProvider, System.Web, Version=2.0.0.0, Culture=neutral, PublicKeyToken=b03f5f7f11d50a3a" />
<add name="MySQLProfileProvider" type="MySql.Web.Profile.MySQLProfileProvider, MySql.Web, Version=6.1.1.0, Culture=neutral, PublicKeyToken=c5687fc88969c44d" connectionStringName="LocalMySqlServer" applicationName="/" />
</providers>
</profile>
<roleManager>
<providers>
<add name="AspNetSqlRoleProvider" connectionStringName="LocalSqlServer" applicationName="/" type="System.Web.Security.SqlRoleProvider, System.Web, Version=2.0.0.0, Culture=neutral, PublicKeyToken=b03f5f7f11d50a3a" />
<add name="AspNetWindowsTokenRoleProvider" applicationName="/" type="System.Web.Security.WindowsTokenRoleProvider, System.Web, Version=2.0.0.0, Culture=neutral, PublicKeyToken=b03f5f7f11d50a3a" />
<add name="MySQLRoleProvider" type="MySql.Web.Security.MySQLRoleProvider, MySql.Web, Version=6.1.1.0, Culture=neutral, PublicKeyToken=c5687fc88969c44d" connectionStringName="LocalMySqlServer" applicationName="/" />
</providers>
</roleManager>
</system.web>
Each provider type can have multiple provider implementations. The
default provider can also be set here using the
defaultProvider attribute, but usually this is
set in the web.config file either manually or
by using the ASP.NET configuration tool.
At time of writing the MySqlSessionStateStore
is not added to machine.config at install
time, and so you would need to add the following:
<sessionState>
<providers>
<add name="MySqlSessionStateStore" type="MySql.Web.SessionState.MySqlSessionStateStore, MySql.Web, Version=6.1.1.0, Culture=neutral, PublicKeyToken=c5687fc88969c44d" connectionStringName="LocalMySqlServer" applicationName="/" />
</providers>
</sessionState>
It should be pointed out that the SessionState Provider uses the
customProvider attribute, rather than
defaultProvider, to set the provider as the
default. A typical web.config file might
contain:
<system.web>
<membership defaultProvider="MySQLMembershipProvider" />
<roleManager defaultProvider="MySQLRoleProvider" />
<profile defaultProvider="MySQLProfileProvider" />
<sessionState customProvider="MySqlSessionStateStore" />
<compilation debug="false">
...
This sets the MySQL Providers as the defaults to be used in this web application.
The providers are implemented in the file
mysql.web.dll and this file can be found in
your MySQL Connector/NET installation folder. There is no need to run any type
of SQL script to set up the database schema as the providers
create and maintain the proper schema automatically.
Using The Providers
The easiest way to start using the providers is to use the ASP.NET configuration tool that is available on the Solution Explorer toolbar when you have a website project loaded.
In the web pages that open you will be able to select the MySQL membership and roles providers by indicating that you want to pick a custom provider for each area.
When the provider is installed, it creates a dummy connection
string named LocalMySqlServer. This has to be
done so that the provider will work in the ASP.NET configuration
tool. However, you will want to override this connection string in
your web.config file. You do this by first
removing the dummy connection string and then adding in the proper
one, as shown in the following example:
<connectionStrings> <remove name="LocalMySqlServer"/> <add name="LocalMySqlServer" connectionString="server=xxx;uid=xxx;pwd=xxx;database=xxx;"/> </connectionStrings>
Note the database you want to connect to must be specified.
Rather than manually editing configuration files it is recommended
that you use the MySQL Website Configuration tool to config your
desired provider setup. From MySQL Connector/NET 6.1.1 onwards all providers
can be selected and configured from this wizard. The tool will
modify your website.config file to the
desired configuration. A tutorial on doing this is available in
the following section
Section 21.2.3.10, “MySQL Website Configuration Tool”.
A tutorial demonstrating how to use the Membership and Role Providers can be found in the following section Section 21.2.4.2, “Tutorial: MySQL Connector/NET ASP.NET Membership and Role Provider”.
Deployment
To use the providers on a production server you will need to
distribute the MySql.Data and the
MySql.Web assemblies and either register them
in the remote systems Global Assembly Cache or keep them in your
application's bin/ directory.
There are certain situations where MySQL will return incorrect metadata about one or more columns. More specifically, the server will sometimes report that a column is binary when it is not and vice versa. In these situations, it becomes practically impossible for the connector to be able to correctly identify the correct metadat.
Some examples of situations that may return incorrect metadata are:
Execution of
SHOW PROCESSLIST. Some of the columns will be returned as binary even though they only hold string data.When a temp table is used to process a resultset, some columns may be returned with incorrect binary flags.
Some server functions such
DATE_FORMATwill incorrectly return the column as binary.
With the availability of BINARY and
VARBINARY data types it is important that we
respect the metadata returned by the sever. However, we are aware
that some existing applications may break with this change so we
are creating a connection string option to enable or disable it.
By default, Connector/Net 5.1 will respect the binary flags
returned by the server. This will mean that you may need to make
small changes to your application to accomodate this change.
In the event that the changes required to your application would
be too large, you can add 'respect binary flags=false'
to your connection string. This will cause the connector to use
the prior behavior. In a nutshell, that behavior was that any
column that is marked as string, regardless of binary flags, will
be returned as string. Only columns that are specifically marked
as a BLOB will be returned as
BLOB.
Treating Binary Blobs As UTF8
MySQL doesn't currently support 4 byte UTF8 sequences. This makes it difficult to represent some multi-byte languages such as Japanese. To try and alleviate this, Connector/Net now supports a mode where binary blobs can be treated as strings.
To do this, you set the 'Treat Blobs As UTF8' connection string keyword to yes. This is all that needs to be done to enable conversion of all binary blobs to UTF8 strings. If you wish to convert only some of your blob columns, then you can make use of the 'BlobAsUTF8IncludePattern' and 'BlobAsUTF8ExcludePattern' keywords. These should be set to the regular expression pattern that matches the column names you wish to include or exlude respectively.
One thing to note is that the regular expression patterns can both
match a single column. When this happens, the include pattern is
applied before the exclude pattern. The result, in this case,
would be that the column would be excluded. You should also be
aware that this mode does not apply to columns of type
BINARY or VARBINARY and also
do not apply to nonbinary BLOB columns.
Currently this mode only applies to reading strings out of MySQL.
To insert 4-byte UTF8 strings into blob columns you will need to
use the .NET Encoding.GetBytes function to
convert your string to a series of bytes. You can then set this
byte array as a parameter for a BLOB column.
.NET applications operate under a given trust level. Normal desktop applications operate under full trust while web applications that are hosted in shared environments are normally run under the medium trust level. Some hosting providers host shared applications in their own app pools and allow the application to run under full trust, but this seems to be the exception rather than the rule.
Connector/Net versions prior to 5.0.8 and 5.1.3 were not
compatible with medium trust hosting. Starting with these
versions, Connector/Net can be used under medium trust hosting
that has been modified to allow the use of sockets for
communication. By default, medium trust does not include
SocketPermission. Connector/Net uses sockets to
talk with the MySQL server so it is required that a new trust
level be created that is an exact clone of medium trust but that
has SocketPermission added.
MySQL Connector/NET 6.2 introduced support for .NET 2.0 compatible tracing,
using TraceSource objects.
The .NET 2.0 tracing architecture consists of four main parts:
Source - This is the originator of the trace information. The source is used to send trace messages. The name of the source provided by MySQL Connector/NET is
mysql.Switch - This defines the level of trace information to emit. Typically, this is specified in the
app.configfile, so that it is not necessary to recompile an application to change the trace level.Listener - Trace listeners define where the trace information will be written to. Supported listeners include, for example, the Visual Studio Output window, the Windows Event Log, and the console.
Filter - Filters can be attached to listeners. Filters determine the level of trace information that will be written. While a switch defines the level of information that will be written to all listeners, a filter can be applied on a per-listener basis, giving finer grained control of trace information.
To use tracing a TraceSource object first needs
to be created. To create a TraceSource object
in MySQL Connector/NET you would use code similar to the following:
TraceSource ts = new TraceSource("mysql");
To enable trace messages you also need to configure a trace
switch. There are three main switch classes,
BooleanSwitch, SourceSwitch,
and TraceSwitch. Trace switches also have
associated with them a trace level enumeration, these are
Off, Error,
Warning, Info, and
Verbose. The following code snippet illustrates
creating a switch:
ts.Switch = new SourceSwitch("MySwitch", "Verbose");
This creates a SourceSwitch, called
MySwitch, and sets the trace level to
Verbose, meaning that all trace messages will
be written.
It is convenient to be able to change the trace level without
having to recompile the code. This is achieved by specifying the
trace level in application configuration file,
app.config. You then simply need to specify
the desired trace level in the configuration file and restart the
application. The trace source is configured within the
system.diagnostics section of the file. The
following XML snippet illustrates this:
<configuration>
...
<system.diagnostics>
<sources>
<source name="mysql" switchName="MySwitch"
switchType="System.Diagnostics.SourceSwitch" />
...
</sources>
<switches>
<add name="MySwitch" value="Verbose"/>
...
</switches>
</system.diagnostics>
...
</configuration>
By default trace information is written to the Output window of
Microsoft Visual Studio. However, there are a wide range of
listeners than can be attached to the trace source, so that trace
messages can be written out to various destinations. It is also
possible to create custom listeners to allow trace messages to be
written to other destinations as mobile devices and web services.
A commonly used example of a listener is
ConsoleTraceListener, which writes trace
messages to the console.
To add a listener at run time you can use code such as the following:
ts.Listeners.Add(new ConsoleTraceListener());
You can then call methods on trace source object to generate trace
information. For example, the
TraceInformation(),
TraceEvent(), or TraceData()
methods can be used.
The TraceInformation() method simply prints a
string passed as a parameter. The TraceEvent()
method, as well as the optional informational string, requires a
TraceEventType value to be passed to indicate
the trace message type, and also an application specific ID. The
TraceEventType can have a value of
Verbose, Information,
Warning, Error, and
Critical. Using the
TraceData() method you can pass any object, for
example an exception object, instead of a message.
To ensure than these generated trace messages gets flushed from
the trace source buffers to listeners, you need to invoke the
Flush() method. When you are finished using a
trace source, you should call the Close()
method. The Close() method first calls
Flush(), to ensure any remaining data is
written out. It then frees up resources, and closes the listeners
associated with the trace source.
ts.TraceInformation("Informational message");
ts.TraceEvent(TraceEventType.Error, 3, "Optional error message");
ts.TraceData(TraceEventType.Error, 3, ex); // pass exception object
ts.Flush();
...
ts.Close();This section describes how to set up your application to view MySQL trace information.
The first thing you need to do is create a suitable
app.config file for your application. An
example is shown in the following code:
<?xml version="1.0" encoding="utf-8" ?>
<configuration>
<system.diagnostics>
<sources>
<source name="mysql" switchName="SourceSwitch"
switchType="System.Diagnostics.SourceSwitch" >
<listeners>
<add name="console" />
<remove name ="Default" />
</listeners>
</source>
</sources>
<switches>
<!-- You can set the level at which tracing is to occur -->
<add name="SourceSwitch" value="Verbose" />
<!-- You can turn tracing off -->
<!--add name="SourceSwitch" value="Off" -->
</switches>
<sharedListeners>
<add name="console"
type="System.Diagnostics.ConsoleTraceListener"
initializeData="false"/>
</sharedListeners>
</system.diagnostics>
</configuration>
This ensures a suitable trace source is created, along with a
switch. The switch level in this case is set to
Verbose to display the maximum amount of
information.
In the application the only other step required is to add
logging=true to the connection string. An
example application could be:
using System;
using System.Collections.Generic;
using System.Linq;
using System.Text;
using System.Diagnostics;
using MySql.Data;
using MySql.Data.MySqlClient;
using MySql.Web;
namespace ConsoleApplication1
{
class Program
{
static void Main(string[] args)
{
string connStr = "server=localhost;user=root;database=world;port=3306;password=******;logging=true;";
MySqlConnection conn = new MySqlConnection(connStr);
try
{
Console.WriteLine("Connecting to MySQL...");
conn.Open();
string sql = "SELECT Name, HeadOfState FROM Country WHERE Continent='Oceania'";
MySqlCommand cmd = new MySqlCommand(sql, conn);
MySqlDataReader rdr = cmd.ExecuteReader();
while (rdr.Read())
{
Console.WriteLine(rdr[0] + " -- " + rdr[1]);
}
rdr.Close();
conn.Close();
}
catch (Exception ex)
{
Console.WriteLine(ex.ToString());
}
Console.WriteLine("Done.");
}
}
}
Ths simple application will then generate the following output:
Connecting to MySQL... mysql Information: 1 : 1: Connection Opened: connection string = 'server=localhost;User Id=root;database=world;port=3306 ;password=******;logging=True' mysql Information: 3 : 1: Query Opened: SHOW VARIABLES mysql Information: 4 : 1: Resultset Opened: field(s) = 2, affected rows = -1, inserted id = -1 mysql Information: 5 : 1: Resultset Closed. Total rows=272, skipped rows=0, size (bytes)=7058 mysql Information: 6 : 1: Query Closed mysql Information: 3 : 1: Query Opened: SHOW COLLATION mysql Information: 4 : 1: Resultset Opened: field(s) = 6, affected rows = -1, inserted id = -1 mysql Information: 5 : 1: Resultset Closed. Total rows=127, skipped rows=0, size (bytes)=4102 mysql Information: 6 : 1: Query Closed mysql Information: 3 : 1: Query Opened: SET character_set_results=NULL mysql Information: 4 : 1: Resultset Opened: field(s) = 0, affected rows = 0, inserted id = 0 mysql Information: 5 : 1: Resultset Closed. Total rows=0, skipped rows=0, size (bytes)=0 mysql Information: 6 : 1: Query Closed mysql Information: 10 : 1: Set Database: world mysql Information: 3 : 1: Query Opened: SELECT Name, HeadOfState FROM Country WHERE Continent='Oceania' mysql Information: 4 : 1: Resultset Opened: field(s) = 2, affected rows = -1, inserted id = -1 American Samoa -- George W. Bush Australia -- Elisabeth II ... Wallis and Futuna -- Jacques Chirac Vanuatu -- John Bani United States Minor Outlying Islands -- George W. Bush mysql Information: 5 : 1: Resultset Closed. Total rows=28, skipped rows=0, size (bytes)=788 mysql Information: 6 : 1: Query Closed Done. mysql Information: 2 : 1: Connection Closed
The first number displayed in the trace message corresponds to the MySQL event type:
| Event | Description |
|---|---|
| 1 | ConnectionOpened: connection string |
| 2 | ConnectionClosed: |
| 3 | QueryOpened: mysql server thread id, query text |
| 4 | ResultOpened: field count, affected rows (-1 if select), inserted id (-1 if select) |
| 5 | ResultClosed: total rows read, rows skipped, size of resultset in bytes |
| 6 | QueryClosed: |
| 7 | StatementPrepared: prepared sql, statement id |
| 8 | StatementExecuted: statement id, mysql server thread id |
| 9 | StatementClosed: statement id |
| 10 | NonQuery: [varies] |
| 11 | UsageAdvisorWarning: usage advisor flag. NoIndex = 1, BadIndex = 2, SkippedRows = 3, SkippedColumns = 4, FieldConversion = 5. |
| 12 | Warning: level, code, message |
| 13 | Error: error number, error message |
The second number displayed in the trace message is the connection count.
Although this example uses the
ConsoleTraceListener, any of the other
standard listeners could have been used. Another possibility is
to create a custom listener that uses the information passed
using the TraceEvent method. For example, a
custom trace listener could be created to perform active
monitoring of the MySQL event messages, rather than simply
writing these to an output device.
It is also possible to add listeners to the MySQL Trace Source at run time. This can be done with the following code:
MySqlTrace.Listeners.Add(new ConsoleTraceListener());
MySQL Connector/NET 6.3.2 introduced the ability to switch tracing on and off
at run time. This can be achieved using the calls
MySqlTrace.EnableQueryAnalyzer(string host, int
postInterval) and
MySqlTrace.DisableQueryAnalyzer(). The
parameter host is the URL of the MySQL
Enterprise Monitor server to monitor. The parameter
postInterval is how often the data should be
periodically posted to MySQL Enterprise Monitor, in seconds.
To build custom listeners that work with the MySQL Connector/NET Trace Source, it is necessary to understand the key methods used, and the event data formats used.
The main method involved in passing trace messages is the
TraceSource.TraceEvent method. This has the
prototype:
public void TraceEvent(
TraceEventType eventType,
int id,
string format,
params Object[] args
)
This trace source method will process the list of attached
listeners and call the listener's TraceListener.TraceEvent
method. The prototype for the
TraceListener.TraceEvent method is as
follows:
public virtual void TraceEvent(
TraceEventCache eventCache,
string source,
TraceEventType eventType,
int id,
string format,
params Object[] args
)
The first three parameters are used in the standard as defined by Microsoft. The last three parameters contain MySQL-specifc trace information. Each of these parameters is now discussed in more detail.
int id
This is a MySQL-specific identifier. It identifies the MySQL
event type that has occurred, resulting in a trace message being
generated. This value is defined by the
MySqlTraceEventType public enum contained in
the MySQL Connector/NET code:
public enum MySqlTraceEventType : int
{
ConnectionOpened = 1,
ConnectionClosed,
QueryOpened,
ResultOpened,
ResultClosed,
QueryClosed,
StatementPrepared,
StatementExecuted,
StatementClosed,
NonQuery,
UsageAdvisorWarning,
Warning,
Error
}
The MySQL event type also determines the contents passed using
the parameter params Object[] args. The
nature of the args parameters are described
in further detail in the following material.
string
format
This is the format string that contains zero or more format
items, which correspond to objects in the args array. This would
be used by a listener such as
ConsoleTraceListener to write a message to
the output device.
params Object[]
args
This is a list of objects that depends on the MySQL event type,
id. However, the first parameter passed using
this list is always the driver id. The driver id is a unique
number that is incremented each time the connector is opened.
This enables groups of queries on the same connection to be
identified. The parameters that follow driver id depend of the
MySQL event id, and are as follows:
| MySQL-specific event type | Arguments (params Object[] args) |
|---|---|
| ConnectionOpened | Connection string |
| ConnectionClosed | No additional parameters |
| QueryOpened | mysql server thread id, query text |
| ResultOpened | field count, affected rows (-1 if select), inserted id (-1 if select) |
| ResultClosed | total rows read, rows skipped, size of resultset in bytes |
| QueryClosed | No additional parameters |
| StatementPrepared | prepared sql, statement id |
| StatementExecuted | statement id, mysql server thread id |
| StatementClosed | statement id |
| NonQuery | Varies |
| UsageAdvisorWarning | usage advisor flag. NoIndex = 1, BadIndex = 2, SkippedRows = 3, SkippedColumns = 4, FieldConversion = 5. |
| Warning | level, code, message |
| Error | error number, error message |
This information will allow you to create custom trace listeners that can actively monitor the MySQL-specific events.
MySQL Connector/NET features a bulk loader class that wraps the MySQL statement
LOAD DATA INFILE. This gives MySQL Connector/NET the ability
to load a data file from a local or remote host to the server. The
class concerned is MySqlBulkLoader. This class
has various methods, the main one being load to
cause the specified file to be loaded to the server. Various
parameters can be set to control how the data file is processed.
This is achieved through setting various properties of the class.
For example, the field separator used, such as comma or tab, can
be specified, along with the record terminator, such as newline.
The following code shows a simple example of using the
MySqlBulkLoader class. First an empty table
needs to be created, in this case in the test
database:
CREATE TABLE Career (
Name VARCHAR(100) NOT NULL,
Age INTEGER,
Profession VARCHAR(200)
);A simple tab-delimited data file is also created (it could use any other field delimiter such as comma):
Table Career in Test Database Name Age Profession Tony 47 Technical Writer Ana 43 Nurse Fred 21 IT Specialist Simon 45 Hairy Biker
Note that with this test file the first three lines will need to
be ignored, as they do not contain table data. This can be
achieved using the NumberOfLinesToSkip
property. This file can then be loaded and used to populate the
Career table in the test
database:
using System;
using System.Text;
using MySql.Data;
using MySql.Data.MySqlClient;
namespace ConsoleApplication1
{
class Program
{
static void Main(string[] args)
{
string connStr = "server=localhost;user=root;database=test;port=3306;password=******;";
MySqlConnection conn = new MySqlConnection(connStr);
MySqlBulkLoader bl = new MySqlBulkLoader(conn);
bl.TableName = "Career";
bl.FieldTerminator = "\t";
bl.LineTerminator = "\n";
bl.FileName = "c:/career_data.txt";
bl.NumberOfLinesToSkip = 3;
try
{
Console.WriteLine("Connecting to MySQL...");
conn.Open();
// Upload data from file
int count = bl.Load();
Console.WriteLine(count + " lines uploaded.");
string sql = "SELECT Name, Age, Profession FROM Career";
MySqlCommand cmd = new MySqlCommand(sql, conn);
MySqlDataReader rdr = cmd.ExecuteReader();
while (rdr.Read())
{
Console.WriteLine(rdr[0] + " -- " + rdr[1] + " -- " + rdr[2]);
}
rdr.Close();
conn.Close();
}
catch (Exception ex)
{
Console.WriteLine(ex.ToString());
}
Console.WriteLine("Done.");
}
}
}
Further information on LOAD DATA INFILE can be
found in Section 12.2.6, “LOAD DATA INFILE
Syntax”. Further information on
MySqlBulkLoader can be found in the reference
documentation that was included with your connector.
| Name | Default | Description |
|---|---|---|
Allow Batch | true | When true, multiple SQL statements can be sent with one command execution. -Note- Starting with MySQL 4.1.1, batch statements should be separated by the server-defined separator character. Commands sent to earlier versions of MySQL should be separated with ';'. |
Allow User Variables | false | Setting this to true indicates that the provider
expects user variables in the SQL. This option was added in
Connector/NET version 5.2.2. |
Allow Zero Datetime | false | If set to True,
MySqlDataReader.GetValue() will return a
MySqlDateTime object for date or datetime
columns that have illegal values, such as zero datetime
values, and a System.DateTime object for
legal values. If set to False (the
default setting) it will cause a
System.DateTime object to be returned for
all legal values and an exception to be thrown for illegal
values, such as zero datetime values. |
AutoEnlist | true | If AutoEnlist is set to true,
which is the default, a connection opened using
TransactionScope participates in this
scope, it commits when the scope commits and rolls back if
TransactionScope does not commit.
However, this feature is considered security sensitive and
therefore cannot be used in a medium trust environment. |
BlobAsUTF8ExcludePattern | null | |
BlobAsUTF8IncludePattern | null | |
CertificateFile | null | This option specifies the path to a certificate file in PFX format. For an example of usage see Section 21.2.4.7, “Tutorial: Using SSL with MySQL Connector/NET”. Was introduced with 6.2.1. |
CertificatePassword | null | This option enables you to specify a password which is used in
conjunction with a certificate specified using the option
CertificateFile. For an example of usage
see Section 21.2.4.7, “Tutorial: Using SSL with MySQL Connector/NET”. Was
introduced with 6.2.1. |
Certificate Store Location | null | This option enables you to access a certificate held in a personal store, rather than use a certificate file and password combination. For an example of usage see Section 21.2.4.7, “Tutorial: Using SSL with MySQL Connector/NET”. Was introduced with 6.2.1. |
Certificate Thumbprint | null | This option enables you to specify a certificate thumbprint to ensure correct identifcation of a certificate contained within a personal store. For an example of usage see Section 21.2.4.7, “Tutorial: Using SSL with MySQL Connector/NET”. Was introduced with 6.2.1. |
CharSet, Character Set | Specifies the character set that should be used to encode all queries sent to the server. Resultsets are still returned in the character set of the data returned. | |
Connect Timeout, Connection
Timeout | 15 | The length of time (in seconds) to wait for a connection to the server before terminating the attempt and generating an error. |
Connection Reset | false | If true, the connection state will be reset when it is retrieved from the pool. If set to false this avoids making an additional server round trip when obtaining a connection, but the connection state is not reset. |
Convert Zero Datetime | false | True to have MySqlDataReader.GetValue() and
MySqlDataReader.GetDateTime() return
DateTime.MinValue for date or datetime columns that have
illegal values. |
Default Command Timeout | 30 | Sets the default value of the command timeout to be used. This does not supercede the individual command timeout property on an individual command object. If you set the command timeout property, that will be used. This option was added in Connector/NET 5.1.4 |
Encrypt, UseSSL | false | For Connector/NET 5.0.3 and later, when true, SSL
encryption is used for all data sent between the client and
server if the server has a certificate installed. Recognized
values are true,
false, yes, and
no. In versions before 5.0.3, this option
had no effect. From version 6.2.1 this option is deprecated
and is replaced by SSL Mode. However, the
option is still supported if used. If this option is set to
true it is equivalent to SSL Mode =
Preferred. |
FunctionsReturnString | false | This will cause the connector to return binary/varbinary values as strings, if they do not have a tablename in the metadata. |
Host, Server, Data
Source, DataSource,
Address, Addr,
Network Address | localhost | The name or network address of the instance of MySQL to which to connect. Multiple hosts can be specified separated by &. This can be useful where multiple MySQL servers are configured for replication and you are not concerned about the precise server you are connecting to. No attempt is made by the provider to synchronize writes to the database so care should be taken when using this option. In Unix environment with Mono, this can be a fully qualified path to MySQL socket file name. With this configuration, the Unix socket will be used instead of TCP/IP socket. Currently only a single socket name can be given so accessing MySQL in a replicated environment using Unix sockets is not currently supported. |
Ignore Prepare | true | When true, instructs the provider to ignore any calls to
MySqlCommand.Prepare(). This option is
provided to prevent issues with corruption of the statements
when use with server side prepared statements. If you want
to use server-side prepare statements, set this option to
false. This option was added in Connector/NET 5.0.3 and
Connector/NET 1.0.9. |
Initial Catalog, Database | mysql | The name of the database to use intially |
Interactive, InteractiveSession | false | If set to true the client is interactive. An interactive client is one
where the server variable
CLIENT_INTERACTIVE is set. If an
interactive client is set, the
wait_timeout variable is set to the value
of interactive_timeout. The client will
then timeout after this period of inactivity. More details
can be found in the server manual
Section 5.1.4, “Server System Variables”. |
Logging | false | When true, various pieces of information is output to any configured TraceListeners. See Section 21.2.5.14, “Using the MySQL Connector/NET Trace Source Object” for further details. |
Old Guids | false | This option was introduced in Connector/NET 6.1.1. The backend
representation of a GUID type was changed from
BINARY(16) to
CHAR(36). This was done to allow
developers to use the server function
UUID() to populate a GUID table -
UUID() generates a 36-character string.
Developers of older applications can add 'Old Guids=true' to
the connection string to use a GUID of data type
BINARY(16). |
Old Syntax, OldSyntax | false | This option was deprecated in Connector/NET 5.2.2. All code should now be written using the '@' symbol as the parameter marker. |
Password, pwd | The password for the MySQL account being used. | |
Persist Security Info | false | When set to false or no (strongly
recommended), security-sensitive information, such as the
password, is not returned as part of the connection if the
connection is open or has ever been in an open state.
Resetting the connection string resets all connection string
values including the password. Recognized values are
true, false,
yes, and no. |
Pipe Name, Pipe | mysql | When set to the name of a named pipe, the
MySqlConnection will attempt to connect
to MySQL on that named pipe.This settings only applies to
the Windows platform. |
Port | 3306 | The port MySQL is using to listen for connections. This value is ignored if Unix socket is used. |
Procedure Cache Size | 25 | Sets the size of the stored procedure cache. By default, Connector/NET will store the metadata (input/output data types) about the last 25 stored procedures used. To disable the stored procedure cache, set the value to zero (0). This option was added in Connector/NET 5.0.2 and Connector/NET 1.0.9. |
Protocol | socket | Specifies the type of connection to make to the server. Values can be:
socket or tcp for a
socket connection, pipe for a named pipe
connection, unix for a Unix socket
connection, memory to use MySQL shared
memory. |
Respect Binary Flags | true | Setting this option to false means that Connector/NET
will ignore a column's binary flags as set by the server.
This option was added in Connector/NET version 5.1.3. |
Shared Memory Name | MYSQL | The name of the shared memory object to use for communication if the connection protocol is set to memory. |
Sql Server Mode | false | Allow SQL Server syntax. When set to true enables
Connector/NET to support square brackets around symbols
instead of backticks. This enables Visual Studio wizards
that bracket symbols with [] to work with Connector/NET.
This option incurs a performance hit, so should only be used
if necessary. This option was added in version 6.3.1. |
SSL Mode | None | This option has the following values:
This option was introduced in MySQL Connector/NET 6.2.1. |
TreatBlobsAsUTF8 | false | |
Treat Tiny As Boolean | true | Setting this value to false indicates that
TINYINT(1) will be treated as an
INT. See also
Section 10.1.1, “Overview of Numeric Types” for a further
explanation of the TINYINT
and BOOL data types. |
Use Affected Rows | false | When true the connection will report changed rows
instead of found rows. This option was added in
Connector/NET version 5.2.6. |
Use Procedure Bodies | true | When set to true, the default value, MySQL Connector/NET expects
the body of the procedure to be viewable. This enables it to
determine the parameter types and order. The option should
be set to false when the user connecting
to the database does not have the
SELECT privileges for the
mysql.proc (stored procedures) table, or
cannot view I_S.ROUTINES. In this case,
MySQL Connector/NET will not be able to determine the types and order of
the parameters, and must be alerted to this fact by setting
this option to false. When set to
false, MySQL Connector/NET will not rely on this
information being available when the procedure is called.
Because MySQL Connector/NET will not be able to determine this
information, you should explicitly set the types of all the
parameters before the call and the parameters should be
added to the command in the same order as they appear in the
procedure definition. This option was added in MySQL Connector/NET 5.0.4
and MySQL Connector/NET 1.0.10. |
User Id, Username,
Uid, User name | The MySQL login account being used. | |
Use Compression | false |
Setting this option to Compression is used if both client and server support ZLIB compression, and the client has requested compression using this option. A compressed packet header is: packet length (3 bytes), packet number (1 byte), and Uncompressed Packet Length (3 bytes). The Uncompressed Packet Length is the number of bytes in the original, uncompressed packet. If this is zero then the data in this packet has not been compressed. When the compression protocol is in use, either the client or the server may compress packets. However, compression will not occur if the compressed length is greater than the original length. Thus, some packets will contain compressed data while other packets will not. |
Use Usage Advisor | false | |
Use Performance Monitor | false |
The following table lists the valid names for connection pooling
values within the ConnectionString. For more
information about connection pooling, see Connection Pooling for the
MySQL Data Provider.
| Name | Default | Description |
|---|---|---|
Cache Server Configuration,
CacheServerConfiguration,
CacheServerConfig | false | Specifies whether server variables should be updated when a pooled connection is returned. Turning this on will yield faster opens but will also not catch any server changes made by other connections. |
Connection Lifetime | 0 | When a connection is returned to the pool, its creation time is compared
with the current time, and the connection is destroyed if
that time span (in seconds) exceeds the value specified by
Connection Lifetime. This is useful in
clustered configurations to force load balancing between a
running server and a server just brought online. A value of
zero (0) causes pooled connections to have the maximum
connection timeout. |
Max Pool Size | 100 | The maximum number of connections allowed in the pool. |
Min Pool Size | 0 | The minimum number of connections allowed in the pool. |
Pooling | true | When true, the MySqlConnection
object is drawn from the appropriate pool, or if necessary,
is created and added to the appropriate pool. Recognized
values are true,
false, yes, and
no. |
This section of the manual contains a complete reference to the Connector/NET ADO.NET component, automatically generated from the embedded documentation.
Classes
| Class | Description |
|---|---|
| MySqlCommand | |
| MySqlCommandBuilder | |
| MySqlConnection | |
| MySqlDataAdapter | |
| MySqlDataReader | Provides a means of reading a forward-only stream of rows from a MySQL database. This class cannot be inherited. |
| MySqlError | Collection of error codes that can be returned by the server |
| MySqlException | The exception that is thrown when MySQL returns an error. This class cannot be inherited. |
| MySqlHelper | Helper class that makes it easier to work with the provider. |
| MySqlInfoMessageEventArgs | Provides data for the InfoMessage event. This class cannot be inherited. |
| MySqlParameter | Represents a parameter to a MySqlCommand , and optionally, its mapping to DataSetcolumns. This class cannot be inherited. |
| MySqlParameterCollection | Represents a collection of parameters relevant to a MySqlCommand as well as their respective mappings to columns in a DataSet. This class cannot be inherited. |
| MySqlRowUpdatedEventArgs | Provides data for the RowUpdated event. This class cannot be inherited. |
| MySqlRowUpdatingEventArgs | Provides data for the RowUpdating event. This class cannot be inherited. |
| MySqlTransaction |
Delegates
| Delegate | Description |
|---|---|
| MySqlInfoMessageEventHandler | Represents the method that will handle the InfoMessage event of a MySqlConnection. |
| MySqlRowUpdatedEventHandler | Represents the method that will handle the RowUpdatedevent of a MySqlDataAdapter . |
| MySqlRowUpdatingEventHandler | Represents the method that will handle the RowUpdatingevent of a MySqlDataAdapter . |
Enumerations
| Enumeration | Description |
|---|---|
| MySqlDbType | Specifies MySQL specific data type of a field, property, for use in a MySqlParameter . |
| MySqlErrorCode |
For a list of all members of this type, see MySqlCommand Members .
Syntax: Visual Basic
NotInheritable Public Class MySqlCommand_ Inherits Component_ Implements IDbCommand, ICloneable
Syntax: C#
public sealed class MySqlCommand : Component, IDbCommand, ICloneable
Thread Safety
Public static (Shared in Visual Basic) members of this type are safe for multithreaded operations. Instance members are not guaranteed to be thread-safe.
Requirements
Namespace: MySql.Data.MySqlClient
Assembly: MySql.Data (in MySql.Data.dll)
See Also
MySqlCommand Members, MySql.Data.MySqlClient Namespace
- 21.2.7.1.2.1.1.
MySqlCommandConstructor - 21.2.7.1.2.1.2. CommandText Property
- 21.2.7.1.2.1.3. CommandTimeout Property
- 21.2.7.1.2.1.4. CommandType Property
- 21.2.7.1.2.1.5. Connection Property
- 21.2.7.1.2.1.6. IsPrepared Property
- 21.2.7.1.2.1.7. Parameters Property
- 21.2.7.1.2.1.8. Transaction Property
- 21.2.7.1.2.1.9. UpdatedRowSource Property
- 21.2.7.1.2.1.10.
MySqlCommand.CancelMethod - 21.2.7.1.2.1.11.
MySqlCommand.CreateParameterMethod - 21.2.7.1.2.1.12.
MySqlCommand.ExecuteNonQueryMethod - 21.2.7.1.2.1.13. ExecuteReader Method
- 21.2.7.1.2.1.14.
MySqlCommand.ExecuteScalarMethod - 21.2.7.1.2.1.15.
MySqlCommand.PrepareMethod
Public Instance Constructors
| MySqlCommand | Overloaded. Initializes a new instance of the MySqlCommand class. |
Public Instance Properties
| CommandText | |
| CommandTimeout | |
| CommandType | |
| Connection | |
| Container(inherited from Component) | Gets the IContainerthat contains the Component. |
| IsPrepared | |
| Parameters | |
| Site(inherited from Component) | Gets or sets the ISiteof the Component. |
| Transaction | |
| UpdatedRowSource |
Public Instance Methods
| Cancel | Attempts to cancel the execution of a MySqlCommand. This operation is not supported. |
| CreateObjRef(inherited from MarshalByRefObject) | Creates an object that contains all the relevant information required to generate a proxy used to communicate with a remote object. |
| CreateParameter | Creates a new instance of a MySqlParameter object. |
| Dispose(inherited from Component) | Releases all resources used by the Component. |
| Equals(inherited from Object) | Determines whether the specified Objectis equal to the current Object. |
| ExecuteNonQuery | |
| ExecuteReader | Overloaded. |
| ExecuteScalar | |
| GetHashCode(inherited from Object) | Serves as a hash function for a particular type. GetHashCodeis suitable for use in hashing algorithms and data structures like a hash table. |
| GetLifetimeService(inherited from MarshalByRefObject) | Retrieves the current lifetime service object that controls the lifetime policy for this instance. |
| GetType(inherited from Object) | Gets the Typeof the current instance. |
| InitializeLifetimeService(inherited from MarshalByRefObject) | Obtains a lifetime service object to control the lifetime policy for this instance. |
| Prepare | |
| ToString(inherited from Component) | Returns a Stringcontaining the name of the Component, if any. This method should not be overridden. |
Public Instance Events
| Disposed(inherited from Component) | Adds an event handler to listen to the Disposedevent on the component. |
See Also
MySqlCommand Class, MySql.Data.MySqlClient Namespace
Initializes a new instance of the MySqlCommand class.
Overload List
Initializes a new instance of the MySqlCommand class.
See Also
MySqlCommand Class, MySql.Data.MySqlClient Namespace
Initializes a new instance of the MySqlCommand class.
Syntax: Visual Basic
Overloads Public Sub New()
Syntax: C#
public MySqlCommand();
See Also
MySqlCommand Class, MySql.Data.MySqlClient Namespace, MySqlCommand Constructor Overload List
Syntax: Visual Basic
Overloads Public Sub New( _ ByVal cmdText As String _ )
Syntax: C#
public MySqlCommand( stringcmdText );
See Also
MySqlCommand Class, MySql.Data.MySqlClient Namespace, MySqlCommand Constructor Overload List
Syntax: Visual Basic
Overloads Public Sub New( _ ByVal cmdText As String, _ ByVal connection As MySqlConnection _ )
Syntax: C#
public MySqlCommand( stringcmdText, MySqlConnectionconnection );
See Also
MySqlCommand Class, MySql.Data.MySqlClient Namespace, MySqlCommand Constructor Overload List
For a list of all members of this type, see MySqlConnection Members .
Syntax: Visual Basic
NotInheritable Public Class MySqlConnection_ Inherits Component_ Implements IDbConnection, ICloneable
Syntax: C#
public sealed class MySqlConnection : Component, IDbConnection, ICloneable
Thread Safety
Public static (Shared in Visual Basic) members of this type are safe for multithreaded operations. Instance members are not guaranteed to be thread-safe.
Requirements
Namespace: MySql.Data.MySqlClient
Assembly: MySql.Data (in MySql.Data.dll)
See Also
MySqlConnection Members, MySql.Data.MySqlClient Namespace
Public Instance Constructors
| MySqlConnection | Overloaded. Initializes a new instance of the MySqlConnection class. |
Public Instance Properties
| ConnectionString | |
| ConnectionTimeout | |
| Container(inherited from Component) | Gets the IContainerthat contains the Component. |
| Database | |
| DataSource | Gets the name of the MySQL server to which to connect. |
| ServerThread | Returns the id of the server thread this connection is executing on |
| ServerVersion | |
| Site(inherited from Component) | Gets or sets the ISiteof the Component. |
| State | |
| UseCompression | Indicates if this connection should use compression when communicating with the server. |
Public Instance Methods
| BeginTransaction | Overloaded. |
| ChangeDatabase | |
| Close | |
| CreateCommand | |
| CreateObjRef(inherited from MarshalByRefObject) | Creates an object that contains all the relevant information required to generate a proxy used to communicate with a remote object. |
| Dispose(inherited from Component) | Releases all resources used by the Component. |
| Equals(inherited from Object) | Determines whether the specified Objectis equal to the current Object. |
| GetHashCode(inherited from Object) | Serves as a hash function for a particular type. GetHashCodeis suitable for use in hashing algorithms and data structures like a hash table. |
| GetLifetimeService(inherited from MarshalByRefObject) | Retrieves the current lifetime service object that controls the lifetime policy for this instance. |
| GetType(inherited from Object) | Gets the Typeof the current instance. |
| InitializeLifetimeService(inherited from MarshalByRefObject) | Obtains a lifetime service object to control the lifetime policy for this instance. |
| Open | |
| Ping | Ping |
| ToString(inherited from Component) | Returns a Stringcontaining the name of the Component, if any. This method should not be overridden. |
Public Instance Events
| Disposed(inherited from Component) | Adds an event handler to listen to the Disposedevent on the component. |
| InfoMessage | |
| StateChange |
See Also
MySqlConnection Class, MySql.Data.MySqlClient Namespace
Initializes a new instance of the MySqlConnection class.
Overload List
Initializes a new instance of the MySqlConnection class.
See Also
MySqlConnection Class, MySql.Data.MySqlClient Namespace
Initializes a new instance of the MySqlConnection class.
Syntax: Visual Basic
Overloads Public Sub New()
Syntax: C#
public MySqlConnection();
See Also
MySqlConnection Class, MySql.Data.MySqlClient Namespace, MySqlConnection Constructor Overload List
Syntax: Visual Basic
Overloads Public Sub New( _ ByVal connectionString As String _ )
Syntax: C#
public MySqlConnection( stringconnectionString );
See Also
MySqlConnection Class, MySql.Data.MySqlClient Namespace, MySqlConnection Constructor Overload List
Syntax: Visual Basic
NotOverridable Public Property ConnectionString As String _ _ Implements IDbConnection.ConnectionString
Syntax: C#
public string ConnectionString {get; set;}
Implements
IDbConnection.ConnectionString
See Also
Syntax: Visual Basic
NotOverridable Public ReadOnly Property ConnectionTimeout As Integer _ _ Implements IDbConnection.ConnectionTimeout
Syntax: C#
public int ConnectionTimeout {get;}
Implements
IDbConnection.ConnectionTimeout
See Also
Syntax: Visual Basic
NotOverridable Public ReadOnly Property Database As String _ _ Implements IDbConnection.Database
Syntax: C#
public string Database {get;}
Implements
IDbConnection.Database
See Also
Gets the name of the MySQL server to which to connect.
Syntax: Visual Basic
Public ReadOnly Property DataSource As String
Syntax: C#
public string DataSource {get;}See Also
Returns the id of the server thread this connection is executing on
Syntax: Visual Basic
Public ReadOnly Property ServerThread As Integer
Syntax: C#
public int ServerThread {get;}See Also
Syntax: Visual Basic
Public ReadOnly Property ServerVersion As String
Syntax: C#
public string ServerVersion {get;}See Also
Syntax: Visual Basic
NotOverridable Public ReadOnly Property State As ConnectionState _ _ Implements IDbConnection.State
Syntax: C#
public System.Data.ConnectionState State {get;}
Implements
IDbConnection.State
See Also
Indicates if this connection should use compression when communicating with the server.
Syntax: Visual Basic
Public ReadOnly Property UseCompression As Boolean
Syntax: C#
public bool UseCompression {get;}See Also
Overload List
See Also
MySqlConnection Class, MySql.Data.MySqlClient Namespace
Syntax: Visual Basic
Overloads Public Function BeginTransaction() As MySqlTransaction
Syntax: C#
public MySqlTransaction BeginTransaction();
See Also
MySqlConnection Class, MySql.Data.MySqlClient Namespace, MySqlConnection.BeginTransaction Overload List
For a list of all members of this type, see MySqlTransaction Members .
Syntax: Visual Basic
NotInheritable Public Class MySqlTransaction_ Implements IDbTransaction, IDisposable
Syntax: C#
public sealed class MySqlTransaction : IDbTransaction, IDisposable
Thread Safety
Public static (Sharedin Visual Basic) members of this type are safe for multithreaded operations. Instance members are notguaranteed to be thread-safe.
Requirements
Namespace: MySql.Data.MySqlClient
Assembly: MySql.Data (in MySql.Data.dll)
See Also
MySqlTransaction Members, MySql.Data.MySqlClient Namespace
Public Instance Properties
| Connection | Gets the MySqlConnection object associated with the transaction, or a null reference (Nothing in Visual Basic) if the transaction is no longer valid. |
| IsolationLevel | Specifies the IsolationLevelfor this transaction. |
Public Instance Methods
| Commit | |
| Equals(inherited from Object) | Determines whether the specified Objectis equal to the current Object. |
| GetHashCode(inherited from Object) | Serves as a hash function for a particular type. GetHashCodeis suitable for use in hashing algorithms and data structures like a hash table. |
| GetType(inherited from Object) | Gets the Typeof the current instance. |
| Rollback | |
| ToString(inherited from Object) | Returns a Stringthat represents the current Object. |
See Also
MySqlTransaction Class, MySql.Data.MySqlClient Namespace
Gets the MySqlConnection object associated with the transaction, or a null reference (Nothing in Visual Basic) if the transaction is no longer valid.
Syntax: Visual Basic
Public ReadOnly Property Connection As MySqlConnection
Syntax: C#
public MySqlConnection Connection {get;}Property Value
The MySqlConnection object associated with this transaction.
Remarks
A single application may have multiple database connections, each with zero or more transactions. This property enables you to determine the connection object associated with a particular transaction created by BeginTransaction .
See Also
Specifies the IsolationLevelfor this transaction.
Syntax: Visual Basic
NotOverridable Public ReadOnly Property IsolationLevel As IsolationLevel _ _ Implements IDbTransaction.IsolationLevel
Syntax: C#
public System.Data.IsolationLevel IsolationLevel {get;}
Property Value
The IsolationLevel for this transaction. The default is ReadCommitted.
Implements
IDbTransaction.IsolationLevel
Remarks
Parallel transactions are not supported. Therefore, the IsolationLevel applies to the entire transaction.
See Also
Syntax: Visual Basic
NotOverridable Public Sub Commit() _ _ Implements IDbTransaction.Commit
Syntax: C#
public void Commit();
Implements
IDbTransaction.Commit
See Also
Syntax: Visual Basic
NotOverridable Public Sub Rollback() _ _ Implements IDbTransaction.Rollback
Syntax: C#
public void Rollback();
Implements
IDbTransaction.Rollback
See Also
Syntax: Visual Basic
Overloads Public Function BeginTransaction( _ ByVal iso As IsolationLevel _ ) As MySqlTransaction
Syntax: C#
public MySqlTransaction BeginTransaction( IsolationLeveliso );
See Also
MySqlConnection Class, MySql.Data.MySqlClient Namespace, MySqlConnection.BeginTransaction Overload List
Syntax: Visual Basic
NotOverridable Public Sub ChangeDatabase( _ ByVal databaseName As String _ ) _ _ Implements IDbConnection.ChangeDatabase
Syntax: C#
public void ChangeDatabase( stringdatabaseName );
Implements
IDbConnection.ChangeDatabase
See Also
Syntax: Visual Basic
NotOverridable Public Sub Close() _ _ Implements IDbConnection.Close
Syntax: C#
public void Close();
Implements
IDbConnection.Close
See Also
Syntax: Visual Basic
Public Function CreateCommand() As MySqlCommand
Syntax: C#
public MySqlCommand CreateCommand();
See Also
Syntax: Visual Basic
NotOverridable Public Sub Open() _ _ Implements IDbConnection.Open
Syntax: C#
public void Open();
Implements
IDbConnection.Open
See Also
Ping
Syntax: Visual Basic
Public Function Ping() As Boolean
Syntax: C#
public bool Ping();
Return Value
See Also
Syntax: Visual Basic
Public Event InfoMessage As MySqlInfoMessageEventHandler
Syntax: C#
public event MySqlInfoMessageEventHandler InfoMessage;
See Also
MySqlConnection Class, MySql.Data.MySqlClient Namespace
Represents the method that will handle the InfoMessage event of a MySqlConnection .
Syntax: Visual Basic
Public Delegate Sub MySqlInfoMessageEventHandler( _ ByVal sender As Object, _ ByVal args As MySqlInfoMessageEventArgs _ )
Syntax: C#
public delegate void MySqlInfoMessageEventHandler( objectsender, MySqlInfoMessageEventArgsargs );
Requirements
Namespace: MySql.Data.MySqlClient
Assembly: MySql.Data (in MySql.Data.dll)
See Also
MySql.Data.MySqlClient Namespace
Provides data for the InfoMessage event. This class cannot be inherited.
For a list of all members of this type, see MySqlInfoMessageEventArgs Members .
Syntax: Visual Basic
Public Class MySqlInfoMessageEventArgs_ Inherits EventArgs
Syntax: C#
public class MySqlInfoMessageEventArgs : EventArgs
Thread Safety
Public static (Sharedin Visual Basic) members of this type are safe for multithreaded operations. Instance members are notguaranteed to be thread-safe.
Requirements
Namespace: MySql.Data.MySqlClient
Assembly: MySql.Data (in MySql.Data.dll)
See Also
MySqlInfoMessageEventArgs Members, MySql.Data.MySqlClient Namespace
MySqlInfoMessageEventArgs overview
Public Instance Constructors
| MySqlInfoMessageEventArgs Constructor | Initializes a new instance of the MySqlInfoMessageEventArgs class. |
Public Instance Fields
Public Instance Methods
| Equals(inherited from Object) | Determines whether the specified Objectis equal to the current Object. |
| GetHashCode(inherited from Object) | Serves as a hash function for a particular type. GetHashCodeis suitable for use in hashing algorithms and data structures like a hash table. |
| GetType(inherited from Object) | Gets the Typeof the current instance. |
| ToString(inherited from Object) | Returns a Stringthat represents the current Object. |
Protected Instance Methods
| Finalize(inherited from Object) | Allows an Objectto attempt to free resources and perform other cleanup operations before the Objectis reclaimed by garbage collection. |
| MemberwiseClone(inherited from Object) | Creates a shallow copy of the current Object. |
See Also
MySqlInfoMessageEventArgs Class, MySql.Data.MySqlClient Namespace
Initializes a new instance of the MySqlInfoMessageEventArgs class.
Syntax: Visual Basic
Public Sub New()
Syntax: C#
public MySqlInfoMessageEventArgs();
See Also
MySqlInfoMessageEventArgs Class, MySql.Data.MySqlClient Namespace
Syntax: Visual Basic
Public errors As MySqlError()
Syntax: C#
public MySqlError[] errors;
See Also
MySqlInfoMessageEventArgs Class, MySql.Data.MySqlClient Namespace
Collection of error codes that can be returned by the server
For a list of all members of this type, see MySqlError Members .
Syntax: Visual Basic
Public Class MySqlError
Syntax: C#
public class MySqlError
Thread Safety
Public static (Shared in Visual Basic) members of this type are safe for multithreaded operations. Instance members are not guaranteed to be thread-safe.
Requirements
Namespace: MySql.Data.MySqlClient
Assembly: MySql.Data (in MySql.Data.dll)
See Also
MySqlError Members, MySql.Data.MySqlClient Namespace
Public Instance Constructors
Public Instance Properties
Public Instance Methods
| Equals(inherited from Object) | Determines whether the specified Objectis equal to the current Object. |
| GetHashCode(inherited from Object) | Serves as a hash function for a particular type. GetHashCodeis suitable for use in hashing algorithms and data structures like a hash table. |
| GetType(inherited from Object) | Gets the Typeof the current instance. |
| ToString(inherited from Object) | Returns a Stringthat represents the current Object. |
Protected Instance Methods
| Finalize(inherited from Object) | Allows an Objectto attempt to free resources and perform other cleanup operations before the Objectis reclaimed by garbage collection. |
| MemberwiseClone(inherited from Object) | Creates a shallow copy of the current Object. |
See Also
MySqlError Class, MySql.Data.MySqlClient Namespace
Syntax: Visual Basic
Public Sub New( _ ByVal level As String, _ ByVal code As Integer, _ ByVal message As String _ )
Syntax: C#
public MySqlError( stringlevel, intcode, stringmessage );
Parameters
level:code:message:
See Also
Error code
Syntax: Visual Basic
Public ReadOnly Property Code As Integer
Syntax: C#
public int Code {get;}See Also
Error level
Syntax: Visual Basic
Public ReadOnly Property Level As String
Syntax: C#
public string Level {get;}See Also
Error message
Syntax: Visual Basic
Public ReadOnly Property Message As String
Syntax: C#
public string Message {get;}See Also
Syntax: Visual Basic
Public Event StateChange As StateChangeEventHandler
Syntax: C#
public event StateChangeEventHandler StateChange;
See Also
Syntax: Visual Basic
Overloads Public Sub New( _ ByVal cmdText As String, _ ByVal connection As MySqlConnection, _ ByVal transaction As MySqlTransaction _ )
Syntax: C#
public MySqlCommand( stringcmdText, MySqlConnectionconnection, MySqlTransactiontransaction );
See Also
MySqlCommand Class, MySql.Data.MySqlClient Namespace, MySqlCommand Constructor Overload List
Syntax: Visual Basic
NotOverridable Public Property CommandText As String _ _ Implements IDbCommand.CommandText
Syntax: C#
public string CommandText {get; set;}
Implements
IDbCommand.CommandText
See Also
Syntax: Visual Basic
NotOverridable Public Property CommandTimeout As Integer _ _ Implements IDbCommand.CommandTimeout
Syntax: C#
public int CommandTimeout {get; set;}
Implements
IDbCommand.CommandTimeout
See Also
Syntax: Visual Basic
NotOverridable Public Property CommandType As CommandType _ _ Implements IDbCommand.CommandType
Syntax: C#
public System.Data.CommandType CommandType {get; set;}
Implements
IDbCommand.CommandType
See Also
Syntax: Visual Basic
Public Property Connection As MySqlConnection
Syntax: C#
public MySqlConnection Connection {get; set;}See Also
Syntax: Visual Basic
Public ReadOnly Property IsPrepared As Boolean
Syntax: C#
public bool IsPrepared {get;}See Also
Syntax: Visual Basic
Public ReadOnly Property Parameters As MySqlParameterCollection
Syntax: C#
public MySqlParameterCollection Parameters {get;}See Also
MySqlCommand Class, MySql.Data.MySqlClient Namespace
Represents a collection of parameters relevant to a MySqlCommand as well as their respective mappings to columns in a DataSet. This class cannot be inherited.
For a list of all members of this type, see MySqlParameterCollection Members .
Syntax: Visual Basic
NotInheritable Public Class MySqlParameterCollection_ Inherits MarshalByRefObject_ Implements IDataParameterCollection, IList, ICollection, IEnumerable
Syntax: C#
public sealed class MySqlParameterCollection : MarshalByRefObject, IDataParameterCollection, IList, ICollection, IEnumerable
Thread Safety
Public static (Shared in Visual Basic) members of this type are safe for multithreaded operations. Instance members are not guaranteed to be thread-safe.
Requirements
Namespace: MySql.Data.MySqlClient
Assembly: MySql.Data (in MySql.Data.dll)
See Also
MySqlParameterCollection Members, MySql.Data.MySqlClient Namespace
- 21.2.7.1.2.1.7.1.1.1.
MySqlParameterCollectionConstructor - 21.2.7.1.2.1.7.1.1.2. Count Property
- 21.2.7.1.2.1.7.1.1.3. Item Property
- 21.2.7.1.2.1.7.1.1.4. Add Method
- 21.2.7.1.2.1.7.1.1.5.
MySqlParameterCollection.ClearMethod - 21.2.7.1.2.1.7.1.1.6. Contains Method
- 21.2.7.1.2.1.7.1.1.7.
MySqlParameterCollection.CopyToMethod - 21.2.7.1.2.1.7.1.1.8. IndexOf Method
- 21.2.7.1.2.1.7.1.1.9.
MySqlParameterCollection.InsertMethod - 21.2.7.1.2.1.7.1.1.10.
MySqlParameterCollection.RemoveMethod - 21.2.7.1.2.1.7.1.1.11. RemoveAt Method
MySqlParameterCollection overview
Public Instance Constructors
| MySqlParameterCollection Constructor | Initializes a new instance of the MySqlParameterCollection class. |
Public Instance Properties
| Count | Gets the number of MySqlParameter objects in the collection. |
| Item | Overloaded. Gets the MySqlParameter with a specified attribute. In C#, this property is the indexer for the MySqlParameterCollection class. |
Public Instance Methods
| Add | Overloaded. Adds the specified MySqlParameter object to the MySqlParameterCollection . |
| Clear | Removes all items from the collection. |
| Contains | Overloaded. Gets a value indicating whether a MySqlParameter exists in the collection. |
| CopyTo | Copies MySqlParameter objects from the MySqlParameterCollection to the specified array. |
| CreateObjRef(inherited from MarshalByRefObject) | Creates an object that contains all the relevant information required to generate a proxy used to communicate with a remote object. |
| Equals(inherited from Object) | Determines whether the specified Objectis equal to the current Object. |
| GetHashCode(inherited from Object) | Serves as a hash function for a particular type. GetHashCodeis suitable for use in hashing algorithms and data structures like a hash table. |
| GetLifetimeService(inherited from MarshalByRefObject) | Retrieves the current lifetime service object that controls the lifetime policy for this instance. |
| GetType(inherited from Object) | Gets the Typeof the current instance. |
| IndexOf | Overloaded. Gets the location of a MySqlParameter in the collection. |
| InitializeLifetimeService(inherited from MarshalByRefObject) | Obtains a lifetime service object to control the lifetime policy for this instance. |
| Insert | Inserts a MySqlParameter into the collection at the specified index. |
| Remove | Removes the specified MySqlParameter from the collection. |
| RemoveAt | Overloaded. Removes the specified MySqlParameter from the collection. |
| ToString(inherited from Object) | Returns a Stringthat represents the current Object. |
See Also
MySqlParameterCollection Class, MySql.Data.MySqlClient Namespace
Initializes a new instance of the MySqlParameterCollection class.
Syntax: Visual Basic
Public Sub New()
Syntax: C#
public MySqlParameterCollection();
See Also
MySqlParameterCollection Class, MySql.Data.MySqlClient Namespace
Gets the number of MySqlParameter objects in the collection.
Syntax: Visual Basic
NotOverridable Public ReadOnly Property Count As Integer _ _ Implements ICollection.Count
Syntax: C#
public int Count {get;}
Implements
ICollection.Count
See Also
MySqlParameterCollection Class, MySql.Data.MySqlClient Namespace
Gets the MySqlParameter with a specified attribute. In C#, this property is the indexer for the MySqlParameterCollection class.
Overload List
Gets the MySqlParameter at the specified index.
Gets the MySqlParameter with the specified name.
See Also
MySqlParameterCollection Class, MySql.Data.MySqlClient Namespace
Represents a parameter to a MySqlCommand , and optionally, its mapping to DataSetcolumns. This class cannot be inherited.
For a list of all members of this type, see MySqlParameter Members .
Syntax: Visual Basic
NotInheritable Public Class MySqlParameter_ Inherits MarshalByRefObject_ Implements IDataParameter, IDbDataParameter, ICloneable
Syntax: C#
public sealed class MySqlParameter : MarshalByRefObject, IDataParameter, IDbDataParameter, ICloneable
Thread Safety
Public static (Shared in Visual Basic) members of this type are safe for multithreaded operations. Instance members are not guaranteed to be thread-safe.
Requirements
Namespace: MySql.Data.MySqlClient
Assembly: MySql.Data (in MySql.Data.dll)
See Also
MySqlParameter Members, MySql.Data.MySqlClient Namespace
Public Instance Constructors
| MySqlParameter | Overloaded. Initializes a new instance of the MySqlParameter class. |
Public Instance Properties
| DbType | Gets or sets the DbTypeof the parameter. |
| Direction | Gets or sets a value indicating whether the parameter is input-only, output-only, bidirectional, or a stored procedure return value parameter. As of MySQL version 4.1 and earlier, input-only is the only valid choice. |
| IsNullable | Gets or sets a value indicating whether the parameter accepts null values. |
| IsUnsigned | |
| MySqlDbType | Gets or sets the MySqlDbType of the parameter. |
| ParameterName | Gets or sets the name of the MySqlParameter. |
| Precision | Gets or sets the maximum number of digits used to represent the Value property. |
| Scale | Gets or sets the number of decimal places to which Value is resolved. |
| Size | Gets or sets the maximum size, in bytes, of the data within the column. |
| SourceColumn | Gets or sets the name of the source column that is mapped to the DataSetand used for loading or returning the Value . |
| SourceVersion | Gets or sets the DataRowVersionto use when loading Value . |
| Value | Gets or sets the value of the parameter. |
Public Instance Methods
| CreateObjRef(inherited from MarshalByRefObject) | Creates an object that contains all the relevant information required to generate a proxy used to communicate with a remote object. |
| Equals(inherited from Object) | Determines whether the specified Objectis equal to the current Object. |
| GetHashCode(inherited from Object) | Serves as a hash function for a particular type. GetHashCodeis suitable for use in hashing algorithms and data structures like a hash table. |
| GetLifetimeService(inherited from MarshalByRefObject) | Retrieves the current lifetime service object that controls the lifetime policy for this instance. |
| GetType(inherited from Object) | Gets the Typeof the current instance. |
| InitializeLifetimeService(inherited from MarshalByRefObject) | Obtains a lifetime service object to control the lifetime policy for this instance. |
| ToString | Overridden. Gets a string containing the ParameterName . |
See Also
MySqlParameter Class, MySql.Data.MySqlClient Namespace
Initializes a new instance of the MySqlParameter class.
Overload List
Initializes a new instance of the MySqlParameter class.
Initializes a new instance of the MySqlParameter class with the parameter name and the data type.
Initializes a new instance of the MySqlParameter class with the parameter name, the MySqlDbType , and the size.
Initializes a new instance of the MySqlParameter class with the parameter name, the type of the parameter, the size of the parameter, a ParameterDirection, the precision of the parameter, the scale of the parameter, the source column, a DataRowVersionto use, and the value of the parameter.
Initializes a new instance of the MySqlParameter class with the parameter name, the MySqlDbType , the size, and the source column name.
Initializes a new instance of the MySqlParameter class with the parameter name and a value of the new MySqlParameter.
See Also
MySqlParameter Class, MySql.Data.MySqlClient Namespace
Initializes a new instance of the MySqlParameter class.
Syntax: Visual Basic
Overloads Public Sub New()
Syntax: C#
public MySqlParameter();
See Also
MySqlParameter Class, MySql.Data.MySqlClient Namespace, MySqlParameter Constructor Overload List
Initializes a new instance of the MySqlParameter class with the parameter name and the data type.
Syntax: Visual Basic
Overloads Public Sub New( _ ByVal parameterName As String, _ ByVal dbType As MySqlDbType _ )
Syntax: C#
public MySqlParameter( stringparameterName, MySqlDbTypedbType );
Parameters
parameterName: The name of the parameter to map.dbType: One of the MySqlDbType values.
See Also
MySqlParameter Class, MySql.Data.MySqlClient Namespace, MySqlParameter Constructor Overload List
Specifies MySQL specific data type of a field, property, for use in a MySqlParameter .
Syntax: Visual Basic
Public Enum MySqlDbType
Syntax: C#
public enum MySqlDbType
Members
| Member Name | Description |
| Newdate | Obsolete. Use Datetime or Date type. |
| Timestamp | A timestamp. The range is '1970-01-01 00:00:01' to sometime in the year 2038. |
| Time | The range is '-838:59:59' to '838:59:59' |
| Date | Date The supported range is '1000-01-01' to '9999-12-31' |
| Datetime | The supported range is '1000-01-01 00:00:00' to '9999-12-31 23:59:59' |
| Year | A year in 2- or 4-digit format (default is 4-digit). The allowable values are 1901 to 2155, 0000 in the 4-digit year format, and 1970-2069 if you use the 2-digit format (70-69). |
| TinyBlob | A BLOB column with a maximum length of 255 (2^8 - 1) characters |
| Blob | A BLOB column with a maximum length of 65535 (2^16 - 1) characters |
| MediumBlob | A BLOB column with a maximum length of 16777215 (2^24 - 1) characters |
| LongBlob | A BLOB column with a maximum length of 4294967295 or 4G (2^32 - 1) characters |
| Int16 | A 16-bit signed integer. The signed range is -32768 to 32767. The unsigned range is 0 to 65535 |
| Int24 | Specifies a 24 (3 byte) signed or unsigned value |
| Int32 | A 32-bit signed integer |
| Int64 | A 64-bit signed integer |
| Byte | The signed range is -128 to 127. The unsigned range is 0 to 255. |
| Float | A small (single-precision) floating-point number. Allowable values are -3.402823466E+38 to -1.175494351E-38, 0, and 1.175494351E-38 to 3.402823466E+38. |
| Double | A normal-size (double-precision) floating-point number. Allowable values are -1.7976931348623157E+308 to -2.2250738585072014E-308, 0, and 2.2250738585072014E-308 to 1.7976931348623157E+308. |
| UByte | An 8-bit unsigned value |
| UInt16 | A 16-bit unsigned value |
| UInt24 | A 24-bit unsigned value |
| UInt32 | A 32-bit unsigned value |
| UInt64 | A 64-bit unsigned value |
| Decimal | A fixed precision and scale numeric value between -1038 -1 and 10 38 -1 |
| NewDecimal | New Decimal |
| Set | A set. A string object that can have zero or more values, each of which must be chosen from the list of values 'value1', 'value2', ... A SET can have a maximum of 64 members. |
| String | Obsolete Use VarChar type |
| VarChar | A variable-length string containing 0 to 255 characters |
| VarString | A variable-length string containing 0 to 65535 characters |
| Enum | An enumeration. A string object that can have only one value, chosen from the list of values 'value1', 'value2', ..., NULL or the special "" error value. An ENUM can have a maximum of 65535 distinct values. |
| Geometry | |
| Bit | Bit-field data type |
| TinyText | A nonbinary string column supporting a maximum length of 255 (2^8 - 1) characters |
| Text | A nonbinary string column supporting a maximum length of 65535 (2^16 - 1) characters |
| MediumText | A nonbinary string column supporting a maximum length of 16777215 (2^24 - 1) characters |
| LongText | A nonbinary string column supporting a maximum length of 4294967295 (2^32 - 1) characters |
Requirements
Namespace: MySql.Data.MySqlClient
Assembly: MySql.Data (in MySql.Data.dll)
See Also
Initializes a new instance of the MySqlParameter class with the parameter name, the MySqlDbType , and the size.
Syntax: Visual Basic
Overloads Public Sub New( _ ByVal parameterName As String, _ ByVal dbType As MySqlDbType, _ ByVal size As Integer _ )
Syntax: C#
public MySqlParameter( stringparameterName, MySqlDbTypedbType, intsize );
Parameters
parameterName: The name of the parameter to map.dbType: One of the MySqlDbType values.size: The length of the parameter.
See Also
MySqlParameter Class, MySql.Data.MySqlClient Namespace, MySqlParameter Constructor Overload List
Initializes a new instance of the MySqlParameter class with the parameter name, the type of the parameter, the size of the parameter, a ParameterDirection, the precision of the parameter, the scale of the parameter, the source column, a DataRowVersionto use, and the value of the parameter.
Syntax: Visual Basic
Overloads Public Sub New( _ ByVal parameterName As String, _ ByVal dbType As MySqlDbType, _ ByVal size As Integer, _ ByVal direction As ParameterDirection, _ ByVal isNullable As Boolean, _ ByVal precision As Byte, _ ByVal scale As Byte, _ ByVal sourceColumn As String, _ ByVal sourceVersion As DataRowVersion, _ ByVal value As Object _ )
Syntax: C#
public MySqlParameter( stringparameterName, MySqlDbTypedbType, intsize, ParameterDirectiondirection, boolisNullable, byteprecision, bytescale, stringsourceColumn, DataRowVersionsourceVersion, objectvalue );
Parameters
parameterName: The name of the parameter to map.dbType: One of the MySqlDbType values.size: The length of the parameter.direction: One of the ParameterDirectionvalues.isNullable: true if the value of the field can be null, otherwise false.precision: The total number of digits to the left and right of the decimal point to which Value is resolved.scale: The total number of decimal places to which Value is resolved.sourceColumn: The name of the source column.sourceVersion: One of the DataRowVersionvalues.value: An Objectthat is the value of the MySqlParameter .
Exceptions
| Exception Type | Condition |
| ArgumentException |
See Also
MySqlParameter Class, MySql.Data.MySqlClient Namespace, MySqlParameter Constructor Overload List
Gets or sets the value of the parameter.
Syntax: Visual Basic
NotOverridable Public Property Value As Object _ _ Implements IDataParameter.Value
Syntax: C#
public object Value {get; set;}
Implements
IDataParameter.Value
See Also
Initializes a new instance of the MySqlParameter class with the parameter name, the MySqlDbType , the size, and the source column name.
Syntax: Visual Basic
Overloads Public Sub New( _ ByVal parameterName As String, _ ByVal dbType As MySqlDbType, _ ByVal size As Integer, _ ByVal sourceColumn As String _ )
Syntax: C#
public MySqlParameter( stringparameterName, MySqlDbTypedbType, intsize, stringsourceColumn );
Parameters
parameterName: The name of the parameter to map.dbType: One of the MySqlDbType values.size: The length of the parameter.sourceColumn: The name of the source column.
See Also
MySqlParameter Class, MySql.Data.MySqlClient Namespace, MySqlParameter Constructor Overload List
Initializes a new instance of the MySqlParameter class with the parameter name and a value of the new MySqlParameter.
Syntax: Visual Basic
Overloads Public Sub New( _ ByVal parameterName As String, _ ByVal value As Object _ )
Syntax: C#
public MySqlParameter( stringparameterName, objectvalue );
Parameters
parameterName: The name of the parameter to map.value: An Objectthat is the value of the MySqlParameter .
See Also
MySqlParameter Class, MySql.Data.MySqlClient Namespace, MySqlParameter Constructor Overload List
Gets or sets the DbTypeof the parameter.
Syntax: Visual Basic
NotOverridable Public Property DbType As DbType _ _ Implements IDataParameter.DbType
Syntax: C#
public System.Data.DbType DbType {get; set;}
Implements
IDataParameter.DbType
See Also
Gets or sets a value indicating whether the parameter is input-only, output-only, bidirectional, or a stored procedure return value parameter. As of MySQL version 4.1 and earlier, input-only is the only valid choice.
Syntax: Visual Basic
NotOverridable Public Property Direction As ParameterDirection _ _ Implements IDataParameter.Direction
Syntax: C#
public System.Data.ParameterDirection Direction {get; set;}
Implements
IDataParameter.Direction
See Also
Gets or sets a value indicating whether the parameter accepts null values.
Syntax: Visual Basic
NotOverridable Public Property IsNullable As Boolean _ _ Implements IDataParameter.IsNullable
Syntax: C#
public bool IsNullable {get; set;}
Implements
IDataParameter.IsNullable
See Also
Syntax: Visual Basic
Public Property IsUnsigned As Boolean
Syntax: C#
public bool IsUnsigned {get; set;}See Also
Gets or sets the MySqlDbType of the parameter.
Syntax: Visual Basic
Public Property MySqlDbType As MySqlDbType
Syntax: C#
public MySqlDbType MySqlDbType {get; set;}See Also
Gets or sets the name of the MySqlParameter.
Syntax: Visual Basic
NotOverridable Public Property ParameterName As String _ _ Implements IDataParameter.ParameterName
Syntax: C#
public string ParameterName {get; set;}
Implements
IDataParameter.ParameterName
See Also
Gets or sets the maximum number of digits used to represent the Value property.
Syntax: Visual Basic
NotOverridable Public Property Precision As Byte _ _ Implements IDbDataParameter.Precision
Syntax: C#
public byte Precision {get; set;}
Implements
IDbDataParameter.Precision
See Also
Gets or sets the number of decimal places to which Value is resolved.
Syntax: Visual Basic
NotOverridable Public Property Scale As Byte _ _ Implements IDbDataParameter.Scale
Syntax: C#
public byte Scale {get; set;}
Implements
IDbDataParameter.Scale
See Also
Gets or sets the maximum size, in bytes, of the data within the column.
Syntax: Visual Basic
NotOverridable Public Property Size As Integer _ _ Implements IDbDataParameter.Size
Syntax: C#
public int Size {get; set;}
Implements
IDbDataParameter.Size
See Also
Gets or sets the name of the source column that is mapped to the DataSetand used for loading or returning the Value .
Syntax: Visual Basic
NotOverridable Public Property SourceColumn As String _ _ Implements IDataParameter.SourceColumn
Syntax: C#
public string SourceColumn {get; set;}
Implements
IDataParameter.SourceColumn
See Also
Gets or sets the DataRowVersionto use when loading Value .
Syntax: Visual Basic
NotOverridable Public Property SourceVersion As DataRowVersion _ _ Implements IDataParameter.SourceVersion
Syntax: C#
public System.Data.DataRowVersion SourceVersion {get; set;}
Implements
IDataParameter.SourceVersion
See Also
Overridden. Gets a string containing the ParameterName .
Syntax: Visual Basic
Overrides Public Function ToString() As String
Syntax: C#
public override string ToString();
Return Value
See Also
Gets the MySqlParameter at the specified index.
Syntax: Visual Basic
Overloads Public Default Property Item( _ ByVal index As Integer _ ) As MySqlParameter
Syntax: C#
public MySqlParameter this[
intindex
] {get; set;}See Also
MySqlParameterCollection Class, MySql.Data.MySqlClient Namespace, MySqlParameterCollection.Item Overload List
Gets the MySqlParameter with the specified name.
Syntax: Visual Basic
Overloads Public Default Property Item( _ ByVal name As String _ ) As MySqlParameter
Syntax: C#
public MySqlParameter this[
stringname
] {get; set;}See Also
MySqlParameterCollection Class, MySql.Data.MySqlClient Namespace, MySqlParameterCollection.Item Overload List
Adds the specified MySqlParameter object to the MySqlParameterCollection .
Overload List
Adds the specified MySqlParameter object to the MySqlParameterCollection .
Adds the specified MySqlParameter object to the MySqlParameterCollection .
Adds a MySqlParameter to the MySqlParameterCollection given the parameter name and the data type.
Adds a MySqlParameter to the MySqlParameterCollection with the parameter name, the data type, and the column length.
Adds a MySqlParameter to the MySqlParameterCollection with the parameter name, the data type, the column length, and the source column name.
Adds a MySqlParameter to the MySqlParameterCollection given the specified parameter name and value.
See Also
MySqlParameterCollection Class, MySql.Data.MySqlClient Namespace
Adds the specified MySqlParameter object to the MySqlParameterCollection .
Syntax: Visual Basic
Overloads Public Function Add( _ ByVal value As MySqlParameter _ ) As MySqlParameter
Syntax: C#
public MySqlParameter Add( MySqlParametervalue );
Parameters
value: The MySqlParameter to add to the collection.
Return Value
The newly added MySqlParameter object.
See Also
MySqlParameterCollection Class, MySql.Data.MySqlClient Namespace, MySqlParameterCollection.Add Overload List
Adds the specified MySqlParameter object to the MySqlParameterCollection .
Syntax: Visual Basic
NotOverridable Overloads Public Function Add( _ ByVal value As Object _ ) As Integer _ _ Implements IList.Add
Syntax: C#
public int Add( objectvalue );
Parameters
value: The MySqlParameter to add to the collection.
Return Value
The index of the new MySqlParameter object.
Implements
IList.Add
See Also
MySqlParameterCollection Class, MySql.Data.MySqlClient Namespace, MySqlParameterCollection.Add Overload List
Adds a MySqlParameter to the MySqlParameterCollection given the parameter name and the data type.
Syntax: Visual Basic
Overloads Public Function Add( _ ByVal parameterName As String, _ ByVal dbType As MySqlDbType _ ) As MySqlParameter
Syntax: C#
public MySqlParameter Add( stringparameterName, MySqlDbTypedbType );
Parameters
parameterName: The name of the parameter.dbType: One of the MySqlDbType values.
Return Value
The newly added MySqlParameter object.
See Also
MySqlParameterCollection Class, MySql.Data.MySqlClient Namespace, MySqlParameterCollection.Add Overload List
Adds a MySqlParameter to the MySqlParameterCollection with the parameter name, the data type, and the column length.
Syntax: Visual Basic
Overloads Public Function Add( _ ByVal parameterName As String, _ ByVal dbType As MySqlDbType, _ ByVal size As Integer _ ) As MySqlParameter
Syntax: C#
public MySqlParameter Add( stringparameterName, MySqlDbTypedbType, intsize );
Parameters
parameterName: The name of the parameter.dbType: One of the MySqlDbType values.size: The length of the column.
Return Value
The newly added MySqlParameter object.
See Also
MySqlParameterCollection Class, MySql.Data.MySqlClient Namespace, MySqlParameterCollection.Add Overload List
Adds a MySqlParameter to the MySqlParameterCollection with the parameter name, the data type, the column length, and the source column name.
Syntax: Visual Basic
Overloads Public Function Add( _ ByVal parameterName As String, _ ByVal dbType As MySqlDbType, _ ByVal size As Integer, _ ByVal sourceColumn As String _ ) As MySqlParameter
Syntax: C#
public MySqlParameter Add( stringparameterName, MySqlDbTypedbType, intsize, stringsourceColumn );
Parameters
parameterName: The name of the parameter.dbType: One of the MySqlDbType values.size: The length of the column.sourceColumn: The name of the source column.
Return Value
The newly added MySqlParameter object.
See Also
MySqlParameterCollection Class, MySql.Data.MySqlClient Namespace, MySqlParameterCollection.Add Overload List
Adds a MySqlParameter to the MySqlParameterCollection given the specified parameter name and value.
Syntax: Visual Basic
Overloads Public Function Add( _ ByVal parameterName As String, _ ByVal value As Object _ ) As MySqlParameter
Syntax: C#
public MySqlParameter Add( stringparameterName, objectvalue );
Parameters
parameterName: The name of the parameter.value: The Value of the MySqlParameter to add to the collection.
Return Value
The newly added MySqlParameter object.
See Also
MySqlParameterCollection Class, MySql.Data.MySqlClient Namespace, MySqlParameterCollection.Add Overload List
Removes all items from the collection.
Syntax: Visual Basic
NotOverridable Public Sub Clear() _ _ Implements IList.Clear
Syntax: C#
public void Clear();
Implements
IList.Clear
See Also
MySqlParameterCollection Class, MySql.Data.MySqlClient Namespace
Gets a value indicating whether a MySqlParameter exists in the collection.
Overload List
Gets a value indicating whether a MySqlParameter exists in the collection.
Gets a value indicating whether a MySqlParameter with the specified parameter name exists in the collection.
See Also
MySqlParameterCollection Class, MySql.Data.MySqlClient Namespace
Gets a value indicating whether a MySqlParameter exists in the collection.
Syntax: Visual Basic
NotOverridable Overloads Public Function Contains( _ ByVal value As Object _ ) As Boolean _ _ Implements IList.Contains
Syntax: C#
public bool Contains( objectvalue );
Parameters
value: The value of the MySqlParameter object to find.
Return Value
true if the collection contains the MySqlParameter object; otherwise, false.
Implements
IList.Contains
See Also
MySqlParameterCollection Class, MySql.Data.MySqlClient Namespace, MySqlParameterCollection.Contains Overload List
Gets a value indicating whether a MySqlParameter with the specified parameter name exists in the collection.
Syntax: Visual Basic
NotOverridable Overloads Public Function Contains( _ ByVal name As String _ ) As Boolean _ _ Implements IDataParameterCollection.Contains
Syntax: C#
public bool Contains( stringname );
Parameters
name: The name of the MySqlParameter object to find.
Return Value
true if the collection contains the parameter; otherwise, false.
Implements
IDataParameterCollection.Contains
See Also
MySqlParameterCollection Class, MySql.Data.MySqlClient Namespace, MySqlParameterCollection.Contains Overload List
Copies MySqlParameter objects from the MySqlParameterCollection to the specified array.
Syntax: Visual Basic
NotOverridable Public Sub CopyTo( _ ByVal array As Array, _ ByVal index As Integer _ ) _ _ Implements ICollection.CopyTo
Syntax: C#
public void CopyTo( Arrayarray, intindex );
Parameters
array:
Implements
ICollection.CopyTo
See Also
MySqlParameterCollection Class, MySql.Data.MySqlClient Namespace
Gets the location of a MySqlParameter in the collection.
Overload List
Gets the location of a MySqlParameter in the collection.
Gets the location of the MySqlParameter in the collection with a specific parameter name.
See Also
MySqlParameterCollection Class, MySql.Data.MySqlClient Namespace
Gets the location of a MySqlParameter in the collection.
Syntax: Visual Basic
NotOverridable Overloads Public Function IndexOf( _ ByVal value As Object _ ) As Integer _ _ Implements IList.IndexOf
Syntax: C#
public int IndexOf( objectvalue );
Parameters
value: The MySqlParameter object to locate.
Return Value
The zero-based location of the MySqlParameter in the collection.
Implements
IList.IndexOf
See Also
MySqlParameterCollection Class, MySql.Data.MySqlClient Namespace, MySqlParameterCollection.IndexOf Overload List
Gets the location of the MySqlParameter in the collection with a specific parameter name.
Syntax: Visual Basic
NotOverridable Overloads Public Function IndexOf( _ ByVal parameterName As String _ ) As Integer _ _ Implements IDataParameterCollection.IndexOf
Syntax: C#
public int IndexOf( stringparameterName );
Parameters
parameterName: The name of the MySqlParameter object to retrieve.
Return Value
The zero-based location of the MySqlParameter in the collection.
Implements
IDataParameterCollection.IndexOf
See Also
MySqlParameterCollection Class, MySql.Data.MySqlClient Namespace, MySqlParameterCollection.IndexOf Overload List
Inserts a MySqlParameter into the collection at the specified index.
Syntax: Visual Basic
NotOverridable Public Sub Insert( _ ByVal index As Integer, _ ByVal value As Object _ ) _ _ Implements IList.Insert
Syntax: C#
public void Insert( intindex, objectvalue );
Parameters
value:
Implements
IList.Insert
See Also
MySqlParameterCollection Class, MySql.Data.MySqlClient Namespace
Removes the specified MySqlParameter from the collection.
Syntax: Visual Basic
NotOverridable Public Sub Remove( _ ByVal value As Object _ ) _ _ Implements IList.Remove
Syntax: C#
public void Remove( objectvalue );
Parameters
value:
Implements
IList.Remove
See Also
MySqlParameterCollection Class, MySql.Data.MySqlClient Namespace
Removes the specified MySqlParameter from the collection.
Overload List
Removes the specified MySqlParameter from the collection using a specific index.
Removes the specified MySqlParameter from the collection using the parameter name.
See Also
MySqlParameterCollection Class, MySql.Data.MySqlClient Namespace
Removes the specified MySqlParameter from the collection using a specific index.
Syntax: Visual Basic
NotOverridable Overloads Public Sub RemoveAt( _ ByVal index As Integer _ ) _ _ Implements IList.RemoveAt
Syntax: C#
public void RemoveAt( intindex );
Parameters
index: The zero-based index of the parameter.
Implements
IList.RemoveAt
See Also
MySqlParameterCollection Class, MySql.Data.MySqlClient Namespace, MySqlParameterCollection.RemoveAt Overload List
Removes the specified MySqlParameter from the collection using the parameter name.
Syntax: Visual Basic
NotOverridable Overloads Public Sub RemoveAt( _ ByVal name As String _ ) _ _ Implements IDataParameterCollection.RemoveAt
Syntax: C#
public void RemoveAt( stringname );
Parameters
name: The name of the MySqlParameter object to retrieve.
Implements
IDataParameterCollection.RemoveAt
See Also
MySqlParameterCollection Class, MySql.Data.MySqlClient Namespace, MySqlParameterCollection.RemoveAt Overload List
Syntax: Visual Basic
Public Property Transaction As MySqlTransaction
Syntax: C#
public MySqlTransaction Transaction {get; set;}See Also
Syntax: Visual Basic
NotOverridable Public Property UpdatedRowSource As UpdateRowSource _ _ Implements IDbCommand.UpdatedRowSource
Syntax: C#
public System.Data.UpdateRowSource UpdatedRowSource {get; set;}
Implements
IDbCommand.UpdatedRowSource
See Also
Attempts to cancel the execution of a MySqlCommand. This operation is not supported.
Syntax: Visual Basic
NotOverridable Public Sub Cancel() _ _ Implements IDbCommand.Cancel
Syntax: C#
public void Cancel();
Implements
IDbCommand.Cancel
Remarks
Cancelling an executing command is currently not supported on any version of MySQL.
Exceptions
| Exception Type | Condition |
| NotSupportedException | This operation is not supported. |
See Also
Creates a new instance of a MySqlParameter object.
Syntax: Visual Basic
Public Function CreateParameter() As MySqlParameter
Syntax: C#
public MySqlParameter CreateParameter();
Return Value
A MySqlParameter object.
Remarks
This method is a strongly-typed version of CreateParameter.
See Also
Syntax: Visual Basic
NotOverridable Public Function ExecuteNonQuery() As Integer _ _ Implements IDbCommand.ExecuteNonQuery
Syntax: C#
public int ExecuteNonQuery();
Implements
IDbCommand.ExecuteNonQuery
See Also
Overload List
See Also
MySqlCommand Class, MySql.Data.MySqlClient Namespace
Syntax: Visual Basic
Overloads Public Function ExecuteReader() As MySqlDataReader
Syntax: C#
public MySqlDataReader ExecuteReader();
See Also
MySqlCommand Class, MySql.Data.MySqlClient Namespace, MySqlCommand.ExecuteReader Overload List
Provides a means of reading a forward-only stream of rows from a MySQL database. This class cannot be inherited.
For a list of all members of this type, see MySqlDataReader Members .
Syntax: Visual Basic
NotInheritable Public Class MySqlDataReader_ Inherits MarshalByRefObject_ Implements IEnumerable, IDataReader, IDisposable, IDataRecord
Syntax: C#
public sealed class MySqlDataReader : MarshalByRefObject, IEnumerable, IDataReader, IDisposable, IDataRecord
Thread Safety
Public static (Shared in Visual Basic) members of this type are safe for multithreaded operations. Instance members are not guaranteed to be thread-safe.
Requirements
Namespace: MySql.Data.MySqlClient
Assembly: MySql.Data (in MySql.Data.dll)
See Also
MySqlDataReader Members, MySql.Data.MySqlClient Namespace
Public Instance Properties
| Depth | Gets a value indicating the depth of nesting for the current row. This method is not supported currently and always returns 0. |
| FieldCount | Gets the number of columns in the current row. |
| HasRows | Gets a value indicating whether the MySqlDataReader contains one or more rows. |
| IsClosed | Gets a value indicating whether the data reader is closed. |
| Item | Overloaded. Overloaded. Gets the value of a column in its native format. In C#, this property is the indexer for the MySqlDataReader class. |
| RecordsAffected | Gets the number of rows changed, inserted, or deleted by execution of the SQL statement. |
Public Instance Methods
| Close | Closes the MySqlDataReader object. |
| CreateObjRef(inherited from MarshalByRefObject) | Creates an object that contains all the relevant information required to generate a proxy used to communicate with a remote object. |
| Equals(inherited from Object) | Determines whether the specified Objectis equal to the current Object. |
| GetBoolean | Gets the value of the specified column as a Boolean. |
| GetByte | Gets the value of the specified column as a byte. |
| GetBytes | Reads a stream of bytes from the specified column offset into the buffer an array starting at the given buffer offset. |
| GetChar | Gets the value of the specified column as a single character. |
| GetChars | Reads a stream of characters from the specified column offset into the buffer as an array starting at the given buffer offset. |
| GetDataTypeName | Gets the name of the source data type. |
| GetDateTime | |
| GetDecimal | |
| GetDouble | |
| GetFieldType | Gets the Type that is the data type of the object. |
| GetFloat | |
| GetGuid | |
| GetHashCode(inherited from Object) | Serves as a hash function for a particular type. GetHashCodeis suitable for use in hashing algorithms and data structures like a hash table. |
| GetInt16 | |
| GetInt32 | |
| GetInt64 | |
| GetLifetimeService(inherited from MarshalByRefObject) | Retrieves the current lifetime service object that controls the lifetime policy for this instance. |
| GetMySqlDateTime | |
| GetName | Gets the name of the specified column. |
| GetOrdinal | Gets the column ordinal, given the name of the column. |
| GetSchemaTable | Returns a DataTable that describes the column metadata of the MySqlDataReader. |
| GetString | |
| GetTimeSpan | |
| GetType(inherited from Object) | Gets the Typeof the current instance. |
| GetUInt16 | |
| GetUInt32 | |
| GetUInt64 | |
| GetValue | Gets the value of the specified column in its native format. |
| GetValues | Gets all attribute columns in the collection for the current row. |
| InitializeLifetimeService(inherited from MarshalByRefObject) | Obtains a lifetime service object to control the lifetime policy for this instance. |
| IsDBNull | Gets a value indicating whether the column contains non-existent or missing values. |
| NextResult | Advances the data reader to the next result, when reading the results of batch SQL statements. |
| Read | Advances the MySqlDataReader to the next record. |
| ToString(inherited from Object) | Returns a Stringthat represents the current Object. |
See Also
MySqlDataReader Class, MySql.Data.MySqlClient Namespace
Gets a value indicating the depth of nesting for the current row. This method is not supported currently and always returns 0.
Syntax: Visual Basic
NotOverridable Public ReadOnly Property Depth As Integer _ _ Implements IDataReader.Depth
Syntax: C#
public int Depth {get;}
Implements
IDataReader.Depth
See Also
Gets the number of columns in the current row.
Syntax: Visual Basic
NotOverridable Public ReadOnly Property FieldCount As Integer _ _ Implements IDataRecord.FieldCount
Syntax: C#
public int FieldCount {get;}
Implements
IDataRecord.FieldCount
See Also
Gets a value indicating whether the MySqlDataReader contains one or more rows.
Syntax: Visual Basic
Public ReadOnly Property HasRows As Boolean
Syntax: C#
public bool HasRows {get;}See Also
Gets a value indicating whether the data reader is closed.
Syntax: Visual Basic
NotOverridable Public ReadOnly Property IsClosed As Boolean _ _ Implements IDataReader.IsClosed
Syntax: C#
public bool IsClosed {get;}
Implements
IDataReader.IsClosed
See Also
Overloaded. Gets the value of a column in its native format. In C#, this property is the indexer for the MySqlDataReader class.
Overload List
Overloaded. Gets the value of a column in its native format. In C#, this property is the indexer for the MySqlDataReader class.
Gets the value of a column in its native format. In C#, this property is the indexer for the MySqlDataReader class.
See Also
MySqlDataReader Class, MySql.Data.MySqlClient Namespace
Overloaded. Gets the value of a column in its native format. In C#, this property is the indexer for the MySqlDataReader class.
Syntax: Visual Basic
NotOverridable Overloads Public Default ReadOnly Property Item( _ ByVal i As Integer _ ) _ _ Implements IDataRecord.Item As Object _ _ Implements IDataRecord.Item
Syntax: C#
public object this[
inti
] {get;}Implements
IDataRecord.Item
See Also
MySqlDataReader Class, MySql.Data.MySqlClient Namespace, MySqlDataReader.Item Overload List
Gets the value of a column in its native format. In C#, this property is the indexer for the MySqlDataReader class.
Syntax: Visual Basic
NotOverridable Overloads Public Default ReadOnly Property Item( _ ByVal name As String _ ) _ _ Implements IDataRecord.Item As Object _ _ Implements IDataRecord.Item
Syntax: C#
public object this[
stringname
] {get;}Implements
IDataRecord.Item
See Also
MySqlDataReader Class, MySql.Data.MySqlClient Namespace, MySqlDataReader.Item Overload List
Gets the number of rows changed, inserted, or deleted by execution of the SQL statement.
Syntax: Visual Basic
NotOverridable Public ReadOnly Property RecordsAffected As Integer _ _ Implements IDataReader.RecordsAffected
Syntax: C#
public int RecordsAffected {get;}
Implements
IDataReader.RecordsAffected
See Also
Closes the MySqlDataReader object.
Syntax: Visual Basic
NotOverridable Public Sub Close() _ _ Implements IDataReader.Close
Syntax: C#
public void Close();
Implements
IDataReader.Close
See Also
Gets the value of the specified column as a Boolean.
Syntax: Visual Basic
NotOverridable Public Function GetBoolean( _ ByVal i As Integer _ ) As Boolean _ _ Implements IDataRecord.GetBoolean
Syntax: C#
public bool GetBoolean( inti );
Parameters
i:
Return Value
Implements
IDataRecord.GetBoolean
See Also
Gets the value of the specified column as a byte.
Syntax: Visual Basic
NotOverridable Public Function GetByte( _ ByVal i As Integer _ ) As Byte _ _ Implements IDataRecord.GetByte
Syntax: C#
public byte GetByte( inti );
Parameters
i:
Return Value
Implements
IDataRecord.GetByte
See Also
Reads a stream of bytes from the specified column offset into the buffer an array starting at the given buffer offset.
Syntax: Visual Basic
NotOverridable Public Function GetBytes( _ ByVal i As Integer, _ ByVal dataIndex As Long, _ ByVal buffer As Byte(), _ ByVal bufferIndex As Integer, _ ByVal length As Integer _ ) As Long _ _ Implements IDataRecord.GetBytes
Syntax: C#
public long GetBytes( inti, longdataIndex, byte[]buffer, intbufferIndex, intlength );
Parameters
i: The zero-based column ordinal.dataIndex: The index within the field from which to begin the read operation.buffer: The buffer into which to read the stream of bytes.bufferIndex: The index for buffer to begin the read operation.length: The maximum length to copy into the buffer.
Return Value
The actual number of bytes read.
Implements
IDataRecord.GetBytes
See Also
Gets the value of the specified column as a single character.
Syntax: Visual Basic
NotOverridable Public Function GetChar( _ ByVal i As Integer _ ) As Char _ _ Implements IDataRecord.GetChar
Syntax: C#
public char GetChar( inti );
Parameters
i:
Return Value
Implements
IDataRecord.GetChar
See Also
Reads a stream of characters from the specified column offset into the buffer as an array starting at the given buffer offset.
Syntax: Visual Basic
NotOverridable Public Function GetChars( _ ByVal i As Integer, _ ByVal fieldOffset As Long, _ ByVal buffer As Char(), _ ByVal bufferoffset As Integer, _ ByVal length As Integer _ ) As Long _ _ Implements IDataRecord.GetChars
Syntax: C#
public long GetChars( inti, longfieldOffset, char[]buffer, intbufferoffset, intlength );
Parameters
i:fieldOffset:buffer:bufferoffset:length:
Return Value
Implements
IDataRecord.GetChars
See Also
Gets the name of the source data type.
Syntax: Visual Basic
NotOverridable Public Function GetDataTypeName( _ ByVal i As Integer _ ) As String _ _ Implements IDataRecord.GetDataTypeName
Syntax: C#
public string GetDataTypeName( inti );
Parameters
i:
Return Value
Implements
IDataRecord.GetDataTypeName
See Also
Syntax: Visual Basic
NotOverridable Public Function GetDateTime( _ ByVal index As Integer _ ) As Date _ _ Implements IDataRecord.GetDateTime
Syntax: C#
public DateTime GetDateTime( intindex );
Implements
IDataRecord.GetDateTime
See Also
Syntax: Visual Basic
NotOverridable Public Function GetDecimal( _ ByVal index As Integer _ ) As Decimal _ _ Implements IDataRecord.GetDecimal
Syntax: C#
public decimal GetDecimal( intindex );
Implements
IDataRecord.GetDecimal
See Also
Syntax: Visual Basic
NotOverridable Public Function GetDouble( _ ByVal index As Integer _ ) As Double _ _ Implements IDataRecord.GetDouble
Syntax: C#
public double GetDouble( intindex );
Implements
IDataRecord.GetDouble
See Also
Gets the Type that is the data type of the object.
Syntax: Visual Basic
NotOverridable Public Function GetFieldType( _ ByVal i As Integer _ ) As Type _ _ Implements IDataRecord.GetFieldType
Syntax: C#
public Type GetFieldType( inti );
Parameters
i:
Return Value
Implements
IDataRecord.GetFieldType
See Also
Syntax: Visual Basic
NotOverridable Public Function GetFloat( _ ByVal index As Integer _ ) As Single _ _ Implements IDataRecord.GetFloat
Syntax: C#
public float GetFloat( intindex );
Implements
IDataRecord.GetFloat
See Also
Syntax: Visual Basic
NotOverridable Public Function GetGuid( _ ByVal index As Integer _ ) As Guid _ _ Implements IDataRecord.GetGuid
Syntax: C#
public Guid GetGuid( intindex );
Implements
IDataRecord.GetGuid
See Also
Syntax: Visual Basic
NotOverridable Public Function GetInt16( _ ByVal index As Integer _ ) As Short _ _ Implements IDataRecord.GetInt16
Syntax: C#
public short GetInt16( intindex );
Implements
IDataRecord.GetInt16
See Also
Syntax: Visual Basic
NotOverridable Public Function GetInt32( _ ByVal index As Integer _ ) As Integer _ _ Implements IDataRecord.GetInt32
Syntax: C#
public int GetInt32( intindex );
Implements
IDataRecord.GetInt32
See Also
Syntax: Visual Basic
NotOverridable Public Function GetInt64( _ ByVal index As Integer _ ) As Long _ _ Implements IDataRecord.GetInt64
Syntax: C#
public long GetInt64( intindex );
Implements
IDataRecord.GetInt64
See Also
Syntax: Visual Basic
Public Function GetMySqlDateTime( _ ByVal index As Integer _ ) As MySqlDateTime
Syntax: C#
public MySqlDateTime GetMySqlDateTime( intindex );
See Also
Gets the name of the specified column.
Syntax: Visual Basic
NotOverridable Public Function GetName( _ ByVal i As Integer _ ) As String _ _ Implements IDataRecord.GetName
Syntax: C#
public string GetName( inti );
Parameters
i:
Return Value
Implements
IDataRecord.GetName
See Also
Gets the column ordinal, given the name of the column.
Syntax: Visual Basic
NotOverridable Public Function GetOrdinal( _ ByVal name As String _ ) As Integer _ _ Implements IDataRecord.GetOrdinal
Syntax: C#
public int GetOrdinal( stringname );
Parameters
name:
Return Value
Implements
IDataRecord.GetOrdinal
See Also
Returns a DataTable that describes the column metadata of the MySqlDataReader.
Syntax: Visual Basic
NotOverridable Public Function GetSchemaTable() As DataTable _ _ Implements IDataReader.GetSchemaTable
Syntax: C#
public DataTable GetSchemaTable();
Return Value
Implements
IDataReader.GetSchemaTable
See Also
Syntax: Visual Basic
NotOverridable Public Function GetString( _ ByVal index As Integer _ ) As String _ _ Implements IDataRecord.GetString
Syntax: C#
public string GetString( intindex );
Implements
IDataRecord.GetString
See Also
Syntax: Visual Basic
Public Function GetTimeSpan( _ ByVal index As Integer _ ) As TimeSpan
Syntax: C#
public TimeSpan GetTimeSpan( intindex );
See Also
Syntax: Visual Basic
Public Function GetUInt16( _ ByVal index As Integer _ ) As UInt16
Syntax: C#
public ushort GetUInt16( intindex );
See Also
Syntax: Visual Basic
Public Function GetUInt32( _ ByVal index As Integer _ ) As UInt32
Syntax: C#
public uint GetUInt32( intindex );
See Also
Syntax: Visual Basic
Public Function GetUInt64( _ ByVal index As Integer _ ) As UInt64
Syntax: C#
public ulong GetUInt64( intindex );
See Also
Gets the value of the specified column in its native format.
Syntax: Visual Basic
NotOverridable Public Function GetValue( _ ByVal i As Integer _ ) As Object _ _ Implements IDataRecord.GetValue
Syntax: C#
public object GetValue( inti );
Parameters
i:
Return Value
Implements
IDataRecord.GetValue
See Also
Gets all attribute columns in the collection for the current row.
Syntax: Visual Basic
NotOverridable Public Function GetValues( _ ByVal values As Object() _ ) As Integer _ _ Implements IDataRecord.GetValues
Syntax: C#
public int GetValues( object[]values );
Parameters
values:
Return Value
Implements
IDataRecord.GetValues
See Also
Gets a value indicating whether the column contains non-existent or missing values.
Syntax: Visual Basic
NotOverridable Public Function IsDBNull( _ ByVal i As Integer _ ) As Boolean _ _ Implements IDataRecord.IsDBNull
Syntax: C#
public bool IsDBNull( inti );
Parameters
i:
Return Value
Implements
IDataRecord.IsDBNull
See Also
Advances the data reader to the next result, when reading the results of batch SQL statements.
Syntax: Visual Basic
NotOverridable Public Function NextResult() As Boolean _ _ Implements IDataReader.NextResult
Syntax: C#
public bool NextResult();
Return Value
Implements
IDataReader.NextResult
See Also
Advances the MySqlDataReader to the next record.
Syntax: Visual Basic
NotOverridable Public Function Read() As Boolean _ _ Implements IDataReader.Read
Syntax: C#
public bool Read();
Return Value
Implements
IDataReader.Read
See Also
Syntax: Visual Basic
Overloads Public Function ExecuteReader( _ ByVal behavior As CommandBehavior _ ) As MySqlDataReader
Syntax: C#
public MySqlDataReader ExecuteReader( CommandBehaviorbehavior );
See Also
MySqlCommand Class, MySql.Data.MySqlClient Namespace, MySqlCommand.ExecuteReader Overload List
Syntax: Visual Basic
NotOverridable Public Function ExecuteScalar() As Object _ _ Implements IDbCommand.ExecuteScalar
Syntax: C#
public object ExecuteScalar();
Implements
IDbCommand.ExecuteScalar
See Also
Syntax: Visual Basic
NotOverridable Public Sub Prepare() _ _ Implements IDbCommand.Prepare
Syntax: C#
public void Prepare();
Implements
IDbCommand.Prepare
See Also
For a list of all members of this type, see MySqlCommandBuilder Members .
Syntax: Visual Basic
NotInheritable Public Class MySqlCommandBuilder_ Inherits Component
Syntax: C#
public sealed class MySqlCommandBuilder : Component
Thread Safety
Public static (Sharedin Visual Basic) members of this type are safe for multithreaded operations. Instance members are notguaranteed to be thread-safe.
Requirements
Namespace: MySql.Data.MySqlClient
Assembly: MySql.Data (in MySql.Data.dll)
See Also
MySqlCommandBuilder Members, MySql.Data.MySqlClient Namespace
- 21.2.7.1.3.1.1. DeriveParameters Method
- 21.2.7.1.3.1.2.
MySqlCommandBuilderConstructor - 21.2.7.1.3.1.3. DataAdapter Property
- 21.2.7.1.3.1.4. QuotePrefix Property
- 21.2.7.1.3.1.5. QuoteSuffix Property
- 21.2.7.1.3.1.6.
MySqlCommandBuilder.GetDeleteCommandMethod - 21.2.7.1.3.1.7.
MySqlCommandBuilder.GetInsertCommandMethod - 21.2.7.1.3.1.8.
MySqlCommandBuilder.GetUpdateCommandMethod - 21.2.7.1.3.1.9.
MySqlCommandBuilder.RefreshSchemaMethod
Public Static (Shared) Methods
| DeriveParameters | Overloaded. Retrieves parameter information from the stored procedure specified in the MySqlCommand and populates the Parameters collection of the specified MySqlCommand object. This method is not currently supported since stored procedures are not available in MySql. |
Public Instance Constructors
| MySqlCommandBuilder | Overloaded. Initializes a new instance of the MySqlCommandBuilder class. |
Public Instance Properties
| Container(inherited from Component) | Gets the IContainerthat contains the Component. |
| DataAdapter | |
| QuotePrefix | |
| QuoteSuffix | |
| Site(inherited from Component) | Gets or sets the ISiteof the Component. |
Public Instance Methods
| CreateObjRef(inherited from MarshalByRefObject) | Creates an object that contains all the relevant information required to generate a proxy used to communicate with a remote object. |
| Dispose(inherited from Component) | Releases all resources used by the Component. |
| Equals(inherited from Object) | Determines whether the specified Objectis equal to the current Object. |
| GetDeleteCommand | |
| GetHashCode(inherited from Object) | Serves as a hash function for a particular type. GetHashCodeis suitable for use in hashing algorithms and data structures like a hash table. |
| GetInsertCommand | |
| GetLifetimeService(inherited from MarshalByRefObject) | Retrieves the current lifetime service object that controls the lifetime policy for this instance. |
| GetType(inherited from Object) | Gets the Typeof the current instance. |
| GetUpdateCommand | |
| InitializeLifetimeService(inherited from MarshalByRefObject) | Obtains a lifetime service object to control the lifetime policy for this instance. |
| RefreshSchema | |
| ToString(inherited from Component) | Returns a Stringcontaining the name of the Component, if any. This method should not be overridden. |
Public Instance Events
| Disposed(inherited from Component) | Adds an event handler to listen to the Disposedevent on the component. |
See Also
MySqlCommandBuilder Class, MySql.Data.MySqlClient Namespace
Retrieves parameter information from the stored procedure specified in the MySqlCommand and populates the Parameters collection of the specified MySqlCommand object. This method is not currently supported since stored procedures are not available in MySql.
Overload List
Retrieves parameter information from the stored procedure specified in the MySqlCommand and populates the Parameters collection of the specified MySqlCommand object. This method is not currently supported since stored procedures are not available in MySql.
See Also
MySqlCommandBuilder Class, MySql.Data.MySqlClient Namespace
Retrieves parameter information from the stored procedure specified in the MySqlCommand and populates the Parameters collection of the specified MySqlCommand object. This method is not currently supported since stored procedures are not available in MySql.
Syntax: Visual Basic
Overloads Public Shared Sub DeriveParameters( _ ByVal command As MySqlCommand _ )
Syntax: C#
public static void DeriveParameters( MySqlCommandcommand );
Parameters
command: The MySqlCommand referencing the stored procedure from which the parameter information is to be derived. The derived parameters are added to the Parameters collection of the MySqlCommand.
Exceptions
| Exception Type | Condition |
| InvalidOperationException | The command text is not a valid stored procedure name. |
See Also
MySqlCommandBuilder Class, MySql.Data.MySqlClient Namespace, MySqlCommandBuilder.DeriveParameters Overload List
Syntax: Visual Basic
Overloads Public Shared Sub DeriveParameters( _ ByVal command As MySqlCommand, _ ByVal useProc As Boolean _ )
Syntax: C#
public static void DeriveParameters( MySqlCommandcommand, booluseProc );
See Also
MySqlCommandBuilder Class, MySql.Data.MySqlClient Namespace, MySqlCommandBuilder.DeriveParameters Overload List
Initializes a new instance of the MySqlCommandBuilder class.
Overload List
Initializes a new instance of the MySqlCommandBuilder class.
See Also
MySqlCommandBuilder Class, MySql.Data.MySqlClient Namespace
Initializes a new instance of the MySqlCommandBuilder class.
Syntax: Visual Basic
Overloads Public Sub New()
Syntax: C#
public MySqlCommandBuilder();
See Also
MySqlCommandBuilder Class, MySql.Data.MySqlClient Namespace, MySqlCommandBuilder Constructor Overload List
Syntax: Visual Basic
Overloads Public Sub New( _ ByVal adapter As MySqlDataAdapter _ )
Syntax: C#
public MySqlCommandBuilder( MySqlDataAdapteradapter );
See Also
MySqlCommandBuilder Class, MySql.Data.MySqlClient Namespace, MySqlCommandBuilder Constructor Overload List
For a list of all members of this type, see MySqlDataAdapter Members .
Syntax: Visual Basic
NotInheritable Public Class MySqlDataAdapter_ Inherits DbDataAdapter
Syntax: C#
public sealed class MySqlDataAdapter : DbDataAdapter
Thread Safety
Public static (Sharedin Visual Basic) members of this type are safe for multithreaded operations. Instance members are notguaranteed to be thread-safe.
Requirements
Namespace: MySql.Data.MySqlClient
Assembly: MySql.Data (in MySql.Data.dll)
See Also
MySqlDataAdapter Members, MySql.Data.MySqlClient Namespace
Public Instance Constructors
| MySqlDataAdapter | Overloaded. Initializes a new instance of the MySqlDataAdapter class. |
Public Instance Properties
| AcceptChangesDuringFill(inherited from DataAdapter) | Gets or sets a value indicating whether AcceptChangesis called on a DataRowafter it is added to the DataTableduring any of the Fill operations. |
| AcceptChangesDuringUpdate(inherited from DataAdapter) | Gets or sets whether AcceptChangesis called during a Update. |
| Container(inherited from Component) | Gets the IContainerthat contains the Component. |
| ContinueUpdateOnError(inherited from DataAdapter) | Gets or sets a value that specifies whether to generate an exception when an error is encountered during a row update. |
| DeleteCommand | Overloaded. |
| FillLoadOption(inherited from DataAdapter) | Gets or sets the LoadOptionthat determines how the adapter fills the DataTablefrom the DbDataReader. |
| InsertCommand | Overloaded. |
| MissingMappingAction(inherited from DataAdapter) | Determines the action to take when incoming data does not have a matching table or column. |
| MissingSchemaAction(inherited from DataAdapter) | Determines the action to take when existing DataSetschema does not match incoming data. |
| ReturnProviderSpecificTypes(inherited from DataAdapter) | Gets or sets whether the Fillmethod should return provider-specific values or common CLS-compliant values. |
| SelectCommand | Overloaded. |
| Site(inherited from Component) | Gets or sets the ISiteof the Component. |
| TableMappings(inherited from DataAdapter) | Gets a collection that provides the master mapping between a source table and a DataTable. |
| UpdateBatchSize(inherited from DbDataAdapter) | Gets or sets a value that enables or disables batch processing support, and specifies the number of commands that can be executed in a batch. |
| UpdateCommand | Overloaded. |
Public Instance Methods
| CreateObjRef(inherited from MarshalByRefObject) | Creates an object that contains all the relevant information required to generate a proxy used to communicate with a remote object. |
| Dispose(inherited from Component) | Releases all resources used by the Component. |
| Equals(inherited from Object) | Determines whether the specified Objectis equal to the current Object. |
| Fill(inherited from DbDataAdapter) | Overloaded. Adds or refreshes rows in the DataSetto match those in the data source using the DataSetname, and creates a DataTablenamed "Table." |
| FillSchema(inherited from DbDataAdapter) | Overloaded. Configures the schema of the specified DataTablebased on the specified SchemaType. |
| GetFillParameters(inherited from DbDataAdapter) | Gets the parameters set by the user when executing an SQL
SELECT
statement. |
| GetHashCode(inherited from Object) | Serves as a hash function for a particular type. GetHashCodeis suitable for use in hashing algorithms and data structures like a hash table. |
| GetLifetimeService(inherited from MarshalByRefObject) | Retrieves the current lifetime service object that controls the lifetime policy for this instance. |
| GetType(inherited from Object) | Gets the Typeof the current instance. |
| InitializeLifetimeService(inherited from MarshalByRefObject) | Obtains a lifetime service object to control the lifetime policy for this instance. |
| ResetFillLoadOption(inherited from DataAdapter) | Resets FillLoadOptionto its default state and causes Fillto honor AcceptChangesDuringFill. |
| ShouldSerializeAcceptChangesDuringFill(inherited from DataAdapter) | Determines whether the AcceptChangesDuringFillproperty should be persisted. |
| ShouldSerializeFillLoadOption(inherited from DataAdapter) | Determines whether the FillLoadOptionproperty should be persisted. |
| ToString(inherited from Component) | Returns a Stringcontaining the name of the Component, if any. This method should not be overridden. |
| Update(inherited from DbDataAdapter) | Overloaded. Calls the respective INSERT, UPDATE, or DELETE statements for each inserted, updated, or deleted row in the specified DataSet. |
Public Instance Events
| Disposed(inherited from Component) | Adds an event handler to listen to the Disposedevent on the component. |
| FillError(inherited from DataAdapter) | Returned when an error occurs during a fill operation. |
| RowUpdated | Occurs during Update after a command is executed against the data source. The attempt to update is made, so the event fires. |
| RowUpdating | Occurs during Update before a command is executed against the data source. The attempt to update is made, so the event fires. |
Protected Internal Instance Properties
| FillCommandBehavior(inherited from DbDataAdapter) | Gets or sets the behavior of the command used to fill the data adapter. |
See Also
MySqlDataAdapter Class, MySql.Data.MySqlClient Namespace
Initializes a new instance of the MySqlDataAdapter class.
Overload List
Initializes a new instance of the MySqlDataAdapter class.
See Also
MySqlDataAdapter Class, MySql.Data.MySqlClient Namespace
Initializes a new instance of the MySqlDataAdapter class.
Syntax: Visual Basic
Overloads Public Sub New()
Syntax: C#
public MySqlDataAdapter();
See Also
MySqlDataAdapter Class, MySql.Data.MySqlClient Namespace, MySqlDataAdapter Constructor Overload List
Syntax: Visual Basic
Overloads Public Sub New( _ ByVal selectCommand As MySqlCommand _ )
Syntax: C#
public MySqlDataAdapter( MySqlCommandselectCommand );
See Also
MySqlDataAdapter Class, MySql.Data.MySqlClient Namespace, MySqlDataAdapter Constructor Overload List
Syntax: Visual Basic
Overloads Public Sub New( _ ByVal selectCommandText As String, _ ByVal connection As MySqlConnection _ )
Syntax: C#
public MySqlDataAdapter( stringselectCommandText, MySqlConnectionconnection );
See Also
MySqlDataAdapter Class, MySql.Data.MySqlClient Namespace, MySqlDataAdapter Constructor Overload List
Syntax: Visual Basic
Overloads Public Sub New( _ ByVal selectCommandText As String, _ ByVal selectConnString As String _ )
Syntax: C#
public MySqlDataAdapter( stringselectCommandText, stringselectConnString );
See Also
MySqlDataAdapter Class, MySql.Data.MySqlClient Namespace, MySqlDataAdapter Constructor Overload List
Syntax: Visual Basic
Overloads Public Property DeleteCommand As MySqlCommand
Syntax: C#
new public MySqlCommand DeleteCommand {get; set;}See Also
Syntax: Visual Basic
Overloads Public Property InsertCommand As MySqlCommand
Syntax: C#
new public MySqlCommand InsertCommand {get; set;}See Also
Syntax: Visual Basic
Overloads Public Property SelectCommand As MySqlCommand
Syntax: C#
new public MySqlCommand SelectCommand {get; set;}See Also
Syntax: Visual Basic
Overloads Public Property UpdateCommand As MySqlCommand
Syntax: C#
new public MySqlCommand UpdateCommand {get; set;}See Also
Occurs during Update after a command is executed against the data source. The attempt to update is made, so the event fires.
Syntax: Visual Basic
Public Event RowUpdated As MySqlRowUpdatedEventHandler
Syntax: C#
public event MySqlRowUpdatedEventHandler RowUpdated;
Event Data
The event handler receives an argument of type MySqlRowUpdatedEventArgs containing data related to this event. The following MySqlRowUpdatedEventArgsproperties provide information specific to this event.
| Property | Description |
| Command | Gets or sets the MySqlCommand executed when Update is called. |
| Errors | Gets any errors generated by the .NET Framework data provider when the Commandwas executed. |
| RecordsAffected | Gets the number of rows changed, inserted, or deleted by execution of the SQL statement. |
| Row | Gets the DataRowsent through an Update. |
| RowCount | Gets the number of rows processed in a batch of updated records. |
| StatementType | Gets the type of SQL statement executed. |
| Status | Gets the UpdateStatusof the Commandproperty. |
| TableMapping | Gets the DataTableMappingsent through an Update. |
See Also
MySqlDataAdapter Class, MySql.Data.MySqlClient Namespace
Represents the method that will handle the RowUpdatedevent of a MySqlDataAdapter .
Syntax: Visual Basic
Public Delegate Sub MySqlRowUpdatedEventHandler( _ ByVal sender As Object, _ ByVal e As MySqlRowUpdatedEventArgs _ )
Syntax: C#
public delegate void MySqlRowUpdatedEventHandler( objectsender, MySqlRowUpdatedEventArgse );
Requirements
Namespace: MySql.Data.MySqlClient
Assembly: MySql.Data (in MySql.Data.dll)
See Also
MySql.Data.MySqlClient Namespace
Provides data for the RowUpdated event. This class cannot be inherited.
For a list of all members of this type, see MySqlRowUpdatedEventArgs Members .
Syntax: Visual Basic
NotInheritable Public Class MySqlRowUpdatedEventArgs_ Inherits RowUpdatedEventArgs
Syntax: C#
public sealed class MySqlRowUpdatedEventArgs : RowUpdatedEventArgs
Thread Safety
Public static (Sharedin Visual Basic) members of this type are safe for multithreaded operations. Instance members are notguaranteed to be thread-safe.
Requirements
Namespace: MySql.Data.MySqlClient
Assembly: MySql.Data (in MySql.Data.dll)
See Also
MySqlRowUpdatedEventArgs Members, MySql.Data.MySqlClient Namespace
MySqlRowUpdatedEventArgs overview
Public Instance Constructors
| MySqlRowUpdatedEventArgs Constructor | Initializes a new instance of the MySqlRowUpdatedEventArgs class. |
Public Instance Properties
| Command | Overloaded. Gets or sets the MySqlCommand executed when Update is called. |
| Errors(inherited from RowUpdatedEventArgs) | Gets any errors generated by the .NET Framework data provider when the Commandwas executed. |
| RecordsAffected(inherited from RowUpdatedEventArgs) | Gets the number of rows changed, inserted, or deleted by execution of the SQL statement. |
| Row(inherited from RowUpdatedEventArgs) | Gets the DataRowsent through an Update. |
| RowCount(inherited from RowUpdatedEventArgs) | Gets the number of rows processed in a batch of updated records. |
| StatementType(inherited from RowUpdatedEventArgs) | Gets the type of SQL statement executed. |
| Status(inherited from RowUpdatedEventArgs) | Gets the UpdateStatusof the Commandproperty. |
| TableMapping(inherited from RowUpdatedEventArgs) | Gets the DataTableMappingsent through an Update. |
Public Instance Methods
| CopyToRows(inherited from RowUpdatedEventArgs) | Overloaded. Copies references to the modified rows into the provided array. |
| Equals(inherited from Object) | Determines whether the specified Objectis equal to the current Object. |
| GetHashCode(inherited from Object) | Serves as a hash function for a particular type. GetHashCodeis suitable for use in hashing algorithms and data structures like a hash table. |
| GetType(inherited from Object) | Gets the Typeof the current instance. |
| ToString(inherited from Object) | Returns a Stringthat represents the current Object. |
See Also
MySqlRowUpdatedEventArgs Class, MySql.Data.MySqlClient Namespace
Initializes a new instance of the MySqlRowUpdatedEventArgs class.
Syntax: Visual Basic
Public Sub New( _ ByVal row As DataRow, _ ByVal command As IDbCommand, _ ByVal statementType As StatementType, _ ByVal tableMapping As DataTableMapping _ )
Syntax: C#
public MySqlRowUpdatedEventArgs( DataRowrow, IDbCommandcommand, StatementTypestatementType, DataTableMappingtableMapping );
Parameters
row: The DataRowsent through an Update.command: The IDbCommandexecuted when Updateis called.statementType: One of the StatementTypevalues that specifies the type of query executed.tableMapping: The DataTableMappingsent through an Update.
See Also
MySqlRowUpdatedEventArgs Class, MySql.Data.MySqlClient Namespace
Gets or sets the MySqlCommand executed when Update is called.
Syntax: Visual Basic
Overloads Public ReadOnly Property Command As MySqlCommand
Syntax: C#
new public MySqlCommand Command {get;}See Also
MySqlRowUpdatedEventArgs Class, MySql.Data.MySqlClient Namespace
Occurs during Update before a command is executed against the data source. The attempt to update is made, so the event fires.
Syntax: Visual Basic
Public Event RowUpdating As MySqlRowUpdatingEventHandler
Syntax: C#
public event MySqlRowUpdatingEventHandler RowUpdating;
Event Data
The event handler receives an argument of type MySqlRowUpdatingEventArgs containing data related to this event. The following MySqlRowUpdatingEventArgsproperties provide information specific to this event.
| Property | Description |
| Command | Gets or sets the MySqlCommand to execute when performing the Update. |
| Errors | Gets any errors generated by the .NET Framework data provider when the Commandexecutes. |
| Row | Gets the DataRowthat will be sent to the server as part of an insert, update, or delete operation. |
| StatementType | Gets the type of SQL statement to execute. |
| Status | Gets or sets the UpdateStatusof the Commandproperty. |
| TableMapping | Gets the DataTableMappingto send through the Update. |
See Also
MySqlDataAdapter Class, MySql.Data.MySqlClient Namespace
Represents the method that will handle the RowUpdatingevent of a MySqlDataAdapter .
Syntax: Visual Basic
Public Delegate Sub MySqlRowUpdatingEventHandler( _ ByVal sender As Object, _ ByVal e As MySqlRowUpdatingEventArgs _ )
Syntax: C#
public delegate void MySqlRowUpdatingEventHandler( objectsender, MySqlRowUpdatingEventArgse );
Requirements
Namespace: MySql.Data.MySqlClient
Assembly: MySql.Data (in MySql.Data.dll)
See Also
MySql.Data.MySqlClient Namespace
Provides data for the RowUpdating event. This class cannot be inherited.
For a list of all members of this type, see MySqlRowUpdatingEventArgs Members .
Syntax: Visual Basic
NotInheritable Public Class MySqlRowUpdatingEventArgs_ Inherits RowUpdatingEventArgs
Syntax: C#
public sealed class MySqlRowUpdatingEventArgs : RowUpdatingEventArgs
Thread Safety
Public static (Sharedin Visual Basic) members of this type are safe for multithreaded operations. Instance members are notguaranteed to be thread-safe.
Requirements
Namespace: MySql.Data.MySqlClient
Assembly: MySql.Data (in MySql.Data.dll)
See Also
MySqlRowUpdatingEventArgs Members, MySql.Data.MySqlClient Namespace
MySqlRowUpdatingEventArgs overview
Public Instance Constructors
| MySqlRowUpdatingEventArgs Constructor | Initializes a new instance of the MySqlRowUpdatingEventArgs class. |
Public Instance Properties
| Command | Overloaded. Gets or sets the MySqlCommand to execute when performing the Update. |
| Errors(inherited from RowUpdatingEventArgs) | Gets any errors generated by the .NET Framework data provider when the Commandexecutes. |
| Row(inherited from RowUpdatingEventArgs) | Gets the DataRowthat will be sent to the server as part of an insert, update, or delete operation. |
| StatementType(inherited from RowUpdatingEventArgs) | Gets the type of SQL statement to execute. |
| Status(inherited from RowUpdatingEventArgs) | Gets or sets the UpdateStatusof the Commandproperty. |
| TableMapping(inherited from RowUpdatingEventArgs) | Gets the DataTableMappingto send through the Update. |
Public Instance Methods
| Equals(inherited from Object) | Determines whether the specified Objectis equal to the current Object. |
| GetHashCode(inherited from Object) | Serves as a hash function for a particular type. GetHashCodeis suitable for use in hashing algorithms and data structures like a hash table. |
| GetType(inherited from Object) | Gets the Typeof the current instance. |
| ToString(inherited from Object) | Returns a Stringthat represents the current Object. |
See Also
MySqlRowUpdatingEventArgs Class, MySql.Data.MySqlClient Namespace
Initializes a new instance of the MySqlRowUpdatingEventArgs class.
Syntax: Visual Basic
Public Sub New( _ ByVal row As DataRow, _ ByVal command As IDbCommand, _ ByVal statementType As StatementType, _ ByVal tableMapping As DataTableMapping _ )
Syntax: C#
public MySqlRowUpdatingEventArgs( DataRowrow, IDbCommandcommand, StatementTypestatementType, DataTableMappingtableMapping );
Parameters
row: The DataRowto Update.command: The IDbCommandto execute during Update.statementType: One of the StatementTypevalues that specifies the type of query executed.tableMapping: The DataTableMappingsent through an Update.
See Also
MySqlRowUpdatingEventArgs Class, MySql.Data.MySqlClient Namespace
Gets or sets the MySqlCommand to execute when performing the Update.
Syntax: Visual Basic
Overloads Public Property Command As MySqlCommand
Syntax: C#
new public MySqlCommand Command {get; set;}See Also
MySqlRowUpdatingEventArgs Class, MySql.Data.MySqlClient Namespace
Syntax: Visual Basic
Overloads Public Sub New( _ ByVal adapter As MySqlDataAdapter, _ ByVal lastOneWins As Boolean _ )
Syntax: C#
public MySqlCommandBuilder( MySqlDataAdapteradapter, boollastOneWins );
See Also
MySqlCommandBuilder Class, MySql.Data.MySqlClient Namespace, MySqlCommandBuilder Constructor Overload List
Syntax: Visual Basic
Overloads Public Sub New( _ ByVal lastOneWins As Boolean _ )
Syntax: C#
public MySqlCommandBuilder( boollastOneWins );
See Also
MySqlCommandBuilder Class, MySql.Data.MySqlClient Namespace, MySqlCommandBuilder Constructor Overload List
Syntax: Visual Basic
Public Property DataAdapter As MySqlDataAdapter
Syntax: C#
public MySqlDataAdapter DataAdapter {get; set;}See Also
Syntax: Visual Basic
Public Property QuotePrefix As String
Syntax: C#
public string QuotePrefix {get; set;}See Also
Syntax: Visual Basic
Public Property QuoteSuffix As String
Syntax: C#
public string QuoteSuffix {get; set;}See Also
Syntax: Visual Basic
Public Function GetDeleteCommand() As MySqlCommand
Syntax: C#
public MySqlCommand GetDeleteCommand();
See Also
Syntax: Visual Basic
Public Function GetInsertCommand() As MySqlCommand
Syntax: C#
public MySqlCommand GetInsertCommand();
See Also
Syntax: Visual Basic
Public Function GetUpdateCommand() As MySqlCommand
Syntax: C#
public MySqlCommand GetUpdateCommand();
See Also
Syntax: Visual Basic
Public Sub RefreshSchema()
Syntax: C#
public void RefreshSchema();
See Also
The exception that is thrown when MySQL returns an error. This class cannot be inherited.
For a list of all members of this type, see MySqlException Members .
Syntax: Visual Basic
NotInheritable Public Class MySqlException_ Inherits SystemException
Syntax: C#
public sealed class MySqlException : SystemException
Thread Safety
Public static (Sharedin Visual Basic) members of this type are safe for multithreaded operations. Instance members are notguaranteed to be thread-safe.
Requirements
Namespace: MySql.Data.MySqlClient
Assembly: MySql.Data (in MySql.Data.dll)
See Also
MySqlException Members, MySql.Data.MySqlClient Namespace
Public Instance Properties
| Data(inherited from Exception) | Gets a collection of key/value pairs that provide additional, user-defined information about the exception. |
| HelpLink(inherited from Exception) | Gets or sets a link to the help file associated with this exception. |
| InnerException(inherited from Exception) | Gets the Exceptioninstance that caused the current exception. |
| Message(inherited from Exception) | Gets a message that describes the current exception. |
| Number | Gets a number that identifies the type of error. This number corresponds to the error numbers given in Section C.3, “Server Error Codes and Messages”. |
| Source(inherited from Exception) | Gets or sets the name of the application or the object that causes the error. |
| StackTrace(inherited from Exception) | Gets a string representation of the frames on the call stack at the time the current exception was thrown. |
| TargetSite(inherited from Exception) | Gets the method that throws the current exception. |
Public Instance Methods
| Equals(inherited from Object) | Determines whether the specified Objectis equal to the current Object. |
| GetBaseException(inherited from Exception) | When overridden in a derived class, returns the Exceptionthat is the root cause of one or more subsequent exceptions. |
| GetHashCode(inherited from Object) | Serves as a hash function for a particular type. GetHashCodeis suitable for use in hashing algorithms and data structures like a hash table. |
| GetObjectData(inherited from Exception) | When overridden in a derived class, sets the SerializationInfowith information about the exception. |
| GetType(inherited from Exception) | Gets the runtime type of the current instance. |
| ToString(inherited from Exception) | Creates and returns a string representation of the current exception. |
See Also
MySqlException Class, MySql.Data.MySqlClient Namespace
Gets a number that identifies the type of error.
Syntax: Visual Basic
Public ReadOnly Property Number As Integer
Syntax: C#
public int Number {get;}See Also
Helper class that makes it easier to work with the provider.
For a list of all members of this type, see MySqlHelper Members .
Syntax: Visual Basic
NotInheritable Public Class MySqlHelper
Syntax: C#
public sealed class MySqlHelper
Thread Safety
Public static (Shared in Visual Basic) members of this type are safe for multithreaded operations. Instance members are not guaranteed to be thread-safe.
Requirements
Namespace: MySql.Data.MySqlClient
Assembly: MySql.Data (in MySql.Data.dll)
See Also
MySqlHelper Members, MySql.Data.MySqlClient Namespace
Public Static (Shared) Methods
| ExecuteDataRow | Executes a single SQL statement and returns the first row of the resultset. A new MySqlConnection object is created, opened, and closed during this method. |
| ExecuteDataset | Overloaded. Executes a single SQL statement and returns the resultset in a DataSet. A new MySqlConnection object is created, opened, and closed during this method. |
| ExecuteNonQuery | Overloaded. Executes a single command against a MySQL database. The MySqlConnection is assumed to be open when the method is called and remains open after the method completes. |
| ExecuteReader | Overloaded. Executes a single command against a MySQL database. |
| ExecuteScalar | Overloaded. Execute a single command against a MySQL database. |
| UpdateDataSet | Updates the given table with data from the given DataSet |
Public Instance Methods
| Equals(inherited from Object) | Determines whether the specified Objectis equal to the current Object. |
| GetHashCode(inherited from Object) | Serves as a hash function for a particular type. GetHashCodeis suitable for use in hashing algorithms and data structures like a hash table. |
| GetType(inherited from Object) | Gets the Typeof the current instance. |
| ToString(inherited from Object) | Returns a Stringthat represents the current Object. |
See Also
MySqlHelper Class, MySql.Data.MySqlClient Namespace
Executes a single SQL statement and returns the first row of the resultset. A new MySqlConnection object is created, opened, and closed during this method.
Syntax: Visual Basic
Public Shared Function ExecuteDataRow( _ ByVal connectionString As String, _ ByVal commandText As String, _ ParamArray parms As MySqlParameter() _ ) As DataRow
Syntax: C#
public static DataRow ExecuteDataRow( stringconnectionString, stringcommandText, params MySqlParameter[]parms );
Parameters
connectionString: Settings to be used for the connectioncommandText: Command to executeparms: Parameters to use for the command
Return Value
DataRow containing the first row of the resultset
See Also
Executes a single SQL statement and returns the resultset in a DataSet. The state of the MySqlConnection object remains unchanged after execution of this method.
Overload List
Executes a single SQL statement and returns the resultset in a DataSet. The state of the MySqlConnection object remains unchanged after execution of this method.
Executes a single SQL statement and returns the resultset in a DataSet. The state of the MySqlConnection object remains unchanged after execution of this method.
Executes a single SQL statement and returns the resultset in a DataSet. A new MySqlConnection object is created, opened, and closed during this method.
Executes a single SQL statement and returns the resultset in a DataSet. A new MySqlConnection object is created, opened, and closed during this method.
See Also
MySqlHelper Class, MySql.Data.MySqlClient Namespace
Executes a single SQL statement and returns the resultset in a DataSet. The state of the MySqlConnection object remains unchanged after execution of this method.
Syntax: Visual Basic
Overloads Public Shared Function ExecuteDataset( _ ByVal connection As MySqlConnection, _ ByVal commandText As String _ ) As DataSet
Syntax: C#
public static DataSet ExecuteDataset( MySqlConnectionconnection, stringcommandText );
Parameters
connection: MySqlConnection object to usecommandText: Command to execute
Return Value
DataSetcontaining the resultset
See Also
MySqlHelper Class, MySql.Data.MySqlClient Namespace, MySqlHelper.ExecuteDataset Overload List
Executes a single SQL statement and returns the resultset in a DataSet. The state of the MySqlConnection object remains unchanged after execution of this method.
Syntax: Visual Basic
Overloads Public Shared Function ExecuteDataset( _ ByVal connection As MySqlConnection, _ ByVal commandText As String, _ ParamArray commandParameters As MySqlParameter() _ ) As DataSet
Syntax: C#
public static DataSet ExecuteDataset( MySqlConnectionconnection, stringcommandText, params MySqlParameter[]commandParameters );
Parameters
connection: MySqlConnection object to usecommandText: Command to executecommandParameters: Parameters to use for the command
Return Value
DataSetcontaining the resultset
See Also
MySqlHelper Class, MySql.Data.MySqlClient Namespace, MySqlHelper.ExecuteDataset Overload List
Executes a single SQL statement and returns the resultset in a DataSet. A new MySqlConnection object is created, opened, and closed during this method.
Syntax: Visual Basic
Overloads Public Shared Function ExecuteDataset( _ ByVal connectionString As String, _ ByVal commandText As String _ ) As DataSet
Syntax: C#
public static DataSet ExecuteDataset( stringconnectionString, stringcommandText );
Parameters
connectionString: Settings to be used for the connectioncommandText: Command to execute
Return Value
DataSetcontaining the resultset
See Also
MySqlHelper Class, MySql.Data.MySqlClient Namespace, MySqlHelper.ExecuteDataset Overload List
Executes a single SQL statement and returns the resultset in a DataSet. A new MySqlConnection object is created, opened, and closed during this method.
Syntax: Visual Basic
Overloads Public Shared Function ExecuteDataset( _ ByVal connectionString As String, _ ByVal commandText As String, _ ParamArray commandParameters As MySqlParameter() _ ) As DataSet
Syntax: C#
public static DataSet ExecuteDataset( stringconnectionString, stringcommandText, params MySqlParameter[]commandParameters );
Parameters
connectionString: Settings to be used for the connectioncommandText: Command to executecommandParameters: Parameters to use for the command
Return Value
DataSetcontaining the resultset
See Also
MySqlHelper Class, MySql.Data.MySqlClient Namespace, MySqlHelper.ExecuteDataset Overload List
Executes a single command against a MySQL database. The MySqlConnection is assumed to be open when the method is called and remains open after the method completes.
Overload List
Executes a single command against a MySQL database. The MySqlConnection is assumed to be open when the method is called and remains open after the method completes.
Executes a single command against a MySQL database. A new MySqlConnection is created using the ConnectionString given.
See Also
MySqlHelper Class, MySql.Data.MySqlClient Namespace
Executes a single command against a MySQL database. The MySqlConnection is assumed to be open when the method is called and remains open after the method completes.
Syntax: Visual Basic
Overloads Public Shared Function ExecuteNonQuery( _ ByVal connection As MySqlConnection, _ ByVal commandText As String, _ ParamArray commandParameters As MySqlParameter() _ ) As Integer
Syntax: C#
public static int ExecuteNonQuery( MySqlConnectionconnection, stringcommandText, params MySqlParameter[]commandParameters );
Parameters
connection: MySqlConnection object to usecommandText: SQL statement to be executedcommandParameters: Array of MySqlParameter objects to use with the command.
Return Value
See Also
MySqlHelper Class, MySql.Data.MySqlClient Namespace, MySqlHelper.ExecuteNonQuery Overload List
Executes a single command against a MySQL database. A new MySqlConnection is created using the ConnectionString given.
Syntax: Visual Basic
Overloads Public Shared Function ExecuteNonQuery( _ ByVal connectionString As String, _ ByVal commandText As String, _ ParamArray parms As MySqlParameter() _ ) As Integer
Syntax: C#
public static int ExecuteNonQuery( stringconnectionString, stringcommandText, params MySqlParameter[]parms );
Parameters
connectionString: ConnectionString to usecommandText: SQL statement to be executedparms: Array of MySqlParameter objects to use with the command.
Return Value
See Also
MySqlHelper Class, MySql.Data.MySqlClient Namespace, MySqlHelper.ExecuteNonQuery Overload List
Executes a single command against a MySQL database.
Overload List
Executes a single command against a MySQL database.
Executes a single command against a MySQL database.
See Also
MySqlHelper Class, MySql.Data.MySqlClient Namespace
Executes a single command against a MySQL database.
Syntax: Visual Basic
Overloads Public Shared Function ExecuteReader( _ ByVal connectionString As String, _ ByVal commandText As String _ ) As MySqlDataReader
Syntax: C#
public static MySqlDataReader ExecuteReader( stringconnectionString, stringcommandText );
Parameters
connectionString: Settings to use for this commandcommandText: Command text to use
Return Value
MySqlDataReader object ready to read the results of the command
See Also
MySqlHelper Class, MySql.Data.MySqlClient Namespace, MySqlHelper.ExecuteReader Overload List
Executes a single command against a MySQL database.
Syntax: Visual Basic
Overloads Public Shared Function ExecuteReader( _ ByVal connectionString As String, _ ByVal commandText As String, _ ParamArray commandParameters As MySqlParameter() _ ) As MySqlDataReader
Syntax: C#
public static MySqlDataReader ExecuteReader( stringconnectionString, stringcommandText, params MySqlParameter[]commandParameters );
Parameters
connectionString: Settings to use for this commandcommandText: Command text to usecommandParameters: Array of MySqlParameter objects to use with the command
Return Value
MySqlDataReader object ready to read the results of the command
See Also
MySqlHelper Class, MySql.Data.MySqlClient Namespace, MySqlHelper.ExecuteReader Overload List
Execute a single command against a MySQL database.
Overload List
Execute a single command against a MySQL database.
Execute a single command against a MySQL database.
Execute a single command against a MySQL database.
Execute a single command against a MySQL database.
See Also
MySqlHelper Class, MySql.Data.MySqlClient Namespace
Execute a single command against a MySQL database.
Syntax: Visual Basic
Overloads Public Shared Function ExecuteScalar( _ ByVal connection As MySqlConnection, _ ByVal commandText As String _ ) As Object
Syntax: C#
public static object ExecuteScalar( MySqlConnectionconnection, stringcommandText );
Parameters
connection: MySqlConnection object to usecommandText: Command text to use for the command
Return Value
The first column of the first row in the result set, or a null reference if the result set is empty.
See Also
MySqlHelper Class, MySql.Data.MySqlClient Namespace, MySqlHelper.ExecuteScalar Overload List
Execute a single command against a MySQL database.
Syntax: Visual Basic
Overloads Public Shared Function ExecuteScalar( _ ByVal connection As MySqlConnection, _ ByVal commandText As String, _ ParamArray commandParameters As MySqlParameter() _ ) As Object
Syntax: C#
public static object ExecuteScalar( MySqlConnectionconnection, stringcommandText, params MySqlParameter[]commandParameters );
Parameters
connection: MySqlConnection object to usecommandText: Command text to use for the commandcommandParameters: Parameters to use for the command
Return Value
The first column of the first row in the result set, or a null reference if the result set is empty.
See Also
MySqlHelper Class, MySql.Data.MySqlClient Namespace, MySqlHelper.ExecuteScalar Overload List
Execute a single command against a MySQL database.
Syntax: Visual Basic
Overloads Public Shared Function ExecuteScalar( _ ByVal connectionString As String, _ ByVal commandText As String _ ) As Object
Syntax: C#
public static object ExecuteScalar( stringconnectionString, stringcommandText );
Parameters
connectionString: Settings to use for the updatecommandText: Command text to use for the update
Return Value
The first column of the first row in the result set, or a null reference if the result set is empty.
See Also
MySqlHelper Class, MySql.Data.MySqlClient Namespace, MySqlHelper.ExecuteScalar Overload List
Execute a single command against a MySQL database.
Syntax: Visual Basic
Overloads Public Shared Function ExecuteScalar( _ ByVal connectionString As String, _ ByVal commandText As String, _ ParamArray commandParameters As MySqlParameter() _ ) As Object
Syntax: C#
public static object ExecuteScalar( stringconnectionString, stringcommandText, params MySqlParameter[]commandParameters );
Parameters
connectionString: Settings to use for the commandcommandText: Command text to use for the commandcommandParameters: Parameters to use for the command
Return Value
The first column of the first row in the result set, or a null reference if the result set is empty.
See Also
MySqlHelper Class, MySql.Data.MySqlClient Namespace, MySqlHelper.ExecuteScalar Overload List
Updates the given table with data from the given DataSet
Syntax: Visual Basic
Public Shared Sub UpdateDataSet( _ ByVal connectionString As String, _ ByVal commandText As String, _ ByVal ds As DataSet, _ ByVal tablename As String _ )
Syntax: C#
public static void UpdateDataSet( stringconnectionString, stringcommandText, DataSetds, stringtablename );
Parameters
connectionString: Settings to use for the updatecommandText: Command text to use for the updateds: DataSetcontaining the new data to use in the updatetablename: Tablename in the data set to update
See Also
Syntax: Visual Basic
Public Enum MySqlErrorCode
Syntax: C#
public enum MySqlErrorCode
Members
| Member Name | Description |
| PacketTooLarge | |
| PasswordNotAllowed | |
| DuplicateKeyEntry | |
| HostNotPrivileged | |
| PasswordNoMatch | |
| AnonymousUser | |
| DuplicateKey | |
| KeyNotFound | |
| DuplicateKeyName |
Requirements
Namespace: MySql.Data.MySqlClient
Assembly: MySql.Data (in MySql.Data.dll)
See Also
Classes
| Class | Description |
| MySqlConversionException | Summary description for MySqlConversionException. |
| MySqlDateTime | Summary description for MySqlDateTime. |
| MySqlValue |
Summary description for MySqlConversionException.
For a list of all members of this type, see MySqlConversionException Members .
Syntax: Visual Basic
Public Class MySqlConversionException_ Inherits ApplicationException
Syntax: C#
public class MySqlConversionException : ApplicationException
Thread Safety
Public static (Sharedin Visual Basic) members of this type are safe for multithreaded operations. Instance members are notguaranteed to be thread-safe.
Requirements
Namespace: MySql.Data.Types
Assembly: MySql.Data (in MySql.Data.dll)
See Also
MySqlConversionException Members, MySql.Data.Types Namespace
MySqlConversionException overview
Public Instance Constructors
Public Instance Properties
| Data(inherited from Exception) | Gets a collection of key/value pairs that provide additional, user-defined information about the exception. |
| HelpLink(inherited from Exception) | Gets or sets a link to the help file associated with this exception. |
| InnerException(inherited from Exception) | Gets the Exceptioninstance that caused the current exception. |
| Message(inherited from Exception) | Gets a message that describes the current exception. |
| Source(inherited from Exception) | Gets or sets the name of the application or the object that causes the error. |
| StackTrace(inherited from Exception) | Gets a string representation of the frames on the call stack at the time the current exception was thrown. |
| TargetSite(inherited from Exception) | Gets the method that throws the current exception. |
Public Instance Methods
| Equals(inherited from Object) | Determines whether the specified Objectis equal to the current Object. |
| GetBaseException(inherited from Exception) | When overridden in a derived class, returns the Exceptionthat is the root cause of one or more subsequent exceptions. |
| GetHashCode(inherited from Object) | Serves as a hash function for a particular type. GetHashCodeis suitable for use in hashing algorithms and data structures like a hash table. |
| GetObjectData(inherited from Exception) | When overridden in a derived class, sets the SerializationInfowith information about the exception. |
| GetType(inherited from Exception) | Gets the runtime type of the current instance. |
| ToString(inherited from Exception) | Creates and returns a string representation of the current exception. |
Protected Instance Properties
| HResult(inherited from Exception) | Gets or sets HRESULT, a coded numeric value that is assigned to a specific exception. |
Protected Instance Methods
| Finalize(inherited from Object) | Allows an Objectto attempt to free resources and perform other cleanup operations before the Objectis reclaimed by garbage collection. |
| MemberwiseClone(inherited from Object) | Creates a shallow copy of the current Object. |
See Also
MySqlConversionException Class, MySql.Data.Types Namespace
Syntax: Visual Basic
Public Sub New( _ ByVal msg As String _ )
Syntax: C#
public MySqlConversionException( stringmsg );
See Also
Summary description for MySqlDateTime.
For a list of all members of this type, see MySqlDateTime Members .
Syntax: Visual Basic
Public Class MySqlDateTime_ Inherits MySqlValue_ Implements IConvertible, IComparable
Syntax: C#
public class MySqlDateTime : MySqlValue, IConvertible, IComparable
Thread Safety
Public static (Shared in Visual Basic) members of this type are safe for multithreaded operations. Instance members are not guaranteed to be thread-safe.
Requirements
Namespace: MySql.Data.Types
Assembly: MySql.Data (in MySql.Data.dll)
See Also
MySqlDateTime Members, MySql.Data.Types Namespace
- 21.2.7.2.3.1.1.
MySqlDateTimeExplicitMySqlDateTimetoDateTimeConversion - 21.2.7.2.3.1.2. Day Property
- 21.2.7.2.3.1.3. Hour Property
- 21.2.7.2.3.1.4. IsNull Property
- 21.2.7.2.3.1.5. IsValidDateTime Property
- 21.2.7.2.3.1.6. Minute Property
- 21.2.7.2.3.1.7. Month Property
- 21.2.7.2.3.1.8. Second Property
- 21.2.7.2.3.1.9. Year Property
- 21.2.7.2.3.1.10.
MySqlDateTime.GetDateTimeMethod - 21.2.7.2.3.1.11.
MySqlDateTime.ToStringMethod
Public Static (Shared) Type Conversions
Public Instance Properties
| Day | Returns the day portion of this datetime |
| Hour | Returns the hour portion of this datetime |
| IsNull (inherited from MySqlValue) | |
| IsValidDateTime | Indicates if this object contains a value that can be represented as a DateTime |
| Minute | Returns the minute portion of this datetime |
| Month | Returns the month portion of this datetime |
| Second | Returns the second portion of this datetime |
| ValueAsObject (inherited from MySqlValue) | Returns the value of this field as an object |
| Year | Returns the year portion of this datetime |
Public Instance Methods
| Equals(inherited from Object) | Determines whether the specified Objectis equal to the current Object. |
| GetDateTime | Returns this value as a DateTime |
| GetHashCode(inherited from Object) | Serves as a hash function for a particular type. GetHashCodeis suitable for use in hashing algorithms and data structures like a hash table. |
| GetType(inherited from Object) | Gets the Typeof the current instance. |
| ToString | Returns a MySQL specific string representation of this value |
Protected Instance Fields
| classType (inherited from MySqlValue) | The system type represented by this value |
| dbType (inherited from MySqlValue) | The generic dbtype of this value |
| isNull (inherited from MySqlValue) | Is this value null |
| mySqlDbType (inherited from MySqlValue) | The specific MySQL db type |
| mySqlTypeName (inherited from MySqlValue) | The MySQL specific typename of this value |
| objectValue (inherited from MySqlValue) |
Protected Instance Methods
| Finalize(inherited from Object) | Allows an Objectto attempt to free resources and perform other cleanup operations before the Objectis reclaimed by garbage collection. |
| MemberwiseClone(inherited from Object) | Creates a shallow copy of the current Object. |
See Also
MySqlDateTime Class, MySql.Data.Types Namespace
Syntax: Visual Basic
MySqlDateTime.op_Explicit(val)
Syntax: C#
public static explicit operator DateTime( MySqlDateTimeval );
Parameters
val:
Return Value
See Also
Returns the day portion of this datetime
Syntax: Visual Basic
Public Property Day As Integer
Syntax: C#
public int Day {get; set;}See Also
Returns the hour portion of this datetime
Syntax: Visual Basic
Public Property Hour As Integer
Syntax: C#
public int Hour {get; set;}See Also
Syntax: Visual Basic
Public Property IsNull As Boolean
Syntax: C#
public bool IsNull {get; set;}See Also
MySqlValue Class, MySql.Data.Types Namespace
For a list of all members of this type, see MySqlValue Members .
Syntax: Visual Basic
MustInherit Public Class MySqlValue
Syntax: C#
public abstract class MySqlValue
Thread Safety
Public static (Shared in Visual Basic) members of this type are safe for multithreaded operations. Instance members are not guaranteed to be thread-safe.
Requirements
Namespace: MySql.Data.Types
Assembly: MySql.Data (in MySql.Data.dll)
See Also
MySqlValue Members, MySql.Data.Types Namespace
- 21.2.7.2.3.1.4.1.1.1.
MySqlValue.numberFormatField - 21.2.7.2.3.1.4.1.1.2.
MySqlValueConstructor - 21.2.7.2.3.1.4.1.1.3. ValueAsObject Property
- 21.2.7.2.3.1.4.1.1.4.
MySqlValue.ToStringMethod - 21.2.7.2.3.1.4.1.1.5.
MySqlValue.classTypeField - 21.2.7.2.3.1.4.1.1.6.
MySqlValue.dbTypeField - 21.2.7.2.3.1.4.1.1.7.
MySqlValue.mySqlDbTypeField - 21.2.7.2.3.1.4.1.1.8.
MySqlValue.mySqlTypeNameField - 21.2.7.2.3.1.4.1.1.9.
MySqlValue.objectValueField
Protected Static (Shared) Fields
Public Instance Constructors
| MySqlValue Constructor | Initializes a new instance of the MySqlValue class. |
Public Instance Properties
| IsNull | |
| ValueAsObject | Returns the value of this field as an object |
Public Instance Methods
| Equals(inherited from Object) | Determines whether the specified Objectis equal to the current Object. |
| GetHashCode(inherited from Object) | Serves as a hash function for a particular type. GetHashCodeis suitable for use in hashing algorithms and data structures like a hash table. |
| GetType(inherited from Object) | Gets the Typeof the current instance. |
| ToString | Returns a string representation of this value |
Protected Instance Fields
| classType | The system type represented by this value |
| dbType | The generic dbtype of this value |
| isNull | Is this value null |
| mySqlDbType | The specific MySQL db type |
| mySqlTypeName | The MySQL specific typename of this value |
| objectValue |
Protected Instance Methods
| Finalize(inherited from Object) | Allows an Objectto attempt to free resources and perform other cleanup operations before the Objectis reclaimed by garbage collection. |
| MemberwiseClone(inherited from Object) | Creates a shallow copy of the current Object. |
See Also
MySqlValue Class, MySql.Data.Types Namespace
Syntax: Visual Basic
Protected Shared numberFormat As NumberFormatInfo
Syntax: C#
protected static NumberFormatInfo numberFormat;
See Also
Initializes a new instance of the MySqlValue class.
Syntax: Visual Basic
Public Sub New()
Syntax: C#
public MySqlValue();
See Also
Returns the value of this field as an object
Syntax: Visual Basic
Public ReadOnly Property ValueAsObject As Object
Syntax: C#
public object ValueAsObject {get;}See Also
Returns a string representation of this value
Syntax: Visual Basic
Overrides Public Function ToString() As String
Syntax: C#
public override string ToString();
See Also
The system type represented by this value
Syntax: Visual Basic
Protected classType As Type
Syntax: C#
protected Type classType;
See Also
The generic dbtype of this value
Syntax: Visual Basic
Protected dbType As DbType
Syntax: C#
protected DbType dbType;
See Also
The specific MySQL db type
Syntax: Visual Basic
Protected mySqlDbType As MySqlDbType
Syntax: C#
protected MySqlDbType mySqlDbType;
See Also
The MySQL specific typename of this value
Syntax: Visual Basic
Protected mySqlTypeName As String
Syntax: C#
protected string mySqlTypeName;
See Also
Syntax: Visual Basic
Protected objectValue As Object
Syntax: C#
protected object objectValue;
See Also
Indicates if this object contains a value that can be represented as a DateTime
Syntax: Visual Basic
Public ReadOnly Property IsValidDateTime As Boolean
Syntax: C#
public bool IsValidDateTime {get;}See Also
Returns the minute portion of this datetime
Syntax: Visual Basic
Public Property Minute As Integer
Syntax: C#
public int Minute {get; set;}See Also
Returns the month portion of this datetime
Syntax: Visual Basic
Public Property Month As Integer
Syntax: C#
public int Month {get; set;}See Also
Returns the second portion of this datetime
Syntax: Visual Basic
Public Property Second As Integer
Syntax: C#
public int Second {get; set;}See Also
Returns the year portion of this datetime
Syntax: Visual Basic
Public Property Year As Integer
Syntax: C#
public int Year {get; set;}See Also
Returns this value as a DateTime
Syntax: Visual Basic
Public Function GetDateTime() As Date
Syntax: C#
public DateTime GetDateTime();
See Also
Returns a MySQL specific string representation of this value
Syntax: Visual Basic
Overrides Public Function ToString() As String
Syntax: C#
public override string ToString();
See Also
The developers of Connector/NET greatly value the input of our users in the software development process. If you find Connector/NET lacking some feature important to you, or if you discover a bug and need to file a bug report, please use the instructions in Section 1.7, “How to Report Bugs or Problems”.
Community support for Connector/NET can be found through the forums at http://forums.mysql.com.
Community support for Connector/NET can also be found through the mailing lists at http://lists.mysql.com.
Paid support is available from Oracle. Additional information is available at http://dev.mysql.com/support/.
If you encounter difficulties or problems with Connector/NET, contact the Connector/NET community Section 21.2.8.1, “Connector/NET Community Support”.
You should first try to execute the same SQL statements and
commands from the mysql client program or from
admndemo. This helps you determine whether the
error is in Connector/NET or MySQL.
If reporting a problem, you should ideally include the following information with the email:
Operating system and version
Connector/NET version
MySQL server version
Copies of error messages or other unexpected output
Simple reproducible sample
Remember that the more information you can supply to us, the more likely it is that we can fix the problem.
If you believe the problem to be a bug, then you must report the bug through http://bugs.mysql.com/.
The Connector/NET Change History (Changelog) is located with the main Changelog for MySQL. See Section D.4, “MySQL Connector/NET Change History”.
Questions
22.2.9.1: How do I obtain the value of an auto-incremented column?
Questions and Answers
22.2.9.1: How do I obtain the value of an auto-incremented column?
When using CommandBuilder, setting
ReturnGeneratedIdentifiers property to
true no longer works, as
CommandBuilder does not add
last_insert_id() by default.
CommandBuilder hooks up to the
DataAdapter.RowUpdating event handler,
which means it will get called for every row. It examines the
command object and, if it is the same referenced object, it
essentially rebuilds the object, thereby destroying your command
text changes.
One approach to solving this problem is to clone the command object so you have a different actual reference:
dataAdapter.InsertCommand = cb.GetInsertCommand().Clone()
This will work, but since the CommandBuilder is still connected to the DataAdapter, the RowUpdating event will still fire and performance will be hit. To stop that, once all your commands have been added you need to disconnect the CommandBuilder from the DataAdapter:
cb.DataAdapter = null;
The last requirement is to make sure the id
that is returned by last_insert_id() has the
correct name. For example:
SELECT last_insert_id() AS id
A complete working example is shown here:
using System;
using System.Collections.Generic;
using System.Linq;
using System.Text;
using System.Data;
using MySql.Data;
using MySql.Data.MySqlClient;
namespace GetAutoIncId
{
class Program
{
static void Main(string[] args)
{
string connStr = "server=localhost;user=root;database=TestDB;port=3306;password=******;";
MySqlConnection conn = new MySqlConnection(connStr);
try
{
Console.WriteLine("Connecting to MySQL...");
conn.Open();
string sql = "SELECT * FROM TestTable";
MySqlDataAdapter da = new MySqlDataAdapter(sql, conn);
MySqlCommandBuilder cb = new MySqlCommandBuilder(da);
MySqlCommand cmd = new MySqlCommand();
cmd.Connection = conn;
cmd.CommandText = sql;
// use Cloned object to avoid .NET rebuilding the object, and
// thereby throwing away our command text additions.
MySqlCommand insertCmd = cb.GetInsertCommand().Clone();
insertCmd.CommandText = insertCmd.CommandText + ";SELECT last_insert_id() AS id";
insertCmd.UpdatedRowSource = UpdateRowSource.FirstReturnedRecord;
da.InsertCommand = insertCmd;
cb.DataAdapter = null; // Unhook RowUpdating event handler
DataTable dt = new DataTable();
da.Fill(dt);
DataRow row = dt.NewRow();
row["name"] = "Joe Smith";
dt.Rows.Add(row);
da.Update(dt);
System.Console.WriteLine("ID after update: " + row["id"]);
}
catch (Exception ex)
{
Console.WriteLine(ex.ToString());
}
conn.Close();
Console.WriteLine("Done.");
}
}
}
MySQL provides connectivity for client applications developed in the Java programming language through a JDBC driver, which is called MySQL Connector/J.
MySQL Connector/J is a JDBC Type 4 driver. Different versions are available that are compatible with the JDBC 3.0 and JDBC 4.0 specifications. The Type 4 designation means that the driver is pure-Java implementation of the MySQL protocol and does not rely on the MySQL client libraries.
Although JDBC is useful by itself, we would hope that if you are not familiar with JDBC that after reading the first few sections of this manual, that you would avoid using naked JDBC for all but the most trivial problems and consider using one of the popular persistence frameworks such as Hibernate, Spring's JDBC templates or Ibatis SQL Maps to do the majority of repetitive work and heavier lifting that is sometimes required with JDBC.
This section is not designed to be a complete JDBC tutorial. If you need more information about using JDBC you might be interested in the following online tutorials that are more in-depth than the information presented here:
JDBC Basics: A tutorial from Sun covering beginner topics in JDBC
JDBC Short Course: A more in-depth tutorial from Sun and JGuru
Key topics:
For help with connection strings, connection options setting up your connection through JDBC, see Section 21.3.4.1, “Driver/Datasource Class Names, URL Syntax and Configuration Properties for Connector/J”.
For tips on using Connector/J and JDBC with generic J2EE toolkits, see Section 21.3.5.2, “Using Connector/J with J2EE and Other Java Frameworks”.
Developers using the Tomcat server platform, see Section 21.3.5.2.2, “Using Connector/J with Tomcat”.
Developers using JBoss, see Section 21.3.5.2.3, “Using Connector/J with JBoss”.
Developers using Spring, see Section 21.3.5.2.4, “Using Connector/J with Spring”.
Developers using GlassFish (Sun Application Server), see Section 21.3.5.2.5, “Using Connector/J with GlassFish”.
There are currently four versions of MySQL Connector/J available:
Connector/J 5.1 is the Type 4 pure Java JDBC driver, which conforms to the JDBC 3.0 and JDBC 4.0 specifications. It provides compatibility with all the functionality of MySQL, including 4.1, 5.0, 5.1, 5.4 and 5.5. Connector/J 5.1 provides ease of development features, including auto-registration with the Driver Manager, standardized validity checks, categorized SQLExceptions, support for the JDBC-4.0 XML processing, per connection client information,
NCHAR,NVARCHARandNCLOBtypes. This release also includes all bug fixes up to and including Connector/J 5.0.6.Connector/J 5.0 provides support for all the functionality offered by Connector/J 3.1 and includes distributed transaction (XA) support.
Connector/J 3.1 was designed for connectivity to MySQL 4.1 and MySQL 5.0 servers and provides support for all the functionality in MySQL 5.0 except distributed transaction (XA) support.
Connector/J 3.0 provides core functionality and was designed with connectivity to MySQL 3.x or MySQL 4.1 servers, although it will provide basic compatibility with later versions of MySQL. Connector/J 3.0 does not support server-side prepared statements, and does not support any of the features in versions of MySQL later than 4.1.
The following table summarizes the Connector/J versions available:
| Connector/J version | Driver Type | JDBC version | MySQL Server version | Status |
|---|---|---|---|---|
| 5.1 | 4 | 3.0, 4.0 | 4.1, 5.0, 5.1, 5.4, 5.5 | Recommended version |
| 5.0 | 4 | 3.0 | 4.1, 5.0 | Released version |
| 3.1 | 4 | 3.0 | 4.1, 5.0 | Obsolete |
| 3.0 | 4 | 3.0 | 3.x, 4.1 | Obsolete |
The current recommended version for Connector/J is 5.1. This guide covers all four connector versions, with specific notes given where a setting applies to a specific option.
The following table summarizes Connector/J Java dependencies:
| Connector/J version | Java RTE required | JDK required (to build source code) |
|---|---|---|
| 5.1 | 1.5.x, 1.6.x | 1.6.x and 1.5.x |
| 5.0 | 1.3.x, 1.4.x, 1.5.x, 1.6.x | 1.4.2, 1.5.x, 1.6.x |
| 3.1 | 1.2.x, 1.3.x, 1.4.x, 1.5.x, 1.6.x | 1.4.2, 1.5.x, 1.6.x |
| 3.0 | 1.2.x, 1.3.x, 1.4.x, 1.5.x, 1.6.x | 1.4.2, 1.5.x, 1.6.x |
MySQL Connector/J does not support JDK-1.1.x or JDK-1.0.x.
Because of the implementation of
java.sql.Savepoint, Connector/J 3.1.0 and
newer will not run on a Java runtime older than 1.4 unless the
class verifier is turned off (by setting the
-Xverify:none option to the Java runtime). This
is because the class verifier will try to load the class
definition for java.sql.Savepoint even
though it is not accessed by the driver unless you actually use
savepoint functionality.
Caching functionality provided by Connector/J 3.1.0 or newer is
also not available on JVMs older than 1.4.x, as it relies on
java.util.LinkedHashMap which was first
available in JDK-1.4.0.
If you are building Connector/J from source code using the source distribution (see Section 21.3.2.4, “Installing from the Development Source Tree”) then you must use JDK 1.4.2 or newer to compile the Connector package. For Connector/J 5.1 you must have both JDK-1.6.x. and JDK-1.5.x installed to be able to build the source code.
You can install the Connector/J package using either the binary or
source distribution. The binary distribution provides the easiest
method for installation; the source distribution enables you to
customize your installation further. With either solution, you
must manually add the Connector/J location to your Java
CLASSPATH.
If you are upgrading from a previous version, read the upgrade information before continuing. See Section 21.3.2.3, “Upgrading from an Older Version”.
Connector/J is also available as part of the Maven project. More information, and the Connector/J JAR files can be found at the Maven repository.
The easiest method of installation is to use the binary
distribution of the Connector/J package. The binary distribution
is available either as a Tar/Gzip or Zip file which you must
extract to a suitable location and then optionally make the
information about the package available by changing your
CLASSPATH (see
Section 21.3.2.2, “Installing the Driver and Configuring the CLASSPATH”).
MySQL Connector/J is distributed as a .zip or .tar.gz archive
containing the sources, the class files, and the JAR archive
named
mysql-connector-java-,
and starting with Connector/J 3.1.8 a debug build of the driver
in a file named
[version]-bin.jarmysql-connector-java-.
[version]-bin-g.jar
Starting with Connector/J 3.1.9, the .class
files that constitute the JAR files are only included as part of
the driver JAR file.
You should not use the debug build of the driver unless
instructed to do so when reporting a problem or a bug, as it is
not designed to be run in production environments, and will have
adverse performance impact when used. The debug binary also
depends on the Aspect/J runtime library, which is located in the
src/lib/aspectjrt.jar file that comes with
the Connector/J distribution.
You will need to use the appropriate graphical or command-line utility to extract the distribution (for example, WinZip for the .zip archive, and tar for the .tar.gz archive). Because there are potentially long file names in the distribution, we use the GNU tar archive format. You will need to use GNU tar (or an application that understands the GNU tar archive format) to unpack the .tar.gz variant of the distribution.
Once you have extracted the distribution archive, you can
install the driver by placing
mysql-connector-java-[version]-bin.jar in
your classpath, either by adding the full path to it to your
CLASSPATH environment variable, or by
directly specifying it with the command line switch -cp when
starting your JVM.
If you are going to use the driver with the JDBC DriverManager,
you would use com.mysql.jdbc.Driver as the
class that implements java.sql.Driver.
You can set the CLASSPATH environment
variable under UNIX, Linux or Mac OS X either locally for a user
within their .profile,
.login or other login file. You can also set
it globally by editing the global
/etc/profile file.
For example, under a C shell (csh, tcsh) you would add the
Connector/J driver to your CLASSPATH using
the following:
shell> setenv CLASSPATH /path/mysql-connector-java-[ver]-bin.jar:$CLASSPATH
Or with a Bourne-compatible shell (sh, ksh, bash):
shell> export set CLASSPATH=/path/mysql-connector-java-[ver]-bin.jar:$CLASSPATH
Within Windows 2000, Windows XP, Windows Server 2003 and Windows Vista, you must set the environment variable through the System Control Panel.
If you want to use MySQL Connector/J with an application server
such as GlassFish, Tomcat or JBoss, you will have to read your
vendor's documentation for more information on how to configure
third-party class libraries, as most application servers ignore
the CLASSPATH environment variable. For
configuration examples for some J2EE application servers, see
Section 21.3.5.2, “Using Connector/J with J2EE and Other Java Frameworks”. However, the
authoritative source for JDBC connection pool configuration
information for your particular application server is the
documentation for that application server.
If you are developing servlets or JSPs, and your application server is J2EE-compliant, you can put the driver's .jar file in the WEB-INF/lib subdirectory of your webapp, as this is a standard location for third party class libraries in J2EE web applications.
You can also use the MysqlDataSource or
MysqlConnectionPoolDataSource classes in
the com.mysql.jdbc.jdbc2.optional package, if
your J2EE application server supports or requires them. Starting
with Connector/J 5.0.0, the
javax.sql.XADataSource interface is
implemented using the
com.mysql.jdbc.jdbc2.optional.MysqlXADataSource
class, which supports XA distributed transactions when used in
combination with MySQL server version 5.0.
The various MysqlDataSource classes
support the following parameters (through standard set
mutators):
user
password
serverName (see the previous section about fail-over hosts)
databaseName
port
We try to keep the upgrade process as easy as possible, however as is the case with any software, sometimes changes need to be made in new versions to support new features, improve existing functionality, or comply with new standards.
This section has information about what users who are upgrading from one version of Connector/J to another (or to a new version of the MySQL server, with respect to JDBC functionality) should be aware of.
Connector/J 3.1 is designed to be backward-compatible with Connector/J 3.0 as much as possible. Major changes are isolated to new functionality exposed in MySQL-4.1 and newer, which includes Unicode character sets, server-side prepared statements, SQLState codes returned in error messages by the server and various performance enhancements that can be enabled or disabled using configuration properties.
Unicode Character Sets: See the next section, as well as Section 9.1, “Character Set Support”, for information on this new feature of MySQL. If you have something misconfigured, it will usually show up as an error with a message similar to
Illegal mix of collations.Server-side Prepared Statements: Connector/J 3.1 will automatically detect and use server-side prepared statements when they are available (MySQL server version 4.1.0 and newer).
Starting with version 3.1.7, the driver scans SQL you are preparing using all variants of
Connection.prepareStatement()to determine if it is a supported type of statement to prepare on the server side, and if it is not supported by the server, it instead prepares it as a client-side emulated prepared statement. You can disable this feature by passing emulateUnsupportedPstmts=false in your JDBC URL.If your application encounters issues with server-side prepared statements, you can revert to the older client-side emulated prepared statement code that is still presently used for MySQL servers older than 4.1.0 with the connection property useServerPrepStmts=false
Datetimes with all-zero components (
0000-00-00 ...): These values can not be represented reliably in Java. Connector/J 3.0.x always converted them toNULLwhen being read from a ResultSet.Connector/J 3.1 throws an exception by default when these values are encountered as this is the most correct behavior according to the JDBC and SQL standards. This behavior can be modified using the zeroDateTimeBehavior configuration property. The permissible values are:
exception(the default), which throws an SQLException with an SQLState ofS1009.convertToNull, which returnsNULLinstead of the date.round, which rounds the date to the nearest closest value which is0001-01-01.
Starting with Connector/J 3.1.7,
ResultSet.getString()can be decoupled from this behavior using noDatetimeStringSync=true (the default value isfalse) so that you can retrieve the unaltered all-zero value as a String. It should be noted that this also precludes using any time zone conversions, therefore the driver will not allow you to enable noDatetimeStringSync and useTimezone at the same time.New SQLState Codes: Connector/J 3.1 uses SQL:1999 SQLState codes returned by the MySQL server (if supported), which are different from the legacy X/Open state codes that Connector/J 3.0 uses. If connected to a MySQL server older than MySQL-4.1.0 (the oldest version to return SQLStates as part of the error code), the driver will use a built-in mapping. You can revert to the old mapping by using the configuration property useSqlStateCodes=false.
ResultSet.getString(): CallingResultSet.getString()on aBLOBcolumn will now return the address of thebyte[]array that represents it, instead of aStringrepresentation of theBLOB.BLOBvalues have no character set, so they cannot be converted tojava.lang.Strings without data loss or corruption.To store strings in MySQL with LOB behavior, use one of the
TEXTtypes, which the driver will treat as ajava.sql.Clob.Debug builds: Starting with Connector/J 3.1.8 a debug build of the driver in a file named
mysql-connector-java-is shipped alongside the normal binary jar file that is named[version]-bin-g.jarmysql-connector-java-.[version]-bin.jarStarting with Connector/J 3.1.9, we do not ship the .class files unbundled, they are only available in the JAR archives that ship with the driver.
You should not use the debug build of the driver unless instructed to do so when reporting a problem or bug, as it is not designed to be run in production environments, and will have adverse performance impact when used. The debug binary also depends on the Aspect/J runtime library, which is located in the
src/lib/aspectjrt.jarfile that comes with the Connector/J distribution.
In Connector/J 5.0.x and earlier, the alias for a table in a
SELECTstatement is returned when accessing the result set metadata usingResultSetMetaData.getColumnName(). This behavior however is not JDBC compliant, and in Connector/J 5.1 this behavior was changed so that the original table name, rather than the alias, is returned.The JDBC-compliant behavior is designed to let API users reconstruct the DML statement based on the metadata within
ResultSetandResultSetMetaData.You can get the alias for a column in a result set by calling
ResultSetMetaData.getColumnLabel(). If you want to use the old noncompliant behavior withResultSetMetaData.getColumnName(), use theuseOldAliasMetadataBehavioroption and set the value totrue.In Connector/J 5.0.x the default value of
useOldAliasMetadataBehaviorwas true, but in Connector/J 5.1 this was changed to a default value of false.
Using the UTF-8 Character Encoding - Prior to MySQL server version 4.1, the UTF-8 character encoding was not supported by the server, however the JDBC driver could use it, allowing storage of multiple character sets in latin1 tables on the server.
Starting with MySQL-4.1, this functionality is deprecated. If you have applications that rely on this functionality, and can not upgrade them to use the official Unicode character support in MySQL server version 4.1 or newer, you should add the following property to your connection URL:
useOldUTF8Behavior=trueServer-side Prepared Statements - Connector/J 3.1 will automatically detect and use server-side prepared statements when they are available (MySQL server version 4.1.0 and newer). If your application encounters issues with server-side prepared statements, you can revert to the older client-side emulated prepared statement code that is still presently used for MySQL servers older than 4.1.0 with the following connection property:
useServerPrepStmts=false
You should read this section only if you are interested in helping us test our new code. If you just want to get MySQL Connector/J up and running on your system, you should use a standard binary release distribution.
To install MySQL Connector/J from the development source tree, make sure that you have the following prerequisites:
A Bazaar client, to check out the sources from our Launchpad repository (available from http://bazaar-vcs.org/).
Apache Ant version 1.7 or newer (available from http://ant.apache.org/).
JDK 1.4.2 or later. Although MySQL Connector/J can be be used with older JDKs, to compile it from source you must have at least JDK 1.4.2. If you are building Connector/J 5.1 you will need JDK 1.6.x and an older JDK such as JDK 1.5.x. You will then need to point your JAVA_HOME environment variable at the older installation.
The source code repository for MySQL Connector/J is located on Launchpad at https://code.launchpad.net/connectorj.
To check out and compile a specific branch of MySQL Connector/J, follow these steps:
Check out the latest code from the branch that you want with one of the following commands.
To check out the latest development branch use:
shell>
bzr branch lp:connectorjThis creates a
connectorjsubdirectory in the current directory that contains the latest sources for the requested branch.To check out the latest 5.1 code use:
shell>
bzr branch lp:connectorj/5.1This will create a
5.1subdirectory in the current directory containing the latest 5.1 code.If you are building Connector/J 5.1 make sure that you have both JDK 1.6.x installed and an older JDK such as JDK 1.5.x. This is because Connector/J supports both JDBC 3.0 (which was prior to JDK 1.6.x) and JDBC 4.0. Set your JAVA_HOME environment variable to the path of the older JDK installation.
Change location to either the
connectorjor5.1directory, depending on which branch you want to build, to make it your current working directory. For example:shell>
cd connectorjIf you are building Connector/J 5.1 you need to edit the
build.xmlto reflect the location of your JDK 1.6.x installation. The lines that you need to change are:<property name="com.mysql.jdbc.java6.javac" value="C:\jvms\jdk1.6.0\bin\javac.exe" /> <property name="com.mysql.jdbc.java6.rtjar" value="C:\jvms\jdk1.6.0\jre\lib\rt.jar" />Alternatively, you can set the value of these property names through the Ant
-Doption.Issue the following command to compile the driver and create a
.jarfile suitable for installation:shell>
ant distThis creates a
builddirectory in the current directory, where all build output will go. A directory is created in thebuilddirectory that includes the version number of the sources you are building from. This directory contains the sources, compiled.classfiles, and a.jarfile suitable for deployment. For other possible targets, including ones that will create a fully packaged distribution, issue the following command:shell>
ant -projecthelpA newly created
.jarfile containing the JDBC driver will be placed in the directorybuild/mysql-connector-java-.[version]Install the newly created JDBC driver as you would a binary
.jarfile that you download from MySQL by following the instructions in Section 21.3.2.2, “Installing the Driver and Configuring theCLASSPATH”.
A package containing both the binary and source code for Connector/J 5.1 can also be found at the following location: Connector/J 5.1 Download
Examples of using Connector/J are located throughout this document, this section provides a summary and links to these examples.
Example 21.1, “Connector/J: Obtaining a connection from the
DriverManager”Example 21.2, “Connector/J: Using java.sql.Statement to execute a
SELECTquery”Example 21.6, “Connector/J: Setting
CallableStatementinput parameters”Example 21.7, “Connector/J: Retrieving results and output parameter values”
Example 21.9, “Connector/J: Retrieving
AUTO_INCREMENTcolumn values usingSELECT LAST_INSERT_ID()”Example 21.10, “Connector/J: Retrieving
AUTO_INCREMENTcolumn values inUpdatable ResultSets”Example 21.11, “Connector/J: Using a connection pool with a J2EE application server”
Example 21.12, “Connector/J: Example of transaction with retry logic”
- 21.3.4.1. Driver/Datasource Class Names, URL Syntax and Configuration Properties for Connector/J
- 21.3.4.2. JDBC API Implementation Notes
- 21.3.4.3. Java, JDBC and MySQL Types
- 21.3.4.4. Using Character Sets and Unicode
- 21.3.4.5. Connecting Securely Using SSL
- 21.3.4.6. Using Master/Slave Replication with ReplicationConnection
- 21.3.4.7. Mapping MySQL Error Numbers to SQLStates
This section of the manual contains reference material for MySQL Connector/J, some of which is automatically generated during the Connector/J build process.
The name of the class that implements java.sql.Driver in MySQL
Connector/J is com.mysql.jdbc.Driver. The
org.gjt.mm.mysql.Driver class name is also
usable to remain backward-compatible with MM.MySQL. You should
use this class name when registering the driver, or when
otherwise configuring software to use MySQL Connector/J.
The JDBC URL format for MySQL Connector/J is as follows, with items in square brackets ([, ]) being optional:
jdbc:mysql://[host][,failoverhost...][:port]/[database] » [?propertyName1][=propertyValue1][&propertyName2][=propertyValue2]...
If the host name is not specified, it defaults to 127.0.0.1. If the port is not specified, it defaults to 3306, the default port number for MySQL servers.
jdbc:mysql://[host:port],[host:port].../[database] » [?propertyName1][=propertyValue1][&propertyName2][=propertyValue2]...
If the database is not specified, the connection will be made
with no default database. In this case, you will need to either
call the setCatalog() method on the
Connection instance or fully specify table names using the
database name (that is, SELECT dbname.tablename.colname
FROM dbname.tablename...) in your SQL. Not specifying
the database to use upon connection is generally only useful
when building tools that work with multiple databases, such as
GUI database managers.
JDBC clients should never employ the USE
database statement to specify the desired database,
they should always use the
Connection.setCatalog() method instead.
MySQL Connector/J has fail-over support. This enables the driver
to fail-over to any number of slave hosts and still perform
read-only queries. Fail-over only happens when the connection is
in an autoCommit(true) state, because
fail-over can not happen reliably when a transaction is in
progress. Most application servers and connection pools set
autoCommit to true at the
end of every transaction/connection use.
The fail-over functionality has the following behavior:
If the URL property autoReconnect is false: Failover only happens at connection initialization, and failback occurs when the driver determines that the first host has become available again.
If the URL property autoReconnect is true: Failover happens when the driver determines that the connection has failed (before every query), and falls back to the first host when it determines that the host has become available again (after
queriesBeforeRetryMasterqueries have been issued).
In either case, whenever you are connected to a "failed-over" server, the connection will be set to read-only state, so queries that would modify data will have exceptions thrown (the query will never be processed by the MySQL server).
Configuration properties define how Connector/J will make a connection to a MySQL server. Unless otherwise noted, properties can be set for a DataSource object or for a Connection object.
Configuration Properties can be set in one of the following ways:
Using the set*() methods on MySQL implementations of java.sql.DataSource (which is the preferred method when using implementations of java.sql.DataSource):
com.mysql.jdbc.jdbc2.optional.MysqlDataSource
com.mysql.jdbc.jdbc2.optional.MysqlConnectionPoolDataSource
As a key/value pair in the java.util.Properties instance passed to
DriverManager.getConnection()orDriver.connect()As a JDBC URL parameter in the URL given to
java.sql.DriverManager.getConnection(),java.sql.Driver.connect()or the MySQL implementations of thejavax.sql.DataSourcesetURL()method.NoteIf the mechanism you use to configure a JDBC URL is XML-based, you will need to use the XML character literal & to separate configuration parameters, as the ampersand is a reserved character for XML.
The properties are listed in the following tables.
Connection/Authentication.
| Property Name | Definition | Default Value | Since Version |
| user | The user to connect as | all versions | |
| password | The password to use when connecting | all versions | |
| socketFactory | The name of the class that the driver should use for creating socket connections to the server. This class must implement the interface 'com.mysql.jdbc.SocketFactory' and have public no-args constructor. | com.mysql.jdbc.StandardSocketFactory | 3.0.3 |
| connectTimeout | Timeout for socket connect (in milliseconds), with 0 being no timeout. Only works on JDK-1.4 or newer. Defaults to '0'. | 0 | 3.0.1 |
| socketTimeout | Timeout on network socket operations (0, the default means no timeout). | 0 | 3.0.1 |
| connectionLifecycleInterceptors | A comma-delimited list of classes that implement "com.mysql.jdbc.ConnectionLifecycleInterceptor" that should notified of connection lifecycle events (creation, destruction, commit, rollback, setCatalog and setAutoCommit) and potentially alter the execution of these commands. ConnectionLifecycleInterceptors are "stackable", more than one interceptor may be specified via the configuration property as a comma-delimited list, with the interceptors executed in order from left to right. | 5.1.4 | |
| useConfigs | Load the comma-delimited list of configuration properties before parsing the URL or applying user-specified properties. These configurations are explained in the 'Configurations' of the documentation. | 3.1.5 | |
| interactiveClient | Set the CLIENT_INTERACTIVE flag, which tells MySQL to timeout connections based on INTERACTIVE_TIMEOUT instead of WAIT_TIMEOUT | false | 3.1.0 |
| localSocketAddress | Hostname or IP address given to explicitly configure the interface that the driver will bind the client side of the TCP/IP connection to when connecting. | 5.0.5 | |
| propertiesTransform | An implementation of com.mysql.jdbc.ConnectionPropertiesTransform that the driver will use to modify URL properties passed to the driver before attempting a connection | 3.1.4 | |
| useCompression | Use zlib compression when communicating with the server (true/false)? Defaults to 'false'. | false | 3.0.17 |
Networking.
| Property Name | Definition | Default Value | Since Version |
| maxAllowedPacket | Maximum allowed packet size to send to server. If not set, the value of system variable 'max_allowed_packet' will be used to initialize this upon connecting. This value will not take effect if set larger than the value of 'max_allowed_packet'. | -1 | 5.1.8 |
| tcpKeepAlive | If connecting using TCP/IP, should the driver set SO_KEEPALIVE? | true | 5.0.7 |
| tcpNoDelay | If connecting using TCP/IP, should the driver set SO_TCP_NODELAY (disabling the Nagle Algorithm)? | true | 5.0.7 |
| tcpRcvBuf | If connecting using TCP/IP, should the driver set SO_RCV_BUF to the given value? The default value of '0', means use the platform default value for this property) | 0 | 5.0.7 |
| tcpSndBuf | If connecting using TCP/IP, shuold the driver set SO_SND_BUF to the given value? The default value of '0', means use the platform default value for this property) | 0 | 5.0.7 |
| tcpTrafficClass | If connecting using TCP/IP, should the driver set traffic class or type-of-service fields ?See the documentation for java.net.Socket.setTrafficClass() for more information. | 0 | 5.0.7 |
High Availability and Clustering.
| Property Name | Definition | Default Value | Since Version |
| autoReconnect | Should the driver try to re-establish stale and/or dead connections? If enabled the driver will throw an exception for a queries issued on a stale or dead connection, which belong to the current transaction, but will attempt reconnect before the next query issued on the connection in a new transaction. The use of this feature is not recommended, because it has side effects related to session state and data consistency when applications don't handle SQLExceptions properly, and is only designed to be used when you are unable to configure your application to handle SQLExceptions resulting from dead and stale connections properly. Alternatively, investigate setting the MySQL server variable "wait_timeout" to some high value rather than the default of 8 hours. | false | 1.1 |
| autoReconnectForPools | Use a reconnection strategy appropriate for connection pools (defaults to 'false') | false | 3.1.3 |
| failOverReadOnly | When failing over in autoReconnect mode, should the connection be set to 'read-only'? | true | 3.0.12 |
| maxReconnects | Maximum number of reconnects to attempt if autoReconnect is true, default is '3'. | 3 | 1.1 |
| reconnectAtTxEnd | If autoReconnect is set to true, should the driver attempt reconnections at the end of every transaction? | false | 3.0.10 |
| retriesAllDown | When using loadbalancing, the number of times the driver should cycle through available hosts, attempting to connect. Between cycles, the driver will pause for 250ms if no servers are available. | 120 | 5.1.6 |
| initialTimeout | If autoReconnect is enabled, the initial time to wait between re-connect attempts (in seconds, defaults to '2'). | 2 | 1.1 |
| roundRobinLoadBalance | When autoReconnect is enabled, and failoverReadonly is false, should we pick hosts to connect to on a round-robin basis? | false | 3.1.2 |
| queriesBeforeRetryMaster | Number of queries to issue before falling back to master when failed over (when using multi-host failover). Whichever condition is met first, 'queriesBeforeRetryMaster' or 'secondsBeforeRetryMaster' will cause an attempt to be made to reconnect to the master. Defaults to 50. | 50 | 3.0.2 |
| secondsBeforeRetryMaster | How long should the driver wait, when failed over, before attempting | 30 | 3.0.2 |
| selfDestructOnPingMaxOperations | =If set to a non-zero value, the driver will report close the connection and report failure when Connection.ping() or Connection.isValid(int) is called if the connnection's count of commands sent to the server exceeds this value. | 0 | 5.1.6 |
| selfDestructOnPingSecondsLifetime | If set to a non-zero value, the driver will report close the connection and report failure when Connection.ping() or Connection.isValid(int) is called if the connnection's lifetime exceeds this value. | 0 | 5.1.6 |
| resourceId | A globally unique name that identifies the resource that this datasource or connection is connected to, used for XAResource.isSameRM() when the driver can't determine this value based on hostnames used in the URL | 5.0.1 |
Security.
| Property Name | Definition | Default Value | Since Version |
| allowMultiQueries | Allow the use of ';' to delimit multiple queries during one statement (true/false), defaults to 'false' | false | 3.1.1 |
| useSSL | Use SSL when communicating with the server (true/false), defaults to 'false' | false | 3.0.2 |
| requireSSL | Require SSL connection if useSSL=true? (defaults to 'false'). | false | 3.1.0 |
| verifyServerCertificate | If "useSSL" is set to "true", should the driver verify the server's certificate? When using this feature, the keystore parameters should be specified by the "clientCertificateKeyStore*" properties, rather than system properties. | true | 5.1.6 |
| clientCertificateKeyStoreUrl | URL to the client certificate KeyStore (if not specified, use defaults) | 5.1.0 | |
| clientCertificateKeyStoreType | KeyStore type for client certificates (NULL or empty means use default, standard keystore types supported by the JVM are "JKS" and "PKCS12", your environment may have more available depending on what security products are installed and available to the JVM. | 5.1.0 | |
| clientCertificateKeyStorePassword | Password for the client certificates KeyStore | 5.1.0 | |
| trustCertificateKeyStoreUrl | URL to the trusted root certificate KeyStore (if not specified, use defaults) | 5.1.0 | |
| trustCertificateKeyStoreType | KeyStore type for trusted root certificates (NULL or empty means use default, standard keystore types supported by the JVM are "JKS" and "PKCS12", your environment may have more available depending on what security products are installed and available to the JVM. | 5.1.0 | |
| trustCertificateKeyStorePassword | Password for the trusted root certificates KeyStore | 5.1.0 | |
| allowLoadLocalInfile | Should the driver allow use of 'LOAD DATA LOCAL INFILE...' (defaults to 'true'). | true | 3.0.3 |
| allowUrlInLocalInfile | Should the driver allow URLs in 'LOAD DATA LOCAL INFILE' statements? | false | 3.1.4 |
| paranoid | Take measures to prevent exposure sensitive information in error messages and clear data structures holding sensitive data when possible? (defaults to 'false') | false | 3.0.1 |
| passwordCharacterEncoding | What character encoding is used for passwords? Leaving this set to the default value (null), uses the platform character set, which works for ISO8859_1 (i.e. "latin1") passwords. For passwords in other character encodings, the encoding will have to be specified with this property, as it's not possible for the driver to auto-detect this. | 5.1.7 |
Performance Extensions.
| Property Name | Definition | Default Value | Since Version |
| callableStmtCacheSize | If 'cacheCallableStmts' is enabled, how many callable statements should be cached? | 100 | 3.1.2 |
| metadataCacheSize | The number of queries to cache ResultSetMetadata for if cacheResultSetMetaData is set to 'true' (default 50) | 50 | 3.1.1 |
| useLocalSessionState | Should the driver refer to the internal values of autocommit and transaction isolation that are set by Connection.setAutoCommit() and Connection.setTransactionIsolation() and transaction state as maintained by the protocol, rather than querying the database or blindly sending commands to the database for commit() or rollback() method calls? | false | 3.1.7 |
| useLocalTransactionState | Should the driver use the in-transaction state provided by the MySQL protocol to determine if a commit() or rollback() should actually be sent to the database? | false | 5.1.7 |
| prepStmtCacheSize | If prepared statement caching is enabled, how many prepared statements should be cached? | 25 | 3.0.10 |
| prepStmtCacheSqlLimit | If prepared statement caching is enabled, what's the largest SQL the driver will cache the parsing for? | 256 | 3.0.10 |
| alwaysSendSetIsolation | Should the driver always communicate with the database when Connection.setTransactionIsolation() is called? If set to false, the driver will only communicate with the database when the requested transaction isolation is different than the whichever is newer, the last value that was set via Connection.setTransactionIsolation(), or the value that was read from the server when the connection was established. | true | 3.1.7 |
| maintainTimeStats | Should the driver maintain various internal timers to enable idle time calculations as well as more verbose error messages when the connection to the server fails? Setting this property to false removes at least two calls to System.getCurrentTimeMillis() per query. | true | 3.1.9 |
| useCursorFetch | If connected to MySQL > 5.0.2, and setFetchSize() > 0 on a statement, should that statement use cursor-based fetching to retrieve rows? | false | 5.0.0 |
| blobSendChunkSize | Chunk to use when sending BLOB/CLOBs via ServerPreparedStatements | 1048576 | 3.1.9 |
| cacheCallableStmts | Should the driver cache the parsing stage of CallableStatements | false | 3.1.2 |
| cachePrepStmts | Should the driver cache the parsing stage of PreparedStatements of client-side prepared statements, the "check" for suitability of server-side prepared and server-side prepared statements themselves? | false | 3.0.10 |
| cacheResultSetMetadata | Should the driver cache ResultSetMetaData for Statements and PreparedStatements? (Req. JDK-1.4+, true/false, default 'false') | false | 3.1.1 |
| cacheServerConfiguration | Should the driver cache the results of 'SHOW VARIABLES' and 'SHOW COLLATION' on a per-URL basis? | false | 3.1.5 |
| defaultFetchSize | The driver will call setFetchSize(n) with this value on all newly-created Statements | 0 | 3.1.9 |
| dontTrackOpenResources | The JDBC specification requires the driver to automatically track and close resources, however if your application doesn't do a good job of explicitly calling close() on statements or result sets, this can cause memory leakage. Setting this property to true relaxes this constraint, and can be more memory efficient for some applications. | false | 3.1.7 |
| dynamicCalendars | Should the driver retrieve the default calendar when required, or cache it per connection/session? | false | 3.1.5 |
| elideSetAutoCommits | If using MySQL-4.1 or newer, should the driver only issue 'set autocommit=n' queries when the server's state doesn't match the requested state by Connection.setAutoCommit(boolean)? | false | 3.1.3 |
| enableQueryTimeouts | When enabled, query timeouts set via Statement.setQueryTimeout() use a shared java.util.Timer instance for scheduling. Even if the timeout doesn't expire before the query is processed, there will be memory used by the TimerTask for the given timeout which won't be reclaimed until the time the timeout would have expired if it hadn't been cancelled by the driver. High-load environments might want to consider disabling this functionality. | true | 5.0.6 |
| holdResultsOpenOverStatementClose | Should the driver leave the result sets open on Statement.close() (enabling violates JDBC specification) | false | 3.1.7 |
| largeRowSizeThreshold | What size result set row should the JDBC driver consider "large", and thus use a more memory-efficient way of representing the row internally? | 2048 | 5.1.1 |
| loadBalanceStrategy | If using a load-balanced connection to connect to SQL nodes in a MySQL Cluster/NDB configuration (by using the URL prefix "jdbc:mysql:loadbalance://"), which load balancing algorithm should the driver use: (1) "random" - the driver will pick a random host for each request. This tends to work better than round-robin, as the randomness will somewhat account for spreading loads where requests vary in response time, while round-robin can sometimes lead to overloaded nodes if there are variations in response times across the workload. (2) "bestResponseTime" - the driver will route the request to the host that had the best response time for the previous transaction. | random | 5.0.6 |
| locatorFetchBufferSize | If 'emulateLocators' is configured to 'true', what size buffer should be used when fetching BLOB data for getBinaryInputStream? | 1048576 | 3.2.1 |
| rewriteBatchedStatements | Should the driver use multiqueries (irregardless of the setting of "allowMultiQueries") as well as rewriting of prepared statements for INSERT into multi-value inserts when executeBatch() is called? Notice that this has the potential for SQL injection if using plain java.sql.Statements and your code doesn't sanitize input correctly. Notice that for prepared statements, server-side prepared statements can not currently take advantage of this rewrite option, and that if you don't specify stream lengths when using PreparedStatement.set*Stream(), the driver won't be able to determine the optimum number of parameters per batch and you might receive an error from the driver that the resultant packet is too large. Statement.getGeneratedKeys() for these rewritten statements only works when the entire batch includes INSERT statements. | false | 3.1.13 |
| useDirectRowUnpack | Use newer result set row unpacking code that skips a copy from network buffers to a MySQL packet instance and instead reads directly into the result set row data buffers. | true | 5.1.1 |
| useDynamicCharsetInfo | Should the driver use a per-connection cache of character set information queried from the server when necessary, or use a built-in static mapping that is more efficient, but isn't aware of custom character sets or character sets implemented after the release of the JDBC driver? | true | 5.0.6 |
| useFastDateParsing | Use internal String->Date/Time/Timestamp conversion routines to avoid excessive object creation? | true | 5.0.5 |
| useFastIntParsing | Use internal String->Integer conversion routines to avoid excessive object creation? | true | 3.1.4 |
| useJvmCharsetConverters | Always use the character encoding routines built into the JVM, rather than using lookup tables for single-byte character sets? | false | 5.0.1 |
| useReadAheadInput | Use newer, optimized non-blocking, buffered input stream when reading from the server? | true | 3.1.5 |
Debugging/Profiling.
| Property Name | Definition | Default Value | Since Version |
| logger | The name of a class that implements "com.mysql.jdbc.log.Log" that will be used to log messages to. (default is "com.mysql.jdbc.log.StandardLogger", which logs to STDERR) | com.mysql.jdbc.log.StandardLogger | 3.1.1 |
| gatherPerfMetrics | Should the driver gather performance metrics, and report them via the configured logger every 'reportMetricsIntervalMillis' milliseconds? | false | 3.1.2 |
| profileSQL | Trace queries and their execution/fetch times to the configured logger (true/false) defaults to 'false' | false | 3.1.0 |
| profileSql | Deprecated, use 'profileSQL' instead. Trace queries and their execution/fetch times on STDERR (true/false) defaults to 'false' | 2.0.14 | |
| reportMetricsIntervalMillis | If 'gatherPerfMetrics' is enabled, how often should they be logged (in ms)? | 30000 | 3.1.2 |
| maxQuerySizeToLog | Controls the maximum length/size of a query that will get logged when profiling or tracing | 2048 | 3.1.3 |
| packetDebugBufferSize | The maximum number of packets to retain when 'enablePacketDebug' is true | 20 | 3.1.3 |
| slowQueryThresholdMillis | If 'logSlowQueries' is enabled, how long should a query (in ms) before it is logged as 'slow'? | 2000 | 3.1.2 |
| slowQueryThresholdNanos | If 'useNanosForElapsedTime' is set to true, and this property is set to a non-zero value, the driver will use this threshold (in nanosecond units) to determine if a query was slow. | 0 | 5.0.7 |
| useUsageAdvisor | Should the driver issue 'usage' warnings advising proper and efficient usage of JDBC and MySQL Connector/J to the log (true/false, defaults to 'false')? | false | 3.1.1 |
| autoGenerateTestcaseScript | Should the driver dump the SQL it is executing, including server-side prepared statements to STDERR? | false | 3.1.9 |
| autoSlowLog | Instead of using slowQueryThreshold* to determine if a query is slow enough to be logged, maintain statistics that allow the driver to determine queries that are outside the 99th percentile? | true | 5.1.4 |
| clientInfoProvider | The name of a class that implements the com.mysql.jdbc.JDBC4ClientInfoProvider interface in order to support JDBC-4.0's Connection.get/setClientInfo() methods | com.mysql.jdbc.JDBC4CommentClientInfoProvider | 5.1.0 |
| dumpMetadataOnColumnNotFound | Should the driver dump the field-level metadata of a result set into the exception message when ResultSet.findColumn() fails? | false | 3.1.13 |
| dumpQueriesOnException | Should the driver dump the contents of the query sent to the server in the message for SQLExceptions? | false | 3.1.3 |
| enablePacketDebug | When enabled, a ring-buffer of 'packetDebugBufferSize' packets will be kept, and dumped when exceptions are thrown in key areas in the driver's code | false | 3.1.3 |
| explainSlowQueries | If 'logSlowQueries' is enabled, should the driver automatically issue an 'EXPLAIN' on the server and send the results to the configured log at a WARN level? | false | 3.1.2 |
| includeInnodbStatusInDeadlockExceptions | Include the output of "SHOW ENGINE INNODB STATUS" in exception messages when deadlock exceptions are detected? | false | 5.0.7 |
| logSlowQueries | Should queries that take longer than 'slowQueryThresholdMillis' be logged? | false | 3.1.2 |
| logXaCommands | Should the driver log XA commands sent by MysqlXaConnection to the server, at the DEBUG level of logging? | false | 5.0.5 |
| profilerEventHandler | Name of a class that implements the interface com.mysql.jdbc.profiler.ProfilerEventHandler that will be used to handle profiling/tracing events. | com.mysql.jdbc.profiler.LoggingProfilerEventHandler | 5.1.6 |
| resultSetSizeThreshold | If the usage advisor is enabled, how many rows should a result set contain before the driver warns that it is suspiciously large? | 100 | 5.0.5 |
| traceProtocol | Should trace-level network protocol be logged? | false | 3.1.2 |
| useNanosForElapsedTime | For profiling/debugging functionality that measures elapsed time, should the driver try to use nanoseconds resolution if available (JDK >= 1.5)? | false | 5.0.7 |
Miscellaneous.
| Property Name | Definition | Default Value | Since Version |
| useUnicode | Forces the driver to use Unicode character encodings. Should only be set to false either when the driver can't determine the character set mapping (in which case, specify the Java character encoding in the characterEncoding property), or you are trying to force the driver to use a character set that MySQL doesn't natively support. Should be 'true' for all versions of MySQL 4.1 or higher unless you are trying to emulate the character set handling support provided in MySQL 4.0. Value is true/false, defaults to 'true' | true | 1.1g |
| characterEncoding | If 'useUnicode' is set to true, what Java character encoding should the driver use when dealing with strings? (defaults is to 'autodetect'). If the encoding cannot be determined, then an exception will be raised. | 1.1g | |
| characterSetResults | Character set to tell the server to return results as. | 3.0.13 | |
| connectionCollation | If set, tells the server to use this collation via 'set collation_connection' | 3.0.13 | |
| useBlobToStoreUTF8OutsideBMP | Tells the driver to treat [MEDIUM/LONG]BLOB columns as [LONG]VARCHAR columns holding text encoded in UTF-8 that has characters outside the BMP (4-byte encodings), which MySQL server can't handle natively. | false | 5.1.3 |
| utf8OutsideBmpExcludedColumnNamePattern | When "useBlobToStoreUTF8OutsideBMP" is set to "true", column names matching the given regex will still be treated as BLOBs unless they match the regex specified for "utf8OutsideBmpIncludedColumnNamePattern". The regex must follow the patterns used for the java.util.regex package. | 5.1.3 | |
| utf8OutsideBmpIncludedColumnNamePattern | Used to specify exclusion rules to "utf8OutsideBmpExcludedColumnNamePattern". The regex must follow the patterns used for the java.util.regex package. | 5.1.3 | |
| loadBalanceEnableJMX | Enables JMX-based management of load-balanced connection groups, including live addition/removal of hosts from load-balancing pool. | false | 5.1.13 |
| sessionVariables | A comma-separated list of name/value pairs to be sent as SET SESSION ... to the server when the driver connects. | 3.1.8 | |
| useColumnNamesInFindColumn | Prior to JDBC-4.0, the JDBC specification had a bug related to what could be given as a "column name" to ResultSet methods like findColumn(), or getters that took a String property. JDBC-4.0 clarified "column name" to mean the label, as given in an "AS" clause and returned by ResultSetMetaData.getColumnLabel(), and if no AS clause, the column name. Setting this property to "true" will give behavior that is congruent to JDBC-3.0 and earlier versions of the JDBC specification, but which because of the specification bug could give unexpected results. This property is preferred over "useOldAliasMetadataBehavior" unless you need the specific behavior that it provides with respect to ResultSetMetadata. | false | 5.1.7 |
| allowNanAndInf | Should the driver allow NaN or +/- INF values in PreparedStatement.setDouble()? | false | 3.1.5 |
| autoClosePStmtStreams | Should the driver automatically call .close() on streams/readers passed as arguments via set*() methods? | false | 3.1.12 |
| autoDeserialize | Should the driver automatically detect and de-serialize objects stored in BLOB fields? | false | 3.1.5 |
| blobsAreStrings | Should the driver always treat BLOBs as Strings - specifically to work around dubious metadata returned by the server for GROUP BY clauses? | false | 5.0.8 |
| capitalizeTypeNames | Capitalize type names in DatabaseMetaData? (usually only useful when using WebObjects, true/false, defaults to 'false') | true | 2.0.7 |
| clobCharacterEncoding | The character encoding to use for sending and retrieving TEXT, MEDIUMTEXT and LONGTEXT values instead of the configured connection characterEncoding | 5.0.0 | |
| clobberStreamingResults | This will cause a 'streaming' ResultSet to be automatically closed, and any outstanding data still streaming from the server to be discarded if another query is executed before all the data has been read from the server. | false | 3.0.9 |
| compensateOnDuplicateKeyUpdateCounts | Should the driver compensate for the update counts of "ON DUPLICATE KEY" INSERT statements (2 = 1, 0 = 1) when using prepared statements? | false | 5.1.7 |
| continueBatchOnError | Should the driver continue processing batch commands if one statement fails. The JDBC spec allows either way (defaults to 'true'). | true | 3.0.3 |
| createDatabaseIfNotExist | Creates the database given in the URL if it doesn't yet exist. Assumes the configured user has permissions to create databases. | false | 3.1.9 |
| emptyStringsConvertToZero | Should the driver allow conversions from empty string fields to numeric values of '0'? | true | 3.1.8 |
| emulateLocators | Should the driver emulate java.sql.Blobs with locators? With this feature enabled, the driver will delay loading the actual Blob data until the one of the retrieval methods (getInputStream(), getBytes(), and so forth) on the blob data stream has been accessed. For this to work, you must use a column alias with the value of the column to the actual name of the Blob. The feature also has the following restrictions: The SELECT that created the result set must reference only one table, the table must have a primary key; the SELECT must alias the original blob column name, specified as a string, to an alternate name; the SELECT must cover all columns that make up the primary key. | false | 3.1.0 |
| emulateUnsupportedPstmts | Should the driver detect prepared statements that are not supported by the server, and replace them with client-side emulated versions? | true | 3.1.7 |
| exceptionInterceptors | Comma-delimited list of classes that implement com.mysql.jdbc.ExceptionInterceptor. These classes will be instantiated one per Connection instance, and all SQLExceptions thrown by the driver will be allowed to be intercepted by these interceptors, in a chained fashion, with the first class listed as the head of the chain. | 5.1.8 | |
| functionsNeverReturnBlobs | Should the driver always treat data from functions returning BLOBs as Strings - specifically to work around dubious metadata returned by the server for GROUP BY clauses? | false | 5.0.8 |
| generateSimpleParameterMetadata | Should the driver generate simplified parameter metadata for PreparedStatements when no metadata is available either because the server couldn't support preparing the statement, or server-side prepared statements are disabled? | false | 5.0.5 |
| ignoreNonTxTables | Ignore non-transactional table warning for rollback? (defaults to 'false'). | false | 3.0.9 |
| jdbcCompliantTruncation | This sets whether Connector/J should throw java.sql.DataTruncation exceptions when data is truncated. This is required by the JDBC specification when connected to a server that supports warnings (MySQL 4.1.0 and newer). This property has no effect if the server sql-mode includes STRICT_TRANS_TABLES. Note that if STRICT_TRANS_TABLES is not set, it will be set as a result of using this connection string option. | true | 3.1.2 |
| loadBalanceBlacklistTimeout | Time in milliseconds between checks of servers which are unavailable. | 0 | 5.1.0 |
| loadBalanceConnectionGroup | Logical group of load-balanced connections within a classloader, used to manage different groups independently. If not specified, live management of load-balanced connections is disabled. | 5.1.13 | |
| loadBalanceExceptionChecker | Fully-qualified class name of custom exception checker. The class must implement com.mysql.jdbc.LoadBalanceExceptionChecker interface, and is used to inspect SQLExceptions and determine whether they should trigger fail-over to another host in a load-balanced deployment. | com.mysql.jdbc.StandardLoadBalanceExceptionChecker | 5.1.13 |
| loadBalancePingTimeout | Time in milliseconds to wait for ping response from each of load-balanced physical connections when using load-balanced Connection. | 0 | 5.1.13 |
| loadBalanceSQLExceptionSubclassFailover | Comma-delimited list of classes/interfaces used by default load-balanced exception checker to determine whether a given SQLException should trigger failover. The comparison is done using Class.isInstance(SQLException) using the thrown SQLException. | 5.1.13 | |
| loadBalanceSQLStateFailover | Comma-delimited list of SQLState codes used by default load-balanced exception checker to determine whether a given SQLException should trigger failover. The SQLState of a given SQLException is evaluated to determine whether it begins with any value in the comma-delimited list. | 5.1.13 | |
| loadBalanceValidateConnectionOnSwapServer | Should the load-balanced Connection explicitly check whether the connection is live when swapping to a new physical connection at commit/rollback? | false | 5.1.13 |
| maxRows | The maximum number of rows to return (0, the default means return all rows). | -1 | all versions |
| netTimeoutForStreamingResults | What value should the driver automatically set the server setting 'net_write_timeout' to when the streaming result sets feature is in use? (value has unit of seconds, the value '0' means the driver will not try and adjust this value) | 600 | 5.1.0 |
| noAccessToProcedureBodies | When determining procedure parameter types for CallableStatements, and the connected user can't access procedure bodies through "SHOW CREATE PROCEDURE" or select on mysql.proc should the driver instead create basic metadata (all parameters reported as IN VARCHARs, but allowing registerOutParameter() to be called on them anyway) instead of throwing an exception? | false | 5.0.3 |
| noDatetimeStringSync | Don't ensure that ResultSet.getDatetimeType().toString().equals(ResultSet.getString()) | false | 3.1.7 |
| noTimezoneConversionForTimeType | Don't convert TIME values using the server timezone if 'useTimezone'='true' | false | 5.0.0 |
| nullCatalogMeansCurrent | When DatabaseMetadataMethods ask for a 'catalog' parameter, does the value null mean use the current catalog? When nullCatalogMeansCurrent is true the current catalog will be used if the catalog parameter is null. If nullCatalogMeansCurrent is false and the catalog parameter is null then the catalog parameter is not used to restrict the catalog search. (This is not JDBC-compliant, but follows legacy behavior from earlier versions of the driver) | true | 3.1.8 |
| nullNamePatternMatchesAll | Should DatabaseMetaData methods that accept *pattern parameters treat null the same as '%' (this is not JDBC-compliant, however older versions of the driver accepted this departure from the specification) | true | 3.1.8 |
| overrideSupportsIntegrityEnhancementFacility | Should the driver return "true" for DatabaseMetaData.supportsIntegrityEnhancementFacility() even if the database doesn't support it to workaround applications that require this method to return "true" to signal support of foreign keys, even though the SQL specification states that this facility contains much more than just foreign key support (one such application being OpenOffice)? | false | 3.1.12 |
| padCharsWithSpace | If a result set column has the CHAR type and the value does not fill the amount of characters specified in the DDL for the column, should the driver pad the remaining characters with space (for ANSI compliance)? | false | 5.0.6 |
| pedantic | Follow the JDBC spec to the letter. | false | 3.0.0 |
| pinGlobalTxToPhysicalConnection | When using XAConnections, should the driver ensure that operations on a given XID are always routed to the same physical connection? This allows the XAConnection to support "XA START ... JOIN" after "XA END" has been called | false | 5.0.1 |
| populateInsertRowWithDefaultValues | When using ResultSets that are CONCUR_UPDATABLE, should the driver pre-populate the "insert" row with default values from the DDL for the table used in the query so those values are immediately available for ResultSet accessors? This functionality requires a call to the database for metadata each time a result set of this type is created. If disabled (the default), the default values will be populated by the an internal call to refreshRow() which pulls back default values and/or values changed by triggers. | false | 5.0.5 |
| processEscapeCodesForPrepStmts | Should the driver process escape codes in queries that are prepared? | true | 3.1.12 |
| queryTimeoutKillsConnection | If the timeout given in Statement.setQueryTimeout() expires, should the driver forcibly abort the Connection instead of attempting to abort the query? | false | 5.1.9 |
| relaxAutoCommit | If the version of MySQL the driver connects to does not support transactions, still allow calls to commit(), rollback() and setAutoCommit() (true/false, defaults to 'false')? | false | 2.0.13 |
| retainStatementAfterResultSetClose | Should the driver retain the Statement reference in a ResultSet after ResultSet.close() has been called. This is not JDBC-compliant after JDBC-4.0. | false | 3.1.11 |
| rollbackOnPooledClose | Should the driver issue a rollback() when the logical connection in a pool is closed? | true | 3.0.15 |
| runningCTS13 | Enables workarounds for bugs in Sun's JDBC compliance testsuite version 1.3 | false | 3.1.7 |
| serverTimezone | Override detection/mapping of timezone. Used when timezone from server doesn't map to Java timezone | 3.0.2 | |
| statementInterceptors | A comma-delimited list of classes that implement "com.mysql.jdbc.StatementInterceptor" that should be placed "in between" query execution to influence the results. StatementInterceptors are "chainable", the results returned by the "current" interceptor will be passed on to the next in in the chain, from left-to-right order, as specified in this property. | 5.1.1 | |
| strictFloatingPoint | Used only in older versions of compliance test | false | 3.0.0 |
| strictUpdates | Should the driver do strict checking (all primary keys selected) of updatable result sets (true, false, defaults to 'true')? | true | 3.0.4 |
| tinyInt1isBit | Should the driver treat the datatype TINYINT(1) as the BIT type (because the server silently converts BIT -> TINYINT(1) when creating tables)? | true | 3.0.16 |
| transformedBitIsBoolean | If the driver converts TINYINT(1) to a different type, should it use BOOLEAN instead of BIT for future compatibility with MySQL-5.0, as MySQL-5.0 has a BIT type? | false | 3.1.9 |
| treatUtilDateAsTimestamp | Should the driver treat java.util.Date as a TIMESTAMP for the purposes of PreparedStatement.setObject()? | true | 5.0.5 |
| ultraDevHack | Create PreparedStatements for prepareCall() when required, because UltraDev is broken and issues a prepareCall() for _all_ statements? (true/false, defaults to 'false') | false | 2.0.3 |
| useAffectedRows | Don't set the CLIENT_FOUND_ROWS flag when connecting to the server (not JDBC-compliant, will break most applications that rely on "found" rows vs. "affected rows" for DML statements), but does cause "correct" update counts from "INSERT ... ON DUPLICATE KEY UPDATE" statements to be returned by the server. | false | 5.1.7 |
| useGmtMillisForDatetimes | Convert between session timezone and GMT before creating Date and Timestamp instances (value of "false" is legacy behavior, "true" leads to more JDBC-compliant behavior. | false | 3.1.12 |
| useHostsInPrivileges | Add '@hostname' to users in DatabaseMetaData.getColumn/TablePrivileges() (true/false), defaults to 'true'. | true | 3.0.2 |
| useInformationSchema | When connected to MySQL-5.0.7 or newer, should the driver use the INFORMATION_SCHEMA to derive information used by DatabaseMetaData? | false | 5.0.0 |
| useJDBCCompliantTimezoneShift | Should the driver use JDBC-compliant rules when converting TIME/TIMESTAMP/DATETIME values' timezone information for those JDBC arguments which take a java.util.Calendar argument? (Notice that this option is exclusive of the "useTimezone=true" configuration option.) | false | 5.0.0 |
| useLegacyDatetimeCode | Use code for DATE/TIME/DATETIME/TIMESTAMP handling in result sets and statements that consistently handles timezone conversions from client to server and back again, or use the legacy code for these datatypes that has been in the driver for backwards-compatibility? | true | 5.1.6 |
| useOldAliasMetadataBehavior | Should the driver use the legacy behavior for "AS" clauses on columns and tables, and only return aliases (if any) for ResultSetMetaData.getColumnName() or ResultSetMetaData.getTableName() rather than the original column/table name? In 5.0.x, the default value was true. | false | 5.0.4 |
| useOldUTF8Behavior | Use the UTF-8 behavior the driver did when communicating with 4.0 and older servers | false | 3.1.6 |
| useOnlyServerErrorMessages | Don't prepend 'standard' SQLState error messages to error messages returned by the server. | true | 3.0.15 |
| useSSPSCompatibleTimezoneShift | If migrating from an environment that was using server-side prepared statements, and the configuration property "useJDBCCompliantTimeZoneShift" set to "true", use compatible behavior when not using server-side prepared statements when sending TIMESTAMP values to the MySQL server. | false | 5.0.5 |
| useServerPrepStmts | Use server-side prepared statements if the server supports them? | false | 3.1.0 |
| useSqlStateCodes | Use SQL Standard state codes instead of 'legacy' X/Open/SQL state codes (true/false), default is 'true' | true | 3.1.3 |
| useStreamLengthsInPrepStmts | Honor stream length parameter in PreparedStatement/ResultSet.setXXXStream() method calls (true/false, defaults to 'true')? | true | 3.0.2 |
| useTimezone | Convert time/date types between client and server timezones (true/false, defaults to 'false')? | false | 3.0.2 |
| useUnbufferedInput | Don't use BufferedInputStream for reading data from the server | true | 3.0.11 |
| yearIsDateType | Should the JDBC driver treat the MySQL type "YEAR" as a java.sql.Date, or as a SHORT? | true | 3.1.9 |
| zeroDateTimeBehavior | What should happen when the driver encounters DATETIME values that are composed entirely of zeros (used by MySQL to represent invalid dates)? Valid values are "exception", "round" and "convertToNull". | exception | 3.1.4 |
Connector/J also supports access to MySQL using named pipes on
Windows NT/2000/XP using the
NamedPipeSocketFactory as a plugin-socket
factory using the socketFactory property.
If you do not use a namedPipePath property,
the default of '\\.\pipe\MySQL' will be used. If you use the
NamedPipeSocketFactory, the host name and
port number values in the JDBC url will be ignored. You can
enable this feature using:
socketFactory=com.mysql.jdbc.NamedPipeSocketFactory
Named pipes only work when connecting to a MySQL server on the same physical machine as the one the JDBC driver is being used on. In simple performance tests, it appears that named pipe access is between 30%-50% faster than the standard TCP/IP access. However, this varies per system, and named pipes are slower than TCP/IP in many Windows configurations.
You can create your own socket factories by following the
example code in
com.mysql.jdbc.NamedPipeSocketFactory, or
com.mysql.jdbc.StandardSocketFactory.
MySQL Connector/J passes all of the tests in the publicly available version of Sun's JDBC compliance test suite. However, in many places the JDBC specification is vague about how certain functionality should be implemented, or the specification enables leeway in implementation.
This section gives details on a interface-by-interface level about how certain implementation decisions may affect how you use MySQL Connector/J.
Blob
Starting with Connector/J version 3.1.0, you can emulate Blobs with locators by adding the property 'emulateLocators=true' to your JDBC URL. Using this method, the driver will delay loading the actual Blob data until you retrieve the other data and then use retrieval methods (
getInputStream(),getBytes(), and so forth) on the blob data stream.For this to work, you must use a column alias with the value of the column to the actual name of the Blob, for example:
SELECT id, 'data' as blob_data from blobtable
For this to work, you must also follow these rules:
The Blob implementation does not allow in-place modification (they are copies, as reported by the
DatabaseMetaData.locatorsUpdateCopies()method). Because of this, you should use the correspondingPreparedStatement.setBlob()orResultSet.updateBlob()(in the case of updatable result sets) methods to save changes back to the database.CallableStatement
Starting with Connector/J 3.1.1, stored procedures are supported when connecting to MySQL version 5.0 or newer using the
CallableStatementinterface. Currently, thegetParameterMetaData()method ofCallableStatementis not supported.Clob
The Clob implementation does not allow in-place modification (they are copies, as reported by the
DatabaseMetaData.locatorsUpdateCopies()method). Because of this, you should use thePreparedStatement.setClob()method to save changes back to the database. The JDBC API does not have aResultSet.updateClob()method.Connection
Unlike older versions of MM.MySQL the
isClosed()method does not ping the server to determine if it is available. In accordance with the JDBC specification, it only returns true ifclosed()has been called on the connection. If you need to determine if the connection is still valid, you should issue a simple query, such asSELECT 1. The driver will throw an exception if the connection is no longer valid.DatabaseMetaData
Foreign Key information (
getImportedKeys()/getExportedKeys()andgetCrossReference()) is only available from InnoDB tables. However, the driver usesSHOW CREATE TABLEto retrieve this information, so when other storage engines support foreign keys, the driver will transparently support them as well.PreparedStatement
PreparedStatements are implemented by the driver, as MySQL does not have a prepared statement feature. Because of this, the driver does not implement
getParameterMetaData()orgetMetaData()as it would require the driver to have a complete SQL parser in the client.Starting with version 3.1.0 MySQL Connector/J, server-side prepared statements and binary-encoded result sets are used when the server supports them.
Take care when using a server-side prepared statement with large parameters that are set using
setBinaryStream(),setAsciiStream(),setUnicodeStream(),setBlob(), orsetClob(). If you want to re-execute the statement with any large parameter changed to a nonlarge parameter, it is necessary to callclearParameters()and set all parameters again. The reason for this is as follows:During both server-side prepared statements and client-side emulation, large data is exchanged only when
PreparedStatement.execute()is called.
Once that has been done, the stream used to read the data on the client side is closed (as per the JDBC spec), and cannot be read from again.
If a parameter changes from large to nonlarge, the driver must reset the server-side state of the prepared statement to allow the parameter that is being changed to take the place of the prior large value. This removes all of the large data that has already been sent to the server, thus requiring the data to be re-sent, using the
setBinaryStream(),setAsciiStream(),setUnicodeStream(),setBlob()orsetClob()method.
Consequently, if you want to change the type of a parameter to a nonlarge one, you must call
clearParameters()and set all parameters of the prepared statement again before it can be re-executed.ResultSet
By default, ResultSets are completely retrieved and stored in memory. In most cases this is the most efficient way to operate, and due to the design of the MySQL network protocol is easier to implement. If you are working with ResultSets that have a large number of rows or large values, and can not allocate heap space in your JVM for the memory required, you can tell the driver to stream the results back one row at a time.
To enable this functionality, you need to create a Statement instance in the following manner:
stmt = conn.createStatement(java.sql.ResultSet.TYPE_FORWARD_ONLY, java.sql.ResultSet.CONCUR_READ_ONLY); stmt.setFetchSize(Integer.MIN_VALUE);The combination of a forward-only, read-only result set, with a fetch size of
Integer.MIN_VALUEserves as a signal to the driver to stream result sets row-by-row. After this any result sets created with the statement will be retrieved row-by-row.There are some caveats with this approach. You will have to read all of the rows in the result set (or close it) before you can issue any other queries on the connection, or an exception will be thrown.
The earliest the locks these statements hold can be released (whether they be
MyISAMtable-level locks or row-level locks in some other storage engine such asInnoDB) is when the statement completes.If the statement is within scope of a transaction, then locks are released when the transaction completes (which implies that the statement needs to complete first). As with most other databases, statements are not complete until all the results pending on the statement are read or the active result set for the statement is closed.
Therefore, if using streaming results, you should process them as quickly as possible if you want to maintain concurrent access to the tables referenced by the statement producing the result set.
ResultSetMetaData
The
isAutoIncrement()method only works when using MySQL servers 4.0 and newer.Statement
When using versions of the JDBC driver earlier than 3.2.1, and connected to server versions earlier than 5.0.3, the
setFetchSize()method has no effect, other than to toggle result set streaming as described above.Connector/J 5.0.0 and later include support for both
Statement.cancel()andStatement.setQueryTimeout(). Both require MySQL 5.0.0 or newer server, and require a separate connection to issue theKILL QUERYstatement. In the case ofsetQueryTimeout(), the implementation creates an additional thread to handle the timeout functionality.NoteFailures to cancel the statement for
setQueryTimeout()may manifest themselves asRuntimeExceptionrather than failing silently, as there is currently no way to unblock the thread that is executing the query being cancelled due to timeout expiration and have it throw the exception instead.MySQL does not support SQL cursors, and the JDBC driver doesn't emulate them, so "setCursorName()" has no effect.
Connector/J 5.1.3 and later include two additional methods:
setLocalInfileInputStream()sets anInputStreaminstance that will be used to send data to the MySQL server for aLOAD DATA LOCAL INFILEstatement rather than aFileInputStreamorURLInputStreamthat represents the path given as an argument to the statement.This stream will be read to completion upon execution of a
LOAD DATA LOCAL INFILEstatement, and will automatically be closed by the driver, so it needs to be reset before each call toexecute*()that would cause the MySQL server to request data to fulfill the request forLOAD DATA LOCAL INFILE.If this value is set to
NULL, the driver will revert to using aFileInputStreamorURLInputStreamas required.getLocalInfileInputStream()returns theInputStreaminstance that will be used to send data in response to aLOAD DATA LOCAL INFILEstatement.This method returns
NULLif no such stream has been set usingsetLocalInfileInputStream().
MySQL Connector/J is flexible in the way it handles conversions between MySQL data types and Java data types.
In general, any MySQL data type can be converted to a java.lang.String, and any numeric type can be converted to any of the Java numeric types, although round-off, overflow, or loss of precision may occur.
Starting with Connector/J 3.1.0, the JDBC driver will issue
warnings or throw DataTruncation exceptions as is required by
the JDBC specification unless the connection was configured not
to do so by using the property
jdbcCompliantTruncation and setting it to
false.
The conversions that are always guaranteed to work are listed in the following table:
Connection Properties - Miscellaneous.
| These MySQL Data Types | Can always be converted to these Java types |
|---|---|
CHAR, VARCHAR, BLOB, TEXT, ENUM, and SET | java.lang.String, java.io.InputStream, java.io.Reader,
java.sql.Blob, java.sql.Clob |
FLOAT, REAL, DOUBLE PRECISION, NUMERIC, DECIMAL, TINYINT,
SMALLINT, MEDIUMINT, INTEGER, BIGINT | java.lang.String, java.lang.Short, java.lang.Integer,
java.lang.Long, java.lang.Double,
java.math.BigDecimal |
DATE, TIME, DATETIME, TIMESTAMP | java.lang.String, java.sql.Date, java.sql.Timestamp |
Round-off, overflow or loss of precision may occur if you choose a Java numeric data type that has less precision or capacity than the MySQL data type you are converting to/from.
The ResultSet.getObject() method uses the
type conversions between MySQL and Java types, following the
JDBC specification where appropriate. The value returned by
ResultSetMetaData.GetColumnClassName() is
also shown below. For more information on the
java.sql.Types classes see
Java
2 Platform Types.
MySQL Types to Java Types for ResultSet.getObject().
| MySQL Type Name | Return value of GetColumnClassName | Returned as Java Class |
|---|---|---|
| BIT(1) (new in MySQL-5.0) | BIT | java.lang.Boolean |
| BIT( > 1) (new in MySQL-5.0) | BIT | byte[] |
| TINYINT | TINYINT | java.lang.Boolean if the configuration property
tinyInt1isBit is set to
true (the default) and the
storage size is 1, or
java.lang.Integer if not. |
| BOOL, BOOLEAN | TINYINT | See TINYINT, above as these are aliases for TINYINT(1), currently. |
| SMALLINT[(M)] [UNSIGNED] | SMALLINT [UNSIGNED] | java.lang.Integer (regardless if UNSIGNED or not) |
| MEDIUMINT[(M)] [UNSIGNED] | MEDIUMINT [UNSIGNED] | java.lang.Integer, if UNSIGNED
java.lang.Long (C/J 3.1 and
earlier), or
java.lang.Integer for C/J 5.0
and later |
| INT,INTEGER[(M)] [UNSIGNED] | INTEGER [UNSIGNED] | java.lang.Integer, if UNSIGNED
java.lang.Long |
| BIGINT[(M)] [UNSIGNED] | BIGINT [UNSIGNED] | java.lang.Long, if UNSIGNED
java.math.BigInteger |
| FLOAT[(M,D)] | FLOAT | java.lang.Float |
| DOUBLE[(M,B)] | DOUBLE | java.lang.Double |
| DECIMAL[(M[,D])] | DECIMAL | java.math.BigDecimal |
| DATE | DATE | java.sql.Date |
| DATETIME | DATETIME | java.sql.Timestamp |
| TIMESTAMP[(M)] | TIMESTAMP | java.sql.Timestamp |
| TIME | TIME | java.sql.Time |
| YEAR[(2|4)] | YEAR | If yearIsDateType configuration property is set to
false, then the returned object type is
java.sql.Short. If set to
true (the default) then an object of type
java.sql.Date (with the date
set to January 1st, at midnight). |
| CHAR(M) | CHAR | java.lang.String (unless the character set for
the column is BINARY, then
byte[] is returned. |
| VARCHAR(M) [BINARY] | VARCHAR | java.lang.String (unless the character set for
the column is BINARY, then
byte[] is returned. |
| BINARY(M) | BINARY | byte[] |
| VARBINARY(M) | VARBINARY | byte[] |
| TINYBLOB | TINYBLOB | byte[] |
| TINYTEXT | VARCHAR | java.lang.String |
| BLOB | BLOB | byte[] |
| TEXT | VARCHAR | java.lang.String |
| MEDIUMBLOB | MEDIUMBLOB | byte[] |
| MEDIUMTEXT | VARCHAR | java.lang.String |
| LONGBLOB | LONGBLOB | byte[] |
| LONGTEXT | VARCHAR | java.lang.String |
| ENUM('value1','value2',...) | CHAR | java.lang.String |
| SET('value1','value2',...) | CHAR | java.lang.String |
All strings sent from the JDBC driver to the server are
converted automatically from native Java Unicode form to the
client character encoding, including all queries sent using
Statement.execute(),
Statement.executeUpdate(),
Statement.executeQuery() as well as all
PreparedStatement
and
CallableStatement
parameters with the exclusion of parameters set using
setBytes(),
setBinaryStream(),
setAsciiStream(),
setUnicodeStream() and
setBlob().
Prior to MySQL Server 4.1, Connector/J supported a single
character encoding per connection, which could either be
automatically detected from the server configuration, or could
be configured by the user through the
useUnicode and
characterEncoding properties.
Starting with MySQL Server 4.1, Connector/J supports a single
character encoding between client and server, and any number of
character encodings for data returned by the server to the
client in ResultSets.
The character encoding between client and server is
automatically detected upon connection. The encoding used by the
driver is specified on the server using the
character_set system variable for server
versions older than 4.1.0 and
character_set_server for server
versions 4.1.0 and newer. For more information, see
Section 9.1.3.1, “Server Character Set and Collation”.
To override the automatically detected encoding on the client
side, use the characterEncoding property
in the URL used to connect to the server.
When specifying character encodings on the client side, Java-style names should be used. The following table lists Java-style names for MySQL character sets:
MySQL to Java Encoding Name Translations.
| MySQL Character Set Name | Java-Style Character Encoding Name |
|---|---|
| ascii | US-ASCII |
| big5 | Big5 |
| gbk | GBK |
| sjis | SJIS (or Cp932 or MS932 for MySQL Server < 4.1.11) |
| cp932 | Cp932 or MS932 (MySQL Server > 4.1.11) |
| gb2312 | EUC_CN |
| ujis | EUC_JP |
| euckr | EUC_KR |
| latin1 | Cp1252 |
| latin2 | ISO8859_2 |
| greek | ISO8859_7 |
| hebrew | ISO8859_8 |
| cp866 | Cp866 |
| tis620 | TIS620 |
| cp1250 | Cp1250 |
| cp1251 | Cp1251 |
| cp1257 | Cp1257 |
| macroman | MacRoman |
| macce | MacCentralEurope |
| utf8 | UTF-8 |
| ucs2 | UnicodeBig |
Do not issue the query 'set names' with Connector/J, as the driver will not detect that the character set has changed, and will continue to use the character set detected during the initial connection setup.
To allow multiple character sets to be sent from the client, the
UTF-8 encoding should be used, either by configuring
utf8 as the default server character set, or
by configuring the JDBC driver to use UTF-8 through the
characterEncoding property.
SSL in MySQL Connector/J encrypts all data (other than the initial handshake) between the JDBC driver and the server. The performance penalty for enabling SSL is an increase in query processing time between 35% and 50%, depending on the size of the query, and the amount of data it returns.
For SSL Support to work, you must have the following:
A JDK that includes JSSE (Java Secure Sockets Extension), like JDK-1.4.1 or newer. SSL does not currently work with a JDK that you can add JSSE to, like JDK-1.2.x or JDK-1.3.x due to the following JSSE bug: http://developer.java.sun.com/developer/bugParade/bugs/4273544.html
A MySQL server that supports SSL and has been compiled and configured to do so, which is MySQL-4.0.4 or later, see Section 5.5.6, “Using SSL for Secure Connections”, for more information.
A client certificate (covered later in this section)
The system works through two Java truststore files, one file
contains the certificate information for the server
(truststore in the examples below). The
other file contains the certificate for the client
(keystore in the examples below). All Java
truststore files are password protected by supplying a suitable
password to the keytool when you create the
files. You need the file names and associated passwords to
create an SSL connection.
You will first need to import the MySQL server CA Certificate
into a Java truststore. A sample MySQL server CA Certificate is
located in the SSL subdirectory of the
MySQL source distribution. This is what SSL will use to
determine if you are communicating with a secure MySQL server.
Alternatively, use the CA Certificate that you have generated or
been provided with by your SSL provider.
To use Java's keytool to create a truststore
in the current directory , and import the server's CA
certificate (cacert.pem), you can do the
following (assuming that keytool is in your
path. The keytool should be located in the
bin subdirectory of your JDK or JRE):
shell> keytool -import -alias mysqlServerCACert \
-file cacert.pem -keystore truststoreYou will need to enter the password when prompted for the keystore file. Interaction with keytool will look like this:
Enter keystore password: *********
Owner: EMAILADDRESS=walrus@example.com, CN=Walrus,
O=MySQL AB, L=Orenburg, ST=Some-State, C=RU
Issuer: EMAILADDRESS=walrus@example.com, CN=Walrus,
O=MySQL AB, L=Orenburg, ST=Some-State, C=RU
Serial number: 0
Valid from:
Fri Aug 02 16:55:53 CDT 2002 until: Sat Aug 02 16:55:53 CDT 2003
Certificate fingerprints:
MD5: 61:91:A0:F2:03:07:61:7A:81:38:66:DA:19:C4:8D:AB
SHA1: 25:77:41:05:D5:AD:99:8C:14:8C:CA:68:9C:2F:B8:89:C3:34:4D:6C
Trust this certificate? [no]: yes
Certificate was added to keystoreYou then have two options, you can either import the client certificate that matches the CA certificate you just imported, or you can create a new client certificate.
To import an existing certificate, the certificate should be in DER format. You can use openssl to convert an existing certificate into the new format. For example:
shell> openssl x509 -outform DER -in client-cert.pem -out client.cert
You now need to import the converted certificate into your keystore using keytool:
shell> keytool -import -file client.cert -keystore keystore -alias mysqlClientCertificate
To generate your own client certificate, use
keytool to create a suitable certificate and
add it to the keystore file:
shell> keytool -genkey -keyalg rsa \
-alias mysqlClientCertificate -keystore keystore
Keytool will prompt you for the following information, and
create a keystore named keystore in the
current directory.
You should respond with information that is appropriate for your situation:
Enter keystore password: *********
What is your first and last name?
[Unknown]: Matthews
What is the name of your organizational unit?
[Unknown]: Software Development
What is the name of your organization?
[Unknown]: MySQL AB
What is the name of your City or Locality?
[Unknown]: Flossmoor
What is the name of your State or Province?
[Unknown]: IL
What is the two-letter country code for this unit?
[Unknown]: US
Is <CN=Matthews, OU=Software Development, O=MySQL AB,
L=Flossmoor, ST=IL, C=US> correct?
[no]: y
Enter key password for <mysqlClientCertificate>
(RETURN if same as keystore password):Finally, to get JSSE to use the keystore and truststore that you have generated, you need to set the following system properties when you start your JVM, replacing path_to_keystore_file with the full path to the keystore file you created, path_to_truststore_file with the path to the truststore file you created, and using the appropriate password values for each property. You can do this either on the command line:
-Djavax.net.ssl.keyStore=path_to_keystore_file -Djavax.net.ssl.keyStorePassword=password -Djavax.net.ssl.trustStore=path_to_truststore_file -Djavax.net.ssl.trustStorePassword=password
Or you can set the values directly within the application:
System.setProperty("javax.net.ssl.keyStore","path_to_keystore_file");
System.setProperty("javax.net.ssl.keyStorePassword","password");
System.setProperty("javax.net.ssl.trustStore","path_to_truststore_file");
System.setProperty("javax.net.ssl.trustStorePassword","password");
You will also need to set useSSL to
true in your connection parameters for MySQL
Connector/J, either by adding useSSL=true to
your URL, or by setting the property useSSL
to true in the
java.util.Properties instance you pass to
DriverManager.getConnection().
You can test that SSL is working by turning on JSSE debugging (as detailed below), and look for the following key events:
...
*** ClientHello, v3.1
RandomCookie: GMT: 1018531834 bytes = { 199, 148, 180, 215, 74, 12, »
54, 244, 0, 168, 55, 103, 215, 64, 16, 138, 225, 190, 132, 153, 2, »
217, 219, 239, 202, 19, 121, 78 }
Session ID: {}
Cipher Suites: { 0, 5, 0, 4, 0, 9, 0, 10, 0, 18, 0, 19, 0, 3, 0, 17 }
Compression Methods: { 0 }
***
[write] MD5 and SHA1 hashes: len = 59
0000: 01 00 00 37 03 01 3D B6 90 FA C7 94 B4 D7 4A 0C ...7..=.......J.
0010: 36 F4 00 A8 37 67 D7 40 10 8A E1 BE 84 99 02 D9 6...7g.@........
0020: DB EF CA 13 79 4E 00 00 10 00 05 00 04 00 09 00 ....yN..........
0030: 0A 00 12 00 13 00 03 00 11 01 00 ...........
main, WRITE: SSL v3.1 Handshake, length = 59
main, READ: SSL v3.1 Handshake, length = 74
*** ServerHello, v3.1
RandomCookie: GMT: 1018577560 bytes = { 116, 50, 4, 103, 25, 100, 58, »
202, 79, 185, 178, 100, 215, 66, 254, 21, 83, 187, 190, 42, 170, 3, »
132, 110, 82, 148, 160, 92 }
Session ID: {163, 227, 84, 53, 81, 127, 252, 254, 178, 179, 68, 63, »
182, 158, 30, 11, 150, 79, 170, 76, 255, 92, 15, 226, 24, 17, 177, »
219, 158, 177, 187, 143}
Cipher Suite: { 0, 5 }
Compression Method: 0
***
%% Created: [Session-1, SSL_RSA_WITH_RC4_128_SHA]
** SSL_RSA_WITH_RC4_128_SHA
[read] MD5 and SHA1 hashes: len = 74
0000: 02 00 00 46 03 01 3D B6 43 98 74 32 04 67 19 64 ...F..=.C.t2.g.d
0010: 3A CA 4F B9 B2 64 D7 42 FE 15 53 BB BE 2A AA 03 :.O..d.B..S..*..
0020: 84 6E 52 94 A0 5C 20 A3 E3 54 35 51 7F FC FE B2 .nR..\ ..T5Q....
0030: B3 44 3F B6 9E 1E 0B 96 4F AA 4C FF 5C 0F E2 18 .D?.....O.L.\...
0040: 11 B1 DB 9E B1 BB 8F 00 05 00 ..........
main, READ: SSL v3.1 Handshake, length = 1712
...
JSSE provides debugging (to STDOUT) when you set the following
system property: -Djavax.net.debug=all This
will tell you what keystores and truststores are being used, as
well as what is going on during the SSL handshake and
certificate exchange. It will be helpful when trying to
determine what is not working when trying to get an SSL
connection to happen.
Starting with Connector/J 3.1.7, we've made available a variant
of the driver that will automatically send queries to a
read/write master, or a failover or round-robin loadbalanced set
of slaves based on the state of
Connection.getReadOnly() .
An application signals that it wants a transaction to be
read-only by calling
Connection.setReadOnly(true), this
replication-aware connection will use one of the slave
connections, which are load-balanced per-vm using a round-robin
scheme (a given connection is sticky to a slave unless that
slave is removed from service). If you have a write transaction,
or if you have a read that is time-sensitive (remember,
replication in MySQL is asynchronous), set the connection to be
not read-only, by calling
Connection.setReadOnly(false) and the driver
will ensure that further calls are sent to the master MySQL
server. The driver takes care of propagating the current state
of autocommit, isolation level, and catalog between all of the
connections that it uses to accomplish this load balancing
functionality.
To enable this functionality, use the "
com.mysql.jdbc.ReplicationDriver " class when
configuring your application server's connection pool or when
creating an instance of a JDBC driver for your standalone
application. Because it accepts the same URL format as the
standard MySQL JDBC driver, ReplicationDriver
does not currently work with
java.sql.DriverManager -based connection
creation unless it is the only MySQL JDBC driver registered with
the DriverManager .
Here is a short, simple example of how ReplicationDriver might be used in a standalone application.
import java.sql.Connection;
import java.sql.ResultSet;
import java.util.Properties;
import com.mysql.jdbc.ReplicationDriver;
public class ReplicationDriverDemo {
public static void main(String[] args) throws Exception {
ReplicationDriver driver = new ReplicationDriver();
Properties props = new Properties();
// We want this for failover on the slaves
props.put("autoReconnect", "true");
// We want to load balance between the slaves
props.put("roundRobinLoadBalance", "true");
props.put("user", "foo");
props.put("password", "bar");
//
// Looks like a normal MySQL JDBC url, with a
// comma-separated list of hosts, the first
// being the 'master', the rest being any number
// of slaves that the driver will load balance against
//
Connection conn =
driver.connect("jdbc:mysql:replication://master,slave1,slave2,slave3/test",
props);
//
// Perform read/write work on the master
// by setting the read-only flag to "false"
//
conn.setReadOnly(false);
conn.setAutoCommit(false);
conn.createStatement().executeUpdate("UPDATE some_table ....");
conn.commit();
//
// Now, do a query from a slave, the driver automatically picks one
// from the list
//
conn.setReadOnly(true);
ResultSet rs =
conn.createStatement().executeQuery("SELECT a,b FROM alt_table");
.......
}
}
You may also want to investigate the Load Balancing JDBC Pool (lbpol) tool, which provides a wrapper around the standard JDBC driver and enables you to use DB connection pools that includes checks for system failures and uneven load distribution. For more information, see Load Balancing JDBC Pool (lbpool).
The table below provides a mapping of the MySQL Error Numbers to
SQL States
Table 21.3. Mapping of MySQL Error Numbers to SQLStates
| MySQL Error Number | MySQL Error Name | Legacy (X/Open) SQLState | SQL Standard SQLState |
|---|---|---|---|
| 1022 | ER_DUP_KEY | S1000 | 23000 |
| 1037 | ER_OUTOFMEMORY | S1001 | HY001 |
| 1038 | ER_OUT_OF_SORTMEMORY | S1001 | HY001 |
| 1040 | ER_CON_COUNT_ERROR | 08004 | 08004 |
| 1042 | ER_BAD_HOST_ERROR | 08004 | 08S01 |
| 1043 | ER_HANDSHAKE_ERROR | 08004 | 08S01 |
| 1044 | ER_DBACCESS_DENIED_ERROR | S1000 | 42000 |
| 1045 | ER_ACCESS_DENIED_ERROR | 28000 | 28000 |
| 1047 | ER_UNKNOWN_COM_ERROR | 08S01 | HY000 |
| 1050 | ER_TABLE_EXISTS_ERROR | S1000 | 42S01 |
| 1051 | ER_BAD_TABLE_ERROR | 42S02 | 42S02 |
| 1052 | ER_NON_UNIQ_ERROR | S1000 | 23000 |
| 1053 | ER_SERVER_SHUTDOWN | S1000 | 08S01 |
| 1054 | ER_BAD_FIELD_ERROR | S0022 | 42S22 |
| 1055 | ER_WRONG_FIELD_WITH_GROUP | S1009 | 42000 |
| 1056 | ER_WRONG_GROUP_FIELD | S1009 | 42000 |
| 1057 | ER_WRONG_SUM_SELECT | S1009 | 42000 |
| 1058 | ER_WRONG_VALUE_COUNT | 21S01 | 21S01 |
| 1059 | ER_TOO_LONG_IDENT | S1009 | 42000 |
| 1060 | ER_DUP_FIELDNAME | S1009 | 42S21 |
| 1061 | ER_DUP_KEYNAME | S1009 | 42000 |
| 1062 | ER_DUP_ENTRY | S1009 | 23000 |
| 1063 | ER_WRONG_FIELD_SPEC | S1009 | 42000 |
| 1064 | ER_PARSE_ERROR | 42000 | 42000 |
| 1065 | ER_EMPTY_QUERY | 42000 | 42000 |
| 1066 | ER_NONUNIQ_TABLE | S1009 | 42000 |
| 1067 | ER_INVALID_DEFAULT | S1009 | 42000 |
| 1068 | ER_MULTIPLE_PRI_KEY | S1009 | 42000 |
| 1069 | ER_TOO_MANY_KEYS | S1009 | 42000 |
| 1070 | ER_TOO_MANY_KEY_PARTS | S1009 | 42000 |
| 1071 | ER_TOO_LONG_KEY | S1009 | 42000 |
| 1072 | ER_KEY_COLUMN_DOES_NOT_EXITS | S1009 | 42000 |
| 1073 | ER_BLOB_USED_AS_KEY | S1009 | 42000 |
| 1074 | ER_TOO_BIG_FIELDLENGTH | S1009 | 42000 |
| 1075 | ER_WRONG_AUTO_KEY | S1009 | 42000 |
| 1080 | ER_FORCING_CLOSE | S1000 | 08S01 |
| 1081 | ER_IPSOCK_ERROR | 08S01 | 08S01 |
| 1082 | ER_NO_SUCH_INDEX | S1009 | 42S12 |
| 1083 | ER_WRONG_FIELD_TERMINATORS | S1009 | 42000 |
| 1084 | ER_BLOBS_AND_NO_TERMINATED | S1009 | 42000 |
| 1090 | ER_CANT_REMOVE_ALL_FIELDS | S1000 | 42000 |
| 1091 | ER_CANT_DROP_FIELD_OR_KEY | S1000 | 42000 |
| 1101 | ER_BLOB_CANT_HAVE_DEFAULT | S1000 | 42000 |
| 1102 | ER_WRONG_DB_NAME | S1000 | 42000 |
| 1103 | ER_WRONG_TABLE_NAME | S1000 | 42000 |
| 1104 | ER_TOO_BIG_SELECT | S1000 | 42000 |
| 1106 | ER_UNKNOWN_PROCEDURE | S1000 | 42000 |
| 1107 | ER_WRONG_PARAMCOUNT_TO_PROCEDURE | S1000 | 42000 |
| 1109 | ER_UNKNOWN_TABLE | S1000 | 42S02 |
| 1110 | ER_FIELD_SPECIFIED_TWICE | S1000 | 42000 |
| 1112 | ER_UNSUPPORTED_EXTENSION | S1000 | 42000 |
| 1113 | ER_TABLE_MUST_HAVE_COLUMNS | S1000 | 42000 |
| 1115 | ER_UNKNOWN_CHARACTER_SET | S1000 | 42000 |
| 1118 | ER_TOO_BIG_ROWSIZE | S1000 | 42000 |
| 1120 | ER_WRONG_OUTER_JOIN | S1000 | 42000 |
| 1121 | ER_NULL_COLUMN_IN_INDEX | S1000 | 42000 |
| 1129 | ER_HOST_IS_BLOCKED | 08004 | HY000 |
| 1130 | ER_HOST_NOT_PRIVILEGED | 08004 | HY000 |
| 1131 | ER_PASSWORD_ANONYMOUS_USER | S1000 | 42000 |
| 1132 | ER_PASSWORD_NOT_ALLOWED | S1000 | 42000 |
| 1133 | ER_PASSWORD_NO_MATCH | S1000 | 42000 |
| 1136 | ER_WRONG_VALUE_COUNT_ON_ROW | S1000 | 21S01 |
| 1138 | ER_INVALID_USE_OF_NULL | S1000 | 42000 |
| 1139 | ER_REGEXP_ERROR | S1000 | 42000 |
| 1140 | ER_MIX_OF_GROUP_FUNC_AND_FIELDS | S1000 | 42000 |
| 1141 | ER_NONEXISTING_GRANT | S1000 | 42000 |
| 1142 | ER_TABLEACCESS_DENIED_ERROR | S1000 | 42000 |
| 1143 | ER_COLUMNACCESS_DENIED_ERROR | S1000 | 42000 |
| 1144 | ER_ILLEGAL_GRANT_FOR_TABLE | S1000 | 42000 |
| 1145 | ER_GRANT_WRONG_HOST_OR_USER | S1000 | 42000 |
| 1146 | ER_NO_SUCH_TABLE | S1000 | 42S02 |
| 1147 | ER_NONEXISTING_TABLE_GRANT | S1000 | 42000 |
| 1148 | ER_NOT_ALLOWED_COMMAND | S1000 | 42000 |
| 1149 | ER_SYNTAX_ERROR | S1000 | 42000 |
| 1152 | ER_ABORTING_CONNECTION | S1000 | 08S01 |
| 1153 | ER_NET_PACKET_TOO_LARGE | S1000 | 08S01 |
| 1154 | ER_NET_READ_ERROR_FROM_PIPE | S1000 | 08S01 |
| 1155 | ER_NET_FCNTL_ERROR | S1000 | 08S01 |
| 1156 | ER_NET_PACKETS_OUT_OF_ORDER | S1000 | 08S01 |
| 1157 | ER_NET_UNCOMPRESS_ERROR | S1000 | 08S01 |
| 1158 | ER_NET_READ_ERROR | S1000 | 08S01 |
| 1159 | ER_NET_READ_INTERRUPTED | S1000 | 08S01 |
| 1160 | ER_NET_ERROR_ON_WRITE | S1000 | 08S01 |
| 1161 | ER_NET_WRITE_INTERRUPTED | S1000 | 08S01 |
| 1162 | ER_TOO_LONG_STRING | S1000 | 42000 |
| 1163 | ER_TABLE_CANT_HANDLE_BLOB | S1000 | 42000 |
| 1164 | ER_TABLE_CANT_HANDLE_AUTO_INCREMENT | S1000 | 42000 |
| 1166 | ER_WRONG_COLUMN_NAME | S1000 | 42000 |
| 1167 | ER_WRONG_KEY_COLUMN | S1000 | 42000 |
| 1169 | ER_DUP_UNIQUE | S1000 | 23000 |
| 1170 | ER_BLOB_KEY_WITHOUT_LENGTH | S1000 | 42000 |
| 1171 | ER_PRIMARY_CANT_HAVE_NULL | S1000 | 42000 |
| 1172 | ER_TOO_MANY_ROWS | S1000 | 42000 |
| 1173 | ER_REQUIRES_PRIMARY_KEY | S1000 | 42000 |
| 1177 | ER_CHECK_NO_SUCH_TABLE | S1000 | 42000 |
| 1178 | ER_CHECK_NOT_IMPLEMENTED | S1000 | 42000 |
| 1179 | ER_CANT_DO_THIS_DURING_AN_TRANSACTION | S1000 | 25000 |
| 1184 | ER_NEW_ABORTING_CONNECTION | S1000 | 08S01 |
| 1189 | ER_MASTER_NET_READ | S1000 | 08S01 |
| 1190 | ER_MASTER_NET_WRITE | S1000 | 08S01 |
| 1203 | ER_TOO_MANY_USER_CONNECTIONS | S1000 | 42000 |
| 1205 | ER_LOCK_WAIT_TIMEOUT | 41000 | 41000 |
| 1207 | ER_READ_ONLY_TRANSACTION | S1000 | 25000 |
| 1211 | ER_NO_PERMISSION_TO_CREATE_USER | S1000 | 42000 |
| 1213 | ER_LOCK_DEADLOCK | 41000 | 40001 |
| 1216 | ER_NO_REFERENCED_ROW | S1000 | 23000 |
| 1217 | ER_ROW_IS_REFERENCED | S1000 | 23000 |
| 1218 | ER_CONNECT_TO_MASTER | S1000 | 08S01 |
| 1222 | ER_WRONG_NUMBER_OF_COLUMNS_IN_SELECT | S1000 | 21000 |
| 1226 | ER_USER_LIMIT_REACHED | S1000 | 42000 |
| 1230 | ER_NO_DEFAULT | S1000 | 42000 |
| 1231 | ER_WRONG_VALUE_FOR_VAR | S1000 | 42000 |
| 1232 | ER_WRONG_TYPE_FOR_VAR | S1000 | 42000 |
| 1234 | ER_CANT_USE_OPTION_HERE | S1000 | 42000 |
| 1235 | ER_NOT_SUPPORTED_YET | S1000 | 42000 |
| 1239 | ER_WRONG_FK_DEF | S1000 | 42000 |
| 1241 | ER_OPERAND_COLUMNS | S1000 | 21000 |
| 1242 | ER_SUBQUERY_NO_1_ROW | S1000 | 21000 |
| 1247 | ER_ILLEGAL_REFERENCE | S1000 | 42S22 |
| 1248 | ER_DERIVED_MUST_HAVE_ALIAS | S1000 | 42000 |
| 1249 | ER_SELECT_REDUCED | S1000 | 01000 |
| 1250 | ER_TABLENAME_NOT_ALLOWED_HERE | S1000 | 42000 |
| 1251 | ER_NOT_SUPPORTED_AUTH_MODE | S1000 | 08004 |
| 1252 | ER_SPATIAL_CANT_HAVE_NULL | S1000 | 42000 |
| 1253 | ER_COLLATION_CHARSET_MISMATCH | S1000 | 42000 |
| 1261 | ER_WARN_TOO_FEW_RECORDS | S1000 | 01000 |
| 1262 | ER_WARN_TOO_MANY_RECORDS | S1000 | 01000 |
| 1263 | ER_WARN_NULL_TO_NOTNULL | S1000 | 01000 |
| 1264 | ER_WARN_DATA_OUT_OF_RANGE | S1000 | 01000 |
| 1265 | ER_WARN_DATA_TRUNCATED | S1000 | 01000 |
| 1280 | ER_WRONG_NAME_FOR_INDEX | S1000 | 42000 |
| 1281 | ER_WRONG_NAME_FOR_CATALOG | S1000 | 42000 |
| 1286 | ER_UNKNOWN_STORAGE_ENGINE | S1000 | 42000 |
This section provides some general JDBC background.
When you are using JDBC outside of an application server, the
DriverManager class manages the
establishment of Connections.
The DriverManager needs to be told which
JDBC drivers it should try to make Connections with. The
easiest way to do this is to use
Class.forName() on the class that
implements the java.sql.Driver interface.
With MySQL Connector/J, the name of this class is
com.mysql.jdbc.Driver. With this method,
you could use an external configuration file to supply the
driver class name and driver parameters to use when connecting
to a database.
The following section of Java code shows how you might
register MySQL Connector/J from the
main() method of your application. If
testing this code please ensure you read the installation
section first at Section 21.3.2, “Connector/J Installation”, to
make sure you have connector installed correctly and the
CLASSPATH set up. Also, ensure that MySQL
is configured to accept external TCP/IP connections.
import java.sql.Connection;
import java.sql.DriverManager;
import java.sql.SQLException;
// Notice, do not import com.mysql.jdbc.*
// or you will have problems!
public class LoadDriver {
public static void main(String[] args) {
try {
// The newInstance() call is a work around for some
// broken Java implementations
Class.forName("com.mysql.jdbc.Driver").newInstance();
} catch (Exception ex) {
// handle the error
}
}
}
After the driver has been registered with the
DriverManager, you can obtain a
Connection instance that is connected to a
particular database by calling
DriverManager.getConnection():
Example 21.1. Connector/J: Obtaining a connection from the
DriverManager
If you have not already done so, please review the section
Section 21.3.5.1.1, “Connecting to MySQL Using the DriverManager Interface”
before working with these examples.
This example shows how you can obtain a
Connection instance from the
DriverManager. There are a few different
signatures for the getConnection()
method. You should see the API documentation that comes with
your JDK for more specific information on how to use them.
import java.sql.Connection;
import java.sql.DriverManager;
import java.sql.SQLException;
Connection conn = null;
...
try {
conn =
DriverManager.getConnection("jdbc:mysql://localhost/test?" +
"user=monty&password=greatsqldb");
// Do something with the Connection
...
} catch (SQLException ex) {
// handle any errors
System.out.println("SQLException: " + ex.getMessage());
System.out.println("SQLState: " + ex.getSQLState());
System.out.println("VendorError: " + ex.getErrorCode());
}
Once a Connection is established, it
can be used to create Statement and
PreparedStatement objects, as well as
retrieve metadata about the database. This is explained in
the following sections.
Statement objects allow you to execute
basic SQL queries and retrieve the results through the
ResultSet class which is described later.
To create a Statement instance, you
call the createStatement() method on the
Connection object you have retrieved using
one of the DriverManager.getConnection() or
DataSource.getConnection() methods
described earlier.
Once you have a Statement instance, you
can execute a SELECT query by
calling the executeQuery(String) method
with the SQL you want to use.
To update data in the database, use the
executeUpdate(String SQL) method. This
method returns the number of rows matched by the update
statement, not the number of rows that were modified.
If you do not know ahead of time whether the SQL statement
will be a SELECT or an
UPDATE/INSERT,
then you can use the execute(String SQL)
method. This method will return true if the SQL query was a
SELECT, or false if it was an
UPDATE,
INSERT, or
DELETE statement. If the
statement was a SELECT query,
you can retrieve the results by calling the
getResultSet() method. If the statement
was an UPDATE,
INSERT, or
DELETE statement, you can
retrieve the affected rows count by calling
getUpdateCount() on the
Statement instance.
Example 21.2. Connector/J: Using java.sql.Statement to execute a
SELECT query
import java.sql.Connection;
import java.sql.DriverManager;
import java.sql.SQLException;
import java.sql.Statement;
import java.sql.ResultSet;
// assume that conn is an already created JDBC connection (see previous examples)
Statement stmt = null;
ResultSet rs = null;
try {
stmt = conn.createStatement();
rs = stmt.executeQuery("SELECT foo FROM bar");
// or alternatively, if you don't know ahead of time that
// the query will be a SELECT...
if (stmt.execute("SELECT foo FROM bar")) {
rs = stmt.getResultSet();
}
// Now do something with the ResultSet ....
}
catch (SQLException ex){
// handle any errors
System.out.println("SQLException: " + ex.getMessage());
System.out.println("SQLState: " + ex.getSQLState());
System.out.println("VendorError: " + ex.getErrorCode());
}
finally {
// it is a good idea to release
// resources in a finally{} block
// in reverse-order of their creation
// if they are no-longer needed
if (rs != null) {
try {
rs.close();
} catch (SQLException sqlEx) { } // ignore
rs = null;
}
if (stmt != null) {
try {
stmt.close();
} catch (SQLException sqlEx) { } // ignore
stmt = null;
}
}
Starting with MySQL server version 5.0 when used with
Connector/J 3.1.1 or newer, the
java.sql.CallableStatement interface is
fully implemented with the exception of the
getParameterMetaData() method.
For more information on MySQL stored procedures, please refer to http://dev.mysql.com/doc/mysql/en/stored-routines.html.
Connector/J exposes stored procedure functionality through
JDBC's CallableStatement interface.
Current versions of MySQL server do not return enough
information for the JDBC driver to provide result set
metadata for callable statements. This means that when using
CallableStatement,
ResultSetMetaData may return
NULL.
The following example shows a stored procedure that returns
the value of inOutParam incremented by 1,
and the string passed in using inputParam
as a ResultSet:
Example 21.3. Connector/J: Calling Stored Procedures
CREATE PROCEDURE demoSp(IN inputParam VARCHAR(255), \
INOUT inOutParam INT)
BEGIN
DECLARE z INT;
SET z = inOutParam + 1;
SET inOutParam = z;
SELECT inputParam;
SELECT CONCAT('zyxw', inputParam);
END
To use the demoSp procedure with
Connector/J, follow these steps:
Prepare the callable statement by using
Connection.prepareCall().Notice that you have to use JDBC escape syntax, and that the parentheses surrounding the parameter placeholders are not optional:
Example 21.4. Connector/J: Using
Connection.prepareCall()import java.sql.CallableStatement; ... // // Prepare a call to the stored procedure 'demoSp' // with two parameters // // Notice the use of JDBC-escape syntax ({call ...}) // CallableStatement cStmt = conn.prepareCall("{call demoSp(?, ?)}"); cStmt.setString(1, "abcdefg");NoteConnection.prepareCall()is an expensive method, due to the metadata retrieval that the driver performs to support output parameters. For performance reasons, you should try to minimize unnecessary calls toConnection.prepareCall()by reusingCallableStatementinstances in your code.Register the output parameters (if any exist)
To retrieve the values of output parameters (parameters specified as
OUTorINOUTwhen you created the stored procedure), JDBC requires that they be specified before statement execution using the variousregisterOutputParameter()methods in theCallableStatementinterface:Example 21.5. Connector/J: Registering output parameters
import java.sql.Types; ... // // Connector/J supports both named and indexed // output parameters. You can register output // parameters using either method, as well // as retrieve output parameters using either // method, regardless of what method was // used to register them. // // The following examples show how to use // the various methods of registering // output parameters (you should of course // use only one registration per parameter). // // // Registers the second parameter as output, and // uses the type 'INTEGER' for values returned from // getObject() // cStmt.registerOutParameter(2, Types.INTEGER); // // Registers the named parameter 'inOutParam', and // uses the type 'INTEGER' for values returned from // getObject() // cStmt.registerOutParameter("inOutParam", Types.INTEGER); ...Set the input parameters (if any exist)
Input and in/out parameters are set as for
PreparedStatementobjects. However,CallableStatementalso supports setting parameters by name:Example 21.6. Connector/J: Setting
CallableStatementinput parameters... // // Set a parameter by index // cStmt.setString(1, "abcdefg"); // // Alternatively, set a parameter using // the parameter name // cStmt.setString("inputParameter", "abcdefg"); // // Set the 'in/out' parameter using an index // cStmt.setInt(2, 1); // // Alternatively, set the 'in/out' parameter // by name // cStmt.setInt("inOutParam", 1); ...Execute the
CallableStatement, and retrieve any result sets or output parameters.Although
CallableStatementsupports calling any of theStatementexecute methods (executeUpdate(),executeQuery()orexecute()), the most flexible method to call isexecute(), as you do not need to know ahead of time if the stored procedure returns result sets:Example 21.7. Connector/J: Retrieving results and output parameter values
... boolean hadResults = cStmt.execute(); // // Process all returned result sets // while (hadResults) { ResultSet rs = cStmt.getResultSet(); // process result set ... hadResults = cStmt.getMoreResults(); } // // Retrieve output parameters // // Connector/J supports both index-based and // name-based retrieval // int outputValue = cStmt.getInt(2); // index-based outputValue = cStmt.getInt("inOutParam"); // name-based ...
Before version 3.0 of the JDBC API, there was no standard way
of retrieving key values from databases that supported auto
increment or identity columns. With older JDBC drivers for
MySQL, you could always use a MySQL-specific method on the
Statement interface, or issue the query
SELECT LAST_INSERT_ID() after issuing an
INSERT to a table that had an
AUTO_INCREMENT key. Using the
MySQL-specific method call isn't portable, and issuing a
SELECT to get the
AUTO_INCREMENT key's value requires another
round-trip to the database, which isn't as efficient as
possible. The following code snippets demonstrate the three
different ways to retrieve AUTO_INCREMENT
values. First, we demonstrate the use of the new JDBC-3.0
method getGeneratedKeys() which is now
the preferred method to use if you need to retrieve
AUTO_INCREMENT keys and have access to
JDBC-3.0. The second example shows how you can retrieve the
same value using a standard SELECT
LAST_INSERT_ID() query. The final example shows how
updatable result sets can retrieve the
AUTO_INCREMENT value when using the
insertRow() method.
Example 21.8. Connector/J: Retrieving AUTO_INCREMENT column values
using Statement.getGeneratedKeys()
Statement stmt = null;
ResultSet rs = null;
try {
//
// Create a Statement instance that we can use for
// 'normal' result sets assuming you have a
// Connection 'conn' to a MySQL database already
// available
stmt = conn.createStatement(java.sql.ResultSet.TYPE_FORWARD_ONLY,
java.sql.ResultSet.CONCUR_UPDATABLE);
//
// Issue the DDL queries for the table for this example
//
stmt.executeUpdate("DROP TABLE IF EXISTS autoIncTutorial");
stmt.executeUpdate(
"CREATE TABLE autoIncTutorial ("
+ "priKey INT NOT NULL AUTO_INCREMENT, "
+ "dataField VARCHAR(64), PRIMARY KEY (priKey))");
//
// Insert one row that will generate an AUTO INCREMENT
// key in the 'priKey' field
//
stmt.executeUpdate(
"INSERT INTO autoIncTutorial (dataField) "
+ "values ('Can I Get the Auto Increment Field?')",
Statement.RETURN_GENERATED_KEYS);
//
// Example of using Statement.getGeneratedKeys()
// to retrieve the value of an auto-increment
// value
//
int autoIncKeyFromApi = -1;
rs = stmt.getGeneratedKeys();
if (rs.next()) {
autoIncKeyFromApi = rs.getInt(1);
} else {
// throw an exception from here
}
rs.close();
rs = null;
System.out.println("Key returned from getGeneratedKeys():"
+ autoIncKeyFromApi);
} finally {
if (rs != null) {
try {
rs.close();
} catch (SQLException ex) {
// ignore
}
}
if (stmt != null) {
try {
stmt.close();
} catch (SQLException ex) {
// ignore
}
}
}
Example 21.9. Connector/J: Retrieving AUTO_INCREMENT column values
using SELECT LAST_INSERT_ID()
Statement stmt = null;
ResultSet rs = null;
try {
//
// Create a Statement instance that we can use for
// 'normal' result sets.
stmt = conn.createStatement();
//
// Issue the DDL queries for the table for this example
//
stmt.executeUpdate("DROP TABLE IF EXISTS autoIncTutorial");
stmt.executeUpdate(
"CREATE TABLE autoIncTutorial ("
+ "priKey INT NOT NULL AUTO_INCREMENT, "
+ "dataField VARCHAR(64), PRIMARY KEY (priKey))");
//
// Insert one row that will generate an AUTO INCREMENT
// key in the 'priKey' field
//
stmt.executeUpdate(
"INSERT INTO autoIncTutorial (dataField) "
+ "values ('Can I Get the Auto Increment Field?')");
//
// Use the MySQL LAST_INSERT_ID()
// function to do the same thing as getGeneratedKeys()
//
int autoIncKeyFromFunc = -1;
rs = stmt.executeQuery("SELECT LAST_INSERT_ID()");
if (rs.next()) {
autoIncKeyFromFunc = rs.getInt(1);
} else {
// throw an exception from here
}
rs.close();
System.out.println("Key returned from " +
"'SELECT LAST_INSERT_ID()': " +
autoIncKeyFromFunc);
} finally {
if (rs != null) {
try {
rs.close();
} catch (SQLException ex) {
// ignore
}
}
if (stmt != null) {
try {
stmt.close();
} catch (SQLException ex) {
// ignore
}
}
}
Example 21.10. Connector/J: Retrieving AUTO_INCREMENT column values
in Updatable ResultSets
Statement stmt = null;
ResultSet rs = null;
try {
//
// Create a Statement instance that we can use for
// 'normal' result sets as well as an 'updatable'
// one, assuming you have a Connection 'conn' to
// a MySQL database already available
//
stmt = conn.createStatement(java.sql.ResultSet.TYPE_FORWARD_ONLY,
java.sql.ResultSet.CONCUR_UPDATABLE);
//
// Issue the DDL queries for the table for this example
//
stmt.executeUpdate("DROP TABLE IF EXISTS autoIncTutorial");
stmt.executeUpdate(
"CREATE TABLE autoIncTutorial ("
+ "priKey INT NOT NULL AUTO_INCREMENT, "
+ "dataField VARCHAR(64), PRIMARY KEY (priKey))");
//
// Example of retrieving an AUTO INCREMENT key
// from an updatable result set
//
rs = stmt.executeQuery("SELECT priKey, dataField "
+ "FROM autoIncTutorial");
rs.moveToInsertRow();
rs.updateString("dataField", "AUTO INCREMENT here?");
rs.insertRow();
//
// the driver adds rows at the end
//
rs.last();
//
// We should now be on the row we just inserted
//
int autoIncKeyFromRS = rs.getInt("priKey");
rs.close();
rs = null;
System.out.println("Key returned for inserted row: "
+ autoIncKeyFromRS);
} finally {
if (rs != null) {
try {
rs.close();
} catch (SQLException ex) {
// ignore
}
}
if (stmt != null) {
try {
stmt.close();
} catch (SQLException ex) {
// ignore
}
}
}
When you run the preceding example code, you should get the
following output: Key returned from
getGeneratedKeys(): 1 Key returned from
SELECT LAST_INSERT_ID(): 1 Key returned for
inserted row: 2 You should be aware, that at times, it can be
tricky to use the SELECT LAST_INSERT_ID()
query, as that function's value is scoped to a connection. So,
if some other query happens on the same connection, the value
will be overwritten. On the other hand, the
getGeneratedKeys() method is scoped by
the Statement instance, so it can be
used even if other queries happen on the same connection, but
not on the same Statement instance.
This section describes how to use Connector/J in several contexts.
This section provides general background on J2EE concepts that pertain to use of Connector/J.
Connection pooling is a technique of creating and managing a pool of connections that are ready for use by any thread that needs them.
This technique of pooling connections is based on the fact that most applications only need a thread to have access to a JDBC connection when they are actively processing a transaction, which usually take only milliseconds to complete. When not processing a transaction, the connection would otherwise sit idle. Instead, connection pooling enables the idle connection to be used by some other thread to do useful work.
In practice, when a thread needs to do work against a MySQL or other database with JDBC, it requests a connection from the pool. When the thread is finished using the connection, it returns it to the pool, so that it may be used by any other threads that want to use it.
When the connection is loaned out from the pool, it is used
exclusively by the thread that requested it. From a
programming point of view, it is the same as if your thread
called DriverManager.getConnection()
every time it needed a JDBC connection, however with
connection pooling, your thread may end up using either a
new, or already-existing connection.
Connection pooling can greatly increase the performance of your Java application, while reducing overall resource usage. The main benefits to connection pooling are:
Reduced connection creation time
Although this is not usually an issue with the quick connection setup that MySQL offers compared to other databases, creating new JDBC connections still incurs networking and JDBC driver overhead that will be avoided if connections are recycled.
Simplified programming model
When using connection pooling, each individual thread can act as though it has created its own JDBC connection, allowing you to use straight-forward JDBC programming techniques.
Controlled resource usage
If you do not use connection pooling, and instead create a new connection every time a thread needs one, your application's resource usage can be quite wasteful and lead to unpredictable behavior under load.
Remember that each connection to MySQL has overhead (memory, CPU, context switches, and so forth) on both the client and server side. Every connection limits how many resources there are available to your application as well as the MySQL server. Many of these resources will be used whether or not the connection is actually doing any useful work!
Connection pools can be tuned to maximize performance, while keeping resource utilization below the point where your application will start to fail rather than just run slower.
Luckily, Sun has standardized the concept of connection pooling in JDBC through the JDBC-2.0 Optional interfaces, and all major application servers have implementations of these APIs that work fine with MySQL Connector/J.
Generally, you configure a connection pool in your application server configuration files, and access it through the Java Naming and Directory Interface (JNDI). The following code shows how you might use a connection pool from an application deployed in a J2EE application server:
Example 21.11. Connector/J: Using a connection pool with a J2EE application server
import java.sql.Connection;
import java.sql.SQLException;
import java.sql.Statement;
import javax.naming.InitialContext;
import javax.sql.DataSource;
public class MyServletJspOrEjb {
public void doSomething() throws Exception {
/*
* Create a JNDI Initial context to be able to
* lookup the DataSource
*
* In production-level code, this should be cached as
* an instance or static variable, as it can
* be quite expensive to create a JNDI context.
*
* Note: This code only works when you are using servlets
* or EJBs in a J2EE application server. If you are
* using connection pooling in standalone Java code, you
* will have to create/configure datasources using whatever
* mechanisms your particular connection pooling library
* provides.
*/
InitialContext ctx = new InitialContext();
/*
* Lookup the DataSource, which will be backed by a pool
* that the application server provides. DataSource instances
* are also a good candidate for caching as an instance
* variable, as JNDI lookups can be expensive as well.
*/
DataSource ds =
(DataSource)ctx.lookup("java:comp/env/jdbc/MySQLDB");
/*
* The following code is what would actually be in your
* Servlet, JSP or EJB 'service' method...where you need
* to work with a JDBC connection.
*/
Connection conn = null;
Statement stmt = null;
try {
conn = ds.getConnection();
/*
* Now, use normal JDBC programming to work with
* MySQL, making sure to close each resource when you're
* finished with it, which permits the connection pool
* resources to be recovered as quickly as possible
*/
stmt = conn.createStatement();
stmt.execute("SOME SQL QUERY");
stmt.close();
stmt = null;
conn.close();
conn = null;
} finally {
/*
* close any jdbc instances here that weren't
* explicitly closed during normal code path, so
* that we don't 'leak' resources...
*/
if (stmt != null) {
try {
stmt.close();
} catch (sqlexception sqlex) {
// ignore -- as we can't do anything about it here
}
stmt = null;
}
if (conn != null) {
try {
conn.close();
} catch (sqlexception sqlex) {
// ignore -- as we can't do anything about it here
}
conn = null;
}
}
}
}As shown in the example above, after obtaining the JNDI InitialContext, and looking up the DataSource, the rest of the code should look familiar to anyone who has done JDBC programming in the past.
The most important thing to remember when using connection pooling is to make sure that no matter what happens in your code (exceptions, flow-of-control, and so forth), connections, and anything created by them (such as statements or result sets) are closed, so that they may be re-used, otherwise they will be stranded, which in the best case means that the MySQL server resources they represent (such as buffers, locks, or sockets) may be tied up for some time, or worst case, may be tied up forever.
What Is the Best Size for my Connection Pool?
As with all other configuration rules-of-thumb, the answer is: it depends. Although the optimal size depends on anticipated load and average database transaction time, the optimum connection pool size is smaller than you might expect. If you take Sun's Java Petstore blueprint application for example, a connection pool of 15-20 connections can serve a relatively moderate load (600 concurrent users) using MySQL and Tomcat with response times that are acceptable.
To correctly size a connection pool for your application, you should create load test scripts with tools such as Apache JMeter or The Grinder, and load test your application.
An easy way to determine a starting point is to configure your connection pool's maximum number of connections to be unbounded, run a load test, and measure the largest amount of concurrently used connections. You can then work backward from there to determine what values of minimum and maximum pooled connections give the best performance for your particular application.
Validating Connections
MySQL Connector/J has the ability to execute a lightweight ping against a server, in order to validate the connection. In the case of load-balanced connections, this is performed against all active pooled internal connections that are retained. This is beneficial to Java applications using connection pools, as the pool can use this feature to validate connections. Depending on your connection pool and configuration, this validation can be carried out at different times:
Before the pool returns a connection to the application.
When the application returns a connection to the pool.
During periodic checks of idle connections.
In order to use this feature you need to specify a
validation query in your connection pool that starts with
/* ping */. Note the syntax must be
exactly as specified. This will cause the driver send a ping
to the server and return a fake, light-weight, result set.
When using a ReplicationConnection or
LoadBalancedConnection, the ping will be
sent across all active connections.
It is critical that the syntax be specified correctly. For example, consider the following snippets:
sql = "/* PING */ SELECT 1"; sql = "SELECT 1 /* ping*/"; sql = "/*ping*/ SELECT 1"; sql = " /* ping */ SELECT 1"; sql = "/*to ping or not to ping*/ SELECT 1";
None of the above statements will work. This is because the ping syntax is sensitive to whitespace, capitalization, and placement. The syntax needs to be exact for reasons of efficiency, as this test is done for every statement that is executed:
protected static final String PING_MARKER = "/* ping */";
...
if (sql.charAt(0) == '/') {
if (sql.startsWith(PING_MARKER)) {
doPingInstead();
...
All of the previous statements will issue a normal
SELECT statement and will
not be transformed into the
lightweight ping. Further, for load-balanced connections the
statement will be executed against one connection in the
internal pool, rather than validating each underlying
physical connection. This results in the non-active physical
connections assuming a stale state, and they may die. If
Connector/J then re-balances it may select a dead
connection, resulting in an exception being passed to the
application. To help prevent this you can use
loadBalanceValidateConnectionOnSwapServer
to validate the connection before use.
If your Connector/J deployment uses a connection pool that
allows you to specify a validation query, this should be
taken advantage of, but ensure that the query starts
exactly with /* ping
*/. This is particularly important if you are
using the load-balancing or replication-aware features of
Connector/J, as it will help keep alive connections which
otherwise will go stale and die, causing problems later.
Connector/J has long provided an effective means to distribute read/write load across multiple MySQL server instances for Cluster or master-master replication deployments, but until version 5.1.13, managing such deployments frequently required a service outage to redeploy a new configuration. Given that the ease of scaling out by adding additional MySQL Cluster (server) instances is a key element in that product offering, which is also naturally targeted at deployments with very strict availability requirements, it was necessary to add support for online changes of this nature. This is also critical for online upgrades, as the alternative is to take a MySQL Cluster server instance down hard, which will lose any in-process transactions and will also generate application exceptions, if any application is trying to use that particular server instance. Connector/J now has the ability to dynamically configure load-balanced connections.
There are two connection string options associated with this functionality:
loadBalanceConnectionGroup– This provides the ability to group connections from different sources. This allows you to manage these JDBC sources within a single class-loader in any combination you choose. If they use the same configuration, and you want to manage them as a logical single group, give them the same name. This is the key property for management, if you do not define a name (string) forloadBalanceConnectionGroup, you cannot manage the connections. All load-balanced connections sharing the sameloadBalanceConnectionGroupvalue, regardless of how the application creates them, will be managed together.loadBalanceEnableJMX– The ability to manage the connections is exposed when you define aloadBalanceConnectionGroup, but if you want to manage this externally, it is necessary to enable JMX by setting this property totrue. This enables a JMX implementation, which exposes the management and monitoring operations of a connection group. Further, you need to start your application with the-Dcom.sun.management.jmxremoteJVM flag. You can then perform connect and perform operations using a JMX client such asjconsole.
Once a connection has been made using the correct connection string options, a number of monitoring properties are available:
Current active host count
Current active physical connection count
Current active logical connection count
Total logical connections created
Total transaction count
The following management operations can also be performed:
Add host
Remove host
The JMX interface,
com.mysql.jdbc.jmx.LoadBalanceConnectionGroupManagerMBean,
has the following methods:
int getActiveHostCount(String group);
int getTotalHostCount(String group);
long getTotalLogicalConnectionCount(String group);
long getActiveLogicalConnectionCount(String group);
long getActivePhysicalConnectionCount(String group);
long getTotalPhysicalConnectionCount(String group);
long getTotalTransactionCount(String group);
void removeHost(String group, String host) throws SQLException;
void stopNewConnectionsToHost(String group, String host) throws SQLException;
void addHost(String group, String host, boolean forExisting);
String getActiveHostsList(String group);
String getRegisteredConnectionGroups();
The getRegisteredConnectionGroups()
method will return the names of all connection groups
defined in that class-loader.
You can test this setup with the following code:
public class Test {
private static String URL = "jdbc:mysql:loadbalance://" +
"localhost:3306,localhost:3310/test?" +
"loadBalanceConnectionGroup=first&loadBalanceEnableJMX=true";
public static void main(String[] args) throws Exception {
new Thread(new Repeater()).start();
new Thread(new Repeater()).start();
new Thread(new Repeater()).start();
}
static Connection getNewConnection() throws SQLException, ClassNotFoundException {
Class.forName("com.mysql.jdbc.Driver");
return DriverManager.getConnection(URL, "root", "");
}
static void executeSimpleTransaction(Connection c, int conn, int trans){
try {
c.setAutoCommit(false);
Statement s = c.createStatement();
s.executeQuery("SELECT SLEEP(1) /* Connection: " + conn + ", transaction: " + trans + " */");
c.commit();
} catch (SQLException e) {
e.printStackTrace();
}
}
public static class Repeater implements Runnable {
public void run() {
for(int i=0; i < 100; i++){
try {
Connection c = getNewConnection();
for(int j=0; j < 10; j++){
executeSimpleTransaction(c, i, j);
Thread.sleep(Math.round(100 * Math.random()));
}
c.close();
Thread.sleep(100);
} catch (Exception e) {
e.printStackTrace();
}
}
}
}
}
After compiling, the application can be started with the
-Dcom.sun.management.jmxremote flag, to
enable remote management. jconsole can
then be started. The Test main class will be listed by
jconsole. Select this and click
. You can then navigate to the
com.mysql.jdbc.jmx.LoadBalanceConnectionGroupManager
bean. At this point you can click on various operations and
examine the returned result.
If you now had an additional instance of MySQL running on
port 3309, you could ensure that Connector/J starts using it
by using the addHost(), which is exposed
in jconsole. Note that these operations
can be performed dynamically without having to stop the
application running.
Connector/J provides a useful load-balancing implementation
for Cluster or multi-master deployments. As of Connector/J
5.1.12, this same implementation is used for balancing load
between read-only slaves with
ReplicationDriver. When trying to balance
workload between multiple servers, the driver has to
determine when it is safe to swap servers, doing so in the
middle of a transaction, for example, could cause problems.
It is important not to lose state information. For this
reason, Connector/J will only try to pick a new server when
one of the following happens:
At transaction boundaries (transactions are explicitly committed or rolled back).
A communication exception (SQL State starting with "08") is encountered.
When a
SQLExceptionmatches conditions defined by user, using the extension points defined by theloadBalanceSQLStateFailover,loadBalanceSQLExceptionSubclassFailoverorloadBalanceExceptionCheckerproperties.
The third condition revolves around three new properties
introduced with Connector/J 5.1.13. It allows you to control
which SQLExceptions trigger failover.
loadBalanceExceptionChecker- TheloadBalanceExceptionCheckerproperty is really the key. This takes a fully-qualified class name which implements the newcom.mysql.jdbc.LoadBalanceExceptionCheckerinterface. This interface is very simple, and you only need to implement the following method:public boolean shouldExceptionTriggerFailover(SQLException ex)
A
SQLExceptionis passed in, and a boolean returned.Truetriggers a failover,falsedoes not.You can use this to implement your own custom logic. An example where this might be useful is when dealing with transient errors when using MySQL Cluster, where certain buffers may become overloaded. The following code snippet illustrates this:
public class NdbLoadBalanceExceptionChecker extends StandardLoadBalanceExceptionChecker { public boolean shouldExceptionTriggerFailover(SQLException ex) { return super.shouldExceptionTriggerFailover(ex) || checkNdbException(ex); } private boolean checkNdbException(SQLException ex){ // Have to parse the message since most NDB errors // are mapped to the same DEMC. return (ex.getMessage().startsWith("Lock wait timeout exceeded") || (ex.getMessage().startsWith("Got temporary error") && ex.getMessage().endsWith("from NDB"))); } }The code above extends
com.mysql.jdbc.StandardLoadBalanceExceptionChecker, which is the default implementation. There are a few convenient shortcuts built into this, for those who want to have some level of control using properties, without writing Java code. This default implementation uses the two remaining properties:loadBalanceSQLStateFailoverandloadBalanceSQLExceptionSubclassFailover.loadBalanceSQLStateFailover- allows you to define a comma-delimited list ofSQLStatecode prefixes, against which aSQLExceptionis compared. If the prefix matches, failover is triggered. So, for example, the following would trigger a failover if a givenSQLExceptionstarts with "00", or is "12345":loadBalanceSQLStateFailover=00,12345
loadBalanceSQLExceptionSubclassFailover- can be used in conjunction withloadBalanceSQLStateFailoveror on its own. If you want certain subclasses ofSQLExceptionto trigger failover, simply provide a comma-delimited list of fully-qualified class or interface names to check against. For example, if you want allSQLTransientConnectionExceptionsto trigger failover, you would specify:loadBalanceSQLExceptionSubclassFailover=java.sql.SQLTransientConnectionException
While the three fail-over conditions enumerated earlier suit
most situations, if auto-commit is
enabled, Connector/J never re-balances, and continues using
the same physical connection. This can be problematic,
particularly when load-balancing is being used to distribute
read-only load across multiple slaves. However, Connector/J
can be configured to re-balance after a certain number of
statements are executed, when auto-commit
is enabled. This functionality is dependent upon the
following properties:
loadBalanceAutoCommitStatementThreshold– defines the number of matching statements which will trigger the driver to potentially swap physical server connections. The default value, 0, retains the behavior that connections withauto-commitenabled are never balanced.loadBalanceAutoCommitStatementRegex– the regular expression against which statements must match. The default value, blank, matches all statements. So, for example, using the following properties will cause Connector/J to re-balance after every third statement that contains the string “test”:loadBalanceAutoCommitStatementThreshold=3 loadBalanceAutoCommitStatementRegex=.*test.*
loadBalanceAutoCommitStatementRegexcan prove useful in a number of situations. Your application may use temporary tables, server-side session state variables, or connection state, where letting the driver arbitrarily swap physical connections before processing is complete could cause data loss or other problems. This allows you to identify a trigger statement that is only executed when it is safe to swap physical connections.
The following instructions are based on the instructions for Tomcat-5.x, available at http://tomcat.apache.org/tomcat-5.5-doc/jndi-datasource-examples-howto.html which is current at the time this document was written.
First, install the .jar file that comes with Connector/J in
$CATALINA_HOME/common/lib so that it is
available to all applications installed in the container.
Next, Configure the JNDI DataSource by adding a declaration
resource to
$CATALINA_HOME/conf/server.xml in the
context that defines your web application:
<Context ....>
...
<Resource name="jdbc/MySQLDB"
auth="Container"
type="javax.sql.DataSource"/>
<!-- The name you used above, must match _exactly_ here!
The connection pool will be bound into JNDI with the name
"java:/comp/env/jdbc/MySQLDB"
-->
<ResourceParams name="jdbc/MySQLDB">
<parameter>
<name>factory</name>
<value>org.apache.commons.dbcp.BasicDataSourceFactory</value>
</parameter>
<!-- Don't set this any higher than max_connections on your
MySQL server, usually this should be a 10 or a few 10's
of connections, not hundreds or thousands -->
<parameter>
<name>maxActive</name>
<value>10</value>
</parameter>
<!-- You don't want to many idle connections hanging around
if you can avoid it, only enough to soak up a spike in
the load -->
<parameter>
<name>maxIdle</name>
<value>5</value>
</parameter>
<!-- Don't use autoReconnect=true, it's going away eventually
and it's a crutch for older connection pools that couldn't
test connections. You need to decide whether your application
is supposed to deal with SQLExceptions (hint, it should), and
how much of a performance penalty you're willing to pay
to ensure 'freshness' of the connection -->
<parameter>
<name>validationQuery</name>
<value>SELECT 1</value> <-- See discussion below for update to this option -->
</parameter>
<!-- The most conservative approach is to test connections
before they're given to your application. For most applications
this is okay, the query used above is very small and takes
no real server resources to process, other than the time used
to traverse the network.
If you have a high-load application you'll need to rely on
something else. -->
<parameter>
<name>testOnBorrow</name>
<value>true</value>
</parameter>
<!-- Otherwise, or in addition to testOnBorrow, you can test
while connections are sitting idle -->
<parameter>
<name>testWhileIdle</name>
<value>true</value>
</parameter>
<!-- You have to set this value, otherwise even though
you've asked connections to be tested while idle,
the idle evicter thread will never run -->
<parameter>
<name>timeBetweenEvictionRunsMillis</name>
<value>10000</value>
</parameter>
<!-- Don't allow connections to hang out idle too long,
never longer than what wait_timeout is set to on the
server...A few minutes or even fraction of a minute
is sometimes okay here, it depends on your application
and how much spikey load it will see -->
<parameter>
<name>minEvictableIdleTimeMillis</name>
<value>60000</value>
</parameter>
<!-- Username and password used when connecting to MySQL -->
<parameter>
<name>username</name>
<value>someuser</value>
</parameter>
<parameter>
<name>password</name>
<value>somepass</value>
</parameter>
<!-- Class name for the Connector/J driver -->
<parameter>
<name>driverClassName</name>
<value>com.mysql.jdbc.Driver</value>
</parameter>
<!-- The JDBC connection url for connecting to MySQL, notice
that if you want to pass any other MySQL-specific parameters
you should pass them here in the URL, setting them using the
parameter tags above will have no effect, you will also
need to use & to separate parameter values as the
ampersand is a reserved character in XML -->
<parameter>
<name>url</name>
<value>jdbc:mysql://localhost:3306/test</value>
</parameter>
</ResourceParams>
</Context>
Note that Connector/J 5.1.3 introduced a facility whereby,
rather than use a validationQuery value of
SELECT 1, it is possible to use
validationQuery with a value set to
/* ping */. This sends a ping to the server
which then returns a fake result set. This is a lighter weight
solution. It also has the advantage that if using
ReplicationConnection or
LoadBalancedConnection type connections,
the ping will be sent across all active connections. The
following XML snippet illustrates how to select this option:
<parameter> <name>validationQuery</name> <value>/* ping */</value> </parameter>
Note that /* ping */ has to be specified
exactly.
In general, you should follow the installation instructions that come with your version of Tomcat, as the way you configure datasources in Tomcat changes from time-to-time, and unfortunately if you use the wrong syntax in your XML file, you will most likely end up with an exception similar to the following:
Error: java.sql.SQLException: Cannot load JDBC driver class 'null ' SQL state: null
These instructions cover JBoss-4.x. To make the JDBC driver
classes available to the application server, copy the .jar
file that comes with Connector/J to the
lib directory for your server
configuration (which is usually called
default). Then, in the same configuration
directory, in the subdirectory named deploy, create a
datasource configuration file that ends with "-ds.xml", which
tells JBoss to deploy this file as a JDBC Datasource. The file
should have the following contents:
<datasources>
<local-tx-datasource>
<!-- This connection pool will be bound into JNDI with the name
"java:/MySQLDB" -->
<jndi-name>MySQLDB</jndi-name>
<connection-url>jdbc:mysql://localhost:3306/dbname</connection-url>
<driver-class>com.mysql.jdbc.Driver</driver-class>
<user-name>user</user-name>
<password>pass</password>
<min-pool-size>5</min-pool-size>
<!-- Don't set this any higher than max_connections on your
MySQL server, usually this should be a 10 or a few 10's
of connections, not hundreds or thousands -->
<max-pool-size>20</max-pool-size>
<!-- Don't allow connections to hang out idle too long,
never longer than what wait_timeout is set to on the
server...A few minutes is usually okay here,
it depends on your application
and how much spikey load it will see -->
<idle-timeout-minutes>5</idle-timeout-minutes>
<!-- If you're using Connector/J 3.1.8 or newer, you can use
our implementation of these to increase the robustness
of the connection pool. -->
<exception-sorter-class-name>
com.mysql.jdbc.integration.jboss.ExtendedMysqlExceptionSorter
</exception-sorter-class-name>
<valid-connection-checker-class-name>
com.mysql.jdbc.integration.jboss.MysqlValidConnectionChecker
</valid-connection-checker-class-name>
</local-tx-datasource>
</datasources> The Spring Framework is a Java-based application framework designed for assisting in application design by providing a way to configure components. The technique used by Spring is a well known design pattern called Dependency Injection (see Inversion of Control Containers and the Dependency Injection pattern). This article will focus on Java-oriented access to MySQL databases with Spring 2.0. For those wondering, there is a .NET port of Spring appropriately named Spring.NET.
Spring is not only a system for configuring components, but also includes support for aspect oriented programming (AOP). This is one of the main benefits and the foundation for Spring's resource and transaction management. Spring also provides utilities for integrating resource management with JDBC and Hibernate.
For the examples in this section the MySQL world sample database will be used. The first task is to set up a MySQL data source through Spring. Components within Spring use the "bean" terminology. For example, to configure a connection to a MySQL server supporting the world sample database you might use:
<util:map id="dbProps">
<entry key="db.driver" value="com.mysql.jdbc.Driver"/>
<entry key="db.jdbcurl" value="jdbc:mysql://localhost/world"/>
<entry key="db.username" value="myuser"/>
<entry key="db.password" value="mypass"/>
</util:map>
In the above example we are assigning values to properties that will be used in the configuration. For the datasource configuration:
<bean id="dataSource"
class="org.springframework.jdbc.datasource.DriverManagerDataSource">
<property name="driverClassName" value="${db.driver}"/>
<property name="url" value="${db.jdbcurl}"/>
<property name="username" value="${db.username}"/>
<property name="password" value="${db.password}"/>
</bean>
The placeholders are used to provide values for properties of this bean. This means that you can specify all the properties of the configuration in one place instead of entering the values for each property on each bean. We do, however, need one more bean to pull this all together. The last bean is responsible for actually replacing the placeholders with the property values.
<bean
class="org.springframework.beans.factory.config.PropertyPlaceholderConfigurer">
<property name="properties" ref="dbProps"/>
</bean>
Now that we have our MySQL data source configured and ready to go, we write some Java code to access it. The example below will retrieve three random cities and their corresponding country using the data source we configured with Spring.
// Create a new application context. this processes the Spring config
ApplicationContext ctx =
new ClassPathXmlApplicationContext("ex1appContext.xml");
// Retrieve the data source from the application context
DataSource ds = (DataSource) ctx.getBean("dataSource");
// Open a database connection using Spring's DataSourceUtils
Connection c = DataSourceUtils.getConnection(ds);
try {
// retrieve a list of three random cities
PreparedStatement ps = c.prepareStatement(
"select City.Name as 'City', Country.Name as 'Country' " +
"from City inner join Country on City.CountryCode = Country.Code " +
"order by rand() limit 3");
ResultSet rs = ps.executeQuery();
while(rs.next()) {
String city = rs.getString("City");
String country = rs.getString("Country");
System.out.printf("The city %s is in %s%n", city, country);
}
} catch (SQLException ex) {
// something has failed and we print a stack trace to analyse the error
ex.printStackTrace();
// ignore failure closing connection
try { c.close(); } catch (SQLException e) { }
} finally {
// properly release our connection
DataSourceUtils.releaseConnection(c, ds);
}This is very similar to normal JDBC access to MySQL with the main difference being that we are using DataSourceUtils instead of the DriverManager to create the connection.
While it may seem like a small difference, the implications are somewhat far reaching. Spring manages this resource in a way similar to a container managed data source in a J2EE application server. When a connection is opened, it can be subsequently accessed in other parts of the code if it is synchronized with a transaction. This makes it possible to treat different parts of your application as transactional instead of passing around a database connection.
Spring makes extensive use of the Template method design
pattern (see
Template
Method Pattern). Our immediate focus will be on the
JdbcTemplate and related classes,
specifically NamedParameterJdbcTemplate.
The template classes handle obtaining and releasing a
connection for data access when one is needed.
The next example shows how to use
NamedParameterJdbcTemplate inside of a
DAO (Data Access Object) class to retrieve a random city
given a country code.
public class Ex2JdbcDao {
/**
* Data source reference which will be provided by Spring.
*/
private DataSource dataSource;
/**
* Our query to find a random city given a country code. Notice
* the ":country" parameter toward the end. This is called a
* named parameter.
*/
private String queryString = "select Name from City " +
"where CountryCode = :country order by rand() limit 1";
/**
* Retrieve a random city using Spring JDBC access classes.
*/
public String getRandomCityByCountryCode(String cntryCode) {
// A template that permits using queries with named parameters
NamedParameterJdbcTemplate template =
new NamedParameterJdbcTemplate(dataSource);
// A java.util.Map is used to provide values for the parameters
Map params = new HashMap();
params.put("country", cntryCode);
// We query for an Object and specify what class we are expecting
return (String)template.queryForObject(queryString, params, String.class);
}
/**
* A JavaBean setter-style method to allow Spring to inject the data source.
* @param dataSource
*/
public void setDataSource(DataSource dataSource) {
this.dataSource = dataSource;
}
}
The focus in the above code is on the
getRandomCityByCountryCode() method. We
pass a country code and use the
NamedParameterJdbcTemplate to query for a
city. The country code is placed in a Map with the key
"country", which is the parameter is named in the SQL query.
To access this code, you need to configure it with Spring by providing a reference to the data source.
<bean id="dao" class="code.Ex2JdbcDao">
<property name="dataSource" ref="dataSource"/>
</bean>
At this point, we can just grab a reference to the DAO from
Spring and call
getRandomCityByCountryCode().
// Create the application context
ApplicationContext ctx =
new ClassPathXmlApplicationContext("ex2appContext.xml");
// Obtain a reference to our DAO
Ex2JdbcDao dao = (Ex2JdbcDao) ctx.getBean("dao");
String countryCode = "USA";
// Find a few random cities in the US
for(int i = 0; i < 4; ++i)
System.out.printf("A random city in %s is %s%n", countryCode,
dao.getRandomCityByCountryCode(countryCode));
This example shows how to use Spring's JDBC classes to
completely abstract away the use of traditional JDBC classes
including Connection and
PreparedStatement.
You might be wondering how we can add transactions into our code if we do not deal directly with the JDBC classes. Spring provides a transaction management package that not only replaces JDBC transaction management, but also enables declarative transaction management (configuration instead of code).
To use transactional database access, we will need to change the storage engine of the tables in the world database. The downloaded script explicitly creates MyISAM tables which do not support transactional semantics. The InnoDB storage engine does support transactions and this is what we will be using. We can change the storage engine with the following statements.
ALTER TABLE City ENGINE=InnoDB; ALTER TABLE Country ENGINE=InnoDB; ALTER TABLE CountryLanguage ENGINE=InnoDB;
A good programming practice emphasized by Spring is separating interfaces and implementations. What this means is that we can create a Java interface and only use the operations on this interface without any internal knowledge of what the actual implementation is. We will let Spring manage the implementation and with this it will manage the transactions for our implementation.
First you create a simple interface:
public interface Ex3Dao {
Integer createCity(String name, String countryCode,
String district, Integer population);
}
This interface contains one method that will create a new city record in the database and return the id of the new record. Next you need to create an implementation of this interface.
public class Ex3DaoImpl implements Ex3Dao {
protected DataSource dataSource;
protected SqlUpdate updateQuery;
protected SqlFunction idQuery;
public Integer createCity(String name, String countryCode,
String district, Integer population) {
updateQuery.update(new Object[] { name, countryCode,
district, population });
return getLastId();
}
protected Integer getLastId() {
return idQuery.run();
}
}
You can see that we only operate on abstract query objects here and do not deal directly with the JDBC API. Also, this is the complete implementation. All of our transaction management will be dealt with in the configuration. To get the configuration started, we need to create the DAO.
<bean id="dao" class="code.Ex3DaoImpl">
<property name="dataSource" ref="dataSource"/>
<property name="updateQuery">...</property>
<property name="idQuery">...</property>
</bean>
Now you need to set up the transaction configuration. The
first thing you must do is create transaction manager to
manage the data source and a specification of what
transaction properties are required for the
dao methods.
<bean id="transactionManager"
class="org.springframework.jdbc.datasource.DataSourceTransactionManager">
<property name="dataSource" ref="dataSource"/>
</bean>
<tx:advice id="txAdvice" transaction-manager="transactionManager">
<tx:attributes>
<tx:method name="*"/>
</tx:attributes>
</tx:advice>
The preceding code creates a transaction manager that
handles transactions for the data source provided to it. The
txAdvice uses this transaction manager
and the attributes specify to create a transaction for all
methods. Finally you need to apply this advice with an AOP
pointcut.
<aop:config>
<aop:pointcut id="daoMethods"
expression="execution(* code.Ex3Dao.*(..))"/>
<aop:advisor advice-ref="txAdvice" pointcut-ref="daoMethods"/>
</aop:config>
This basically says that all methods called on the
Ex3Dao interface will be wrapped in a
transaction. To make use of this, you only have to retrieve
the dao from the application context and
call a method on the dao instance.
Ex3Dao dao = (Ex3Dao) ctx.getBean("dao");
Integer id = dao.createCity(name, countryCode, district, pop);
We can verify from this that there is no transaction management happening in our Java code and it is all configured with Spring. This is a very powerful notion and regarded as one of the most beneficial features of Spring.
In many sitations, such as web applications, there will be a
large number of small database transactions. When this is
the case, it usually makes sense to create a pool of
database connections available for web requests as needed.
Although MySQL does not spawn an extra process when a
connection is made, there is still a small amount of
overhead to create and set up the connection. Pooling of
connections also alleviates problems such as collecting
large amounts of sockets in the TIME_WAIT
state.
Setting up pooling of MySQL connections with Spring is as
simple as changing the data source configuration in the
application context. There are a number of configurations
that we can use. The first example is based on the
Jakarta
Commons DBCP library. The example below replaces the
source configuration that was based on
DriverManagerDataSource with DBCP's
BasicDataSource.
<bean id="dataSource" destroy-method="close"
class="org.apache.commons.dbcp.BasicDataSource">
<property name="driverClassName" value="${db.driver}"/>
<property name="url" value="${db.jdbcurl}"/>
<property name="username" value="${db.username}"/>
<property name="password" value="${db.password}"/>
<property name="initialSize" value="3"/>
</bean>
The configuration of the two solutions is very similar. The
difference is that DBCP will pool connections to the
database instead of creating a new connection every time one
is requested. We have also set a parameter here called
initialSize. This tells DBCP that we want
three connections in the pool when it is created.
Another way to configure connection pooling is to configure
a data source in our J2EE application server. Using JBoss as
an example, you can set up the MySQL connection pool by
creating a file called
mysql-local-ds.xml and placing it in
the server/default/deploy directory in JBoss. Once we have
this setup, we can use JNDI to look it up. With Spring, this
lookup is very simple. The data source configuration looks
like this.
<jee:jndi-lookup id="dataSource" jndi-name="java:MySQL_DS"/>
This section explains how to use MySQL Connector/J with Glassfish ™ Server Open Source Edition 3.0.1. Glassfish can be downloaded from the Glassfish website.
Once Glassfish is installed you will need to make sure it can
access MySQL Connector/J. To do this copy the MySQL Connector/J JAR file to the
directory
GLASSFISH_INSTALL/glassfish/libmysql-connector-java-5.1.12-bin.jar to
C:\glassfishv3\glassfish\lib. Restart the
Glassfish Application Server.
You are now ready to create JDBC Connection Pools and JDBC Resources.
Creating a Connection Pool
In the Glassfish Administration Console, using the navigation tree navigate to Resources, JDBC, Connection Pools.
In the JDBC Connection Pools frame click . You will enter a two step wizard.
In the Name field under General Settings enter the name for the connection pool, for example enter
MySQLConnPool.In the Resource Type field, select
javax.sql.DataSourcefrom the drop-down listbox.In the Database Vendor field, select
MySQLfrom the drop-down listbox. Click to go to the next page of the wizard.You can accept the default settings for General Settings, Pool Settings and Transactions for this example. Scroll down to Additional Properties.
In Additional Properties you will need to ensure the following properties are set:
ServerName - The server you wish to connect to. For local testing this will be
localhost.User - The user name with which to connect to MySQL.
Password - The corresponding password for the user.
DatabaseName - The database you wish to connect to, for example the sample MySQL database
World.
Click to exit the wizard. You will be taken to the JDBC Connection Pools page where all current connection pools, including the one you just created, will be displayed.
In the JDBC Connection Pools frame click on the connection pool you just created. Here you can review and edit information about the connection pool.
To test your connection pool click the button at the top of the frame. A message will be displayed confirming correct operation or otherwise. If an error message is received recheck the previous steps, and ensure that MySQL Connector/J has been correctly copied into the previously specified location.
Now that you have created a connection pool you will also need to create a JDBC Resource (data source) for use by your application.
Creating a JDBC Resource
Your Java application will usually reference a data source object to establish a connection with the database. This needs to be created first using the following procedure.
Using the navigation tree in the Glassfish Administration Console, navigate to Resources, JDBC, JDBC Resources. A list of resources will be displayed in the JDBC Resources frame.
Click . The New JDBC Resource frame will be displayed.
In the JNDI Name field, enter the JNDI name that will be used to access this resource, for example enter
jdbc/MySQLDataSource.In the Pool Name field, select a connection pool you want this resource to use from the drop-down listbox.
Optionally, you can enter a description into the Description field.
Additional properties can be added if required.
Click to create the new JDBC resource. The JDBC Resources frame will list all available JDBC Resources.
This section shows how to deploy a simple JSP application on Glassfish, that connects to a MySQL database.
This example assumes you have already set up a suitable
Connection Pool and JDBC Resource, as explained in the
preceding sections. It is also assumed you have a sample
database installed, such as world.
The main application code, index.jsp is
presented here:
<%@ page import="java.sql.*, javax.sql.*, java.io.*, javax.naming.*" %>
<html>
<head><title>Hello world from JSP</title></head>
<body>
<%
InitialContext ctx;
DataSource ds;
Connection conn;
Statement stmt;
ResultSet rs;
try {
ctx = new InitialContext();
ds = (DataSource) ctx.lookup("java:comp/env/jdbc/MySQLDataSource");
//ds = (DataSource) ctx.lookup("jdbc/MySQLDataSource");
conn = ds.getConnection();
stmt = conn.createStatement();
rs = stmt.executeQuery("SELECT * FROM Country");
while(rs.next()) {
%>
<h3>Name: <%= rs.getString("Name") %></h3>
<h3>Population: <%= rs.getString("Population") %></h3>
<%
}
}
catch (SQLException se) {
%>
<%= se.getMessage() %>
<%
}
catch (NamingException ne) {
%>
<%= ne.getMessage() %>
<%
}
%>
</body>
</html>
In addition two XML files are required:
web.xml, and
sun-web.xml. There may be other files
present, such as classes and images. These files are
organized into the directory structure as follows:
index.jsp WEB-INF | - web.xml - sun-web.xml
The code for web.xml is:
<?xml version="1.0" encoding="UTF-8"?>
<web-app version="2.4" xmlns="http://java.sun.com/xml/ns/j2ee" xmlns:xsi="http://www.w3.org/2001/XMLSchema-instance" xsi:schemaLocation="http://java.sun.com/xml/ns/j2ee http://java.sun.com/xml/ns/j2ee/web-app_2_4.xsd">
<display-name>HelloWebApp</display-name>
<distributable/>
<resource-ref>
<res-ref-name>jdbc/MySQLDataSource</res-ref-name>
<res-type>javax.sql.DataSource</res-type>
<res-auth>Container</res-auth>
<res-sharing-scope>Shareable</res-sharing-scope>
</resource-ref>
</web-app>
The code for sun-web.xml is:
<?xml version="1.0" encoding="UTF-8"?>
<!DOCTYPE sun-web-app PUBLIC "-//Sun Microsystems, Inc.//DTD Application Server 8.1 Servlet 2.4//EN" "http://www.sun.com/software/appserver/dtds/sun-web-app_2_4-1.dtd">
<sun-web-app>
<context-root>HelloWebApp</context-root>
<resource-ref>
<res-ref-name>jdbc/MySQLDataSource</res-ref-name>
<jndi-name>jdbc/MySQLDataSource</jndi-name>
</resource-ref>
</sun-web-app>
These XML files illustrate a very important aspect of
running JDBC applications on Glassfish. On Glassfish it is
important to map the string specified for a JDBC resource to
its JNDI name, as set up in the Glassfish administration
console. In this example, the JNDI name for the JDBC
resource, as specified in the Glassfish Administration
console when creating the JDBC Resource, was
jdbc/MySQLDataSource. This must be mapped
to the name given in the application. In this example the
name specified in the application,
jdbc/MySQLDataSource, and the JNDI name,
happen to be the same, but this does not necessarily have to
be the case. Note that the XML element <res-ref-name>
is used to specify the name as used in the application
source code, and this is mapped to the JNDI name specified
using the <jndi-name> element, in the file
sun-web.xml. The resource also has to
be created in the web.xml file,
although the mapping of the resource to a JNDI name takes
place in the sun-web.xml file.
If you do not have this mapping set up correctly in the XML files you will not be able to lookup the data source using a JNDI lookup string such as:
ds = (DataSource) ctx.lookup("java:comp/env/jdbc/MySQLDataSource");
You will still be able to access the data source directly using:
ds = (DataSource) ctx.lookup("jdbc/MySQLDataSource");
With the source files in place, in the correct directory structure, you are ready to deploy the application:
In the navigation tree, navigate to Applications - the Applications frame will be displayed. Click .
You can now deploy an application packaged into a single WAR file from a remote client, or you can choose a packaged file or directory that is locally accessible to the server. If you are simply testing an application locally you can simply ponit Glassfish at the directory that contains your application, without needing to package the application into a WAR file.
Now select the application type from the Type drop-down listbox, which in this example is
Web application.Click OK.
Now, when you navigate to the
Applications frame, you will have the
option to Launch,
Redeploy, or
Restart your application. You can test
your application by clicking Launch.
The application will connection to the MySQL database and
display the Name and Population of countries in the
Country table.
This section describes a simple servlet that can be used in
the Glassfish environment to access a MySQL database. As
with the previous section, this example assumes the sample
database world is installed.
The project is set up with the following directory structure:
index.html
WEB-INF
|
- web.xml
- sun-web.xml
- classes
|
- HelloWebServlet.java
- HelloWebServlet.class
The code for the servlet, located in
HelloWebServlet.java, is as follows:
import javax.servlet.http.*;
import javax.servlet.*;
import java.io.*;
import java.sql.*;
import javax.sql.*;
import javax.naming.*;
public class HelloWebServlet extends HttpServlet {
InitialContext ctx = null;
DataSource ds = null;
Connection conn = null;
PreparedStatement ps = null;
ResultSet rs = null;
String sql = "SELECT Name, Population FROM Country WHERE Name=?";
public void init () throws ServletException {
try {
ctx = new InitialContext();
ds = (DataSource) ctx.lookup("java:comp/env/jdbc/MySQLDataSource");
conn = ds.getConnection();
ps = conn.prepareStatement(sql);
}
catch (SQLException se) {
System.out.println("SQLException: "+se.getMessage());
}
catch (NamingException ne) {
System.out.println("NamingException: "+ne.getMessage());
}
}
public void destroy () {
try {
if (rs != null)
rs.close();
if (ps != null)
ps.close();
if (conn != null)
conn.close();
if (ctx != null)
ctx.close();
}
catch (SQLException se) {
System.out.println("SQLException: "+se.getMessage());
}
catch (NamingException ne) {
System.out.println("NamingException: "+ne.getMessage());
}
}
public void doPost(HttpServletRequest req, HttpServletResponse resp){
try {
String country_name = req.getParameter("country_name");
resp.setContentType("text/html");
PrintWriter writer = resp.getWriter();
writer.println("<html><body>");
writer.println("<p>Country: "+country_name+"</p>");
ps.setString(1, country_name);
rs = ps.executeQuery();
if (!rs.next()){
writer.println("<p>Country does not exist!</p>");
}
else {
rs.beforeFirst();
while(rs.next()) {
writer.println("<p>Name: "+rs.getString("Name")+"</p>");
writer.println("<p>Population: "+rs.getString("Population")+"</p>");
}
}
writer.println("</body></html>");
writer.close();
}
catch (Exception e) {
e.printStackTrace();
}
}
public void doGet(HttpServletRequest req, HttpServletResponse resp){
try {
resp.setContentType("text/html");
PrintWriter writer = resp.getWriter();
writer.println("<html><body>");
writer.println("<p>Hello from servlet doGet()</p>");
writer.println("</body></html>");
writer.close();
}
catch (Exception e) {
e.printStackTrace();
}
}
}
In the preceding code a basic doGet()
method is implemented, but is not used in the example. The
code to establish the connection with the database is as
shown in the previous example,
Section 21.3.5.2.5.1, “A Simple JSP Application with Glassfish, Connector/J and MySQL”,
and is most conveniently located in the servlet
init() method. The corresponding freeing
of resources is located in the destroy method. The main
functionality of the servlet is located in the
doPost() method. If the user enters nto
the input form a country name that can be located in the
database, the population of the country is returned. The
code is invoked using a POST action associated with the
input form. The form is defined in the file
index.html:
<html>
<head><title>HelloWebServlet</title></head>
<body>
<h1>HelloWebServlet</h1>
<p>Please enter country name:</p>
<form action="HelloWebServlet" method="POST">
<input type="text" name="country_name" length="50" />
<input type="submit" value="Submit" />
</form>
</body>
</html>
The XML files web.xml and
sun-web.xml are as for the example in
the preceding section,
Section 21.3.5.2.5.1, “A Simple JSP Application with Glassfish, Connector/J and MySQL”,
no additional changes are required.
Whe compiling the Java source code, you will need to specify
the path to the file javaee.jar. On
Windows, this can be done as follows:
shell> javac -classpath c:\glassfishv3\glassfish\lib\javaee.jar HelloWebServlet.java
Once the code is correctly located within its directory structure, and compiled, the application can be deployed in Glassfish. This is done in exactly the same way as described in the preceding section, Section 21.3.5.2.5.1, “A Simple JSP Application with Glassfish, Connector/J and MySQL”.
Once deployed the application can be launched from within the Glassfish Administration Console. Enter a country name such as “England”, and the application will return “Country does not exist!”. Enter “France”, and the application will return a population of 59225700.
There are a few issues that seem to be commonly encountered often by users of MySQL Connector/J. This section deals with their symptoms, and their resolutions.
Questions
22.3.5.3.1: When I try to connect to the database with MySQL Connector/J, I get the following exception:
SQLException: Server configuration denies access to data source SQLState: 08001 VendorError: 0
What is going on? I can connect just fine with the MySQL command-line client.
22.3.5.3.2: My application throws an SQLException 'No Suitable Driver'. Why is this happening?
22.3.5.3.3: I'm trying to use MySQL Connector/J in an applet or application and I get an exception similar to:
SQLException: Cannot connect to MySQL server on host:3306. Is there a MySQL server running on the machine/port you are trying to connect to? (java.security.AccessControlException) SQLState: 08S01 VendorError: 0
22.3.5.3.4: I have a servlet/application that works fine for a day, and then stops working overnight
22.3.5.3.5: I'm trying to use JDBC-2.0 updatable result sets, and I get an exception saying my result set is not updatable.
22.3.5.3.6: I cannot connect to the MySQL server using Connector/J, and I'm sure the connection paramters are correct.
22.3.5.3.7: I am trying to connect to my MySQL server within my application, but I get the following error and stack trace:
java.net.SocketException MESSAGE: Software caused connection abort: recv failed STACKTRACE: java.net.SocketException: Software caused connection abort: recv failed at java.net.SocketInputStream.socketRead0(Native Method) at java.net.SocketInputStream.read(Unknown Source) at com.mysql.jdbc.MysqlIO.readFully(MysqlIO.java:1392) at com.mysql.jdbc.MysqlIO.readPacket(MysqlIO.java:1414) at com.mysql.jdbc.MysqlIO.doHandshake(MysqlIO.java:625) at com.mysql.jdbc.Connection.createNewIO(Connection.java:1926) at com.mysql.jdbc.Connection.<init>(Connection.java:452) at com.mysql.jdbc.NonRegisteringDriver.connect(NonRegisteringDriver.java:411)
22.3.5.3.8: My application is deployed through JBoss and I am using transactions to handle the statements on the MySQL database. Under heavy loads I am getting a error and stack trace, but these only occur after a fixed period of heavy activity.
22.3.5.3.9: When using gcj an
java.io.CharConversionExceptionis raised when working with certain character sequences.22.3.5.3.10: Updating a table that contains a primary key that is either
FLOATor compound primary key that usesFLOATfails to update the table and raises an exception.22.3.5.3.11: You get an
ER_NET_PACKET_TOO_LARGEexception, even though the binary blob size you want to insert using JDBC is safely below themax_allowed_packetsize.22.3.5.3.12: What should you do if you receive error messages similar to the following: “Communications link failure – Last packet sent to the server was X ms ago”?
22.3.5.3.13: Why does Connector/J not reconnect to MySQL and re-issue the statement after a communication failure, instead of throwing an Exception, even though I use the
autoReconnectconnection string option?
Questions and Answers
22.3.5.3.1: When I try to connect to the database with MySQL Connector/J, I get the following exception:
SQLException: Server configuration denies access to data source SQLState: 08001 VendorError: 0
What is going on? I can connect just fine with the MySQL command-line client.
MySQL Connector/J must use TCP/IP sockets to connect to MySQL, as Java does not support Unix Domain Sockets. Therefore, when MySQL Connector/J connects to MySQL, the security manager in MySQL server will use its grant tables to determine whether the connection should be permitted.
You must add the necessary security credentials to the
MySQL server for this to happen, using the
GRANT statement to your
MySQL Server. See Section 12.4.1.3, “GRANT Syntax”, for more
information.
Testing your connectivity with the
mysql command-line client will not
work unless you add the
--host flag, and use
something other than localhost for
the host. The mysql command-line
client will use Unix domain sockets if you use the
special host name localhost. If you
are testing connectivity to
localhost, use
127.0.0.1 as the host name instead.
Changing privileges and permissions improperly in MySQL can potentially cause your server installation to not have optimal security properties.
22.3.5.3.2: My application throws an SQLException 'No Suitable Driver'. Why is this happening?
There are three possible causes for this error:
The Connector/J driver is not in your
CLASSPATH, see Section 21.3.2, “Connector/J Installation”.The format of your connection URL is incorrect, or you are referencing the wrong JDBC driver.
When using DriverManager, the
jdbc.driverssystem property has not been populated with the location of the Connector/J driver.
22.3.5.3.3: I'm trying to use MySQL Connector/J in an applet or application and I get an exception similar to:
SQLException: Cannot connect to MySQL server on host:3306. Is there a MySQL server running on the machine/port you are trying to connect to? (java.security.AccessControlException) SQLState: 08S01 VendorError: 0
Either you're running an Applet, your MySQL server has been installed with the "--skip-networking" option set, or your MySQL server has a firewall sitting in front of it.
Applets can only make network connections back to the machine that runs the web server that served the .class files for the applet. This means that MySQL must run on the same machine (or you must have some sort of port re-direction) for this to work. This also means that you will not be able to test applets from your local file system, you must always deploy them to a web server.
MySQL Connector/J can only communicate with MySQL using TCP/IP, as Java does not support Unix domain sockets. TCP/IP communication with MySQL might be affected if MySQL was started with the "--skip-networking" flag, or if it is firewalled.
If MySQL has been started with the "--skip-networking"
option set (the Debian Linux package of MySQL server does
this for example), you need to comment it out in the file
/etc/mysql/my.cnf or /etc/my.cnf. Of course your my.cnf
file might also exist in the data
directory of your MySQL server, or anywhere else
(depending on how MySQL was compiled for your system).
Binaries created by us always look in /etc/my.cnf and
[datadir]/my.cnf. If your MySQL server has been
firewalled, you will need to have the firewall configured
to allow TCP/IP connections from the host where your Java
code is running to the MySQL server on the port that MySQL
is listening to (by default, 3306).
22.3.5.3.4: I have a servlet/application that works fine for a day, and then stops working overnight
MySQL closes connections after 8 hours of inactivity. You either need to use a connection pool that handles stale connections or use the "autoReconnect" parameter (see Section 21.3.4.1, “Driver/Datasource Class Names, URL Syntax and Configuration Properties for Connector/J”).
Also, you should be catching SQLExceptions in your
application and dealing with them, rather than propagating
them all the way until your application exits, this is
just good programming practice. MySQL Connector/J will set
the SQLState (see
java.sql.SQLException.getSQLState() in
your APIDOCS) to "08S01" when it encounters
network-connectivity issues during the processing of a
query. Your application code should then attempt to
re-connect to MySQL at this point.
The following (simplistic) example shows what code that can handle these exceptions might look like:
Example 21.12. Connector/J: Example of transaction with retry logic
public void doBusinessOp() throws SQLException {
Connection conn = null;
Statement stmt = null;
ResultSet rs = null;
//
// How many times do you want to retry the transaction
// (or at least _getting_ a connection)?
//
int retryCount = 5;
boolean transactionCompleted = false;
do {
try {
conn = getConnection(); // assume getting this from a
// javax.sql.DataSource, or the
// java.sql.DriverManager
conn.setAutoCommit(false);
//
// Okay, at this point, the 'retry-ability' of the
// transaction really depends on your application logic,
// whether or not you're using autocommit (in this case
// not), and whether you're using transacational storage
// engines
//
// For this example, we'll assume that it's _not_ safe
// to retry the entire transaction, so we set retry
// count to 0 at this point
//
// If you were using exclusively transaction-safe tables,
// or your application could recover from a connection going
// bad in the middle of an operation, then you would not
// touch 'retryCount' here, and just let the loop repeat
// until retryCount == 0.
//
retryCount = 0;
stmt = conn.createStatement();
String query = "SELECT foo FROM bar ORDER BY baz";
rs = stmt.executeQuery(query);
while (rs.next()) {
}
rs.close();
rs = null;
stmt.close();
stmt = null;
conn.commit();
conn.close();
conn = null;
transactionCompleted = true;
} catch (SQLException sqlEx) {
//
// The two SQL states that are 'retry-able' are 08S01
// for a communications error, and 40001 for deadlock.
//
// Only retry if the error was due to a stale connection,
// communications problem or deadlock
//
String sqlState = sqlEx.getSQLState();
if ("08S01".equals(sqlState) || "40001".equals(sqlState)) {
retryCount--;
} else {
retryCount = 0;
}
} finally {
if (rs != null) {
try {
rs.close();
} catch (SQLException sqlEx) {
// You'd probably want to log this . . .
}
}
if (stmt != null) {
try {
stmt.close();
} catch (SQLException sqlEx) {
// You'd probably want to log this as well . . .
}
}
if (conn != null) {
try {
//
// If we got here, and conn is not null, the
// transaction should be rolled back, as not
// all work has been done
try {
conn.rollback();
} finally {
conn.close();
}
} catch (SQLException sqlEx) {
//
// If we got an exception here, something
// pretty serious is going on, so we better
// pass it up the stack, rather than just
// logging it. . .
throw sqlEx;
}
}
}
} while (!transactionCompleted && (retryCount > 0));
}
Use of the autoReconnect option is not
recommended because there is no safe method of
reconnecting to the MySQL server without risking some
corruption of the connection state or database state
information. Instead, you should use a connection pool
which will enable your application to connect to the
MySQL server using an available connection from the
pool. The autoReconnect facility is
deprecated, and may be removed in a future release.
22.3.5.3.5: I'm trying to use JDBC-2.0 updatable result sets, and I get an exception saying my result set is not updatable.
Because MySQL does not have row identifiers, MySQL Connector/J can only update result sets that have come from queries on tables that have at least one primary key, the query must select every primary key and the query can only span one table (that is, no joins). This is outlined in the JDBC specification.
Note that this issue only occurs when using updatable
result sets, and is caused because Connector/J is unable
to guarantee that it can identify the correct rows within
the result set to be updated without having a unique
reference to each row. There is no requirement to have a
unique field on a table if you are using
UPDATE or
DELETE statements on a
table where you can individually specify the criteria to
be matched using a WHERE clause.
22.3.5.3.6: I cannot connect to the MySQL server using Connector/J, and I'm sure the connection paramters are correct.
Make sure that the
skip-networking option has
not been enabled on your server. Connector/J must be able
to communicate with your server over TCP/IP, named sockets
are not supported. Also ensure that you are not filtering
connections through a Firewall or other network security
system. For more information, see
Section C.5.2.2, “Can't connect to [local] MySQL server”.
22.3.5.3.7: I am trying to connect to my MySQL server within my application, but I get the following error and stack trace:
java.net.SocketException MESSAGE: Software caused connection abort: recv failed STACKTRACE: java.net.SocketException: Software caused connection abort: recv failed at java.net.SocketInputStream.socketRead0(Native Method) at java.net.SocketInputStream.read(Unknown Source) at com.mysql.jdbc.MysqlIO.readFully(MysqlIO.java:1392) at com.mysql.jdbc.MysqlIO.readPacket(MysqlIO.java:1414) at com.mysql.jdbc.MysqlIO.doHandshake(MysqlIO.java:625) at com.mysql.jdbc.Connection.createNewIO(Connection.java:1926) at com.mysql.jdbc.Connection.<init>(Connection.java:452) at com.mysql.jdbc.NonRegisteringDriver.connect(NonRegisteringDriver.java:411)
The error probably indicates that you are using a older version of the Connector/J JDBC driver (2.0.14 or 3.0.x) and you are trying to connect to a MySQL server with version 4.1x or newer. The older drivers are not compatible with 4.1 or newer of MySQL as they do not support the newer authentication mechanisms.
It is likely that the older version of the Connector/J
driver exists within your application directory or your
CLASSPATH includes the older
Connector/J package.
22.3.5.3.8: My application is deployed through JBoss and I am using transactions to handle the statements on the MySQL database. Under heavy loads I am getting a error and stack trace, but these only occur after a fixed period of heavy activity.
This is a JBoss, not Connector/J, issue and is connected to the use of transactions. Under heavy loads the time taken for transactions to complete can increase, and the error is caused because you have exceeded the predefined timeout.
You can increase the timeout value by setting the
TransactionTimeout attribute to the
TransactionManagerService within the
/conf/jboss-service.xml file
(pre-4.0.3) or
/deploy/jta-service.xml for JBoss
4.0.3 or later. See
TransactionTimeoute
within the JBoss wiki for more information.
22.3.5.3.9:
When using gcj an
java.io.CharConversionException is
raised when working with certain character sequences.
This is a known issue with gcj which
raises an exception when it reaches an unknown character
or one it cannot convert. You should add
useJvmCharsetConverters=true to your
connection string to force character conversion outside of
the gcj libraries, or try a different
JDK.
22.3.5.3.10:
Updating a table that contains a primary key that is
either FLOAT or compound
primary key that uses FLOAT
fails to update the table and raises an exception.
Connector/J adds conditions to the
WHERE clause during an
UPDATE to check the old
values of the primary key. If there is no match then
Connector/J considers this a failure condition and raises
an exception.
The problem is that rounding differences between supplied values and the values stored in the database may mean that the values never match, and hence the update fails. The issue will affect all queries, not just those from Connector/J.
To prevent this issue, use a primary key that does not use
FLOAT. If you have to use a
floating point column in your primary key use
DOUBLE or
DECIMAL types in place of
FLOAT.
22.3.5.3.11:
You get an
ER_NET_PACKET_TOO_LARGE
exception, even though the binary blob size you want to
insert using JDBC is safely below the
max_allowed_packet size.
This is because the hexEscapeBlock()
method in
com.mysql.jdbc.PreparedStatement.streamToBytes()
may almost double the size of your data.
22.3.5.3.12: What should you do if you receive error messages similar to the following: “Communications link failure – Last packet sent to the server was X ms ago”?
Generally speaking, this error suggests that the network connection has been closed. There can be several root causes:
Firewalls or routers may clamp down on idle connections (the MySQL client/server protocol does not ping).
The MySQL Server may be closing idle connections which exceed the
wait_timeoutorinteractive_timeoutthreshold.
To help troubleshoot these issues, the following tips can be used. If a recent (5.1.13+) version of Connector/J is used, you will see an improved level of information compared to earlier versions. Older versions simply display the last time a packet was sent to the server, which is frequently 0 ms ago. This is of limited use, as it may be that a packet was just sent, while a packet from the server has not been received for several hours. Knowing the period of time since Connector/J last received a packet from the server is useful information, so if this is not displayed in your exception message, it is recommended that you update Connector/J.
Further, if the time a packet was last sent/received
exceeds the wait_timeout or
interactive_timeout threshold, this is
noted in the exception message.
Although network connections can be volatile, the following can be helpful in avoiding problems:
Ensure connections are valid when used from the connection pool. Use a query that starts with
/* ping */to execute a lightweight ping instead of full query. Note, the syntax of the ping needs to be exactly as specified here.Minimize the duration a connection object is left idle while other application logic is executed.
Explicitly validate the connection before using it if the connection has been left idle for an extended period of time.
Ensure that
wait_timeoutandinteractive_timeoutare set sufficiently high.Ensure that
tcpKeepaliveis enabled.Ensure that any configurable firewall or router timeout settings allow for the maximum expected connection idle time.
Do not expect to be able to reuse a connection without problems, if it has being lying idle for a period. If a connection is to be reused after being idle for any length of time, ensure that you explicitly test it before reusing it.
22.3.5.3.13:
Why does Connector/J not reconnect to MySQL and re-issue
the statement after a communication failure, instead of
throwing an Exception, even though I use the
autoReconnect connection string option?
There are several reasons for this. The first is transactional integrity. The MySQL Reference Manual states that “there is no safe method of reconnecting to the MySQL server without risking some corruption of the connection state or database state information”. Consider the following series of statements for example:
conn.createStatement().execute( "UPDATE checking_account SET balance = balance - 1000.00 WHERE customer='Smith'"); conn.createStatement().execute( "UPDATE savings_account SET balance = balance + 1000.00 WHERE customer='Smith'"); conn.commit();
Consider the case where the connection to the server fails
after the UPDATE to
checking_account. If no exception is
thrown, and the application never learns about the
problem, it will continue executing. However, the server
did not commit the first transaction in this case, so that
will get rolled back. But execution continues with the
next transaction, and increases the
savings_account balance by 1000. The
application did not receive an exception, so it continued
regardless, eventually commiting the second transaction,
as the commit only applies to the changes made in the new
connection. Rather than a transfer taking place, a deposit
was made in this example.
Note that running with auto-commit
enabled does not solve this problem. When Connector/J
encounters a communication problem, there is no means to
determine whether the server processed the currently
executing statement or not. The following theoretical
states are equally possible:
The server never received the statement, and therefore no related processing occurred on the server.
The server received the statement, executed it in full, but the response was not received by the client.
If you are running with auto-commit
enabled, it is not possible to guarantee the state of data
on the server when a communication exception is
encountered. The statement may have reached the server, or
it may not. All you know is that communication failed at
some point, before the client received confirmation (or
data) from the server. This does not only affect
auto-commit statements though. If the
communication problem occurred during
Connection.commit(), the question
arises of whether the transaction was committed on the
server before the communication failed, or whether the
server received the commit request at all.
The second reason for the generation of exceptions is that transaction-scoped contextual data may be vulnerable, for example:
Temporary tables
User-defined variables
Server-side prepared statements
These items are lost when a connection fails, and if the connection silently reconnects without generating an exception, this could be detrimental to the correct execution of your application.
In summary, communication errors generate conditions that may well be unsafe for Connector/J to simply ignore by silently reconnecting. It is necessary for the application to be notified. It is then for the application developer to decide how to proceed in the event of connection errors and failures.
Oracle provides assistance to the user community by means of its mailing lists. For Connector/J related issues, you can get help from experienced users by using the MySQL and Java mailing list. Archives and subscription information is available online at http://lists.mysql.com/java.
For information about subscribing to MySQL mailing lists or to browse list archives, visit http://lists.mysql.com/. See Section 1.6.1, “MySQL Mailing Lists”.
Community support from experienced users is also available through the JDBC Forum. You may also find help from other users in the other MySQL Forums, located at http://forums.mysql.com. See Section 1.6.2, “MySQL Community Support at the MySQL Forums”.
The normal place to report bugs is http://bugs.mysql.com/, which is the address for our bugs database. This database is public, and can be browsed and searched by anyone. If you log in to the system, you will also be able to enter new reports.
If you have found a sensitive security bug in MySQL, you can
send email to <security@mysql.com>.
Writing a good bug report takes patience, but doing it right the first time saves time both for us and for yourself. A good bug report, containing a full test case for the bug, makes it very likely that we will fix the bug in the next release.
This section will help you write your report correctly so that you do not waste your time doing things that may not help us much or at all.
If you have a repeatable bug report, please report it to the bugs database at http://bugs.mysql.com/. Any bug that we are able to repeat has a high chance of being fixed in the next MySQL release.
To report other problems, you can use one of the MySQL mailing lists.
Remember that it is possible for us to respond to a message containing too much information, but not to one containing too little. People often omit facts because they think they know the cause of a problem and assume that some details do not matter.
A good principle is this: If you are in doubt about stating something, state it. It is faster and less troublesome to write a couple more lines in your report than to wait longer for the answer if we must ask you to provide information that was missing from the initial report.
The most common errors made in bug reports are (a) not including the version number of Connector/J or MySQL used, and (b) not fully describing the platform on which Connector/J is installed (including the JVM version, and the platform type and version number that MySQL itself is installed on).
This is highly relevant information, and in 99 cases out of 100, the bug report is useless without it. Very often we get questions like, “Why doesn't this work for me?” Then we find that the feature requested wasn't implemented in that MySQL version, or that a bug described in a report has already been fixed in newer MySQL versions.
Sometimes the error is platform-dependent; in such cases, it is next to impossible for us to fix anything without knowing the operating system and the version number of the platform.
If at all possible, you should create a repeatable, stanalone testcase that doesn't involve any third-party classes.
To streamline this process, we ship a base class for testcases
with Connector/J, named
'com.mysql.jdbc.util.BaseBugReport'. To
create a testcase for Connector/J using this class, create your
own class that inherits from
com.mysql.jdbc.util.BaseBugReport and
override the methods setUp(),
tearDown() and
runTest().
In the setUp() method, create code that
creates your tables, and populates them with any data needed to
demonstrate the bug.
In the runTest() method, create code that
demonstrates the bug using the tables and data you created in
the setUp method.
In the tearDown() method, drop any tables
you created in the setUp() method.
In any of the above three methods, you should use one of the
variants of the getConnection() method to
create a JDBC connection to MySQL:
getConnection()- Provides a connection to the JDBC URL specified ingetUrl(). If a connection already exists, that connection is returned, otherwise a new connection is created.getNewConnection()- Use this if you need to get a new connection for your bug report (that is, there is more than one connection involved).getConnection(String url)- Returns a connection using the given URL.getConnection(String url, Properties props)- Returns a connection using the given URL and properties.
If you need to use a JDBC URL that is different from
'jdbc:mysql:///test', override the method
getUrl() as well.
Use the assertTrue(boolean expression) and
assertTrue(String failureMessage, boolean
expression) methods to create conditions that must be
met in your testcase demonstrating the behavior you are
expecting (vs. the behavior you are observing, which is why you
are most likely filing a bug report).
Finally, create a main() method that
creates a new instance of your testcase, and calls the
run method:
public static void main(String[] args) throws Exception {
new MyBugReport().run();
}Once you have finished your testcase, and have verified that it demonstrates the bug you are reporting, upload it with your bug report to http://bugs.mysql.com/.
The Connector/J Change History (Changelog) is located with the main Changelog for MySQL. See Section D.6, “MySQL Connector/J Change History”.
MySQL Connector/MXJ is a Java Utility package for deploying and managing a MySQL database. Deploying and using MySQL can be as easy as adding another parameter to the JDBC connection url, which will result in the database being started when the first connection is made. This makes it easy for Java developers to deploy applications which require a database by reducing installation barriers for their end-users.
MySQL Connector/MXJ makes the MySQL database appear to be a java-based component. It does this by determining what platform the system is running on, selecting the appropriate binary, and launching the executable. It will also optionally deploy an initial database, with any specified parameters.
Included are instructions for use with a JDBC driver and deploying as a JMX MBean to JBoss.
You can download sources and binaries from: http://dev.mysql.com/downloads/connector/mxj/
This a beta release and feedback is welcome and encouraged.
Please send questions or comments to the MySQL and Java mailing list.
Connector/MXJ consists of a Java class, a copy of the
mysqld binary for a specific list of platforms,
and associated files and support utilities. The Java class
controls the initialization of an instance of the embedded
mysqld binary, and the ongoing management of
the mysqld process. The entire sequence and
management can be controlled entirely from within Java using the
Connector/MXJ Java classes. You can see an overview of the
contents of the Connector/MXJ package in the figure below.
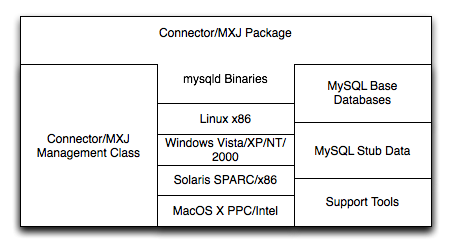
It is important to note that Connector/MXJ is not an embedded
version of MySQL, or a version of MySQL written as part of a Java
class. Connector/MXJ works through the use of an embedded,
compiled binary of mysqld as would normally be
used when deploying a standard MySQL installation.
It is the Connector/MXJ wrapper, support classes and tools, that enable Connector/MXJ to appear as a MySQL instance.
When Connector/MXJ is initialized, the corresponding
mysqld binary for the current platform is
extracted, along with a pre-configured data directed. Both are
contained within the Connector/MXJ JAR file. The
mysqld instance is then started, with any
additional options as specified during the initialization, and the
MySQL database becomes accessible.
Because Connector/MXJ works in combination with Connector/J, you can access and integrate with the MySQL instance through a JDBC connection. When you have finished with the server, the instance is terminated, and, by default, any data created during the session is retained within the temporary directory created when the instance was started.
Connector/MXJ and the embedded mysqld instance
can be deployed in a number of environments where relying on an
existing database, or installing a MySQL instance would be
impossible, including CD-ROM embedded database applications and
temporary database requirements within a Java-based application
environment.
Connector/MXJ 5.x, currently in beta status, includes
mysqld version 5.x and includes binaries for
Linux x86, Mac OS X PPC, Windows XP/NT/2000 x86 and Solaris SPARC.
Connector/MXJ 5.x requires the Connector/J 5.x package.
A summary of the different MySQL versions supplied with each Connector/MXJ release are shown in the table.
| Connector/MXJ Version | MySQL Version(s) |
|---|---|
| 5.0.11 | 5.1.40 |
| 5.0.9 | 5.0.51a (CS), 5.0.54 (ES) |
| 5.0.8 | 5.0.45 (CS), 5.0.46 (ES) |
| 5.0.7 | 5.0.41 (CS), 5.0.42 (ES) |
| 5.0.6 | 5.0.37 (CS), 5.0.40 (ES) |
| 5.0.5 | 5.0.37 (CS), 5.0.36 (ES) |
| 5.0.4 | 5.0.27 (CS), 5.0.32 (ES) |
| 5.0.3 | 5.0.22 |
| 5.0.2 | 5.0.19 |
This guide provides information on the Connector/MXJ 5.x release. For information on using the older releases, please see the documentation included with the appropriate distribution.
Connector/MXJ does not have a installation application or process, but there are some steps you can follow to make the installation and deployment of Connector/MXJ easier.
Before you start, there are some baseline requirements for
Java Runtime Environment (v1.4.0 or newer) if you are only going to deploy the package.
Java Development Kit (v1.4.0 or newer) if you want to build Connector/MXJ from source.
Connector/J 5.0 or newer.
Depending on your target installation/deployment environment you may also require:
JBoss - 4.0rc1 or newer
Apache Tomcat - 5.0 or newer
Sun's JMX reference implementation version 1.2.1 (from http://java.sun.com/products/JavaManagement/)
Connector/MXJ is compatible with any platform supporting Java
and MySQL. By default, Connector/MXJ incorporates the
mysqld binary for a select number of
platforms which differs by version. The following platforms have
been tested and working as deployment platforms. Support for all
the platforms listed below is not included by default.
Linux (i386)
FreeBSD (i386)
Windows NT (x86), Windows 2000 (x86), Windows XP (x86), Windows Vista (x86)
Solaris 8, SPARC 32-bit (compatible with Solaris 8, Solaris 9 and Solaris 10 on SPARC 32-bit and 64-bit platforms)
Mac OS X (PowerPC and Intel)
The Connector/MXJ 5.0.8 release includes mysqld binaries for the following platforms:
Linux (i386)
Windows (x86), compatible with Windows NT, Windows 2000, Windows XP , Windows Vista
Solaris 8, SPARC 32-bit (compatible with Solaris 8, Solaris 9 and Solaris 10 on SPARC 32-bit and 64-bit platforms)
Mac OS X (PowerPC and Intel)
For more information on packaging your own Connector/MXJ with the platforms you require, see Section 21.4.6.1, “Creating your own Connector/MXJ Package”
Because there is no formal installation process, the method, installation directory, and access methods you use for Connector/MXJ are entirely up to your individual requirements.
To perform a basic installation, choose a target directory for
the files included in the Connector/MXJ package. On Unix/Linux
systems you may opt to use a directory such as
/usr/local/connector-mxj; On Windows, you
may want to install the files in the base directory,
C:\Connector-MXJ, or within the
Program Files directory.
To install the files, for a Connector/MXJ 5.0.4 installation:
Download the Connector/MXJ package, either in Tar/Gzip format (ideal for Unix/Linux systems) or Zip format (Windows).
Extract the files from the package. This will create a directory
mysql-connector-mxj-gpl-[ver]. Copy and optionally rename this directory to your desired location.For best results, you should update your global
CLASSPATHvariable with the location of the requiredjarfiles.Within Unix/Linux you can do this globally by editing the global shell profile, or on a user by user basis by editing their individual shell profile.
On Windows 2000, Windows NT and Windows XP, you can edit the global
CLASSPATHby editing theEnvironment Variablesconfigured through theSystemcontrol panel.
For Connector/MXJ 5.0.6 and later you need the following JAR
files in your CLASSPATH:
mysql-connector-mxj-gpl-[ver].jar: contains the main Connector/MXJ classes.mysql-connector-mxj-gpl-[ver]-db-files.jar: contains the embeddedmysqldand database files.aspectjrt.jar: the AspectJ runtime library, located inlib/aspectjrt.jarin the Connector/MXJ package.mysql-connector-java-[ver]-bin.jar: Connector/J, see Section 21.3, “MySQL Connector/J”.
For Connector/MXJ 5.0.4 and later you need the following JAR
files in your CLASSPATH:
connector-mxj.jar: contains the main Connector/MXJ classes.connector-mxj-db-files.jar: contains the embeddedmysqldand database files.aspectjrt.jar: the AspectJ runtime library, located inlib/aspectjrt.jarin the Connector/MXJ package.mysql-connector-mxj-gpl-[ver].jar: Connector/J, see Section 21.3, “MySQL Connector/J”.
For Connector/MXJ 5.0.3 and earlier, you need the following JAR files:
connector-mxj.jaraspectjrt.jar: the AspectJ runtime library, located inlib/aspectjrt.jarin the Connector/MXJ package.mysql-connector-mxj-gpl-[ver].jar: Connector/J, see Section 21.3, “MySQL Connector/J”.
Once you have extracted the Connector/MXJ and Connector/J
components you can run one of the sample applications that
initiates a MySQL instance. You can test the installation by
running the ConnectorMXJUrlTestExample:
shell> java ConnectorMXJUrlTestExample
jdbc:mysql:mxj://localhost:3336/our_test_app?server.basedir»
=/var/tmp/test-mxj&createDatabaseIfNotExist=true&server.initialize-user=true
[/var/tmp/test-mxj/bin/mysqld][--no-defaults][--port=3336][--socket=mysql.sock]»
[--basedir=/var/tmp/test-mxj][--datadir=/var/tmp/test-mxj/data]»
[--pid-file=/var/tmp/test-mxj/data/MysqldResource.pid]
[MysqldResource] launching mysqld (driver_launched_mysqld_1)
InnoDB: The first specified data file ./ibdata1 did not exist:
InnoDB: a new database to be created!
080220 9:40:20 InnoDB: Setting file ./ibdata1 size to 10 MB
InnoDB: Database physically writes the file full: wait...
080220 9:40:20 InnoDB: Log file ./ib_logfile0 did not exist: new to be created
InnoDB: Setting log file ./ib_logfile0 size to 5 MB
InnoDB: Database physically writes the file full: wait...
080220 9:40:20 InnoDB: Log file ./ib_logfile1 did not exist: new to be created
InnoDB: Setting log file ./ib_logfile1 size to 5 MB
InnoDB: Database physically writes the file full: wait...
InnoDB: Doublewrite buffer not found: creating new
InnoDB: Doublewrite buffer created
InnoDB: Creating foreign key constraint system tables
InnoDB: Foreign key constraint system tables created
080220 9:40:21 InnoDB: Started; log sequence number 0 0
080220 9:40:21 [Note] /var/tmp/test-mxj/bin/mysqld: ready for connections.
Version: '5.0.51a' socket: 'mysql.sock' port: 3336 MySQL Community Server (GPL)
[MysqldResource] mysqld running as process: 2238
------------------------
SELECT VERSION()
------------------------
5.0.51a
------------------------
[MysqldResource] stopping mysqld (process: 2238)
080220 9:40:27 [Note] /var/tmp/test-mxj/bin/mysqld: Normal shutdown
080220 9:40:27 InnoDB: Starting shutdown...
080220 9:40:29 InnoDB: Shutdown completed; log sequence number 0 43655
080220 9:40:29 [Note] /var/tmp/test-mxj/bin/mysqld: Shutdown complete
[MysqldResource] shutdown completeThe above output shows an instance of MySQL starting, the necessary files being created (log files, InnoDB data files) and the MySQL database entering the running state. The instance is then shutdown by Connector/MXJ before the example terminates.
You should avoid running your Connector/MXJ application as the
root user, because this will cause the
mysqld to also be executed with root
privileges. For more information, see
Section 5.3.6, “How to Run MySQL as a Normal User”.
Connector/MXJ and Connector/J work together to enable you to
launch an instance of the mysqld server
through the use of a keyword in the JDBC connection string.
Deploying Connector/MXJ within a Java application can be
automated through this method, making the deployment of
Connector/MXJ a simple process:
Download and unzip Connector/MXJ, add
mysql-connector-mxj-gpl-[ver].jarto theCLASSPATH.If you are using Connector/MXJ v5.0.4 or later you will also need to add the
mysql-connector-mxj-gpl-[ver]-db-files.jarfile to yourCLASSPATH.To the JDBC connection string, embed the
mxjkeyword, for example:jdbc:mysql:mxj://localhost:.PORT/DBNAME
For more details, see Section 21.4.4, “Connector/MXJ Configuration”.
For deployment of Connector/MXJ within a JBoss environment, you must configure the JBoss environment to use the Connector/MXJ component within the JDBC parameters:
Download Connector/MXJ and copy the
mysql-connector-mxj-gpl-[ver].jarfile to the$JBOSS_HOME/server/default/libdirectory.If you are using Connector/MXJ v5.0.4 or later you will also need to copy the
mysql-connector-mxj-gpl-[ver]-db-files.jarfile to$JBOSS_HOME/server/default/lib.Download Connector/J and copy the
mysql-connector-java-file to the5.1.5-bin.jar$JBOSS_HOME/server/default/libdirectory.Create an MBean service xml file in the
$JBOSS_HOME/server/default/deploydirectory with any attributes set, for instance thedatadirandautostart.Set the JDBC parameters of your web application to use:
String driver = "com.mysql.jdbc.Driver"; String url = "jdbc:mysql:///test?propertiesTransform="+ "com.mysql.management.jmx.ConnectorMXJPropertiesTransform"; String user = "root"; String password = ""; Class.forName(driver); Connection conn = DriverManager.getConnection(url, user, password);
You may wish to create a separate users and database table spaces for each application, rather than using "root and test".
We highly suggest having a routine backup procedure for backing
up the database files in the
datadir.
The best way to ensure that your platform is supported is to run the JUnit tests. These will test the Connector/MXJ classes and the associated components.
The first thing to do is make sure that the components will
work on the platform. The
MysqldResource class is really a
wrapper for a native version of MySQL, so not all platforms
are supported. At the time of this writing, Linux on the i386
architecture has been tested and seems to work quite well, as
does OS X v10.3. There has been limited testing on Windows and
Solaris.
Requirements:
JDK-1.4 or newer (or the JRE if you aren't going to be compiling the source or JSPs).
MySQL Connector/J version 5.0 or newer (from http://dev.mysql.com/downloads/connector/j/) installed and available using your CLASSPATH.
The
javax.managementclasses for JMX version 1.2.1, these are present in the following application servers:JBoss - 4.0rc1 or newer.
Apache Tomcat - 5.0 or newer.
Sun's JMX reference implementation version 1.2.1 (from http://java.sun.com/products/JavaManagement/).
JUnit 3.8.1 (from http://www.junit.org/).
If building from source, All of the requirements from above, plus:
Ant version 1.5 or newer (download from http://ant.apache.org/).
The tests attempt to launch MySQL on the port 3336. If you have a MySQL running, it may conflict, but this isn't very likely because the default port for MySQL is 3306. However, You may set the "c-mxj_test_port" Java property to a port of your choosing. Alternatively, you may wish to start by shutting down any instances of MySQL you have running on the target machine.
The tests suppress output to the console by default. For verbose output, you may set the "c-mxj_test_silent" Java property to "false".
To run the JUnit test suite, the $CLASSPATH must include the following:
JUnit
JMX
Connector/J
MySQL Connector/MXJ
If
connector-mxj.jaris not present in your download, unzip MySQL Connector/MXJ source archive.cd mysqldjmx ant distThen add
$TEMP/cmxj/stage/connector-mxj/connector-mxj.jarto the CLASSPATH.If you have
junit, execute the unit tests. From the command line, type:java com.mysql.management.AllTestsSuiteThe output should look something like this:
......................................... ......................................... .......... Time: 259.438 OK (101 tests)
Note that the tests are a bit slow near the end, so please be patient.
A feature of the MySQL Connector/J JDBC driver is the ability to specify a connection to an embedded Connector/MXJ instance through the use of the mxj keyword in the JDBC connection string.
In the following example, we have a program which creates a connection, executes a query, and prints the result to the System.out. The MySQL database will be deployed and started as part of the connection process, and shutdown as part of the finally block.
You can find this file in the Connector/MXJ package as
src/ConnectorMXJUrlTestExample.java.
import java.io.File;
import java.sql.Connection;
import java.sql.DriverManager;
import com.mysql.management.driverlaunched.ServerLauncherSocketFactory;
import com.mysql.management.util.QueryUtil;
public class ConnectorMXJUrlTestExample {
public static String DRIVER = "com.mysql.jdbc.Driver";
public static String JAVA_IO_TMPDIR = "java.io.tmpdir";
public static void main(String[] args) throws Exception {
File ourAppDir = new File(System.getProperty(JAVA_IO_TMPDIR));
File databaseDir = new File(ourAppDir, "test-mxj");
int port = Integer.parseInt(System.getProperty("c-mxj_test_port", "3336"));
String dbName = "our_test_app";
String url = "jdbc:mysql:mxj://localhost:" + port + "/" + dbName //
+ "?" + "server.basedir=" + databaseDir //
+ "&" + "createDatabaseIfNotExist=true"//
+ "&" + "server.initialize-user=true" //
;
System.out.println(url);
String userName = "alice";
String password = "q93uti0opwhkd";
Class.forName(DRIVER);
Connection conn = null;
try {
conn = DriverManager.getConnection(url, userName, password);
String sql = "SELECT VERSION()";
String queryForString = new QueryUtil(conn).queryForString(sql);
System.out.println("------------------------");
System.out.println(sql);
System.out.println("------------------------");
System.out.println(queryForString);
System.out.println("------------------------");
System.out.flush();
Thread.sleep(100); // wait for System.out to finish flush
} finally {
try {
if (conn != null)
conn.close();
} catch (Exception e) {
e.printStackTrace();
}
ServerLauncherSocketFactory.shutdown(databaseDir, null);
}
}
}To run the above program, be sure to have connector-mxj.jar and Connector/J in the CLASSPATH. Then type:
java ConnectorMXJUrlTestExample
If you have a java application and wish to “embed”
a MySQL database, make use of the
com.mysql.management.MysqldResource class
directly. This class may be instantiated with the default (no
argument) constructor, or by passing in a java.io.File object
representing the directory you wish the server to be "unzipped"
into. It may also be instantiated with printstreams for "stdout"
and "stderr" for logging.
Once instantiated, a java.util.Map, the
object will be able to provide a
java.util.Map of server options appropriate
for the platform and version of MySQL which you will be using.
The MysqldResource enables you to "start"
MySQL with a java.util.Map of server options
which you provide, as well as "shutdown" the database. The
following example shows a simplistic way to embed MySQL in an
application using plain java objects.
You can find this file in the Connector/MXJ package as
src/ConnectorMXJObjectTestExample.java.
import java.io.File;
import java.sql.Connection;
import java.sql.DriverManager;
import java.util.HashMap;
import java.util.Map;
import com.mysql.management.MysqldResource;
import com.mysql.management.MysqldResourceI;
import com.mysql.management.util.QueryUtil;
public class ConnectorMXJObjectTestExample {
public static final String DRIVER = "com.mysql.jdbc.Driver";
public static final String JAVA_IO_TMPDIR = "java.io.tmpdir";
public static void main(String[] args) throws Exception {
File ourAppDir = new File(System.getProperty(JAVA_IO_TMPDIR));
File databaseDir = new File(ourAppDir, "mysql-mxj");
int port = Integer.parseInt(System.getProperty("c-mxj_test_port",
"3336"));
String userName = "alice";
String password = "q93uti0opwhkd";
MysqldResource mysqldResource = startDatabase(databaseDir, port,
userName, password);
Class.forName(DRIVER);
Connection conn = null;
try {
String dbName = "our_test_app";
String url = "jdbc:mysql://localhost:" + port + "/" + dbName //
+ "?" + "createDatabaseIfNotExist=true"//
;
conn = DriverManager.getConnection(url, userName, password);
String sql = "SELECT VERSION()";
String queryForString = new QueryUtil(conn).queryForString(sql);
System.out.println("------------------------");
System.out.println(sql);
System.out.println("------------------------");
System.out.println(queryForString);
System.out.println("------------------------");
System.out.flush();
Thread.sleep(100); // wait for System.out to finish flush
} finally {
try {
if (conn != null) {
conn.close();
}
} catch (Exception e) {
e.printStackTrace();
}
try {
mysqldResource.shutdown();
} catch (Exception e) {
e.printStackTrace();
}
}
}
public static MysqldResource startDatabase(File databaseDir, int port,
String userName, String password) {
MysqldResource mysqldResource = new MysqldResource(databaseDir);
Map database_options = new HashMap();
database_options.put(MysqldResourceI.PORT, Integer.toString(port));
database_options.put(MysqldResourceI.INITIALIZE_USER, "true");
database_options.put(MysqldResourceI.INITIALIZE_USER_NAME, userName);
database_options.put(MysqldResourceI.INITIALIZE_PASSWORD, password);
mysqldResource.start("test-mysqld-thread", database_options);
if (!mysqldResource.isRunning()) {
throw new RuntimeException("MySQL did not start.");
}
System.out.println("MySQL is running.");
return mysqldResource;
}
}
Of course there are many options we may wish to set for a MySQL
database. These options may be specified as part of the JDBC
connection string simply by prefixing each server option with
server.. In the following example we set two
driver parameters and two server parameters:
String url = "jdbc:mysql://" + hostColonPort + "/"
+ "?"
+ "cacheServerConfiguration=true"
+ "&"
+ "useLocalSessionState=true"
+ "&"
+ "server.basedir=/opt/myapp/db"
+ "&"
+ "server.datadir=/mnt/bigdisk/myapp/data";
Starting with Connector/MXJ 5.0.6 you can use the
initialize-user property to a connection
string. If set to true, the default anonymous and root users
will be removed and the user/password combination from the
connection URL will be used to create a new user. For example:
String url = "jdbc:mysql:mxj://localhost:" + port
+ "/alice_db"
+ "?server.datadir=" + dataDir.getPath()
+ "&server.initialize-user=true"
+ "&createDatabaseIfNotExist=true"
;
The following sections include detailed information on the different API interfaces to Connector/MXJ.
The MysqldResource class supports three
different constructor forms:
public MysqldResource(File baseDir, File dataDir, String mysqlVersionString, PrintStream out, PrintStream err)Enables you to set the base directory, data directory, select a server by its version string, standard out and standard error.
public MysqldResource(File baseDir, File dataDir, String mysqlVersionString)Enables you to set the base directory, data directory and select a server by its version string. Output for standard out and standard err are directed to System.out and System.err.
public MysqldResource(File baseDir, File dataDir)Enables you to set the base directory and data directory. The default MySQL version is selected, and output for standard out and standard err are directed to System.out and System.err.
public MysqldResource(File baseDir);Enables the setting of the "basedir" to deploy the MySQL files to. Output for standard out and standard err are directed to System.out and System.err.
public MysqldResource();The basedir is defaulted to a subdirectory of the java.io.tempdir. Output for standard out and standard err are directed to System.out and System.err;
MysqldResource API includes the following methods:
void start(String threadName, Map mysqldArgs);Deploys and starts MySQL. The "threadName" string is used to name the thread which actually performs the execution of the MySQL command line. The map is the set of arguments and their values to be passed to the command line.
void shutdown();Shuts down the MySQL instance managed by the MysqldResource object.
Map getServerOptions();Returns a map of all the options and their current (or default, if not running) options available for the MySQL database.
boolean isRunning();Returns true if the MySQL database is running.
boolean isReadyForConnections();Returns true once the database reports that is ready for connections.
void setKillDelay(int millis);The default “Kill Delay” is 30 seconds. This represents the amount of time to wait between the initial request to shutdown and issuing a “force kill” if the database has not shutdown by itself.
void addCompletionListenser(Runnable listener);Enables applications to be notified when the server process completes. Each “listener” will be fired off in its own thread.
String getVersion();Returns the version of MySQL.
void setVersion(int MajorVersion, int minorVersion, int patchLevel);The standard distribution comes with only one version of MySQL packaged. However, it is possible to package multiple versions, and specify which version to use.
This section contains notes and tips on using the Connector/MXJ component within your applications.
If you want to create a custom Connector/MXJ package that
includes a specific mysqld version or
platform then you must extract and rebuild the
mysql-connector-mxj.jar (Connector/MXJ
v5.0.3 or earlier) or
mysql-connector-mxj-gpl-[ver]-db-files.jar
(Connector/MXJ v5.0.4 or later) file.
First, you should create a new directory into which you can
extract the current connector-mxj.jar:
shell> mkdir custom-mxj shell> cd custom-mxj shell> jar -xf connector-mxj.jar shell> ls 5-0-22/ ConnectorMXJObjectTestExample.class ConnectorMXJUrlTestExample.class META-INF/ TestDb.class com/ kill.exe
If you are using Connector/MXJ v5.0.4 or later, you should
unpack the connector-mxj-db-files.jar:
shell> mkdir custom-mxj shell> cd custom-mxj shell> jar -xf connector-mxj-db-files.jar shell> ls 5-0-51a/ META-INF/ connector-mxj.properties
The MySQL version directory, 5-0-22 or
5-0-51a in the preceding examples, contains
all of the files used to create an instance of MySQL when
Connector/MXJ is executed. All of the files in this directory
are required for each version of MySQL that you want to embed.
Note as well the format of the version number, which uses
hyphens instead of periods to separate the version number
components.
Within the version specific directory are the platform specific
directories, and archives of the data and
share directory required by MySQL for the
various platforms. For example, here is the listing for the
default Connector/MXJ package:
shell>> ls Linux-i386/ META-INF/ Mac_OS_X-ppc/ SunOS-sparc/ Win-x86/ com/ data_dir.jar share_dir.jar win_share_dir.jar
Platform specific directories are listed by their OS and
platform - for example the mysqld for Mac OS
X PowerPC is located within the
Mac_OS_X-ppc directory. You can delete
directories from this location that you do not require, and add
new directories for additional platforms that you want to
support.
To add a platform specific mysqld, create a
new directory with the corresponding name for your operating
system/platform. For example, you could add a directory for Mac
OS X/Intel using the directory
Mac_OS_X-i386.
On Unix systems, you can determine the platform using
uname:
shell> uname -p i386
In Connector/MXJ v5.0.9 and later, an additional
platform-map.properties file is used to
associate a specific platform and operating system combination
with the directory in which the mysqld for
that combination is located. The determined operating system and
platform are on the left, and the directory name where the
appropriate mysqld is located is on the right. You can see a
sample of the file below:
Linux-i386=Linux-i386
Linux-x86=Linux-i386
Linux-i686=Linux-i386
Linux-x86_64=Linux-i386
Linux-ia64=Linux-i386
#Linux-ppc=Linux-ppc
#Linux-ppc64=Linux-ppc
Mac_OS_X-i386=Mac_OS_X-i386
Mac_OS_X-ppc=Mac_OS_X-ppc
Rhapsody-PowerPC=Mac_OS_X-ppc
#Mac_OS-PowerPC=
#macos-PowerPC=
#MacOS-PowerPC=
SunOS-sparc=SunOS-sparc
Solaris-sparc=SunOS-sparc
SunOS-x86=SunOS-x86
Solaris-x86=SunOS-x86
FreeBSD-x86=FreeBSD-x86
Windows_Vista-x86=Win-x86
Windows_2003-x86=Win-x86
Windows_XP-x86=Win-x86
Windows_2000-x86=Win-x86
Windows_NT-x86=Win-x86
Windows_NT_(unknown)-x86=Win-x86
Now you need to download or compile mysqld
for the MySQL version and platform you want to include in your
custom connector-mxj.jar package into the
new directory.
Create a file called version.txt in the
OS/platform directory you have just created that contains the
version string/path of the mysqld binary. For example:
mysql-5.0.22-osx10.3-i386/bin/mysqld
You can now recreate the connector-mxj.jar
file with the added mysqld:
shell> cd custom-mxj shell> jar -cf ../connector-mxj.jar *
For Connector/MXJ v5.0.4 and later, you should repackage to the
connector-mxj-db-files.jar:
shell> cd custom-mxj shell> jar -cf ../mysql-connector-mxj-gpl-[ver]-db-files.jar *
You should test this package using the steps outlined in Section 21.4.3.3, “Connector/MXJ Quick Start Guide”.
Because the
mysql-connector-mxj-gpl-[ver]-db-files.jar
file is separate from the main Connector/MXJ classes you can
distribute different
mysql-connector-mxj-gpl-[ver]-db-files.jar
files to different hosts or for different projects without
having to create a completely new main
mysql-connector-mxj-gpl-[ver].jar file
for each one.
To include a pre-configured/populated database within your
Connector/MXJ JAR file you must create a custom
data_dir.jar file, as included within the
main connector-mxj.jar (Connector/MXJ 5.0.3
or earlier) or
mysql-connector-mxj-gpl-[ver]-db-files.jar
(Connector/MXJ 5.0.4 or later) file:
First extract the
connector-mxj.jarormysql-connector-gpl-[ver]-db-files.jarfile, as outlined in the previous section (see Section 21.4.6.1, “Creating your own Connector/MXJ Package”).First, create your database and populate the database with the information you require in an existing instance of MySQL - including Connector/MXJ instances. Data file formats are compatible across platforms.
Shutdown the instance of MySQL.
Create a JAR file of the data directory and databases that you want to include your Connector/MXJ package. You should include the
mysqldatabase, which includes user authentication information, in addition to the specific databases you want to include. For example, to create a JAR of themysqlandmxjtestdatabases:shell> jar -cf ../data_dir.jar mysql mxjtest
For Connector/MXJ 5.0.3 or earlier, copy the
data_dir.jarfile into the extractedconnector-mxj.jardirectory, and then create an archive forconnector-mxj.jar.For Connector/MXJ 5.0.4 or later, copy the
data_dir.jarfile into the extractedmysql-connector-mxj-gpl-[ver]-db-files.jardirectory, and then create an archive formysql-connector-mxj-db-gpl-[ver]--files.jar.
Note that if you are create databases using the InnoDB engine,
you must include the ibdata.* and
ib_logfile* files within the
data_dir.jar archive.
As a JMX MBean, MySQL Connector/MXJ requires a JMX v1.2 compliant MBean container, such as JBoss version 4. The MBean will uses the standard JMX management APIs to present (and allow the setting of) parameters which are appropriate for that platform.
If you are not using the SUN Reference implementation of the JMX libraries, you should skip this section. Or, if you are deploying to JBoss, you also may wish to skip to the next section.
We want to see the MysqldDynamicMBean in action inside of a JMX
agent. In the com.mysql.management.jmx.sunri
package is a custom JMX agent with two MBeans:
The MysqldDynamicMBean, and
A com.sun.jdmk.comm.HtmlAdaptorServer, which provides a web interface for manipulating the beans inside of a JMX agent.
When this very simple agent is started, it will allow a MySQL database to be started and stopped with a web browser.
Complete the testing of the platform as above.
Current JDK, JUnit, Connector/J, MySQL Connector/MXJ
This section requires the SUN reference implementation of JMX
PATH,JAVA_HOME,ANT_HOME,CLASSPATH
If not building from source, skip to next step
Rebuild with the "sunri.present"
ant -Dsunri.present=true dist re-run tests: java junit.textui.TestRunner com.mysql.management.AllTestsSuite
Launch the test agent from the command line:
java com.mysql.management.jmx.sunri.MysqldTestAgentSunHtmlAdaptor &From a browser:
http://localhost:9092/Under MysqldAgent,
select "name=mysqld"Observe the MBean View
Scroll to the bottom of the screen press the button
Click
Back to MBean ViewScroll to the bottom of the screen press button
Kill the java process running the Test Agent (jmx server)
Once there is confidence that the MBean will function on the platform, deploying the MBean inside of a standard JMX Agent is the next step. Included are instructions for deploying to JBoss.
Ensure a current version of java development kit (v1.4.x), see above.
Ensure
JAVA_HOMEis set (JBoss requiresJAVA_HOME)Ensure
JAVA_HOME/binis in thePATH(You will NOT need to set your CLASSPATH, nor will you need any of the jars used in the previous tests).
Ensure a current version of JBoss (v4.0RC1 or better)
http://www.jboss.org/index.html select "Downloads" select "jboss-4.0.zip" pick a mirror unzip ~/dload/jboss-4.0.zip create a JBOSS_HOME environment variable set to the unzipped directory unix only: cd $JBOSS_HOME/bin chmod +x *.sh
Deploy (copy) the
connector-mxj.jarto$JBOSS_HOME/server/default/lib.Deploy (copy)
mysql-connector-java-3.1.4-beta-bin.jarto$JBOSS_HOME/server/default/lib.Create a
mxjtest.wardirectory in$JBOSS_HOME/server/default/deploy.Deploy (copy)
index.jspto$JBOSS_HOME/server/default/deploy/mxjtest.war.Create a
mysqld-service.xmlfile in$JBOSS_HOME/server/default/deploy.<?xml version="1.0" encoding="UTF-8"?> <server> <mbean code="com.mysql.management.jmx.jboss.JBossMysqldDynamicMBean" name="mysql:type=service,name=mysqld"> <attribute name="datadir">/tmp/xxx_data_xxx</attribute> <attribute name="autostart">true</attribute> </mbean> </server>Start jboss:
On unix: $JBOSS_HOME/bin/run.sh
On windows: %JBOSS_HOME%\bin\run.bat
Be ready: JBoss sends a lot of output to the screen.
When JBoss seems to have stopped sending output to the screen, open a web browser to:
http://localhost:8080/jmx-consoleScroll down to the bottom of the page in the
mysqlsection, select the bulletedmysqldlink.Observe the JMX MBean View page. MySQL should already be running.
(If "autostart=true" was set, you may skip this step.) Scroll to the bottom of the screen. You may press the button to stop (or start) MySQL observe
Operation completed successfully without a return value.ClickBack to MBean ViewTo confirm MySQL is running, open a web browser to
http://localhost:8080/mxjtest/and you should see thatSELECT 1
returned with a result of
1
Guided by the
$JBOSS_HOME/server/default/deploy/mxjtest.war/index.jspyou will be able to use MySQL in your Web Application. There is atestdatabase and arootuser (no password) ready to experiment with. Try creating a table, inserting some rows, and doing some selects.Shut down MySQL. MySQL will be stopped automatically when JBoss is stopped, or: from the browser, scroll down to the bottom of the MBean View press the stop service button to halt the service. Observe
Operation completed successfully without a return value.Usingpsortask managersee that MySQL is no longer running
As of 1.0.6-beta version is the ability to have the MBean start the MySQL database upon start up. Also, we've taken advantage of the JBoss life-cycle extension methods so that the database will gracefully shut down when JBoss is shutdown.
This section contains some sample applications using Connector/MXJ.
The following web application was provided by Pavan Venkatesh as
an example of a JSP based application using Connector/MXJ to
provide contact data. The example consists of two components,
insertdata.jsp and
response.jsp. The
insertdata.jsp provides a form into which
you can enter information to be stored within the MySQL database
provided by Connector/MXJ. The response.jsp
file is called when you submit the form and then provides a
table of the data.
Because the data is stored through Connector/MXJ the instantiation of the MySQL database is handled dynamically on the fly, making the script lightweight and self-contained.
Example 21.13. insertdata.jsp
<%@page contentType="text/html" pageEncoding="UTF-8"%>
<!DOCTYPE HTML PUBLIC "-//W3C//DTD HTML 4.01 Transitional//EN"
"http://www.w3.org/TR/html4/loose.dtd">
<%@ page import="java.sql.*"%>
<%@ page import="java.io.*"%>
<%@ page import="java.io.*"%>
<%@ page import="java.sql.*"%>
<HTML>
<HEAD>
<TITLE>insert data</TITLE>
<script language="Javascript">
function validFields(){
if (document.form2.ID.value == "" || document.form2.ID.value == null){
alert ( "Please enter ID / Field cannot be left blank" );
return false;
}
if (document.form2.names.value == "" || document.form2.names.value == null){
alert ( "Please enter Name / Field cannot be left blank" );
return false;
}
if (document.form2.place.value == ""|| document.form2.place.value == null){
alert ( "Please enter Place / Field cannot be left blank" );
return false;
}
if (document.form2.phone.value == ""|| document.form2.phone.value == null){
alert ( "Please enter Phone number / Field cannot be left blank" );
return false;
}
return true;
}
</script>
</HEAD>
<BODY bgcolor="#ffffcc">
<H1>Welcome to MySQL world</H1>
<H2>MySQL with MXJ Connection</H2>
<P>Insert data in existing "contactdetails2009" table under
"Directory" database</P>
<FORM action="response.jsp" method="get" name="form2">
<TABLE style="background-color: #ECE5B6;" WIDTH="30%">
<TR>
<TH width="50%">
<center>ID</center>
</TH>
<TD width="50%"><INPUT TYPE="text" NAME="ID"></TD>
</TR>
<TR>
<TH width="50%">
<center>Name</center>
</TH>
<TD width="50%"><INPUT TYPE="text" NAME="names"></TD>
</TR>
<TR>
<TH width="50%">
<center>City</center>
</TH>
<TD width="50%"><INPUT TYPE="text" NAME="place"></TD>
</TR>
<TR>
<TH width="50%">
<center>Phone</center>
</TH>
<TD width="50%"><INPUT TYPE="text" NAME="phone"></TD>
</TR>
<TR>
<TH></TH>
<TD width="50%"><INPUT TYPE="submit" VALUE="Insert"
OnClick="return validFields();"></TD>
</TR>
</TABLE>
</FORM>
</BODY>
Example 21.14. response.jsp
<%@ page import="java.sql.*"%>
<%@ page import="java.sql.*"%>
<%@ page import="java.io.*"%>
<%@ page import="java.io.*"%>
<%@ page import="java.sql.*"%>
<%@ page import="java.sql.Connection"%>
<%@ page import="java.sql.DriverManager"%>
<%@ page language="java"%>
<%@ page import=" com.mysql.management.util.QueryUtil"%>
<%@page contentType="text/html" pageEncoding="UTF-8"%>
<!DOCTYPE HTML PUBLIC "-//W3C//DTD HTML 4.01 Transitional//EN"
"http://www.w3.org/TR/html4/loose.dtd">
<HTML>
<HEAD>
<META http-equiv="Content-Type" content="text/html; charset=UTF-8">
<TITLE>JSP Page</TITLE>
</HEAD>
<BODY bgcolor="#ffffcc">
<P><INPUT type=button value="Back" onCLick="history.back()"></P>
<H1>Welcome to Directory Database</H1>
<%
String ID = request.getParameter("ID");
String name = request.getParameter("names");
String city = request.getParameter("place");
String phone = request.getParameter("phone");
File ourAppDir1 = new File("/tmp/src");
File databaseDir1 = new File(ourAppDir1,"database");
int port = 4336;
String dbName = "Directory";
try
{
String url = "jdbc:mysql:mxj://localhost:" + port + "/" + dbName //
+ "?" + "server.basedir=" + databaseDir1 //
+ "&" + "createDatabaseIfNotExist=true"//
+ "&" + "server.initialize-user=true" //
;
Connection connection = null;
int updateQuery=0;
Class.forName("com.mysql.jdbc.Driver").newInstance();
String userName = "alice";
String password = "q93uti0opwhkd";
connection = DriverManager.getConnection(url, userName, password);
PreparedStatement pstatement = null;
String sql = "SELECT VERSION()";
String queryForString = new QueryUtil(connection).queryForString(sql);
String command = "INSERT INTO contactdetails2009 (ID, name,city,phone) VALUES (?,?,?,?)";
pstatement = connection.prepareStatement(command);
pstatement.setString(1, ID);
pstatement.setString(2, name);
pstatement.setString(3, city);
pstatement.setString(4, phone);
updateQuery = pstatement.executeUpdate();
ResultSet resultset = pstatement.executeQuery("select * from contactdetails2009");
if (updateQuery != 0) { %>
<P>MySQL Version------------> <% out.println(queryForString); %>
</P>
<TABLE style="background-color: #ECE5B6;" WIDTH="50%">
<TR>
<TH style="text-align: center;">Data successfully inserted into
MySQL database using MXJ connection</TH>
</TR>
<TR>
<th style="text-align: center;">Storage Engine used is MyISAM</th>
</TR>
<TR>
<TD>
<H2>ContactDetails2009 Table</H2>
<TABLE cellpadding="10" border="1" style="background-color: #ffffcc;">
<TR>
<TH>ID</TH>
<TH>name</TH>
<TH>city</TH>
<TH>phone</TH>
</TR>
<%
while(resultset.next()){
%>
<TR>
<TD><%= resultset.getString(1) %></TD>
<TD><%= resultset.getString(2) %></TD>
<TD><%= resultset.getString(3) %></TD>
<TD><%= resultset.getString(4) %></TD>
</TR>
<%
} %>
<%
resultset.close();
pstatement.close();
connection.close();
}
}
catch (Exception e) {
%>
<TR>
<TD>ERROR------------> <%
out.println("ID or Row already exist");
}
%>
</TD>
</TR>
</TABLE>
</TD>
</TR>
</TABLE>
</BODY>
</HTML>
There are a wide variety of options available for obtaining support for using Connector/MXJ. You should contact the Connector/MXJ community for help before reporting a potential bug or problem. See Section 21.4.8.1, “Connector/MXJ Community Support”.
Oracle provides assistance to the user community by means of a number of mailing lists and web based forums.
You can find help and support through the MySQL and Java mailing list.
For information about subscribing to MySQL mailing lists or to browse list archives, visit http://lists.mysql.com/. See Section 1.6.1, “MySQL Mailing Lists”.
Community support from experienced users is also available through the MyODBC Forum. You may also find help from other users in the other MySQL Forums, located at http://forums.mysql.com. See Section 1.6.2, “MySQL Community Support at the MySQL Forums”.
If you encounter difficulties or problems with Connector/MXJ, contact the Connector/MXJ community Section 21.4.8.1, “Connector/MXJ Community Support”.
If reporting a problem, you should ideally include the following information with the email:
Operating system and version
Connector/MXJ version
MySQL server version
Copies of error messages or other unexpected output
Simple reproducible sample
Remember that the more information you can supply to us, the more likely it is that we can fix the problem.
If you believe the problem to be a bug, then you must report the bug through http://bugs.mysql.com/.
The Connector/MXJ Change History (Changelog) is located with the main Changelog for MySQL. See Section D.7, “MySQL Connector/MXJ Change History”.
- 21.5.1. MySQL Connector/C++ Binary Installation
- 21.5.2. MySQL Connector/C++ Source Installation
- 21.5.3. MySQL Connector/C++ Building Windows applications with Microsoft Visual Studio
- 21.5.4. MySQL Connector/C++ Building Linux applications with NetBeans
- 21.5.5. MySQL Connector/C++ Getting Started: Usage Examples
- 21.5.6. MySQL Connector/C++ Tutorials
- 21.5.7. MySQL Connector/C++ Debug Tracing
- 21.5.8. MySQL Connector/C++ Usage Notes
- 21.5.9. MySQL Connector/C++ Known Bugs and Issues
- 21.5.10. MySQL Connector/C++ Feature requests
- 21.5.11. MySQL Connector/C++ Support
- 21.5.12. MySQL Connector/C++ FAQ
MySQL Connector/C++ is a MySQL database connector for C++.
The MySQL Connector/C++ is licensed under the terms of the GPL, like most MySQL Connectors. There are special exceptions to the terms and conditions of the GPL as it is applied to this software, see FLOSS License Exception. If you need a non-GPL license for commercial distribution please contact us.
The MySQL Connector/C++ is compatible with the JDBC 4.0 API. However, MySQL Connector/C++ does not implement all of the JDBC 4.0 API. The MySQL Connector/C++ current version features the following classes:
ConnectionDatabaseMetaDataDriverPreparedStatementResultSetResultSetMetaDataSavepointStatement
The JDBC 4.0 API defines approximately 450 methods for the above mentioned classes. MySQL Connector/C++ implements around 80% of these and makes them available in the current release.
The release has been successfully compiled and tested on the following platforms:
AIX
5.2 (PPC32, PPC64)
5.3 (PPC32, PPC64)
FreeBSD
6.0 (x86, x86_64)
HPUX
11.11 (PA-RISC 32bit, PA-RISC 64bit)
Linux
Debian 3.1 (PPC32, x86)
FC4 (x86)
RHEL 3 (ia64, x86, x86_64)
RHEL 4 (ia64, x86, x86_64)
RHEL 5 (ia64, x86, x86_64)
SLES 9 (ia64, x86, x86_64)
SLES 10 (ia64, x86_64)
SuSE 10.3, (x86_64)
Ubuntu 8.04 (x86)
Ubuntu 8.10 (x86_64)
Mac
MacOSX 10.3 (PPC32, PPC64)
MacOSX 10.4 (PPC32, PPC64, x86)
MacOSX 10.5 (PPC32, PPC64, x86, x86_64)
SunOS
Solaris 8 (SPARC32, SPARC64, x86)
Solaris 9 (SPARC32, SPARC64, x86)
Solaris 10 (SPARC32, SPARC64, x86, x86_64)
Windows
XP Professional (32bit)
2003 (64bit)
Future versions will run on all platforms supported by the MySQL Server.
MySQL Connector/C++ supports MySQL 5.1 and later.
MySQL Connector/C++ supports only Microsoft Visual Studio 2003 and above on Windows.
MySQL Connector/C++ Download
You can download the source code for the MySQL Connector/C++ current release at the MySQL Connector/C++ downloads.
MySQL Connector/C++ Source repository
The latest development version is also available through Launchpad.
Bazaar is used for the MySQL Connector/C++ code repository. You can check out the latest source code using the bzr command line tool:
shell> bzr branch lp:~mysql/mysql-connector-cpp/trunk .
Binary distributions
Starting with 1.0.4 Beta, binary distributions were made available in addition to source code releases. The releases available are shown below.
Microsoft Windows platform:
Without installer, a Zip file
MSI installer package
Other platforms:
Compressed GNU TAR archive (tar.gz)
Note that source packages are available for all platforms in the Compressed GNU TAR archive (tar.gz) format.
Binary and source packages can be obtained from MySQL Connector/C++ downloads.
MySQL Connector/C++ Advantages
Using MySQL Connector/C++ instead of the MySQL C API (MySQL Client Library) offers the following advantages for C++ users:
Convenience of pure C++, no C function calls required
Supports an industry standard API, JDBC 4.0
Supports the object-oriented programming paradigm
Reduces development time
MySQL Connector/C++ is licensed under the GPL with the FLOSS License Exception
MySQL Connector/C++ is available under a commercial license upon request
MySQL Connector/C++ Status
MySQL Connector/C++ is available as a GA version. We kindly ask users and developers to try it out and provide us with feedback.
Note that MySQL Workbench is successfully using MySQL Connector/C++.
If you have any queries please contact us.
One problem that can occur is when the tools you use to build your application are not compatible with the tools used to build the binary versions of MySQL Connector/C++. Ideally you need to build your application with the same tools that were used to build the MySQL Connector/C++ binaries. To help with this the following resources are provided.
All distributions contain a README file,
which contains platform-specific notes. At the end of the
README file contained in the binary
distribution you will find the settings used to build the
binaries. If you experience build-related issues on a platform,
it may help to check the settings used on the platform to build
the binary.
For your convenience the same information, but more frequently updated, can be found on the MySQL Forge site.
A better solution is to build your MySQL Connector/C++ libraries from the source code, using the same tools that you use for building your application. This ensures compatibility.
Downloading MySQL Connector/C++
Binary and source packages can be obtained from MySQL Connector/C++ downloads.
Archive Package
Unpack the archive into an appropriate directory. If you plan to use a dynamically linked version of MySQL Connector/C++, make sure that your system can reference the MySQL Client Library. Consult your operating system documentation on how do modify and expand the search path for libraries. In case you cannot modify the library search path it may help to copy your application, the MySQL Connector/C++ library and the MySQL Client Library into the same directory. Most systems search for libraries in the current directory.
Windows MSI Installer
Windows users can choose between two binary packages:
Without installer (unzip in C:\)
Windows MSI Installer (x86)
Using the MSI Installer may be the easiest solution. Running the MSI Installer does not require any administrative permissions as it simply copies files.
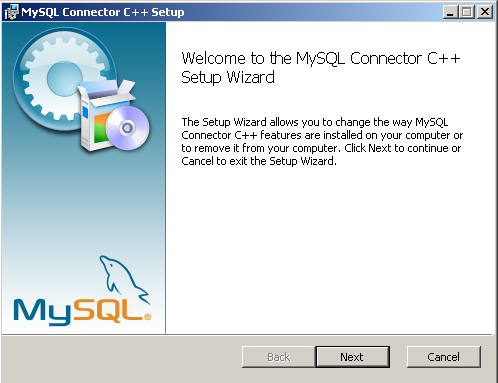
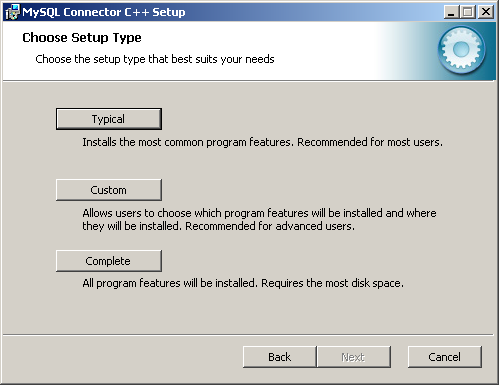
The “Typical” installation consists of all required header files and the Release libraries. The only available “Custom” installation option enables you to install additional Debug versions of the connector libraries.
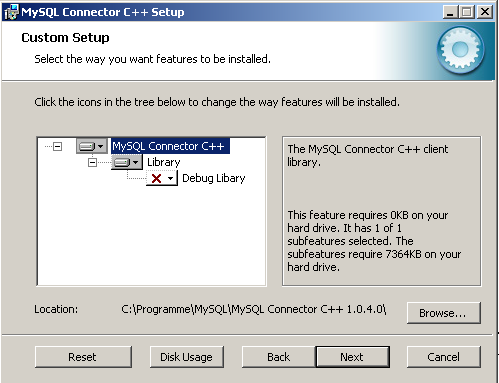
The MySQL Connector/C++ is based on the MySQL Client Library (MySQL C API). MySQL Connector/C++ is linked against the MySQL Client Library. You need to have the MySQL Client Library installed to compile MySQL Connector/C++.
You also need to have the cross-platform build tool CMake 2.4, or newer, and GLib 2.2.3 or newer installed. Check the README file included with the distribution for platform specific notes on building for Windows and SunOS.
Typically the MySQL Client Library is installed when the MySQL Server is installed. However, check your operating system documentation for other installation options.
As of MySQL Connector/C++ version 1.1.0 it is necessary to have the Boost C++
libraries 1.34.0 or newer installed. Boost is only required to
build the connector, it is not required to use the connector. You
can obtain Boost from the
official site and installation instructions can be
obtained from the same site. Once Boost has been installed you
will need to tell the make system where the Boost files are. This
is done by setting the define
-DBOOST_ROOT:STRING=. This can be done when
initially invoking CMake, for example:
shell> CMake . -DBOOST_ROOT:STRING=/usr/local/boost_1_40_0
You may need to change
/usr/local/boost_1_40_0/ to match your
installation. See the
Section 21.5.2.1, “Building source on Unix, Solaris and Mac OS X” and
Section 21.5.2.2, “Building source on Windows” for
further details.
Run CMake to build a Makefile:
shell> me@host:/path/to/mysql-connector-cpp> cmake . -- Check for working C compiler: /usr/local/bin/gcc -- Check for working C compiler: /usr/local/bin/gcc -- works [...] -- Generating done -- Build files have been written to: /path/to/mysql-connector-cpp/
On non-Windows systems, CMake first checks to see if the CMake variable
MYSQL_CONFIG_EXECUTABLEis set. If it is not found CMake will try to locatemysql_configin the default locations.If you have any problems with the configure process please check the troubleshooting instructions below.
Use make to build the libraries. First make sure you have a clean build:
shell> me@host:/path/to/mysql-connector-cpp> make clean
Then build the connector:
me@host:/path/to/mysql-connector-cpp> make [ 1%] Building CXX object » driver/CMakeFiles/mysqlcppconn.dir/mysql_connection.o [ 3%] Building CXX object » driver/CMakeFiles/mysqlcppconn.dir/mysql_constructed_resultset.o [...] [100%] Building CXX object examples/CMakeFiles/statement.dir/statement.o Linking CXX executable statement
If all goes well, you will find the MySQL Connector/C++ library in
/path/to/cppconn/libmysqlcppconn.so.Finally make sure the header and library files are installed to their correct locations:
make install
Unless you have changed this in the configuration step, the header files will be copied to the directory
/usr/local/include. The header files copied aremysql_connection.handmysql_driver.h.Again, unless you have specified otherwise, the library files will be copied to
/usr/local/lib. The files copied arelibmysqlcppcon.so, the dynamic library, andlibmysqlcppconn-static.a, the static library.
If you encounter any errors, please first carry out the checks shown below:
CMake options: MySQL installation path, debug version and more
In case of configuration or compilation problems, check the list of CMake options:
shell> me@host:/path/to/mysql-connector-cpp> cmake -L [...] CMAKE_BACKWARDS_COMPATIBILITY:STRING=2.4 CMAKE_BUILD_TYPE:STRING= CMAKE_INSTALL_PREFIX:PATH=/usr/local EXECUTABLE_OUTPUT_PATH:PATH= LIBRARY_OUTPUT_PATH:PATH= MYSQLCPPCONN_GCOV_ENABLE:BOOL=0 MYSQLCPPCONN_TRACE_ENABLE:BOOL=0 MYSQL_CONFIG_EXECUTABLE:FILEPATH=/usr/bin/mysql_config
For example, if your MySQL Server installation path is not
/usr/local/mysqland you want to build a debug version of the MySQL Connector/C++ use:shell> me@host:/path/to/mysql-connector-cpp> cmake » -D CMAKE_BUILD_TYPE:STRING=Debug » -D MYSQL_CONFIG_EXECUTABLE=/path/to/my/mysql/server/bin/mysql_config .
Verify your settings with cmake
-L:shell> me@host:/path/to/mysql-connector-cpp> cmake -L [...] CMAKE_BACKWARDS_COMPATIBILITY:STRING=2.4 CMAKE_BUILD_TYPE:STRING= CMAKE_INSTALL_PREFIX:PATH=/usr/local EXECUTABLE_OUTPUT_PATH:PATH= LIBRARY_OUTPUT_PATH:PATH= MYSQLCPPCONN_GCOV_ENABLE:BOOL=0 MYSQLCPPCONN_TRACE_ENABLE:BOOL=0 MYSQL_CONFIG_EXECUTABLE=/path/to/my/mysql/server/bin/mysql_config
Proceed by carrying out a make clean command followed by a make command, as described above.
Once you have installed MySQL Connector/C++ you can carry out a quick test to
check the installation. To do this you can compile and run one
of the example programs, such as
examples/standalone_example.cpp. This
example is discussed in more detail later, but for now you can
use it to test the connector has been correctly installed. This
procedure assumes you have a working MySQL Server that you can
connect to.
First compile the example. To do this change to the
examplesdirectory and type:shell> g++ -o test_install -I/usr/local/include -I/usr/local/include/cppconn -Wl,-Bdynamic -lmysqlcppconn standalone_example.cpp
You need to make sure the dynamic library which is used in this case can be found at run time. To do this enter:
shell> export LD_LIBRARY_PATH=/usr/local/lib
Now run the program to test your installation, exchanging the host, user, password and database to be accessed given below to match your system:
./test_install localhost root password database
You will see something similar to the following:
Connector/C++ standalone program example... ... running 'SELECT 'Welcome to Connector/C++' AS _message' ... MySQL replies: Welcome to Connector/C++ ... say it again, MySQL ....MySQL replies: Welcome to Connector/C++ ... find more at http://www.mysql.com
If you see any errors take note of them and go through the troubleshooting procedures discussed earlier.
Please note the only compiler formally supported for Windows is Microsoft Visual Studio 2003 and above.
The basic steps for building the connector on Windows are the same as for Unix. It is important to use CMake 2.6.2 or newer to generate build files for your compiler and to invoke the compiler.
On Windows, mysql_config is not present, so
CMake will attempt to retrieve the location of MySQL from the
environment variable $ENV{MYSQL_DIR}. If
MYSQL_DIR is not set, CMake will then
proceed to check for MySQL in the following locations:
$ENV{ProgramFiles}/MySQL/*/include, and
$ENV{SystemDrive}/MySQL/*/include.
CMake makes it easy for you to try other compilers. However, you may experience compile warnings, compile errors or linking issues not detected by Visual Studio. Patches are gratefully accepted to fix issues with other compilers.
Consult the CMake manual or check cmake
--help to find out which build systems are supported
by your CMake version:
C:\>cmake --help
cmake version 2.6-patch 2
Usage
[...]
Generators
The following generators are available on this platform:
Borland Makefiles = Generates Borland makefiles.
MSYS Makefiles = Generates MSYS makefiles.
MinGW Makefiles = Generates a make file for use with
mingw32-make.
NMake Makefiles = Generates NMake makefiles.
Unix Makefiles = Generates standard UNIX makefiles.
Visual Studio 6 = Generates Visual Studio 6 project files.
Visual Studio 7 = Generates Visual Studio .NET 2002 project
files.
Visual Studio 7 .NET 2003 = Generates Visual Studio .NET 2003 project
files.
Visual Studio 8 2005 = Generates Visual Studio .NET 2005 project
files.
Visual Studio 8 2005 Win64 = Generates Visual Studio .NET 2005 Win64
project files.
Visual Studio 9 2008 = Generates Visual Studio 9 2008 project fil
Visual Studio 9 2008 Win64 = Generates Visual Studio 9 2008 Win64 proje
files.
[...]It is likely that your CMake binary will support more compilers, known by CMake as generators, than supported by MySQL Connector/C++. We have built the connector using the following generators:
Microsoft Visual Studio 8 (Visual Studio 2005)
Microsoft Visual Studio 9 (Visual Studio 2008, Visual Studio 2008 Express)
NMake
Please see the building instructions for Unix, Solaris and Mac OS X for troubleshooting and configuration hints.
The steps to build the connector are given below:
Run CMake to generate build files for your generator:
Visual Studio
C:\path_to_mysql_cpp>cmake -G "Visual Studio 9 2008" -- Check for working C compiler: cl -- Check for working C compiler: cl -- works -- Detecting C compiler ABI info -- Detecting C compiler ABI info - done -- Check for working CXX compiler: cl -- Check for working CXX compiler: cl -- works -- Detecting CXX compiler ABI info -- Detecting CXX compiler ABI info - done -- ENV{MYSQL_DIR} = -- MySQL Include dir: C:/Programme/MySQL/MySQL Server 5.1/include -- MySQL Library : C:/Progams/MySQL/MySQL Server 5.1/lib/opt/mysqlclient.lib -- MySQL Library dir: C:/Progams/MySQL/MySQL Server 5.1/lib/opt -- MySQL CFLAGS: -- MySQL Link flags: -- MySQL Include dir: C:/Progams/MySQL/MySQL Server 5.1/include -- MySQL Library dir: C:/Progams/MySQL/MySQL Server 5.1/lib/opt -- MySQL CFLAGS: -- MySQL Link flags: -- Configuring cppconn -- Configuring test cases -- Looking for isinf -- Looking for isinf - not found -- Looking for isinf -- Looking for isinf - not found. -- Looking for finite -- Looking for finite - not found. -- Configuring C/J junit tests port -- Configuring examples -- Configuring done -- Generating done -- Build files have been written to: C:\path_to_mysql_cpp C:\path_to_mysql_cpp>dir *.sln *.vcproj [...] 19.11.2008 12:16 23.332 MYSQLCPPCONN.sln [...] 19.11.2008 12:16 27.564 ALL_BUILD.vcproj 19.11.2008 12:16 27.869 INSTALL.vcproj 19.11.2008 12:16 28.073 PACKAGE.vcproj 19.11.2008 12:16 27.495 ZERO_CHECK.vcprojNMake
C:\path_to_mysql_cpp>cmake -G "NMake Makefiles" -- The C compiler identification is MSVC -- The CXX compiler identification is MSVC [...] -- Build files have been written to: C:\path_to_mysql_cpp
Use your compiler to build MySQL Connector/C++
Visual Studio - GUI
Open the newly generated project files in the Visual Studio GUI or use a Visual Studio command line to build the driver. The project files contain a variety of different configurations. Among them debug and nondebug versions.
Visual Studio - NMake
C:\path_to_mysql_cpp>nmake Microsoft (R) Program Maintenance Utility Version 9.00.30729.01 Copyright (C) Microsoft Corporation. All rights reserved. Scanning dependencies of target mysqlcppconn [ 2%] Building CXX object driver/CMakeFiles/mysqlcppconn.dir/mysql_connection.obj mysql_connection.cpp [...] Linking CXX executable statement.exe [100%] Built target statement
Note this section refers to dynamic linking of the MySQL Connector/C++ with the client library, not the dynamic linking of the application to MySQL Connector/C++.
An application that uses MySQL Connector/C++ can be either statically or dynamically linked to the MySQL Connector/C++ libraries. MySQL Connector/C++ is usually statically linked to the underlying MySQL Client Library (or Connector/C). Note, that unless otherwise stated, reference to the MySQL Client Library is also taken to include Connector/C, which is a separately packaged, stand alone version of the MySQL Client Library. From MySQL Connector/C++ version 1.1.0 it is possible to also dynamically link to the underlying MySQL Client Library. The ability of MySQL Connector/C++ to dynamically link to MySQL Client Library is not enabled by default, and enabling this feature is done through a compile time option, when compiling the MySQL Connector/C++ source code.
To use the ablity to dynamically link the client library to
MySQL Connector/C++ the MYSQLCLIENT_STATIC_BINDING:BOOL
needs to be defined when building the MySQL Connector/C++ source code:
rm CMakeCache.txt cmake -DMYSQLCLIENT_STATIC_BINDING:BOOL=1 . make clean make make install
Note that precompiled binaries of MySQL Connector/C++ use static binding with the client library by default.
Now, in your application, when creating a connection, MySQL Connector/C++ will select and load a client library at runtime. It will choose the client library by searching defined locations and environment variables depending on the host operating system. It also possible when creating a connection in an application to define an absolute path to the client library to be loaded at runtime. This can be convenient if you have defined a standard location from which you want the client library to be loaded. This is sometimes done to circumvent possible conflicts with other versions of the client library that may be located on the system.
MySQL Connector/C++ is available as a static or dynamic library to use with your application. This section looks at how to link the library to your application.
To avoid potential crashes the build configuration of MySQL Connector/C++ should match the build configuration of the application using it. For example, do not use the release build of MySQL Connector/C++ with a debug build of the client application.
Static library
The MySQL Connector/C++ static library file is
mysqlcppconn-static.lib. This needs to be
statically linked with your application. You also need to link
against the files libmysql.dll and
libmysql.lib. Once linking has been
successfully completed, the application will require access to
libmysql.dll at run time.
Dynamic library
The MySQL Connector/C++ dynamic library file is
mysqlcppconn.dll. To build your client
application, you must link it with the file
mysqlcppconn.lib. At run time, the
application will require access to the files
mysqlcppconn.dll and
libmysql.dll.
Building a MySQL Connector/C++ application with Microsoft Visual Studio
Initially, the procedure for building an application to use either the static or dynamic library is the same. You then carry out some additional steps depending on whether you want to build your application to use the static or dynamic library.
Select , , from the main menu.
In the wizard select Visual C++, Win32. From Visual Studio Installed Templates select the application type Win32 Console Application. Enter a name for the application, and then click , to move to the Win32 Application Wizard.
In the Win32 Application Wizard, click Application Settings and ensure the defaults are selected. The radio button Console application, and the checkbox Precompiled headers will be selected. Click to close the wizard.
From the drop down list box on the toolbar, change from the default Debug build to the Release build.
From the main menu select , . This can also be accessed using the hot key + .
Under Configuration Properties, open the tree view.
Select , General in the tree view.
You now need to ensure that Visual Studio can find the MySQL include directory. This directory includes header files that can optionally be installed when installing MySQL Server.
Then in the Additional Include Directories text field, add the MySQL
include/directory.You will also need to set the location of additional libraries that Visual Studio will need to build the application. These are located in the MySQL
lib/optdirectory, a sub-directory of the MySQL Server installation directory.In the tree view open Linker, General, Additional Library Directories.
Add the
lib/optdirectory into the Additional Library Directories text field. This enables the library filelibmysql.libto be found.
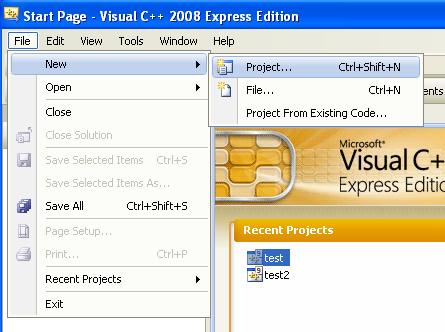
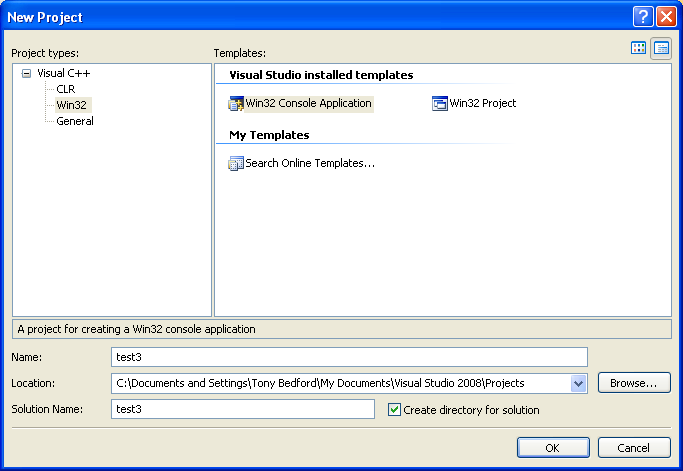
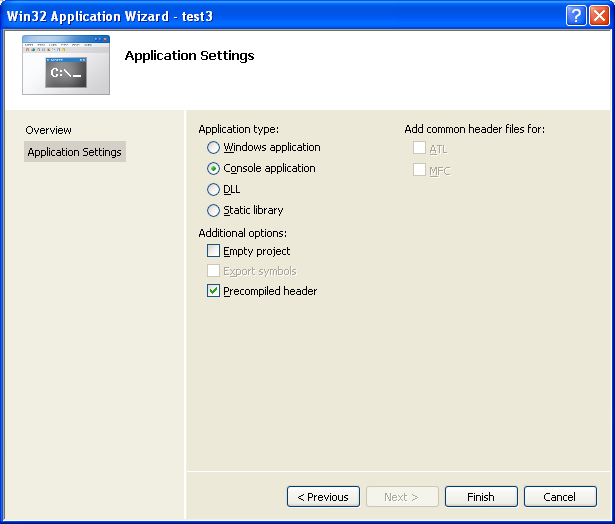
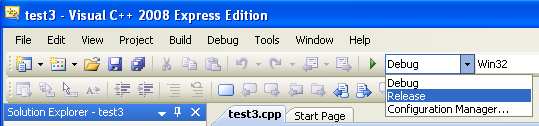
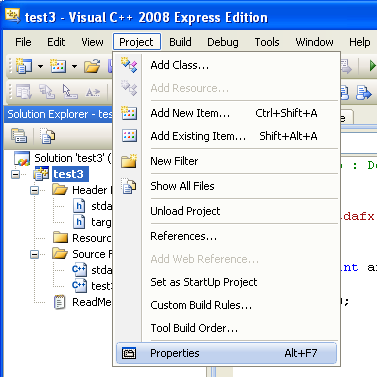
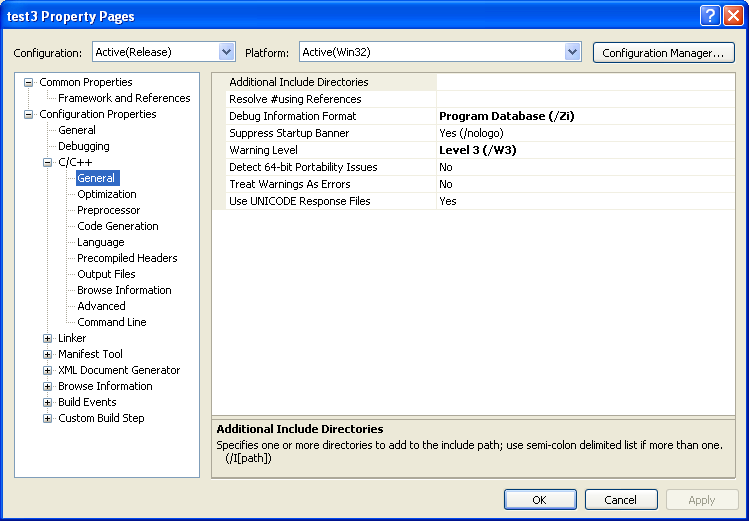
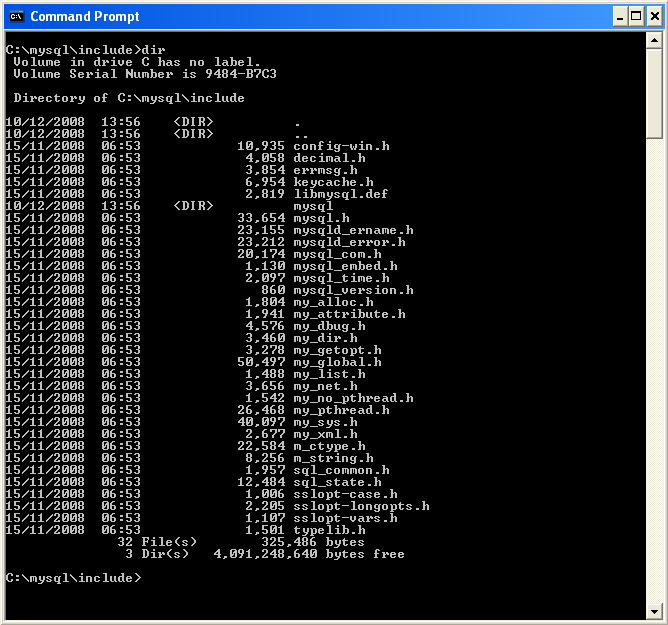
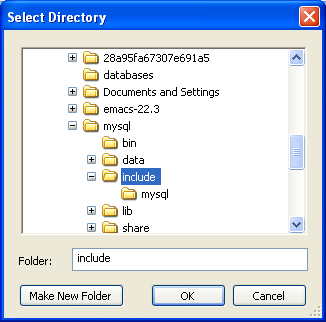
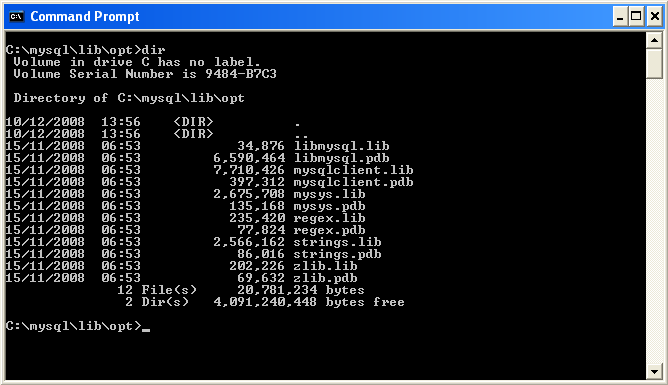
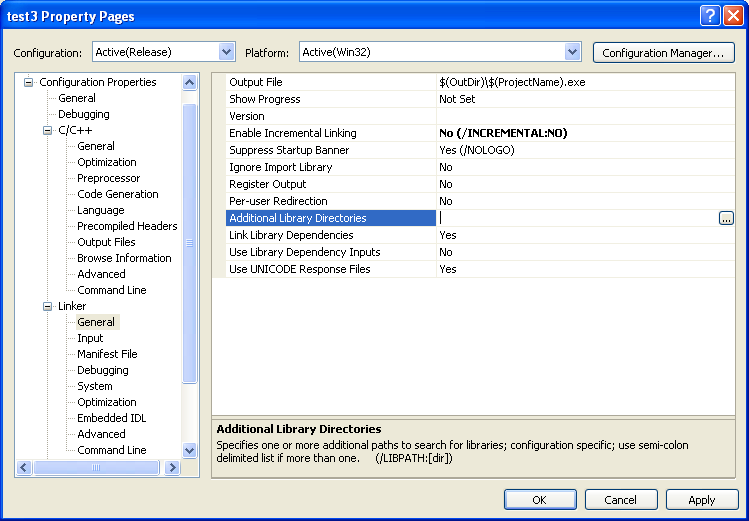
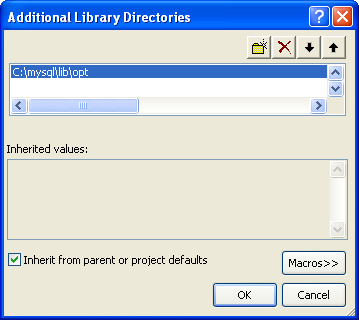
The remaining steps depend on whether you are building an application to use the MySQL Connector/C++ static or dynamic library. If you are building your application to use the dynamic library go here. If you are building your application to use the static library, carry out the following steps:
Then open Linker, Input, Additional Dependencies.
Enter
mysqlcppconn-static.libandlibmysql.lib.By default
CPPCONN_PUBLIC_FUNCis defined to declare functions to be compatible with an application that calls a DLL. If building an application to call the static library, you must ensure that function prototypes are compatible with this. In this caseCPPCONN_PUBLIC_FUNCneeds to be defined to be an empty string, so that functions are declared with the correct prototype.In the Project, Properties tree view, under C++, Preprocessor, enter
CPPCONN_PUBLIC_FUNC=into the text field.NoteMake sure you enter
CPPCONN_PUBLIC_FUNC=and notCPPCONN_PUBLIC_FUNC, as it needs to be defined as an empty string.
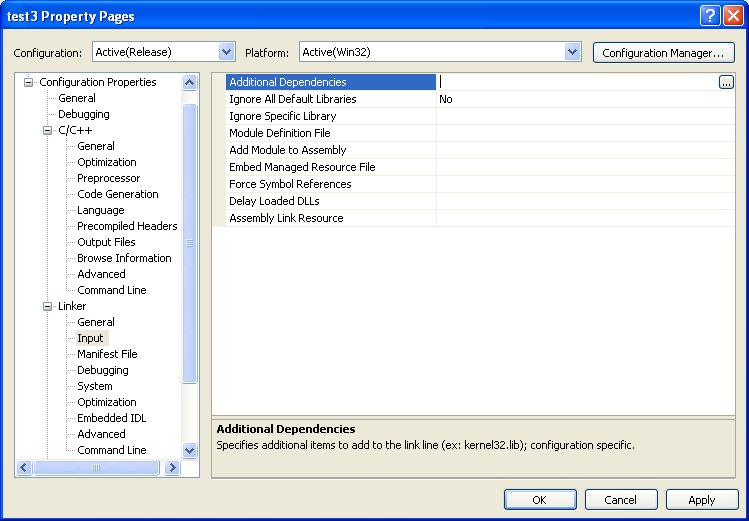
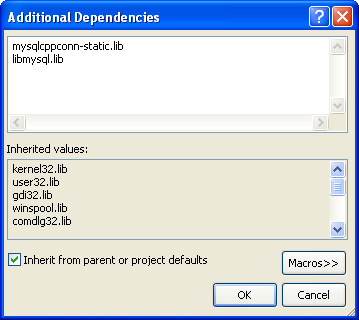
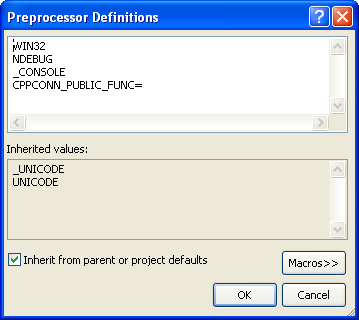
If building an application to use the MySQL Connector/C++ dynamically linked library carry out these steps:
Under Linker, Input, add
mysqlcppconn.libinto the Additional Dependencies text field.The application will need to access the MySQL Connector/C++ Dynamic Linked Library at run time. Therefore,
mysqlcppconn.dllneeds to be in the same directory as the application executable, or somewhere on the system's path.Copy
mysqlcppconn.dllto the same directory as the application. Alternatively, extend thePATHenvironment variable usingSET PATH=%PATH%;C:\path\to\cpp. Alternatively, you can copymysqlcppconn.dllto the Windows installation Directory, typicallyc:\windows.
This section describes how you can build MySQL Connector/C++ applications for Linux using the NetBeans IDE.
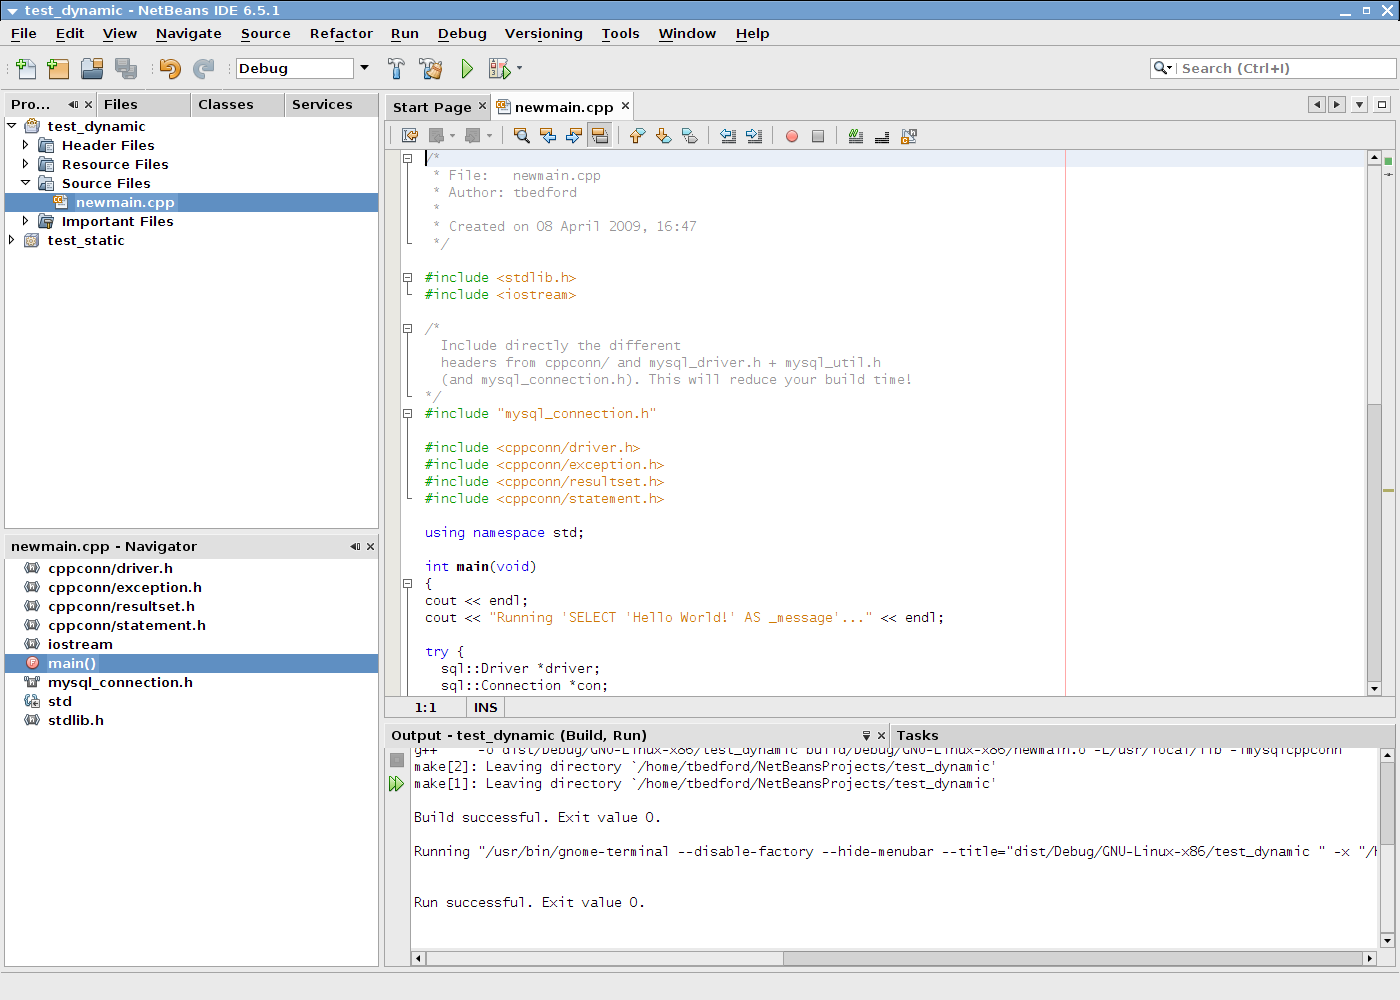
To avoid potential crashes the build configuration of MySQL Connector/C++ should match the build configuration of the application using it. For example, do not use the release build of MySQL Connector/C++ with a debug build of the client application.
The first step of building your application is to create a new project. Select , . Choose a C/C++ Application and click .
Give the project a name and click . A new project is created.
In the Projects tab, right-click Source Files and select , then .
Change the filename, or simply select the defaults and click to add the new file to the project.
You now need to add some working code to you main source file. Explore your MySQL Connector/C++ installation and navigate to the
examplesdirectory.Select a suitable example such as
standalone_example_docs1.cpp. Copy all the code in this file, and use it to replace the code in your existing main source file. Amend the code to reflect the connection properties required for your test database. You now have a working example that will access a MySQL database using MySQL Connector/C++.You will notice that at this point NetBeans is showing some errors in the source code. This is because you need to direct NetBeans to the necessary header files that need to be included. Select , from the main menu.
In the Categories: tree view panel, navigate to Build, C++ Compiler.
In the General panel, select Include Directories.
Click the button.
Click and then navigate to the directory where the MySQL Connector/C++ header files are located. This will be
/usr/local/includeunless you have installed the files to a different location. Click . Click .Click again to close the Project Properties dialog.
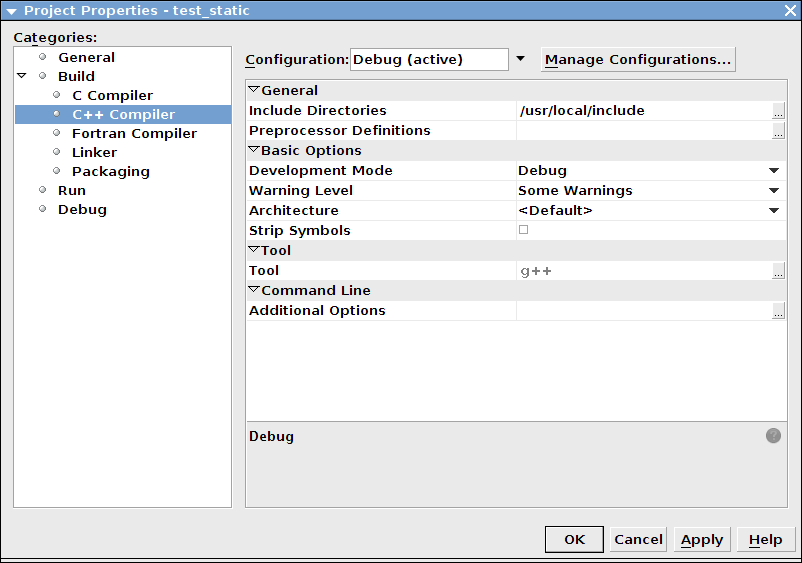
At this point you have created a NetBeans project, containing a single C++ source file. You have also ensured that the necessary include files are accessible. Before continuing, you need to decide whether your project is to use the MySQL Connector/C++ static or dynamic library. The project settings are slightly different in each case, as you need to link against a different library.
Using the static library
If you intend to use the static library you will need to link
against two library files,
libmysqlcppconn-static.a and
libmysqlclient.a. The locations of the files
will depend on your setup, but typically the former will be found
in /usr/local/lib and the latter in
/usr/lib. Note the file
libmysqlclient.a is not part of MySQL Connector/C++, but
is the MySQL Client Library file distributed with MySQL Server.
Remember, the MySQL Client Library is an optional component as
part of the MySQL Server installation process. Note the MySQL
Client Library is also available as part of the new MySQL Connector/C
distribution.
The first step is to set the project to link the necessary library files. Select , from the main menu.
In the Categores: tree view navigate to Linker.
In the General panel select Additional Library Directories. Click the button.
Select and add the
/usr/liband/usr/local/libdirectories.In the same panel add the two library files required for static linking as discussed earlier. The properties panel should then look similar to the following screenshot:
Click to close the Project Properties dialog.
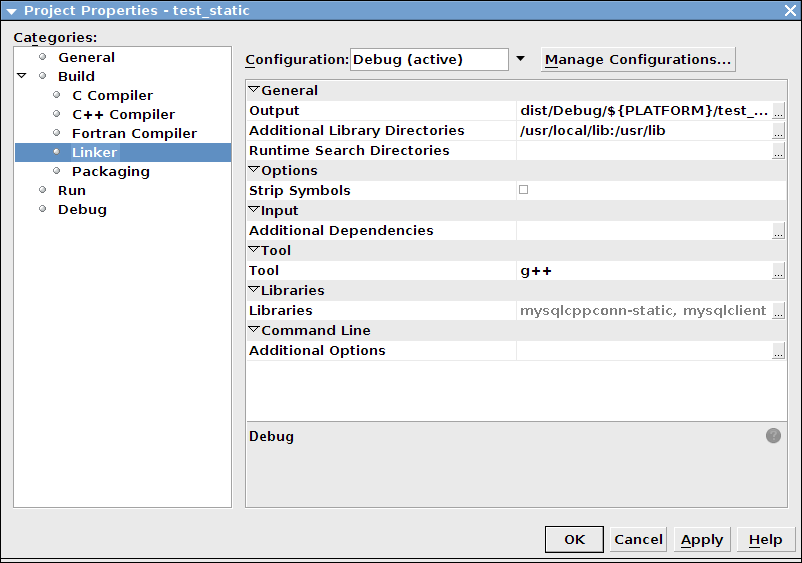
Using the dynamic library
If you require your application to use the MySQL Connector/C++ dynamic library,
you simply need to link your project with a single library file,
libmysqlcppconn.so. The location of this file
will depend on how you configured your installation of MySQL Connector/C++, but
will typically be /usr/local/lib.
The first step is to set the project to link the necessary library file. Select , from the main menu.
In the Categories: tree view navigate to Linker.
In the General panel select Additional Library Directories. Click the button.
Select and add the
/usr/local/libdirectories.In the same panel add the library file required for static linking as discussed earlier. The properties panel should then look similar to the following screenshot:
Click OK to close the Project Properties dialog.
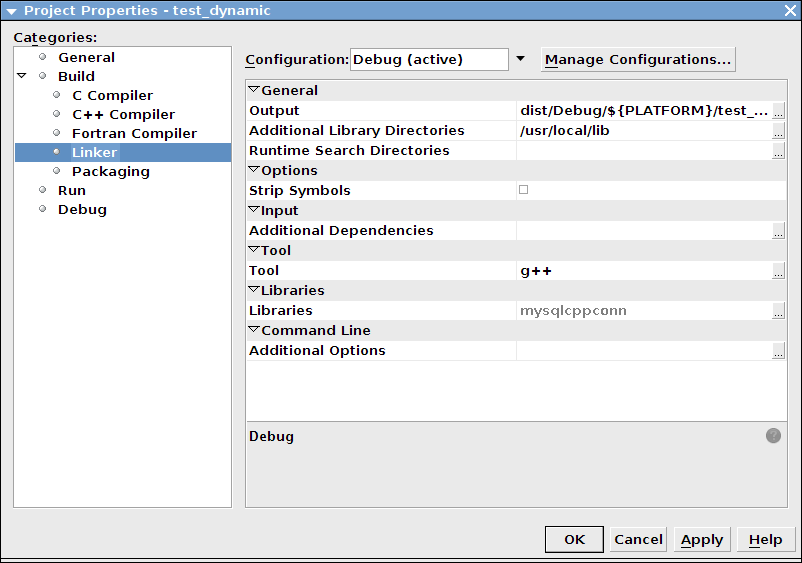
Having configured your project you can build it by selecting , from the main menu. You can then run the project using , .
On running the application you should see a screen similar to the following (this is actually the static version of the application shown):
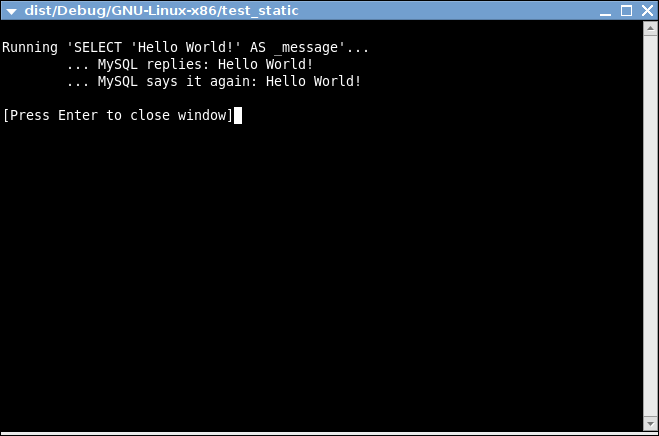
Note the above settings and procedures were carried out for the
default Debug configuration. If you want to
create a Release configuration you will need
to select that configuration before setting the Project
Properties.
The download package contains usage examples in the directory
examples/. The examples explain the basic
usage of the following classes:
ConnectionDriverPreparedStatementResultSetResultSetMetaDataStatement
The examples cover:
Using the
Driverclass to connect to MySQLCreating tables, inserting rows, fetching rows using (simple) statements
Creating tables, inserting rows, fetching rows using prepared statements
Hints for working around prepared statement limitations
Accessing result set metadata
The examples in this document are only code snippets. The code
snippets provide a brief overview on the API. They are not
complete programs. Please check the examples/
directory of your MySQL Connector/C++ installation for complete programs.
Please also read the README file in the
examples/ directory. Note to test the example
code you will first need to edit the
examples.h file in the
examples/ directory, to add your connection
information. Then simply rebuild the code by issuing a
make command.
The examples in the examples/ directory
include:
examples/connect.cpp:How to create a connection, insert data into MySQL and handle exceptions.
examples/connection_meta_schemaobj.cpp:How to obtain metadata associated with a connection object, for example, a list of tables, databases, MySQL version, connector version.
examples/debug_output.cpp:How to activate and deactivate the MySQL Connector/C++ debug protocol.
examples/exceptions.cpp:A closer look at the exceptions thrown by the connector and how to fetch error information.
examples/prepared_statements.cpp:How to run Prepared Statements including an example how to handle SQL commands that cannot be prepared by the MySQL Server.
examples/resultset.cpp:How to fetch data and iterate over the result set (cursor).
examples/resultset_meta.cpp:How to obtain metadata associated with a result set, for example, number of columns and column types.
examples/resultset_types.cpp:Result sets returned from metadata methods - this is more a test than much of an example.
examples/standalone_example.cpp:Simple standalone program not integrated into regular CMake builds.
examples/statements.cpp:How to run SQL commands without using Prepared Statements.
examples/cpp_trace_analyzer.cpp:This example shows how to filter the output of the debug trace. Please see the inline comments for further documentation. This script is unsupported.
A connection to MySQL is established by retrieving an instance
of sql::Connection from a
sql::mysql::MySQL_Driver object. A
sql::mysql::MySQL_Driver object is
returned by
sql::mysql::MySQL_Driver::get_mysql_driver_instance().
sql::mysql::MySQL_Driver *driver;
sql::Connection *con;
driver = sql::mysql::MySQL_Driver::get_mysql_driver_instance();
con = driver->connect("tcp://127.0.0.1:3306", "user", "password");
delete con;
Make sure that you free the
sql::Connection object as soon as you do
not need it any more. But do not explicitly free the connector
object!
For running simple queries you can use the methods
sql::Statement::execute(),
sql::Statement::executeQuery() and
sql::Statement::executeUpdate(). The
method sql::Statement::execute() should
be used if your query does not return a result set or if your
query returns more than one result set. See the
examples/ directory for more on this.
sql::mysql::MySQL_Driver *driver;
sql::Connection *con;
sql::Statement *stmt
driver = sql::mysql::get_mysql_driver_instance();
con = driver->connect("tcp://127.0.0.1:3306", "user", "password");
stmt = con->createStatement();
stmt->execute("USE " EXAMPLE_DB);
stmt->execute("DROP TABLE IF EXISTS test");
stmt->execute("CREATE TABLE test(id INT, label CHAR(1))");
stmt->execute("INSERT INTO test(id, label) VALUES (1, 'a')");
delete stmt;
delete con;
Note that you have to free sql::Statement
and sql::Connection objects explicitly
using delete.
The API for fetching result sets is identical for (simple)
statments and prepared statements. If your query returns one
result set you should use
sql::Statement::executeQuery() or
sql::PreparedStatement::executeQuery()
to run your query. Both methods return
sql::ResultSet objects. The preview
version does buffer all result sets on the client to support
cursors.
// ...
sql::Connection *con;
sql::Statement *stmt
sql::ResultSet *res;
// ...
stmt = con->createStatement();
// ...
res = stmt->executeQuery("SELECT id, label FROM test ORDER BY id ASC");
while (res->next()) {
// You can use either numeric offsets...
cout << "id = " << res->getInt(1); // getInt(1) returns the first column
// ... or column names for accessing results.
// The latter is recommended.
cout << ", label = '" << res->getString("label") << "'" << endl;
}
delete res;
delete stmt;
delete con;
Note in the preceding code snippet that column indexing starts from 1.
Note that you have to free
sql::Statement,
sql::Connection and
sql::ResultSet objects explicitly using
delete.
The usage of cursors is demonstrated in the examples contained in the download package.
If you are not familiar with Prepared Statements on MySQL have
an extra look at the source code comments and explanations in
the file examples/prepared_statement.cpp.
sql::PreparedStatement is created by
passing a SQL query to
sql::Connection::prepareStatement(). As
sql::PreparedStatement is derived from
sql::Statement, you will feel familiar
with the API once you have learned how to use (simple)
statements (sql::Statement). For example,
the syntax for fetching results is identical.
// ...
sql::Connection *con;
sql::PreparedStatement *prep_stmt
// ...
prep_stmt = con->prepareStatement("INSERT INTO test(id, label) VALUES (?, ?)");
prep_stmt->setInt(1, 1);
prep_stmt->setString(2, "a");
prep_stmt->execute();
prep_stmt->setInt(1, 2);
prep_stmt->setString(2, "b");
prep_stmt->execute();
delete prep_stmt;
delete con;
As usual, you have to free
sql::PreparedStatement and
sql::Connection objects explicitly.
The following code shows a complete example of how to use MySQL Connector/C++:
/* Copyright 2008, 2010, Oracle and/or its affiliates. All rights reserved.
This program is free software; you can redistribute it and/or modify
it under the terms of the GNU General Public License as published by
the Free Software Foundation; version 2 of the License.
There are special exceptions to the terms and conditions of the GPL
as it is applied to this software. View the full text of the
exception in file EXCEPTIONS-CONNECTOR-C++ in the directory of this
software distribution.
This program is distributed in the hope that it will be useful,
but WITHOUT ANY WARRANTY; without even the implied warranty of
MERCHANTABILITY or FITNESS FOR A PARTICULAR PURPOSE. See the
GNU General Public License for more details.
You should have received a copy of the GNU General Public License
along with this program; if not, write to the Free Software
Foundation, Inc., 51 Franklin Street, Fifth Floor, Boston, MA 02110-1301 USA
*/
/* Standard C++ includes */
#include <stdlib.h>
#include <iostream>
/*
Include directly the different
headers from cppconn/ and mysql_driver.h + mysql_util.h
(and mysql_connection.h). This will reduce your build time!
*/
#include "mysql_connection.h"
#include <cppconn/driver.h>
#include <cppconn/exception.h>
#include <cppconn/resultset.h>
#include <cppconn/statement.h>
using namespace std;
int main(void)
{
cout << endl;
cout << "Running 'SELECT 'Hello World!' »
AS _message'..." << endl;
try {
sql::Driver *driver;
sql::Connection *con;
sql::Statement *stmt;
sql::ResultSet *res;
/* Create a connection */
driver = get_driver_instance();
con = driver->connect("tcp://127.0.0.1:3306", "root", "root");
/* Connect to the MySQL test database */
con->setSchema("test");
stmt = con->createStatement();
res = stmt->executeQuery("SELECT 'Hello World!' AS _message");
while (res->next()) {
cout << "\t... MySQL replies: ";
/* Access column data by alias or column name */
cout << res->getString("_message") << endl;
cout << "\t... MySQL says it again: ";
/* Access column fata by numeric offset, 1 is the first column */
cout << res->getString(1) << endl;
}
delete res;
delete stmt;
delete con;
} catch (sql::SQLException &e) {
cout << "# ERR: SQLException in " << __FILE__;
cout << "(" << __FUNCTION__ << ") on line " »
<< __LINE__ << endl;
cout << "# ERR: " << e.what();
cout << " (MySQL error code: " << e.getErrorCode();
cout << ", SQLState: " << e.getSQLState() << " )" << endl;
}
cout << endl;
return EXIT_SUCCESS;
}The following code shows a complete example of how to use MySQL Connector/C++:
/* Copyright 2008, 2010, Oracle and/or its affiliates. All rights reserved.
This program is free software; you can redistribute it and/or modify
it under the terms of the GNU General Public License as published by
the Free Software Foundation; version 2 of the License.
There are special exceptions to the terms and conditions of the GPL
as it is applied to this software. View the full text of the
exception in file EXCEPTIONS-CONNECTOR-C++ in the directory of this
software distribution.
This program is distributed in the hope that it will be useful,
but WITHOUT ANY WARRANTY; without even the implied warranty of
MERCHANTABILITY or FITNESS FOR A PARTICULAR PURPOSE. See the
GNU General Public License for more details.
You should have received a copy of the GNU General Public License
along with this program; if not, write to the Free Software
Foundation, Inc., 51 Franklin Street, Fifth Floor, Boston, MA 02110-1301 USA
*/
/* Standard C++ includes */
#include <stdlib.h>
#include <iostream>
/*
Include directly the different
headers from cppconn/ and mysql_driver.h + mysql_util.h
(and mysql_connection.h). This will reduce your build time!
*/
#include "mysql_connection.h"
#include <cppconn/driver.h>
#include <cppconn/exception.h>
#include <cppconn/resultset.h>
#include <cppconn/statement.h>
#include <cppconn/prepared_statement.h>
using namespace std;
int main(void)
{
cout << endl;
cout << "Let's have MySQL count from 10 to 1..." << endl;
try {
sql::Driver *driver;
sql::Connection *con;
sql::Statement *stmt;
sql::ResultSet *res;
sql::PreparedStatement *pstmt;
/* Create a connection */
driver = get_driver_instance();
con = driver->connect("tcp://127.0.0.1:3306", "root", "root");
/* Connect to the MySQL test database */
con->setSchema("test");
stmt = con->createStatement();
stmt->execute("DROP TABLE IF EXISTS test");
stmt->execute("CREATE TABLE test(id INT)");
delete stmt;
/* '?' is the supported placeholder syntax */
pstmt = con->prepareStatement("INSERT INTO test(id) VALUES (?)");
for (int i = 1; i <= 10; i++) {
pstmt->setInt(1, i);
pstmt->executeUpdate();
}
delete pstmt;
/* Select in ascending order */
pstmt = con->prepareStatement("SELECT id FROM test ORDER BY id ASC");
res = pstmt->executeQuery();
/* Fetch in reverse = descending order! */
res->afterLast();
while (res->previous())
cout << "\t... MySQL counts: " << res->getInt("id") << endl;
delete res;
delete pstmt;
delete con;
} catch (sql::SQLException &e) {
cout << "# ERR: SQLException in " << __FILE__;
cout << "(" << __FUNCTION__ << ") on line " »
<< __LINE__ << endl;
cout << "# ERR: " << e.what();
cout << " (MySQL error code: " << e.getErrorCode();
cout << ", SQLState: " << e.getSQLState() << »
" )" << endl;
}
cout << endl;
return EXIT_SUCCESS;
}Here are some tutorials on using MySQL Connector/C++. You should also have a look at the examples which can be found in the following section Section 21.5.5, “MySQL Connector/C++ Getting Started: Usage Examples”.
Setting up the World database for use in the tutorials
These tutorials primarily use the World database,
so you need to have that installed. You can download the
World database, and documentation on how to
install it, from the MySQL
Documentation page - look for the section called
“Example Databases”.
Tutorial framework code
Rather than repeating the same code, a framework is given here. You can reuse this framework with all the tutorials unless otherwise stated. This boiler plate code can then simply be reused for each tutorial.
The framework code is given here:
#include <stdlib.h>
#include <iostream>
#include <sstream>
#include <stdexcept>
#include "mysql_connection.h"
#include <cppconn/driver.h>
#include <cppconn/exception.h>
#include <cppconn/resultset.h>
#include <cppconn/statement.h>
#include <cppconn/prepared_statement.h>
#define EXAMPLE_HOST "localhost"
#define EXAMPLE_USER "root"
#define EXAMPLE_PASS ""
#define EXAMPLE_DB "world"
using namespace std;
int main(int argc, const char **argv)
{
string url(argc >= 2 ? argv[1] : EXAMPLE_HOST);
const string user(argc >= 3 ? argv[2] : EXAMPLE_USER);
const string pass(argc >= 4 ? argv[3] : EXAMPLE_PASS);
const string database(argc >= 5 ? argv[4] : EXAMPLE_DB);
cout << "Connector/C++ tutorial framework..." << endl;
cout << endl;
try {
/* INSERT TUTORIAL CODE HERE! */
} catch (sql::SQLException &e) {
/*
The MySQL Connector/C++ throws three different exceptions:
- sql::MethodNotImplementedException (derived from sql::SQLException)
- sql::InvalidArgumentException (derived from sql::SQLException)
- sql::SQLException (derived from std::runtime_error)
*/
cout << "# ERR: SQLException in " << __FILE__;
cout << "(" << __FUNCTION__ << ") on line " << __LINE__ << endl;
/* Use what() (derived from std::runtime_error) to fetch the error message */
cout << "# ERR: " << e.what();
cout << " (MySQL error code: " << e.getErrorCode();
cout << ", SQLState: " << e.getSQLState() << " )" << endl;
return EXIT_FAILURE;
}
cout << "Done." << endl;
return EXIT_SUCCESS;
}
To compile and run the framework
First, copy and paste the framework code to a file such as
frmwk.cpp. Edit the #define
statements to reflect your connection details (server, user,
password, database).
To compile the framework, for example on Mac OS X, type:
shell> g++ -o frmwk -I/usr/local/include -I/usr/local/include/cppconn -lmysqlcppconn frmwk.cpp
To run the framework, enter the following:
shell> ./frmwk
You will see a simple message. You are now ready to continue to the tutorials.
Stored Procedures can be called using both Statements and Prepared Statements. This tutorial looks at calling Stored Procedures using Statements. The following tutorial Section 21.5.6.2, “Tutorial: Calling Stored Procedures with Prepared Statements in MySQL Connector/C++” will cover the use of Prepared Statements.
When considering calling Stored Procedures there are several scenarios that can occur:
A Stored Procedure that does not return a result set.
A Stored Procedure that returns an output parameter.
A Stored Procedure that returns a result set.
Stored Procedures are given below that illustrate each of the above scenarios.
The following routine enables you to add a country into the World database, but does not return a result. This corresonds to Scenario 1 above.
CREATE PROCEDURE add_country (IN country_code CHAR(3), IN country_name CHAR(52), IN continent_name CHAR(30)) BEGIN INSERT INTO Country(Code, Name, Continent) VALUES (country_code, country_name, continent_name); END
The next routine returns the population of a specified country, and corresponds to Scenario 2 above:
CREATE PROCEDURE get_pop (IN country_name CHAR(52), OUT country_pop INT(11)) BEGIN SELECT Population INTO country_pop FROM Country WHERE Name = country_name; END
The next routine is an example of a procedure returning a result set containing multiple records. This routine corresponds to Scenario 3 above.
CREATE PROCEDURE get_data ()
BEGIN
SELECT Code, Name, Population, Continent FROM Country WHERE Continent = "Oceania" AND Population < 10000;
SELECT Code, Name, Population, Continent FROM Country WHERE Continent = "Europe" AND Population < 10000;
SELECT Code, Name, Population, Continent FROM Country WHERE Continent = "North America" AND Population < 10000;
END
Enter and test the Stored Procedures to ensure no errors have been introduced. You are now ready to start writing routines to test out the use of Stored Procedures using Connector/C++.
Scenario 1 - Stored Procedure does not return a result set
In the first case you will examine Scenario 1, you call a Stored procedure that does not return a result set.
Make a copy of the tutorial framework code.
Insert the following code into the framework at the correct location (denoted by an INSERT HERE comment in the framework).
sql::Driver* driver = get_driver_instance(); std::auto_ptr<sql::Connection> con(driver->connect(url, user, pass)); con->setSchema(database); std::auto_ptr<sql::Statement> stmt(con->createStatement()); // We don't need to check the return value explicitly, if it indicates // an error Connector/C++ will generate an exception. stmt->execute("CALL add_country(\"ATL\", \"Atlantis\", \"North America\")");Compile the program using the following command:
shell> g++ -o sp_scenario1 -I/usr/local/include/cppconn/ -lmysqlcppconn sp_scenario1.cpp
Run the program by typing:
shell> ./sp_scenario1
Using the MySQL Command Line Client, or other suitable tool, check the World database to determine that it has been updated correctly. You can use a query such as:
SELECT Code, Name, Continent FROM Country WHERE Code="ATL";
The code in this case simply creates a statement and then invokes
the execute method on it, passing the call to the Stored Procedure
as a parameter. The Stored Procedure itself does not return a
value, although it is important to note there will always be a
return value from the call - this is simply the call status.
MySQL Connector/C++ handles this status for you, so you do not need code to
handle it explicitly. If the call should fail for some reason an
exception will be raised, and this will be handled by the
catch statement in the code.
Scenario 2 - Stored Procedure returns an output parameter
You will now see how to handle a Stored Procedure that returns an output parameter.
Enter the following code into the tutorial framework code:
sql::Driver* driver = get_driver_instance(); std::auto_ptr<sql::Connection> con(driver->connect(url, user, pass)); con->setSchema(database); std::auto_ptr<sql::Statement> stmt(con->createStatement()); stmt->execute("CALL get_pop(\"Uganda\", @pop)"); std::auto_ptr<sql::ResultSet> res(stmt->executeQuery("SELECT @pop AS _reply")); while (res->next()) cout << "Population of Uganda: " << res->getString("_reply") << endl; stmt->execute("CALL get_pop_continent(\"Asia\", @pop)"); res.reset(stmt->executeQuery("SELECT @pop AS _reply")); while (res->next()) cout << "Population of Asia: " << res->getString("_reply") << endl; stmt->execute("CALL get_world_pop(@pop)"); res.reset(stmt->executeQuery("SELECT @pop AS _reply")); while (res->next()) cout << "Population of World: " << res->getString("_reply") << endl;Compile the program using the following command:
shell> g++ -o sp_scenario2 -I/usr/local/include/cppconn/ -lmysqlcppconn sp_scenario2.cpp
Run the program by typing:
shell> ./sp_scenario2
Note the output generated by the program.
In this scenario the Stored Procedure sets an output parameter. This is not returned as such, but needs to be obtained using a query. If running the SQL statements directly this might be similar to the following:
CALL get_world_pop(@pop); SELECT @pop;
In the C++ code a similar sequence is carried out. First, the
CALL is executed as seen earlier. To obtain the
output parameter an additional query must be executed. This query
results in a ResultSet that can then be
processed in a while loop. The simplest way to
retrieve the data in this case is to use a getString method on the
ResultSet, passing the name of the variable to access. In this
example _reply is used as a placeholder for the
variable and therefore is used as the key to access the correct
element of the result dictionary.
Scenario 3 - Stored Procedure returns a Result Set
You will now see how to handle a Stored Procedure that returns a result set.
Enter the following code into the tutorial framework code:
sql::Driver* driver = get_driver_instance(); std::auto_ptr<sql::Connection> con(driver->connect(url, user, pass)); con->setSchema(database); std::auto_ptr<sql::Statement> stmt(con->createStatement()); stmt->execute("CALL get_stats()"); std::auto_ptr< sql::ResultSet > res; do { res.reset(stmt->getResultSet()); while (res->next()) { cout << "Result: " << res->getString(1) << endl; } } while (stmt->getMoreResults());Compile the program using the following command:
shell> g++ -o sp_scenario3 -I/usr/local/include/cppconn/ -lmysqlcppconn sp_scenario3.cpp
Run the program by typing:
shell> ./sp_scenario3
Note the output generated by the program.
The code is similar to the examples you have previously seen. The code of particular interest in this case is:
do {
res.reset(stmt->getResultSet());
while (res->next()) {
cout << "Name: " << res->getString("Name")
<< " Population: " << res->getInt("Population")
<< endl;
}
} while (stmt->getMoreResults());
The CALL is executed as before, with the
results being returned into multiple
ResultSets. This is because the Stored
Procedure in this case uses multiple SELECT
statements. In this example the output shows that three Result
Sets are processed, because there are three
SELECT statements in the Stored Procedure. All
of the Result Sets have more than one row.
Studying the code it should be noted that the results are processed using the pattern:
do {
Get Result Set
while (Get Result) {
Process Result
}
} while (Get More Result Sets);
Note this pattern would be used even if the Stored Procedure
carried out a single SELECT and you knew
there was only one result set. This is a requirement of the
underlying protocol.
Before working through this tutorial it is recommended you first work through the previous tutorial Section 21.5.6.1, “Tutorial: Calling Stored Procedures with Statements in MySQL Connector/C++”.
Scenario 1 - Using a Prepared Statement to prepare a Stored Procedure that does not return a result set
Add the following code to the
tryblock of the tutorial framework:vector<string> code_vector; code_vector.push_back("SLD"); code_vector.push_back("DSN"); code_vector.push_back("ATL"); vector<string> name_vector; name_vector.push_back("Sealand"); name_vector.push_back("Disneyland"); name_vector.push_back("Atlantis"); vector<string> cont_vector; cont_vector.push_back("Europe"); cont_vector.push_back("North America"); cont_vector.push_back("Oceania"); sql::Driver * driver = get_driver_instance(); std::auto_ptr< sql::Connection > con(driver->connect(url, user, pass)); con->setSchema(database); std::auto_ptr< sql::PreparedStatement > pstmt; pstmt.reset(con->prepareStatement("CALL add_country(?,?,?)")); for (int i=0; i<3; i++) { pstmt->setString(1,code_vector[i]); pstmt->setString(2,name_vector[i]); pstmt->setString(3,cont_vector[i]); pstmt->execute(); }You will also need to add
#include <vector>to the top of your code as vectors are used to store sample data.Compile the code using the following command:
g++ -o ps_scenario1 -I/usr/local/include/cppconn/ -lmysqlcppconn ps_scenario1.cpp
Run the code using the command:
./ps_scenario1
You can test the dataase has been updated correctly by using a query such as:
SELECT Code, Name, Continent FROM Country WHERE Code = "DSN" OR Code="ATL" OR Code="SLD";
The code is relatively simple, as no processing is required to
handle Result Sets. The procedure call, CALL
add_country(?,?,?), is made using placeholders for input
parameters denoted by '?'. These placeholders are replaced by
values using the Prepared Statement's setString
method in this case. The for loop is set up to
iterate 3 times, as there are three data sets in this example. The
same Prepared Statement is executed three times, each time with
different input parameters.
Scenario 2 - Using a Prepared Statement to prepare a Stored Procedure that uses an output parameter
In this scenario a different Stored Procedure is going to be used compared to the one use in the the tutorial Section 21.5.6.1, “Tutorial: Calling Stored Procedures with Statements in MySQL Connector/C++”. This is to illustrate passing an input parameter as well as fetching an output parameter. The stored routine is as follows:
CREATE PROCEDURE get_pop_continent (IN continent_name CHAR(30), OUT continent_pop INT(11))
BEGIN
SELECT SUM(Population) INTO continent_pop FROM Country WHERE Continent = continent_name;
ENDCopy the following code into the try block of the tutorial framework code:
vector<string> cont_vector; cont_vector.push_back("Europe"); cont_vector.push_back("North America"); cont_vector.push_back("Oceania"); sql::Driver * driver = get_driver_instance(); std::auto_ptr< sql::Connection > con(driver->connect(url, user, pass)); con->setSchema(database); std::auto_ptr< sql::Statement > stmt(con->createStatement()); std::auto_ptr< sql::PreparedStatement > pstmt; std::auto_ptr< sql::ResultSet > res; pstmt.reset(con->prepareStatement("CALL get_pop_continent(?,@pop)")); for (int i=0; i<3; i++) { pstmt->setString(1,cont_vector[i]); pstmt->execute(); res.reset(stmt->executeQuery("SELECT @pop AS _population")); while (res->next()) cout << "Population of " << cont_vector[i] << " is " << res->getString("_population") << endl; }You will also need to add the line
#include <vector>to the top of the code, as vectors are used in this example.Compile the code using:
shell> g++ -o ps_scenario2 -I/usr/local/include/cppconn/ -lmysqlcppconn ps_scenario2.cpp
Run the code using:
shell> ./ps_scenario2
Make a note of the output.
In this scenario a Prepared Statement is created that calls the
Stored Procedure get_pop_continent. This
procedure takes an input parameter, and also returns an output
parameter. The approach used is to create another statement that
can be used to fetch the output parameter using a
SELECT query. Note that when the Prepared
Statement is created, the input parameter to the Stored Procedure
is denoted by '?'. Prior to execution of Prepared Statement it is
necessary to replace this placeholder by an actual value. This is
done using methods such as setString and
setInt, for example:
pstmt->setString(1,cont_vector[i]);
Although for the query used to obtain the output parameter a
single result set is expected, it is important to use the
while loop to catch more than one result, to
avoid the possibility of the connection becoming unstable.
Scenario 3 - Using a Prepared Statement to prepare a Stored Procedure that returns multiple Result Sets
Note this scenario is not supported on versions of MySQL prior to 5.5.3. This is due to a limitation in the client/server protocol.
Enter the following code into the
tryblock of the tutorial framework:sql::Driver * driver = get_driver_instance(); std::auto_ptr< sql::Connection > con(driver->connect(url, user, pass)); con->setSchema(database); std::auto_ptr< sql::PreparedStatement > pstmt; std::auto_ptr< sql::ResultSet > res; pstmt.reset(con->prepareStatement("CALL get_data()")); res.reset(pstmt->executeQuery()); do { res.reset(pstmt->getResultSet()); while (res->next()) { cout << "Name: " << res->getString("Name") << " Population: " << res->getInt("Population") << endl; } } while (pstmt->getMoreResults());Compile the code using the following command:
shell> g++ -o ps_scenario3 -I/usr/local/include/cppconn/ -lmysqlcppconn ps_scenario3.cpp
Run the program using the command:
shell> ./ps_scenario3
Make a note of the output generated.
The code executes the Stored Procedure using a Prepared Statement.
The standard do-while construct is used to ensure that all Result
Sets are fetched. In this case the returned values are fetched
from the Result Sets using the getInt and
getString methods.
Although a debugger can be used to debug your application, you may find it beneficial to turn on the debug traces of the connector. Some problems happen randomly which makes them difficult to debug using a debugger. In such cases debug traces and protocol files are more useful because they allow you to trace the activities of all instances of your program.
DTrace is a very powerful technology to trace any application without having to develop an extra trace module for your application. Unfortunately, DTrace is currently only available on Solaris, MacOS 10.5, and FreeBSD.
The MySQL Connector/C++ can write two trace files:
Trace file generated by the MySQL Client Library
Trace file generated internally by MySQL Connector/C++
The first trace file can be generated by the underlying MySQL
Client Library (libmysql). To enable this trace the connector will
call the C-API function mysql_debug()
internally. Only debug versions of the MySQL Client Library are
capable of writing a trace file. Therefore you need to compile
MySQL Connector/C++ against a debug version of the library, if you want utilize
this trace. The trace shows the internal function calls and the
addresses of internal objects as you can see below:
>mysql_stmt_init | >_mymalloc | | enter: Size: 816 | | exit: ptr: 0x68e7b8 | <_mymalloc | >init_alloc_root | | enter: root: 0x68e7b8 | | >_mymalloc | | | enter: Size: 2064 | | | exit: ptr: 0x68eb28 [...]
The second trace is the MySQL Connector/C++ internal trace. It is available
with debug and nondebug builds of the connector as long as you
have enabled the tracing module at compile time using
cmake -DMYSQLCPPCONN_TRACE_ENABLE:BOOL=1. By
default, the tracing functionality is not available and calls to
trace functions are removed by the preprocessor.
Compiling the connector with tracing functionality enabled will cause two additional tracing function calls per each connector function call. You will need to run your own benchmark to find out how much this will impact the performance of your application.
A simple test using a loop running 30,000 INSERT SQL statements showed no significant real-time impact. The two variants of this application using a trace enabled and trace disabled version of the connector performed equally well. The run time measured in real-time was not significantly impacted as long as writing a debug trace was not enabled. However, there will be a difference in the time spent in the application. When writing a debug trace the IO subsystem may become a bottleneck.
In summary, use connector builds with tracing enabled carefully. Trace enabled versions may cause higher CPU usage even if the overall run time of your application is not impacted significantly.
| INF: Tracing enabled <MySQL_Connection::setClientOption >MySQL_Prepared_Statement::setInt | INF: this=0x69a2e0 | >MySQL_Prepared_Statement::checkClosed | <MySQL_Prepared_Statement::checkClosed | <MySQL_Prepared_Statement::setInt [...]
The example from examples/debug_output.cpp
demonstrates how to activate the debug traces in your program.
Currently they can only be activated through API calls. The traces
are controlled on a per-connection basis. You can use the
setClientOptions() method of a connection
object to activate and deactivate the generation of a trace. The
MySQL Client Library trace is always written into a file, whereas
the connector's protocol messages are printed to standard out.
sql::Driver *driver;
int on_off = 1;
/* Using the Driver to create a connection */
driver = get_driver_instance();
std::auto_ptr< sql::Connection > con(driver->connect(host, user, pass));
/*
Activate debug trace of the MySQL Client Library (C-API)
Only available with a debug build of the MySQL Client Library!
*/
con->setClientOption("libmysql_debug", "d:t:O,client.trace");
/*
Tracing is available if you have compiled the driver using
cmake -DMYSQLCPPCONN_TRACE_ENABLE:BOOL=1
*/
con->setClientOption("client_trace", &on_off);
See the
JDBC
overview for information on JDBC 4.0. Please also check
the examples/ directory of the download
package.
Notes on using the MySQL Connector/C++ API
DatabaseMetaData::supportsBatchUpdates()returnstruebecause MySQL supports batch updates in general. However, no API calls for batch updates are provided by the MySQL Connector/C++ API.Two non-JDBC methods have been introduced for fetching and setting unsigned integers:
getUInt64()andgetUInt(). These are available forResultSetandPrepared_Statement:ResultSet::getUInt64()ResultSet::getUInt()Prepared_Statement::setUInt64()Prepared_Statement::setUInt()
The corresponding
getLong()andsetLong()methods have been removed.The method
DatabaseMetaData::getColumns()has 23 columns in its result set, rather than the 22 columns defined by JDBC. The first 22 columns are as described in the JDBC documentation, but column 23 is new:23.
IS_AUTOINCREMENT: String which is “YES” if the column is an auto-increment column. Otherwise the string contains “NO”.MySQL Connector/C++ may return different metadata for the same column.
When you have any column that accepts a charset and a collation in its specification and you specify a binary collation, such as:
CHAR(250) CHARACTER SET 'latin1' COLLATE 'latin1_bin'
The server sets the
BINARYflag in the result set metadata of this column. The methodResultSetMetadata::getColumnTypeName()uses the metadata and will report, due to theBINARYflag, that the column type name isBINARY. This is illustrated below:mysql> create table varbin(a varchar(20) character set utf8 collate utf8_bin); Query OK, 0 rows affected (0.00 sec) mysql> select * from varbin; Field 1: `a` Catalog: `def` Database: `test` Table: `varbin` Org_table: `varbin` Type: VAR_STRING Collation: latin1_swedish_ci (8) Length: 20 Max_length: 0 Decimals: 0 Flags: BINARY 0 rows in set (0.00 sec) mysql> select * from information_schema.columns where table_name='varbin'\G *************************** 1. row *************************** TABLE_CATALOG: NULL TABLE_SCHEMA: test TABLE_NAME: varbin COLUMN_NAME: a ORDINAL_POSITION: 1 COLUMN_DEFAULT: NULL IS_NULLABLE: YES DATA_TYPE: varchar CHARACTER_MAXIMUM_LENGTH: 20 CHARACTER_OCTET_LENGTH: 60 NUMERIC_PRECISION: NULL NUMERIC_SCALE: NULL CHARACTER_SET_NAME: utf8 COLLATION_NAME: utf8_bin COLUMN_TYPE: varchar(20) COLUMN_KEY: EXTRA: PRIVILEGES: select,insert,update,references COLUMN_COMMENT: 1 row in set (0.01 sec)However,
INFORMATION_SCHEMAgives no hint in itsCOLUMNStable that metadata will contain theBINARYflag.DatabaseMetaData::getColumns()usesINFORMATION_SCHEMA. It will report the type nameCHARfor the same column. Note, a different type code is also returned.The MySQL Connector/C++ class
sql::DataTypedefines the following JDBC standard data types:UNKNOWN,BIT,TINYINT,SMALLINT,MEDIUMINT,INTEGER,BIGINT,REAL,DOUBLE,DECIMAL,NUMERIC,CHAR,BINARY,VARCHAR,VARBINARY,LONGVARCHAR,LONGVARBINARY,TIMESTAMP,DATE,TIME,GEOMETRY,ENUM,SET,SQLNULL.However, the following JDBC standard data types are not supported by MySQL Connector/C++:
ARRAY,BLOB,CLOB,DISTINCT,FLOAT,OTHER,REF,STRUCT.When inserting or updating
BLOBorTEXTcolumns, MySQL Connector/C++ developers are advised not to usesetString(). Instead it is recommended that the dedicated API functionsetBlob()be used instead.The use of
setString()can cause a Packet too large error message. The error will occur if the length of the string passed to the connector usingsetString()exceedsmax_allowed_packet(minus a few bytes reserved in the protocol for control purposes). This situation is not handled in MySQL Connector/C++, as this could lead to security issues, such as extremely large memory allocation requests due to malevolently long strings.However, if
setBlob()is used, this problem does not arise. This is becausesetBlob()takes a streaming approach based onstd::istream. When sending the data from the stream to MySQL Server, MySQL Connector/C++ will split the stream into chunks appropriate for MySQL Server and observe themax_allowed_packetsetting currently being used.CautionWhen using
setString()it is not possible to setmax_allowed_packetto a value large enough for the string, prior to passing it to MySQL Connector/C++. The MySQL 5.1 documentation formax_allowed_packetstates: “As of MySQL 5.1.31, the session value of this variable is read only. Before 5.1.31, setting the session value is permitted but has no effect.”This difference with the JDBC specification ensures that MySQL Connector/C++ is not vulnerable to memory flooding attacks.
In general MySQL Connector/C++ works with MySQL 5.0, but it is not completely supported. Some methods may not be available when connecting to MySQL 5.0. This is because the Information Schema is used to obtain the requested information. There are no plans to improve the support for 5.0 because the current GA version of MySQL Server is 5.1. As a new product, MySQL Connector/C++ is primarily targeted at the MySQL Server GA version that was available on its release.
The following methods will throw a
sql::MethodNotImplementedexception when you connect to MySQL earlier than 5.1.0:DatabaseMetadata::getCrossReference()DatabaseMetadata::getExportedKeys()
MySQL Connector/C++ includes a method
Connection::getClientOption()which is not included in the JDBC API specification. The prototype is:void getClientOption(const std::string & optionName, void * optionValue)
The method can be used to check the value of connection properties set when establishing a database connection. The values are returned through the
optionValueargument passed to the method with the typevoid *.Currently,
getClientOption()supports fetching theoptionValueof the following options:metadataUseInfoSchemadefaultStatementResultTypedefaultPreparedStatementResultType
The connection option
metadataUseInfoSchemacontrols whether to use theInformation_Schematafor returning the meta data ofSHOWcommands. In the case ofmetadataUseInfoSchematheoptionValueargument should be interpreted as a boolean upon return.In the case of both
defaultStatementResultTypeanddefaultPreparedStatementResultType, theoptionValueargument should be interpreted as an integer upon return.The connection property can be either set when establishing the connection through the connection property map or using
void Connection::setClientOption(const std::string & optionName, const void * optionValue)whereoptionNameis assigned the valuemetadataUseInfoSchema.Some examples are given below:
int defaultStmtResType; int defaultPStmtResType; conn->getClientOption("defaultStatementResultType", (void *) &defaultStmtResType); conn->getClientOption("defaultPreparedStatementResultType", (void *) &defaultPStmtResType); bool isInfoSchemaUsed; conn->getClientOption("metadataUseInfoSchema", (void *) &isInfoSchemaUsed);MySQL Connector/C++ also supports the following methods not found in the JDBC API standard:
std::string MySQL_Connection::getSessionVariable(const std::string & varname)
void MySQL_Connection::setSessionVariable(const std::string & varname, const std::string & value)
Note that both methods are members of the
MySQL_Connectionclass. The methods get and set MySQL session variables.setSessionVariable()is equivalent to executing:SET SESSION <varname> = <value>
getSessionVariable()is equivalent to executing the following and fetching the first return value:SHOW SESSION VARIABLES LIKE "<varname>"
You can use “%” and other placeholders in <varname>, if the underlying MySQL server supports this.
Fetching the value of a column can sometimes return different values depending on whether the call is made from a Statement or Prepared Statement. This is because the protocol used to communicate with the server differs depending on whether a Statement or Prepared Statement is used.
To illustrate this, consider the case where a column has been defined as of type
BIGINT. The most negativeBIGINTvalue is then inserted into the column. If a Statement and Prepared Statement are created that perform aGetUInt64()call, then the results will be found to be different in each case. The Statement returns the maximum positive value forBIGINT. The Prepared Statement returns 0.The reason for the different results is due to the fact that Statements use a text protocol, and Prepared Statements use a binary protocol. With the binary protocol in this case, a binary value is returned from the server that can be interpreted as an
int64. In the above scenario a very large negative value was fetched withGetUInt64(), which fetches unsigned integers. As the large negative value cannot be sensibly converted to an unsigned value 0 is returned.In the case of the Statement, which uses the text protocol, values are returned from the server as strings, and then converted as required. When a string value is returned from the server in the above scenario the large negative value will need to be converted by the runtime library function
strtoul(), whichGetUInt64()calls. The behavior ofstrtoul()is dependent upon the specific runtime and host operating system, so the results can be variable. In the case given a large positive value was actually returned.Although it is very rare, there are some cases where Statements and Prepared Statements can return different values unexpectedly, but this usually only happens in extreme cases such as the one mentioned.
The JDBC documentation lists many fields for the
DatabaseMetaDataclass. JDBC also appears to define certain values for those fields. However, MySQL Connector/C++ does not define certain values for those fields. Internally enumerations are used and the compiler determines the values to assign to a field.To compare a value with the field, code such as the following should be used, rather than making assumptions about specific values for the attribute:
// dbmeta is an instance of DatabaseMetaData if (myvalue == dbmeta->attributeNoNulls) { ... }Usually
myvaluewill be a column from a result set holding metadata information. MySQL Connector/C++ does not guarantee thatattributeNoNullsis 0. It can be any value.When programming Stored Procedures JDBC has available an extra class, an extra abstraction layer for callable statements, the
CallableStatementclass. This is not present in MySQL Connector/C++. You therefore need to use the methods from theStatementandPrepared Statementclasses to run a Stored Procedure usingCALL.
Please report bugs through MySQL Bug System .
Known bugs:
None.
Known issues:
When linking against a static library for 1.0.3 on Windows you need to define
CPPDBC_PUBLIC_FUNCeither in the compiler options (preferable) or with/D "CPPCONN_PUBLIC_FUNC=". You can also explicitly define it in your code by placing#define CPPCONN_PUBLIC_FUNCbefore the header inclusions.Generally speaking C++ library binaries are less portable than C library binaries. Issues can be caused by name mangling, different Standard Template Library (STL) versions and using different compilers and linkers for linking against the libraries than were used for building the library itself.
Even a small change in the compiler version can, but does not have to, cause problems. If you obtain error messages, that you suspect are related to binary incompatibilities, build MySQL Connector/C++ from source, using the same compiler and linker that you will use to build and link your application.
Due to the variations between Linux distributions, compiler and linker versions and STL versions, it is not possible to provide binaries for each and every possible configuration. However, the MySQL Connector/C++ binary distributions contain a
READMEfile that describes the environment and settings used to build the binary versions of the libraries.To avoid potential crashes the build configuration of MySQL Connector/C++ should match the build configuration of the application using it. For example, do not use the release build of MySQL Connector/C++ with a debug build of the client application.
See also the MySQL Connector/C++ Changelogs which can be found here Section D.8, “MySQL Connector/C++ Change History”.
You can suggest new features in the first instance by joining the mailing list or forum and talking with the developers directly. See Section 21.5.11, “MySQL Connector/C++ Support”
The following feature requests are currently being worked on:
C++ references for
Statements,ResultSets, and exceptions, are being considered, instead of pointers to heap memory. This reduces the exception handling burden for the programmer.Adopt STL (suggestions are welcome).
JDBC compliance: data type interfaces and support through
ResultSet:getType()andPreparedStatement:bind(). Introducesql::Blob,sql::Clob,sql::Date,sql::Time,sql::Timestamp,sql::URL. Supportget|setBlob(),get|setClob(),get|setDate(),get|setTime(),get|setTimestamp(),get|setURL()Add support for all C-API connection options. Improved support for
mysql_options.Add connect method which supports passing options using HashMaps.
Create Windows installer.
For general discussion of the MySQL Connector/C++ please use the C/C++ community forum or join the MySQL Connector/C++ mailing list.
Bugs can be reported at the MySQL bug Web site.
For Licensing questions, and to purchase MySQL Products and Services, please http://www.mysql.com/buy-mysql/
The MySQL Connector/C++ Changelogs can be found here Section D.8, “MySQL Connector/C++ Change History”
Questions
22.5.12.1: What is MySQL Connector/C++?
22.5.12.2: Are any MySQL products using MySQL Connector/C++?
22.5.12.3: Does MySQL Connector/C++ implement the client/server protocol?
22.5.12.4: Which MySQL Server version(s) is MySQL Connector/C++ compatible with?
Questions and Answers
22.5.12.1: What is MySQL Connector/C++?
MySQL Connector/C++ is a MySQL database connector for C++. It allows you develop applications in C++ that connect to the MySQL Server. MySQL Connector/C++ is compatible with the JDBC 4.0 API.
22.5.12.2: Are any MySQL products using MySQL Connector/C++?
Yes, MySQL Workbench and MySQL Connector/OpenOffice.org.
22.5.12.3: Does MySQL Connector/C++ implement the client/server protocol?
No. MySQL Connector/C++ uses the MySQL Client Library for the client/server communication.
22.5.12.4: Which MySQL Server version(s) is MySQL Connector/C++ compatible with?
MySQL Connector/C++ fully supports MySQL Server version 5.1 and later.
What is MySQL Connector/C?
MySQL Connector/C is a C client library for client/server communication. It is a standalone replacement for the MySQL Client Library shipped with the MySQL Server.
Why have a replacement for MySQL Client Library?
There is no need to compile or install the MySQL Server package if you only need the client library.
MySQL Connector/C does not rely on the MySQL Server release cycle, so bug fixes and new features are released more often.
MySQL Connector/C API documentation is available here Section 21.9.3, “C API Function Descriptions”.
Supported platforms include:
Windows
Windows x64
Linux
Solaris
FreeBSD
Mac OS X
HP-UX
IBM AIX
IBM i5/OS
Obtaining the Source Code
A TAR file containing the source code can be downloaded from the MySQL Developers site. You will need to select the source code package from the drop down list.
The source code for development releases of the connector can be found at Launchpad. The project home page can be found here.
The source code for the 1.0 branch can be found here.
To obtain the code you will need to have Bazaar installed and use
the command bzr branch lp:libmysql.
Building on Unix
Examples of supported Unix or Unix-like operating systems include:
Solaris
Linux
HP-UX
AIX
OS X
Compiler Tools
Ideally, the native compiler tool set for the target platform is used for compilation. This would be SunStudio for Solaris and aCC for HP-UX for example. However, the GNU tool-chain can be used across all platforms.
You also need CMake 2.6 or newer, which is available online.
To Build
If using GNU AutoTools change to the MySQL Connector/C source directory and follow the procedure below.
To generate the makefile enter:
shell> cmake -G "Unix Makefiles"
or for a Debug build enter:
shell> cmake -G "Unix Makefiles" -DCMAKE_BUILD_TYPE=Debug
Then build the project using:
shell> make
To Install
By default make install will install the MySQL Connector/C files in the
/usr/localdirectory. You can change this behavior by specifying another directory when generating themakefile:shell> cmake -G "Unix Makefiles" -DCMAKE_INSTALL_PREFIX=/mypath
Now, in the root shell, enter the following to install the MySQL Connector/C libraries and tools:
root-shell> make install
At this point all of the MySQL Connector/C files will be in place.
Building on Microsoft Windows
Older versions of Microsoft Windows are not supported. Supported versions are Windows 2000, Windows XP, Windows Vista, Windows Server 2003, or Windows Server 2008.
Compiler Tools
Microsoft Visual Studio 8 and 9 are recommended. The Express Edition of Visual Studio and other compilers may work, but are untested.
You also need CMake 2.6 or newer, available at http://www.cmake.org
To Build
You need to have the environment variables set for the Visual Studio toolchain. Visual Studio includes a batch file to set these for you, and installs a shortcut into the Start menu to open a command prompt with these variables set.
Build MySQL Connector/C using the CMake command-line tool by entering the following from the source root directory in a command prompt window:
shell> cmake -G "Visual Studio 9 2008"
This produces a project file that you can open with Visual Studio or build from the command line with either of:
shell> devenv.com libmysql.sln /build Release
shell> devenv.com libmysql.sln /build RelWithDebInfo
For other versions of Visual Studio or
nmakebased build, run the following command:shell> cmake --help
to check the supported generators.
To compile the Debug build, you must run set the CMake build type so the correct version of external libraries are used:
shell> cmake -G "Visual Studio 8 2005" -DCMAKE_BUILD_TYPE=Debug
Followed by:
shell> devenv.com libmysql.sln /build Debug
To Install
To create a install package you can choose between two variants:
Creating a Zip package
Creating an MSI install package
Zip package
To create a Zip package, run the
cpackcommand from the root of your MySQL Connector/C source directory.MSI Install package
The required tools include Windows XML Installer toolset (WIX), which is available online.
To create the MSI install package change to the subdirectory
winand generate themakefile:shell> cmake -G "NMake Makefiles"
Create the MSI install package by calling
nmake:shell> nmake
Build Options
The following options can be used when building the MySQL Connector/C source code:
| Build Option | Description |
|---|---|
| -DWITH_OPENSSL=1 | Enables dynamic linking to the system OpenSSL library. |
| -DWITH_EXTERNAL_ZLIB=1 | Enables dynamic linking to the system Zlib library. |
For testing MySQL Connector/C you will need a running MySQL server instance. Before you run the test suite you need to specify the following environment variables:
MYSQL_TEST_HOST(default localhost)MYSQL_TEST_USERMYSQL_TEST_PASSWDMYSQL_TEST_PORTMYSQL_TEST_SOCKETMYSQL_TEST_DB(default test)
To run the test suite, execute ctest from the
command line:
shell> ctest
Questions
22.6.3.1: What is the “MySQL Native C API”? What are its typical benefits and use cases?
22.6.3.2: What is “libmysql”?
22.6.3.3: What is “libmysqld”?
22.6.3.4: What is “MySQL Connector/C”?
22.6.3.5: What is the difference between “Native C API”, “libmysql”, “libmysqld” and “MySQL Connector/C”?
22.6.3.6: Does MySQL Connector/C replace any of “Native C API”, “libmysql” and “libmysqld”?
Questions and Answers
22.6.3.1: What is the “MySQL Native C API”? What are its typical benefits and use cases?
MySQL Connector/C, also known as libmysql, or MySQL Native
C API, is a standalone, C-based API and library that you can use
in C applications to connect with the MySQL Server. It
implements the same MySQL client API that has been in use for a
decade.
It is also used as the foundation for drivers for standard database APIs such as ODBC, Perl's DBI, and Python's DB API.
libmysql is the name of the library that MySQL Connector/C
provides.
22.6.3.3: What is “libmysqld”?
libmysqld is an embedded database server with
the same API as MySQL Connector/C. It is included with the MySQL Server
distribution.
22.6.3.4: What is “MySQL Connector/C”?
MySQL Connector/C is a standalone distribution of the
libmysql library, which was previously only
available as part of the MySQL Server distribution. The version
of libmysql included with MySQL Connector/C and the
version bundled with the server are functionally equivalent, but
the cross-platform build system for MySQL Connector/C uses CMake.
22.6.3.5: What is the difference between “Native C API”, “libmysql”, “libmysqld” and “MySQL Connector/C”?
MySQL Connector/C and libmysql are the “native C API
for MySQL”, and all three terms can be used
interchangeably. “libmysqld” is the embedded
version of the MySQL Server, and is included in the server
distribution.
22.6.3.6: Does MySQL Connector/C replace any of “Native C API”, “libmysql” and “libmysqld”?
MySQL Connector/C contains libmysql, and implements a
native C API. It does not include libmysqld,
which can be found with the MySQL server distribution.
MySQL Connector/OpenOffice.org is a native MySQL database connector for OpenOffice.org. Currently, it is in preview status and supports OpenOffice.org 3.1 and above. It can be used to connect OpenOffice.org applications to a MySQL server.
Before MySQL Connector/OpenOffice.org became available you would have to use MySQL Connector/J (JDBC) or MySQL Connector/ODBC to connect to a MySQL server.
Connector/OpenOffice.org is a community project. The source code for Connector/OpenOffice.org is available under GPL with the FLOSS License Exception.
Advantages
Using MySQL Connector/OpenOffice.org has the following advantages:
Easy installation through the OpenOffice.org Extension Manager.
Seamless integration into OpenOffice.org.
No need to go through an additional Connector installation routine (ODBC/JDBC)
No need to configure or register an additional Connector (ODBC)
No need to install or configure a driver manager (ODBC)
Status
MySQL Connector/OpenOffice.org is currently at version 1.0 GA.
If you have any queries please contact us through our mailing list
at <users@dba.openoffice.org>
Install or upgrade to OpenOffice.org 3.1.
Download MySQL Connector/OpenOffice.org from The OpenOffice.org extension download site. Save the file corresponding to your platform. Currently supported platforms are Windows, Linux, Linux x86-64, Mac OS X, Solaris x86 and Solaris SPARC.
Add the
.oxtextension through the Extension Manager of OpenOffice.org. In OpenOffice.org, select , and specify the.oxtfile as a new extension. When done, MySQL Connector/OpenOffice.org will show up as a new extension in the Extension Manager.Restart OpenOffice.org.
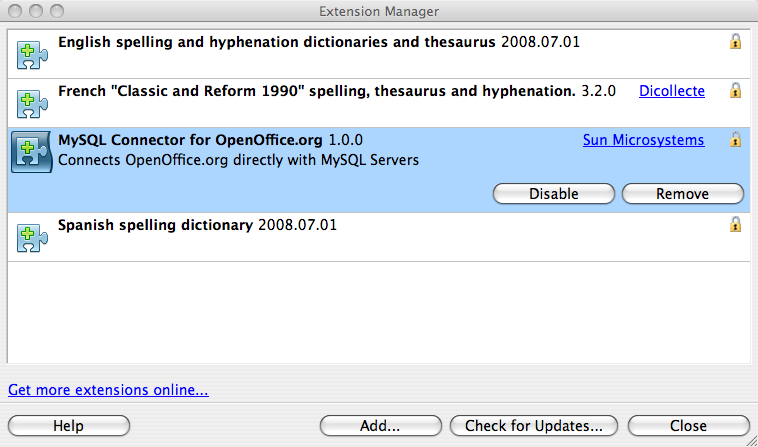
MySQL Connector/OpenOffice.org enables you to access the MySQL Server and its schemata from the OpenOffice.org suite.
The following example demonstrates the creation of a new OpenOffice.org Base database which uses a local MySQL Server for storage and the new connector for connecting.
Select the database
Create a new database by selecting , , . This starts a wizard that enables you to create a new database, open an existing database, or connect to an existing database. Select the Connect to existing database radio button. From the listbox select MySQL. Click .
You will be asked how you would like to connect to the database. Select the Connect native radio button.
Click .
Fill in the connection settings
Enter the name of the database, server URL, and optionally the socket to connect on (if not using the default).
Note that if you do not specify a database all databases will be available for selection.
Click .
Set up user authentication
If you are using MySQL server's anonymous account without a password, you do not have to fill in anything in this step. Otherwise, fill in your MySQL user name and check the password checkbox. Note, for security reasons, you should not normally use the anonymous account without a password.
You can now test your connection to the MySQL database server by clicking the button. Check the checkbox if you do not want OpenOffice.org to ask you for your password again in the current session. Testing the connection is optional, although recommended.
Click .
Decide how to proceed after connecting to the database
Keep the default settings.
Click .
You will then be prompted to save you database as a database file. Enter the name of the database and the location in which to save the file.
Click .
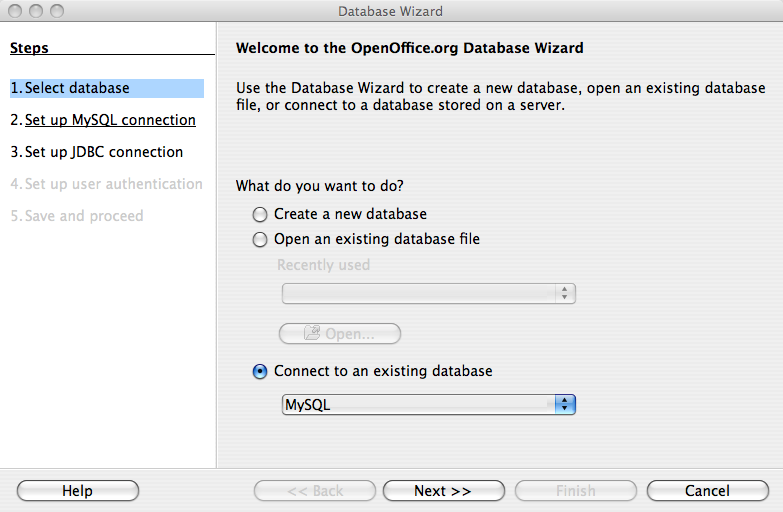
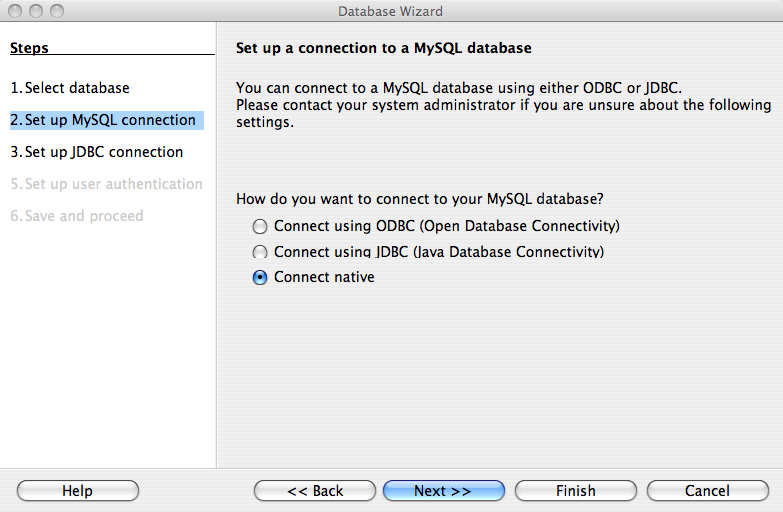
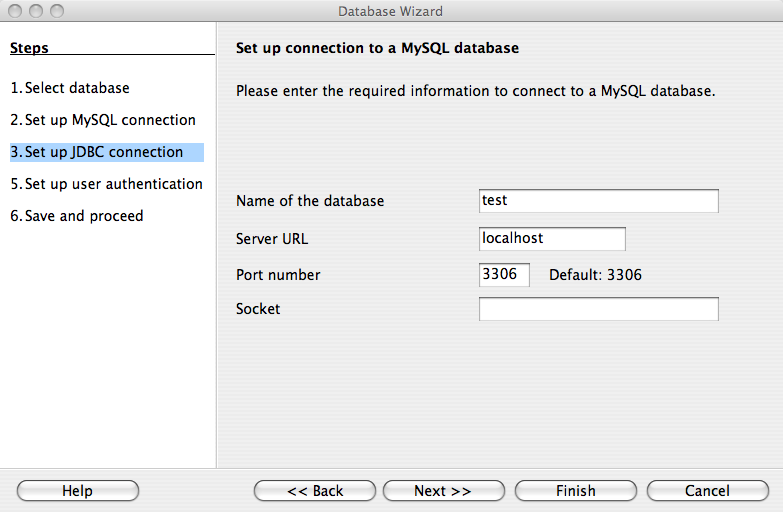
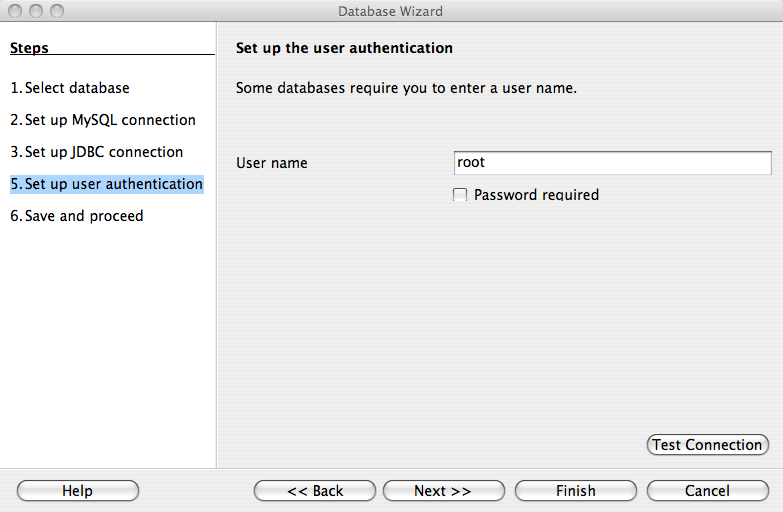
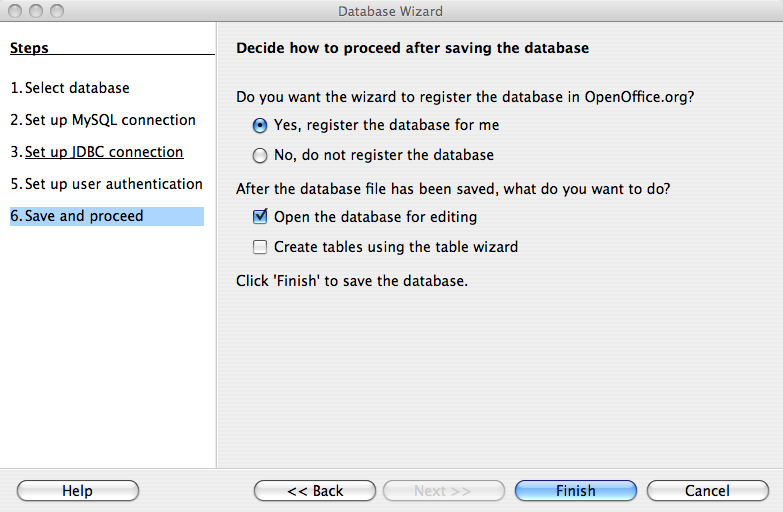
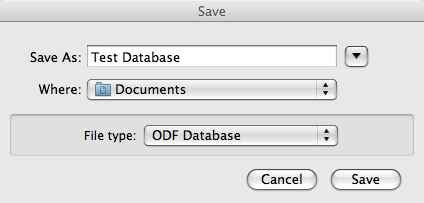
You will be located in the Base application with your database tables displayed.
Listing Tables
In the Database area of the Base main window, select Tables. If this is the first time you are accessing the database you will be prompted for your credentials (user name and password); you can store these settings for your current Base session.
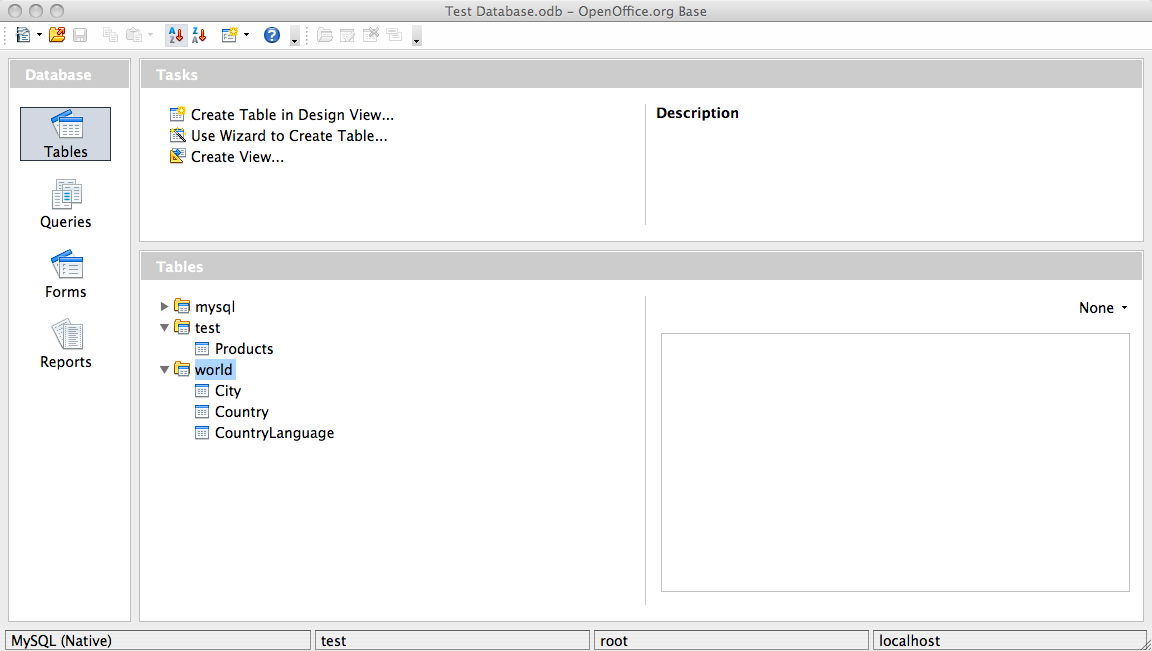
Depending on your connection settings you will now see all databases with all their tables, or just the database you have specified in the connection settings.
See the OpenOffice.org Web site for documentation of the office suite and its Extension Manager.
If you discover a bug in Connector/OpenOffice.org please
add
it to this list and send an email to
<users@dba.openoffice.org>. You need to be logged in
with an OpenOffice.org account for both; see the
project
mailing list for details.
To discuss the new MySQL Connector/OpenOffice.org, please
subscribe to the mailing list
<users@dba.openoffice.org>. It is a low-volume list
with less than 10 mails per day.
The embedded MySQL server library makes it possible to run a full-featured MySQL server inside a client application. The main benefits are increased speed and more simple management for embedded applications.
The embedded server library is based on the client/server version of MySQL, which is written in C/C++. Consequently, the embedded server also is written in C/C++. There is no embedded server available in other languages.
The API is identical for the embedded MySQL version and the client/server version. To change an old threaded application to use the embedded library, you normally only have to add calls to the following functions.
| Function | When to Call |
|---|---|
mysql_library_init() | Should be called before any other MySQL function is called, preferably
early in the main() function. |
mysql_library_end() | Should be called before your program exits. |
mysql_thread_init() | Should be called in each thread you create that accesses MySQL. |
mysql_thread_end() | Should be called before calling pthread_exit() |
Then you must link your code with libmysqld.a
instead of libmysqlclient.a. To ensure binary
compatibility between your application and the server library, be
sure to compile your application against headers for the same series
of MySQL that was used to compile the server library. For example,
if libmysqld was compiled against MySQL 4.1
headers, do not compile your application against MySQL 5.1 headers,
or vice versa.
The
mysql_library_
functions are also included in xxx()libmysqlclient.a
to enable you to change between the embedded and the client/server
version by just linking your application with the right library. See
Section 21.9.3.40, “mysql_library_init()”.
One difference between the embedded server and the standalone server
is that for the embedded server, authentication for connections is
disabled by default. To use authentication for the embedded server,
specify the --with-embedded-privilege-control
option when you invoke configure to configure
your MySQL distribution.
In precompiled binary MySQL distributions that include
libmysqld, the embedded server library, MySQL
builds the library using the appropriate vendor compiler if there
is one.
To get a libmysqld library if you build MySQL
from source yourself, you should configure MySQL with the
--with-embedded-server option.
See Section 2.11.3, “Typical configure Options”.
When you link your program with libmysqld, you
must also include the system-specific pthread
libraries and some libraries that the MySQL server uses. You can
get the full list of libraries by executing mysql_config
--libmysqld-libs.
The correct flags for compiling and linking a threaded program must be used, even if you do not directly call any thread functions in your code.
To compile a C program to include the necessary files to embed the MySQL server library into an executable version of a program, the compiler will need to know where to find various files and need instructions on how to compile the program. The following example shows how a program could be compiled from the command line, assuming that you are using gcc, use the GNU C compiler:
gcc mysql_test.c -o mysql_test -lz \ `/usr/local/mysql/bin/mysql_config --include --libmysqld-libs`
Immediately following the gcc command is the
name of the C program source file. After it, the
-o option is given to indicate that the file name
that follows is the name that the compiler is to give to the
output file, the compiled program. The next line of code tells the
compiler to obtain the location of the include files and libraries
and other settings for the system on which it is compiled. Because
of a problem with mysql_config, the option
-lz (for compression) is added here. The
mysql_config command is contained in backticks,
not single quotation marks.
On some non-gcc platforms, the embedded library depends on C++ runtime libraries and linking against the embedded library might result in missing-symbol errors. To solve this, link using a C++ compiler or explicitly list the required libraries on the link command line.
The embedded server has the following limitations:
No user-defined functions (UDFs).
No stack trace on core dump.
You cannot set this up as a master or a slave (no replication).
Very large result sets may be unusable on low memory systems.
You cannot connect to an embedded server from an outside process with sockets or TCP/IP. However, you can connect to an intermediate application, which in turn can connect to an embedded server on the behalf of a remote client or outside process.
InnoDBis not reentrant in the embedded server and cannot be used for multiple connections, either successively or simultaneously.The Event Scheduler is not available. Because of this, the
event_schedulersystem variable is disabled.
Some of these limitations can be changed by editing the
mysql_embed.h include file and recompiling
MySQL.
Any options that may be given with the mysqld
server daemon, may be used with an embedded server library. Server
options may be given in an array as an argument to the
mysql_library_init(), which
initializes the server. They also may be given in an option file
like my.cnf. To specify an option file for a
C program, use the --defaults-file
option as one of the elements of the second argument of the
mysql_library_init() function. See
Section 21.9.3.40, “mysql_library_init()”, for more information on the
mysql_library_init() function.
Using option files can make it easier to switch between a
client/server application and one where MySQL is embedded. Put
common options under the [server] group. These
are read by both MySQL versions. Client/server-specific options
should go under the [mysqld] section. Put
options specific to the embedded MySQL server library in the
[embedded] section. Options specific to
applications go under section labeled
[ApplicationName_SERVER]. See
Section 4.2.3.3, “Using Option Files”.
These two example programs should work without any changes on a Linux or FreeBSD system. For other operating systems, minor changes are needed, mostly with file paths. These examples are designed to give enough details for you to understand the problem, without the clutter that is a necessary part of a real application. The first example is very straightforward. The second example is a little more advanced with some error checking. The first is followed by a command-line entry for compiling the program. The second is followed by a GNUmake file that may be used for compiling instead.
Example 1
test1_libmysqld.c
#include <stdio.h>
#include <stdlib.h>
#include <stdarg.h>
#include "mysql.h"
MYSQL *mysql;
MYSQL_RES *results;
MYSQL_ROW record;
static char *server_options[] = \
{ "mysql_test", "--defaults-file=my.cnf", NULL };
int num_elements = (sizeof(server_options) / sizeof(char *)) - 1;
static char *server_groups[] = { "libmysqld_server",
"libmysqld_client", NULL };
int main(void)
{
mysql_library_init(num_elements, server_options, server_groups);
mysql = mysql_init(NULL);
mysql_options(mysql, MYSQL_READ_DEFAULT_GROUP, "libmysqld_client");
mysql_options(mysql, MYSQL_OPT_USE_EMBEDDED_CONNECTION, NULL);
mysql_real_connect(mysql, NULL,NULL,NULL, "database1", 0,NULL,0);
mysql_query(mysql, "SELECT column1, column2 FROM table1");
results = mysql_store_result(mysql);
while((record = mysql_fetch_row(results))) {
printf("%s - %s \n", record[0], record[1]);
}
mysql_free_result(results);
mysql_close(mysql);
mysql_library_end();
return 0;
}
Here is the command line for compiling the above program:
gcc test1_libmysqld.c -o test1_libmysqld -lz \ `/usr/local/mysql/bin/mysql_config --include --libmysqld-libs`
Example 2
To try the example, create an test2_libmysqld
directory at the same level as the MySQL source directory. Save
the test2_libmysqld.c source and the
GNUmakefile in the directory, and run GNU
make from inside the
test2_libmysqld directory.
test2_libmysqld.c
/*
* A simple example client, using the embedded MySQL server library
*/
#include <mysql.h>
#include <stdarg.h>
#include <stdio.h>
#include <stdlib.h>
MYSQL *db_connect(const char *dbname);
void db_disconnect(MYSQL *db);
void db_do_query(MYSQL *db, const char *query);
const char *server_groups[] = {
"test2_libmysqld_SERVER", "embedded", "server", NULL
};
int
main(int argc, char **argv)
{
MYSQL *one, *two;
/* mysql_library_init() must be called before any other mysql
* functions.
*
* You can use mysql_library_init(0, NULL, NULL), and it
* initializes the server using groups = {
* "server", "embedded", NULL
* }.
*
* In your $HOME/.my.cnf file, you probably want to put:
[test2_libmysqld_SERVER]
language = /path/to/source/of/mysql/sql/share/english
* You could, of course, modify argc and argv before passing
* them to this function. Or you could create new ones in any
* way you like. But all of the arguments in argv (except for
* argv[0], which is the program name) should be valid options
* for the MySQL server.
*
* If you link this client against the normal mysqlclient
* library, this function is just a stub that does nothing.
*/
mysql_library_init(argc, argv, (char **)server_groups);
one = db_connect("test");
two = db_connect(NULL);
db_do_query(one, "SHOW TABLE STATUS");
db_do_query(two, "SHOW DATABASES");
mysql_close(two);
mysql_close(one);
/* This must be called after all other mysql functions */
mysql_library_end();
exit(EXIT_SUCCESS);
}
static void
die(MYSQL *db, char *fmt, ...)
{
va_list ap;
va_start(ap, fmt);
vfprintf(stderr, fmt, ap);
va_end(ap);
(void)putc('\n', stderr);
if (db)
db_disconnect(db);
exit(EXIT_FAILURE);
}
MYSQL *
db_connect(const char *dbname)
{
MYSQL *db = mysql_init(NULL);
if (!db)
die(db, "mysql_init failed: no memory");
/*
* Notice that the client and server use separate group names.
* This is critical, because the server does not accept the
* client's options, and vice versa.
*/
mysql_options(db, MYSQL_READ_DEFAULT_GROUP, "test2_libmysqld_CLIENT");
if (!mysql_real_connect(db, NULL, NULL, NULL, dbname, 0, NULL, 0))
die(db, "mysql_real_connect failed: %s", mysql_error(db));
return db;
}
void
db_disconnect(MYSQL *db)
{
mysql_close(db);
}
void
db_do_query(MYSQL *db, const char *query)
{
if (mysql_query(db, query) != 0)
goto err;
if (mysql_field_count(db) > 0)
{
MYSQL_RES *res;
MYSQL_ROW row, end_row;
int num_fields;
if (!(res = mysql_store_result(db)))
goto err;
num_fields = mysql_num_fields(res);
while ((row = mysql_fetch_row(res)))
{
(void)fputs(">> ", stdout);
for (end_row = row + num_fields; row < end_row; ++row)
(void)printf("%s\t", row ? (char*)*row : "NULL");
(void)fputc('\n', stdout);
}
(void)fputc('\n', stdout);
mysql_free_result(res);
}
else
(void)printf("Affected rows: %lld\n", mysql_affected_rows(db));
return;
err:
die(db, "db_do_query failed: %s [%s]", mysql_error(db), query);
}
GNUmakefile
# This assumes the MySQL software is installed in /usr/local/mysql
inc := /usr/local/mysql/include/mysql
lib := /usr/local/mysql/lib
# If you have not installed the MySQL software yet, try this instead
#inc := $(HOME)/mysql-5.1/include
#lib := $(HOME)/mysql-5.1/libmysqld
CC := gcc
CPPFLAGS := -I$(inc) -D_THREAD_SAFE -D_REENTRANT
CFLAGS := -g -W -Wall
LDFLAGS := -static
# You can change -lmysqld to -lmysqlclient to use the
# client/server library
LDLIBS = -L$(lib) -lmysqld -lz -lm -ldl -lcrypt
ifneq (,$(shell grep FreeBSD /COPYRIGHT 2>/dev/null))
# FreeBSD
LDFLAGS += -pthread
else
# Assume Linux
LDLIBS += -lpthread
endif
# This works for simple one-file test programs
sources := $(wildcard *.c)
objects := $(patsubst %c,%o,$(sources))
targets := $(basename $(sources))
all: $(targets)
clean:
rm -f $(targets) $(objects) *.core
We encourage everyone to promote free software by releasing code under the GPL or a compatible license. For those who are not able to do this, another option is to purchase a commercial license for the MySQL code from Oracle Corporation. For details, please see http://www.mysql.com/company/legal/licensing/.
- 21.9.1. C API Data Structures
- 21.9.2. C API Function Overview
- 21.9.3. C API Function Descriptions
- 21.9.4. C API Prepared Statements
- 21.9.5. C API Prepared Statement Data Structures
- 21.9.6. C API Prepared Statement Function Overview
- 21.9.7. C API Prepared Statement Function Descriptions
- 21.9.8. C API Threaded Function Descriptions
- 21.9.9. C API Embedded Server Function Descriptions
- 21.9.10. Common Questions and Problems When Using the C API
- 21.9.11. Controlling Automatic Reconnection Behavior
- 21.9.12. C API Support for Multiple Statement Execution
- 21.9.13. C API Prepared Statement Problems
- 21.9.14. C API Prepared Statement Handling of Date and Time Values
- 21.9.15. C API Support for Prepared
CALLStatements - 21.9.16. Building Client Programs
The C API code is distributed with MySQL. It is included in the
mysqlclient library and enables C programs to
access a database.
Many of the clients in the MySQL source distribution are written in
C. If you are looking for examples that demonstrate how to use the C
API, take a look at these clients. You can find these in the
client directory in the MySQL source
distribution.
Most of the other client APIs (all except Connector/J and
Connector/NET) use the mysqlclient library to
communicate with the MySQL server. This means that, for example, you
can take advantage of many of the same environment variables that
are used by other client programs, because they are referenced from
the library. See Chapter 4, MySQL Programs, for a list of these
variables.
The client has a maximum communication buffer size. The size of the buffer that is allocated initially (16KB) is automatically increased up to the maximum size (the maximum is 16MB). Because buffer sizes are increased only as demand warrants, simply increasing the default maximum limit does not in itself cause more resources to be used. This size check is mostly a check for erroneous statements and communication packets.
The communication buffer must be large enough to contain a single
SQL statement (for client-to-server traffic) and one row of returned
data (for server-to-client traffic). Each thread's communication
buffer is dynamically enlarged to handle any query or row up to the
maximum limit. For example, if you have
BLOB values that contain up to 16MB
of data, you must have a communication buffer limit of at least 16MB
(in both server and client). The client's default maximum is 16MB,
but the default maximum in the server is 1MB. You can increase this
by changing the value of the
max_allowed_packet parameter when
the server is started. See Section 7.9.2, “Tuning Server Parameters”.
The MySQL server shrinks each communication buffer to
net_buffer_length bytes after each
query. For clients, the size of the buffer associated with a
connection is not decreased until the connection is closed, at which
time client memory is reclaimed.
For programming with threads, see Section 21.9.16.2, “How to Make a Threaded Client”. For creating a standalone application which includes the "server" and "client" in the same program (and does not communicate with an external MySQL server), see Section 21.8, “libmysqld, the Embedded MySQL Server Library”.
If, after an upgrade, you experience problems with compiled client
programs, such as Commands out of sync or
unexpected core dumps, you probably have used old header or
library files when compiling your programs. In this case, you
should check the date for your mysql.h file
and libmysqlclient.a library to verify that
they are from the new MySQL distribution. If not, recompile your
programs with the new headers and libraries. Recompilation might
also be necessary for programs compiled against the shared client
library if the library major version number has changed (for
example from libmysqlclient.so.15 to
libmysqlclient.so.16.
This section describes C API data structures other than those used for prepared statements. For information about the latter, see Section 21.9.5, “C API Prepared Statement Data Structures”.
This structure represents a handle to one database connection. It is used for almost all MySQL functions. You should not try to make a copy of a
MYSQLstructure. There is no guarantee that such a copy will be usable.This structure represents the result of a query that returns rows (
SELECT,SHOW,DESCRIBE,EXPLAIN). The information returned from a query is called the result set in the remainder of this section.This is a type-safe representation of one row of data. It is currently implemented as an array of counted byte strings. (You cannot treat these as null-terminated strings if field values may contain binary data, because such values may contain null bytes internally.) Rows are obtained by calling
mysql_fetch_row().This structure contains information about a field, such as the field's name, type, and size. Its members are described in more detail later in this section. You may obtain the
MYSQL_FIELDstructures for each field by callingmysql_fetch_field()repeatedly. Field values are not part of this structure; they are contained in aMYSQL_ROWstructure.This is a type-safe representation of an offset into a MySQL field list. (Used by
mysql_field_seek().) Offsets are field numbers within a row, beginning at zero.The type used for the number of rows and for
mysql_affected_rows(),mysql_num_rows(), andmysql_insert_id(). This type provides a range of0to1.84e19.On some systems, attempting to print a value of type
my_ulonglongdoes not work. To print such a value, convert it tounsigned longand use a%luprint format. Example:printf ("Number of rows: %lu\n", (unsigned long) mysql_num_rows(result));A boolean type, for values that are true (nonzero) or false (zero).
The MYSQL_FIELD structure contains the members
described in the following list:
char * nameThe name of the field, as a null-terminated string. If the field was given an alias with an
ASclause, the value ofnameis the alias.char * org_nameThe name of the field, as a null-terminated string. Aliases are ignored.
char * tableThe name of the table containing this field, if it isn't a calculated field. For calculated fields, the
tablevalue is an empty string. If the column is selected from a view,tablenames the view. If the table or view was given an alias with anASclause, the value oftableis the alias. For aUNION, the value is the empty string.char * org_tableThe name of the table, as a null-terminated string. Aliases are ignored. If the column is selected from a view,
org_tablenames the underlying table. For aUNION, the value is the empty string.char * dbThe name of the database that the field comes from, as a null-terminated string. If the field is a calculated field,
dbis an empty string. For aUNION, the value is the empty string.char * catalogThe catalog name. This value is always
"def".char * defThe default value of this field, as a null-terminated string. This is set only if you use
mysql_list_fields().unsigned long lengthThe width of the field. This corresponds to the display length, in bytes.
The server determines the
lengthvalue before it generates the result set, so this is the minimum length required for a data type capable of holding the largest possible value from the result column, without knowing in advance the actual values that will be produced by the query for the result set.unsigned long max_lengthThe maximum width of the field for the result set (the length in bytes of the longest field value for the rows actually in the result set). If you use
mysql_store_result()ormysql_list_fields(), this contains the maximum length for the field. If you usemysql_use_result(), the value of this variable is zero.The value of
max_lengthis the length of the string representation of the values in the result set. For example, if you retrieve aFLOATcolumn and the “widest” value is-12.345,max_lengthis 7 (the length of'-12.345').If you are using prepared statements,
max_lengthis not set by default because for the binary protocol the lengths of the values depend on the types of the values in the result set. (See Section 21.9.5, “C API Prepared Statement Data Structures”.) If you want themax_lengthvalues anyway, enable theSTMT_ATTR_UPDATE_MAX_LENGTHoption withmysql_stmt_attr_set()and the lengths will be set when you callmysql_stmt_store_result(). (See Section 21.9.7.3, “mysql_stmt_attr_set()”, and Section 21.9.7.27, “mysql_stmt_store_result()”.)unsigned int name_lengthThe length of
name.unsigned int org_name_lengthThe length of
org_name.unsigned int table_lengthThe length of
table.unsigned int org_table_lengthThe length of
org_table.unsigned int db_lengthThe length of
db.unsigned int catalog_lengthThe length of
catalog.unsigned int def_lengthThe length of
def.unsigned int flagsBit-flags that describe the field. The
flagsvalue may have zero or more of the following bits set.Flag Value Flag Description NOT_NULL_FLAGField can't be NULLPRI_KEY_FLAGField is part of a primary key UNIQUE_KEY_FLAGField is part of a unique key MULTIPLE_KEY_FLAGField is part of a nonunique key UNSIGNED_FLAGField has the UNSIGNEDattributeZEROFILL_FLAGField has the ZEROFILLattributeBINARY_FLAGField has the BINARYattributeAUTO_INCREMENT_FLAGField has the AUTO_INCREMENTattributeNUM_FLAGField is numeric ENUM_FLAGField is an ENUM(deprecated)SET_FLAGField is a SET(deprecated)BLOB_FLAGField is a BLOBorTEXT(deprecated)TIMESTAMP_FLAGField is a TIMESTAMP(deprecated)NO_DEFAULT_VALUE_FLAGField has no default value; see additional notes following table Use of the
BLOB_FLAG,ENUM_FLAG,SET_FLAG, andTIMESTAMP_FLAGflags is deprecated because they indicate the type of a field rather than an attribute of its type. It is preferable to testfield->typeagainstMYSQL_TYPE_BLOB,MYSQL_TYPE_ENUM,MYSQL_TYPE_SET, orMYSQL_TYPE_TIMESTAMPinstead.NUM_FLAGindicates that a column is numeric. This includes columns with a type ofMYSQL_TYPE_DECIMAL,MYSQL_TYPE_TINY,MYSQL_TYPE_SHORT,MYSQL_TYPE_LONG,MYSQL_TYPE_FLOAT,MYSQL_TYPE_DOUBLE,MYSQL_TYPE_NULL,MYSQL_TYPE_LONGLONG,MYSQL_TYPE_INT24, andMYSQL_TYPE_YEAR.NO_DEFAULT_VALUE_FLAGindicates that a column has noDEFAULTclause in its definition. This does not apply toNULLcolumns (because such columns have a default ofNULL), or toAUTO_INCREMENTcolumns (which have an implied default value).The following example illustrates a typical use of the
flagsvalue:if (field->flags & NOT_NULL_FLAG) printf("Field can't be null\n");You may use the following convenience macros to determine the boolean status of the
flagsvalue.unsigned int decimalsThe number of decimals for numeric fields.
unsigned int charsetnrAn ID number that indicates the character set/collation pair for the field.
To distinguish between binary and nonbinary data for string data types, check whether the
charsetnrvalue is 63. If so, the character set isbinary, which indicates binary rather than nonbinary data. This enables you to distinguishBINARYfromCHAR,VARBINARYfromVARCHAR, and theBLOBtypes from theTEXTtypes.charsetnrvalues are the same as those displayed in theIdcolumn of theSHOW COLLATIONstatement or theIDcolumn of theINFORMATION_SCHEMACOLLATIONStable. You can use those information sources to see which character set and collation specificcharsetnrvalues indicate:mysql>
SHOW COLLATION WHERE Id = 63;+-----------+---------+----+---------+----------+---------+ | Collation | Charset | Id | Default | Compiled | Sortlen | +-----------+---------+----+---------+----------+---------+ | binary | binary | 63 | Yes | Yes | 1 | +-----------+---------+----+---------+----------+---------+ mysql>SELECT COLLATION_NAME, CHARACTER_SET_NAME->FROM INFORMATION_SCHEMA.COLLATIONS WHERE ID = 33;+-----------------+--------------------+ | COLLATION_NAME | CHARACTER_SET_NAME | +-----------------+--------------------+ | utf8_general_ci | utf8 | +-----------------+--------------------+enum enum_field_types typeThe type of the field. The
typevalue may be one of theMYSQL_TYPE_symbols shown in the following table.Type Value Type Description MYSQL_TYPE_TINYTINYINTfieldMYSQL_TYPE_SHORTSMALLINTfieldMYSQL_TYPE_LONGINTEGERfieldMYSQL_TYPE_INT24MEDIUMINTfieldMYSQL_TYPE_LONGLONGBIGINTfieldMYSQL_TYPE_DECIMALDECIMALorNUMERICfieldMYSQL_TYPE_NEWDECIMALPrecision math DECIMALorNUMERICMYSQL_TYPE_FLOATFLOATfieldMYSQL_TYPE_DOUBLEDOUBLEorREALfieldMYSQL_TYPE_BITBITfieldMYSQL_TYPE_TIMESTAMPTIMESTAMPfieldMYSQL_TYPE_DATEDATEfieldMYSQL_TYPE_TIMETIMEfieldMYSQL_TYPE_DATETIMEDATETIMEfieldMYSQL_TYPE_YEARYEARfieldMYSQL_TYPE_STRINGCHARorBINARYfieldMYSQL_TYPE_VAR_STRINGVARCHARorVARBINARYfieldMYSQL_TYPE_BLOBBLOBorTEXTfield (usemax_lengthto determine the maximum length)MYSQL_TYPE_SETSETfieldMYSQL_TYPE_ENUMENUMfieldMYSQL_TYPE_GEOMETRYSpatial field MYSQL_TYPE_NULLNULL-type fieldYou can use the
IS_NUM()macro to test whether a field has a numeric type. Pass thetypevalue toIS_NUM()and it evaluates to TRUE if the field is numeric:if (IS_NUM(field->type)) printf("Field is numeric\n");
The functions available in the C API are summarized here and described in greater detail in a later section. See Section 21.9.3, “C API Function Descriptions”.
| Function | Description |
|---|---|
my_init() | Initialize global variables, and thread handler in thread-safe programs |
mysql_affected_rows() | Returns the number of rows changed/deleted/inserted by the last
UPDATE,
DELETE, or
INSERT query |
mysql_autocommit() | Toggles autocommit mode on/off |
mysql_change_user() | Changes user and database on an open connection |
mysql_character_set_name() | Return default character set name for current connection |
mysql_close() | Closes a server connection |
mysql_commit() | Commits the transaction |
mysql_connect() | Connects to a MySQL server (this function is deprecated; use
mysql_real_connect()
instead) |
mysql_create_db() | Creates a database (this function is deprecated; use the SQL statement
CREATE DATABASE instead) |
mysql_data_seek() | Seeks to an arbitrary row number in a query result set |
mysql_debug() | Does a DBUG_PUSH with the given string |
mysql_drop_db() | Drops a database (this function is deprecated; use the SQL statement
DROP DATABASE instead) |
mysql_dump_debug_info() | Makes the server write debug information to the log |
mysql_eof() | Determines whether the last row of a result set has been read (this
function is deprecated;
mysql_errno() or
mysql_error() may be used
instead) |
mysql_errno() | Returns the error number for the most recently invoked MySQL function |
mysql_error() | Returns the error message for the most recently invoked MySQL function |
mysql_escape_string() | Escapes special characters in a string for use in an SQL statement |
mysql_fetch_field() | Returns the type of the next table field |
mysql_fetch_field_direct() | Returns the type of a table field, given a field number |
mysql_fetch_fields() | Returns an array of all field structures |
mysql_fetch_lengths() | Returns the lengths of all columns in the current row |
mysql_fetch_row() | Fetches the next row from the result set |
mysql_field_count() | Returns the number of result columns for the most recent statement |
mysql_field_seek() | Puts the column cursor on a specified column |
mysql_field_tell() | Returns the position of the field cursor used for the last
mysql_fetch_field() |
mysql_free_result() | Frees memory used by a result set |
mysql_get_character_set_info() | Return information about default character set |
mysql_get_client_info() | Returns client version information as a string |
mysql_get_client_version() | Returns client version information as an integer |
mysql_get_host_info() | Returns a string describing the connection |
mysql_get_proto_info() | Returns the protocol version used by the connection |
mysql_get_server_info() | Returns the server version number |
mysql_get_server_version() | Returns version number of server as an integer |
mysql_get_ssl_cipher() | Return current SSL cipher |
mysql_hex_string() | Encode string in hexadecimal format |
mysql_info() | Returns information about the most recently executed query |
mysql_init() | Gets or initializes a MYSQL structure |
mysql_insert_id() | Returns the ID generated for an AUTO_INCREMENT column
by the previous query |
mysql_kill() | Kills a given thread |
mysql_library_end() | Finalize the MySQL C API library |
mysql_library_init() | Initialize the MySQL C API library |
mysql_list_dbs() | Returns database names matching a simple regular expression |
mysql_list_fields() | Returns field names matching a simple regular expression |
mysql_list_processes() | Returns a list of the current server threads |
mysql_list_tables() | Returns table names matching a simple regular expression |
mysql_more_results() | Checks whether any more results exist |
mysql_next_result() | Returns/initiates the next result in multiple-result executions |
mysql_num_fields() | Returns the number of columns in a result set |
mysql_num_rows() | Returns the number of rows in a result set |
mysql_options() | Sets connect options for
mysql_real_connect() |
mysql_ping() | Checks whether the connection to the server is working, reconnecting as necessary |
mysql_query() | Executes an SQL query specified as a null-terminated string |
mysql_real_connect() | Connects to a MySQL server |
mysql_real_escape_string() | Escapes special characters in a string for use in an SQL statement, taking into account the current character set of the connection |
mysql_real_query() | Executes an SQL query specified as a counted string |
mysql_refresh() | Flush or reset tables and caches |
mysql_reload() | Tells the server to reload the grant tables |
mysql_rollback() | Rolls back the transaction |
mysql_row_seek() | Seeks to a row offset in a result set, using value returned from
mysql_row_tell() |
mysql_row_tell() | Returns the row cursor position |
mysql_select_db() | Selects a database |
mysql_server_end() | Finalize the MySQL C API library |
mysql_server_init() | Initialize the MySQL C API library |
mysql_set_character_set() | Set default character set for current connection |
mysql_set_local_infile_default() | Set the LOAD DATA LOCAL
INFILE handler callbacks to their default values |
mysql_set_local_infile_handler() | Install application-specific
LOAD DATA LOCAL
INFILE handler callbacks |
mysql_set_server_option() | Sets an option for the connection (like
multi-statements) |
mysql_sqlstate() | Returns the SQLSTATE error code for the last error |
mysql_shutdown() | Shuts down the database server |
mysql_ssl_set() | Prepare to establish SSL connection to server |
mysql_stat() | Returns the server status as a string |
mysql_store_result() | Retrieves a complete result set to the client |
mysql_thread_end() | Finalize thread handler |
mysql_thread_id() | Returns the current thread ID |
mysql_thread_init() | Initialize thread handler |
mysql_thread_safe() | Returns 1 if the clients are compiled as thread-safe |
mysql_use_result() | Initiates a row-by-row result set retrieval |
mysql_warning_count() | Returns the warning count for the previous SQL statement |
Application programs should use this general outline for interacting with MySQL:
Initialize the MySQL library by calling
mysql_library_init(). This function exists in both themysqlclientC client library and themysqldembedded server library, so it is used whether you build a regular client program by linking with the-libmysqlclientflag, or an embedded server application by linking with the-libmysqldflag.Initialize a connection handler by calling
mysql_init()and connect to the server by callingmysql_real_connect().Issue SQL statements and process their results. (The following discussion provides more information about how to do this.)
Close the connection to the MySQL server by calling
mysql_close().End use of the MySQL library by calling
mysql_library_end().
The purpose of calling
mysql_library_init() and
mysql_library_end() is to provide
proper initialization and finalization of the MySQL library. For
applications that are linked with the client library, they provide
improved memory management. If you don't call
mysql_library_end(), a block of
memory remains allocated. (This does not increase the amount of
memory used by the application, but some memory leak detectors
will complain about it.) For applications that are linked with the
embedded server, these calls start and stop the server.
In a nonmulti-threaded environment, the call to
mysql_library_init() may be
omitted, because mysql_init() will
invoke it automatically as necessary. However,
mysql_library_init() is not
thread-safe in a multi-threaded environment, and thus neither is
mysql_init(), which calls
mysql_library_init(). You must
either call mysql_library_init()
prior to spawning any threads, or else use a mutex to protect the
call, whether you invoke
mysql_library_init() or indirectly
through mysql_init(). This should
be done prior to any other client library call.
To connect to the server, call
mysql_init() to initialize a
connection handler, then call
mysql_real_connect() with that
handler (along with other information such as the host name, user
name, and password). Upon connection,
mysql_real_connect() sets the
reconnect flag (part of the
MYSQL structure) to a value of
1 in versions of the API older than 5.0.3, or
0 in newer versions. A value of
1 for this flag indicates that if a statement
cannot be performed because of a lost connection, to try
reconnecting to the server before giving up. You can use the
MYSQL_OPT_RECONNECT option to
mysql_options() to control
reconnection behavior. When you are done with the connection, call
mysql_close() to terminate it.
While a connection is active, the client may send SQL statements
to the server using mysql_query()
or mysql_real_query(). The
difference between the two is that
mysql_query() expects the query to
be specified as a null-terminated string whereas
mysql_real_query() expects a
counted string. If the string contains binary data (which may
include null bytes), you must use
mysql_real_query().
For each non-SELECT query (for
example, INSERT,
UPDATE,
DELETE), you can find out how many
rows were changed (affected) by calling
mysql_affected_rows().
For SELECT queries, you retrieve
the selected rows as a result set. (Note that some statements are
SELECT-like in that they return
rows. These include SHOW,
DESCRIBE, and
EXPLAIN. They should be treated the
same way as SELECT statements.)
There are two ways for a client to process result sets. One way is
to retrieve the entire result set all at once by calling
mysql_store_result(). This
function acquires from the server all the rows returned by the
query and stores them in the client. The second way is for the
client to initiate a row-by-row result set retrieval by calling
mysql_use_result(). This function
initializes the retrieval, but does not actually get any rows from
the server.
In both cases, you access rows by calling
mysql_fetch_row(). With
mysql_store_result(),
mysql_fetch_row() accesses rows
that have previously been fetched from the server. With
mysql_use_result(),
mysql_fetch_row() actually
retrieves the row from the server. Information about the size of
the data in each row is available by calling
mysql_fetch_lengths().
After you are done with a result set, call
mysql_free_result() to free the
memory used for it.
The two retrieval mechanisms are complementary. Client programs
should choose the approach that is most appropriate for their
requirements. In practice, clients tend to use
mysql_store_result() more
commonly.
An advantage of
mysql_store_result() is that
because the rows have all been fetched to the client, you not only
can access rows sequentially, you can move back and forth in the
result set using mysql_data_seek()
or mysql_row_seek() to change the
current row position within the result set. You can also find out
how many rows there are by calling
mysql_num_rows(). On the other
hand, the memory requirements for
mysql_store_result() may be very
high for large result sets and you are more likely to encounter
out-of-memory conditions.
An advantage of mysql_use_result()
is that the client requires less memory for the result set because
it maintains only one row at a time (and because there is less
allocation overhead,
mysql_use_result() can be faster).
Disadvantages are that you must process each row quickly to avoid
tying up the server, you don't have random access to rows within
the result set (you can only access rows sequentially), and you
don't know how many rows are in the result set until you have
retrieved them all. Furthermore, you must
retrieve all the rows even if you determine in mid-retrieval that
you've found the information you were looking for.
The API makes it possible for clients to respond appropriately to
statements (retrieving rows only as necessary) without knowing
whether the statement is a SELECT.
You can do this by calling
mysql_store_result() after each
mysql_query() (or
mysql_real_query()). If the result
set call succeeds, the statement was a
SELECT and you can read the rows.
If the result set call fails, call
mysql_field_count() to determine
whether a result was actually to be expected. If
mysql_field_count() returns zero,
the statement returned no data (indicating that it was an
INSERT,
UPDATE,
DELETE, and so forth), and was not
expected to return rows. If
mysql_field_count() is nonzero,
the statement should have returned rows, but didn't. This
indicates that the statement was a
SELECT that failed. See the
description for
mysql_field_count() for an example
of how this can be done.
Both mysql_store_result() and
mysql_use_result() enable you to
obtain information about the fields that make up the result set
(the number of fields, their names and types, and so forth). You
can access field information sequentially within the row by
calling mysql_fetch_field()
repeatedly, or by field number within the row by calling
mysql_fetch_field_direct(). The
current field cursor position may be changed by calling
mysql_field_seek(). Setting the
field cursor affects subsequent calls to
mysql_fetch_field(). You can also
get information for fields all at once by calling
mysql_fetch_fields().
For detecting and reporting errors, MySQL provides access to error
information by means of the
mysql_errno() and
mysql_error() functions. These
return the error code or error message for the most recently
invoked function that can succeed or fail, enabling you to
determine when an error occurred and what it was.
- 21.9.3.1.
mysql_affected_rows() - 21.9.3.2.
mysql_autocommit() - 21.9.3.3.
mysql_change_user() - 21.9.3.4.
mysql_character_set_name() - 21.9.3.5.
mysql_close() - 21.9.3.6.
mysql_commit() - 21.9.3.7.
mysql_connect() - 21.9.3.8.
mysql_create_db() - 21.9.3.9.
mysql_data_seek() - 21.9.3.10.
mysql_debug() - 21.9.3.11.
mysql_drop_db() - 21.9.3.12.
mysql_dump_debug_info() - 21.9.3.13.
mysql_eof() - 21.9.3.14.
mysql_errno() - 21.9.3.15.
mysql_error() - 21.9.3.16.
mysql_escape_string() - 21.9.3.17.
mysql_fetch_field() - 21.9.3.18.
mysql_fetch_field_direct() - 21.9.3.19.
mysql_fetch_fields() - 21.9.3.20.
mysql_fetch_lengths() - 21.9.3.21.
mysql_fetch_row() - 21.9.3.22.
mysql_field_count() - 21.9.3.23.
mysql_field_seek() - 21.9.3.24.
mysql_field_tell() - 21.9.3.25.
mysql_free_result() - 21.9.3.26.
mysql_get_character_set_info() - 21.9.3.27.
mysql_get_client_info() - 21.9.3.28.
mysql_get_client_version() - 21.9.3.29.
mysql_get_host_info() - 21.9.3.30.
mysql_get_proto_info() - 21.9.3.31.
mysql_get_server_info() - 21.9.3.32.
mysql_get_server_version() - 21.9.3.33.
mysql_get_ssl_cipher() - 21.9.3.34.
mysql_hex_string() - 21.9.3.35.
mysql_info() - 21.9.3.36.
mysql_init() - 21.9.3.37.
mysql_insert_id() - 21.9.3.38.
mysql_kill() - 21.9.3.39.
mysql_library_end() - 21.9.3.40.
mysql_library_init() - 21.9.3.41.
mysql_list_dbs() - 21.9.3.42.
mysql_list_fields() - 21.9.3.43.
mysql_list_processes() - 21.9.3.44.
mysql_list_tables() - 21.9.3.45.
mysql_more_results() - 21.9.3.46.
mysql_next_result() - 21.9.3.47.
mysql_num_fields() - 21.9.3.48.
mysql_num_rows() - 21.9.3.49.
mysql_options() - 21.9.3.50.
mysql_ping() - 21.9.3.51.
mysql_query() - 21.9.3.52.
mysql_real_connect() - 21.9.3.53.
mysql_real_escape_string() - 21.9.3.54.
mysql_real_query() - 21.9.3.55.
mysql_refresh() - 21.9.3.56.
mysql_reload() - 21.9.3.57.
mysql_rollback() - 21.9.3.58.
mysql_row_seek() - 21.9.3.59.
mysql_row_tell() - 21.9.3.60.
mysql_select_db() - 21.9.3.61.
mysql_set_character_set() - 21.9.3.62.
mysql_set_local_infile_default() - 21.9.3.63.
mysql_set_local_infile_handler() - 21.9.3.64.
mysql_set_server_option() - 21.9.3.65.
mysql_shutdown() - 21.9.3.66.
mysql_sqlstate() - 21.9.3.67.
mysql_ssl_set() - 21.9.3.68.
mysql_stat() - 21.9.3.69.
mysql_store_result() - 21.9.3.70.
mysql_thread_id() - 21.9.3.71.
mysql_use_result() - 21.9.3.72.
mysql_warning_count()
In the descriptions here, a parameter or return value of
NULL means NULL in the sense
of the C programming language, not a MySQL NULL
value.
Functions that return a value generally return a pointer or an
integer. Unless specified otherwise, functions returning a pointer
return a non-NULL value to indicate success or
a NULL value to indicate an error, and
functions returning an integer return zero to indicate success or
nonzero to indicate an error. Note that “nonzero”
means just that. Unless the function description says otherwise,
do not test against a value other than zero:
if (result) /* correct */
... error ...
if (result < 0) /* incorrect */
... error ...
if (result == -1) /* incorrect */
... error ...
When a function returns an error, the
Errors subsection of the function
description lists the possible types of errors. You can find out
which of these occurred by calling
mysql_errno(). A string
representation of the error may be obtained by calling
mysql_error().
my_ulonglong mysql_affected_rows(MYSQL
*mysql)
Description
mysql_affected_rows() may be
called immediately after executing a statement with
mysql_query() or
mysql_real_query(). It returns
the number of rows changed, deleted, or inserted by the last
statement if it was an UPDATE,
DELETE, or
INSERT. For
SELECT statements,
mysql_affected_rows() works like
mysql_num_rows().
For UPDATE statements, the
affected-rows value by default is the number of rows actually
changed. If you specify the CLIENT_FOUND_ROWS
flag to mysql_real_connect()
when connecting to mysqld, the affected-rows
value is the number of rows “found”; that is,
matched by the WHERE clause.
For REPLACE statements, the
affected-rows value is 2 if the new row replaced an old row,
because in this case, one row was inserted after the duplicate
was deleted.
For INSERT
... ON DUPLICATE KEY UPDATE statements, the
affected-rows value is 1 if the row is inserted as a new row and
2 if an existing row is updated.
Following a CALL statement for a
stored procedure,
mysql_affected_rows() returns
the value that it would return for the last statement executed
within the procedure, or 0 if that statement
would return -1. Within the procedure, you
can use ROW_COUNT() at the SQL
level to obtain the affected-rows value for individual
statements.
Return Values
An integer greater than zero indicates the number of rows
affected or retrieved. Zero indicates that no records were
updated for an UPDATE statement,
no rows matched the WHERE clause in the query
or that no query has yet been executed. -1 indicates that the
query returned an error or that, for a
SELECT query,
mysql_affected_rows() was called
prior to calling
mysql_store_result().
Because mysql_affected_rows()
returns an unsigned value, you can check for -1 by comparing the
return value to (my_ulonglong)-1 (or to
(my_ulonglong)~0, which is equivalent).
Errors
None.
Example
char *stmt = "UPDATE products SET cost=cost*1.25
WHERE group=10";
mysql_query(&mysql,stmt);
printf("%ld products updated",
(long) mysql_affected_rows(&mysql));
my_bool mysql_autocommit(MYSQL *mysql, my_bool
mode)
Description
Sets autocommit mode on if mode is 1, off if
mode is 0.
Return Values
Zero if successful. Nonzero if an error occurred.
Errors
None.
my_bool mysql_change_user(MYSQL *mysql, const char
*user, const char *password, const char *db)
Description
Changes the user and causes the database specified by
db to become the default (current) database
on the connection specified by mysql. In
subsequent queries, this database is the default for table
references that do not include an explicit database specifier.
mysql_change_user() fails if the
connected user cannot be authenticated or doesn't have
permission to use the database. In this case, the user and
database are not changed.
The db parameter may be set to
NULL if you don't want to have a default
database.
This command resets the state as if one had done a new connect.
(See Section 21.9.11, “Controlling Automatic Reconnection Behavior”.) It always performs a
ROLLBACK of
any active transactions, closes and drops all temporary tables,
and unlocks all locked tables. Session system variables are
reset to the values of the corresponding global system
variables. Prepared statements are released and
HANDLER variables are closed.
Locks acquired with GET_LOCK()
are released. These effects occur even if the user didn't
change.
Return Values
Zero for success. Nonzero if an error occurred.
Errors
The same that you can get from
mysql_real_connect().
Commands were executed in an improper order.
The MySQL server has gone away.
The connection to the server was lost during the query.
An unknown error occurred.
The MySQL server doesn't implement this command (probably an old server).
The user or password was wrong.
The database didn't exist.
The user did not have access rights to the database.
The database name was too long.
Example
if (mysql_change_user(&mysql, "user", "password", "new_database"))
{
fprintf(stderr, "Failed to change user. Error: %s\n",
mysql_error(&mysql));
}
const char *mysql_character_set_name(MYSQL
*mysql)
Description
Returns the default character set name for the current connection.
Return Values
The default character set name
Errors
None.
void mysql_close(MYSQL *mysql)
Description
Closes a previously opened connection.
mysql_close() also deallocates
the connection handle pointed to by mysql if
the handle was allocated automatically by
mysql_init() or
mysql_connect().
Return Values
None.
Errors
None.
my_bool mysql_commit(MYSQL *mysql)
Description
Commits the current transaction.
The action of this function is subject to the value of the
completion_type system
variable. In particular, if the value of
completion_type is 2, the
server performs a release after terminating a transaction and
closes the client connection. The client program should call
mysql_close() to close the
connection from the client side.
Return Values
Zero if successful. Nonzero if an error occurred.
Errors
None.
MYSQL *mysql_connect(MYSQL *mysql, const char *host,
const char *user, const char *passwd)
Description
This function is deprecated. Use
mysql_real_connect() instead.
mysql_connect() attempts to
establish a connection to a MySQL database engine running on
host.
mysql_connect() must complete
successfully before you can execute any of the other API
functions, with the exception of
mysql_get_client_info().
The meanings of the parameters are the same as for the
corresponding parameters for
mysql_real_connect() with the
difference that the connection parameter may be
NULL. In this case, the C API allocates
memory for the connection structure automatically and frees it
when you call mysql_close(). The
disadvantage of this approach is that you can't retrieve an
error message if the connection fails. (To get error information
from mysql_errno() or
mysql_error(), you must provide
a valid MYSQL pointer.)
Return Values
Same as for
mysql_real_connect().
Errors
Same as for
mysql_real_connect().
int mysql_create_db(MYSQL *mysql, const char
*db)
Description
Creates the database named by the db
parameter.
This function is deprecated. It is preferable to use
mysql_query() to issue an SQL
CREATE DATABASE statement
instead.
Return Values
Zero if the database was created successfully. Nonzero if an error occurred.
Errors
Commands were executed in an improper order.
The MySQL server has gone away.
The connection to the server was lost during the query.
An unknown error occurred.
Example
if(mysql_create_db(&mysql, "my_database"))
{
fprintf(stderr, "Failed to create new database. Error: %s\n",
mysql_error(&mysql));
}
void mysql_data_seek(MYSQL_RES *result, my_ulonglong
offset)
Description
Seeks to an arbitrary row in a query result set. The
offset value is a row number and should be in
the range from 0 to
mysql_num_rows(result)-1.
This function requires that the result set structure contains
the entire result of the query, so
mysql_data_seek() may be used
only in conjunction with
mysql_store_result(), not with
mysql_use_result().
Return Values
None.
Errors
None.
void mysql_debug(const char *debug)
Description
Does a DBUG_PUSH with the given string.
mysql_debug() uses the Fred Fish
debug library. To use this function, you must compile the client
library to support debugging. See
MySQL
Internals: Porting.
Return Values
None.
Errors
None.
Example
The call shown here causes the client library to generate a
trace file in /tmp/client.trace on the
client machine:
mysql_debug("d:t:O,/tmp/client.trace");
int mysql_drop_db(MYSQL *mysql, const char
*db)
Description
Drops the database named by the db parameter.
This function is deprecated. It is preferable to use
mysql_query() to issue an SQL
DROP DATABASE statement instead.
Return Values
Zero if the database was dropped successfully. Nonzero if an error occurred.
Errors
Commands were executed in an improper order.
The MySQL server has gone away.
The connection to the server was lost during the query.
An unknown error occurred.
Example
if(mysql_drop_db(&mysql, "my_database"))
fprintf(stderr, "Failed to drop the database: Error: %s\n",
mysql_error(&mysql));
int mysql_dump_debug_info(MYSQL *mysql)
Description
Instructs the server to write some debug information to the log.
For this to work, the connected user must have the
SUPER privilege.
Return Values
Zero if the command was successful. Nonzero if an error occurred.
Errors
Commands were executed in an improper order.
The MySQL server has gone away.
The connection to the server was lost during the query.
An unknown error occurred.
my_bool mysql_eof(MYSQL_RES *result)
Description
This function is deprecated.
mysql_errno() or
mysql_error() may be used
instead.
mysql_eof() determines whether
the last row of a result set has been read.
If you acquire a result set from a successful call to
mysql_store_result(), the client
receives the entire set in one operation. In this case, a
NULL return from
mysql_fetch_row() always means
the end of the result set has been reached and it is unnecessary
to call mysql_eof(). When used
with mysql_store_result(),
mysql_eof() always returns true.
On the other hand, if you use
mysql_use_result() to initiate a
result set retrieval, the rows of the set are obtained from the
server one by one as you call
mysql_fetch_row() repeatedly.
Because an error may occur on the connection during this
process, a NULL return value from
mysql_fetch_row() does not
necessarily mean the end of the result set was reached normally.
In this case, you can use
mysql_eof() to determine what
happened. mysql_eof() returns a
nonzero value if the end of the result set was reached and zero
if an error occurred.
Historically, mysql_eof()
predates the standard MySQL error functions
mysql_errno() and
mysql_error(). Because those
error functions provide the same information, their use is
preferred over mysql_eof(),
which is deprecated. (In fact, they provide more information,
because mysql_eof() returns only
a boolean value whereas the error functions indicate a reason
for the error when one occurs.)
Return Values
Zero if no error occurred. Nonzero if the end of the result set has been reached.
Errors
None.
Example
The following example shows how you might use
mysql_eof():
mysql_query(&mysql,"SELECT * FROM some_table");
result = mysql_use_result(&mysql);
while((row = mysql_fetch_row(result)))
{
// do something with data
}
if(!mysql_eof(result)) // mysql_fetch_row() failed due to an error
{
fprintf(stderr, "Error: %s\n", mysql_error(&mysql));
}
However, you can achieve the same effect with the standard MySQL error functions:
mysql_query(&mysql,"SELECT * FROM some_table");
result = mysql_use_result(&mysql);
while((row = mysql_fetch_row(result)))
{
// do something with data
}
if(mysql_errno(&mysql)) // mysql_fetch_row() failed due to an error
{
fprintf(stderr, "Error: %s\n", mysql_error(&mysql));
}
unsigned int mysql_errno(MYSQL *mysql)
Description
For the connection specified by mysql,
mysql_errno() returns the error
code for the most recently invoked API function that can succeed
or fail. A return value of zero means that no error occurred.
Client error message numbers are listed in the MySQL
errmsg.h header file. Server error message
numbers are listed in mysqld_error.h.
Errors also are listed at Appendix C, Errors, Error Codes, and Common Problems.
Note that some functions like
mysql_fetch_row() don't set
mysql_errno() if they succeed.
A rule of thumb is that all functions that have to ask the
server for information reset
mysql_errno() if they succeed.
MySQL-specific error numbers returned by
mysql_errno() differ from
SQLSTATE values returned by
mysql_sqlstate(). For example,
the mysql client program displays errors
using the following format, where 1146 is the
mysql_errno() value and
'42S02' is the corresponding
mysql_sqlstate() value:
shell> SELECT * FROM no_such_table;
ERROR 1146 (42S02): Table 'test.no_such_table' doesn't exist
Return Values
An error code value for the last
mysql_ call,
if it failed. zero means no error occurred.
xxx()
Errors
None.
const char *mysql_error(MYSQL *mysql)
Description
For the connection specified by mysql,
mysql_error() returns a
null-terminated string containing the error message for the most
recently invoked API function that failed. If a function didn't
fail, the return value of
mysql_error() may be the
previous error or an empty string to indicate no error.
A rule of thumb is that all functions that have to ask the
server for information reset
mysql_error() if they succeed.
For functions that reset
mysql_error(), the following two
tests are equivalent:
if(*mysql_error(&mysql))
{
// an error occurred
}
if(mysql_error(&mysql)[0])
{
// an error occurred
}
The language of the client error messages may be changed by recompiling the MySQL client library. Currently, you can choose error messages in several different languages. See Section 9.2, “Setting the Error Message Language”.
Return Values
A null-terminated character string that describes the error. An empty string if no error occurred.
Errors
None.
You should use
mysql_real_escape_string()
instead!
This function is identical to
mysql_real_escape_string()
except that
mysql_real_escape_string() takes
a connection handler as its first argument and escapes the
string according to the current character set.
mysql_escape_string() does not
take a connection argument and does not respect the current
character set.
MYSQL_FIELD *mysql_fetch_field(MYSQL_RES
*result)
Description
Returns the definition of one column of a result set as a
MYSQL_FIELD structure. Call this function
repeatedly to retrieve information about all columns in the
result set. mysql_fetch_field()
returns NULL when no more fields are left.
mysql_fetch_field() is reset to
return information about the first field each time you execute a
new SELECT query. The field
returned by mysql_fetch_field()
is also affected by calls to
mysql_field_seek().
If you've called mysql_query()
to perform a SELECT on a table
but have not called
mysql_store_result(), MySQL
returns the default blob length (8KB) if you call
mysql_fetch_field() to ask for
the length of a BLOB field. (The
8KB size is chosen because MySQL doesn't know the maximum length
for the BLOB. This should be made
configurable sometime.) Once you've retrieved the result set,
field->max_length contains the length of
the largest value for this column in the specific query.
Return Values
The MYSQL_FIELD structure for the current
column. NULL if no columns are left.
Errors
None.
Example
MYSQL_FIELD *field;
while((field = mysql_fetch_field(result)))
{
printf("field name %s\n", field->name);
}
MYSQL_FIELD *mysql_fetch_field_direct(MYSQL_RES
*result, unsigned int fieldnr)
Description
Given a field number fieldnr for a column
within a result set, returns that column's field definition as a
MYSQL_FIELD structure. You may use this
function to retrieve the definition for an arbitrary column. The
value of fieldnr should be in the range from
0 to mysql_num_fields(result)-1.
Return Values
The MYSQL_FIELD structure for the specified
column.
Errors
None.
Example
unsigned int num_fields;
unsigned int i;
MYSQL_FIELD *field;
num_fields = mysql_num_fields(result);
for(i = 0; i < num_fields; i++)
{
field = mysql_fetch_field_direct(result, i);
printf("Field %u is %s\n", i, field->name);
}
MYSQL_FIELD *mysql_fetch_fields(MYSQL_RES
*result)
Description
Returns an array of all MYSQL_FIELD
structures for a result set. Each structure provides the field
definition for one column of the result set.
Return Values
An array of MYSQL_FIELD structures for all
columns of a result set.
Errors
None.
Example
unsigned int num_fields;
unsigned int i;
MYSQL_FIELD *fields;
num_fields = mysql_num_fields(result);
fields = mysql_fetch_fields(result);
for(i = 0; i < num_fields; i++)
{
printf("Field %u is %s\n", i, fields[i].name);
}
unsigned long *mysql_fetch_lengths(MYSQL_RES
*result)
Description
Returns the lengths of the columns of the current row within a
result set. If you plan to copy field values, this length
information is also useful for optimization, because you can
avoid calling strlen(). In addition, if the
result set contains binary data, you
must use this function to
determine the size of the data, because
strlen() returns incorrect results for any
field containing null characters.
The length for empty columns and for columns containing
NULL values is zero. To see how to
distinguish these two cases, see the description for
mysql_fetch_row().
Return Values
An array of unsigned long integers representing the size of each
column (not including any terminating null characters).
NULL if an error occurred.
Errors
mysql_fetch_lengths() is valid
only for the current row of the result set. It returns
NULL if you call it before calling
mysql_fetch_row() or after
retrieving all rows in the result.
Example
MYSQL_ROW row;
unsigned long *lengths;
unsigned int num_fields;
unsigned int i;
row = mysql_fetch_row(result);
if (row)
{
num_fields = mysql_num_fields(result);
lengths = mysql_fetch_lengths(result);
for(i = 0; i < num_fields; i++)
{
printf("Column %u is %lu bytes in length.\n",
i, lengths[i]);
}
}
MYSQL_ROW mysql_fetch_row(MYSQL_RES *result)
Description
Retrieves the next row of a result set. When used after
mysql_store_result(),
mysql_fetch_row() returns
NULL when there are no more rows to retrieve.
When used after
mysql_use_result(),
mysql_fetch_row() returns
NULL when there are no more rows to retrieve
or if an error occurred.
The number of values in the row is given by
mysql_num_fields(result). If
row holds the return value from a call to
mysql_fetch_row(), pointers to
the values are accessed as row[0] to
row[mysql_num_fields(result)-1].
NULL values in the row are indicated by
NULL pointers.
The lengths of the field values in the row may be obtained by
calling mysql_fetch_lengths().
Empty fields and fields containing NULL both
have length 0; you can distinguish these by checking the pointer
for the field value. If the pointer is NULL,
the field is NULL; otherwise, the field is
empty.
Return Values
A MYSQL_ROW structure for the next row.
NULL if there are no more rows to retrieve or
if an error occurred.
Errors
Note that error is not reset between calls to
mysql_fetch_row()
The connection to the server was lost during the query.
An unknown error occurred.
Example
MYSQL_ROW row;
unsigned int num_fields;
unsigned int i;
num_fields = mysql_num_fields(result);
while ((row = mysql_fetch_row(result)))
{
unsigned long *lengths;
lengths = mysql_fetch_lengths(result);
for(i = 0; i < num_fields; i++)
{
printf("[%.*s] ", (int) lengths[i],
row[i] ? row[i] : "NULL");
}
printf("\n");
}
unsigned int mysql_field_count(MYSQL *mysql)
Description
Returns the number of columns for the most recent query on the connection.
The normal use of this function is when
mysql_store_result() returned
NULL (and thus you have no result set
pointer). In this case, you can call
mysql_field_count() to determine
whether mysql_store_result()
should have produced a nonempty result. This enables the client
program to take proper action without knowing whether the query
was a SELECT (or
SELECT-like) statement. The
example shown here illustrates how this may be done.
Return Values
An unsigned integer representing the number of columns in a result set.
Errors
None.
Example
MYSQL_RES *result;
unsigned int num_fields;
unsigned int num_rows;
if (mysql_query(&mysql,query_string))
{
// error
}
else // query succeeded, process any data returned by it
{
result = mysql_store_result(&mysql);
if (result) // there are rows
{
num_fields = mysql_num_fields(result);
// retrieve rows, then call mysql_free_result(result)
}
else // mysql_store_result() returned nothing; should it have?
{
if(mysql_field_count(&mysql) == 0)
{
// query does not return data
// (it was not a SELECT)
num_rows = mysql_affected_rows(&mysql);
}
else // mysql_store_result() should have returned data
{
fprintf(stderr, "Error: %s\n", mysql_error(&mysql));
}
}
}
An alternative is to replace the
mysql_field_count(&mysql)
call with
mysql_errno(&mysql). In this
case, you are checking directly for an error from
mysql_store_result() rather than
inferring from the value of
mysql_field_count() whether the
statement was a SELECT.
MYSQL_FIELD_OFFSET mysql_field_seek(MYSQL_RES *result,
MYSQL_FIELD_OFFSET offset)
Description
Sets the field cursor to the given offset. The next call to
mysql_fetch_field() retrieves
the field definition of the column associated with that offset.
To seek to the beginning of a row, pass an
offset value of zero.
Return Values
The previous value of the field cursor.
Errors
None.
MYSQL_FIELD_OFFSET mysql_field_tell(MYSQL_RES
*result)
Description
Returns the position of the field cursor used for the last
mysql_fetch_field(). This value
can be used as an argument to
mysql_field_seek().
Return Values
The current offset of the field cursor.
Errors
None.
void mysql_free_result(MYSQL_RES *result)
Description
Frees the memory allocated for a result set by
mysql_store_result(),
mysql_use_result(),
mysql_list_dbs(), and so forth.
When you are done with a result set, you must free the memory it
uses by calling
mysql_free_result().
Do not attempt to access a result set after freeing it.
Return Values
None.
Errors
None.
void mysql_get_character_set_info(MYSQL *mysql,
MY_CHARSET_INFO *cs)
Description
This function provides information about the default client
character set. The default character set may be changed with the
mysql_set_character_set()
function.
Example
This example shows the fields that are available in the
MY_CHARSET_INFO structure:
if (!mysql_set_character_set(&mysql, "utf8"))
{
MY_CHARSET_INFO cs;
mysql_get_character_set_info(&mysql, &cs);
printf("character set information:\n");
printf("character set+collation number: %d\n", cs.number);
printf("character set name: %s\n", cs.name);
printf("collation name: %s\n", cs.csname);
printf("comment: %s\n", cs.comment);
printf("directory: %s\n", cs.dir);
printf("multi byte character min. length: %d\n", cs.mbminlen);
printf("multi byte character max. length: %d\n", cs.mbmaxlen);
}
const char *mysql_get_client_info(void)
Description
Returns a string that represents the client library version.
Return Values
A character string that represents the MySQL client library version.
Errors
None.
unsigned long mysql_get_client_version(void)
Description
Returns an integer that represents the client library version.
The value has the format XYYZZ where
X is the major version, YY
is the release level, and ZZ is the version
number within the release level. For example, a value of
40102 represents a client library version of
4.1.2.
Return Values
An integer that represents the MySQL client library version.
Errors
None.
const char *mysql_get_host_info(MYSQL *mysql)
Description
Returns a string describing the type of connection in use, including the server host name.
Return Values
A character string representing the server host name and the connection type.
Errors
None.
unsigned int mysql_get_proto_info(MYSQL
*mysql)
Description
Returns the protocol version used by current connection.
Return Values
An unsigned integer representing the protocol version used by the current connection.
Errors
None.
const char *mysql_get_server_info(MYSQL
*mysql)
Description
Returns a string that represents the server version number.
Return Values
A character string that represents the server version number.
Errors
None.
unsigned long mysql_get_server_version(MYSQL
*mysql)
Description
Returns the version number of the server as an integer.
Return Values
A number that represents the MySQL server version in this format:
major_version*10000 + minor_version *100 + sub_version
For example, 5.1.5 is returned as 50105.
This function is useful in client programs for quickly determining whether some version-specific server capability exists.
Errors
None.
const char *mysql_get_ssl_cipher(MYSQL
*mysql)
Description
mysql_get_ssl_cipher() returns
the SSL cipher used for the given connection to the server.
mysql is the connection handler returned from
mysql_init().
This function was added in MySQL 5.1.11.
Return Values
A string naming the SSL cipher used for the connection, or
NULL if no cipher is being used.
unsigned long mysql_hex_string(char *to, const char
*from, unsigned long length)
Description
This function is used to create a legal SQL string that you can use in an SQL statement. See Section 8.1.1, “Strings”.
The string in from is encoded to hexadecimal
format, with each character encoded as two hexadecimal digits.
The result is placed in to and a terminating
null byte is appended.
The string pointed to by from must be
length bytes long. You must allocate the
to buffer to be at least
length*2+1 bytes long. When
mysql_hex_string() returns, the
contents of to is a null-terminated string.
The return value is the length of the encoded string, not
including the terminating null character.
The return value can be placed into an SQL statement using
either 0x or
valueX' format.
However, the return value does not include the
value'0x or X'...'. The caller
must supply whichever of those is desired.
Example
char query[1000],*end;
end = strmov(query,"INSERT INTO test_table values(");
end = strmov(end,"0x");
end += mysql_hex_string(end,"What is this",12);
end = strmov(end,",0x");
end += mysql_hex_string(end,"binary data: \0\r\n",16);
*end++ = ')';
if (mysql_real_query(&mysql,query,(unsigned int) (end - query)))
{
fprintf(stderr, "Failed to insert row, Error: %s\n",
mysql_error(&mysql));
}
The strmov() function used in the example is
included in the mysqlclient library and works
like strcpy() but returns a pointer to the
terminating null of the first parameter.
Return Values
The length of the value placed into to, not
including the terminating null character.
Errors
None.
const char *mysql_info(MYSQL *mysql)
Description
Retrieves a string providing information about the most recently
executed statement, but only for the statements listed here. For
other statements, mysql_info()
returns NULL. The format of the string varies
depending on the type of statement, as described here. The
numbers are illustrative only; the string contains values
appropriate for the statement.
String format:
Records: 100 Duplicates: 0 Warnings: 0INSERT INTO ... VALUES (...),(...),(...)...String format:
Records: 3 Duplicates: 0 Warnings: 0String format:
Records: 1 Deleted: 0 Skipped: 0 Warnings: 0String format:
Records: 3 Duplicates: 0 Warnings: 0String format:
Rows matched: 40 Changed: 40 Warnings: 0
Note that mysql_info() returns a
non-NULL value for
INSERT ...
VALUES only for the multiple-row form of the statement
(that is, only if multiple value lists are specified).
Return Values
A character string representing additional information about the
most recently executed statement. NULL if no
information is available for the statement.
Errors
None.
MYSQL *mysql_init(MYSQL *mysql)
Description
Allocates or initializes a MYSQL object
suitable for
mysql_real_connect(). If
mysql is a NULL pointer,
the function allocates, initializes, and returns a new object.
Otherwise, the object is initialized and the address of the
object is returned. If
mysql_init() allocates a new
object, it is freed when
mysql_close() is called to close
the connection.
Return Values
An initialized MYSQL* handle.
NULL if there was insufficient memory to
allocate a new object.
Errors
In case of insufficient memory, NULL is
returned.
my_ulonglong mysql_insert_id(MYSQL *mysql)
Description
Returns the value generated for an
AUTO_INCREMENT column by the previous
INSERT or
UPDATE statement. Use this
function after you have performed an
INSERT statement into a table
that contains an AUTO_INCREMENT field, or
have used INSERT or
UPDATE to set a column value with
LAST_INSERT_ID(.
expr)
The return value of
mysql_insert_id() is always zero
unless explicitly updated under one of the following conditions:
INSERTstatements that store a value into anAUTO_INCREMENTcolumn. This is true whether the value is automatically generated by storing the special valuesNULLor0into the column, or is an explicit nonspecial value.In the case of a multiple-row
INSERTstatement, the return value ofmysql_insert_id()depends on the MySQL server version.In MySQL 5.1.12 and later,
mysql_insert_id()returns the first automatically generatedAUTO_INCREMENTvalue that was successfully inserted. In MySQL 5.1.11 and earlier,mysql_insert_id()returns the first automatically generatedAUTO_INCREMENTvalue, regardless of whether insertion of that value was successful.If no rows are successfully inserted,
mysql_insert_id()returns 0.Starting in MySQL 5.1.12, if an
INSERT ... SELECTstatement is executed, and no automatically generated value is successfully inserted,mysql_insert_id()returns the ID of the last inserted row.Starting in MySQL 5.1.12, if an
INSERT ... SELECTstatement usesLAST_INSERT_ID(,expr)mysql_insert_id()returnsexpr.INSERTstatements that generate anAUTO_INCREMENTvalue by insertingLAST_INSERT_ID(into any column or by updating any column toexpr)LAST_INSERT_ID(.expr)If the previous statement returned an error, the value of
mysql_insert_id()is undefined.
For 5.1.12 and later, the return value of
mysql_insert_id() can be
simplified to the following sequence:
If there is an
AUTO_INCREMENTcolumn, and an automatically generated value was successfully inserted, return the first such value.If
LAST_INSERT_ID(occurred in the statement, returnexpr)expr, even if there was anAUTO_INCREMENTcolumn in the affected table.The return value varies depending on the statement used. When called after an
INSERTstatement:If there is an
AUTO_INCREMENTcolumn in the table, and there were some explicit values for this column that were successfully inserted into the table, return the last of the explicit values.
When called after an
INSERT ... ON DUPLICATE KEY UPDATEstatement:If there is an
AUTO_INCREMENTcolumn in the table and there were some explicit succesfully inserted values, or some updated rows, return the last of the inserted or updated values.
mysql_insert_id() returns
0 if the previous statement does not use an
AUTO_INCREMENT value. If you need to save the
value for later, be sure to call
mysql_insert_id() immediately
after the statement that generates the value.
The value of mysql_insert_id()
is affected only by statements issued within the current client
connection. It is not affected by statements issued by other
clients.
The LAST_INSERT_ID() SQL function
returns the value of the first automatically generated value
that was successfully inserted (starting from 5.1.12) or the
first automatically generated value if any rows were
successfully inserted (before 5.1.12).
LAST_INSERT_ID() is not reset
between statements because the value of that function is
maintained in the server. Another difference from
mysql_insert_id() is that
LAST_INSERT_ID() is not updated
if you set an AUTO_INCREMENT column to a
specific nonspecial value. See
Section 11.14, “Information Functions”.
mysql_insert_id() returns
0 following a
CALL statement for a stored
procedure that generates an AUTO_INCREMENT
value because in this case
mysql_insert_id() applies to
CALL and not the statement within
the procedure. Within the procedure, you can use
LAST_INSERT_ID() at the SQL level
to obtain the AUTO_INCREMENT value.
The reason for the differences between
LAST_INSERT_ID() and
mysql_insert_id() is that
LAST_INSERT_ID() is made easy to
use in scripts while
mysql_insert_id() tries to
provide more exact information about what happens to the
AUTO_INCREMENT column.
Return Values
Described in the preceding discussion.
Errors
None.
int mysql_kill(MYSQL *mysql, unsigned long
pid)
Description
Asks the server to kill the thread specified by
pid.
This function is deprecated. It is preferable to use
mysql_query() to issue an SQL
KILL statement instead.
Return Values
Zero for success. Nonzero if an error occurred.
Errors
Commands were executed in an improper order.
The MySQL server has gone away.
The connection to the server was lost during the query.
An unknown error occurred.
void mysql_library_end(void)
Description
This function finalizes the MySQL library. You should call it
when you are done using the library (for example, after
disconnecting from the server). The action taken by the call
depends on whether your application is linked to the MySQL
client library or the MySQL embedded server library. For a
client program linked against the
libmysqlclient library by using the
-lmysqlclient flag,
mysql_library_end() performs
some memory management to clean up. For an embedded server
application linked against the libmysqld
library by using the -lmysqld flag,
mysql_library_end() shuts down
the embedded server and then cleans up.
For usage information, see
Section 21.9.2, “C API Function Overview”, and
Section 21.9.3.40, “mysql_library_init()”.
int mysql_library_init(int argc, char **argv, char
**groups)
Description
This function should be called to initialize the MySQL library
before you call any other MySQL function, whether your
application is a regular client program or uses the embedded
server. If the application uses the embedded server, this call
starts the server and initializes any subsystems
(mysys, InnoDB, and so
forth) that the server uses.
After your application is done using the MySQL library, call
mysql_library_end() to clean up.
See Section 21.9.3.39, “mysql_library_end()”.
The choice of whether the application operates as a regular
client or uses the embedded server depends on whether you use
the libmysqlclient or
libmysqld library at link time to produce the
final executable. For additional information, see
Section 21.9.2, “C API Function Overview”.
In a nonmulti-threaded environment, the call to
mysql_library_init() may be
omitted, because mysql_init()
will invoke it automatically as necessary. However,
mysql_library_init() is not
thread-safe in a multi-threaded environment, and thus neither is
mysql_init(), which calls
mysql_library_init(). You must
either call mysql_library_init()
prior to spawning any threads, or else use a mutex to protect
the call, whether you invoke
mysql_library_init() or
indirectly through mysql_init().
This should be done prior to any other client library call.
The argc and argv
arguments are analogous to the arguments to
main(), and enable passing of options to the
embedded server. For convenience, argc may be
0 (zero) if there are no command-line
arguments for the server. This is the usual case for
applications intended for use only as regular (nonembedded)
clients, and the call typically is written as
mysql_library_init(0, NULL,
NULL).
#include <mysql.h>
#include <stdlib.h>
int main(void) {
if (mysql_library_init(0, NULL, NULL)) {
fprintf(stderr, "could not initialize MySQL library\n");
exit(1);
}
/* Use any MySQL API functions here */
mysql_library_end();
return EXIT_SUCCESS;
}
When arguments are to be passed (argc is
greater than 0), the first element of
argv is ignored (it typically contains the
program name).
mysql_library_init() makes a
copy of the arguments so it is safe to destroy
argv or groups after the
call.
For embedded applications, if you want to connect to an external
server without starting the embedded server, you have to specify
a negative value for argc.
The groups argument should be an array of
strings that indicate the groups in option files from which
options should be read. See Section 4.2.3.3, “Using Option Files”. The
final entry in the array should be NULL. For
convenience, if the groups argument itself is
NULL, the [server] and
[embedded] groups are used by default.
#include <mysql.h>
#include <stdlib.h>
static char *server_args[] = {
"this_program", /* this string is not used */
"--datadir=.",
"--key_buffer_size=32M"
};
static char *server_groups[] = {
"embedded",
"server",
"this_program_SERVER",
(char *)NULL
};
int main(void) {
if (mysql_library_init(sizeof(server_args) / sizeof(char *),
server_args, server_groups)) {
fprintf(stderr, "could not initialize MySQL library\n");
exit(1);
}
/* Use any MySQL API functions here */
mysql_library_end();
return EXIT_SUCCESS;
}
Return Values
Zero if successful. Nonzero if an error occurred.
MYSQL_RES *mysql_list_dbs(MYSQL *mysql, const char
*wild)
Description
Returns a result set consisting of database names on the server
that match the simple regular expression specified by the
wild parameter. wild may
contain the wildcard characters
“%” or
“_”, or may be a
NULL pointer to match all databases. Calling
mysql_list_dbs() is similar to
executing the query SHOW DATABASES [LIKE
.
wild]
You must free the result set with
mysql_free_result().
Return Values
A MYSQL_RES result set for success.
NULL if an error occurred.
Errors
Commands were executed in an improper order.
Out of memory.
The MySQL server has gone away.
The connection to the server was lost during the query.
An unknown error occurred.
MYSQL_RES *mysql_list_fields(MYSQL *mysql, const char
*table, const char *wild)
Description
Returns a result set consisting of field names in the given
table that match the simple regular expression specified by the
wild parameter. wild may
contain the wildcard characters
“%” or
“_”, or may be a
NULL pointer to match all fields. Calling
mysql_list_fields() is similar
to executing the query SHOW COLUMNS FROM
.
tbl_name [LIKE
wild]
It is preferable to use SHOW COLUMNS FROM
instead of
tbl_namemysql_list_fields().
You must free the result set with
mysql_free_result().
Return Values
A MYSQL_RES result set for success.
NULL if an error occurred.
Errors
Commands were executed in an improper order.
The MySQL server has gone away.
The connection to the server was lost during the query.
An unknown error occurred.
MYSQL_RES *mysql_list_processes(MYSQL *mysql)
Description
Returns a result set describing the current server threads. This
is the same kind of information as that reported by
mysqladmin processlist or a
SHOW PROCESSLIST query.
You must free the result set with
mysql_free_result().
Return Values
A MYSQL_RES result set for success.
NULL if an error occurred.
Errors
Commands were executed in an improper order.
The MySQL server has gone away.
The connection to the server was lost during the query.
An unknown error occurred.
MYSQL_RES *mysql_list_tables(MYSQL *mysql, const char
*wild)
Description
Returns a result set consisting of table names in the current
database that match the simple regular expression specified by
the wild parameter. wild
may contain the wildcard characters
“%” or
“_”, or may be a
NULL pointer to match all tables. Calling
mysql_list_tables() is similar
to executing the query SHOW TABLES [LIKE
.
wild]
You must free the result set with
mysql_free_result().
Return Values
A MYSQL_RES result set for success.
NULL if an error occurred.
Errors
Commands were executed in an improper order.
The MySQL server has gone away.
The connection to the server was lost during the query.
An unknown error occurred.
my_bool mysql_more_results(MYSQL *mysql)
Description
This function is used when you execute multiple statements
specified as a single statement string, or when you execute
CALL statements, which can return
multiple result sets.
mysql_more_results() true if
more results exist from the currently executed statement, in
which case the application must call
mysql_next_result() to fetch the
results.
Return Values
TRUE (1) if more results exist.
FALSE (0) if no more results exist.
In most cases, you can call
mysql_next_result() instead to
test whether more results exist and initiate retrieval if so.
See Section 21.9.12, “C API Support for Multiple Statement Execution”, and
Section 21.9.3.46, “mysql_next_result()”.
Errors
None.
int mysql_next_result(MYSQL *mysql)
Description
This function is used when you execute multiple statements
specified as a single statement string, or when you use
CALL statements to execute stored
procedures, which can return multiple result sets.
mysql_next_result() reads the
next statement result and returns a status to indicate whether
more results exist. If
mysql_next_result() returns an
error, there are no more results.
Before each call to
mysql_next_result(), you must
call mysql_free_result() for the
current statement if it is a statement that returned a result
set (rather than just a result status).
After calling
mysql_next_result() the state of
the connection is as if you had called
mysql_real_query() or
mysql_query() for the next
statement. This means that you can call
mysql_store_result(),
mysql_warning_count(),
mysql_affected_rows(), and so
forth.
If your program uses CALL
statements to execute stored procedures, the
CLIENT_MULTI_RESULTS flag must be enabled.
This is because each CALL returns
a result to indicate the call status, in addition to any result
sets that might be returned by statements executed within the
procedure. Because CALL can
return multiple results, you should process them using a loop
that calls mysql_next_result()
to determine whether there are more results.
CLIENT_MULTI_RESULTS can be enabled when you
call mysql_real_connect(),
either explicitly by passing the
CLIENT_MULTI_RESULTS flag itself, or
implicitly by passing CLIENT_MULTI_STATEMENTS
(which also enables CLIENT_MULTI_RESULTS).
It is also possible to test whether there are more results by
calling mysql_more_results().
However, this function does not change the connection state, so
if it returns true, you must still call
mysql_next_result() to advance
to the next result.
For an example that shows how to use
mysql_next_result(), see
Section 21.9.12, “C API Support for Multiple Statement Execution”.
Return Values
| Return Value | Description |
|---|---|
| 0 | Successful and there are more results |
| -1 | Successful and there are no more results |
| >0 | An error occurred |
Errors
Commands were executed in an improper order. For example, if you didn't call
mysql_use_result()for a previous result set.The MySQL server has gone away.
The connection to the server was lost during the query.
An unknown error occurred.
unsigned int mysql_num_fields(MYSQL_RES
*result)
To pass a MYSQL* argument instead, use
unsigned int mysql_field_count(MYSQL *mysql).
Description
Returns the number of columns in a result set.
Note that you can get the number of columns either from a
pointer to a result set or to a connection handle. You would use
the connection handle if
mysql_store_result() or
mysql_use_result() returned
NULL (and thus you have no result set
pointer). In this case, you can call
mysql_field_count() to determine
whether mysql_store_result()
should have produced a nonempty result. This enables the client
program to take proper action without knowing whether the query
was a SELECT (or
SELECT-like) statement. The
example shown here illustrates how this may be done.
Return Values
An unsigned integer representing the number of columns in a result set.
Errors
None.
Example
MYSQL_RES *result;
unsigned int num_fields;
unsigned int num_rows;
if (mysql_query(&mysql,query_string))
{
// error
}
else // query succeeded, process any data returned by it
{
result = mysql_store_result(&mysql);
if (result) // there are rows
{
num_fields = mysql_num_fields(result);
// retrieve rows, then call mysql_free_result(result)
}
else // mysql_store_result() returned nothing; should it have?
{
if (mysql_errno(&mysql))
{
fprintf(stderr, "Error: %s\n", mysql_error(&mysql));
}
else if (mysql_field_count(&mysql) == 0)
{
// query does not return data
// (it was not a SELECT)
num_rows = mysql_affected_rows(&mysql);
}
}
}
An alternative (if you know that your query should have returned
a result set) is to replace the
mysql_errno(&mysql) call
with a check whether
mysql_field_count(&mysql)
returns 0. This happens only if something went wrong.
my_ulonglong mysql_num_rows(MYSQL_RES
*result)
Description
Returns the number of rows in the result set.
The use of mysql_num_rows()
depends on whether you use
mysql_store_result() or
mysql_use_result() to return the
result set. If you use
mysql_store_result(),
mysql_num_rows() may be called
immediately. If you use
mysql_use_result(),
mysql_num_rows() does not return
the correct value until all the rows in the result set have been
retrieved.
mysql_num_rows() is intended for
use with statements that return a result set, such as
SELECT. For statements such as
INSERT,
UPDATE, or
DELETE, the number of affected
rows can be obtained with
mysql_affected_rows().
Return Values
The number of rows in the result set.
Errors
None.
int mysql_options(MYSQL *mysql, enum mysql_option
option, const void *arg)
Description
Can be used to set extra connect options and affect behavior for a connection. This function may be called multiple times to set several options.
mysql_options() should be called
after mysql_init() and before
mysql_connect() or
mysql_real_connect().
The option argument is the option that you
want to set; the arg argument is the value
for the option. If the option is an integer,
arg should point to the value of the integer.
The following list describes the possible options, their effect,
and how arg is used for each option. Several
of the options apply only when the application is linked against
the libmysqld embedded server library and are
unused for applications linked against the
libmysql client library. For option
descriptions that indicate arg is unused, its
value is irrelevant; it is conventional to pass 0.
MYSQL_INIT_COMMAND(argument type:char *)SQL statement to execute when connecting to the MySQL server. Automatically re-executed if reconnection occurs.
MYSQL_OPT_COMPRESS(argument: not used)Use the compressed client/server protocol.
MYSQL_OPT_CONNECT_TIMEOUT(argument type:unsigned int *)Connect timeout in seconds.
MYSQL_OPT_GUESS_CONNECTION(argument: not used)For an application linked against the
libmysqldembedded server library, this enables the library to guess whether to use the embedded server or a remote server. “Guess” means that if the host name is set and is notlocalhost, it uses a remote server. This behavior is the default.MYSQL_OPT_USE_EMBEDDED_CONNECTIONandMYSQL_OPT_USE_REMOTE_CONNECTIONcan be used to override it. This option is ignored for applications linked against thelibmysqlclientclient library.MYSQL_OPT_LOCAL_INFILE(argument type: optional pointer tounsigned int)If no pointer is given or if pointer points to an
unsigned intthat has a nonzero value, theLOAD LOCAL INFILEstatement is enabled.MYSQL_OPT_NAMED_PIPE(argument: not used)Use named pipes to connect to a MySQL server on Windows, if the server permits named-pipe connections.
MYSQL_OPT_PROTOCOL(argument type:unsigned int *)Type of protocol to use. Should be one of the enum values of
mysql_protocol_typedefined inmysql.h.MYSQL_OPT_READ_TIMEOUT(argument type:unsigned int *)The timeout in seconds for attempts to read from the server. Each attempt uses this timeout value and there are retries if necessary, so the total effective timeout value is three times the option value. You can set the value so that a lost connection can be detected earlier than the TCP/IP
Close_Wait_Timeoutvalue of 10 minutes. This option works only for TCP/IP connections and, prior to MySQL 5.1.12, only for Windows.MYSQL_OPT_RECONNECT(argument type:my_bool *)Enable or disable automatic reconnection to the server if the connection is found to have been lost. Reconnect is off by default; this option provides a way to set reconnection behavior explicitly.
Note:
mysql_real_connect()incorrectly reset theMYSQL_OPT_RECONNECToption to its default value before MySQL 5.1.6. Therefore, prior to that version, if you want reconnect to be enabled for each connection, you must callmysql_options()with theMYSQL_OPT_RECONNECToption after each call tomysql_real_connect(). This is not necessary as of 5.1.6: Callmysql_options()only beforemysql_real_connect()as usual.MYSQL_SET_CLIENT_IP(argument type:char *)For an application linked against the
libmysqldembedded server library (whenlibmysqldis compiled with authentication support), this means that the user is considered to have connected from the specified IP address (specified as a string) for authentication purposes. This option is ignored for applications linked against thelibmysqlclientclient library.MYSQL_OPT_SSL_VERIFY_SERVER_CERT(argument type:my_bool *)Enable or disable verification of the server's Common Name value in its certificate against the host name used when connecting to the server. The connection is rejected if there is a mismatch. This feature can be used to prevent man-in-the-middle attacks. Verification is disabled by default. Added in MySQL 5.1.11.
MYSQL_OPT_USE_EMBEDDED_CONNECTION(argument: not used)For an application linked against the
libmysqldembedded server library, this forces the use of the embedded server for the connection. This option is ignored for applications linked against thelibmysqlclientclient library.MYSQL_OPT_USE_REMOTE_CONNECTION(argument: not used)For an application linked against the
libmysqldembedded server library, this forces the use of a remote server for the connection. This option is ignored for applications linked against thelibmysqlclientclient library.MYSQL_OPT_USE_RESULT(argument: not used)This option is unused.
MYSQL_OPT_WRITE_TIMEOUT(argument type:unsigned int *)The timeout in seconds for attempts to write to the server. Each attempt uses this timeout value and there are
net_retry_countretries if necessary, so the total effective timeout value isnet_retry_counttimes the option value. This option works only for TCP/IP connections and, prior to MySQL 5.1.12, only for Windows.MYSQL_READ_DEFAULT_FILE(argument type:char *)Read options from the named option file instead of from
my.cnf.MYSQL_READ_DEFAULT_GROUP(argument type:char *)Read options from the named group from
my.cnfor the file specified withMYSQL_READ_DEFAULT_FILE.MYSQL_REPORT_DATA_TRUNCATION(argument type:my_bool *)Enable or disable reporting of data truncation errors for prepared statements using the
errormember ofMYSQL_BINDstructures. (Default: enabled.)MYSQL_SECURE_AUTH(argument type:my_bool *)Whether to connect to a server that does not support the password hashing used in MySQL 4.1.1 and later.
MYSQL_SET_CHARSET_DIR(argument type:char *)The path name to the directory that contains character set definition files.
MYSQL_SET_CHARSET_NAME(argument type:char *)The name of the character set to use as the default character set.
MYSQL_SHARED_MEMORY_BASE_NAME(argument type:char *)The name of the shared-memory object for communication to the server on Windows, if the server supports shared-memory connections. Should have the same value as the
--shared-memory-base-nameoption used for the mysqld server you want to connect to.
The client group is always read if you use
MYSQL_READ_DEFAULT_FILE or
MYSQL_READ_DEFAULT_GROUP.
The specified group in the option file may contain the following options.
| Option | Description |
|---|---|
character-sets-dir= | The directory where character sets are installed. |
compress | Use the compressed client/server protocol. |
connect-timeout= | Connect timeout in seconds. On Linux this timeout is also used for waiting for the first answer from the server. |
database= | Connect to this database if no database was specified in the connect command. |
debug | Debug options. |
default-character-set= | The default character set to use. |
disable-local-infile | Disable use of LOAD DATA
LOCAL. |
host= | Default host name. |
init-command= | Statement to execute when connecting to MySQL server. Automatically re-executed if reconnection occurs. |
interactive-timeout= | Same as specifying CLIENT_INTERACTIVE to
mysql_real_connect().
See Section 21.9.3.52, “mysql_real_connect()”. |
local-infile[={0|1}] | If no argument or nonzero argument, enable use of
LOAD DATA
LOCAL; otherwise disable. |
max_allowed_packet= | Maximum size of packet that client can read from server. |
multi-queries, multi-results | Enable multiple result sets from multiple-statement executions or stored procedures. |
multi-statements | Enable the client to send multiple statements in a single string
(separated by “;”). |
password= | Default password. |
pipe | Use named pipes to connect to a MySQL server on Windows. |
port= | Default port number. |
protocol={TCP|SOCKET|PIPE|MEMORY} | The protocol to use when connecting to the server. |
return-found-rows | Tell mysql_info() to return found rows
instead of updated rows when using
UPDATE. |
shared-memory-base-name= | Shared-memory name to use to connect to server. |
socket= | Default socket file. |
ssl-ca= | Certificate Authority file. |
ssl-capath= | Certificate Authority directory. |
ssl-cert= | Certificate file. |
ssl-cipher= | Permissible SSL ciphers. |
ssl-key= | Key file. |
timeout= | Like connect-timeout. |
user | Default user. |
timeout has been replaced by
connect-timeout, but
timeout is still supported in MySQL
5.1 for backward compatibility.
For more information about option files, see Section 4.2.3.3, “Using Option Files”.
Before MySQL 5.1.18, the arg argument was
declared as char *.
Return Values
Zero for success. Nonzero if you specify an unknown option.
Example
The following mysql_options()
calls request the use of compression in the client/server
protocol, cause options to be read from the
[odbc] group of option files, and disable
transaction autocommit mode:
MYSQL mysql;
mysql_init(&mysql);
mysql_options(&mysql,MYSQL_OPT_COMPRESS,0);
mysql_options(&mysql,MYSQL_READ_DEFAULT_GROUP,"odbc");
mysql_options(&mysql,MYSQL_INIT_COMMAND,"SET autocommit=0");
if (!mysql_real_connect(&mysql,"host","user","passwd","database",0,NULL,0))
{
fprintf(stderr, "Failed to connect to database: Error: %s\n",
mysql_error(&mysql));
}
This code requests that the client use the compressed
client/server protocol and read the additional options from the
odbc section in the
my.cnf file.
int mysql_ping(MYSQL *mysql)
Description
Checks whether the connection to the server is working. If the
connection has gone down and auto-reconnect is enabled an
attempt to reconnect is made. If the connection is down and
auto-reconnect is disabled,
mysql_ping() returns an error.
Auto-reconnect is disabled by default. To enable it, call
mysql_options() with the
MYSQL_OPT_RECONNECT option. For details, see
Section 21.9.3.49, “mysql_options()”.
mysql_ping() can be used by
clients that remain idle for a long while, to check whether the
server has closed the connection and reconnect if necessary.
If mysql_ping()) does cause a
reconnect, there is no explicit indication of it. To determine
whether a reconnect occurs, call
mysql_thread_id() to get the
original connection identifier before calling
mysql_ping(), then call
mysql_thread_id() again to see
whether the identifier has changed.
If reconnect occurs, some characteristics of the connection will have been reset. For details about these characteristics, see Section 21.9.11, “Controlling Automatic Reconnection Behavior”.
Return Values
Zero if the connection to the server is active. Nonzero if an error occurred. A nonzero return does not indicate whether the MySQL server itself is down; the connection might be broken for other reasons such as network problems.
Errors
Commands were executed in an improper order.
The MySQL server has gone away.
An unknown error occurred.
int mysql_query(MYSQL *mysql, const char
*stmt_str)
Description
Executes the SQL statement pointed to by the null-terminated
string stmt_str. Normally, the string must
consist of a single SQL statement and you should not add a
terminating semicolon (“;”) or
\g to the statement. If multiple-statement
execution has been enabled, the string can contain several
statements separated by semicolons. See
Section 21.9.12, “C API Support for Multiple Statement Execution”.
mysql_query() cannot be used for
statements that contain binary data; you must use
mysql_real_query() instead.
(Binary data may contain the
“\0” character, which
mysql_query() interprets as the
end of the statement string.)
If you want to know whether the statement should return a result
set, you can use
mysql_field_count() to check for
this. See Section 21.9.3.22, “mysql_field_count()”.
Return Values
Zero if the statement was successful. Nonzero if an error occurred.
Errors
Commands were executed in an improper order.
The MySQL server has gone away.
The connection to the server was lost during the query.
An unknown error occurred.
MYSQL *mysql_real_connect(MYSQL *mysql, const char
*host, const char *user, const char *passwd, const char *db,
unsigned int port, const char *unix_socket, unsigned long
client_flag)
Description
mysql_real_connect() attempts to
establish a connection to a MySQL database engine running on
host.
mysql_real_connect() must
complete successfully before you can execute any other API
functions that require a valid MYSQL
connection handle structure.
The parameters are specified as follows:
The first parameter should be the address of an existing
MYSQLstructure. Before callingmysql_real_connect()you must callmysql_init()to initialize theMYSQLstructure. You can change a lot of connect options with themysql_options()call. See Section 21.9.3.49, “mysql_options()”.The value of
hostmay be either a host name or an IP address. IfhostisNULLor the string"localhost", a connection to the local host is assumed: For Windows, the client connects using a shared-memory connection, if the server has shared-memory connections enabled. Otherwise, TCP/IP is used. For Unix, the client connects using a Unix socket file. For local connections, you can also influence the type of connection to use with theMYSQL_OPT_PROTOCOLorMYSQL_OPT_NAMED_PIPEoptions tomysql_options(). The type of connection must be supported by the server. For ahostvalue of"."on Windows, the client connects using a named pipe, if the server has named-pipe connections enabled. If named-pipe connections are not enabled, an error occurs.The
userparameter contains the user's MySQL login ID. IfuserisNULLor the empty string"", the current user is assumed. Under Unix, this is the current login name. Under Windows ODBC, the current user name must be specified explicitly. See the MyODBC section of Chapter 21, Connectors and APIs.The
passwdparameter contains the password foruser. IfpasswdisNULL, only entries in theusertable for the user that have a blank (empty) password field are checked for a match. This enables the database administrator to set up the MySQL privilege system in such a way that users get different privileges depending on whether they have specified a password.NoteDo not attempt to encrypt the password before calling
mysql_real_connect(); password encryption is handled automatically by the client API.The
userandpasswdparameters use whatever character set has been configured for theMYSQLobject. By default, this islatin1, but can be changed by callingmysql_options(mysql, MYSQL_SET_CHARSET_NAME, "prior to connecting.charset_name")dbis the database name. Ifdbis notNULL, the connection sets the default database to this value.If
portis not 0, the value is used as the port number for the TCP/IP connection. Note that thehostparameter determines the type of the connection.If
unix_socketis notNULL, the string specifies the socket or named pipe that should be used. Note that thehostparameter determines the type of the connection.The value of
client_flagis usually 0, but can be set to a combination of the following flags to enable certain features.Flag Name Flag Description CLIENT_COMPRESSUse compression protocol. CLIENT_FOUND_ROWSReturn the number of found (matched) rows, not the number of changed rows. CLIENT_IGNORE_SIGPIPEPrevents the client library from installing a SIGPIPEsignal handler. This can be used to avoid conflicts with a handler that the application has already installed.CLIENT_IGNORE_SPACEPermit spaces after function names. Makes all functions names reserved words. CLIENT_INTERACTIVEPermit interactive_timeoutseconds (instead ofwait_timeoutseconds) of inactivity before closing the connection. The client's sessionwait_timeoutvariable is set to the value of the sessioninteractive_timeoutvariable.CLIENT_LOCAL_FILESEnable LOAD DATA LOCALhandling.CLIENT_MULTI_RESULTSTell the server that the client can handle multiple result sets from multiple-statement executions or stored procedures. This flag is automatically enabled if CLIENT_MULTI_STATEMENTSis enabled. See the note following this table for more information about this flag.CLIENT_MULTI_STATEMENTSTell the server that the client may send multiple statements in a single string (separated by “ ;”). If this flag is not set, multiple-statement execution is disabled. See the note following this table for more information about this flag.CLIENT_NO_SCHEMADo not permit the db_name.tbl_name.col_namesyntax. This is for ODBC. It causes the parser to generate an error if you use that syntax, which is useful for trapping bugs in some ODBC programs.CLIENT_ODBCUnused. CLIENT_SSLUse SSL (encrypted protocol). This option should not be set by application programs; it is set internally in the client library. Instead, use mysql_ssl_set()before callingmysql_real_connect().CLIENT_REMEMBER_OPTIONSRemember options specified by calls to mysql_options(). Without this option, ifmysql_real_connect()fails, you must repeat themysql_options()calls before trying to connect again. With this option, themysql_options()calls need not be repeated.
If your program uses CALL
statements to execute stored procedures, the
CLIENT_MULTI_RESULTS flag must be enabled.
This is because each CALL returns
a result to indicate the call status, in addition to any result
sets that might be returned by statements executed within the
procedure. Because CALL can
return multiple results, you should process them using a loop
that calls mysql_next_result()
to determine whether there are more results.
CLIENT_MULTI_RESULTS can be enabled when you
call mysql_real_connect(),
either explicitly by passing the
CLIENT_MULTI_RESULTS flag itself, or
implicitly by passing CLIENT_MULTI_STATEMENTS
(which also enables CLIENT_MULTI_RESULTS).
If you enable CLIENT_MULTI_STATEMENTS or
CLIENT_MULTI_RESULTS, you should process the
result for every call to
mysql_query() or
mysql_real_query() by using a
loop that calls
mysql_next_result() to determine
whether there are more results. For an example, see
Section 21.9.12, “C API Support for Multiple Statement Execution”.
For some parameters, it is possible to have the value taken from
an option file rather than from an explicit value in the
mysql_real_connect() call. To do
this, call mysql_options() with
the MYSQL_READ_DEFAULT_FILE or
MYSQL_READ_DEFAULT_GROUP option before
calling mysql_real_connect().
Then, in the
mysql_real_connect() call,
specify the “no-value” value for each parameter to
be read from an option file:
For
host, specify a value ofNULLor the empty string ("").For
user, specify a value ofNULLor the empty string.For
passwd, specify a value ofNULL. (For the password, a value of the empty string in themysql_real_connect()call cannot be overridden in an option file, because the empty string indicates explicitly that the MySQL account must have an empty password.)For
db, specify a value ofNULLor the empty string.For
port, specify a value of 0.For
unix_socket, specify a value ofNULL.
If no value is found in an option file for a parameter, its default value is used as indicated in the descriptions given earlier in this section.
Return Values
A MYSQL* connection handle if the connection
was successful, NULL if the connection was
unsuccessful. For a successful connection, the return value is
the same as the value of the first parameter.
Errors
Failed to connect to the MySQL server.
Failed to connect to the local MySQL server.
Failed to create an IP socket.
Out of memory.
Failed to create a Unix socket.
Failed to find the IP address for the host name.
A protocol mismatch resulted from attempting to connect to a server with a client library that uses a different protocol version.
Failed to create a named pipe on Windows.
Failed to wait for a named pipe on Windows.
Failed to get a pipe handler on Windows.
If
connect_timeout> 0 and it took longer thanconnect_timeoutseconds to connect to the server or if the server died while executing theinit-command.
Example
MYSQL mysql;
mysql_init(&mysql);
mysql_options(&mysql,MYSQL_READ_DEFAULT_GROUP,"your_prog_name");
if (!mysql_real_connect(&mysql,"host","user","passwd","database",0,NULL,0))
{
fprintf(stderr, "Failed to connect to database: Error: %s\n",
mysql_error(&mysql));
}
By using mysql_options() the
MySQL library reads the [client] and
[your_prog_name] sections in the
my.cnf file which ensures that your program
works, even if someone has set up MySQL in some nonstandard way.
Note that upon connection,
mysql_real_connect() sets the
reconnect flag (part of the
MYSQL structure) to a value of
1 in versions of the API older than 5.0.3, or
0 in newer versions. A value of
1 for this flag indicates that if a statement
cannot be performed because of a lost connection, to try
reconnecting to the server before giving up. You can use the
MYSQL_OPT_RECONNECT option to
mysql_options() to control
reconnection behavior.
unsigned long mysql_real_escape_string(MYSQL *mysql,
char *to, const char *from, unsigned long length)
Note that mysql must be a valid, open
connection. This is needed because the escaping depends on the
character set in use by the server.
Description
This function is used to create a legal SQL string that you can use in an SQL statement. See Section 8.1.1, “Strings”.
The string in from is encoded to an escaped
SQL string, taking into account the current character set of the
connection. The result is placed in to and a
terminating null byte is appended. Characters encoded are
NUL (ASCII 0),
“\n”,
“\r”,
“\”,
“'”,
“"”, and Control-Z (see
Section 8.1, “Literal Values”). (Strictly speaking, MySQL requires
only that backslash and the quote character used to quote the
string in the query be escaped. This function quotes the other
characters to make them easier to read in log files.)
The string pointed to by from must be
length bytes long. You must allocate the
to buffer to be at least
length*2+1 bytes long. (In the worst case,
each character may need to be encoded as using two bytes, and
you need room for the terminating null byte.) When
mysql_real_escape_string()
returns, the contents of to is a
null-terminated string. The return value is the length of the
encoded string, not including the terminating null character.
If you need to change the character set of the connection, you
should use the
mysql_set_character_set()
function rather than executing a SET NAMES
(or SET CHARACTER SET) statement.
mysql_set_character_set() works
like SET NAMES but also affects the character
set used by
mysql_real_escape_string(),
which SET NAMES does not.
Example
char query[1000],*end;
end = strmov(query,"INSERT INTO test_table values(");
*end++ = '\'';
end += mysql_real_escape_string(&mysql, end,"What is this",12);
*end++ = '\'';
*end++ = ',';
*end++ = '\'';
end += mysql_real_escape_string(&mysql, end,"binary data: \0\r\n",16);
*end++ = '\'';
*end++ = ')';
if (mysql_real_query(&mysql,query,(unsigned int) (end - query)))
{
fprintf(stderr, "Failed to insert row, Error: %s\n",
mysql_error(&mysql));
}
The strmov() function used in the example is
included in the mysqlclient library and works
like strcpy() but returns a pointer to the
terminating null of the first parameter.
Return Values
The length of the value placed into to, not
including the terminating null character.
Errors
None.
int mysql_real_query(MYSQL *mysql, const char
*stmt_str, unsigned long length)
Description
Executes the SQL statement pointed to by
stmt_str, which should be a string
length bytes long. Normally, the string must
consist of a single SQL statement and you should not add a
terminating semicolon (“;”) or
\g to the statement. If multiple-statement
execution has been enabled, the string can contain several
statements separated by semicolons. See
Section 21.9.12, “C API Support for Multiple Statement Execution”.
mysql_query() cannot be used for
statements that contain binary data; you must use
mysql_real_query() instead.
(Binary data may contain the
“\0” character, which
mysql_query() interprets as the
end of the statement string.) In addition,
mysql_real_query() is faster
than mysql_query() because it
does not call strlen() on the statement
string.
If you want to know whether the statement should return a result
set, you can use
mysql_field_count() to check for
this. See Section 21.9.3.22, “mysql_field_count()”.
Return Values
Zero if the statement was successful. Nonzero if an error occurred.
Errors
Commands were executed in an improper order.
The MySQL server has gone away.
The connection to the server was lost during the query.
An unknown error occurred.
int mysql_refresh(MYSQL *mysql, unsigned int
options)
Description
This function flushes tables or caches, or resets replication
server information. The connected user must have the
RELOAD privilege.
The options argument is a bit mask composed
from any combination of the following values. Multiple values
can be OR'ed together to perform multiple operations with a
single call.
REFRESH_GRANTRefresh the grant tables, like
FLUSH PRIVILEGES.REFRESH_LOGFlush the logs, like
FLUSH LOGS.REFRESH_TABLESFlush the table cache, like
FLUSH TABLES.REFRESH_HOSTSFlush the host cache, like
FLUSH HOSTS.REFRESH_STATUSReset status variables, like
FLUSH STATUS.REFRESH_THREADSFlush the thread cache.
REFRESH_SLAVEOn a slave replication server, reset the master server information and restart the slave, like
RESET SLAVE.REFRESH_MASTEROn a master replication server, remove the binary log files listed in the binary log index and truncate the index file, like
RESET MASTER.
Return Values
Zero for success. Nonzero if an error occurred.
Errors
Commands were executed in an improper order.
The MySQL server has gone away.
The connection to the server was lost during the query.
An unknown error occurred.
int mysql_reload(MYSQL *mysql)
Description
Asks the MySQL server to reload the grant tables. The connected
user must have the RELOAD
privilege.
This function is deprecated. It is preferable to use
mysql_query() to issue an SQL
FLUSH
PRIVILEGES statement instead.
Return Values
Zero for success. Nonzero if an error occurred.
Errors
Commands were executed in an improper order.
The MySQL server has gone away.
The connection to the server was lost during the query.
An unknown error occurred.
my_bool mysql_rollback(MYSQL *mysql)
Description
Rolls back the current transaction.
The action of this function is subject to the value of the
completion_type system
variable. In particular, if the value of
completion_type is 2, the
server performs a release after terminating a transaction and
closes the client connection. The client program should call
mysql_close() to close the
connection from the client side.
Return Values
Zero if successful. Nonzero if an error occurred.
Errors
None.
MYSQL_ROW_OFFSET mysql_row_seek(MYSQL_RES *result,
MYSQL_ROW_OFFSET offset)
Description
Sets the row cursor to an arbitrary row in a query result set.
The offset value is a row offset that should
be a value returned from
mysql_row_tell() or from
mysql_row_seek(). This value is
not a row number; if you want to seek to a row within a result
set by number, use
mysql_data_seek() instead.
This function requires that the result set structure contains
the entire result of the query, so
mysql_row_seek() may be used
only in conjunction with
mysql_store_result(), not with
mysql_use_result().
Return Values
The previous value of the row cursor. This value may be passed
to a subsequent call to
mysql_row_seek().
Errors
None.
MYSQL_ROW_OFFSET mysql_row_tell(MYSQL_RES
*result)
Description
Returns the current position of the row cursor for the last
mysql_fetch_row(). This value
can be used as an argument to
mysql_row_seek().
You should use mysql_row_tell()
only after mysql_store_result(),
not after mysql_use_result().
Return Values
The current offset of the row cursor.
Errors
None.
int mysql_select_db(MYSQL *mysql, const char
*db)
Description
Causes the database specified by db to become
the default (current) database on the connection specified by
mysql. In subsequent queries, this database
is the default for table references that do not include an
explicit database specifier.
mysql_select_db() fails unless
the connected user can be authenticated as having permission to
use the database.
Return Values
Zero for success. Nonzero if an error occurred.
Errors
Commands were executed in an improper order.
The MySQL server has gone away.
The connection to the server was lost during the query.
An unknown error occurred.
int mysql_set_character_set(MYSQL *mysql, const char
*csname)
Description
This function is used to set the default character set for the
current connection. The string csname
specifies a valid character set name. The connection collation
becomes the default collation of the character set. This
function works like the SET NAMES statement,
but also sets the value of mysql->charset,
and thus affects the character set used by
mysql_real_escape_string()
Return Values
Zero for success. Nonzero if an error occurred.
Example
MYSQL mysql;
mysql_init(&mysql);
if (!mysql_real_connect(&mysql,"host","user","passwd","database",0,NULL,0))
{
fprintf(stderr, "Failed to connect to database: Error: %s\n",
mysql_error(&mysql));
}
if (!mysql_set_character_set(&mysql, "utf8"))
{
printf("New client character set: %s\n",
mysql_character_set_name(&mysql));
}
void mysql_set_local_infile_default(MYSQL
*mysql);
Description
Sets the LOAD LOCAL DATA INFILE handler
callback functions to the defaults used internally by the C
client library. The library calls this function automatically if
mysql_set_local_infile_handler()
has not been called or does not supply valid functions for each
of its callbacks.
Return Values
None.
Errors
None.
void mysql_set_local_infile_handler(MYSQL *mysql, int
(*local_infile_init)(void **, const char *, void *), int
(*local_infile_read)(void *, char *, unsigned int), void
(*local_infile_end)(void *), int (*local_infile_error)(void *,
char*, unsigned int), void *userdata);
Description
This function installs callbacks to be used during the execution
of LOAD DATA LOCAL
INFILE statements. It enables application programs to
exert control over local (client-side) data file reading. The
arguments are the connection handler, a set of pointers to
callback functions, and a pointer to a data area that the
callbacks can use to share information.
To use
mysql_set_local_infile_handler(),
you must write the following callback functions:
int local_infile_init(void **ptr, const char *filename, void *userdata);
The initialization function. This is called once to do any setup
necessary, open the data file, allocate data structures, and so
forth. The first void** argument is a pointer
to a pointer. You can set the pointer (that is,
*ptr) to a value that will be passed to each
of the other callbacks (as a void*). The
callbacks can use this pointed-to value to maintain state
information. The userdata argument is the
same value that is passed to
mysql_set_local_infile_handler().
The initialization function should return zero for success, nonzero for an error.
int local_infile_read(void *ptr, char *buf, unsigned int buf_len);
The data-reading function. This is called repeatedly to read the
data file. buf points to the buffer where the
read data should be stored, and buf_len is
the maximum number of bytes that the callback can read and store
in the buffer. (It can read fewer bytes, but should not read
more.)
The return value is the number of bytes read, or zero when no more data could be read (this indicates EOF). Return a value less than zero if an error occurs.
void local_infile_end(void *ptr)
The termination function. This is called once after
local_infile_read() has returned zero (EOF)
or an error. This function should deallocate any memory
allocated by local_infile_init() and perform
any other cleanup necessary. It is invoked even if the
initalization function returns an error.
int
local_infile_error(void *ptr,
char *error_msg,
unsigned int error_msg_len);
The error-handling function. This is called to get a textual
error message to return to the user in case any of your other
functions returns an error. error_msg points
to the buffer into which the message should be written, and
error_msg_len is the length of the buffer.
The message should be written as a null-terminated string, so
the message can be at most
error_msg_len–1 bytes long.
The return value is the error number.
Typically, the other callbacks store the error message in the
data structure pointed to by ptr, so that
local_infile_error() can copy the message
from there into error_msg.
After calling
mysql_set_local_infile_handler()
in your C code and passing pointers to your callback functions,
you can then issue a
LOAD DATA LOCAL
INFILE statement (for example, by using
mysql_query()). The client
library automatically invokes your callbacks. The file name
specified in LOAD
DATA LOCAL INFILE will be passed as the second
parameter to the local_infile_init()
callback.
Return Values
None.
Errors
None.
int mysql_set_server_option(MYSQL *mysql, enum
enum_mysql_set_option option)
Description
Enables or disables an option for the connection.
option can have one of the following values.
| Option | Description |
|---|---|
MYSQL_OPTION_MULTI_STATEMENTS_ON | Enable multiple-statement support |
MYSQL_OPTION_MULTI_STATEMENTS_OFF | Disable multiple-statement support |
If you enable multiple-statement support, you should retrieve
results from calls to
mysql_query() or
mysql_real_query() by using a
loop that calls
mysql_next_result() to determine
whether there are more results. For an example, see
Section 21.9.12, “C API Support for Multiple Statement Execution”.
Enabling multiple-statement support with
MYSQL_OPTION_MULTI_STATEMENTS_ON does not
have quite the same effect as enabling it by passing the
CLIENT_MULTI_STATEMENTS flag to
mysql_real_connect():
CLIENT_MULTI_STATEMENTS also enables
CLIENT_MULTI_RESULTS. If you are using the
CALL SQL statement in your
programs, multiple-result support must be enabled; this means
that MYSQL_OPTION_MULTI_STATEMENTS_ON by
itself is insufficient to permit the use of
CALL.
Return Values
Zero for success. Nonzero if an error occurred.
Errors
Commands were executed in an improper order.
The MySQL server has gone away.
The connection to the server was lost during the query.
The server didn't support
mysql_set_server_option()(which is the case that the server is older than 4.1.1) or the server didn't support the option one tried to set.
int mysql_shutdown(MYSQL *mysql, enum
mysql_enum_shutdown_level shutdown_level)
Description
Asks the database server to shut down. The connected user must
have the SHUTDOWN privilege.
MySQL 5.1 servers support only one type of
shutdown; shutdown_level must be equal to
SHUTDOWN_DEFAULT. Additional shutdown levels
are planned to make it possible to choose the desired level.
Dynamically linked executables which have been compiled with
older versions of the libmysqlclient headers
and call mysql_shutdown() need
to be used with the old libmysqlclient
dynamic library.
The shutdown process is described in Section 5.1.10, “The Shutdown Process”.
Return Values
Zero for success. Nonzero if an error occurred.
Errors
Commands were executed in an improper order.
The MySQL server has gone away.
The connection to the server was lost during the query.
An unknown error occurred.
const char *mysql_sqlstate(MYSQL *mysql)
Description
Returns a null-terminated string containing the SQLSTATE error
code for the most recently executed SQL statement. The error
code consists of five characters. '00000'
means “no error”. The values are specified by ANSI
SQL and ODBC. For a list of possible values, see
Appendix C, Errors, Error Codes, and Common Problems.
SQLSTATE values returned by
mysql_sqlstate() differ from
MySQL-specific error numbers returned by
mysql_errno(). For example, the
mysql client program displays errors using
the following format, where 1146 is the
mysql_errno() value and
'42S02' is the corresponding
mysql_sqlstate() value:
shell> SELECT * FROM no_such_table;
ERROR 1146 (42S02): Table 'test.no_such_table' doesn't exist
Not all MySQL error numbers are mapped to SQLSTATE error codes.
The value 'HY000' (general error) is used for
unmapped error numbers.
If you call mysql_sqlstate()
after mysql_real_connect()
fails, mysql_sqlstate() might
not return a useful value. For example, this happens if a host
is blocked by the server and the connection is closed without
any SQLSTATE value being sent to the client.
Return Values
A null-terminated character string containing the SQLSTATE error code.
See Also
See Section 21.9.3.14, “mysql_errno()”,
Section 21.9.3.15, “mysql_error()”, and
Section 21.9.7.26, “mysql_stmt_sqlstate()”.
my_bool mysql_ssl_set(MYSQL *mysql, const char *key,
const char *cert, const char *ca, const char *capath, const char
*cipher)
Description
mysql_ssl_set() is used for
establishing secure connections using SSL. It must be called
before mysql_real_connect().
mysql_ssl_set() does nothing
unless SSL support is enabled in the client library.
mysql is the connection handler returned from
mysql_init(). The other
parameters are specified as follows:
keyis the path name to the key file.certis the path name to the certificate file.cais the path name to the certificate authority file.capathis the path name to a directory that contains trusted SSL CA certificates in pem format.cipheris a list of permissible ciphers to use for SSL encryption.
Any unused SSL parameters may be given as
NULL.
Return Values
This function always returns 0. If SSL setup
is incorrect,
mysql_real_connect() returns an
error when you attempt to connect.
const char *mysql_stat(MYSQL *mysql)
Description
Returns a character string containing information similar to that provided by the mysqladmin status command. This includes uptime in seconds and the number of running threads, questions, reloads, and open tables.
Return Values
A character string describing the server status.
NULL if an error occurred.
Errors
Commands were executed in an improper order.
The MySQL server has gone away.
The connection to the server was lost during the query.
An unknown error occurred.
MYSQL_RES *mysql_store_result(MYSQL *mysql)
Description
After invoking mysql_query() or
mysql_real_query(), you must
call mysql_store_result() or
mysql_use_result() for every
statement that successfully produces a result set
(SELECT,
SHOW,
DESCRIBE,
EXPLAIN,
CHECK TABLE, and so forth). You
must also call
mysql_free_result() after you
are done with the result set.
You don't have to call
mysql_store_result() or
mysql_use_result() for other
statements, but it does not do any harm or cause any notable
performance degradation if you call
mysql_store_result() in all
cases. You can detect whether the statement has a result set by
checking whether
mysql_store_result() returns a
nonzero value (more about this later on).
If you enable multiple-statement support, you should retrieve
results from calls to
mysql_query() or
mysql_real_query() by using a
loop that calls
mysql_next_result() to determine
whether there are more results. For an example, see
Section 21.9.12, “C API Support for Multiple Statement Execution”.
If you want to know whether a statement should return a result
set, you can use
mysql_field_count() to check for
this. See Section 21.9.3.22, “mysql_field_count()”.
mysql_store_result() reads the
entire result of a query to the client, allocates a
MYSQL_RES structure, and places the result
into this structure.
mysql_store_result() returns a
null pointer if the statement didn't return a result set (for
example, if it was an INSERT
statement).
mysql_store_result() also
returns a null pointer if reading of the result set failed. You
can check whether an error occurred by checking whether
mysql_error() returns a nonempty
string, mysql_errno() returns
nonzero, or mysql_field_count()
returns zero.
An empty result set is returned if there are no rows returned. (An empty result set differs from a null pointer as a return value.)
After you have called
mysql_store_result() and gotten
back a result that isn't a null pointer, you can call
mysql_num_rows() to find out how
many rows are in the result set.
You can call mysql_fetch_row()
to fetch rows from the result set, or
mysql_row_seek() and
mysql_row_tell() to obtain or
set the current row position within the result set.
Return Values
A MYSQL_RES result structure with the
results. NULL (0) if an error occurred.
Errors
mysql_store_result() resets
mysql_error() and
mysql_errno() if it succeeds.
Commands were executed in an improper order.
Out of memory.
The MySQL server has gone away.
The connection to the server was lost during the query.
An unknown error occurred.
unsigned long mysql_thread_id(MYSQL *mysql)
Description
Returns the thread ID of the current connection. This value can
be used as an argument to
mysql_kill() to kill the thread.
If the connection is lost and you reconnect with
mysql_ping(), the thread ID
changes. This means you should not get the thread ID and store
it for later. You should get it when you need it.
Return Values
The thread ID of the current connection.
Errors
None.
MYSQL_RES *mysql_use_result(MYSQL *mysql)
Description
After invoking mysql_query() or
mysql_real_query(), you must
call mysql_store_result() or
mysql_use_result() for every
statement that successfully produces a result set
(SELECT,
SHOW,
DESCRIBE,
EXPLAIN,
CHECK TABLE, and so forth). You
must also call
mysql_free_result() after you
are done with the result set.
mysql_use_result() initiates a
result set retrieval but does not actually read the result set
into the client like
mysql_store_result() does.
Instead, each row must be retrieved individually by making calls
to mysql_fetch_row(). This reads
the result of a query directly from the server without storing
it in a temporary table or local buffer, which is somewhat
faster and uses much less memory than
mysql_store_result(). The client
allocates memory only for the current row and a communication
buffer that may grow up to
max_allowed_packet bytes.
On the other hand, you shouldn't use
mysql_use_result() if you are
doing a lot of processing for each row on the client side, or if
the output is sent to a screen on which the user may type a
^S (stop scroll). This ties up the server and
prevent other threads from updating any tables from which the
data is being fetched.
When using mysql_use_result(),
you must execute
mysql_fetch_row() until a
NULL value is returned, otherwise, the
unfetched rows are returned as part of the result set for your
next query. The C API gives the error Commands out of
sync; you can't run this command now if you forget to
do this!
You may not use
mysql_data_seek(),
mysql_row_seek(),
mysql_row_tell(),
mysql_num_rows(), or
mysql_affected_rows() with a
result returned from
mysql_use_result(), nor may you
issue other queries until
mysql_use_result() has finished.
(However, after you have fetched all the rows,
mysql_num_rows() accurately
returns the number of rows fetched.)
You must call
mysql_free_result() once you are
done with the result set.
When using the libmysqld embedded server, the
memory benefits are essentially lost because memory usage
incrementally increases with each row retrieved until
mysql_free_result() is called.
Return Values
A MYSQL_RES result structure.
NULL if an error occurred.
Errors
mysql_use_result() resets
mysql_error() and
mysql_errno() if it succeeds.
Commands were executed in an improper order.
Out of memory.
The MySQL server has gone away.
The connection to the server was lost during the query.
An unknown error occurred.
The MySQL client/server protocol provides for the use of prepared
statements. This capability uses the MYSQL_STMT
statement handler data structure returned by the
mysql_stmt_init() initialization
function. Prepared execution is an efficient way to execute a
statement more than once. The statement is first parsed to prepare
it for execution. Then it is executed one or more times at a later
time, using the statement handle returned by the initialization
function.
Prepared execution is faster than direct execution for statements executed more than once, primarily because the query is parsed only once. In the case of direct execution, the query is parsed every time it is executed. Prepared execution also can provide a reduction of network traffic because for each execution of the prepared statement, it is necessary only to send the data for the parameters.
Prepared statements might not provide a performance increase in some situations. For best results, test your application both with prepared and nonprepared statements and choose whichever yields best performance.
Another advantage of prepared statements is that it uses a binary protocol that makes data transfer between client and server more efficient.
The following SQL statements can be used as prepared statements:
CALL, CREATE
TABLE, DELETE,
DO,
INSERT,
REPLACE,
SELECT,
SET,
UPDATE, and most
SHOW statements.
As of MySQL 5.1.10, the following additional statements are supported:
ANALYZE TABLE OPTIMIZE TABLE REPAIR TABLE
As of MySQL 5.1.12, the following additional statements are supported:
CACHE INDEX
CHANGE MASTER
CHECKSUM {TABLE | TABLES}
{CREATE | RENAME | DROP} DATABASE
{CREATE | RENAME | DROP} USER
FLUSH {TABLE | TABLES | TABLES WITH READ LOCK | HOSTS | PRIVILEGES
| LOGS | STATUS | MASTER | SLAVE | DES_KEY_FILE | USER_RESOURCES}
GRANT
REVOKE
KILL
LOAD INDEX INTO CACHE
RESET {MASTER | SLAVE | QUERY CACHE}
SHOW BINLOG EVENTS
SHOW CREATE {PROCEDURE | FUNCTION | EVENT | TABLE | VIEW}
SHOW {AUTHORS | CONTRIBUTORS | WARNINGS | ERRORS}
SHOW {MASTER | BINARY} LOGS
SHOW {MASTER | SLAVE} STATUS
SLAVE {START | STOP}
INSTALL PLUGIN
UNINSTALL PLUGIN
Other statements are not yet supported in MySQL 5.1.
As of MySQL 5.1.25, metadata changes to tables or views referred to by prepared statements are detected and cause automatic repreparation of the statement when it is next executed. For more information, see Section 12.6.4, “Automatic Prepared Statement Repreparation”.
Prepared statements use several data structures:
To obtain a statement handle, pass a
MYSQLconnection handler tomysql_stmt_init(), which returns a pointer to aMYSQL_STMTdata structure. This structure is used for further operations with the statement. To specify the statement to prepare, pass theMYSQL_STMTpointer and the statement string tomysql_stmt_prepare().To provide input parameters for a prepared statement, set up
MYSQL_BINDstructures and pass them tomysql_stmt_bind_param(). To receive output column values, set upMYSQL_BINDstructures and pass them tomysql_stmt_bind_result().The
MYSQL_TIMEstructure is used to transfer temporal data in both directions.
The following discussion describes the prepared statement data
types in detail. For examples that show how to use them, see
Section 21.9.7.10, “mysql_stmt_execute()”, and
Section 21.9.7.11, “mysql_stmt_fetch()”.
This structure is a handle for a prepared statement. A handle is created by calling
mysql_stmt_init(), which returns a pointer to aMYSQL_STMT. The handle is used for all subsequent operations with the statement until you close it withmysql_stmt_close(), at which point the handle becomes invalid.The
MYSQL_STMTstructure has no members intended for application use. Applications should not try to copy aMYSQL_STMTstructure. There is no guarantee that such a copy will be usable.Multiple statement handles can be associated with a single connection. The limit on the number of handles depends on the available system resources.
This structure is used both for statement input (data values sent to the server) and output (result values returned from the server):
For input, use
MYSQL_BINDstructures withmysql_stmt_bind_param()to bind parameter data values to buffers for use bymysql_stmt_execute().For output, use
MYSQL_BINDstructures withmysql_stmt_bind_result()to bind buffers to result set columns, for use in fetching rows withmysql_stmt_fetch().
To use a
MYSQL_BINDstructure, zero its contents to initialize it, then set its members appropriately. For example, to declare and initialize an array of threeMYSQL_BINDstructures, use this code:MYSQL_BIND bind[3]; memset(bind, 0, sizeof(bind));
The
MYSQL_BINDstructure contains the following members for use by application programs. For several of the members, the manner of use depends on whether the structure is used for input or output.enum enum_field_types buffer_typeThe type of the buffer. This member indicates the data type of the C language variable bound to a statement parameter or result set column. For input,
buffer_typeindicates the type of the variable containing the value to be sent to the server. For output, it indicates the type of the variable into which a value received from the server should be stored. For permissiblebuffer_typevalues, see Section 21.9.5.1, “C API Prepared Statement Type Codes”.void *bufferA pointer to the buffer to be used for data transfer. This is the address of a C language variable.
For input,
bufferis a pointer to the variable in which you store the data value for a statement parameter. When you callmysql_stmt_execute(), MySQL use the value stored in the variable in place of the corresponding parameter marker in the statement (specified with?in the statement string).For output,
bufferis a pointer to the variable in which to return a result set column value. When you callmysql_stmt_fetch(), MySQL stores a column value from the current row of the result set in this variable. You can access the value when the call returns.To minimize the need for MySQL to perform type conversions between C language values on the client side and SQL values on the server side, use C variables that have types similar to those of the corresponding SQL values:
For numeric data types,
buffershould point to a variable of the proper numeric C type. For integer variables (which can becharfor single-byte values or an integer type for larger values), you should also indicate whether the variable has theunsignedattribute by setting theis_unsignedmember, described later.For character (nonbinary) and binary string data types,
buffershould point to a character buffer.For date and time data types,
buffershould point to aMYSQL_TIMEstructure.
For guidelines about mapping between C types and SQL types and notes about type conversions, see Section 21.9.5.1, “C API Prepared Statement Type Codes”, and Section 21.9.5.2, “C API Prepared Statement Type Conversions”.
unsigned long buffer_lengthThe actual size of
*bufferin bytes. This indicates the maximum amount of data that can be stored in the buffer. For character and binary C data, thebuffer_lengthvalue specifies the length of*bufferwhen used withmysql_stmt_bind_param()to specify input values, or the maximum number of output data bytes that can be fetched into the buffer when used withmysql_stmt_bind_result().unsigned long *lengthA pointer to an
unsigned longvariable that indicates the actual number of bytes of data stored in*buffer.lengthis used for character or binary C data.For input parameter data binding, set
*lengthto indicate the actual length of the parameter value stored in*buffer. This is used bymysql_stmt_execute().For output value binding, MySQL sets
*lengthwhen you callmysql_stmt_fetch(). Themysql_stmt_fetch()return value determines how to interpret the length:If the return value is 0,
*lengthindicates the actual length of the parameter value.If the return value is
MYSQL_DATA_TRUNCATED,*lengthindicates the nontruncated length of the parameter value. In this case, the minimum of*lengthandbuffer_lengthindicates the actual length of the value.
lengthis ignored for numeric and temporal data types because thebuffer_typevalue determines the length of the data value.If you must determine the length of a returned value before fetching it, see Section 21.9.7.11, “
mysql_stmt_fetch()”, for some strategies.my_bool *is_nullThis member points to a
my_boolvariable that is true if a value isNULL, false if it is notNULL. For input, set*is_nullto true to indicate that you are passing aNULLvalue as a statement parameter.is_nullis a pointer to a boolean scalar, not a boolean scalar, to provide flexibility in how you specifyNULLvalues:If your data values are always
NULL, useMYSQL_TYPE_NULLas thebuffer_typevalue when you bind the column. The otherMYSQL_BINDmembers, includingis_null, do not matter.If your data values are always
NOT
        NULL
, setis_null = (my_bool*) 0, and set the other members appropriately for the variable you are binding.In all other cases, set the other members appriopriately and set
is_nullto the address of amy_boolvariable. Set that variable's value to true or false appropriately between executions to indicate whether the corresponding data value isNULLorNOT NULL, respectively.
For output, when you fetch a row, MySQL sets the value pointed to by
is_nullto true or false according to whether the result set column value returned from the statement is or is notNULL.my_bool is_unsignedThis member applies for C variables with data types that can be
unsigned(char,short int,int,long long int). Setis_unsignedto true if the variable pointed to bybufferisunsignedand false otherwise. For example, if you bind asigned charvariable tobuffer, specify a type code ofMYSQL_TYPE_TINYand setis_unsignedto false. If you bind anunsigned charinstead, the type code is the same butis_unsignedshould be true. (Forchar, it is not defined whether it is signed or unsigned, so it is best to be explicit about signedness by usingsigned charorunsigned char.)is_unsignedapplies only to the C language variable on the client side. It indicates nothing about the signedness of the corresponding SQL value on the server side. For example, if you use anintvariable to supply a value for aBIGINT UNSIGNEDcolumn,is_unsignedshould be false becauseintis a signed type. If you use anunsigned intvariable to supply a value for aBIGINTcolumn,is_unsignedshould be true becauseunsigned intis an unsigned type. MySQL performs the proper conversion between signed and unsigned values in both directions, although a warning occurs if truncation results.my_bool *errorFor output, set this member to point to a
my_boolvariable to have truncation information for the parameter stored there after a row fetching operation. When truncation reporting is enabled,mysql_stmt_fetch()returnsMYSQL_DATA_TRUNCATEDand*erroris true in theMYSQL_BINDstructures for parameters in which truncation occurred. Truncation indicates loss of sign or significant digits, or that a string was too long to fit in a column. Truncation reporting is enabled by default, but can be controlled by callingmysql_options()with theMYSQL_REPORT_DATA_TRUNCATIONoption.
This structure is used to send and receive
DATE,TIME,DATETIME, andTIMESTAMPdata directly to and from the server. Set thebuffermember to point to aMYSQL_TIMEstructure, and set thebuffer_typemember of aMYSQL_BINDstructure to one of the temporal types (MYSQL_TYPE_TIME,MYSQL_TYPE_DATE,MYSQL_TYPE_DATETIME,MYSQL_TYPE_TIMESTAMP).The
MYSQL_TIMEstructure contains the members listed in the following table.Member Description unsigned int yearThe year unsigned int monthThe month of the year unsigned int dayThe day of the month unsigned int hourThe hour of the day unsigned int minuteThe minute of the hour unsigned int secondThe second of the minute my_bool negA boolean flag indicating whether the time is negative unsigned long second_partThe fractional part of the second in microseconds; currently unused Only those parts of a
MYSQL_TIMEstructure that apply to a given type of temporal value are used. Theyear,month, anddayelements are used forDATE,DATETIME, andTIMESTAMPvalues. Thehour,minute, andsecondelements are used forTIME,DATETIME, andTIMESTAMPvalues. See Section 21.9.14, “C API Prepared Statement Handling of Date and Time Values”.
The buffer_type member of
MYSQL_BIND structures indicates the data type
of the C language variable bound to a statement parameter or
result set column. For input, buffer_type
indicates the type of the variable containing the value to be
sent to the server. For output, it indicates the type of the
variable into which a value received from the server should be
stored.
The following table shows the permissible values for the
buffer_type member of
MYSQL_BIND structures for input values sent
to the server. The table shows the C variable types that you can
use, the corresponding type codes, and the SQL data types for
which the supplied value can be used without conversion. Choose
the buffer_type value according to the data
type of the C language variable that you are binding. For the
integer types, you should also set the
is_unsigned member to indicate whether the
variable is signed or unsigned.
| Input Variable C Type | buffer_type Value | SQL Type of Destination Value |
|---|---|---|
signed char | MYSQL_TYPE_TINY | TINYINT |
short int | MYSQL_TYPE_SHORT | SMALLINT |
int | MYSQL_TYPE_LONG | INT |
long long int | MYSQL_TYPE_LONGLONG | BIGINT |
float | MYSQL_TYPE_FLOAT | FLOAT |
double | MYSQL_TYPE_DOUBLE | DOUBLE |
MYSQL_TIME | MYSQL_TYPE_TIME | TIME |
MYSQL_TIME | MYSQL_TYPE_DATE | DATE |
MYSQL_TIME | MYSQL_TYPE_DATETIME | DATETIME |
MYSQL_TIME | MYSQL_TYPE_TIMESTAMP | TIMESTAMP |
char[] | MYSQL_TYPE_STRING | TEXT,
CHAR,
VARCHAR |
char[] | MYSQL_TYPE_BLOB | BLOB,
BINARY,
VARBINARY |
MYSQL_TYPE_NULL | NULL |
Use MYSQL_TYPE_NULL as indicated in the
description for the is_null member in
Section 21.9.5, “C API Prepared Statement Data Structures”.
For input string data, use MYSQL_TYPE_STRING
or MYSQL_TYPE_BLOB depending on whether the
value is a character (nonbinary) or binary string:
MYSQL_TYPE_STRINGindicates character input string data. The value is assumed to be in the character set indicated by thecharacter_set_clientsystem variable. If the server stores the value into a column with a different character set, it converts the value to that character set.MYSQL_TYPE_BLOBindicates binary input string data. The value is treated as having thebinarycharacter set. That is, it is treated as a byte string and no conversion occurs.
The following table shows the permissible values for the
buffer_type member of
MYSQL_BIND structures for output values
received from the server. The table shows the SQL types of
received values, the corresponding type codes that such values
have in result set metadata, and the recommended C language data
types to bind to the MYSQL_BIND structure to
receive the SQL values without conversion. Choose the
buffer_type value according to the data type
of the C language variable that you are binding. For the integer
types, you should also set the is_unsigned
member to indicate whether the variable is signed or unsigned.
| SQL Type of Received Value | buffer_type Value | Output Variable C Type |
|---|---|---|
TINYINT | MYSQL_TYPE_TINY | signed char |
SMALLINT | MYSQL_TYPE_SHORT | short int |
MEDIUMINT | MYSQL_TYPE_INT24 | int |
INT | MYSQL_TYPE_LONG | int |
BIGINT | MYSQL_TYPE_LONGLONG | long long int |
FLOAT | MYSQL_TYPE_FLOAT | float |
DOUBLE | MYSQL_TYPE_DOUBLE | double |
DECIMAL | MYSQL_TYPE_NEWDECIMAL | char[] |
YEAR | MYSQL_TYPE_SHORT | short int |
TIME | MYSQL_TYPE_TIME | MYSQL_TIME |
DATE | MYSQL_TYPE_DATE | MYSQL_TIME |
DATETIME | MYSQL_TYPE_DATETIME | MYSQL_TIME |
TIMESTAMP | MYSQL_TYPE_TIMESTAMP | MYSQL_TIME |
CHAR,
BINARY | MYSQL_TYPE_STRING | char[] |
VARCHAR,
VARBINARY | MYSQL_TYPE_VAR_STRING | char[] |
TINYBLOB,
TINYTEXT | MYSQL_TYPE_TINY_BLOB | char[] |
BLOB, TEXT | MYSQL_TYPE_BLOB | char[] |
MEDIUMBLOB,
MEDIUMTEXT | MYSQL_TYPE_MEDIUM_BLOB | char[] |
LONGBLOB,
LONGTEXT | MYSQL_TYPE_LONG_BLOB | char[] |
BIT | MYSQL_TYPE_BIT | char[] |
Prepared statements transmit data between the client and server using C language variables on the client side that correspond to SQL values on the server side. If there is a mismatch between the C variable type on the client side and the corresponding SQL value type on the server side, MySQL performs implicit type conversions in both directions.
MySQL knows the type code for the SQL value on the server side.
The buffer_type value in the
MYSQL_BIND structure indicates the type code
of the C variable that holds the value on the client side. The
two codes together tell MySQL what conversion must be performed,
if any. Here are some examples:
If you use
MYSQL_TYPE_LONGwith anintvariable to pass an integer value to the server that is to be stored into aFLOATcolumn, MySQL converts the value to floating-point format before storing it.If you fetch an SQL
MEDIUMINTcolumn value, but specify abuffer_typevalue ofMYSQL_TYPE_LONGLONGand use a C variable of typelong long intas the destination buffer, MySQL converts theMEDIUMINTvalue (which requires less than 8 bytes) for storage into thelong long int(an 8-byte variable).If you fetch a numeric column with a value of 255 into a
char[4]character array and specify abuffer_typevalue ofMYSQL_TYPE_STRING, the resulting value in the array is a 4-byte string'255\0'.MySQL returns
DECIMALvalues as the string representation of the original server-side value, which is why the corresponding C type ischar[]. For example,12.345is returned to the client as'12.345'. If you specifyMYSQL_TYPE_NEWDECIMALand bind a string buffer to theMYSQL_BINDstructure,mysql_stmt_fetch()stores the value in the buffer as a string without conversion. If instead you specify a numeric variable and type code,mysql_stmt_fetch()converts the string-formatDECIMALvalue to numeric form.For the
MYSQL_TYPE_BITtype code,BITvalues are returned into a string buffer, which is why the corresponding C type ischar[]. The value represents a bit string that requires interpretation on the client side. To return the value as a type that is easier to deal with, you can cause the value to be cast to integer using either of the following types of expressions:SELECT bit_col + 0 FROM t SELECT CAST(bit_col AS UNSIGNED) FROM t
To retrieve the value, bind an integer variable large enough to hold the value and specify the appropriate corresponding integer type code.
Before binding variables to the MYSQL_BIND
structures that are to be used for fetching column values, you
can check the type codes for each column of the result set. This
might be desirable if you want to determine which variable types
would be best to use to avoid type conversions. To get the type
codes, call
mysql_stmt_result_metadata()
after executing the prepared statement with
mysql_stmt_execute(). The
metadata provides access to the type codes for the result set as
described in Section 21.9.7.22, “mysql_stmt_result_metadata()”, and
Section 21.9.1, “C API Data Structures”.
To determine whether output string values in a result set
returned from the server contain binary or nonbinary data, check
whether the charsetnr value of the result set
metadata is 63 (see Section 21.9.1, “C API Data Structures”). If
so, the character set is binary, which
indicates binary rather than nonbinary data. This enables you to
distinguish BINARY from
CHAR,
VARBINARY from
VARCHAR, and the
BLOB types from the
TEXT types.
If you cause the max_length member of the
MYSQL_FIELD column metadata structures to be
set (by calling
mysql_stmt_attr_set()), be aware
that the max_length values for the result set
indicate the lengths of the longest string representation of the
result values, not the lengths of the binary representation.
That is, max_length does not necessarily
correspond to the size of the buffers needed to fetch the values
with the binary protocol used for prepared statements. Choose
the size of the buffers according to the types of the variables
into which you fetch the values. For example, a
TINYINT column containing the value -128
might have a max_length value of 4. But the
binary representation of any TINYINT value
requires only 1 byte for storage, so you can supply a
signed char variable in which to store the
value and set is_unsigned to indicate that
values are signed.
As of MySQL 5.1.25, metadata changes to tables or views referred to by prepared statements are detected and cause automatic repreparation of the statement when it is next executed. For more information, see Section 12.6.4, “Automatic Prepared Statement Repreparation”.
The functions available for prepared statement processing are summarized here and described in greater detail in a later section. See Section 21.9.7, “C API Prepared Statement Function Descriptions”.
| Function | Description |
|---|---|
mysql_stmt_affected_rows() | Returns the number of rows changed, deleted, or inserted by prepared
UPDATE,
DELETE, or
INSERT statement |
mysql_stmt_attr_get() | Gets value of an attribute for a prepared statement |
mysql_stmt_attr_set() | Sets an attribute for a prepared statement |
mysql_stmt_bind_param() | Associates application data buffers with the parameter markers in a prepared SQL statement |
mysql_stmt_bind_result() | Associates application data buffers with columns in a result set |
mysql_stmt_close() | Frees memory used by a prepared statement |
mysql_stmt_data_seek() | Seeks to an arbitrary row number in a statement result set |
mysql_stmt_errno() | Returns the error number for the last statement execution |
mysql_stmt_error() | Returns the error message for the last statement execution |
mysql_stmt_execute() | Executes a prepared statement |
mysql_stmt_fetch() | Fetches the next row of data from a result set and returns data for all bound columns |
mysql_stmt_fetch_column() | Fetch data for one column of the current row of a result set |
mysql_stmt_field_count() | Returns the number of result columns for the most recent statement |
mysql_stmt_free_result() | Free the resources allocated to a statement handle |
mysql_stmt_init() | Allocates memory for a MYSQL_STMT structure and
initializes it |
mysql_stmt_insert_id() | Returns the ID generated for an AUTO_INCREMENT column
by a prepared statement |
mysql_stmt_num_rows() | Returns the row count from a buffered statement result set |
mysql_stmt_param_count() | Returns the number of parameters in a prepared statement |
mysql_stmt_param_metadata() | (Return parameter metadata in the form of a result set) Currently, this function does nothing |
mysql_stmt_prepare() | Prepares an SQL statement string for execution |
mysql_stmt_reset() | Resets the statement buffers in the server |
mysql_stmt_result_metadata() | Returns prepared statement metadata in the form of a result set |
mysql_stmt_row_seek() | Seeks to a row offset in a statement result set, using value returned
from mysql_stmt_row_tell() |
mysql_stmt_row_tell() | Returns the statement row cursor position |
mysql_stmt_send_long_data() | Sends long data in chunks to server |
mysql_stmt_sqlstate() | Returns the SQLSTATE error code for the last statement execution |
mysql_stmt_store_result() | Retrieves a complete result set to the client |
Call mysql_stmt_init() to create a
statement handle, then
mysql_stmt_prepare() to prepare
the statement string,
mysql_stmt_bind_param() to supply
the parameter data, and
mysql_stmt_execute() to execute
the statement. You can repeat the
mysql_stmt_execute() by changing
parameter values in the respective buffers supplied through
mysql_stmt_bind_param().
You can send text or binary data in chunks to server using
mysql_stmt_send_long_data(). See
Section 21.9.7.25, “mysql_stmt_send_long_data()”.
If the statement is a SELECT or any
other statement that produces a result set,
mysql_stmt_prepare() also returns
the result set metadata information in the form of a
MYSQL_RES result set through
mysql_stmt_result_metadata().
You can supply the result buffers using
mysql_stmt_bind_result(), so that
the mysql_stmt_fetch()
automatically returns data to these buffers. This is row-by-row
fetching.
When statement execution has been completed, close the statement
handle using mysql_stmt_close() so
that all resources associated with it can be freed.
If you obtained a SELECT
statement's result set metadata by calling
mysql_stmt_result_metadata(), you
should also free the metadata using
mysql_free_result().
Execution Steps
To prepare and execute a statement, an application follows these steps:
Create a prepared statement handle with
mysql_stmt_init(). To prepare the statement on the server, callmysql_stmt_prepare()and pass it a string containing the SQL statement.If the statement will produce a result set, call
mysql_stmt_result_metadata()to obtain the result set metadata. This metadata is itself in the form of result set, albeit a separate one from the one that contains the rows returned by the query. The metadata result set indicates how many columns are in the result and contains information about each column.Set the values of any parameters using
mysql_stmt_bind_param(). All parameters must be set. Otherwise, statement execution returns an error or produces unexpected results.Call
mysql_stmt_execute()to execute the statement.If the statement produces a result set, bind the data buffers to use for retrieving the row values by calling
mysql_stmt_bind_result().Fetch the data into the buffers row by row by calling
mysql_stmt_fetch()repeatedly until no more rows are found.Repeat steps 3 through 6 as necessary, by changing the parameter values and re-executing the statement.
When mysql_stmt_prepare() is
called, the MySQL client/server protocol performs these actions:
The server parses the statement and sends the okay status back to the client by assigning a statement ID. It also sends total number of parameters, a column count, and its metadata if it is a result set oriented statement. All syntax and semantics of the statement are checked by the server during this call.
The client uses this statement ID for the further operations, so that the server can identify the statement from among its pool of statements.
When mysql_stmt_execute() is
called, the MySQL client/server protocol performs these actions:
The client uses the statement handle and sends the parameter data to the server.
The server identifies the statement using the ID provided by the client, replaces the parameter markers with the newly supplied data, and executes the statement. If the statement produces a result set, the server sends the data back to the client. Otherwise, it sends an okay status and the number of rows changed, deleted, or inserted.
When mysql_stmt_fetch() is called,
the MySQL client/server protocol performs these actions:
The client reads the data from the current row of the result set and places it into the application data buffers by doing the necessary conversions. If the application buffer type is same as that of the field type returned from the server, the conversions are straightforward.
If an error occurs, you can get the statement error number, error
message, and SQLSTATE code using
mysql_stmt_errno(),
mysql_stmt_error(), and
mysql_stmt_sqlstate(),
respectively.
Prepared Statement Logging
For prepared statements that are executed with the
mysql_stmt_prepare() and
mysql_stmt_execute() C API
functions, the server writes Prepare and
Execute lines to the general query log so that
you can tell when statements are prepared and executed.
Suppose that you prepare and execute a statement as follows:
Call
mysql_stmt_prepare()to prepare the statement string"SELECT ?".Call
mysql_stmt_bind_param()to bind the value3to the parameter in the prepared statement.Call
mysql_stmt_execute()to execute the prepared statement.
As a result of the preceding calls, the server writes the following lines to the general query log:
Prepare [1] SELECT ? Execute [1] SELECT 3
Each Prepare and Execute
line in the log is tagged with a
[ statement
identifier so that you can keep track of which prepared statement
is being logged. N]N is a positive
integer. If there are multiple prepared statements active
simultaneously for the client, N may be
greater than 1. Each Execute lines shows a
prepared statement after substitution of data values for
? parameters.
- 21.9.7.1.
mysql_stmt_affected_rows() - 21.9.7.2.
mysql_stmt_attr_get() - 21.9.7.3.
mysql_stmt_attr_set() - 21.9.7.4.
mysql_stmt_bind_param() - 21.9.7.5.
mysql_stmt_bind_result() - 21.9.7.6.
mysql_stmt_close() - 21.9.7.7.
mysql_stmt_data_seek() - 21.9.7.8.
mysql_stmt_errno() - 21.9.7.9.
mysql_stmt_error() - 21.9.7.10.
mysql_stmt_execute() - 21.9.7.11.
mysql_stmt_fetch() - 21.9.7.12.
mysql_stmt_fetch_column() - 21.9.7.13.
mysql_stmt_field_count() - 21.9.7.14.
mysql_stmt_free_result() - 21.9.7.15.
mysql_stmt_init() - 21.9.7.16.
mysql_stmt_insert_id() - 21.9.7.17.
mysql_stmt_num_rows() - 21.9.7.18.
mysql_stmt_param_count() - 21.9.7.19.
mysql_stmt_param_metadata() - 21.9.7.20.
mysql_stmt_prepare() - 21.9.7.21.
mysql_stmt_reset() - 21.9.7.22.
mysql_stmt_result_metadata() - 21.9.7.23.
mysql_stmt_row_seek() - 21.9.7.24.
mysql_stmt_row_tell() - 21.9.7.25.
mysql_stmt_send_long_data() - 21.9.7.26.
mysql_stmt_sqlstate() - 21.9.7.27.
mysql_stmt_store_result()
To prepare and execute queries, use the functions described in detail in the following sections.
All functions that operate with a MYSQL_STMT
structure begin with the prefix mysql_stmt_.
To create a MYSQL_STMT handle, use the
mysql_stmt_init() function.
my_ulonglong mysql_stmt_affected_rows(MYSQL_STMT
*stmt)
Description
mysql_stmt_affected_rows() may
be called immediately after executing a statement with
mysql_stmt_execute(). It is like
mysql_affected_rows() but for
prepared statements. For a description of what the affected-rows
value returned by this function means, See
Section 21.9.3.1, “mysql_affected_rows()”.
Errors
None.
Example
See the Example in Section 21.9.7.10, “mysql_stmt_execute()”.
my_bool mysql_stmt_attr_get(MYSQL_STMT *stmt, enum
enum_stmt_attr_type option, void *arg)
Description
Can be used to get the current value for a statement attribute.
The option argument is the option that you
want to get; the arg should point to a
variable that should contain the option value. If the option is
an integer, arg should point to the value of
the integer.
See Section 21.9.7.3, “mysql_stmt_attr_set()”, for a list of options
and option types.
In MySQL 5.1,
mysql_stmt_attr_get()
originally used unsigned int *, not
my_bool *, for
STMT_ATTR_UPDATE_MAX_LENGTH. This was
corrected in MySQL 5.1.7.
Return Values
Zero if successful. Nonzero if option is
unknown.
Errors
None.
my_bool mysql_stmt_attr_set(MYSQL_STMT *stmt, enum
enum_stmt_attr_type option, const void *arg)
Description
Can be used to affect behavior for a prepared statement. This function may be called multiple times to set several options.
The option argument is the option that you
want to set. The arg argument is the value
for the option. arg should point to a
variable that is set to the desired attribute value. The
variable type is as indicated in the following table.
The following table shows the possible option
values.
| Option | Argument Type | Function |
|---|---|---|
STMT_ATTR_UPDATE_MAX_LENGTH | my_bool * | If set to 1, causes
mysql_stmt_store_result()
to update the metadata
MYSQL_FIELD->max_length value. |
STMT_ATTR_CURSOR_TYPE | unsigned long * | Type of cursor to open for statement when
mysql_stmt_execute() is
invoked. *arg can be
CURSOR_TYPE_NO_CURSOR (the default)
or CURSOR_TYPE_READ_ONLY. |
STMT_ATTR_PREFETCH_ROWS | unsigned long * | Number of rows to fetch from server at a time when using a cursor.
*arg can be in the range from 1 to
the maximum value of unsigned long.
The default is 1. |
If you use the STMT_ATTR_CURSOR_TYPE option
with CURSOR_TYPE_READ_ONLY, a cursor is
opened for the statement when you invoke
mysql_stmt_execute(). If there
is already an open cursor from a previous
mysql_stmt_execute() call, it
closes the cursor before opening a new one.
mysql_stmt_reset() also closes
any open cursor before preparing the statement for re-execution.
mysql_stmt_free_result() closes
any open cursor.
If you open a cursor for a prepared statement,
mysql_stmt_store_result() is
unnecessary, because that function causes the result set to be
buffered on the client side.
Return Values
Zero if successful. Nonzero if option is
unknown.
Errors
None.
Example
The following example opens a cursor for a prepared statement and sets the number of rows to fetch at a time to 5:
MYSQL_STMT *stmt;
int rc;
unsigned long type;
unsigned long prefetch_rows = 5;
stmt = mysql_stmt_init(mysql);
type = (unsigned long) CURSOR_TYPE_READ_ONLY;
rc = mysql_stmt_attr_set(stmt, STMT_ATTR_CURSOR_TYPE, (void*) &type);
/* ... check return value ... */
rc = mysql_stmt_attr_set(stmt, STMT_ATTR_PREFETCH_ROWS,
(void*) &prefetch_rows);
/* ... check return value ... */
my_bool mysql_stmt_bind_param(MYSQL_STMT *stmt,
MYSQL_BIND *bind)
Description
mysql_stmt_bind_param() is used
to bind input data for the parameter markers in the SQL
statement that was passed to
mysql_stmt_prepare(). It uses
MYSQL_BIND structures to supply the data.
bind is the address of an array of
MYSQL_BIND structures. The client library
expects the array to contain one element for each
“?” parameter marker that is
present in the query.
Suppose that you prepare the following statement:
INSERT INTO mytbl VALUES(?,?,?)
When you bind the parameters, the array of
MYSQL_BIND structures must contain three
elements, and can be declared like this:
MYSQL_BIND bind[3];
Section 21.9.5, “C API Prepared Statement Data Structures”,
describes the members of each MYSQL_BIND
element and how they should be set to provide input values.
Return Values
Zero if the bind operation was successful. Nonzero if an error occurred.
Errors
The conversion is not supported. Possibly the
buffer_typevalue is illegal or is not one of the supported types.Out of memory.
An unknown error occurred.
Example
See the Example in Section 21.9.7.10, “mysql_stmt_execute()”.
my_bool mysql_stmt_bind_result(MYSQL_STMT *stmt,
MYSQL_BIND *bind)
Description
mysql_stmt_bind_result() is used
to associate (that is, bind) output columns in the result set to
data buffers and length buffers. When
mysql_stmt_fetch() is called to
fetch data, the MySQL client/server protocol places the data for
the bound columns into the specified buffers.
All columns must be bound to buffers prior to calling
mysql_stmt_fetch().
bind is the address of an array of
MYSQL_BIND structures. The client library
expects the array to contain one element for each column of the
result set. If you do not bind columns to
MYSQL_BIND structures,
mysql_stmt_fetch() simply
ignores the data fetch. The buffers should be large enough to
hold the data values, because the protocol doesn't return data
values in chunks.
A column can be bound or rebound at any time, even after a
result set has been partially retrieved. The new binding takes
effect the next time
mysql_stmt_fetch() is called.
Suppose that an application binds the columns in a result set
and calls mysql_stmt_fetch().
The client/server protocol returns data in the bound buffers.
Then suppose that the application binds the columns to a
different set of buffers. The protocol places data into the
newly bound buffers when the next call to
mysql_stmt_fetch() occurs.
To bind a column, an application calls
mysql_stmt_bind_result() and
passes the type, address, and length of the output buffer into
which the value should be stored.
Section 21.9.5, “C API Prepared Statement Data Structures”,
describes the members of each MYSQL_BIND
element and how they should be set to receive output values.
Return Values
Zero if the bind operation was successful. Nonzero if an error occurred.
Errors
The conversion is not supported. Possibly the
buffer_typevalue is illegal or is not one of the supported types.Out of memory.
An unknown error occurred.
Example
See the Example in Section 21.9.7.11, “mysql_stmt_fetch()”.
my_bool mysql_stmt_close(MYSQL_STMT *)
Description
Closes the prepared statement.
mysql_stmt_close() also
deallocates the statement handle pointed to by
stmt.
If the current statement has pending or unread results, this function cancels them so that the next query can be executed.
Return Values
Zero if the statement was freed successfully. Nonzero if an error occurred.
Errors
The MySQL server has gone away.
An unknown error occurred.
Example
See the Example in Section 21.9.7.10, “mysql_stmt_execute()”.
void mysql_stmt_data_seek(MYSQL_STMT *stmt,
my_ulonglong offset)
Description
Seeks to an arbitrary row in a statement result set. The
offset value is a row number and should be in
the range from 0 to
mysql_stmt_num_rows(stmt)-1.
This function requires that the statement result set structure
contains the entire result of the last executed query, so
mysql_stmt_data_seek() may be
used only in conjunction with
mysql_stmt_store_result().
Return Values
None.
Errors
None.
unsigned int mysql_stmt_errno(MYSQL_STMT
*stmt)
Description
For the statement specified by stmt,
mysql_stmt_errno() returns the
error code for the most recently invoked statement API function
that can succeed or fail. A return value of zero means that no
error occurred. Client error message numbers are listed in the
MySQL errmsg.h header file. Server error
message numbers are listed in
mysqld_error.h. Errors also are listed at
Appendix C, Errors, Error Codes, and Common Problems.
Return Values
An error code value. Zero if no error occurred.
Errors
None.
const char *mysql_stmt_error(MYSQL_STMT
*stmt)
Description
For the statement specified by stmt,
mysql_stmt_error() returns a
null-terminated string containing the error message for the most
recently invoked statement API function that can succeed or
fail. An empty string ("") is returned if no
error occurred. This means the following two tests are
equivalent:
if(*mysql_stmt_errno(stmt))
{
// an error occurred
}
if (mysql_stmt_error(stmt)[0])
{
// an error occurred
}
The language of the client error messages may be changed by recompiling the MySQL client library. Currently, you can choose error messages in several different languages.
Return Values
A character string that describes the error. An empty string if no error occurred.
Errors
None.
int mysql_stmt_execute(MYSQL_STMT *stmt)
Description
mysql_stmt_execute() executes
the prepared query associated with the statement handle. The
currently bound parameter marker values are sent to server
during this call, and the server replaces the markers with this
newly supplied data.
Statement processing following
mysql_stmt_execute() depends on
the type of statement:
For an
UPDATE,DELETE, orINSERT, the number of changed, deleted, or inserted rows can be found by callingmysql_stmt_affected_rows().For a statement such as
SELECTthat generates a result set, you must callmysql_stmt_fetch()to fetch the data prior to calling any other functions that result in query processing. For more information on how to fetch the results, refer to Section 21.9.7.11, “mysql_stmt_fetch()”.Do not following invocation of
mysql_stmt_execute()with a call tomysql_store_result()ormysql_use_result(). Those functions are not intended for processing results from prepared statements.
For statements that generate a result set, you can request that
mysql_stmt_execute() open a
cursor for the statement by calling
mysql_stmt_attr_set() before
executing the statement. If you execute a statement multiple
times, mysql_stmt_execute()
closes any open cursor before opening a new one.
As of MySQL 5.1.25, metadata changes to tables or views referred to by prepared statements are detected and cause automatic repreparation of the statement when it is next executed. For more information, see Section 12.6.4, “Automatic Prepared Statement Repreparation”.
Return Values
Zero if execution was successful. Nonzero if an error occurred.
Errors
Commands were executed in an improper order.
Out of memory.
The MySQL server has gone away.
The connection to the server was lost during the query.
An unknown error occurred.
Example
The following example demonstrates how to create and populate a
table using mysql_stmt_init(),
mysql_stmt_prepare(),
mysql_stmt_param_count(),
mysql_stmt_bind_param(),
mysql_stmt_execute(), and
mysql_stmt_affected_rows(). The
mysql variable is assumed to be a valid
connection handle. For an example that shows how to retrieve
data, see Section 21.9.7.11, “mysql_stmt_fetch()”.
#define STRING_SIZE 50
#define DROP_SAMPLE_TABLE "DROP TABLE IF EXISTS test_table"
#define CREATE_SAMPLE_TABLE "CREATE TABLE test_table(col1 INT,\
col2 VARCHAR(40),\
col3 SMALLINT,\
col4 TIMESTAMP)"
#define INSERT_SAMPLE "INSERT INTO \
test_table(col1,col2,col3) \
VALUES(?,?,?)"
MYSQL_STMT *stmt;
MYSQL_BIND bind[3];
my_ulonglong affected_rows;
int param_count;
short small_data;
int int_data;
char str_data[STRING_SIZE];
unsigned long str_length;
my_bool is_null;
if (mysql_query(mysql, DROP_SAMPLE_TABLE))
{
fprintf(stderr, " DROP TABLE failed\n");
fprintf(stderr, " %s\n", mysql_error(mysql));
exit(0);
}
if (mysql_query(mysql, CREATE_SAMPLE_TABLE))
{
fprintf(stderr, " CREATE TABLE failed\n");
fprintf(stderr, " %s\n", mysql_error(mysql));
exit(0);
}
/* Prepare an INSERT query with 3 parameters */
/* (the TIMESTAMP column is not named; the server */
/* sets it to the current date and time) */
stmt = mysql_stmt_init(mysql);
if (!stmt)
{
fprintf(stderr, " mysql_stmt_init(), out of memory\n");
exit(0);
}
if (mysql_stmt_prepare(stmt, INSERT_SAMPLE, strlen(INSERT_SAMPLE)))
{
fprintf(stderr, " mysql_stmt_prepare(), INSERT failed\n");
fprintf(stderr, " %s\n", mysql_stmt_error(stmt));
exit(0);
}
fprintf(stdout, " prepare, INSERT successful\n");
/* Get the parameter count from the statement */
param_count= mysql_stmt_param_count(stmt);
fprintf(stdout, " total parameters in INSERT: %d\n", param_count);
if (param_count != 3) /* validate parameter count */
{
fprintf(stderr, " invalid parameter count returned by MySQL\n");
exit(0);
}
/* Bind the data for all 3 parameters */
memset(bind, 0, sizeof(bind));
/* INTEGER PARAM */
/* This is a number type, so there is no need
to specify buffer_length */
bind[0].buffer_type= MYSQL_TYPE_LONG;
bind[0].buffer= (char *)&int_data;
bind[0].is_null= 0;
bind[0].length= 0;
/* STRING PARAM */
bind[1].buffer_type= MYSQL_TYPE_STRING;
bind[1].buffer= (char *)str_data;
bind[1].buffer_length= STRING_SIZE;
bind[1].is_null= 0;
bind[1].length= &str_length;
/* SMALLINT PARAM */
bind[2].buffer_type= MYSQL_TYPE_SHORT;
bind[2].buffer= (char *)&small_data;
bind[2].is_null= &is_null;
bind[2].length= 0;
/* Bind the buffers */
if (mysql_stmt_bind_param(stmt, bind))
{
fprintf(stderr, " mysql_stmt_bind_param() failed\n");
fprintf(stderr, " %s\n", mysql_stmt_error(stmt));
exit(0);
}
/* Specify the data values for the first row */
int_data= 10; /* integer */
strncpy(str_data, "MySQL", STRING_SIZE); /* string */
str_length= strlen(str_data);
/* INSERT SMALLINT data as NULL */
is_null= 1;
/* Execute the INSERT statement - 1*/
if (mysql_stmt_execute(stmt))
{
fprintf(stderr, " mysql_stmt_execute(), 1 failed\n");
fprintf(stderr, " %s\n", mysql_stmt_error(stmt));
exit(0);
}
/* Get the number of affected rows */
affected_rows= mysql_stmt_affected_rows(stmt);
fprintf(stdout, " total affected rows(insert 1): %lu\n",
(unsigned long) affected_rows);
if (affected_rows != 1) /* validate affected rows */
{
fprintf(stderr, " invalid affected rows by MySQL\n");
exit(0);
}
/* Specify data values for second row,
then re-execute the statement */
int_data= 1000;
strncpy(str_data, "
The most popular Open Source database",
STRING_SIZE);
str_length= strlen(str_data);
small_data= 1000; /* smallint */
is_null= 0; /* reset */
/* Execute the INSERT statement - 2*/
if (mysql_stmt_execute(stmt))
{
fprintf(stderr, " mysql_stmt_execute, 2 failed\n");
fprintf(stderr, " %s\n", mysql_stmt_error(stmt));
exit(0);
}
/* Get the total rows affected */
affected_rows= mysql_stmt_affected_rows(stmt);
fprintf(stdout, " total affected rows(insert 2): %lu\n",
(unsigned long) affected_rows);
if (affected_rows != 1) /* validate affected rows */
{
fprintf(stderr, " invalid affected rows by MySQL\n");
exit(0);
}
/* Close the statement */
if (mysql_stmt_close(stmt))
{
fprintf(stderr, " failed while closing the statement\n");
fprintf(stderr, " %s\n", mysql_stmt_error(stmt));
exit(0);
}
For complete examples on the use of prepared statement
functions, refer to the file
tests/mysql_client_test.c. This file can
be obtained from a MySQL source distribution or from the
Bazaar source repository.
int mysql_stmt_fetch(MYSQL_STMT *stmt)
Description
mysql_stmt_fetch() returns the
next row in the result set. It can be called only while the
result set exists; that is, after a call to
mysql_stmt_execute() for a
statement such as SELECT that
produces a result set.
mysql_stmt_fetch() returns row
data using the buffers bound by
mysql_stmt_bind_result(). It
returns the data in those buffers for all the columns in the
current row set and the lengths are returned to the
length pointer. All columns must be bound by
the application before it calls
mysql_stmt_fetch().
By default, result sets are fetched unbuffered a row at a time
from the server. To buffer the entire result set on the client,
call mysql_stmt_store_result()
after binding the data buffers and before caling
mysql_stmt_fetch().
If a fetched data value is a NULL value, the
*is_null value of the corresponding
MYSQL_BIND structure contains TRUE (1).
Otherwise, the data and its length are returned in the
*buffer and *length
elements based on the buffer type specified by the application.
Each numeric and temporal type has a fixed length, as listed in
the following table. The length of the string types depends on
the length of the actual data value, as indicated by
data_length.
| Type | Length |
|---|---|
MYSQL_TYPE_TINY | 1 |
MYSQL_TYPE_SHORT | 2 |
MYSQL_TYPE_LONG | 4 |
MYSQL_TYPE_LONGLONG | 8 |
MYSQL_TYPE_FLOAT | 4 |
MYSQL_TYPE_DOUBLE | 8 |
MYSQL_TYPE_TIME | sizeof(MYSQL_TIME) |
MYSQL_TYPE_DATE | sizeof(MYSQL_TIME) |
MYSQL_TYPE_DATETIME | sizeof(MYSQL_TIME) |
MYSQL_TYPE_STRING | data length |
MYSQL_TYPE_BLOB | data_length |
In some cases you might want to determine the length of a column
value before fetching it with
mysql_stmt_fetch(). For example,
the value might be a long string or
BLOB value for which you want to
know how much space must be allocated. To accomplish this, you
can use these strategies:
Before invoking
mysql_stmt_fetch()to retrieve individual rows, passSTMT_ATTR_UPDATE_MAX_LENGTHtomysql_stmt_attr_set(), then invokemysql_stmt_store_result()to buffer the entire result on the client side. Setting theSTMT_ATTR_UPDATE_MAX_LENGTHattribute causes the maximal length of column values to be indicated by themax_lengthmember of the result set metadata returned bymysql_stmt_result_metadata().Invoke
mysql_stmt_fetch()with a zero-length buffer for the column in question and a pointer in which the real length can be stored. Then use the real length withmysql_stmt_fetch_column().real_length= 0; bind[0].buffer= 0; bind[0].buffer_length= 0; bind[0].length= &real_length mysql_stmt_bind_result(stmt, bind); mysql_stmt_fetch(stmt); if (real_length > 0) { data= malloc(real_length); bind[0].buffer= data; bind[0].buffer_length= real_length; mysql_stmt_fetch_column(stmt, bind, 0, 0); }
Return Values
| Return Value | Description |
|---|---|
| 0 | Successful, the data has been fetched to application data buffers. |
| 1 | Error occurred. Error code and message can be obtained by calling
mysql_stmt_errno() and
mysql_stmt_error(). |
MYSQL_NO_DATA | No more rows/data exists |
MYSQL_DATA_TRUNCATED | Data truncation occurred |
MYSQL_DATA_TRUNCATED is returned when
truncation reporting is enabled. To determine which column
values were truncated when this value is returned, check the
error members of the
MYSQL_BIND structures used for fetching
values. Truncation reporting is enabled by default, but can be
controlled by calling
mysql_options() with the
MYSQL_REPORT_DATA_TRUNCATION option.
Errors
Commands were executed in an improper order.
Out of memory.
The MySQL server has gone away.
The connection to the server was lost during the query.
An unknown error occurred.
The buffer type is
MYSQL_TYPE_DATE,MYSQL_TYPE_TIME,MYSQL_TYPE_DATETIME, orMYSQL_TYPE_TIMESTAMP, but the data type is notDATE,TIME,DATETIME, orTIMESTAMP.All other unsupported conversion errors are returned from
mysql_stmt_bind_result().
Example
The following example demonstrates how to fetch data from a
table using
mysql_stmt_result_metadata(),
mysql_stmt_bind_result(), and
mysql_stmt_fetch(). (This
example expects to retrieve the two rows inserted by the example
shown in Section 21.9.7.10, “mysql_stmt_execute()”.) The
mysql variable is assumed to be a valid
connection handle.
#define STRING_SIZE 50
#define SELECT_SAMPLE "SELECT col1, col2, col3, col4 \
FROM test_table"
MYSQL_STMT *stmt;
MYSQL_BIND bind[4];
MYSQL_RES *prepare_meta_result;
MYSQL_TIME ts;
unsigned long length[4];
int param_count, column_count, row_count;
short small_data;
int int_data;
char str_data[STRING_SIZE];
my_bool is_null[4];
my_bool error[4];
/* Prepare a SELECT query to fetch data from test_table */
stmt = mysql_stmt_init(mysql);
if (!stmt)
{
fprintf(stderr, " mysql_stmt_init(), out of memory\n");
exit(0);
}
if (mysql_stmt_prepare(stmt, SELECT_SAMPLE, strlen(SELECT_SAMPLE)))
{
fprintf(stderr, " mysql_stmt_prepare(), SELECT failed\n");
fprintf(stderr, " %s\n", mysql_stmt_error(stmt));
exit(0);
}
fprintf(stdout, " prepare, SELECT successful\n");
/* Get the parameter count from the statement */
param_count= mysql_stmt_param_count(stmt);
fprintf(stdout, " total parameters in SELECT: %d\n", param_count);
if (param_count != 0) /* validate parameter count */
{
fprintf(stderr, " invalid parameter count returned by MySQL\n");
exit(0);
}
/* Fetch result set meta information */
prepare_meta_result = mysql_stmt_result_metadata(stmt);
if (!prepare_meta_result)
{
fprintf(stderr,
" mysql_stmt_result_metadata(), \
returned no meta information\n");
fprintf(stderr, " %s\n", mysql_stmt_error(stmt));
exit(0);
}
/* Get total columns in the query */
column_count= mysql_num_fields(prepare_meta_result);
fprintf(stdout,
" total columns in SELECT statement: %d\n",
column_count);
if (column_count != 4) /* validate column count */
{
fprintf(stderr, " invalid column count returned by MySQL\n");
exit(0);
}
/* Execute the SELECT query */
if (mysql_stmt_execute(stmt))
{
fprintf(stderr, " mysql_stmt_execute(), failed\n");
fprintf(stderr, " %s\n", mysql_stmt_error(stmt));
exit(0);
}
/* Bind the result buffers for all 4 columns before fetching them */
memset(bind, 0, sizeof(bind));
/* INTEGER COLUMN */
bind[0].buffer_type= MYSQL_TYPE_LONG;
bind[0].buffer= (char *)&int_data;
bind[0].is_null= &is_null[0];
bind[0].length= &length[0];
bind[0].error= &error[0];
/* STRING COLUMN */
bind[1].buffer_type= MYSQL_TYPE_STRING;
bind[1].buffer= (char *)str_data;
bind[1].buffer_length= STRING_SIZE;
bind[1].is_null= &is_null[1];
bind[1].length= &length[1];
bind[1].error= &error[1];
/* SMALLINT COLUMN */
bind[2].buffer_type= MYSQL_TYPE_SHORT;
bind[2].buffer= (char *)&small_data;
bind[2].is_null= &is_null[2];
bind[2].length= &length[2];
bind[2].error= &error[2];
/* TIMESTAMP COLUMN */
bind[3].buffer_type= MYSQL_TYPE_TIMESTAMP;
bind[3].buffer= (char *)&ts;
bind[3].is_null= &is_null[3];
bind[3].length= &length[3];
bind[3].error= &error[3];
/* Bind the result buffers */
if (mysql_stmt_bind_result(stmt, bind))
{
fprintf(stderr, " mysql_stmt_bind_result() failed\n");
fprintf(stderr, " %s\n", mysql_stmt_error(stmt));
exit(0);
}
/* Now buffer all results to client (optional step) */
if (mysql_stmt_store_result(stmt))
{
fprintf(stderr, " mysql_stmt_store_result() failed\n");
fprintf(stderr, " %s\n", mysql_stmt_error(stmt));
exit(0);
}
/* Fetch all rows */
row_count= 0;
fprintf(stdout, "Fetching results ...\n");
while (!mysql_stmt_fetch(stmt))
{
row_count++;
fprintf(stdout, " row %d\n", row_count);
/* column 1 */
fprintf(stdout, " column1 (integer) : ");
if (is_null[0])
fprintf(stdout, " NULL\n");
else
fprintf(stdout, " %d(%ld)\n", int_data, length[0]);
/* column 2 */
fprintf(stdout, " column2 (string) : ");
if (is_null[1])
fprintf(stdout, " NULL\n");
else
fprintf(stdout, " %s(%ld)\n", str_data, length[1]);
/* column 3 */
fprintf(stdout, " column3 (smallint) : ");
if (is_null[2])
fprintf(stdout, " NULL\n");
else
fprintf(stdout, " %d(%ld)\n", small_data, length[2]);
/* column 4 */
fprintf(stdout, " column4 (timestamp): ");
if (is_null[3])
fprintf(stdout, " NULL\n");
else
fprintf(stdout, " %04d-%02d-%02d %02d:%02d:%02d (%ld)\n",
ts.year, ts.month, ts.day,
ts.hour, ts.minute, ts.second,
length[3]);
fprintf(stdout, "\n");
}
/* Validate rows fetched */
fprintf(stdout, " total rows fetched: %d\n", row_count);
if (row_count != 2)
{
fprintf(stderr, " MySQL failed to return all rows\n");
exit(0);
}
/* Free the prepared result metadata */
mysql_free_result(prepare_meta_result);
/* Close the statement */
if (mysql_stmt_close(stmt))
{
fprintf(stderr, " failed while closing the statement\n");
fprintf(stderr, " %s\n", mysql_stmt_error(stmt));
exit(0);
}
int mysql_stmt_fetch_column(MYSQL_STMT *stmt,
MYSQL_BIND *bind, unsigned int column, unsigned long
offset)
Description
Fetch one column from the current result set row.
bind provides the buffer where data should be
placed. It should be set up the same way as for
mysql_stmt_bind_result().
column indicates which column to fetch. The
first column is numbered 0. offset is the
offset within the data value at which to begin retrieving data.
This can be used for fetching the data value in pieces. The
beginning of the value is offset 0.
Return Values
Zero if the value was fetched successfully. Nonzero if an error occurred.
Errors
Invalid column number.
The end of the result set has already been reached.
unsigned int mysql_stmt_field_count(MYSQL_STMT
*stmt)
Description
Returns the number of columns for the most recent statement for
the statement handler. This value is zero for statements such as
INSERT or
DELETE that do not produce result
sets.
mysql_stmt_field_count() can be
called after you have prepared a statement by invoking
mysql_stmt_prepare().
Return Values
An unsigned integer representing the number of columns in a result set.
Errors
None.
my_bool mysql_stmt_free_result(MYSQL_STMT
*stmt)
Description
Releases memory associated with the result set produced by
execution of the prepared statement. If there is a cursor open
for the statement,
mysql_stmt_free_result() closes
it.
Return Values
Zero if the result set was freed successfully. Nonzero if an error occurred.
Errors
MYSQL_STMT *mysql_stmt_init(MYSQL *mysql)
Description
Create a MYSQL_STMT handle. The handle should
be freed with mysql_stmt_close(MYSQL_STMT
*).
See also Section 21.9.5, “C API Prepared Statement Data Structures”, for more information.
Return Values
A pointer to a MYSQL_STMT structure in case
of success. NULL if out of memory.
Errors
Out of memory.
my_ulonglong mysql_stmt_insert_id(MYSQL_STMT
*stmt)
Description
Returns the value generated for an
AUTO_INCREMENT column by the prepared
INSERT or
UPDATE statement. Use this
function after you have executed a prepared
INSERT statement on a table which
contains an AUTO_INCREMENT field.
See Section 21.9.3.37, “mysql_insert_id()”, for more information.
Return Values
Value for AUTO_INCREMENT column which was
automatically generated or explicitly set during execution of
prepared statement, or value generated by
LAST_INSERT_ID(
function. Return value is undefined if statement does not set
expr)AUTO_INCREMENT value.
Errors
None.
my_ulonglong mysql_stmt_num_rows(MYSQL_STMT
*stmt)
Description
Returns the number of rows in the result set.
The use of mysql_stmt_num_rows()
depends on whether you used
mysql_stmt_store_result() to
buffer the entire result set in the statement handle. If you use
mysql_stmt_store_result(),
mysql_stmt_num_rows() may be
called immediately. Otherwise, the row count is unavailable
unless you count the rows as you fetch them.
mysql_stmt_num_rows() is
intended for use with statements that return a result set, such
as SELECT. For statements such as
INSERT,
UPDATE, or
DELETE, the number of affected
rows can be obtained with
mysql_stmt_affected_rows().
Return Values
The number of rows in the result set.
Errors
None.
unsigned long mysql_stmt_param_count(MYSQL_STMT
*stmt)
Description
Returns the number of parameter markers present in the prepared statement.
Return Values
An unsigned long integer representing the number of parameters in a statement.
Errors
None.
Example
See the Example in Section 21.9.7.10, “mysql_stmt_execute()”.
MYSQL_RES *mysql_stmt_param_metadata(MYSQL_STMT
*stmt)
This function currently does nothing.
Description
Return Values
Errors
int mysql_stmt_prepare(MYSQL_STMT *stmt, const char
*stmt_str, unsigned long length)
Description
Given the statement handle returned by
mysql_stmt_init(), prepares the
SQL statement pointed to by the string
stmt_str and returns a status value. The
string length should be given by the length
argument. The string must consist of a single SQL statement. You
should not add a terminating semicolon
(“;”) or \g
to the statement.
The application can include one or more parameter markers in the
SQL statement by embedding question mark
(“?”) characters into the SQL
string at the appropriate positions.
The markers are legal only in certain places in SQL statements.
For example, they are permitted in the
VALUES() list of an
INSERT statement (to specify
column values for a row), or in a comparison with a column in a
WHERE clause to specify a comparison value.
However, they are not permitted for identifiers (such as table
or column names), or to specify both operands of a binary
operator such as the = equal sign. The latter
restriction is necessary because it would be impossible to
determine the parameter type. In general, parameters are legal
only in Data Manipulation Language (DML) statements, and not in
Data Definition Language (DDL) statements.
The parameter markers must be bound to application variables
using mysql_stmt_bind_param()
before executing the statement.
Return Values
Zero if the statement was prepared successfully. Nonzero if an error occurred.
Errors
Commands were executed in an improper order.
Out of memory.
The MySQL server has gone away.
The connection to the server was lost during the query
An unknown error occurred.
If the prepare operation was unsuccessful (that is,
mysql_stmt_prepare() returns
nonzero), the error message can be obtained by calling
mysql_stmt_error().
Example
See the Example in Section 21.9.7.10, “mysql_stmt_execute()”.
my_bool mysql_stmt_reset(MYSQL_STMT *stmt)
Description
Resets a prepared statement on client and server to state after
prepare. It resets the statement on the server, data sent using
mysql_stmt_send_long_data(),
unbuffered result sets and current errors. It does not clear
bindings or stored result sets. Stored result sets will be
cleared when executing the prepared statement (or closing it).
To re-prepare the statement with another query, use
mysql_stmt_prepare().
Return Values
Zero if the statement was reset successfully. Nonzero if an error occurred.
Errors
Commands were executed in an improper order.
The MySQL server has gone away.
The connection to the server was lost during the query
An unknown error occurred.
MYSQL_RES *mysql_stmt_result_metadata(MYSQL_STMT
*stmt)
Description
If a statement passed to
mysql_stmt_prepare() is one that
produces a result set,
mysql_stmt_result_metadata()
returns the result set metadata in the form of a pointer to a
MYSQL_RES structure that can be used to
process the meta information such as number of fields and
individual field information. This result set pointer can be
passed as an argument to any of the field-based API functions
that process result set metadata, such as:
The result set structure should be freed when you are done with
it, which you can do by passing it to
mysql_free_result(). This is
similar to the way you free a result set obtained from a call to
mysql_store_result().
The result set returned by
mysql_stmt_result_metadata()
contains only metadata. It does not contain any row results. The
rows are obtained by using the statement handle with
mysql_stmt_fetch().
Return Values
A MYSQL_RES result structure.
NULL if no meta information exists for the
prepared query.
Errors
Out of memory.
An unknown error occurred.
Example
See the Example in Section 21.9.7.11, “mysql_stmt_fetch()”.
MYSQL_ROW_OFFSET mysql_stmt_row_seek(MYSQL_STMT *stmt,
MYSQL_ROW_OFFSET offset)
Description
Sets the row cursor to an arbitrary row in a statement result
set. The offset value is a row offset that
should be a value returned from
mysql_stmt_row_tell() or from
mysql_stmt_row_seek(). This
value is not a row number; if you want to seek to a row within a
result set by number, use
mysql_stmt_data_seek() instead.
This function requires that the result set structure contains
the entire result of the query, so
mysql_stmt_row_seek() may be
used only in conjunction with
mysql_stmt_store_result().
Return Values
The previous value of the row cursor. This value may be passed
to a subsequent call to
mysql_stmt_row_seek().
Errors
None.
MYSQL_ROW_OFFSET mysql_stmt_row_tell(MYSQL_STMT
*stmt)
Description
Returns the current position of the row cursor for the last
mysql_stmt_fetch(). This value
can be used as an argument to
mysql_stmt_row_seek().
You should use
mysql_stmt_row_tell() only after
mysql_stmt_store_result().
Return Values
The current offset of the row cursor.
Errors
None.
my_bool mysql_stmt_send_long_data(MYSQL_STMT *stmt,
unsigned int parameter_number, const char *data, unsigned long
length)
Description
Enables an application to send parameter data to the server in
pieces (or “chunks”). Call this function after
mysql_stmt_bind_param() and
before mysql_stmt_execute(). It
can be called multiple times to send the parts of a character or
binary data value for a column, which must be one of the
TEXT or
BLOB data types.
parameter_number indicates which parameter to
associate the data with. Parameters are numbered beginning with
0. data is a pointer to a buffer containing
data to be sent, and length indicates the
number of bytes in the buffer.
The next mysql_stmt_execute()
call ignores the bind buffer for all parameters that have been
used with
mysql_stmt_send_long_data()
since last
mysql_stmt_execute() or
mysql_stmt_reset().
If you want to reset/forget the sent data, you can do it with
mysql_stmt_reset(). See
Section 21.9.7.21, “mysql_stmt_reset()”.
Return Values
Zero if the data is sent successfully to server. Nonzero if an error occurred.
Errors
The parameter does not have a string or binary type.
Commands were executed in an improper order.
The MySQL server has gone away.
Out of memory.
An unknown error occurred.
Example
The following example demonstrates how to send the data for a
TEXT column in chunks. It inserts
the data value 'MySQL - The most popular Open Source
database' into the text_column
column. The mysql variable is assumed to be a
valid connection handle.
#define INSERT_QUERY "INSERT INTO \
test_long_data(text_column) VALUES(?)"
MYSQL_BIND bind[1];
long length;
stmt = mysql_stmt_init(mysql);
if (!stmt)
{
fprintf(stderr, " mysql_stmt_init(), out of memory\n");
exit(0);
}
if (mysql_stmt_prepare(stmt, INSERT_QUERY, strlen(INSERT_QUERY)))
{
fprintf(stderr, "\n mysql_stmt_prepare(), INSERT failed");
fprintf(stderr, "\n %s", mysql_stmt_error(stmt));
exit(0);
}
memset(bind, 0, sizeof(bind));
bind[0].buffer_type= MYSQL_TYPE_STRING;
bind[0].length= &length;
bind[0].is_null= 0;
/* Bind the buffers */
if (mysql_stmt_bind_param(stmt, bind))
{
fprintf(stderr, "\n param bind failed");
fprintf(stderr, "\n %s", mysql_stmt_error(stmt));
exit(0);
}
/* Supply data in chunks to server */
if (mysql_stmt_send_long_data(stmt,0,"MySQL",5))
{
fprintf(stderr, "\n send_long_data failed");
fprintf(stderr, "\n %s", mysql_stmt_error(stmt));
exit(0);
}
/* Supply the next piece of data */
if (mysql_stmt_send_long_data(stmt,0,
" - The most popular Open Source database",40))
{
fprintf(stderr, "\n send_long_data failed");
fprintf(stderr, "\n %s", mysql_stmt_error(stmt));
exit(0);
}
/* Now, execute the query */
if (mysql_stmt_execute(stmt))
{
fprintf(stderr, "\n mysql_stmt_execute failed");
fprintf(stderr, "\n %s", mysql_stmt_error(stmt));
exit(0);
}
const char *mysql_stmt_sqlstate(MYSQL_STMT
*stmt)
Description
For the statement specified by stmt,
mysql_stmt_sqlstate() returns a
null-terminated string containing the SQLSTATE error code for
the most recently invoked prepared statement API function that
can succeed or fail. The error code consists of five characters.
"00000" means “no error.” The
values are specified by ANSI SQL and ODBC. For a list of
possible values, see Appendix C, Errors, Error Codes, and Common Problems.
Note that not all MySQL errors are yet mapped to SQLSTATE codes.
The value "HY000" (general error) is used for
unmapped errors.
Return Values
A null-terminated character string containing the SQLSTATE error code.
int mysql_stmt_store_result(MYSQL_STMT *stmt)
Description
Result sets are produced by calling
mysql_stmt_execute() to executed
prepared statements for SQL statements such as
SELECT,
SHOW,
DESCRIBE, and
EXPLAIN. By default, result sets
for successfully executed prepared statements are not buffered
on the client and
mysql_stmt_fetch() fetches them
one at a time from the server. To cause the complete result set
to be buffered on the client, call
mysql_stmt_store_result() after
binding data buffers with
mysql_stmt_bind_result() and
before calling
mysql_stmt_fetch() to fetch
rows. (For an example, see Section 21.9.7.11, “mysql_stmt_fetch()”.)
mysql_stmt_store_result() is
optional for result set processing, unless you will call
mysql_stmt_data_seek(),
mysql_stmt_row_seek(), or
mysql_stmt_row_tell(). Those
functions require a seekable result set.
It is unnecessary to call
mysql_stmt_store_result() after
executing an SQL statement that does not produce a result set,
but if you do, it does not harm or cause any notable performance
problem. You can detect whether the statement produced a result
set by checking if
mysql_stmt_result_metadata()
returns NULL. For more information, refer to
Section 21.9.7.22, “mysql_stmt_result_metadata()”.
MySQL doesn't by default calculate
MYSQL_FIELD->max_length for all columns
in mysql_stmt_store_result()
because calculating this would slow down
mysql_stmt_store_result()
considerably and most applications don't need
max_length. If you want
max_length to be updated, you can call
mysql_stmt_attr_set(MYSQL_STMT,
STMT_ATTR_UPDATE_MAX_LENGTH, &flag) to enable
this. See Section 21.9.7.3, “mysql_stmt_attr_set()”.
Return Values
Zero if the results are buffered successfully. Nonzero if an error occurred.
Errors
Commands were executed in an improper order.
Out of memory.
The MySQL server has gone away.
The connection to the server was lost during the query.
An unknown error occurred.
To create a threaded client, use the functions described in the following sections. See also Section 21.9.16.2, “How to Make a Threaded Client”.
void my_init(void)
Description
my_init() initializes some
global variables that MySQL needs. If you are using a
thread-safe client library, it also calls
mysql_thread_init() for this
thread.
It is necessary for my_init() to
be called early in the initialization phase of a program's use
of the MySQL library. However,
my_init() is automatically
called by mysql_init(),
mysql_library_init(),
mysql_server_init(), and
mysql_connect(). If you ensure
that your program invokes one of those functions before any
other MySQL calls, there is no need to invoke
my_init() explicitly.
To access the prototype for
my_init(), your program should
include these header files:
#include <my_global.h> #include <my_sys.h>
Return Values
None.
void mysql_thread_end(void)
Description
This function needs to be called before calling
pthread_exit() to free memory allocated by
mysql_thread_init().
mysql_thread_end() is
not invoked automatically by the client library. It
must be called explicitly to avoid a memory leak.
Return Values
None.
my_bool mysql_thread_init(void)
Description
This function must be called early within each created thread to
initialize thread-specific variables. However, you may not
necessarily need to invoke it explicitly:
mysql_thread_init() is
automatically called by
my_init(), which itself is
automatically called by
mysql_init(),
mysql_library_init(),
mysql_server_init(), and
mysql_connect(). If you invoke
any of those functions,
mysql_thread_init() will be
called for you.
Return Values
Zero if successful. Nonzero if an error occurred.
MySQL applications can be written to use an embedded server. See
Section 21.8, “libmysqld, the Embedded MySQL Server Library”. To write such an application, you
must link it against the libmysqld library by
using the -lmysqld flag rather than linking it
against the libmysqlclient client library by
using the -lmysqlclient flag. However, the calls
to initialize and finalize the library are the same whether you
write a client application or one that uses the embedded server:
Call mysql_library_init() to
initialize the library and
mysql_library_end() when you are
done with it. See Section 21.9.2, “C API Function Overview”.
int mysql_server_init(int argc, char **argv, char
**groups)
Description
This function initializes the MySQL library, which must be done
before you call any other MySQL function. However,
mysql_server_init() is
deprecated and you should call
mysql_library_init() instead.
See Section 21.9.3.40, “mysql_library_init()”.
Return Values
Zero if successful. Nonzero if an error occurred.
void mysql_server_end(void)
Description
This function finalizes the MySQL library, which should be done
when you are done using the library. However,
mysql_server_end() is deprecated
and mysql_library_end() should
be used instead. See Section 21.9.3.39, “mysql_library_end()”.
Return Values
None.
It is possible for
mysql_store_result() to return
NULL following a successful call to
mysql_query(). When this
happens, it means one of the following conditions occurred:
You can always check whether the statement should have produced
a nonempty result by calling
mysql_field_count(). If
mysql_field_count() returns
zero, the result is empty and the last query was a statement
that does not return values (for example, an
INSERT or a
DELETE). If
mysql_field_count() returns a
nonzero value, the statement should have produced a nonempty
result. See the description of the
mysql_field_count() function for
an example.
You can test for an error by calling
mysql_error() or
mysql_errno().
In addition to the result set returned by a query, you can also get the following information:
mysql_affected_rows()returns the number of rows affected by the last query when doing anINSERT,UPDATE, orDELETE.For a fast re-create, use
TRUNCATE TABLE.mysql_num_rows()returns the number of rows in a result set. Withmysql_store_result(),mysql_num_rows()may be called as soon asmysql_store_result()returns. Withmysql_use_result(),mysql_num_rows()may be called only after you have fetched all the rows withmysql_fetch_row().mysql_insert_id()returns the ID generated by the last query that inserted a row into a table with anAUTO_INCREMENTindex. See Section 21.9.3.37, “mysql_insert_id()”.Some queries (
LOAD DATA INFILE ...,INSERT INTO ... SELECT ...,UPDATE) return additional information. The result is returned bymysql_info(). See the description formysql_info()for the format of the string that it returns.mysql_info()returns aNULLpointer if there is no additional information.
If you insert a record into a table that contains an
AUTO_INCREMENT column, you can obtain the
value stored into that column by calling the
mysql_insert_id() function.
You can check from your C applications whether a value was
stored in an AUTO_INCREMENT column by
executing the following code (which assumes that you've checked
that the statement succeeded). It determines whether the query
was an INSERT with an
AUTO_INCREMENT index:
if ((result = mysql_store_result(&mysql)) == 0 &&
mysql_field_count(&mysql) == 0 &&
mysql_insert_id(&mysql) != 0)
{
used_id = mysql_insert_id(&mysql);
}
When a new AUTO_INCREMENT value has been
generated, you can also obtain it by executing a SELECT
LAST_INSERT_ID() statement with
mysql_query() and retrieving the
value from the result set returned by the statement.
When inserting multiple values, the last automatically incremented value is returned.
For LAST_INSERT_ID(), the most
recently generated ID is maintained in the server on a
per-connection basis. It is not changed by another client. It is
not even changed if you update another
AUTO_INCREMENT column with a nonmagic value
(that is, a value that is not NULL and not
0). Using
LAST_INSERT_ID() and
AUTO_INCREMENT columns simultaneously from
multiple clients is perfectly valid. Each client will receive
the last inserted ID for the last statement
that client executed.
If you want to use the ID that was generated for one table and insert it into a second table, you can use SQL statements like this:
INSERT INTO foo (auto,text)
VALUES(NULL,'text'); # generate ID by inserting NULL
INSERT INTO foo2 (id,text)
VALUES(LAST_INSERT_ID(),'text'); # use ID in second table
Note that mysql_insert_id()
returns the value stored into an
AUTO_INCREMENT column, whether that value is
automatically generated by storing NULL or
0 or was specified as an explicit value.
LAST_INSERT_ID() returns only
automatically generated AUTO_INCREMENT
values. If you store an explicit value other than
NULL or 0, it does not
affect the value returned by
LAST_INSERT_ID().
For more information on obtaining the last ID in an
AUTO_INCREMENT column:
For information on
LAST_INSERT_ID(), which can be used within an SQL statement, see Section 11.14, “Information Functions”.For information on
mysql_insert_id(), the function you use from within the C API, see Section 21.9.3.37, “mysql_insert_id()”.For information on obtaining the auto-incremented value when using Connector/J, see Section 21.3.5, “Connector/J Notes and Tips”.
For information on obtaining the auto-incremented value when using Connector/ODBC, see Section 21.1.7.1.1, “Obtaining Auto-Increment Values”.
The MySQL client library can perform an automatic reconnection to the server if it finds that the connection is down when you attempt to send a statement to the server to be executed. In this case, the library tries once to reconnect to the server and send the statement again.
If it is important for your application to know that the
connection has been dropped (so that is can exit or take action to
adjust for the loss of state information), be sure to disable
auto-reconnect. This can be done explicitly by calling
mysql_options() with the
MYSQL_OPT_RECONNECT option:
my_bool reconnect = 0; mysql_options(&mysql, MYSQL_OPT_RECONNECT, &reconnect);
In MySQL 5.1, auto-reconnect is disabled by default.
If the connection has gone down, the
mysql_ping() function performs a
reconnect if auto-reconnect is enabled. If auto-reconnect is
disabled, mysql_ping() returns an
error instead.
Some client programs might provide the capability of controlling
automatic reconnection. For example, mysql
reconnects by default, but the
--skip-reconnect
option can be used to suppress this behavior.
If an automatic reconnection does occur (for example, as a result
of calling mysql_ping()), there is
no explicit indication of it. To check for reconnection, call
mysql_thread_id() to get the
original connection identifier before calling
mysql_ping(), then call
mysql_thread_id() again to see
whether the identifier has changed.
Automatic reconnection can be convenient because you need not implement your own reconnect code, but if a reconnection does occur, several aspects of the connection state are reset and your application will not know about it. The connection-related state is affected as follows:
Any active transactions are rolled back and autocommit mode is reset.
All table locks are released.
All
TEMPORARYtables are closed (and dropped).Session variables are reinitialized to the values of the corresponding variables. This also affects variables that are set implicitly by statements such as
SET NAMES.User variable settings are lost.
Prepared statements are released.
HANDLERvariables are closed.The value of
LAST_INSERT_ID()is reset to 0.Locks acquired with
GET_LOCK()are released.
If the connection drops, it is possible that the session
associated with the connection on the server side will still be
running if the server has not yet detected that the client is no
longer connected. In this case, any locks held by the original
connection still belong to that session, so you may want to kill
it by calling mysql_kill().
By default, mysql_query() and
mysql_real_query() interpret their
statement string argument as a single statement to be executed,
and you process the result according to whether the statement
produces a result set (a set of rows, as for
SELECT) or an affected-rows count
(as for INSERT,
UPDATE, and so forth).
MySQL 5.1 also supports the execution of a string
containing multiple statements separated by semicolon
(“;”) characters. This capability
is enabled by special options that are specified either when you
connect to the server with
mysql_real_connect() or after
connecting by calling`
mysql_set_server_option().
Executing a multiple-statement string can produce multiple result
sets or row-count indicators. Processing these results involves a
different approach than for the single-statement case: After
handling the result from the first statement, it is necessary to
check whether more results exist and process them in turn if so.
To support multiple-result processing, the C API includes the
mysql_more_results() and
mysql_next_result() functions.
These functions are used at the end of a loop that iterates as
long as more results are available. Failure to process
the result this way may result in a dropped connection to the
server.
Multiple-result processing also is required if you execute
CALL statements for stored
procedures. Results from a stored procedure have these
characteristics:
Statements within the procedure may produce result sets (for example, if it executes
SELECTstatements). These result sets are returned in the order that they are produced as the procedure executes.In general, the caller cannot know how many result sets a procedure will return. Procedure execution may depend on loops or conditional statements that cause the execution path to differ from one call to the next. Therefore, you must be prepared to retrieve multiple results.
The final result from the procedure is a status result that includes no result set. The status indicates whether the procedure succeeded or an error occurred.
The multiple statement and result capabilities can be used only
with mysql_query() or
mysql_real_query(). They cannot be
used with the prepared statement interface. Prepared statement
handles are defined to work only with strings that contain a
single statement. See Section 21.9.4, “C API Prepared Statements”.
To enable multiple-statement execution and result processing, the following options may be used:
The
mysql_real_connect()function has aflagsargument for which two option values are relevent:CLIENT_MULTI_RESULTSenables the client program to process multiple results. This option must be enabled if you executeCALLstatements for stored procedures that produce result sets. Otherwise, such procedures result in an errorError 1312 (0A000): PROCEDURE.proc_namecan't return a result set in the given contextCLIENT_MULTI_STATEMENTSenablesmysql_query()andmysql_real_query()to execute statement strings containing multiple statements separated by semicolons. This option also enablesCLIENT_MULTI_RESULTSimplicitly, so aflagsargument ofCLIENT_MULTI_STATEMENTStomysql_real_connect()is equivalent to an argument ofCLIENT_MULTI_STATEMENTS | CLIENT_MULTI_RESULTS. That is,CLIENT_MULTI_STATEMENTSis sufficient to enable multiple-statement execution and all multiple-result processing.
After the connection to the server has been established, you can use the
mysql_set_server_option()function to enable or disable multiple-statement execution by passing it an argument ofMYSQL_OPTION_MULTI_STATEMENTS_ONorMYSQL_OPTION_MULTI_STATEMENTS_OFF. Enabling multiple-statement execution with this function also enables processing of “simple” results for a multiple-statement string where each statement produces a single result, but is not sufficient to permit processing of stored procedures that produce result sets.
The following procedure outlines a suggested strategy for handling multiple statements:
Pass
CLIENT_MULTI_STATEMENTStomysql_real_connect(), to fully enable multiple-statement execution and multiple-result processing.After calling
mysql_query()ormysql_real_query()and verifying that it succeeds, enter a loop within which you process statement results.For each iteration of the loop, handle the current statement result, retrieving either a result set or an affected-rows count. If an error occurs, exit the loop.
At the end of the loop, call
mysql_next_result()to check whether another result exists and initiate retrieval for it if so. If no more results are available, exit the loop.
One possible implementation of the preceding strategy is shown
following. The final part of the loop can be reduced to a simple
test of whether
mysql_next_result() returns
nonzero. The code as written distinguishes between no more results
and an error, which enables a message to be printed for the latter
occurrence.
/* connect to server with the CLIENT_MULTI_STATEMENTS option */
if (mysql_real_connect (mysql, host_name, user_name, password,
db_name, port_num, socket_name, CLIENT_MULTI_STATEMENTS) == NULL)
{
printf("mysql_real_connect() failed\n");
mysql_close(mysql);
exit(1);
}
/* execute multiple statements */
status = mysql_query(mysql,
"DROP TABLE IF EXISTS test_table;\
CREATE TABLE test_table(id INT);\
INSERT INTO test_table VALUES(10);\
UPDATE test_table SET id=20 WHERE id=10;\
SELECT * FROM test_table;\
DROP TABLE test_table");
if (status)
{
printf("Could not execute statement(s)");
mysql_close(mysql);
exit(0);
}
/* process each statement result */
do {
/* did current statement return data? */
result = mysql_store_result(mysql);
if (result)
{
/* yes; process rows and free the result set */
process_result_set(mysql, result);
mysql_free_result(result);
}
else /* no result set or error */
{
if (mysql_field_count(mysql) == 0)
{
printf("%lld rows affected\n",
mysql_affected_rows(mysql));
}
else /* some error occurred */
{
printf("Could not retrieve result set\n");
break;
}
}
/* more results? -1 = no, >0 = error, 0 = yes (keep looping) */
if ((status = mysql_next_result(mysql)) > 0)
printf("Could not execute statement\n");
} while (status == 0);
mysql_close(mysql);
Here follows a list of the currently known problems with prepared statements:
TIME,TIMESTAMP, andDATETIMEdo not support parts of seconds (for example, fromDATE_FORMAT()).When converting an integer to string,
ZEROFILLis honored with prepared statements in some cases where the MySQL server doesn't print the leading zeros. (For example, withMIN().number-with-zerofill)When converting a floating-point number to a string in the client, the rightmost digits of the converted value may differ slightly from those of the original value.
Before MySQL 5.1.17, prepared statements do not use the query cache. As of 5.1.17, prepared statements use the query cache under the conditions described in Section 7.6.3.1, “How the Query Cache Operates”.
Prepared statements do not support multi-statements (that is, multiple statements within a single string separated by “
;” characters).In MySQL 5.1, prepared
CALLstatements cannot invoke stored procedures that return result sets because prepared statements do not support multiple result sets. Nor can the calling application access a stored procedure'sOUTorINOUTparameters when the procedure returns. These capabilities are supported beginning with MySQL 5.5.
The binary (prepared statement) protocol enables you to send and
receive date and time values (DATE,
TIME,
DATETIME, and
TIMESTAMP), using the
MYSQL_TIME structure. The members of this
structure are described in
Section 21.9.5, “C API Prepared Statement Data Structures”.
To send temporal data values, create a prepared statement using
mysql_stmt_prepare(). Then, before
calling mysql_stmt_execute() to
execute the statement, use the following procedure to set up each
temporal parameter:
In the
MYSQL_BINDstructure associated with the data value, set thebuffer_typemember to the type that indicates what kind of temporal value you're sending. ForDATE,TIME,DATETIME, orTIMESTAMPvalues, setbuffer_typetoMYSQL_TYPE_DATE,MYSQL_TYPE_TIME,MYSQL_TYPE_DATETIME, orMYSQL_TYPE_TIMESTAMP, respectively.Set the
buffermember of theMYSQL_BINDstructure to the address of theMYSQL_TIMEstructure in which you pass the temporal value.Fill in the members of the
MYSQL_TIMEstructure that are appropriate for the type of temporal value to be passed.
Use mysql_stmt_bind_param() to
bind the parameter data to the statement. Then you can call
mysql_stmt_execute().
To retrieve temporal values, the procedure is similar, except that
you set the buffer_type member to the type of
value you expect to receive, and the buffer
member to the address of a MYSQL_TIME structure
into which the returned value should be placed. Use
mysql_stmt_bind_result() to bind
the buffers to the statement after calling
mysql_stmt_execute() and before
fetching the results.
Here is a simple example that inserts
DATE,
TIME, and
TIMESTAMP data. The
mysql variable is assumed to be a valid
connection handle.
MYSQL_TIME ts;
MYSQL_BIND bind[3];
MYSQL_STMT *stmt;
strmov(query, "INSERT INTO test_table(date_field, time_field, \
timestamp_field) VALUES(?,?,?");
stmt = mysql_stmt_init(mysql);
if (!stmt)
{
fprintf(stderr, " mysql_stmt_init(), out of memory\n");
exit(0);
}
if (mysql_stmt_prepare(mysql, query, strlen(query)))
{
fprintf(stderr, "\n mysql_stmt_prepare(), INSERT failed");
fprintf(stderr, "\n %s", mysql_stmt_error(stmt));
exit(0);
}
/* set up input buffers for all 3 parameters */
bind[0].buffer_type= MYSQL_TYPE_DATE;
bind[0].buffer= (char *)&ts;
bind[0].is_null= 0;
bind[0].length= 0;
...
bind[1]= bind[2]= bind[0];
...
mysql_stmt_bind_param(stmt, bind);
/* supply the data to be sent in the ts structure */
ts.year= 2002;
ts.month= 02;
ts.day= 03;
ts.hour= 10;
ts.minute= 45;
ts.second= 20;
mysql_stmt_execute(stmt);
..
In MySQL 5.1, prepared
CALL statements can be used only
for stored procedures that produce at most one result set. Nor can
the calling application use placeholders for
OUT or INOUT parameters.
MySQL 5.5 expands prepared CALL
statement support for stored procedures that produce multiple
result sets and to provide placeholder access to
OUT and INOUT parameters.
If you compile MySQL clients that you've written yourself or that
you obtain from a third-party, they must be linked using the
-lmysqlclient -lz options in the link command.
You may also need to specify a -L option to tell
the linker where to find the library. For example, if the library
is installed in /usr/local/mysql/lib, use
-L/usr/local/mysql/lib -lmysqlclient -lz in the
link command.
For clients that use MySQL header files, you may need to specify
an -I option when you compile them (for example,
-I/usr/local/mysql/include), so that the compiler
can find the header files.
To make it simpler to compile MySQL programs on Unix, we have provided the mysql_config script for you. See Section 4.7.2, “mysql_config — Get Compile Options for Compiling Clients”.
You can use it to compile a MySQL client as follows:
CFG=/usr/local/mysql/bin/mysql_config sh -c "gcc -o progname `$CFG --cflags` progname.c `$CFG --libs`"
The sh -c is needed to get the shell not to
treat the output from mysql_config as one word.
When linking with the C API, the following errors may occur on some systems:
gcc -g -o client test.o -L/usr/local/lib/mysql \
-lmysqlclient -lsocket -lnsl
Undefined first referenced
symbol in file
floor /usr/local/lib/mysql/libmysqlclient.a(password.o)
ld: fatal: Symbol referencing errors. No output written to client
If this happens on your system, you must include the math
library by adding -lm to the end of the
compile/link line.
Linking with the single-threaded library
(libmysqlclient) may lead to linker errors
related to pthread symbols. When using the
single-threaded library, please compile your client with
MYSQL_CLIENT_NO_THREADS defined. This can be
done on the command line by using the -D option
to the compiler, or in your source code before including the
MySQL header files. This define should not be used when building
for use with the thread-safe client library
(libmysqlclient_r).
The client library is almost thread-safe. The biggest problem is
that the subroutines in net.c that read
from sockets are not interrupt safe. This was done with the
thought that you might want to have your own alarm that can
break a long read to a server. If you install interrupt handlers
for the SIGPIPE interrupt, the socket
handling should be thread-safe.
To avoid aborting the program when a connection terminates,
MySQL blocks SIGPIPE on the first call to
mysql_library_init(),
mysql_init(), or
mysql_connect(). If you want to
use your own SIGPIPE handler, you should
first call mysql_library_init()
and then install your handler.
Current binary distributions should have both a normal and a thread-safe client library.
The thread-safe client library,
libmysqlclient_r, is thread-safe per
connection. You can let two threads share the same connection
with the following caveats:
Two threads can't send a query to the MySQL server at the same time on the same connection. In particular, you have to ensure that between calls to
mysql_query()andmysql_store_result()no other thread is using the same connection.Many threads can access different result sets that are retrieved with
mysql_store_result().If you use
mysql_use_result(), you must ensure that no other thread is using the same connection until the result set is closed. However, it really is best for threaded clients that share the same connection to usemysql_store_result().If you want to use multiple threads on the same connection, you must have a mutex lock around your pair of
mysql_query()andmysql_store_result()calls. Oncemysql_store_result()is ready, the lock can be released and other threads may query the same connection.If you use POSIX threads, you can use
pthread_mutex_lock()andpthread_mutex_unlock()to establish and release a mutex lock.
You need to know the following if you have a thread that is calling MySQL functions which did not create the connection to the MySQL database:
When you call mysql_init(),
MySQL creates a thread-specific variable for the thread that is
used by the debug library (among other things). If you call a
MySQL function before the thread has called
mysql_init(), the thread does
not have the necessary thread-specific variables in place and
you are likely to end up with a core dump sooner or later. To
get things to work smoothly you must do the following:
Call
mysql_library_init()before any other MySQL functions. It is not thread-safe, so call it before threads are created, or protect the call with a mutex.Arrange for
mysql_thread_init()to be called early in the thread handler before calling any MySQL function. If you callmysql_init(), they will callmysql_thread_init()for you.In the thread, call
mysql_thread_end()before callingpthread_exit(). This frees the memory used by MySQL thread-specific variables.
The preceding notes regarding
mysql_init() also apply to
mysql_connect(), which calls
mysql_init().
If “undefined symbol” errors occur when linking
your client with libmysqlclient_r, in most
cases this is because you haven't included the thread libraries
on the link/compile command.
PHP is a server-side, HTML-embedded scripting language that may be used to create dynamic Web pages. It is available for most operating systems and Web servers, and can access most common databases, including MySQL. PHP may be run as a separate program or compiled as a module for use with the Apache Web server.
PHP actually provides two different MySQL API extensions:
mysql: Available for PHP versions 4 and 5, this extension is intended for use with MySQL versions prior to MySQL 4.1. This extension does not support the improved authentication protocol used in MySQL 4.1, nor does it support prepared statements or multiple statements. If you wish to use this extension with MySQL 4.1, you will likely want to configure the MySQL server to use the --old-passwords option (see Section C.5.2.4, “Client does not support authentication protocol”). This extension is documented on the PHP Web site at http://php.net/mysql.Section 21.10.2, “MySQL Improved Extension (
Mysqli)” - Stands for “MySQL, Improved”; this extension is available only in PHP 5. It is intended for use with MySQL 4.1.1 and later. This extension fully supports the authentication protocol used in MySQL 5.0, as well as the Prepared Statements and Multiple Statements APIs. In addition, this extension provides an advanced, object-oriented programming interface. You can read the documentation for themysqliextension at http://php.net/mysqli. Helpful article can be found at http://devzone.zend.com/node/view/id/686 and http://devzone.zend.com/node/view/id/687.
If you're experiencing problems with enabling both the
mysql and the mysqli extension
when building PHP on Linux yourself, see
Section 21.10.7, “Enabling Both mysql and mysqli in
PHP”.
The PHP distribution and documentation are available from the PHP Web site.
Portions of this section are Copyright (c) 1997-2008 the PHP Documentation Group This material may be distributed only subject to the terms and conditions set forth in the Creative Commons Attribution 3.0 License or later. A copy of the Creative Commons Attribution 3.0 license is distributed with this manual. The latest version is presently available at This material may be distributed only subject to the terms and conditio\ ns set forth in the Open Publication License, v1.0.8 or later (the latest version is presently available at http://www.opencontent.org/openpub/).
Copyright 1997-2010 the PHP Documentation Group.
These functions allow you to access MySQL database servers. More information about MySQL can be found at http://www.mysql.com/.
Documentation for MySQL can be found at http://dev.mysql.com/doc/.
For an overview of MySQL database connectivity terms and products see Section 21.10.2.2, “Overview”.
Copyright 1997-2010 the PHP Documentation Group.
Copyright 1997-2010 the PHP Documentation Group.
In order to have these functions available, you must compile PHP with MySQL support.
Copyright 1997-2010 the PHP Documentation Group.
For compiling, simply use the
--with-mysql[=DIR] configuration option where
the optional [DIR] points to the MySQL
installation directory.
Although this MySQL extension is compatible with MySQL 4.1.0 and greater, it doesn't support the extra functionality that these versions provide. For that, use the MySQLi extension.
If you would like to install the mysql extension along with the mysqli extension you have to use the same client library to avoid any conflicts.
Copyright 1997-2010 the PHP Documentation Group.
Copyright 1997-2010 the PHP Documentation Group.
The option --with-mysql is enabled by
default. This default behavior may be disabled with the
--without-mysql configure option. If MySQL
is enabled without specifying the path to the MySQL install
DIR, PHP will use the bundled MySQL client libraries.
Users who run other applications that use MySQL (for
example, auth-mysql) should not use the
bundled library, but rather specify the path to MySQL's
install directory, like so:
--with-mysql=/path/to/mysql. This will
force PHP to use the client libraries installed by MySQL,
thus avoiding any conflicts.
Copyright 1997-2010 the PHP Documentation Group.
MySQL is not enabled by default, nor is the MySQL library
bundled with PHP. Read this
FAQ for details on why. Use the
--with-mysql[=DIR] configure option to
include MySQL support. You can download headers
and libraries from http://www.mysql.com/.
Copyright 1997-2010 the PHP Documentation Group.
In PHP 5.3.0 and above the MySQL-related database extensions
use the MySQL
Native Driver by default. This means that the MySQL
Client Library (libmysql) is no longer
required in order to support connection to a MySQL database.
The extensions mysql,
mysqli, and
PHP_PDO_MYSQL are all enabled by default
in PHP 5.3.0+, and all use the MySQL Native Driver by
default. In each case no further installation steps are
required in order to use these extensions, although you may
want to set some preferences in php.ini
depending on your requirements.
Copyright 1997-2010 the PHP Documentation Group.
Copyright 1997-2010 the PHP Documentation Group.
The PHP MySQL extension is compiled into PHP.
Copyright 1997-2010 the PHP Documentation Group.
MySQL is no longer enabled by default, so the
php_mysql.dll DLL must be enabled
inside of php.ini. Also, PHP needs
access to the MySQL client library. A file named
libmysql.dll is included in the Windows
PHP distribution and in order for PHP to talk to MySQL this
file needs to be available to the Windows systems
PATH. See the FAQ titled
"How
do I add my PHP directory to the PATH on
Windows" for information on how to do this.
Although copying libmysql.dll to the
Windows system directory also works (because the system
directory is by default in the system's
PATH), it's not recommended.
As with enabling any PHP extension (such as
php_mysql.dll), the PHP directive
extension_dir
should be set to the directory where the PHP extensions are
located. See also the
Manual
Windows Installation Instructions. An example
extension_dir value for PHP 5 is
c:\php\ext
If when starting the web server an error similar to the
following occurs: "Unable to load dynamic
library './php_mysql.dll'", this
is because php_mysql.dll and/or
libmysql.dll cannot be found by the
system.
Copyright 1997-2010 the PHP Documentation Group.
Please refer to these notes on installing MySQL support on PHP 5.3.0 and above.
Copyright 1997-2010 the PHP Documentation Group.
Crashes and startup problems of PHP may be encountered when loading this extension in conjunction with the recode extension. See the recode extension for more information.
If you need charsets other than latin (default), you have to install external (not bundled) libmysql with compiled charset support.
Copyright 1997-2010 the PHP Documentation Group.
The behaviour of these functions is affected by settings in php.ini.
Table 21.4. MySQL Configuration Options
| Name | Default | Changeable | Changelog |
|---|---|---|---|
| mysql.allow_persistent | "1" | PHP_INI_SYSTEM | |
| mysql.max_persistent | "-1" | PHP_INI_SYSTEM | |
| mysql.max_links | "-1" | PHP_INI_SYSTEM | |
| mysql.trace_mode | "0" | PHP_INI_ALL | Available since PHP 4.3.0. |
| mysql.default_port | NULL | PHP_INI_ALL | |
| mysql.default_socket | NULL | PHP_INI_ALL | Available since PHP 4.0.1. |
| mysql.default_host | NULL | PHP_INI_ALL | |
| mysql.default_user | NULL | PHP_INI_ALL | |
| mysql.default_password | NULL | PHP_INI_ALL | |
| mysql.connect_timeout | "60" | PHP_INI_ALL | PHP_INI_SYSTEM in PHP <= 4.3.2. Available since PHP 4.3.0. |
For further details and definitions of the PHP_INI_* modes, see the configuration.changes.modes.
Here's a short explanation of the configuration directives.
-
mysql.allow_persistentboolean Whether to allow persistent connections to MySQL.
-
mysql.max_persistentinteger The maximum number of persistent MySQL connections per process.
-
mysql.max_linksinteger The maximum number of MySQL connections per process, including persistent connections.
-
mysql.trace_modeboolean Trace mode. When
mysql.trace_modeis enabled, warnings for table/index scans, non free result sets, and SQL-Errors will be displayed. (Introduced in PHP 4.3.0)-
mysql.default_portstring The default TCP port number to use when connecting to the database server if no other port is specified. If no default is specified, the port will be obtained from the
MYSQL_TCP_PORTenvironment variable, themysql-tcpentry in/etc/servicesor the compile-timeMYSQL_PORTconstant, in that order. Win32 will only use theMYSQL_PORTconstant.-
mysql.default_socketstring The default socket name to use when connecting to a local database server if no other socket name is specified.
-
mysql.default_hoststring The default server host to use when connecting to the database server if no other host is specified. Doesn't apply in SQL safe mode.
-
mysql.default_userstring The default user name to use when connecting to the database server if no other name is specified. Doesn't apply in SQL safe mode.
-
mysql.default_passwordstring The default password to use when connecting to the database server if no other password is specified. Doesn't apply in SQL safe mode.
-
mysql.connect_timeoutinteger Connect timeout in seconds. On Linux this timeout is also used for waiting for the first answer from the server.
Copyright 1997-2010 the PHP Documentation Group.
There are two resource types used in the MySQL module. The first one is the link identifier for a database connection, the second a resource which holds the result of a query.
Copyright 1997-2010 the PHP Documentation Group.
The constants below are defined by this extension, and will only be available when the extension has either been compiled into PHP or dynamically loaded at runtime.
Since PHP 4.3.0 it is possible to specify additional client flags
for the
mysql_connect
and
mysql_pconnect
functions. The following constants are defined:
Table 21.5. MySQL client constants
| Constant | Description |
|---|---|
MYSQL_CLIENT_COMPRESS | Use compression protocol |
MYSQL_CLIENT_IGNORE_SPACE | Allow space after function names |
MYSQL_CLIENT_INTERACTIVE | Allow interactive_timeout seconds (instead of
wait_timeout) of inactivity before
closing the connection. |
MYSQL_CLIENT_SSL | Use SSL encryption. This flag is only available with version 4.x of the MySQL client library or newer. Version 3.23.x is bundled both with PHP 4 and Windows binaries of PHP 5. |
The function
mysql_fetch_array
uses a constant for the different types of result arrays. The
following constants are defined:
Table 21.6. MySQL fetch constants
| Constant | Description |
|---|---|
MYSQL_ASSOC | Columns are returned into the array having the fieldname as the array index. |
MYSQL_BOTH | Columns are returned into the array having both a numerical index and the fieldname as the array index. |
MYSQL_NUM | Columns are returned into the array having a numerical index to the fields. This index starts with 0, the first field in the result. |
Copyright 1997-2010 the PHP Documentation Group.
This simple example shows how to connect, execute a query, print resulting rows and disconnect from a MySQL database.
Example 21.15. MySQL extension overview example
Copyright 1997-2010 the PHP Documentation Group.
<?php
// Connecting, selecting database
$link = mysql_connect('mysql_host', 'mysql_user', 'mysql_password')
or die('Could not connect: ' . mysql_error());
echo 'Connected successfully';
mysql_select_db('my_database') or die('Could not select database');
// Performing SQL query
$query = 'SELECT * FROM my_table';
$result = mysql_query($query) or die('Query failed: ' . mysql_error());
// Printing results in HTML
echo "<table>\n";
while ($line = mysql_fetch_array($result, MYSQL_ASSOC)) {
echo "\t<tr>\n";
foreach ($line as $col_value) {
echo "\t\t<td>$col_value</td>\n";
}
echo "\t</tr>\n";
}
echo "</table>\n";
// Free resultset
mysql_free_result($result);
// Closing connection
mysql_close($link);
?>
- 21.10.1.4.1.
mysql_affected_rows - 21.10.1.4.2.
mysql_client_encoding - 21.10.1.4.3.
mysql_close - 21.10.1.4.4.
mysql_connect - 21.10.1.4.5.
mysql_create_db - 21.10.1.4.6.
mysql_data_seek - 21.10.1.4.7.
mysql_db_name - 21.10.1.4.8.
mysql_db_query - 21.10.1.4.9.
mysql_drop_db - 21.10.1.4.10.
mysql_errno - 21.10.1.4.11.
mysql_error - 21.10.1.4.12.
mysql_escape_string - 21.10.1.4.13.
mysql_fetch_array - 21.10.1.4.14.
mysql_fetch_assoc - 21.10.1.4.15.
mysql_fetch_field - 21.10.1.4.16.
mysql_fetch_lengths - 21.10.1.4.17.
mysql_fetch_object - 21.10.1.4.18.
mysql_fetch_row - 21.10.1.4.19.
mysql_field_flags - 21.10.1.4.20.
mysql_field_len - 21.10.1.4.21.
mysql_field_name - 21.10.1.4.22.
mysql_field_seek - 21.10.1.4.23.
mysql_field_table - 21.10.1.4.24.
mysql_field_type - 21.10.1.4.25.
mysql_free_result - 21.10.1.4.26.
mysql_get_client_info - 21.10.1.4.27.
mysql_get_host_info - 21.10.1.4.28.
mysql_get_proto_info - 21.10.1.4.29.
mysql_get_server_info - 21.10.1.4.30.
mysql_info - 21.10.1.4.31.
mysql_insert_id - 21.10.1.4.32.
mysql_list_dbs - 21.10.1.4.33.
mysql_list_fields - 21.10.1.4.34.
mysql_list_processes - 21.10.1.4.35.
mysql_list_tables - 21.10.1.4.36.
mysql_num_fields - 21.10.1.4.37.
mysql_num_rows - 21.10.1.4.38.
mysql_pconnect - 21.10.1.4.39.
mysql_ping - 21.10.1.4.40.
mysql_query - 21.10.1.4.41.
mysql_real_escape_string - 21.10.1.4.42.
mysql_result - 21.10.1.4.43.
mysql_select_db - 21.10.1.4.44.
mysql_set_charset - 21.10.1.4.45.
mysql_stat - 21.10.1.4.46.
mysql_tablename - 21.10.1.4.47.
mysql_thread_id - 21.10.1.4.48.
mysql_unbuffered_query
Copyright 1997-2010 the PHP Documentation Group.
Most MySQL functions accept
link_identifier as the last optional
parameter. If it is not provided, last opened connection is
used. If it doesn't exist, connection is tried to establish
with default parameters defined in php.ini.
If it is not successful, functions return
FALSE
.
Copyright 1997-2010 the PHP Documentation Group.
mysql_affected_rowsGet number of affected rows in previous MySQL operation
Description
int mysql_affected_rows(resource link_identifier);
Get the number of affected rows by the last INSERT, UPDATE,
REPLACE or DELETE query associated with
link_identifier.
Parameters
-
link_identifier The MySQL connection. If the link identifier is not specified, the last link opened by
mysql_connectis assumed. If no such link is found, it will try to create one as ifmysql_connectwas called with no arguments. If no connection is found or established, anE_WARNINGlevel error is generated.
Return Values
Returns the number of affected rows on success, and -1 if the last query failed.
If the last query was a DELETE query with no WHERE clause, all of the records will have been deleted from the table but this function will return zero with MySQL versions prior to 4.1.2.
When using UPDATE, MySQL will not update columns where the new
value is the same as the old value. This creates the possibility
that
mysql_affected_rows
may not actually equal the number of rows matched, only the
number of rows that were literally affected by the query.
The REPLACE statement first deletes the record with the same primary key and then inserts the new record. This function returns the number of deleted records plus the number of inserted records.
Examples
Example 21.16. mysql_affected_rows
example
<?php
$link = mysql_connect('localhost', 'mysql_user', 'mysql_password');
if (!$link) {
die('Could not connect: ' . mysql_error());
}
mysql_select_db('mydb');
/* this should return the correct numbers of deleted records */
mysql_query('DELETE FROM mytable WHERE id < 10');
printf("Records deleted: %d\n", mysql_affected_rows());
/* with a where clause that is never true, it should return 0 */
mysql_query('DELETE FROM mytable WHERE 0');
printf("Records deleted: %d\n", mysql_affected_rows());
?>
The above example will output something similar to:
Records deleted: 10
Records deleted: 0
Example 21.17. mysql_affected_rows
example using transactions
<?php
$link = mysql_connect('localhost', 'mysql_user', 'mysql_password');
if (!$link) {
die('Could not connect: ' . mysql_error());
}
mysql_select_db('mydb');
/* Update records */
mysql_query("UPDATE mytable SET used=1 WHERE id < 10");
printf ("Updated records: %d\n", mysql_affected_rows());
mysql_query("COMMIT");
?>
The above example will output something similar to:
Updated Records: 10
Notes
If you are using transactions, you need to call
mysql_affected_rows
after your INSERT, UPDATE, or DELETE query, not after the
COMMIT.
To retrieve the number of rows returned by a SELECT, it is
possible to use
mysql_num_rows.
mysql_affected_rows
does not count rows affected implicitly through the use of ON
DELETE CASCADE and/or ON UPDATE CASCADE in foreign key
constraints.
See Also
mysql_num_rows
|
mysql_info
|
Copyright 1997-2010 the PHP Documentation Group.
mysql_client_encodingReturns the name of the character set
Description
string mysql_client_encoding(resource link_identifier);
Retrieves the character_set variable from
MySQL.
Parameters
-
link_identifier The MySQL connection. If the link identifier is not specified, the last link opened by
mysql_connectis assumed. If no such link is found, it will try to create one as ifmysql_connectwas called with no arguments. If no connection is found or established, anE_WARNINGlevel error is generated.
Return Values
Returns the default character set name for the current connection.
Examples
Example 21.18. mysql_client_encoding
example
<?php
$link = mysql_connect('localhost', 'mysql_user', 'mysql_password');
$charset = mysql_client_encoding($link);
echo "The current character set is: $charset\n";
?>
The above example will output something similar to:
The current character set is: latin1
See Also
mysql_set_charset
|
mysql_real_escape_string
|
Copyright 1997-2010 the PHP Documentation Group.
mysql_closeClose MySQL connection
Description
bool mysql_close(resource link_identifier);
mysql_close
closes the non-persistent connection to the MySQL server
that's associated with the specified link identifier. If
link_identifier isn't specified, the
last opened link is used.
Using
mysql_close
isn't usually necessary, as non-persistent open links are
automatically closed at the end of the script's execution.
See also
freeing
resources.
Parameters
-
link_identifier The MySQL connection. If the link identifier is not specified, the last link opened by
mysql_connectis assumed. If no such link is found, it will try to create one as ifmysql_connectwas called with no arguments. If no connection is found or established, anE_WARNINGlevel error is generated.
Return Values
Returns
TRUE
on success or
FALSE
on failure.
Examples
Example 21.19. mysql_close
example
<?php
$link = mysql_connect('localhost', 'mysql_user', 'mysql_password');
if (!$link) {
die('Could not connect: ' . mysql_error());
}
echo 'Connected successfully';
mysql_close($link);
?>
The above example will output:
Connected successfully
Notes
mysql_close
will not close persistent links created by
mysql_pconnect.
See Also
mysql_connect
|
mysql_free_result
|
Copyright 1997-2010 the PHP Documentation Group.
mysql_connectOpen a connection to a MySQL Server
Description
resource mysql_connect(string server= =ini_get("mysql.default_host"),
string username= =ini_get("mysql.default_user"),
string password= =ini_get("mysql.default_password"),
bool new_link= =false,
int client_flags= =0);Opens or reuses a connection to a MySQL server.
Parameters
-
server The MySQL server. It can also include a port number. e.g. "hostname:port" or a path to a local socket e.g. ":/path/to/socket" for the localhost.
If the PHP directive mysql.default_host is undefined (default), then the default value is 'localhost:3306'. In SQL safe mode, this parameter is ignored and value 'localhost:3306' is always used.
-
username The username. Default value is defined by mysql.default_user. In SQL safe mode, this parameter is ignored and the name of the user that owns the server process is used.
-
password The password. Default value is defined by mysql.default_password. In SQL safe mode, this parameter is ignored and empty password is used.
-
new_link If a second call is made to
mysql_connectwith the same arguments, no new link will be established, but instead, the link identifier of the already opened link will be returned. Thenew_linkparameter modifies this behavior and makesmysql_connectalways open a new link, even ifmysql_connectwas called before with the same parameters. In SQL safe mode, this parameter is ignored.-
client_flags The
client_flagsparameter can be a combination of the following constants: 128 (enableLOAD DATA LOCALhandling),MYSQL_CLIENT_SSL,MYSQL_CLIENT_COMPRESS,MYSQL_CLIENT_IGNORE_SPACEorMYSQL_CLIENT_INTERACTIVE. Read the section about Table 21.5, “MySQL client constants” for further information. In SQL safe mode, this parameter is ignored.
Return Values
Returns a MySQL link identifier on success or
FALSE
on failure.
Changelog
| Version | Description |
|---|---|
| 4.3.0 | Added the client_flags parameter. |
| 4.2.0 | Added the new_link parameter. |
Examples
Example 21.20. mysql_connect
example
<?php
$link = mysql_connect('localhost', 'mysql_user', 'mysql_password');
if (!$link) {
die('Could not connect: ' . mysql_error());
}
echo 'Connected successfully';
mysql_close($link);
?>
Example 21.21. mysql_connect
example using hostname:port syntax
<?php
// we connect to example.com and port 3307
$link = mysql_connect('example.com:3307', 'mysql_user', 'mysql_password');
if (!$link) {
die('Could not connect: ' . mysql_error());
}
echo 'Connected successfully';
mysql_close($link);
// we connect to localhost at port 3307
$link = mysql_connect('127.0.0.1:3307', 'mysql_user', 'mysql_password');
if (!$link) {
die('Could not connect: ' . mysql_error());
}
echo 'Connected successfully';
mysql_close($link);
?>
Example 21.22. mysql_connect
example using ":/path/to/socket" syntax
<?php
// we connect to localhost and socket e.g. /tmp/mysql.sock
//variant 1: ommit localhost
$link = mysql_connect(':/tmp/mysql', 'mysql_user', 'mysql_password');
if (!$link) {
die('Could not connect: ' . mysql_error());
}
echo 'Connected successfully';
mysql_close($link);
// variant 2: with localhost
$link = mysql_connect('localhost:/tmp/mysql.sock', 'mysql_user', 'mysql_password');
if (!$link) {
die('Could not connect: ' . mysql_error());
}
echo 'Connected successfully';
mysql_close($link);
?>
Notes
Whenever you specify "localhost" or
"localhost:port" as server, the MySQL client library
will override this and try to connect to a local socket (named
pipe on Windows). If you want to use TCP/IP, use
"127.0.0.1" instead of "localhost". If the
MySQL client library tries to connect to the wrong local
socket, you should set the correct path as
mysql.default_host
string
in your PHP
configuration and leave the server field blank.
The link to the server will be closed as soon as the execution
of the script ends, unless it's closed earlier by
explicitly calling
mysql_close.
You can suppress the error message on failure by prepending a @ to the function name.
Error "Can't create TCP/IP socket (10106)"
usually means that the
variables_order
configure directive doesn't contain character
E. On Windows, if the environment is not
copied the SYSTEMROOT environment variable
won't be available and PHP will have problems loading
Winsock.
See Also
mysql_pconnect
|
mysql_close
|
Copyright 1997-2010 the PHP Documentation Group.
mysql_create_dbCreate a MySQL database
Description
bool mysql_create_db(string database_name,
resource link_identifier);
mysql_create_db
attempts to create a new database on the server associated with
the specified link identifier.
Parameters
-
database_name The name of the database being created.
-
link_identifier The MySQL connection. If the link identifier is not specified, the last link opened by
mysql_connectis assumed. If no such link is found, it will try to create one as ifmysql_connectwas called with no arguments. If no connection is found or established, anE_WARNINGlevel error is generated.
Return Values
Returns
TRUE
on success or
FALSE
on failure.
Examples
Example 21.23. mysql_create_db
alternative example
The function
mysql_create_db
is deprecated. It is preferable to use
mysql_query
to issue an sql CREATE DATABASE statement
instead.
<?php
$link = mysql_connect('localhost', 'mysql_user', 'mysql_password');
if (!$link) {
die('Could not connect: ' . mysql_error());
}
$sql = 'CREATE DATABASE my_db';
if (mysql_query($sql, $link)) {
echo "Database my_db created successfully\n";
} else {
echo 'Error creating database: ' . mysql_error() . "\n";
}
?>
The above example will output something similar to:
Database my_db created successfully
Notes
For backward compatibility, the following deprecated alias may
be used: mysql_createdb
This function will not be available if the MySQL extension was built against a MySQL 4.x client library.
See Also
mysql_query
|
mysql_select_db
|
Copyright 1997-2010 the PHP Documentation Group.
mysql_data_seekMove internal result pointer
Description
bool mysql_data_seek(resource result,
int row_number);
mysql_data_seek
moves the internal row pointer of the MySQL result associated
with the specified result identifier to point to the specified
row number. The next call to a MySQL fetch function, such as
mysql_fetch_assoc,
would return that row.
row_number starts at 0. The
row_number should be a value in the range
from 0 to
mysql_num_rows
- 1. However if the result set is empty
(mysql_num_rows
== 0), a seek to 0 will fail with a
E_WARNING
and
mysql_data_seek
will return
FALSE
.
Parameters
-
result The result resource that is being evaluated. This result comes from a call to
mysql_query.-
row_number The desired row number of the new result pointer.
Return Values
Returns
TRUE
on success or
FALSE
on failure.
Examples
Example 21.24. mysql_data_seek
example
<?php
$link = mysql_connect('localhost', 'mysql_user', 'mysql_password');
if (!$link) {
die('Could not connect: ' . mysql_error());
}
$db_selected = mysql_select_db('sample_db');
if (!$db_selected) {
die('Could not select database: ' . mysql_error());
}
$query = 'SELECT last_name, first_name FROM friends';
$result = mysql_query($query);
if (!$result) {
die('Query failed: ' . mysql_error());
}
/* fetch rows in reverse order */
for ($i = mysql_num_rows($result) - 1; $i >= 0; $i--) {
if (!mysql_data_seek($result, $i)) {
echo "Cannot seek to row $i: " . mysql_error() . "\n";
continue;
}
if (!($row = mysql_fetch_assoc($result))) {
continue;
}
echo $row['last_name'] . ' ' . $row['first_name'] . "<br />\n";
}
mysql_free_result($result);
?>
Notes
The function
mysql_data_seek
can be used in conjunction only with
mysql_query,
not with
mysql_unbuffered_query.
See Also
mysql_query
|
mysql_num_rows
|
mysql_fetch_row
|
mysql_fetch_assoc
|
mysql_fetch_array
|
mysql_fetch_object
|
Copyright 1997-2010 the PHP Documentation Group.
mysql_db_nameGet result data
Description
string mysql_db_name(resource result,
int row,
mixed field);
Retrieve the database name from a call to
mysql_list_dbs.
Parameters
-
result The result pointer from a call to
mysql_list_dbs.-
row The index into the result set.
-
field The field name.
Return Values
Returns the database name on success, and
FALSE
on failure. If
FALSE
is returned, use
mysql_error
to determine the nature of the error.
Examples
Example 21.25. mysql_db_name
example
<?php
error_reporting(E_ALL);
$link = mysql_connect('dbhost', 'username', 'password');
$db_list = mysql_list_dbs($link);
$i = 0;
$cnt = mysql_num_rows($db_list);
while ($i < $cnt) {
echo mysql_db_name($db_list, $i) . "\n";
$i++;
}
?>
Notes
For backward compatibility, the following deprecated alias may
be used: mysql_dbname
See Also
mysql_list_dbs
|
mysql_tablename
|
Copyright 1997-2010 the PHP Documentation Group.
mysql_db_querySend a MySQL query
Description
resource mysql_db_query(string database,
string query,
resource link_identifier);
mysql_db_query
selects a database, and executes a query on it.
This function has been DEPRECATED as of PHP 5.3.0. Relying on this feature is highly discouraged.
Parameters
-
database The name of the database that will be selected.
-
query The MySQL query.
Data inside the query should be properly escaped.
-
link_identifier The MySQL connection. If the link identifier is not specified, the last link opened by
mysql_connectis assumed. If no such link is found, it will try to create one as ifmysql_connectwas called with no arguments. If no connection is found or established, anE_WARNINGlevel error is generated.
Return Values
Returns a positive MySQL result resource to the query result, or
FALSE
on error. The function also returns
TRUE
/
FALSE
for
INSERT/UPDATE/DELETE
queries to indicate success/failure.
Changelog
| Version | Description |
|---|---|
| 5.3.0 | This function now throws an E_DEPRECATED notice. |
| 4.0.6 | This function is deprecated, do not use this function. Use
mysql_select_db
and
mysql_query
instead. |
Examples
Example 21.26. mysql_db_query
alternative example
<?php
if (!$link = mysql_connect('mysql_host', 'mysql_user', 'mysql_password')) {
echo 'Could not connect to mysql';
exit;
}
if (!mysql_select_db('mysql_dbname', $link)) {
echo 'Could not select database';
exit;
}
$sql = 'SELECT foo FROM bar WHERE id = 42';
$result = mysql_query($sql, $link);
if (!$result) {
echo "DB Error, could not query the database\n";
echo 'MySQL Error: ' . mysql_error();
exit;
}
while ($row = mysql_fetch_assoc($result)) {
echo $row['foo'];
}
mysql_free_result($result);
?>
Notes
Be aware that this function does NOT
switch back to the database you were connected before. In
other words, you can't use this function to
temporarily run a sql query on another
database, you would have to manually switch back. Users are
strongly encouraged to use the
database.table syntax in their sql queries
or
mysql_select_db
instead of this function.
See Also
mysql_query
|
mysql_select_db
|
Copyright 1997-2010 the PHP Documentation Group.
mysql_drop_dbDrop (delete) a MySQL database
Description
bool mysql_drop_db(string database_name,
resource link_identifier);
mysql_drop_db
attempts to drop (remove) an entire database from the server
associated with the specified link identifier. This function is
deprecated, it is preferable to use
mysql_query
to issue an sql DROP DATABASE statement
instead.
Parameters
-
database_name The name of the database that will be deleted.
-
link_identifier The MySQL connection. If the link identifier is not specified, the last link opened by
mysql_connectis assumed. If no such link is found, it will try to create one as ifmysql_connectwas called with no arguments. If no connection is found or established, anE_WARNINGlevel error is generated.
Return Values
Returns
TRUE
on success or
FALSE
on failure.
Examples
Example 21.27. mysql_drop_db
alternative example
<?php
$link = mysql_connect('localhost', 'mysql_user', 'mysql_password');
if (!$link) {
die('Could not connect: ' . mysql_error());
}
$sql = 'DROP DATABASE my_db';
if (mysql_query($sql, $link)) {
echo "Database my_db was successfully dropped\n";
} else {
echo 'Error dropping database: ' . mysql_error() . "\n";
}
?>
Notes
This function will not be available if the MySQL extension was built against a MySQL 4.x client library.
For backward compatibility, the following deprecated alias may
be used: mysql_dropdb
See Also
mysql_query
|
Copyright 1997-2010 the PHP Documentation Group.
mysql_errnoReturns the numerical value of the error message from previous MySQL operation
Description
int mysql_errno(resource link_identifier);Returns the error number from the last MySQL function.
Errors coming back from the MySQL database backend no longer
issue warnings. Instead, use
mysql_errno
to retrieve the error code. Note that this function only returns
the error code from the most recently executed MySQL function
(not including
mysql_error
and
mysql_errno),
so if you want to use it, make sure you check the value before
calling another MySQL function.
Parameters
-
link_identifier The MySQL connection. If the link identifier is not specified, the last link opened by
mysql_connectis assumed. If no such link is found, it will try to create one as ifmysql_connectwas called with no arguments. If no connection is found or established, anE_WARNINGlevel error is generated.
Return Values
Returns the error number from the last MySQL function, or
0 (zero) if no error occurred.
Examples
Example 21.28. mysql_errno
example
<?php
$link = mysql_connect("localhost", "mysql_user", "mysql_password");
if (!mysql_select_db("nonexistentdb", $link)) {
echo mysql_errno($link) . ": " . mysql_error($link). "\n";
}
mysql_select_db("kossu", $link);
if (!mysql_query("SELECT * FROM nonexistenttable", $link)) {
echo mysql_errno($link) . ": " . mysql_error($link) . "\n";
}
?>
The above example will output something similar to:
1049: Unknown database 'nonexistentdb'
1146: Table 'kossu.nonexistenttable' doesn't exist
See Also
mysql_error
|
| MySQL error codes |
Copyright 1997-2010 the PHP Documentation Group.
mysql_errorReturns the text of the error message from previous MySQL operation
Description
string mysql_error(resource link_identifier);
Returns the error text from the last MySQL function. Errors
coming back from the MySQL database backend no longer issue
warnings. Instead, use
mysql_error
to retrieve the error text. Note that this function only returns
the error text from the most recently executed MySQL function
(not including
mysql_error
and
mysql_errno),
so if you want to use it, make sure you check the value before
calling another MySQL function.
Parameters
-
link_identifier The MySQL connection. If the link identifier is not specified, the last link opened by
mysql_connectis assumed. If no such link is found, it will try to create one as ifmysql_connectwas called with no arguments. If no connection is found or established, anE_WARNINGlevel error is generated.
Return Values
Returns the error text from the last MySQL function, or
'' (empty string) if no error
occurred.
Examples
Example 21.29. mysql_error
example
<?php
$link = mysql_connect("localhost", "mysql_user", "mysql_password");
mysql_select_db("nonexistentdb", $link);
echo mysql_errno($link) . ": " . mysql_error($link). "\n";
mysql_select_db("kossu", $link);
mysql_query("SELECT * FROM nonexistenttable", $link);
echo mysql_errno($link) . ": " . mysql_error($link) . "\n";
?>
The above example will output something similar to:
1049: Unknown database 'nonexistentdb'
1146: Table 'kossu.nonexistenttable' doesn't exist
See Also
mysql_errno
|
| MySQL error codes |
Copyright 1997-2010 the PHP Documentation Group.
mysql_escape_stringEscapes a string for use in a mysql_query
Description
string mysql_escape_string(string unescaped_string);
This function will escape the
unescaped_string, so that it is safe to
place it in a
mysql_query.
This function is deprecated.
This function is identical to
mysql_real_escape_string
except that
mysql_real_escape_string
takes a connection handler and escapes the string according to
the current character set.
mysql_escape_string
does not take a connection argument and does not respect the
current charset setting.
This function has been DEPRECATED as of PHP 5.3.0. Relying on this feature is highly discouraged.
Parameters
-
unescaped_string The string that is to be escaped.
Return Values
Returns the escaped string.
Changelog
| Version | Description |
|---|---|
| 5.3.0 | This function now throws an E_DEPRECATED notice. |
| 4.3.0 | This function became deprecated, do not use this function. Instead, use
mysql_real_escape_string. |
Examples
Example 21.30. mysql_escape_string
example
<?php
$item = "Zak's Laptop";
$escaped_item = mysql_escape_string($item);
printf("Escaped string: %s\n", $escaped_item);
?>
The above example will output:
Escaped string: Zak\'s Laptop
Notes
mysql_escape_string
does not escape % and _.
See Also
mysql_real_escape_string
|
addslashes
|
| The magic_quotes_gpc directive. |
Copyright 1997-2010 the PHP Documentation Group.
mysql_fetch_arrayFetch a result row as an associative array, a numeric array, or both
Description
array mysql_fetch_array(resource result,
int result_type= =MYSQL_BOTH);Returns an array that corresponds to the fetched row and moves the internal data pointer ahead.
Parameters
-
result The result resource that is being evaluated. This result comes from a call to
mysql_query.-
result_type The type of array that is to be fetched. It's a constant and can take the following values:
MYSQL_ASSOC,MYSQL_NUM, andMYSQL_BOTH.
Return Values
Returns an array of strings that corresponds to the fetched row,
or
FALSE
if there are no more rows. The type of returned array depends on
how result_type is defined. By using
MYSQL_BOTH
(default), you'll get an array with both associative and
number indices. Using
MYSQL_ASSOC
, you only get associative indices (as
mysql_fetch_assoc
works), using
MYSQL_NUM
, you only get number indices (as
mysql_fetch_row
works).
If two or more columns of the result have the same field names, the last column will take precedence. To access the other column(s) of the same name, you must use the numeric index of the column or make an alias for the column. For aliased columns, you cannot access the contents with the original column name.
Examples
Example 21.31. Query with aliased duplicate field names
SELECT table1.field AS foo, table2.field AS bar FROM table1, table2
Example 21.32. mysql_fetch_array
with
MYSQL_NUM
<?php
mysql_connect("localhost", "mysql_user", "mysql_password") or
die("Could not connect: " . mysql_error());
mysql_select_db("mydb");
$result = mysql_query("SELECT id, name FROM mytable");
while ($row = mysql_fetch_array($result, MYSQL_NUM)) {
printf("ID: %s Name: %s", $row[0], $row[1]);
}
mysql_free_result($result);
?>
Example 21.33. mysql_fetch_array
with
MYSQL_ASSOC
<?php
mysql_connect("localhost", "mysql_user", "mysql_password") or
die("Could not connect: " . mysql_error());
mysql_select_db("mydb");
$result = mysql_query("SELECT id, name FROM mytable");
while ($row = mysql_fetch_array($result, MYSQL_ASSOC)) {
printf("ID: %s Name: %s", $row["id"], $row["name"]);
}
mysql_free_result($result);
?>
Example 21.34. mysql_fetch_array
with
MYSQL_BOTH
<?php
mysql_connect("localhost", "mysql_user", "mysql_password") or
die("Could not connect: " . mysql_error());
mysql_select_db("mydb");
$result = mysql_query("SELECT id, name FROM mytable");
while ($row = mysql_fetch_array($result, MYSQL_BOTH)) {
printf ("ID: %s Name: %s", $row[0], $row["name"]);
}
mysql_free_result($result);
?>
Notes
An important thing to note is that using
mysql_fetch_array
is not significantly slower than using
mysql_fetch_row,
while it provides a significant added value.
Field names returned by this function are case-sensitive.
This function sets NULL fields to
the PHP NULL value.
See Also
mysql_fetch_row
|
mysql_fetch_assoc
|
mysql_data_seek
|
mysql_query
|
Copyright 1997-2010 the PHP Documentation Group.
mysql_fetch_assocFetch a result row as an associative array
Description
array mysql_fetch_assoc(resource result);
Returns an associative array that corresponds to the fetched row
and moves the internal data pointer ahead.
mysql_fetch_assoc
is equivalent to calling
mysql_fetch_array
with MYSQL_ASSOC for the optional second parameter. It only
returns an associative array.
Parameters
-
result The result resource that is being evaluated. This result comes from a call to
mysql_query.
Return Values
Returns an associative array of strings that corresponds to the
fetched row, or
FALSE
if there are no more rows.
If two or more columns of the result have the same field names,
the last column will take precedence. To access the other
column(s) of the same name, you either need to access the result
with numeric indices by using
mysql_fetch_row
or add alias names. See the example at the
mysql_fetch_array
description about aliases.
Examples
Example 21.35. An expanded
mysql_fetch_assoc
example
<?php
$conn = mysql_connect("localhost", "mysql_user", "mysql_password");
if (!$conn) {
echo "Unable to connect to DB: " . mysql_error();
exit;
}
if (!mysql_select_db("mydbname")) {
echo "Unable to select mydbname: " . mysql_error();
exit;
}
$sql = "SELECT id as userid, fullname, userstatus
FROM sometable
WHERE userstatus = 1";
$result = mysql_query($sql);
if (!$result) {
echo "Could not successfully run query ($sql) from DB: " . mysql_error();
exit;
}
if (mysql_num_rows($result) == 0) {
echo "No rows found, nothing to print so am exiting";
exit;
}
// While a row of data exists, put that row in $row as an associative array
// Note: If you're expecting just one row, no need to use a loop
// Note: If you put extract($row); inside the following loop, you'll
// then create $userid, $fullname, and $userstatus
while ($row = mysql_fetch_assoc($result)) {
echo $row["userid"];
echo $row["fullname"];
echo $row["userstatus"];
}
mysql_free_result($result);
?>
Notes
An important thing to note is that using
mysql_fetch_assoc
is not significantly slower than using
mysql_fetch_row,
while it provides a significant added value.
Field names returned by this function are case-sensitive.
This function sets NULL fields to
the PHP NULL value.
See Also
mysql_fetch_row
|
mysql_fetch_array
|
mysql_data_seek
|
mysql_query
|
mysql_error
|
Copyright 1997-2010 the PHP Documentation Group.
mysql_fetch_fieldGet column information from a result and return as an object
Description
object mysql_fetch_field(resource result,
int field_offset= =0);Returns an object containing field information. This function can be used to obtain information about fields in the provided query result.
Parameters
-
result The result resource that is being evaluated. This result comes from a call to
mysql_query.-
field_offset The numerical field offset. If the field offset is not specified, the next field that was not yet retrieved by this function is retrieved. The
field_offsetstarts at0.
Return Values
Returns an object containing field information. The properties of the object are:
- name - column name
- table - name of the table the column belongs to
- max_length - maximum length of the column
-
not_null - 1 if the column cannot be
NULL - primary_key - 1 if the column is a primary key
- unique_key - 1 if the column is a unique key
- multiple_key - 1 if the column is a non-unique key
- numeric - 1 if the column is numeric
- blob - 1 if the column is a BLOB
- type - the type of the column
- unsigned - 1 if the column is unsigned
- zerofill - 1 if the column is zero-filled
Examples
Example 21.36. mysql_fetch_field
example
<?php
$conn = mysql_connect('localhost', 'mysql_user', 'mysql_password');
if (!$conn) {
die('Could not connect: ' . mysql_error());
}
mysql_select_db('database');
$result = mysql_query('select * from table');
if (!$result) {
die('Query failed: ' . mysql_error());
}
/* get column metadata */
$i = 0;
while ($i < mysql_num_fields($result)) {
echo "Information for column $i:<br />\n";
$meta = mysql_fetch_field($result, $i);
if (!$meta) {
echo "No information available<br />\n";
}
echo "<pre>
blob: $meta->blob
max_length: $meta->max_length
multiple_key: $meta->multiple_key
name: $meta->name
not_null: $meta->not_null
numeric: $meta->numeric
primary_key: $meta->primary_key
table: $meta->table
type: $meta->type
unique_key: $meta->unique_key
unsigned: $meta->unsigned
zerofill: $meta->zerofill
</pre>";
$i++;
}
mysql_free_result($result);
?>
Notes
Field names returned by this function are case-sensitive.
See Also
mysql_field_seek
|
Copyright 1997-2010 the PHP Documentation Group.
mysql_fetch_lengthsGet the length of each output in a result
Description
array mysql_fetch_lengths(resource result);Returns an array that corresponds to the lengths of each field in the last row fetched by MySQL.
mysql_fetch_lengths
stores the lengths of each result column in the last row
returned by
mysql_fetch_row,
mysql_fetch_assoc,
mysql_fetch_array,
and
mysql_fetch_object
in an array, starting at offset 0.
Parameters
-
result The result resource that is being evaluated. This result comes from a call to
mysql_query.
Return Values
An array of lengths on success or
FALSE
on failure.
Examples
Example 21.37. A
mysql_fetch_lengths
example
<?php
$result = mysql_query("SELECT id,email FROM people WHERE id = '42'");
if (!$result) {
echo 'Could not run query: ' . mysql_error();
exit;
}
$row = mysql_fetch_assoc($result);
$lengths = mysql_fetch_lengths($result);
print_r($row);
print_r($lengths);
?>
The above example will output something similar to:
Array
(
[id] => 42
[email] => user@example.com
)
Array
(
[0] => 2
[1] => 16
)
See Also
mysql_field_len
|
mysql_fetch_row
|
strlen
|
Copyright 1997-2010 the PHP Documentation Group.
mysql_fetch_objectFetch a result row as an object
Description
object mysql_fetch_object(resource result,
string class_name,
array params);Returns an object with properties that correspond to the fetched row and moves the internal data pointer ahead.
Parameters
-
result The result resource that is being evaluated. This result comes from a call to
mysql_query.-
class_name The name of the class to instantiate, set the properties of and return. If not specified, a
stdClassobject is returned.-
params An optional array of parameters to pass to the constructor for
class_nameobjects.
Return Values
Returns an object with string properties that
correspond to the fetched row, or
FALSE
if there are no more rows.
Changelog
| Version | Description |
|---|---|
| 5.0.0 | Added the ability to return as a different object. |
Examples
Example 21.38. mysql_fetch_object
example
<?php
mysql_connect("hostname", "user", "password");
mysql_select_db("mydb");
$result = mysql_query("select * from mytable");
while ($row = mysql_fetch_object($result)) {
echo $row->user_id;
echo $row->fullname;
}
mysql_free_result($result);
?>
Example 21.39. mysql_fetch_object
example
<?php
class foo {
public $name;
}
mysql_connect("hostname", "user", "password");
mysql_select_db("mydb");
$result = mysql_query("select name from mytable limit 1");
$obj = mysql_fetch_object($result, 'foo');
var_dump($obj);
?>
Notes
Speed-wise, the function is identical to
mysql_fetch_array,
and almost as quick as
mysql_fetch_row
(the difference is insignificant).
mysql_fetch_object
is similar to
mysql_fetch_array,
with one difference - an object is returned, instead of an
array. Indirectly, that means that you can only access the
data by the field names, and not by their offsets (numbers are
illegal property names).
Field names returned by this function are case-sensitive.
This function sets NULL fields to
the PHP NULL value.
See Also
mysql_fetch_array
|
mysql_fetch_assoc
|
mysql_fetch_row
|
mysql_data_seek
|
mysql_query
|
Copyright 1997-2010 the PHP Documentation Group.
mysql_fetch_rowGet a result row as an enumerated array
Description
array mysql_fetch_row(resource result);Returns a numerical array that corresponds to the fetched row and moves the internal data pointer ahead.
Parameters
-
result The result resource that is being evaluated. This result comes from a call to
mysql_query.
Return Values
Returns an numerical array of strings that corresponds to the
fetched row, or
FALSE
if there are no more rows.
mysql_fetch_row
fetches one row of data from the result associated with the
specified result identifier. The row is returned as an array.
Each result column is stored in an array offset, starting at
offset 0.
Examples
Example 21.40. Fetching one row with
mysql_fetch_row
<?php
$result = mysql_query("SELECT id,email FROM people WHERE id = '42'");
if (!$result) {
echo 'Could not run query: ' . mysql_error();
exit;
}
$row = mysql_fetch_row($result);
echo $row[0]; // 42
echo $row[1]; // the email value
?>
Notes
This function sets NULL fields to
the PHP NULL value.
See Also
mysql_fetch_array
|
mysql_fetch_assoc
|
mysql_fetch_object
|
mysql_data_seek
|
mysql_fetch_lengths
|
mysql_result
|
Copyright 1997-2010 the PHP Documentation Group.
mysql_field_flagsGet the flags associated with the specified field in a result
Description
string mysql_field_flags(resource result,
int field_offset);
mysql_field_flags
returns the field flags of the specified field. The flags are
reported as a single word per flag separated by a single space,
so that you can split the returned value using
explode.
Parameters
-
result The result resource that is being evaluated. This result comes from a call to
mysql_query.-
field_offset The numerical field offset. The
field_offsetstarts at0. Iffield_offsetdoes not exist, an error of levelE_WARNINGis also issued.
Return Values
Returns a string of flags associated with the result or
FALSE
on failure.
The following flags are reported, if your version of MySQL is
current enough to support them:
"not_null",
"primary_key",
"unique_key",
"multiple_key",
"blob",
"unsigned",
"zerofill",
"binary",
"enum",
"auto_increment" and
"timestamp".
Examples
Example 21.41. A
mysql_field_flags
example
<?php
$result = mysql_query("SELECT id,email FROM people WHERE id = '42'");
if (!$result) {
echo 'Could not run query: ' . mysql_error();
exit;
}
$flags = mysql_field_flags($result, 0);
echo $flags;
print_r(explode(' ', $flags));
?>
The above example will output something similar to:
not_null primary_key auto_increment
Array
(
[0] => not_null
[1] => primary_key
[2] => auto_increment
)
Notes
For backward compatibility, the following deprecated alias may
be used: mysql_fieldflags
See Also
mysql_field_type
|
mysql_field_len
|
Copyright 1997-2010 the PHP Documentation Group.
mysql_field_lenReturns the length of the specified field
Description
int mysql_field_len(resource result,
int field_offset);
mysql_field_len
returns the length of the specified field.
Parameters
-
result The result resource that is being evaluated. This result comes from a call to
mysql_query.-
field_offset The numerical field offset. The
field_offsetstarts at0. Iffield_offsetdoes not exist, an error of levelE_WARNINGis also issued.
Return Values
The length of the specified field index on success or
FALSE
on failure.
Examples
Example 21.42. mysql_field_len
example
<?php
$result = mysql_query("SELECT id,email FROM people WHERE id = '42'");
if (!$result) {
echo 'Could not run query: ' . mysql_error();
exit;
}
// Will get the length of the id field as specified in the database
// schema.
$length = mysql_field_len($result, 0);
echo $length;
?>
Notes
For backward compatibility, the following deprecated alias may
be used: mysql_fieldlen
See Also
mysql_fetch_lengths
|
strlen
|
Copyright 1997-2010 the PHP Documentation Group.
mysql_field_nameGet the name of the specified field in a result
Description
string mysql_field_name(resource result,
int field_offset);
mysql_field_name
returns the name of the specified field index.
Parameters
-
result The result resource that is being evaluated. This result comes from a call to
mysql_query.-
field_offset The numerical field offset. The
field_offsetstarts at0. Iffield_offsetdoes not exist, an error of levelE_WARNINGis also issued.
Return Values
The name of the specified field index on success or
FALSE
on failure.
Examples
Example 21.43. mysql_field_name
example
<?php
/* The users table consists of three fields:
* user_id
* username
* password.
*/
$link = @mysql_connect('localhost', 'mysql_user', 'mysql_password');
if (!$link) {
die('Could not connect to MySQL server: ' . mysql_error());
}
$dbname = 'mydb';
$db_selected = mysql_select_db($dbname, $link);
if (!$db_selected) {
die("Could not set $dbname: " . mysql_error());
}
$res = mysql_query('select * from users', $link);
echo mysql_field_name($res, 0) . "\n";
echo mysql_field_name($res, 2);
?>
The above example will output:
user_id
password
Notes
Field names returned by this function are case-sensitive.
For backward compatibility, the following deprecated alias may
be used: mysql_fieldname
See Also
mysql_field_type
|
mysql_field_len
|
Copyright 1997-2010 the PHP Documentation Group.
mysql_field_seekSet result pointer to a specified field offset
Description
bool mysql_field_seek(resource result,
int field_offset);
Seeks to the specified field offset. If the next call to
mysql_fetch_field
doesn't include a field offset, the field offset specified
in
mysql_field_seek
will be returned.
Parameters
-
result The result resource that is being evaluated. This result comes from a call to
mysql_query.-
field_offset The numerical field offset. The
field_offsetstarts at0. Iffield_offsetdoes not exist, an error of levelE_WARNINGis also issued.
Return Values
Returns
TRUE
on success or
FALSE
on failure.
See Also
mysql_fetch_field
|
Copyright 1997-2010 the PHP Documentation Group.
mysql_field_tableGet name of the table the specified field is in
Description
string mysql_field_table(resource result,
int field_offset);Returns the name of the table that the specified field is in.
Parameters
-
result The result resource that is being evaluated. This result comes from a call to
mysql_query.-
field_offset The numerical field offset. The
field_offsetstarts at0. Iffield_offsetdoes not exist, an error of levelE_WARNINGis also issued.
Return Values
The name of the table on success.
Examples
Example 21.44. A
mysql_field_table
example
<?php
$query = "SELECT account.*, country.* FROM account, country WHERE country.name = 'Portugal' AND account.country_id = country.id";
// get the result from the DB
$result = mysql_query($query);
// Lists the table name and then the field name
for ($i = 0; $i < mysql_num_fields($result); ++$i) {
$table = mysql_field_table($result, $i);
$field = mysql_field_name($result, $i);
echo "$table: $field\n";
}
?>
Notes
For backward compatibility, the following deprecated alias may
be used: mysql_fieldtable
See Also
mysql_list_tables
|
Copyright 1997-2010 the PHP Documentation Group.
mysql_field_typeGet the type of the specified field in a result
Description
string mysql_field_type(resource result,
int field_offset);
mysql_field_type
is similar to the
mysql_field_name
function. The arguments are identical, but the field type is
returned instead.
Parameters
-
result The result resource that is being evaluated. This result comes from a call to
mysql_query.-
field_offset The numerical field offset. The
field_offsetstarts at0. Iffield_offsetdoes not exist, an error of levelE_WARNINGis also issued.
Return Values
The returned field type will be one of
"int",
"real",
"string",
"blob", and others as detailed in
the MySQL
documentation.
Examples
Example 21.45. mysql_field_type
example
<?php
mysql_connect("localhost", "mysql_username", "mysql_password");
mysql_select_db("mysql");
$result = mysql_query("SELECT * FROM func");
$fields = mysql_num_fields($result);
$rows = mysql_num_rows($result);
$table = mysql_field_table($result, 0);
echo "Your '" . $table . "' table has " . $fields . " fields and " . $rows . " record(s)\n";
echo "The table has the following fields:\n";
for ($i=0; $i < $fields; $i++) {
$type = mysql_field_type($result, $i);
$name = mysql_field_name($result, $i);
$len = mysql_field_len($result, $i);
$flags = mysql_field_flags($result, $i);
echo $type . " " . $name . " " . $len . " " . $flags . "\n";
}
mysql_free_result($result);
mysql_close();
?>
The above example will output something similar to:
Your 'func' table has 4 fields and 1 record(s)
The table has the following fields:
string name 64 not_null primary_key binary
int ret 1 not_null
string dl 128 not_null
string type 9 not_null enum
Notes
For backward compatibility, the following deprecated alias may
be used: mysql_fieldtype
See Also
mysql_field_name
|
mysql_field_len
|
Copyright 1997-2010 the PHP Documentation Group.
mysql_free_resultFree result memory
Description
bool mysql_free_result(resource result);
mysql_free_result
will free all memory associated with the result identifier
result.
mysql_free_result
only needs to be called if you are concerned about how much
memory is being used for queries that return large result sets.
All associated result memory is automatically freed at the end
of the script's execution.
Parameters
-
result The result resource that is being evaluated. This result comes from a call to
mysql_query.
Return Values
Returns
TRUE
on success or
FALSE
on failure.
If a non-resource is used for the result,
an error of level E_WARNING will be emitted. It's worth
noting that
mysql_query
only returns a resource for SELECT, SHOW, EXPLAIN,
and DESCRIBE queries.
Examples
Example 21.46. A
mysql_free_result
example
<?php
$result = mysql_query("SELECT id,email FROM people WHERE id = '42'");
if (!$result) {
echo 'Could not run query: ' . mysql_error();
exit;
}
/* Use the result, assuming we're done with it afterwards */
$row = mysql_fetch_assoc($result);
/* Now we free up the result and continue on with our script */
mysql_free_result($result);
echo $row['id'];
echo $row['email'];
?>
Notes
For backward compatibility, the following deprecated alias may
be used: mysql_freeresult
See Also
mysql_query
|
is_resource
|
Copyright 1997-2010 the PHP Documentation Group.
mysql_get_client_infoGet MySQL client info
Description
string mysql_get_client_info();
mysql_get_client_info
returns a string that represents the client library version.
Return Values
The MySQL client version.
Examples
Example 21.47. mysql_get_client_info
example
<?php
printf("MySQL client info: %s\n", mysql_get_client_info());
?>
The above example will output something similar to:
MySQL client info: 3.23.39
See Also
mysql_get_host_info
|
mysql_get_proto_info
|
mysql_get_server_info
|
Copyright 1997-2010 the PHP Documentation Group.
mysql_get_host_infoGet MySQL host info
Description
string mysql_get_host_info(resource link_identifier);Describes the type of connection in use for the connection, including the server host name.
Parameters
-
link_identifier The MySQL connection. If the link identifier is not specified, the last link opened by
mysql_connectis assumed. If no such link is found, it will try to create one as ifmysql_connectwas called with no arguments. If no connection is found or established, anE_WARNINGlevel error is generated.
Return Values
Returns a string describing the type of MySQL connection in use
for the connection or
FALSE
on failure.
Examples
Example 21.48. mysql_get_host_info
example
<?php
$link = mysql_connect('localhost', 'mysql_user', 'mysql_password');
if (!$link) {
die('Could not connect: ' . mysql_error());
}
printf("MySQL host info: %s\n", mysql_get_host_info());
?>
The above example will output something similar to:
MySQL host info: Localhost via UNIX socket
See Also
mysql_get_client_info
|
mysql_get_proto_info
|
mysql_get_server_info
|
Copyright 1997-2010 the PHP Documentation Group.
mysql_get_proto_infoGet MySQL protocol info
Description
int mysql_get_proto_info(resource link_identifier);Retrieves the MySQL protocol.
Parameters
-
link_identifier The MySQL connection. If the link identifier is not specified, the last link opened by
mysql_connectis assumed. If no such link is found, it will try to create one as ifmysql_connectwas called with no arguments. If no connection is found or established, anE_WARNINGlevel error is generated.
Return Values
Returns the MySQL protocol on success or
FALSE
on failure.
Examples
Example 21.49. mysql_get_proto_info
example
<?php
$link = mysql_connect('localhost', 'mysql_user', 'mysql_password');
if (!$link) {
die('Could not connect: ' . mysql_error());
}
printf("MySQL protocol version: %s\n", mysql_get_proto_info());
?>
The above example will output something similar to:
MySQL protocol version: 10
See Also
mysql_get_client_info
|
mysql_get_host_info
|
mysql_get_server_info
|
Copyright 1997-2010 the PHP Documentation Group.
mysql_get_server_infoGet MySQL server info
Description
string mysql_get_server_info(resource link_identifier);Retrieves the MySQL server version.
Parameters
-
link_identifier The MySQL connection. If the link identifier is not specified, the last link opened by
mysql_connectis assumed. If no such link is found, it will try to create one as ifmysql_connectwas called with no arguments. If no connection is found or established, anE_WARNINGlevel error is generated.
Return Values
Returns the MySQL server version on success or
FALSE
on failure.
Examples
Example 21.50. mysql_get_server_info
example
<?php
$link = mysql_connect('localhost', 'mysql_user', 'mysql_password');
if (!$link) {
die('Could not connect: ' . mysql_error());
}
printf("MySQL server version: %s\n", mysql_get_server_info());
?>
The above example will output something similar to:
MySQL server version: 4.0.1-alpha
See Also
mysql_get_client_info
|
mysql_get_host_info
|
mysql_get_proto_info
|
phpversion
|
Copyright 1997-2010 the PHP Documentation Group.
mysql_infoGet information about the most recent query
Description
string mysql_info(resource link_identifier);Returns detailed information about the last query.
Parameters
-
link_identifier The MySQL connection. If the link identifier is not specified, the last link opened by
mysql_connectis assumed. If no such link is found, it will try to create one as ifmysql_connectwas called with no arguments. If no connection is found or established, anE_WARNINGlevel error is generated.
Return Values
Returns information about the statement on success, or
FALSE
on failure. See the example below for which statements provide
information, and what the returned value may look like.
Statements that are not listed will return
FALSE
.
Examples
Example 21.51. Relevant MySQL Statements
Statements that return string values. The numbers are only for illustrating purpose; their values will correspond to the query.
INSERT INTO ... SELECT ...
String format: Records: 23 Duplicates: 0 Warnings: 0
INSERT INTO ... VALUES (...),(...),(...)...
String format: Records: 37 Duplicates: 0 Warnings: 0
LOAD DATA INFILE ...
String format: Records: 42 Deleted: 0 Skipped: 0 Warnings: 0
ALTER TABLE
String format: Records: 60 Duplicates: 0 Warnings: 0
UPDATE
String format: Rows matched: 65 Changed: 65 Warnings: 0
Notes
mysql_info
returns a non-
FALSE
value for the INSERT ... VALUES statement only if multiple
value lists are specified in the statement.
See Also
mysql_affected_rows
|
mysql_insert_id
|
mysql_stat
|
Copyright 1997-2010 the PHP Documentation Group.
mysql_insert_idGet the ID generated in the last query
Description
int mysql_insert_id(resource link_identifier);Retrieves the ID generated for an AUTO_INCREMENT column by the previous query (usually INSERT).
Parameters
-
link_identifier The MySQL connection. If the link identifier is not specified, the last link opened by
mysql_connectis assumed. If no such link is found, it will try to create one as ifmysql_connectwas called with no arguments. If no connection is found or established, anE_WARNINGlevel error is generated.
Return Values
The ID generated for an AUTO_INCREMENT column by the previous
query on success, 0 if the previous query
does not generate an AUTO_INCREMENT value, or
FALSE
if no MySQL connection was established.
Examples
Example 21.52. mysql_insert_id
example
<?php
$link = mysql_connect('localhost', 'mysql_user', 'mysql_password');
if (!$link) {
die('Could not connect: ' . mysql_error());
}
mysql_select_db('mydb');
mysql_query("INSERT INTO mytable (product) values ('kossu')");
printf("Last inserted record has id %d\n", mysql_insert_id());
?>
Notes
mysql_insert_id
will convert the return type of the native MySQL C API
function mysql_insert_id() to a type of
long (named int in PHP). If
your AUTO_INCREMENT column has a column type of BIGINT (64
bits) the conversion may result in an incorrect value.
Instead, use the internal MySQL SQL function LAST_INSERT_ID()
in an SQL query. For more information about PHP's maximum
integer values, please see the
integer
documentation.
Because
mysql_insert_id
acts on the last performed query, be sure to call
mysql_insert_id
immediately after the query that generates the value.
The value of the MySQL SQL function
LAST_INSERT_ID() always contains the most
recently generated AUTO_INCREMENT value, and is not reset
between queries.
See Also
mysql_query
|
mysql_info
|
Copyright 1997-2010 the PHP Documentation Group.
mysql_list_dbsList databases available on a MySQL server
Description
resource mysql_list_dbs(resource link_identifier);Returns a result pointer containing the databases available from the current mysql daemon.
Parameters
-
link_identifier The MySQL connection. If the link identifier is not specified, the last link opened by
mysql_connectis assumed. If no such link is found, it will try to create one as ifmysql_connectwas called with no arguments. If no connection is found or established, anE_WARNINGlevel error is generated.
Return Values
Returns a result pointer resource on success, or
FALSE
on failure. Use the
mysql_tablename
function to traverse this result pointer, or any function for
result tables, such as
mysql_fetch_array.
Examples
Example 21.53. mysql_list_dbs
example
<?php
$link = mysql_connect('localhost', 'mysql_user', 'mysql_password');
$db_list = mysql_list_dbs($link);
while ($row = mysql_fetch_object($db_list)) {
echo $row->Database . "\n";
}
?>
The above example will output something similar to:
database1
database2
database3
Notes
For backward compatibility, the following deprecated alias may
be used: mysql_listdbs
See Also
mysql_db_name
|
mysql_select_db
|
Copyright 1997-2010 the PHP Documentation Group.
mysql_list_fieldsList MySQL table fields
Description
resource mysql_list_fields(string database_name,
string table_name,
resource link_identifier);Retrieves information about the given table name.
This function is deprecated. It is preferable to use
mysql_query
to issue an SQL SHOW COLUMNS FROM table [LIKE
'name'] statement instead.
Parameters
-
database_name The name of the database that's being queried.
-
table_name The name of the table that's being queried.
-
link_identifier The MySQL connection. If the link identifier is not specified, the last link opened by
mysql_connectis assumed. If no such link is found, it will try to create one as ifmysql_connectwas called with no arguments. If no connection is found or established, anE_WARNINGlevel error is generated.
Return Values
A result pointer resource on success, or
FALSE
on failure.
The returned result can be used with
mysql_field_flags,
mysql_field_len,
mysql_field_name
and
mysql_field_type.
Examples
Example 21.54. Alternate to deprecated
mysql_list_fields
<?php
$result = mysql_query("SHOW COLUMNS FROM sometable");
if (!$result) {
echo 'Could not run query: ' . mysql_error();
exit;
}
if (mysql_num_rows($result) > 0) {
while ($row = mysql_fetch_assoc($result)) {
print_r($row);
}
}
?>
The above example will output something similar to:
Array
(
[Field] => id
[Type] => int(7)
[Null] =>
[Key] => PRI
[Default] =>
[Extra] => auto_increment
)
Array
(
[Field] => email
[Type] => varchar(100)
[Null] =>
[Key] =>
[Default] =>
[Extra] =>
)
Notes
For backward compatibility, the following deprecated alias may
be used: mysql_listfields
See Also
mysql_field_flags
|
mysql_info
|
Copyright 1997-2010 the PHP Documentation Group.
mysql_list_processesList MySQL processes
Description
resource mysql_list_processes(resource link_identifier);Retrieves the current MySQL server threads.
Parameters
-
link_identifier The MySQL connection. If the link identifier is not specified, the last link opened by
mysql_connectis assumed. If no such link is found, it will try to create one as ifmysql_connectwas called with no arguments. If no connection is found or established, anE_WARNINGlevel error is generated.
Return Values
A result pointer resource on success or
FALSE
on failure.
Examples
Example 21.55. mysql_list_processes
example
<?php
$link = mysql_connect('localhost', 'mysql_user', 'mysql_password');
$result = mysql_list_processes($link);
while ($row = mysql_fetch_assoc($result)){
printf("%s %s %s %s %s\n", $row["Id"], $row["Host"], $row["db"],
$row["Command"], $row["Time"]);
}
mysql_free_result($result);
?>
The above example will output something similar to:
1 localhost test Processlist 0
4 localhost mysql sleep 5
See Also
mysql_thread_id
|
mysql_stat
|
Copyright 1997-2010 the PHP Documentation Group.
mysql_list_tablesList tables in a MySQL database
Description
resource mysql_list_tables(string database,
resource link_identifier);Retrieves a list of table names from a MySQL database.
This function is deprecated. It is preferable to use
mysql_query
to issue an SQL SHOW TABLES [FROM db_name] [LIKE
'pattern'] statement instead.
Parameters
-
database The name of the database
-
link_identifier The MySQL connection. If the link identifier is not specified, the last link opened by
mysql_connectis assumed. If no such link is found, it will try to create one as ifmysql_connectwas called with no arguments. If no connection is found or established, anE_WARNINGlevel error is generated.
Return Values
A result pointer resource on success or
FALSE
on failure.
Use the
mysql_tablename
function to traverse this result pointer, or any function for
result tables, such as
mysql_fetch_array.
Changelog
| Version | Description |
|---|---|
| 4.3.7 | This function became deprecated. |
Examples
Example 21.56. mysql_list_tables
alternative example
<?php
$dbname = 'mysql_dbname';
if (!mysql_connect('mysql_host', 'mysql_user', 'mysql_password')) {
echo 'Could not connect to mysql';
exit;
}
$sql = "SHOW TABLES FROM $dbname";
$result = mysql_query($sql);
if (!$result) {
echo "DB Error, could not list tables\n";
echo 'MySQL Error: ' . mysql_error();
exit;
}
while ($row = mysql_fetch_row($result)) {
echo "Table: {$row[0]}\n";
}
mysql_free_result($result);
?>
Notes
For backward compatibility, the following deprecated alias may
be used: mysql_listtables
See Also
mysql_list_dbs
|
mysql_tablename
|
Copyright 1997-2010 the PHP Documentation Group.
mysql_num_fieldsGet number of fields in result
Description
int mysql_num_fields(resource result);Retrieves the number of fields from a query.
Parameters
-
result The result resource that is being evaluated. This result comes from a call to
mysql_query.
Return Values
Returns the number of fields in the result set
resource on success or
FALSE
on failure.
Examples
Example 21.57. A
mysql_num_fields
example
<?php
$result = mysql_query("SELECT id,email FROM people WHERE id = '42'");
if (!$result) {
echo 'Could not run query: ' . mysql_error();
exit;
}
/* returns 2 because id,email === two fields */
echo mysql_num_fields($result);
?>
Notes
For backward compatibility, the following deprecated alias may
be used: mysql_numfields
See Also
mysql_select_db
|
mysql_query
|
mysql_fetch_field
|
mysql_num_rows
|
Copyright 1997-2010 the PHP Documentation Group.
mysql_num_rowsGet number of rows in result
Description
int mysql_num_rows(resource result);
Retrieves the number of rows from a result set. This command is
only valid for statements like SELECT or SHOW that return an
actual result set. To retrieve the number of rows affected by a
INSERT, UPDATE, REPLACE or DELETE query, use
mysql_affected_rows.
Parameters
-
result The result resource that is being evaluated. This result comes from a call to
mysql_query.
Return Values
The number of rows in a result set on success or
FALSE
on failure.
Examples
Example 21.58. mysql_num_rows
example
<?php
$link = mysql_connect("localhost", "mysql_user", "mysql_password");
mysql_select_db("database", $link);
$result = mysql_query("SELECT * FROM table1", $link);
$num_rows = mysql_num_rows($result);
echo "$num_rows Rows\n";
?>
Notes
If you use
mysql_unbuffered_query,
mysql_num_rows
will not return the correct value until all the rows in the
result set have been retrieved.
For backward compatibility, the following deprecated alias may
be used: mysql_numrows
See Also
mysql_affected_rows
|
mysql_connect
|
mysql_data_seek
|
mysql_select_db
|
mysql_query
|
Copyright 1997-2010 the PHP Documentation Group.
mysql_pconnectOpen a persistent connection to a MySQL server
Description
resource mysql_pconnect(string server= =ini_get("mysql.default_host"),
string username= =ini_get("mysql.default_user"),
string password= =ini_get("mysql.default_password"),
int client_flags);Establishes a persistent connection to a MySQL server.
mysql_pconnect
acts very much like
mysql_connect
with two major differences.
First, when connecting, the function would first try to find a (persistent) link that's already open with the same host, username and password. If one is found, an identifier for it will be returned instead of opening a new connection.
Second, the connection to the SQL server will not be closed when
the execution of the script ends. Instead, the link will remain
open for future use
(mysql_close
will not close links established by
mysql_pconnect).
This type of link is therefore called 'persistent'.
Parameters
-
server The MySQL server. It can also include a port number. e.g. "hostname:port" or a path to a local socket e.g. ":/path/to/socket" for the localhost.
If the PHP directive mysql.default_host is undefined (default), then the default value is 'localhost:3306'
-
username The username. Default value is the name of the user that owns the server process.
-
password The password. Default value is an empty password.
-
client_flags The
client_flagsparameter can be a combination of the following constants: 128 (enableLOAD DATA LOCALhandling),MYSQL_CLIENT_SSL,MYSQL_CLIENT_COMPRESS,MYSQL_CLIENT_IGNORE_SPACEorMYSQL_CLIENT_INTERACTIVE.
Return Values
Returns a MySQL persistent link identifier on success, or
FALSE
on failure.
Changelog
| Version | Description |
|---|---|
| 4.3.0 | Added the client_flags parameter. |
Notes
Note, that these kind of links only work if you are using a module version of PHP. See the Persistent Database Connections section for more information.
Using persistent connections can require a bit of tuning of your Apache and MySQL configurations to ensure that you do not exceed the number of connections allowed by MySQL.
You can suppress the error message on failure by prepending a @ to the function name.
See Also
mysql_connect
|
| Persistent Database Connections |
Copyright 1997-2010 the PHP Documentation Group.
mysql_pingPing a server connection or reconnect if there is no connection
Description
bool mysql_ping(resource link_identifier);Checks whether or not the connection to the server is working. If it has gone down, an automatic reconnection is attempted. This function can be used by scripts that remain idle for a long while, to check whether or not the server has closed the connection and reconnect if necessary.
Since MySQL 5.0.13, automatic reconnection feature is disabled.
Parameters
-
link_identifier The MySQL connection. If the link identifier is not specified, the last link opened by
mysql_connectis assumed. If no such link is found, it will try to create one as ifmysql_connectwas called with no arguments. If no connection is found or established, anE_WARNINGlevel error is generated.
Return Values
Returns
TRUE
if the connection to the server MySQL server is working,
otherwise
FALSE
.
Examples
Example 21.59. A
mysql_ping
example
<?php
set_time_limit(0);
$conn = mysql_connect('localhost', 'mysqluser', 'mypass');
$db = mysql_select_db('mydb');
/* Assuming this query will take a long time */
$result = mysql_query($sql);
if (!$result) {
echo 'Query #1 failed, exiting.';
exit;
}
/* Make sure the connection is still alive, if not, try to reconnect */
if (!mysql_ping($conn)) {
echo 'Lost connection, exiting after query #1';
exit;
}
mysql_free_result($result);
/* So the connection is still alive, let's run another query */
$result2 = mysql_query($sql2);
?>
See Also
mysql_thread_id
|
mysql_list_processes
|
Copyright 1997-2010 the PHP Documentation Group.
mysql_querySend a MySQL query
Description
resource mysql_query(string query,
resource link_identifier);
mysql_query
sends a unique query (multiple queries are not supported) to the
currently active database on the server that's associated
with the specified link_identifier.
Parameters
-
query An SQL query
The query string should not end with a semicolon. Data inside the query should be properly escaped.
-
link_identifier The MySQL connection. If the link identifier is not specified, the last link opened by
mysql_connectis assumed. If no such link is found, it will try to create one as ifmysql_connectwas called with no arguments. If no connection is found or established, anE_WARNINGlevel error is generated.
Return Values
For SELECT, SHOW, DESCRIBE, EXPLAIN and other statements
returning resultset,
mysql_query
returns a resource on success, or
FALSE
on error.
For other type of SQL statements, INSERT, UPDATE, DELETE, DROP,
etc,
mysql_query
returns
TRUE
on success or
FALSE
on error.
The returned result resource should be passed to
mysql_fetch_array,
and other functions for dealing with result tables, to access
the returned data.
Use
mysql_num_rows
to find out how many rows were returned for a SELECT statement
or
mysql_affected_rows
to find out how many rows were affected by a DELETE, INSERT,
REPLACE, or UPDATE statement.
mysql_query
will also fail and return
FALSE
if the user does not have permission to access the table(s)
referenced by the query.
Examples
Example 21.60. Invalid Query
The following query is syntactically invalid, so
mysql_query
fails and returns
FALSE
.
<?php
$result = mysql_query('SELECT * WHERE 1=1');
if (!$result) {
die('Invalid query: ' . mysql_error());
}
?>
Example 21.61. Valid Query
The following query is valid, so
mysql_query
returns a resource.
<?php
// This could be supplied by a user, for example
$firstname = 'fred';
$lastname = 'fox';
// Formulate Query
// This is the best way to perform an SQL query
// For more examples, see mysql_real_escape_string()
$query = sprintf("SELECT firstname, lastname, address, age FROM friends WHERE firstname='%s' AND lastname='%s'",
mysql_real_escape_string($firstname),
mysql_real_escape_string($lastname));
// Perform Query
$result = mysql_query($query);
// Check result
// This shows the actual query sent to MySQL, and the error. Useful for debugging.
if (!$result) {
$message = 'Invalid query: ' . mysql_error() . "\n";
$message .= 'Whole query: ' . $query;
die($message);
}
// Use result
// Attempting to print $result won't allow access to information in the resource
// One of the mysql result functions must be used
// See also mysql_result(), mysql_fetch_array(), mysql_fetch_row(), etc.
while ($row = mysql_fetch_assoc($result)) {
echo $row['firstname'];
echo $row['lastname'];
echo $row['address'];
echo $row['age'];
}
// Free the resources associated with the result set
// This is done automatically at the end of the script
mysql_free_result($result);
?>
See Also
mysql_connect
|
mysql_error
|
mysql_real_escape_string
|
mysql_result
|
mysql_fetch_assoc
|
mysql_unbuffered_query
|
Copyright 1997-2010 the PHP Documentation Group.
mysql_real_escape_stringEscapes special characters in a string for use in an SQL statement
Description
string mysql_real_escape_string(string unescaped_string,
resource link_identifier);
Escapes special characters in the
unescaped_string, taking into account the
current character set of the connection so that it is safe to
place it in a
mysql_query.
If binary data is to be inserted, this function must be used.
mysql_real_escape_string
calls MySQL's library function mysql_real_escape_string,
which prepends backslashes to the following characters:
\x00, \n,
\r, \,
', " and
\x1a.
This function must always (with few exceptions) be used to make data safe before sending a query to MySQL.
Parameters
-
unescaped_string The string that is to be escaped.
-
link_identifier The MySQL connection. If the link identifier is not specified, the last link opened by
mysql_connectis assumed. If no such link is found, it will try to create one as ifmysql_connectwas called with no arguments. If no connection is found or established, anE_WARNINGlevel error is generated.
Return Values
Returns the escaped string, or
FALSE
on error.
Examples
Example 21.62. Simple
mysql_real_escape_string
example
<?php
// Connect
$link = mysql_connect('mysql_host', 'mysql_user', 'mysql_password')
OR die(mysql_error());
// Query
$query = sprintf("SELECT * FROM users WHERE user='%s' AND password='%s'",
mysql_real_escape_string($user),
mysql_real_escape_string($password));
?>
Example 21.63. An example SQL Injection Attack
<?php
// Query database to check if there are any matching users
$query = "SELECT * FROM users WHERE user='{$_POST['username']}' AND password='{$_POST['password']}'";
mysql_query($query);
// We didn't check $_POST['password'], it could be anything the user wanted! For example:
$_POST['username'] = 'aidan';
$_POST['password'] = "' OR ''='";
// This means the query sent to MySQL would be:
echo $query;
?>
The query sent to MySQL:
SELECT * FROM users WHERE user='aidan' AND password='' OR ''=''
This would allow anyone to log in without a valid password.
Notes
A MySQL connection is required before using
mysql_real_escape_string
otherwise an error of level
E_WARNING
is generated, and
FALSE
is returned. If link_identifier
isn't defined, the last MySQL connection is used.
If
magic_quotes_gpc
is enabled, first apply stripslashes to
the data. Using this function on data which has already been
escaped will escape the data twice.
If this function is not used to escape data, the query is vulnerable to SQL Injection Attacks.
mysql_real_escape_string does not escape
% and _. These are wildcards in
MySQL if combined with LIKE, GRANT,
or REVOKE.
See Also
mysql_client_encoding
|
addslashes
|
stripslashes
|
| The magic_quotes_gpc directive |
| The magic_quotes_runtime directive |
Copyright 1997-2010 the PHP Documentation Group.
mysql_resultGet result data
Description
string mysql_result(resource result,
int row,
mixed field= =0);Retrieves the contents of one cell from a MySQL result set.
When working on large result sets, you should consider using one
of the functions that fetch an entire row (specified below). As
these functions return the contents of multiple cells in one
function call, they're MUCH quicker than
mysql_result.
Also, note that specifying a numeric offset for the field
argument is much quicker than specifying a fieldname or
tablename.fieldname argument.
Parameters
-
result The result resource that is being evaluated. This result comes from a call to
mysql_query.-
row The row number from the result that's being retrieved. Row numbers start at
0.-
field The name or offset of the field being retrieved.
It can be the field's offset, the field's name, or the field's table dot field name (tablename.fieldname). If the column name has been aliased ('select foo as bar from...'), use the alias instead of the column name. If undefined, the first field is retrieved.
Return Values
The contents of one cell from a MySQL result set on success, or
FALSE
on failure.
Examples
Example 21.64. mysql_result
example
<?php
$link = mysql_connect('localhost', 'mysql_user', 'mysql_password');
if (!$link) {
die('Could not connect: ' . mysql_error());
}
if (!mysql_select_db('database_name')) {
die('Could not select database: ' . mysql_error());
}
$result = mysql_query('SELECT name FROM work.employee');
if (!$result) {
die('Could not query:' . mysql_error());
}
echo mysql_result($result, 2); // outputs third employee's name
mysql_close($link);
?>
Notes
Calls to
mysql_result
should not be mixed with calls to other functions that deal
with the result set.
See Also
mysql_fetch_row
|
mysql_fetch_array
|
mysql_fetch_assoc
|
mysql_fetch_object
|
Copyright 1997-2010 the PHP Documentation Group.
mysql_select_dbSelect a MySQL database
Description
bool mysql_select_db(string database_name,
resource link_identifier);
Sets the current active database on the server that's
associated with the specified link identifier. Every subsequent
call to
mysql_query
will be made on the active database.
Parameters
-
database_name The name of the database that is to be selected.
-
link_identifier The MySQL connection. If the link identifier is not specified, the last link opened by
mysql_connectis assumed. If no such link is found, it will try to create one as ifmysql_connectwas called with no arguments. If no connection is found or established, anE_WARNINGlevel error is generated.
Return Values
Returns
TRUE
on success or
FALSE
on failure.
Examples
Example 21.65. mysql_select_db
example
<?php
$link = mysql_connect('localhost', 'mysql_user', 'mysql_password');
if (!$link) {
die('Not connected : ' . mysql_error());
}
// make foo the current db
$db_selected = mysql_select_db('foo', $link);
if (!$db_selected) {
die ('Can\'t use foo : ' . mysql_error());
}
?>
Notes
For backward compatibility, the following deprecated alias may
be used: mysql_selectdb
See Also
mysql_connect
|
mysql_pconnect
|
mysql_query
|
Copyright 1997-2010 the PHP Documentation Group.
mysql_set_charsetSets the client character set
Description
bool mysql_set_charset(string charset,
resource link_identifier);Sets the default character set for the current connection.
Parameters
-
charset A valid character set name.
-
link_identifier The MySQL connection. If the link identifier is not specified, the last link opened by
mysql_connectis assumed. If no such link is found, it will try to create one as ifmysql_connectwas called with no arguments. If no connection is found or established, anE_WARNINGlevel error is generated.
Return Values
Returns
TRUE
on success or
FALSE
on failure.
Notes
This function requires MySQL 5.0.7 or later.
This is the preferred way to change the charset. Using
mysql_query
to execute SET NAMES .. is not recommended.
See Also
mysql_client_encoding
|
| List of character sets that MySQL supports |
Copyright 1997-2010 the PHP Documentation Group.
mysql_statGet current system status
Description
string mysql_stat(resource link_identifier);
mysql_stat
returns the current server status.
Parameters
-
link_identifier The MySQL connection. If the link identifier is not specified, the last link opened by
mysql_connectis assumed. If no such link is found, it will try to create one as ifmysql_connectwas called with no arguments. If no connection is found or established, anE_WARNINGlevel error is generated.
Return Values
Returns a string with the status for uptime, threads, queries,
open tables, flush tables and queries per second. For a complete
list of other status variables, you have to use the
SHOW STATUS SQL command. If
link_identifier is invalid,
NULL
is returned.
Examples
Example 21.66. mysql_stat
example
<?php
$link = mysql_connect('localhost', 'mysql_user', 'mysql_password');
$status = explode(' ', mysql_stat($link));
print_r($status);
?>
The above example will output something similar to:
Array
(
[0] => Uptime: 5380
[1] => Threads: 2
[2] => Questions: 1321299
[3] => Slow queries: 0
[4] => Opens: 26
[5] => Flush tables: 1
[6] => Open tables: 17
[7] => Queries per second avg: 245.595
)
Example 21.67. Alternative
mysql_stat
example
<?php
$link = mysql_connect('localhost', 'mysql_user', 'mysql_password');
$result = mysql_query('SHOW STATUS', $link);
while ($row = mysql_fetch_assoc($result)) {
echo $row['Variable_name'] . ' = ' . $row['Value'] . "\n";
}
?>
The above example will output something similar to:
back_log = 50
basedir = /usr/local/
bdb_cache_size = 8388600
bdb_log_buffer_size = 32768
bdb_home = /var/db/mysql/
bdb_max_lock = 10000
bdb_logdir =
bdb_shared_data = OFF
bdb_tmpdir = /var/tmp/
...
See Also
mysql_get_server_info
|
mysql_list_processes
|
Copyright 1997-2010 the PHP Documentation Group.
mysql_tablenameGet table name of field
Description
string mysql_tablename(resource result,
int i);
Retrieves the table name from a result.
This function is deprecated. It is preferable to use
mysql_query
to issue an SQL SHOW TABLES [FROM db_name] [LIKE
'pattern'] statement instead.
Parameters
-
result A result pointer resource that's returned from
mysql_list_tables.-
i The integer index (row/table number)
Return Values
The name of the table on success or
FALSE
on failure.
Use the
mysql_tablename
function to traverse this result pointer, or any function for
result tables, such as
mysql_fetch_array.
Examples
Example 21.68. mysql_tablename
example
<?php
mysql_connect("localhost", "mysql_user", "mysql_password");
$result = mysql_list_tables("mydb");
$num_rows = mysql_num_rows($result);
for ($i = 0; $i < $num_rows; $i++) {
echo "Table: ", mysql_tablename($result, $i), "\n";
}
mysql_free_result($result);
?>
Notes
The
mysql_num_rows
function may be used to determine the number of tables in the
result pointer.
See Also
mysql_list_tables
|
mysql_field_table
|
mysql_db_name
|
Copyright 1997-2010 the PHP Documentation Group.
mysql_thread_idReturn the current thread ID
Description
int mysql_thread_id(resource link_identifier);
Retrieves the current thread ID. If the connection is lost, and
a reconnect with
mysql_ping
is executed, the thread ID will change. This means only retrieve
the thread ID when needed.
Parameters
-
link_identifier The MySQL connection. If the link identifier is not specified, the last link opened by
mysql_connectis assumed. If no such link is found, it will try to create one as ifmysql_connectwas called with no arguments. If no connection is found or established, anE_WARNINGlevel error is generated.
Return Values
The thread ID on success or
FALSE
on failure.
Examples
Example 21.69. mysql_thread_id
example
<?php
$link = mysql_connect('localhost', 'mysql_user', 'mysql_password');
$thread_id = mysql_thread_id($link);
if ($thread_id){
printf("current thread id is %d\n", $thread_id);
}
?>
The above example will output something similar to:
current thread id is 73
See Also
mysql_ping
|
mysql_list_processes
|
Copyright 1997-2010 the PHP Documentation Group.
mysql_unbuffered_querySend an SQL query to MySQL without fetching and buffering the result rows.
Description
resource mysql_unbuffered_query(string query,
resource link_identifier);
mysql_unbuffered_query
sends the SQL query query to MySQL
without automatically fetching and buffering the result rows as
mysql_query
does. This saves a considerable amount of memory with SQL
queries that produce large result sets, and you can start
working on the result set immediately after the first row has
been retrieved as you don't have to wait until the complete
SQL query has been performed. To use
mysql_unbuffered_query
while multiple database connections are open, you must specify
the optional parameter link_identifier to
identify which connection you want to use.
Parameters
-
query The SQL query to execute.
Data inside the query should be properly escaped.
-
link_identifier The MySQL connection. If the link identifier is not specified, the last link opened by
mysql_connectis assumed. If no such link is found, it will try to create one as ifmysql_connectwas called with no arguments. If no connection is found or established, anE_WARNINGlevel error is generated.
Return Values
For SELECT, SHOW, DESCRIBE or EXPLAIN statements,
mysql_unbuffered_query
returns a resource on success, or
FALSE
on error.
For other type of SQL statements, UPDATE, DELETE, DROP, etc,
mysql_unbuffered_query
returns
TRUE
on success or
FALSE
on error.
Notes
The benefits of
mysql_unbuffered_query
come at a cost: you cannot use
mysql_num_rows
and
mysql_data_seek
on a result set returned from
mysql_unbuffered_query.
You also have to fetch all result rows from an unbuffered SQL
query before you can send a new SQL query to MySQL.
See Also
mysql_query
|
- 21.10.2.1. Examples
- 21.10.2.2. Overview
- 21.10.2.3. Installing/Configuring
- 21.10.2.4. The mysqli Extension and Persistent Connections
- 21.10.2.5. Predefined Constants
- 21.10.2.6. The MySQLi Extension Function Summary
- 21.10.2.7. The MySQLi class (
MySQLi) - 21.10.2.8. The MySQLi_STMT class (
MySQLi_STMT) - 21.10.2.9. The MySQLi_Result class (
MySQLi_Result) - 21.10.2.10. The MySQLi_Driver class (
MySQLi_Driver) - 21.10.2.11. The MySQLi_Warning class (
MySQLi_Warning) - 21.10.2.12. Aliases and deprecated Mysqli Functions
Copyright 1997-2010 the PHP Documentation Group.
The mysqli extension allows you to access the
functionality provided by MySQL 4.1 and above. More information
about the MySQL Database server can be found at
http://www.mysql.com/
An overview of software available for using MySQL from PHP can be found at Section 21.10.2.2, “Overview”
Documentation for MySQL can be found at http://dev.mysql.com/doc/.
Parts of this documentation included from MySQL manual with permissions of Oracle Corporation.
Copyright 1997-2010 the PHP Documentation Group.
All examples in the mysqli documentation use
the world database. The world database can be found at
http://downloads.mysql.com/docs/world.sql.gz
Copyright 1997-2010 the PHP Documentation Group.
This section provides an introduction to the options available to you when developing a PHP application that needs to interact with a MySQL database.
What is an API?
An Application Programming Interface, or API, defines the classes, methods, functions and variables that your application will need to call in order to carry out its desired task. In the case of PHP applications that need to communicate with databases the necessary APIs are usually exposed via PHP extensions.
APIs can be procedural or object-oriented. With a procedural API you call functions to carry out tasks, with the object-oriented API you instantiate classes and then call methods on the resulting objects. Of the two the latter is usually the preferred interface, as it is more modern and leads to better organised code.
When writing PHP applications that need to connect to the MySQL server there are several API options available. This document discusses what is available and how to select the best solution for your application.
What is a Connector?
In the MySQL documentation, the term connector refers to a piece of software that allows your application to connect to the MySQL database server. MySQL provides connectors for a variety of languages, including PHP.
If your PHP application needs to communicate with a database server you will need to write PHP code to perform such activities as connecting to the database server, querying the database and other database-related functions. Software is required to provide the API that your PHP application will use, and also handle the communication between your application and the database server, possibly using other intermediate libraries where necessary. This software is known generically as a connector, as it allows your application to connect to a database server.
What is a Driver?
A driver is a piece of software designed to communicate with a specific type of database server. The driver may also call a library, such as the MySQL Client Library or the MySQL Native Driver. These libraries implement the low-level protocol used to communicate with the MySQL database server.
By way of an example, the PHP Data Objects (PDO) database abstraction layer may use one of several database-specific drivers. One of the drivers it has available is the PDO MYSQL driver, which allows it to interface with the MySQL server.
Sometimes people use the terms connector and driver interchangeably, this can be confusing. In the MySQL-related documentation the term “driver” is reserved for software that provides the database-specific part of a connector package.
What is an Extension?
In the PHP documentation you will come across another term -
extension. The PHP code consists of a core,
with optional extensions to the core functionality. PHP's
MySQL-related extensions, such as the mysqli
extension, and the mysql extension, are
implemented using the PHP extension framework.
An extension typically exposes an API to the PHP programmer, to allow its facilities to be used programmatically. However, some extensions which use the PHP extension framework do not expose an API to the PHP programmer.
The PDO MySQL driver extension, for example, does not expose an API to the PHP programmer, but provides an interface to the PDO layer above it.
The terms API and extension should not be taken to mean the same thing, as an extension may not necessarily expose an API to the programmer.
What are the main PHP API offerings for using MySQL?
There are three main API options when considering connecting to a MySQL database server:
PHP's MySQL Extension
PHP's mysqli Extension
PHP Data Objects (PDO)
Each has its own advantages and disadvantages. The following discussion aims to give a brief introduction to the key aspects of each API.
What is PHP's MySQL Extension?
This is the original extension designed to allow you to develop
PHP applications that interact with a MySQL database. The
mysql extension provides a procedural interface
and is intended for use only with MySQL versions older than 4.1.3.
This extension can be used with versions of MySQL 4.1.3 or newer,
but not all of the latest MySQL server features will be available.
If you are using MySQL versions 4.1.3 or later it is
strongly recommended that you use the
mysqli extension instead.
The mysql extension source code is located in
the PHP extension directory ext/mysql.
For further information on the mysql extension,
see Section 21.10.1, “MySQL”.
What is PHP's mysqli Extension?
The mysqli extension, or as it is sometimes
known, the MySQL improved extension, was
developed to take advantage of new features found in MySQL systems
versions 4.1.3 and newer. The mysqli extension
is included with PHP versions 5 and later.
The mysqli extension has a number of benefits,
the key enhancements over the mysql extension
being:
Object-oriented interface
Support for Prepared Statements
Support for Multiple Statements
Support for Transactions
Enhanced debugging capabilities
Embedded server support
If you are using MySQL versions 4.1.3 or later it is strongly recommended that you use this extension.
As well as the object-oriented interface the extension also provides a procedural interface.
The mysqli extension is built using the PHP
extension framework, its source code is located in the directory
ext/mysqli.
For further information on the mysqli
extension, see Section 21.10.2, “MySQL Improved Extension (Mysqli)”.
PHP Data Objects, or PDO, is a database abstraction layer specifically for PHP applications. PDO provides a consistent API for your PHP application regardless of the type of database server your application will connect to. In theory, if you are using the PDO API, you could switch the database server you used, from say Firebird to MySQL, and only need to make minor changes to your PHP code.
Other examples of database abstraction layers include JDBC for Java applications and DBI for Perl.
While PDO has its advantages, such as a clean, simple, portable API, its main disadvantage is that it doesn't allow you to use all of the advanced features that are available in the latest versions of MySQL server. For example, PDO does not allow you to use MySQL's support for Multiple Statements.
PDO is implemented using the PHP extension framework, its source
code is located in the directory ext/pdo.
For further information on PDO, see the Section 21.10.4, “MySQL Functions (PDO_MYSQL)”.
What is the PDO MYSQL driver?
The PDO MYSQL driver is not an API as such, at least from the PHP programmer's perspective. In fact the PDO MYSQL driver sits in the layer below PDO itself and provides MySQL-specific functionality. The programmer still calls the PDO API, but PDO uses the PDO MYSQL driver to carry out communication with the MySQL server.
The PDO MYSQL driver is one of several available PDO drivers. Other PDO drivers available include those for the Firebird and PostgreSQL database servers.
The PDO MYSQL driver is implemented using the PHP extension
framework. Its source code is located in the directory
ext/pdo_mysql. It does not expose an API to
the PHP programmer.
For further information on the PDO MYSQL driver, see Section 21.10.4, “MySQL Functions (PDO_MYSQL)”.
What is PHP's MySQL Native Driver?
In order to communicate with the MySQL database server the
mysql extension, mysqli and
the PDO MYSQL driver each use a low-level library that implements
the required protocol. In the past, the only available library was
the MySQL Client Library, otherwise known as
libmysql.
However, the interface presented by libmysql
was not optimized for communication with PHP applications, as
libmysql was originally designed with C
applications in mind. For this reason the MySQL Native Driver,
mysqlnd, was developed as an alternative to
libmysql for PHP applications.
The mysql extension, the
mysqli extension and the PDO MySQL driver can
each be individually configured to use either
libmysql or mysqlnd. As
mysqlnd is designed specifically to be utilised
in the PHP system it has numerous memory and speed enhancements
over libmysql. You are strongly encouraged to
take advantage of these improvements.
The MySQL Native Driver can only be used with MySQL server versions 4.1.3 and later.
The MySQL Native Driver is implemented using the PHP extension
framework. The source code is located in
ext/mysqlnd. It does not expose an API to the
PHP programmer.
Comparison of Features
The following table compares the functionality of the three main methods of connecting to MySQL from PHP:
| PHP's mysqli Extension | PDO (Using PDO MySQL Driver and MySQL Native Driver) | PHP's MySQL Extension | |
|---|---|---|---|
| PHP version introduced | 5.0 | 5.0 | Prior to 3.0 |
| Included with PHP 5.x | yes | yes | Yes |
| MySQL development status | Active development | Active development as of PHP 5.3 | Maintenance only |
| Recommended by MySQL for new projects | Yes - preferred option | Yes | No |
| API supports Charsets | Yes | Yes | No |
| API supports server-side Prepared Statements | Yes | Yes | No |
| API supports client-side Prepared Statements | No | Yes | No |
| API supports Stored Procedures | Yes | Yes | No |
| API supports Multiple Statements | Yes | Most | No |
| Supports all MySQL 4.1+ functionality | Yes | Most | No |
Copyright 1997-2010 the PHP Documentation Group.
Copyright 1997-2010 the PHP Documentation Group.
In order to have these functions available, you must compile PHP with support for the mysqli extension.
The mysqli extension is designed to work with MySQL version 4.1.13 or newer, or 5.0.7 or newer. For previous versions, please see the MySQL extension documentation.
Copyright 1997-2010 the PHP Documentation Group.
The mysqli extension was introduced with PHP
version 5.0.0. The MySQL Native Driver was included in PHP
version 5.3.0.
Copyright 1997-2010 the PHP Documentation Group.
The common Unix distributions include binary versions of PHP that can be installed. Although these binary versions are typically built with support for MySQL extensions enabled, the extension libraries themselves may need to be installed using an additional package. Check the package manager than comes with your chosen distribution for availability.
Unless your Unix distribution comes with a binary package of
PHP with the mysqli extension available,
you will need to build PHP from source code. Building PHP from
source allows you to specify the MySQL extensions you want to
use, as well as your choice of client library for each
extension.
Copyright 1997-2010 the PHP Documentation Group.
If building from source code, to ensure that the
mysqli extension for PHP is enabled, you
will need to configure the PHP source code to use
mysqli. This is achieved by running the
configure script with the option
--with-mysqli=mysql_config_path/mysql_config,
prior to building PHP. This will enable
mysqli and it will use the MySQL Client
Library (libmysql) to communicate with the MySQL Server.
The mysql_config_path represents the
location of the mysql_config program that
comes with MySQL Server.
Copyright 1997-2010 the PHP Documentation Group.
With versions of PHP 5.3.0 and newer,
mysqli uses MySQL Native Driver by
default. This gives a number of benefits over
libmysql.
This is the recommended option, as using the MySQL Native Driver results in improved performance and gives access to features not available when using the MySQL Client Library. Refer to What is PHP's MySQL Native Driver? for a brief overview of the advantages of MySQL Native Driver.
To use MySQL Native Driver with mysqli
you need to configure the PHP source code using the
--with-mysqli=mysqlnd option, prior to
building PHP.
Note that it is possible to freely mix MySQL extensions and
client libraries. For example, it is possible to enable the
MySQL extension to use the MySQL Client Library (libmysql),
while configuring the mysqli extension to
use the MySQL Native Driver. However, all permutations of
extension and client library are possible.
The following example builds the MySQL extension to use the
MySQL Client Library, and the mysqli and
PDO MYSQL extensions to use the MySQL Native Driver:
./configure --with-mysql=/usr/bin/mysql_config \ --with-mysqli=mysqlnd \ --with-pdo-mysql=mysqlnd [other options]
Copyright 1997-2010 the PHP Documentation Group.
On Windows, PHP is most commonly installed using the binary installer.
Copyright 1997-2010 the PHP Documentation Group.
Once PHP has been installed, some configuration is required
to enable mysqli and specify the client
library you want it to use.
The mysqli extension is not enabled by
default, so the php_mysqli.dll DLL must
be enabled inside of php.ini. In order
to do this you need to find the php.ini
file (typically located in c:\php), and
make sure you remove the comment (semi-colon) from the start
of the line extension=php_mysqli.dll, in
the section marked [PHP_MYSQLI].
Also, if you want to use the MySQL Client Library with
mysqli, you need to make sure PHP can
access the client library file. The MySQL Client Library is
included as a file named libmysql.dll
in the Windows PHP distribution. This file needs to be
available in the Windows system's PATH
environment variable, so that it can be successfully loaded.
See the FAQ titled
"How
do I add my PHP directory to the PATH on
Windows" for information on how to do this.
Copying libmysql.dll to the Windows
system directory (typically
c:\Windows\system) also works, as the
system directory is by default in the system's
PATH. However, this practice is strongly
discouraged.
As with enabling any PHP extension (such as
php_mysqli.dll), the PHP directive
extension_dir
should be set to the directory where the PHP extensions are
located. See also the
Manual
Windows Installation Instructions. An example
extension_dir value for PHP 5 is
c:\php\ext.
If when starting the web server an error similar to the
following occurs: "Unable to load dynamic
library './php_mysqli.dll'", this
is because php_mysqli.dll and/or
libmysql.dll cannot be found by the
system.
Copyright 1997-2010 the PHP Documentation Group.
On Windows, for PHP versions 5.3 and newer, the
mysqli extension is enabled and uses the
MySQL Native Driver by default. This means you don't
need to worry about configuring access to
libmysql.dll.
Copyright 1997-2010 the PHP Documentation Group.
The behaviour of these functions is affected by settings in php.ini.
Table 21.7. MySQLi Configuration Options
| Name | Default | Changeable | Changelog |
|---|---|---|---|
| mysqli.allow_persistent | "1" | PHP_INI_SYSTEM | Available since PHP 5.3.0. |
| mysqli.max_persistent | "-1" | PHP_INI_SYSTEM | Available since PHP 5.3.0. |
| mysqli.max_links | "-1" | PHP_INI_SYSTEM | Available since PHP 5.0.0. |
| mysqli.default_port | "3306" | PHP_INI_ALL | Available since PHP 5.0.0. |
| mysqli.default_socket | NULL | PHP_INI_ALL | Available since PHP 5.0.0. |
| mysqli.default_host | NULL | PHP_INI_ALL | Available since PHP 5.0.0. |
| mysqli.default_user | NULL | PHP_INI_ALL | Available since PHP 5.0.0. |
| mysqli.default_pw | NULL | PHP_INI_ALL | Available since PHP 5.0.0. |
| mysqli.reconnect | "0" | PHP_INI_SYSTEM | Available since PHP 4.3.5. |
| mysqli.allow_local_infile | "1" | PHP_INI_SYSTEM | Available since PHP 5.2.4. |
| mysqli.cache_size | "2000" | PHP_INI_SYSTEM | Available since PHP 5.3.0. |
For further details and definitions of the preceding PHP_INI_* constants, see the chapter on configuration changes.
Here's a short explanation of the configuration directives.
-
mysqli.allow_persistentinteger Enable the ability to create persistent connections using
mysqli_connect.-
mysqli.max_persistentinteger Maximum of persistent connections that can be made. Set to 0 for unlimited.
-
mysqli.max_linksinteger The maximum number of MySQL connections per process.
-
mysqli.default_portinteger The default TCP port number to use when connecting to the database server if no other port is specified. If no default is specified, the port will be obtained from the
MYSQL_TCP_PORTenvironment variable, themysql-tcpentry in/etc/servicesor the compile-timeMYSQL_PORTconstant, in that order. Win32 will only use theMYSQL_PORTconstant.-
mysqli.default_socketstring The default socket name to use when connecting to a local database server if no other socket name is specified.
-
mysqli.default_hoststring The default server host to use when connecting to the database server if no other host is specified. Doesn't apply in safe mode.
-
mysqli.default_userstring The default user name to use when connecting to the database server if no other name is specified. Doesn't apply in safe mode.
-
mysqli.default_pwstring The default password to use when connecting to the database server if no other password is specified. Doesn't apply in safe mode.
-
mysqli.reconnectinteger Automatically reconnect if the connection was lost.
-
mysqli.allow_local_infileinteger -
mysqli.cache_sizeinteger Available only with mysqlnd.
Users cannot set MYSQL_OPT_READ_TIMEOUT
through an API call or runtime configuration setting. Note that
if it were possible there would be differences between how
libmysql and streams would interpret the
value of MYSQL_OPT_READ_TIMEOUT.
Copyright 1997-2010 the PHP Documentation Group.
This extension has no resource types defined.
Copyright 1997-2010 the PHP Documentation Group.
Persistent connection support was introduced in PHP 5.3 for the
mysqli extension. Support was already present
in PDO MYSQL and ext/mysql. The idea behind persistent connections
is that a connection between a client process and a database can
be reused by a client process, rather than being created and
destroyed multiple times. This reduces the overhead of creating
fresh connections every time one is required, as unused
connections are cached and ready to be reused.
Unlike the mysql extension, mysqli does not provide a separate
function for opening persistent connections. To open a persistent
connection you must prepend p: to the hostname
when connecting.
The problem with persistent connections is that they can be left in unpredictable states by clients. For example, a table lock might be activated before a client terminates unexpectedly. A new client process reusing this persistent connection will get the connection “as is”. Any cleanup would need to be done by the new client process before it could make good use of the persistent connection, increasing the burden on the programmer.
The persistent connection of the mysqli
extension however provides built-in cleanup handling code. The
cleanup carried out by mysqli includes:
Rollback active transactions
Close and drop temporary tables
Unlock tables
Reset session variables
Close prepared statements (always happens with PHP)
Close handler
Release locks acquired with
GET_LOCK
This ensures that persistent connections are in a clean state on return from the connection pool, before the client process uses them.
The mysqli extension does this cleanup by
automatically calling the C-API function
mysql_change_user().
The automatic cleanup feature has advantages and disadvantages though. The advantage is that the programmer no longer needs to worry about adding cleanup code, as it is called automatically. However, the disadvantage is that the code could potentially be a little slower, as the code to perform the cleanup needs to run each time a connection is returned from the connection pool.
It is possible to switch off the automatic cleanup code, by
compiling PHP with
MYSQLI_NO_CHANGE_USER_ON_PCONNECT
defined.
The mysqli extension supports persistent
connections when using either MySQL Native Driver or MySQL
Client Library.
Copyright 1997-2010 the PHP Documentation Group.
-
MYSQLI_READ_DEFAULT_GROUP Read options from the named group from
my.cnfor the file specified withMYSQLI_READ_DEFAULT_FILE-
MYSQLI_READ_DEFAULT_FILE Read options from the named option file instead of from
my.cnf-
MYSQLI_OPT_CONNECT_TIMEOUT Connect timeout in seconds
-
MYSQLI_OPT_LOCAL_INFILE Enables command
LOAD LOCAL INFILE-
MYSQLI_INIT_COMMAND Command to execute when connecting to MySQL server. Will automatically be re-executed when reconnecting.
-
MYSQLI_CLIENT_SSL Use SSL (encrypted protocol). This option should not be set by application programs; it is set internally in the MySQL client library
-
MYSQLI_CLIENT_COMPRESS Use compression protocol
-
MYSQLI_CLIENT_INTERACTIVE Allow
interactive_timeoutseconds (instead ofwait_timeoutseconds) of inactivity before closing the connection. The client's sessionwait_timeoutvariable will be set to the value of the sessioninteractive_timeoutvariable.-
MYSQLI_CLIENT_IGNORE_SPACE Allow spaces after function names. Makes all functions names reserved words.
-
MYSQLI_CLIENT_NO_SCHEMA Don't allow the
db_name.tbl_name.col_namesyntax.-
MYSQLI_CLIENT_MULTI_QUERIES Allows multiple semicolon-delimited queries in a single
mysqli_querycall.-
MYSQLI_STORE_RESULT For using buffered resultsets
-
MYSQLI_USE_RESULT For using unbuffered resultsets
-
MYSQLI_ASSOC Columns are returned into the array having the fieldname as the array index.
-
MYSQLI_NUM Columns are returned into the array having an enumerated index.
-
MYSQLI_BOTH Columns are returned into the array having both a numerical index and the fieldname as the associative index.
-
MYSQLI_NOT_NULL_FLAG Indicates that a field is defined as
NOT NULL-
MYSQLI_PRI_KEY_FLAG Field is part of a primary index
-
MYSQLI_UNIQUE_KEY_FLAG Field is part of a unique index.
-
MYSQLI_MULTIPLE_KEY_FLAG Field is part of an index.
-
MYSQLI_BLOB_FLAG Field is defined as
BLOB-
MYSQLI_UNSIGNED_FLAG Field is defined as
UNSIGNED-
MYSQLI_ZEROFILL_FLAG Field is defined as
ZEROFILL-
MYSQLI_AUTO_INCREMENT_FLAG Field is defined as
AUTO_INCREMENT-
MYSQLI_TIMESTAMP_FLAG Field is defined as
TIMESTAMP-
MYSQLI_SET_FLAG Field is defined as
SET-
MYSQLI_NUM_FLAG Field is defined as
NUMERIC-
MYSQLI_PART_KEY_FLAG Field is part of an multi-index
-
MYSQLI_GROUP_FLAG Field is part of
GROUP BY-
MYSQLI_TYPE_DECIMAL Field is defined as
DECIMAL-
MYSQLI_TYPE_NEWDECIMAL Precision math
DECIMALorNUMERICfield (MySQL 5.0.3 and up)-
MYSQLI_TYPE_BIT Field is defined as
BIT(MySQL 5.0.3 and up)-
MYSQLI_TYPE_TINY Field is defined as
TINYINT-
MYSQLI_TYPE_SHORT Field is defined as
SMALLINT-
MYSQLI_TYPE_LONG Field is defined as
INT-
MYSQLI_TYPE_FLOAT Field is defined as
FLOAT-
MYSQLI_TYPE_DOUBLE Field is defined as
DOUBLE-
MYSQLI_TYPE_NULL Field is defined as
DEFAULT NULL-
MYSQLI_TYPE_TIMESTAMP Field is defined as
TIMESTAMP-
MYSQLI_TYPE_LONGLONG Field is defined as
BIGINT-
MYSQLI_TYPE_INT24 Field is defined as
MEDIUMINT-
MYSQLI_TYPE_DATE Field is defined as
DATE-
MYSQLI_TYPE_TIME Field is defined as
TIME-
MYSQLI_TYPE_DATETIME Field is defined as
DATETIME-
MYSQLI_TYPE_YEAR Field is defined as
YEAR-
MYSQLI_TYPE_NEWDATE Field is defined as
DATE-
MYSQLI_TYPE_INTERVAL Field is defined as
INTERVAL-
MYSQLI_TYPE_ENUM Field is defined as
ENUM-
MYSQLI_TYPE_SET Field is defined as
SET-
MYSQLI_TYPE_TINY_BLOB Field is defined as
TINYBLOB-
MYSQLI_TYPE_MEDIUM_BLOB Field is defined as
MEDIUMBLOB-
MYSQLI_TYPE_LONG_BLOB Field is defined as
LONGBLOB-
MYSQLI_TYPE_BLOB Field is defined as
BLOB-
MYSQLI_TYPE_VAR_STRING Field is defined as
VARCHAR-
MYSQLI_TYPE_STRING Field is defined as
STRING-
MYSQLI_TYPE_CHAR Field is defined as
CHAR-
MYSQLI_TYPE_GEOMETRY Field is defined as
GEOMETRY-
MYSQLI_NEED_DATA More data available for bind variable
-
MYSQLI_NO_DATA No more data available for bind variable
-
MYSQLI_DATA_TRUNCATED Data truncation occurred. Available since PHP 5.1.0 and MySQL 5.0.5.
-
MYSQLI_ENUM_FLAG Field is defined as
ENUM. Available since PHP 5.3.0.-
MYSQLI_CURSOR_TYPE_FOR_UPDATE -
MYSQLI_CURSOR_TYPE_NO_CURSOR -
MYSQLI_CURSOR_TYPE_READ_ONLY -
MYSQLI_CURSOR_TYPE_SCROLLABLE -
MYSQLI_STMT_ATTR_CURSOR_TYPE -
MYSQLI_STMT_ATTR_PREFETCH_ROWS -
MYSQLI_STMT_ATTR_UPDATE_MAX_LENGTH -
MYSQLI_SET_CHARSET_NAME
Copyright 1997-2010 the PHP Documentation Group.
| MySQLi Class | |||
|---|---|---|---|
| OOP Interface | Procedural Interface | Alias (Do not use) | Description |
| Properties | |||
| $mysqli->affected_rows | mysqli_affected_rows | N/A | Gets the number of affected rows in a previous MySQL operation |
| $mysqli->client_info | mysqli_get_client_info | N/A | Returns the MySQL client version as a string |
| $mysqli->client_version | mysqli_get_client_version | N/A | Returns MySQL client version info as an integer |
| $mysqli->connect_errno | mysqli_connect_errno | N/A | Returns the error code from last connect call |
| $mysqli->connect_error | mysqli_connect_error | N/A | Returns a string description of the last connect error |
| $mysqli->errno | mysqli_errno | N/A | Returns the error code for the most recent function call |
| $mysqli->error | mysqli_error | N/A | Returns a string description of the last error |
| $mysqli->field_count | mysqli_field_count | N/A | Returns the number of columns for the most recent query |
| $mysqli->host_info | mysqli_get_host_info | N/A | Returns a string representing the type of connection used |
| $mysqli->protocol_version | mysqli_get_proto_info | N/A | Returns the version of the MySQL protocol used |
| $mysqli->server_info | mysqli_get_server_info | N/A | Returns the version of the MySQL server |
| $mysqli->server_version | mysqli_get_server_version | N/A | Returns the version of the MySQL server as an integer |
| $mysqli->info | mysqli_info | N/A | Retrieves information about the most recently executed query |
| $mysqli->insert_id | mysqli_insert_id | N/A | Returns the auto generated id used in the last query |
| $mysqli->sqlstate | mysqli_sqlstate | N/A | Returns the SQLSTATE error from previous MySQL operation |
| $mysqli->warning_count | mysqli_warning_count | N/A | Returns the number of warnings from the last query for the given link |
| Methods | |||
mysqli->autocommit | mysqli_autocommit | N/A | Turns on or off auto-commiting database modifications |
mysqli->change_user | mysqli_change_user | N/A | Changes the user of the specified database connection |
mysqli->character_set_name,
mysqli->client_encoding | mysqli_character_set_name | mysqli_client_encoding | Returns the default character set for the database connection |
mysqli->close | mysqli_close | N/A | Closes a previously opened database connection |
mysqli->commit | mysqli_commit | N/A | Commits the current transaction |
mysqli::__construct | mysqli_connect | N/A | Open a new connection to the MySQL server [Note: static (i.e. class) method] |
mysqli->debug | mysqli_debug | N/A | Performs debugging operations |
mysqli->dump_debug_info | mysqli_dump_debug_info | N/A | Dump debugging information into the log |
mysqli->get_charset | mysqli_get_charset | N/A | Returns a character set object |
mysqli->get_connection_stats | mysqli_get_connection_stats | N/A | Returns client connection statistics. Available only with mysqlnd. |
mysqli->get_client_info | mysqli_get_client_info | N/A | Returns the MySQL client version as a string |
mysqli->get_client_stats | mysqli_get_client_stats | N/A | Returns client per-process statistics. Available only with mysqlnd. |
mysqli->get_cache_stats | mysqli_get_cache_stats | N/A | Returns client Zval cache statistics. Available only with mysqlnd. |
mysqli->get_server_info | mysqli_get_server_info | N/A | NOT DOCUMENTED |
mysqli->get_warnings | mysqli_get_warnings | N/A | NOT DOCUMENTED |
mysqli::init | mysqli_init | N/A | Initializes MySQLi and returns a resource for use with mysqli_real_connect. [Not called on an object, as it returns a $mysqli object.] |
mysqli->kill | mysqli_kill | N/A | Asks the server to kill a MySQL thread |
mysqli->more_results | mysqli_more_results | N/A | Check if there are any more query results from a multi query |
mysqli->multi_query | mysqli_multi_query | N/A | Performs a query on the database |
mysqli->next_result | mysqli_next_result | N/A | Prepare next result from multi_query |
mysqli->options | mysqli_options | mysqli_set_opt | Set options |
mysqli->ping | mysqli_ping | N/A | Pings a server connection, or tries to reconnect if the connection has gone down |
mysqli->prepare | mysqli_prepare | N/A | Prepare an SQL statement for execution |
mysqli->query | mysqli_query | N/A | Performs a query on the database |
mysqli->real_connect | mysqli_real_connect | N/A | Opens a connection to a mysql server |
mysqli->real_escape_string,
mysqli->escape_string | mysqli_real_escape_string | mysqli_escape_string | Escapes special characters in a string for use in an SQL statement, taking into account the current charset of the connection |
mysqli->real_query | mysqli_real_query | N/A | Execute an SQL query |
mysqli->rollback | mysqli_rollback | N/A | Rolls back current transaction |
mysqli->select_db | mysqli_select_db | N/A | Selects the default database for database queries |
mysqli->set_charset | mysqli_set_charset | N/A | Sets the default client character set |
mysqli->set_local_infile_default | mysqli_set_local_infile_default | N/A | Unsets user defined handler for load local infile command |
mysqli->set_local_infile_handler | mysqli_set_local_infile_handler | N/A | Set callback function for LOAD DATA LOCAL INFILE command |
mysqli->ssl_set | mysqli_ssl_set | N/A | Used for establishing secure connections using SSL |
mysqli->stat | mysqli_stat | N/A | Gets the current system status |
mysqli->stmt_init | mysqli_stmt_init | N/A | Initializes a statement and returns an object for use with mysqli_stmt_prepare |
mysqli->store_result | mysqli_store_result | N/A | Transfers a result set from the last query |
mysqli->thread_id | mysqli_thread_id | N/A | Returns the thread ID for the current connection |
mysqli->thread_safe | mysqli_thread_safe | N/A | Returns whether thread safety is given or not |
mysqli->use_result | mysqli_use_result | N/A | Initiate a result set retrieval |
| MySQL_STMT | |||
|---|---|---|---|
| OOP Interface | Procedural Interface | Alias (Do not use) | Description |
| Properties | |||
| $mysqli_stmt->affected_rows | mysqli_stmt_affected_rows | N/A | Returns the total number of rows changed, deleted, or inserted by the last executed statement |
| $mysqli_stmt->errno | mysqli_stmt_errno | N/A | Returns the error code for the most recent statement call |
| $mysqli_stmt->error | mysqli_stmt_error | N/A | Returns a string description for last statement error |
| $mysqli_stmt->field_count | mysqli_stmt_field_count | N/A | Returns the number of field in the given statement - not documented |
| $mysqli_stmt->insert_id | mysqli_stmt_insert_id | N/A | Get the ID generated from the previous INSERT operation |
| $mysqli_stmt->num_rows | mysqli_stmt_num_rows | N/A | Return the number of rows in statements result set |
| $mysqli_stmt->param_count | mysqli_stmt_param_count | mysqli_param_count | Returns the number of parameter for the given statement |
| $mysqli_stmt->sqlstate | mysqli_stmt_sqlstate | N/A | Returns SQLSTATE error from previous statement operation |
| Methods | |||
mysqli_stmt->attr_get | mysqli_stmt_attr_get | N/A | Used to get the current value of a statement attribute |
mysqli_stmt->attr_set | mysqli_stmt_attr_set | N/A | Used to modify the behavior of a prepared statement |
mysqli_stmt->bind_param | mysqli_stmt_bind_param | mysqli_bind_param | Binds variables to a prepared statement as parameters |
mysqli_stmt->bind_result | mysqli_stmt_bind_result | mysqli_bind_result | Binds variables to a prepared statement for result storage |
mysqli_stmt->close | mysqli_stmt_close | N/A | Closes a prepared statement |
mysqli_stmt->data_seek | mysqli_stmt_data_seek | N/A | Seeks to an arbitrary row in statement result set |
mysqli_stmt->execute | mysqli_stmt_execute | mysqli_execute | Executes a prepared Query |
mysqli_stmt->fetch | mysqli_stmt_fetch | mysqli_fetch | Fetch results from a prepared statement into the bound variables |
mysqli_stmt->free_result | mysqli_stmt_free_result | N/A | Frees stored result memory for the given statement handle |
| $mysqli_stmt->get_result() | mysqli_stmt_get_result | N/A | NOT DOCUMENTED Available only with mysqlnd. |
mysqli_stmt->get_warnings | mysqli_stmt_get_warnings | N/A | NOT DOCUMENTED |
| $mysqli_stmt->more_results() | mysqli_stmt_more_results() | N/A | NOT DOCUMENTED Available only with mysqlnd. |
| $mysqli_stmt->next_result() | mysqli_stmt_next_result() | N/A | NOT DOCUMENTED Available only with mysqlnd. |
mysqli_stmt->num_rows | mysqli_stmt_num_rows | N/A | See also property $mysqli_stmt->num_rows |
mysqli_stmt->prepare | mysqli_stmt_prepare | N/A | Prepare an SQL statement for execution |
mysqli_stmt->reset | mysqli_stmt_reset | N/A | Resets a prepared statement |
mysqli_stmt->result_metadata | mysqli_stmt_result_metadata | mysqli_get_metadata | Returns result set metadata from a prepared statement |
mysqli_stmt->send_long_data | mysqli_stmt_send_long_data | mysqli_send_long_data | Send data in blocks |
mysqli_stmt->store_result | mysqli_stmt_store_result | N/A | Transfers a result set from a prepared statement |
| MySQLi_RESULT | |||
|---|---|---|---|
| OOP Interface | Procedural Interface | Alias (Do not use) | Description |
| Properties | |||
| $mysqli_result->current_field | mysqli_field_tell | N/A | Get current field offset of a result pointer |
| $mysqli_result->field_count | mysqli_num_fields | N/A | Get the number of fields in a result |
| $mysqli_result->lengths | mysqli_fetch_lengths | N/A | Returns the lengths of the columns of the current row in the result set |
| $mysqli_result->num_rows | mysqli_num_rows | N/A | Gets the number of rows in a result |
| Methods | |||
mysqli_result->data_seek | mysqli_data_seek | N/A | Adjusts the result pointer to an arbitary row in the result |
mysqli_result->fetch_all | mysqli_fetch_all | N/A | Fetches all result rows and returns the result set as an associative array, a numeric array, or both. Available only with mysqlnd. |
mysqli_result->fetch_array | mysqli_fetch_array | N/A | Fetch a result row as an associative, a numeric array, or both |
mysqli_result->fetch_assoc | mysqli_fetch_assoc | N/A | Fetch a result row as an associative array |
mysqli_result->fetch_field_direct | mysqli_fetch_field_direct | N/A | Fetch meta-data for a single field |
mysqli_result->fetch_field | mysqli_fetch_field | N/A | Returns the next field in the result set |
mysqli_result->fetch_fields | mysqli_fetch_fields | N/A | Returns an array of objects representing the fields in a result set |
mysqli_result->fetch_object | mysqli_fetch_object | N/A | Returns the current row of a result set as an object |
mysqli_result->fetch_row | mysqli_fetch_row | N/A | Get a result row as an enumerated array |
mysqli_result->field_seek | mysqli_field_seek | N/A | Set result pointer to a specified field offset |
mysqli_result->free,
mysqli_result->close,
mysqli_result->free_result | mysqli_free_result | N/A | Frees the memory associated with a result |
| MySQL_Driver | |||
|---|---|---|---|
| OOP Interface | Procedural Interface | Alias (Do not use) | Description |
| Properties | |||
| N/A | |||
| Methods | |||
mysqli_driver->embedded_server_end | mysqli_embedded_server_end | N/A | NOT DOCUMENTED |
mysqli_driver->embedded_server_start | mysqli_embedded_server_start | N/A | NOT DOCUMENTED |
Alias functions are provided for backward compatibility purposes only. Do not use them in new projects.
- 21.10.2.7.1.
mysqli->affected_rows,mysqli_affected_rows - 21.10.2.7.2.
mysqli::autocommit,mysqli_autocommit - 21.10.2.7.3.
mysqli::change_user,mysqli_change_user - 21.10.2.7.4.
mysqli::character_set_name,mysqli_character_set_name - 21.10.2.7.5.
mysqli->client_info,mysqli_get_client_info - 21.10.2.7.6.
mysqli->client_version,mysqli_get_client_version - 21.10.2.7.7.
mysqli::close,mysqli_close - 21.10.2.7.8.
mysqli::commit,mysqli_commit - 21.10.2.7.9.
mysqli->connect_errno,mysqli_connect_errno - 21.10.2.7.10.
mysqli->connect_error,mysqli_connect_error - 21.10.2.7.11.
mysqli::__construct,mysqli_connect - 21.10.2.7.12.
mysqli::debug,mysqli_debug - 21.10.2.7.13.
mysqli::dump_debug_info,mysqli_dump_debug_info - 21.10.2.7.14.
mysqli->errno,mysqli_errno - 21.10.2.7.15.
mysqli->error,mysqli_error - 21.10.2.7.16.
mysqli->field_count,mysqli_field_count - 21.10.2.7.17.
mysqli::get_charset,mysqli_get_charset - 21.10.2.7.18.
mysqli->get_client_info,mysqli_get_client_info - 21.10.2.7.19.
mysqli->client_version,mysqli_get_client_version - 21.10.2.7.20.
mysqli::get_connection_stats,mysqli_get_connection_stats - 21.10.2.7.21.
mysqli->host_info,mysqli_get_host_info - 21.10.2.7.22.
mysqli->protocol_version,mysqli_get_proto_info - 21.10.2.7.23.
mysqli->server_info,mysqli_get_server_info - 21.10.2.7.24.
mysqli->server_version,mysqli_get_server_version - 21.10.2.7.25.
mysqli::get_warnings,mysqli_get_warnings - 21.10.2.7.26.
mysqli->info,mysqli_info - 21.10.2.7.27.
mysqli::init,mysqli_init - 21.10.2.7.28.
mysqli->insert_id,mysqli_insert_id - 21.10.2.7.29.
mysqli::kill,mysqli_kill - 21.10.2.7.30.
mysqli::more_results,mysqli_more_results - 21.10.2.7.31.
mysqli::multi_query,mysqli_multi_query - 21.10.2.7.32.
mysqli::next_result,mysqli_next_result - 21.10.2.7.33.
mysqli::options,mysqli_options - 21.10.2.7.34.
mysqli::ping,mysqli_ping - 21.10.2.7.35.
mysqli::poll,mysqli_poll - 21.10.2.7.36.
mysqli::prepare,mysqli_prepare - 21.10.2.7.37.
mysqli::query,mysqli_query - 21.10.2.7.38.
mysqli::real_connect,mysqli_real_connect - 21.10.2.7.39.
mysqli::real_escape_string,mysqli_real_escape_string - 21.10.2.7.40.
mysqli::real_query,mysqli_real_query - 21.10.2.7.41.
mysqli::reap_async_query,mysqli_reap_async_query - 21.10.2.7.42.
mysqli::rollback,mysqli_rollback - 21.10.2.7.43.
mysqli::select_db,mysqli_select_db - 21.10.2.7.44.
mysqli::set_charset,mysqli_set_charset - 21.10.2.7.45.
mysqli::set_local_infile_default,mysqli_set_local_infile_default - 21.10.2.7.46.
mysqli::set_local_infile_handler,mysqli_set_local_infile_handler - 21.10.2.7.47.
mysqli->sqlstate,mysqli_sqlstate - 21.10.2.7.48.
mysqli::ssl_set,mysqli_ssl_set - 21.10.2.7.49.
mysqli::stat,mysqli_stat - 21.10.2.7.50.
mysqli::stmt_init,mysqli_stmt_init - 21.10.2.7.51.
mysqli::store_result,mysqli_store_result - 21.10.2.7.52.
mysqli->thread_id,mysqli_thread_id - 21.10.2.7.53.
mysqli::thread_safe,mysqli_thread_safe - 21.10.2.7.54.
mysqli::use_result,mysqli_use_result - 21.10.2.7.55.
mysqli->warning_count,mysqli_warning_count
Copyright 1997-2010 the PHP Documentation Group.
Represents a connection between PHP and a MySQL database.
MySQLi {
MySQLi Propertiesint affected_rows ;string client_info ;int client_version ;string connect_errno ;string connect_error ;int errno ;string error ;int field_count ;int client_version ;string host_info ;string protocol_version ;string server_info ;int server_version ;string info ;mixed insert_id ;string sqlstate ;int thread_id ;int warning_count ;
Methodsint mysqli_affected_rows(mysqli link);bool mysqli::autocommit(bool mode);bool mysqli::change_user(string user,
string password,
string database);string mysqli::character_set_name();string mysqli_get_client_info(mysqli link);int mysqli_get_client_version(mysqli link);bool mysqli::close();bool mysqli::commit();int mysqli_connect_errno();string mysqli_connect_error();mysqli mysqli_connect(string host= =ini_get("mysqli.default_host"),
string username= =ini_get("mysqli.default_user"),
string passwd= =ini_get("mysqli.default_pw"),
string dbname= ="",
int port= =ini_get("mysqli.default_port"),
string socket= =ini_get("mysqli.default_socket"));bool mysqli::debug(string message);bool mysqli::dump_debug_info();int mysqli_errno(mysqli link);string mysqli_error(mysqli link);int mysqli_field_count(mysqli link);object mysqli::get_charset();string mysqli::get_client_info();int mysqli_get_client_version(mysqli link);bool mysqli::get_connection_stats();string mysqli_get_host_info(mysqli link);int mysqli_get_proto_info(mysqli link);string mysqli_get_server_info(mysqli link);int mysqli_get_server_version(mysqli link);mysqli_warning mysqli::get_warnings();string mysqli_info(mysqli link);mysqli mysqli::init();mixed mysqli_insert_id(mysqli link);bool mysqli::kill(int processid);bool mysqli::more_results();bool mysqli::multi_query(string query);bool mysqli::next_result();bool mysqli::options(int option,
mixed value);bool mysqli::ping();public int mysqli::poll(array read,
array error,
array reject,
int sec,
int usec);mysqli_stmt mysqli::prepare(string query);mixed mysqli::query(string query,
int resultmode);bool mysqli::real_connect(string host,
string username,
string passwd,
string dbname,
int port,
string socket,
int flags);string mysqli::escape_string(string escapestr);bool mysqli::real_query(string query);public mysqli_result mysqli::reap_async_query();bool mysqli::rollback();bool mysqli::select_db(string dbname);bool mysqli::set_charset(string charset);void mysqli_set_local_infile_default(mysqli link);bool mysqli::set_local_infile_handler(mysqli link,
callback read_func);string mysqli_sqlstate(mysqli link);bool mysqli::ssl_set(string key,
string cert,
string ca,
string capath,
string cipher);string mysqli::stat();mysqli_stmt mysqli::stmt_init();mysqli_result mysqli::store_result();int mysqli_thread_id(mysqli link);bool mysqli_thread_safe();mysqli_result mysqli::use_result();int mysqli_warning_count(mysqli link);
}
Copyright 1997-2010 the PHP Documentation Group.
mysqli->affected_rowsmysqli_affected_rowsGets the number of affected rows in a previous MySQL operation
Description
Object oriented style
mysqli {int affected_rows ;
}
Procedural style
int mysqli_affected_rows(mysqli link);
Returns the number of rows affected by the last
INSERT, UPDATE,
REPLACE or DELETE query.
For SELECT statements mysqli_affected_rows
works like mysqli_num_rows.
Parameters
-
link Procedural style only: A link identifier returned by
mysqli_connectormysqli_init
Return Values
An integer greater than zero indicates the number of rows
affected or retrieved. Zero indicates that no records where
updated for an UPDATE statement, no rows matched the
WHERE clause in the query or that no query
has yet been executed. -1 indicates that the query returned an
error.
If the number of affected rows is greater than maximal int value, the number of affected rows will be returned as a string.
Examples
Example 21.70. mysqli->affected_rows example
Object oriented style
<?php
$mysqli = new mysqli("localhost", "my_user", "my_password", "world");
/* check connection */
if (mysqli_connect_errno()) {
printf("Connect failed: %s\n", mysqli_connect_error());
exit();
}
/* Insert rows */
$mysqli->query("CREATE TABLE Language SELECT * from CountryLanguage");
printf("Affected rows (INSERT): %d\n", $mysqli->affected_rows);
$mysqli->query("ALTER TABLE Language ADD Status int default 0");
/* update rows */
$mysqli->query("UPDATE Language SET Status=1 WHERE Percentage > 50");
printf("Affected rows (UPDATE): %d\n", $mysqli->affected_rows);
/* delete rows */
$mysqli->query("DELETE FROM Language WHERE Percentage < 50");
printf("Affected rows (DELETE): %d\n", $mysqli->affected_rows);
/* select all rows */
$result = $mysqli->query("SELECT CountryCode FROM Language");
printf("Affected rows (SELECT): %d\n", $mysqli->affected_rows);
$result->close();
/* Delete table Language */
$mysqli->query("DROP TABLE Language");
/* close connection */
$mysqli->close();
?>
Procedural style
<?php
$link = mysqli_connect("localhost", "my_user", "my_password", "world");
if (!$link) {
printf("Can't connect to localhost. Error: %s\n", mysqli_connect_error());
exit();
}
/* Insert rows */
mysqli_query($link, "CREATE TABLE Language SELECT * from CountryLanguage");
printf("Affected rows (INSERT): %d\n", mysqli_affected_rows($link));
mysqli_query($link, "ALTER TABLE Language ADD Status int default 0");
/* update rows */
mysqli_query($link, "UPDATE Language SET Status=1 WHERE Percentage > 50");
printf("Affected rows (UPDATE): %d\n", mysqli_affected_rows($link));
/* delete rows */
mysqli_query($link, "DELETE FROM Language WHERE Percentage < 50");
printf("Affected rows (DELETE): %d\n", mysqli_affected_rows($link));
/* select all rows */
$result = mysqli_query($link, "SELECT CountryCode FROM Language");
printf("Affected rows (SELECT): %d\n", mysqli_affected_rows($link));
mysqli_free_result($result);
/* Delete table Language */
mysqli_query($link, "DROP TABLE Language");
/* close connection */
mysqli_close($link);
?>
The above examples will output:
Affected rows (INSERT): 984
Affected rows (UPDATE): 168
Affected rows (DELETE): 815
Affected rows (SELECT): 169
See Also
mysqli_num_rows
|
mysqli_info
|
Copyright 1997-2010 the PHP Documentation Group.
mysqli::autocommitmysqli_autocommitTurns on or off auto-commiting database modifications
Description
Object oriented style
bool mysqli::autocommit(bool mode);Procedural style
bool mysqli_autocommit(mysqli link,
bool mode);Turns on or off auto-commit mode on queries for the database connection.
To determine the current state of autocommit use the SQL command
SELECT @@autocommit.
Parameters
-
link Procedural style only: A link identifier returned by
mysqli_connectormysqli_init-
mode Whether to turn on auto-commit or not.
Return Values
Returns
TRUE
on success or
FALSE
on failure.
Notes
This function doesn't work with non transactional table types (like MyISAM or ISAM).
Examples
Example 21.71. mysqli::autocommit example
Object oriented style
<?php
$mysqli = new mysqli("localhost", "my_user", "my_password", "world");
if (mysqli_connect_errno()) {
printf("Connect failed: %s\n", mysqli_connect_error());
exit();
}
/* turn autocommit on */
$mysqli->autocommit(TRUE);
if ($result = $mysqli->query("SELECT @@autocommit")) {
$row = $result->fetch_row();
printf("Autocommit is %s\n", $row[0]);
$result->free();
}
/* close connection */
$mysqli->close();
?>
Procedural style
<?php
$link = mysqli_connect("localhost", "my_user", "my_password", "world");
if (!$link) {
printf("Can't connect to localhost. Error: %s\n", mysqli_connect_error());
exit();
}
/* turn autocommit on */
mysqli_autocommit($link, TRUE);
if ($result = mysqli_query($link, "SELECT @@autocommit")) {
$row = mysqli_fetch_row($result);
printf("Autocommit is %s\n", $row[0]);
mysqli_free_result($result);
}
/* close connection */
mysqli_close($link);
?>
The above examples will output:
Autocommit is 1
See Also
mysqli_commit
|
mysqli_rollback
|
Copyright 1997-2010 the PHP Documentation Group.
mysqli::change_usermysqli_change_userChanges the user of the specified database connection
Description
Object oriented style
bool mysqli::change_user(string user,
string password,
string database);Procedural style
bool mysqli_change_user(mysqli link,
string user,
string password,
string database);Changes the user of the specified database connection and sets the current database.
In order to successfully change users a valid
username and
password parameters must be provided and
that user must have sufficient permissions to access the desired
database. If for any reason authorization fails, the current
user authentication will remain.
Parameters
-
link Procedural style only: A link identifier returned by
mysqli_connectormysqli_init-
user The MySQL user name.
-
password The MySQL password.
-
database The database to change to.
If desired, the
NULLvalue may be passed resulting in only changing the user and not selecting a database. To select a database in this case use themysqli_select_dbfunction.
Return Values
Returns
TRUE
on success or
FALSE
on failure.
Notes
Using this command will always cause the current database connection to behave as if was a completely new database connection, regardless of if the operation was completed successfully. This reset includes performing a rollback on any active transactions, closing all temporary tables, and unlocking all locked tables.
Examples
Example 21.72. mysqli::change_user example
Object oriented style
<?php
/* connect database test */
$mysqli = new mysqli("localhost", "my_user", "my_password", "test");
/* check connection */
if (mysqli_connect_errno()) {
printf("Connect failed: %s\n", mysqli_connect_error());
exit();
}
/* Set Variable a */
$mysqli->query("SET @a:=1");
/* reset all and select a new database */
$mysqli->change_user("my_user", "my_password", "world");
if ($result = $mysqli->query("SELECT DATABASE()")) {
$row = $result->fetch_row();
printf("Default database: %s\n", $row[0]);
$result->close();
}
if ($result = $mysqli->query("SELECT @a")) {
$row = $result->fetch_row();
if ($row[0] === NULL) {
printf("Value of variable a is NULL\n");
}
$result->close();
}
/* close connection */
$mysqli->close();
?>
Procedural style
<?php
/* connect database test */
$link = mysqli_connect("localhost", "my_user", "my_password", "test");
/* check connection */
if (!$link) {
printf("Connect failed: %s\n", mysqli_connect_error());
exit();
}
/* Set Variable a */
mysqli_query($link, "SET @a:=1");
/* reset all and select a new database */
mysqli_change_user($link, "my_user", "my_password", "world");
if ($result = mysqli_query($link, "SELECT DATABASE()")) {
$row = mysqli_fetch_row($result);
printf("Default database: %s\n", $row[0]);
mysqli_free_result($result);
}
if ($result = mysqli_query($link, "SELECT @a")) {
$row = mysqli_fetch_row($result);
if ($row[0] === NULL) {
printf("Value of variable a is NULL\n");
}
mysqli_free_result($result);
}
/* close connection */
mysqli_close($link);
?>
The above examples will output:
Default database: world
Value of variable a is NULL
See Also
mysqli_connect
|
mysqli_select_db
|
Copyright 1997-2010 the PHP Documentation Group.
mysqli::character_set_namemysqli_character_set_nameReturns the default character set for the database connection
Description
Object oriented style
string mysqli::character_set_name();Procedural style
string mysqli_character_set_name(mysqli link);Returns the current character set for the database connection.
Parameters
-
link Procedural style only: A link identifier returned by
mysqli_connectormysqli_init
Return Values
The default character set for the current connection
Examples
Example 21.73. mysqli::character_set_name example
Object oriented style
<?php
/* Open a connection */
$mysqli = new mysqli("localhost", "my_user", "my_password", "world");
/* check connection */
if (mysqli_connect_errno()) {
printf("Connect failed: %s\n", mysqli_connect_error());
exit();
}
/* Print current character set */
$charset = $mysqli->character_set_name();
printf ("Current character set is %s\n", $charset);
$mysqli->close();
?>
Procedural style
<?php
/* Open a connection */
$link = mysqli_connect("localhost", "my_user", "my_password", "world");
/* check connection */
if (!$link) {
printf("Connect failed: %s\n", mysqli_connect_error());
exit();
}
/* Print current character set */
$charset = mysqli_character_set_name($link);
printf ("Current character set is %s\n",$charset);
/* close connection */
mysqli_close($link);
?>
The above examples will output:
Current character set is latin1_swedish_ci
See Also
mysqli_client_encoding
|
mysqli_real_escape_string
|
Copyright 1997-2010 the PHP Documentation Group.
mysqli->client_infomysqli_get_client_infoReturns the MySQL client version as a string
Description
Object oriented style
mysqli {string client_info ;
}
Procedural style
string mysqli_get_client_info(mysqli link);Returns a string that represents the MySQL client library version.
Return Values
A string that represents the MySQL client library version
Examples
Example 21.74. mysqli_get_client_info
<?php
/* We don't need a connection to determine
the version of mysql client library */
printf("Client library version: %s\n", mysqli_get_client_info());
?>
See Also
mysqli_get_client_version
|
mysqli_get_server_info
|
mysqli_get_server_version
|
Copyright 1997-2010 the PHP Documentation Group.
mysqli->client_versionmysqli_get_client_versionGet MySQL client info
Description
Object oriented style
mysqli {int client_version ;
}
Procedural style
int mysqli_get_client_version(mysqli link);Returns client version number as an integer.
Return Values
A number that represents the MySQL client library version in
format: main_version*10000 + minor_version *100 +
sub_version. For example, 4.1.0 is returned as 40100.
This is useful to quickly determine the version of the client library to know if some capability exits.
Examples
Example 21.75. mysqli_get_client_version
<?php
/* We don't need a connection to determine
the version of mysql client library */
printf("Client library version: %d\n", mysqli_get_client_version());
?>
See Also
mysqli_get_client_info
|
mysqli_get_server_info
|
mysqli_get_server_version
|
Copyright 1997-2010 the PHP Documentation Group.
mysqli::closemysqli_closeCloses a previously opened database connection
Description
Object oriented style
bool mysqli::close();Procedural style
bool mysqli_close(mysqli link);Closes a previously opened database connection.
Parameters
-
link Procedural style only: A link identifier returned by
mysqli_connectormysqli_init
Return Values
Returns
TRUE
on success or
FALSE
on failure.
Examples
See
mysqli_connect.
See Also
mysqli_connect
|
mysqli_init
|
mysqli_real_connect
|
Copyright 1997-2010 the PHP Documentation Group.
mysqli::commitmysqli_commitCommits the current transaction
Description
Object oriented style
bool mysqli::commit();Procedural style
bool mysqli_commit(mysqli link);Commits the current transaction for the database connection.
Parameters
-
link Procedural style only: A link identifier returned by
mysqli_connectormysqli_init
Return Values
Returns
TRUE
on success or
FALSE
on failure.
Examples
Example 21.76. mysqli::commit example
Object oriented style
<?php
$mysqli = new mysqli("localhost", "my_user", "my_password", "world");
/* check connection */
if (mysqli_connect_errno()) {
printf("Connect failed: %s\n", mysqli_connect_error());
exit();
}
$mysqli->query("CREATE TABLE Language LIKE CountryLanguage");
/* set autocommit to off */
$mysqli->autocommit(FALSE);
/* Insert some values */
$mysqli->query("INSERT INTO Language VALUES ('DEU', 'Bavarian', 'F', 11.2)");
$mysqli->query("INSERT INTO Language VALUES ('DEU', 'Swabian', 'F', 9.4)");
/* commit transaction */
$mysqli->commit();
/* drop table */
$mysqli->query("DROP TABLE Language");
/* close connection */
$mysqli->close();
?>
Procedural style
<?php
$link = mysqli_connect("localhost", "my_user", "my_password", "test");
/* check connection */
if (!$link) {
printf("Connect failed: %s\n", mysqli_connect_error());
exit();
}
/* set autocommit to off */
mysqli_autocommit($link, FALSE);
mysqli_query($link, "CREATE TABLE Language LIKE CountryLanguage");
/* Insert some values */
mysqli_query($link, "INSERT INTO Language VALUES ('DEU', 'Bavarian', 'F', 11.2)");
mysqli_query($link, "INSERT INTO Language VALUES ('DEU', 'Swabian', 'F', 9.4)");
/* commit transaction */
mysqli_commit($link);
/* close connection */
mysqli_close($link);
?>
See Also
mysqli_autocommit
|
mysqli_rollback
|
Copyright 1997-2010 the PHP Documentation Group.
mysqli->connect_errnomysqli_connect_errnoReturns the error code from last connect call
Description
Object oriented style
mysqli {string connect_errno ;
}
Procedural style
int mysqli_connect_errno();
Returns the last error code number from the last call to
mysqli_connect.
Client error message numbers are listed in the MySQL
errmsg.h header file, server error
message numbers are listed in
mysqld_error.h. In the MySQL source
distribution you can find a complete list of error messages
and error numbers in the file
Docs/mysqld_error.txt.
Return Values
An error code value for the last call to
mysqli_connect,
if it failed. zero means no error occurred.
Examples
Example 21.77. mysqli->connect_errno example
Object oriented style
<?php
$mysqli = @new mysqli('localhost', 'fake_user', 'my_password', 'my_db');
if ($mysqli->connect_errno) {
die('Connect Error: ' . $mysqli->connect_errno);
}
?>
Procedural style
<?php
$link = @mysqli_connect('localhost', 'fake_user', 'my_password', 'my_db');
if (!$link) {
die('Connect Error: ' . mysqli_connect_errno());
}
?>
The above examples will output:
Connect Error: 1045
See Also
mysqli_connect
|
mysqli_connect_error
|
mysqli_errno
|
mysqli_error
|
mysqli_sqlstate
|
Copyright 1997-2010 the PHP Documentation Group.
mysqli->connect_errormysqli_connect_errorReturns a string description of the last connect error
Description
Object oriented style
mysqli {string connect_error ;
}
Procedural style
string mysqli_connect_error();
Returns the last error message string from the last call to
mysqli_connect.
Return Values
A string that describes the error.
NULL
is returned if no error occurred.
Examples
Example 21.78. mysqli->connect_error example
Object oriented style
<?php
$mysqli = @new mysqli('localhost', 'fake_user', 'my_password', 'my_db');
// Works as of PHP 5.2.9 and 5.3.0.
if ($mysqli->connect_error) {
die('Connect Error: ' . $mysqli->connect_error);
}
?>
Procedural style
<?php
$link = @mysqli_connect('localhost', 'fake_user', 'my_password', 'my_db');
if (!$link) {
die('Connect Error: ' . mysqli_connect_error());
}
?>
The above examples will output:
Connect Error: Access denied for user 'fake_user'@'localhost' (using password: YES)
Notes
The mysqli->connect_error property only works properly as
of PHP versions 5.2.9 and 5.3.0. Use the
mysqli_connect_error function if
compatibility with earlier PHP versions is required.
See Also
mysqli_connect
|
mysqli_connect_errno
|
mysqli_errno
|
mysqli_error
|
mysqli_sqlstate
|
Copyright 1997-2010 the PHP Documentation Group.
mysqli::__constructmysqli_connectOpen a new connection to the MySQL server
Description
Object oriented style
mysqli::__construct(string host= =ini_get("mysqli.default_host"),
string username= =ini_get("mysqli.default_user"),
string passwd= =ini_get("mysqli.default_pw"),
string dbname= ="",
int port= =ini_get("mysqli.default_port"),
string socket= =ini_get("mysqli.default_socket"));Procedural style
mysqli mysqli_connect(string host= =ini_get("mysqli.default_host"),
string username= =ini_get("mysqli.default_user"),
string passwd= =ini_get("mysqli.default_pw"),
string dbname= ="",
int port= =ini_get("mysqli.default_port"),
string socket= =ini_get("mysqli.default_socket"));Opens a connection to the MySQL Server running on.
Parameters
-
host Can be either a host name or an IP address. Passing the
NULLvalue or the string "localhost" to this parameter, the local host is assumed. When possible, pipes will be used instead of the TCP/IP protocol.Prepending host by
p:opens a persistent connection.mysqli_change_useris automatically called on connections opened from the connection pool.-
username The MySQL user name.
-
passwd If not provided or
NULL, the MySQL server will attempt to authenticate the user against those user records which have no password only. This allows one username to be used with different permissions (depending on if a password as provided or not).-
dbname If provided will specify the default database to be used when performing queries.
-
port Specifies the port number to attempt to connect to the MySQL server.
-
socket Specifies the socket or named pipe that should be used.
NoteSpecifying the
socketparameter will not explicitly determine the type of connection to be used when connecting to the MySQL server. How the connection is made to the MySQL database is determined by thehostparameter.
Return Values
Returns an object which represents the connection to a MySQL Server.
Changelog
| Version | Description |
|---|---|
| 5.3.0 | Added the ability of persistent connections. |
Examples
Example 21.79. mysqli::__construct example
Object oriented style
<?php
$mysqli = new mysqli('localhost', 'my_user', 'my_password', 'my_db');
/*
* This is the "official" OO way to do it,
* BUT $connect_error was broken until PHP 5.2.9 and 5.3.0.
*/
if ($mysqli->connect_error) {
die('Connect Error (' . $mysqli->connect_errno . ') '
. $mysqli->connect_error);
}
/*
* Use this instead of $connect_error if you need to ensure
* compatibility with PHP versions prior to 5.2.9 and 5.3.0.
*/
if (mysqli_connect_error()) {
die('Connect Error (' . mysqli_connect_errno() . ') '
. mysqli_connect_error());
}
echo 'Success... ' . $mysqli->host_info . "\n";
$mysqli->close();
?>
Object oriented style when extending mysqli class
<?php
class foo_mysqli extends mysqli {
public function __construct($host, $user, $pass, $db) {
parent::__construct($host, $user, $pass, $db);
if (mysqli_connect_error()) {
die('Connect Error (' . mysqli_connect_errno() . ') '
. mysqli_connect_error());
}
}
}
$db = new foo_mysqli('localhost', 'my_user', 'my_password', 'my_db');
echo 'Success... ' . $db->host_info . "\n";
$db->close();
?>
Procedural style
<?php
$link = mysqli_connect('localhost', 'my_user', 'my_password', 'my_db');
if (!$link) {
die('Connect Error (' . mysqli_connect_errno() . ') '
. mysqli_connect_error());
}
echo 'Success... ' . mysqli_get_host_info($link) . "\n";
mysqli_close($link);
?>
The above examples will output:
Success... MySQL host info: localhost via TCP/IP
Notes
MySQLnd always assumes the server default charset. This charset is sent during connection hand-shake/authentication, which mysqlnd will use.
Libmysql uses the default charset set in the
my.cnf or by an explicit call to
mysqli_options
prior to calling mysqli_real_connect, but
after
mysqli_init.
OO syntax only: If a connection fails an object is still
returned. To check if the connection failed then use either
the mysqli_connect_error function or the
mysqli->connect_error
property as in the preceding examples.
If it is necessary to set options, such as the connection
timeout, mysqli_real_connect must be used
instead.
Calling the constructor with no parameters is the same as
calling
mysqli_init.
Error "Can't create TCP/IP socket (10106)"
usually means that the
variables_order
configure directive doesn't contain character
E. On Windows, if the environment is not
copied the SYSTEMROOT environment variable
won't be available and PHP will have problems loading
Winsock.
See Also
mysqli_real_connect
|
mysqli_options
|
mysqli_connect_errno
|
mysqli_connect_error
|
mysqli_close
|
Copyright 1997-2010 the PHP Documentation Group.
mysqli::debugmysqli_debugPerforms debugging operations
Description
Object oriented style
bool mysqli::debug(string message);Procedural style
bool mysqli_debug(string message);Performs debugging operations using the Fred Fish debugging library.
Parameters
-
message A string representing the debugging operation to perform
Return Values
Returns
TRUE
.
Notes
To use the
mysqli_debug
function you must compile the MySQL client library to support
debugging.
Examples
Example 21.80. Generating a Trace File
<?php
/* Create a trace file in '/tmp/client.trace' on the local (client) machine: */
mysqli_debug("d:t:o,/tmp/client.trace");
?>
See Also
mysqli_dump_debug_info
|
mysqli_report
|
Copyright 1997-2010 the PHP Documentation Group.
mysqli::dump_debug_infomysqli_dump_debug_infoDump debugging information into the log
Description
Object oriented style
bool mysqli::dump_debug_info();Procedural style
bool mysqli_dump_debug_info(mysqli link);This function is designed to be executed by an user with the SUPER privilege and is used to dump debugging information into the log for the MySQL Server relating to the connection.
Parameters
-
link Procedural style only: A link identifier returned by
mysqli_connectormysqli_init
Return Values
Returns
TRUE
on success or
FALSE
on failure.
See Also
mysqli_debug
|
Copyright 1997-2010 the PHP Documentation Group.
mysqli->errnomysqli_errnoReturns the error code for the most recent function call
Description
Object oriented style
mysqli {int errno ;
}
Procedural style
int mysqli_errno(mysqli link);Returns the last error code for the most recent MySQLi function call that can succeed or fail.
Client error message numbers are listed in the MySQL
errmsg.h header file, server error message
numbers are listed in mysqld_error.h. In
the MySQL source distribution you can find a complete list of
error messages and error numbers in the file
Docs/mysqld_error.txt.
Parameters
-
link Procedural style only: A link identifier returned by
mysqli_connectormysqli_init
Return Values
An error code value for the last call, if it failed. zero means no error occurred.
Examples
Example 21.81. mysqli->errno example
Object oriented style
<?php
$mysqli = new mysqli("localhost", "my_user", "my_password", "world");
/* check connection */
if (mysqli_connect_errno()) {
printf("Connect failed: %s\n", mysqli_connect_error());
exit();
}
if (!$mysqli->query("SET a=1")) {
printf("Errorcode: %d\n", $mysqli->errno);
}
/* close connection */
$mysqli->close();
?>
Procedural style
<?php
$link = mysqli_connect("localhost", "my_user", "my_password", "world");
/* check connection */
if (mysqli_connect_errno()) {
printf("Connect failed: %s\n", mysqli_connect_error());
exit();
}
if (!mysqli_query($link, "SET a=1")) {
printf("Errorcode: %d\n", mysqli_errno($link));
}
/* close connection */
mysqli_close($link);
?>
The above examples will output:
Errorcode: 1193
See Also
mysqli_connect_errno
|
mysqli_connect_error
|
mysqli_error
|
mysqli_sqlstate
|
Copyright 1997-2010 the PHP Documentation Group.
mysqli->errormysqli_errorReturns a string description of the last error
Description
Object oriented style
mysqli {string error ;
}
Procedural style
string mysqli_error(mysqli link);Returns the last error message for the most recent MySQLi function call that can succeed or fail.
Parameters
-
link Procedural style only: A link identifier returned by
mysqli_connectormysqli_init
Return Values
A string that describes the error. An empty string if no error occurred.
Examples
Example 21.82. mysqli->error example
Object oriented style
<?php
$mysqli = new mysqli("localhost", "my_user", "my_password", "world");
/* check connection */
if (mysqli_connect_errno()) {
printf("Connect failed: %s\n", mysqli_connect_error());
exit();
}
if (!$mysqli->query("SET a=1")) {
printf("Errormessage: %s\n", $mysqli->error);
}
/* close connection */
$mysqli->close();
?>
Procedural style
<?php
$link = mysqli_connect("localhost", "my_user", "my_password", "world");
/* check connection */
if (mysqli_connect_errno()) {
printf("Connect failed: %s\n", mysqli_connect_error());
exit();
}
if (!mysqli_query($link, "SET a=1")) {
printf("Errormessage: %s\n", mysqli_error($link));
}
/* close connection */
mysqli_close($link);
?>
The above examples will output:
Errormessage: Unknown system variable 'a'
See Also
mysqli_connect_errno
|
mysqli_connect_error
|
mysqli_errno
|
mysqli_sqlstate
|
Copyright 1997-2010 the PHP Documentation Group.
mysqli->field_countmysqli_field_countReturns the number of columns for the most recent query
Description
Object oriented style
mysqli_result {int field_count ;
}
Procedural style
int mysqli_field_count(mysqli link);
Returns the number of columns for the most recent query on the
connection represented by the link
parameter. This function can be useful when using the
mysqli_store_result function to determine
if the query should have produced a non-empty result set or not
without knowing the nature of the query.
Parameters
-
link Procedural style only: A link identifier returned by
mysqli_connectormysqli_init
Return Values
An integer representing the number of fields in a result set.
Examples
Example 21.83. mysqli->field_count example
Object oriented style
<?php
$mysqli = new mysqli("localhost", "my_user", "my_password", "test");
$mysqli->query( "DROP TABLE IF EXISTS friends");
$mysqli->query( "CREATE TABLE friends (id int, name varchar(20))");
$mysqli->query( "INSERT INTO friends VALUES (1,'Hartmut'), (2, 'Ulf')");
$mysqli->real_query("SELECT * FROM friends");
if ($mysqli->field_count) {
/* this was a select/show or describe query */
$result = $mysqli->store_result();
/* process resultset */
$row = $result->fetch_row();
/* free resultset */
$result->close();
}
/* close connection */
$mysqli->close();
?>
Procedural style
<?php
$link = mysqli_connect("localhost", "my_user", "my_password", "test");
mysqli_query($link, "DROP TABLE IF EXISTS friends");
mysqli_query($link, "CREATE TABLE friends (id int, name varchar(20))");
mysqli_query($link, "INSERT INTO friends VALUES (1,'Hartmut'), (2, 'Ulf')");
mysqli_real_query($link, "SELECT * FROM friends");
if (mysqli_field_count($link)) {
/* this was a select/show or describe query */
$result = mysqli_store_result($link);
/* process resultset */
$row = mysqli_fetch_row($result);
/* free resultset */
mysqli_free_result($result);
}
/* close connection */
mysqli_close($link);
?>
Copyright 1997-2010 the PHP Documentation Group.
mysqli::get_charsetmysqli_get_charsetReturns a character set object
Description
Object oriented style
object mysqli::get_charset();Procedural style
object mysqli_get_charset(mysqli link);Returns a character set object providing several properties of the current active character set.
Parameters
-
link Procedural style only: A link identifier returned by
mysqli_connectormysqli_init
Return Values
The function returns a character set object with the following properties:
-
charset Character set name
-
collation Collation name
-
dir Directory the charset description was fetched from (?) or "" for built-in character sets
-
min_length Minimum character length in bytes
-
max_length Maximum character length in bytes
-
number Internal character set number
-
state Character set status (?)
Examples
Example 21.84. mysqli::get_charset example
Object oriented style
<?php
$db = mysqli_init();
$db->real_connect("localhost","root","","test");
var_dump($db->get_charset());
?>
Procedural style
<?php $db = mysqli_init(); mysqli_real_connect($db, "localhost","root","","test"); var_dump($db->get_charset()); ?>
The above examples will output:
object(stdClass)#2 (7) {
["charset"]=>
string(6) "latin1"
["collation"]=>
string(17) "latin1_swedish_ci"
["dir"]=>
string(0) ""
["min_length"]=>
int(1)
["max_length"]=>
int(1)
["number"]=>
int(8)
["state"]=>
int(801)
}
See Also
mysqli_character_set_name
|
mysqli_set_charset
|
Copyright 1997-2010 the PHP Documentation Group.
mysqli->get_client_infomysqli_get_client_infoReturns the MySQL client version as a string
Description
Object oriented style
string mysqli::get_client_info();Procedural style
string mysqli_get_client_info(mysqli link);Returns a string that represents the MySQL client library version.
Return Values
A string that represents the MySQL client library version
Examples
Example 21.85. mysqli_get_client_info
<?php
/* We don't need a connection to determine
the version of mysql client library */
printf("Client library version: %s\n", mysqli_get_client_info());
?>
See Also
mysqli_get_client_version
|
mysqli_get_server_info
|
mysqli_get_server_version
|
Copyright 1997-2010 the PHP Documentation Group.
mysqli->client_versionmysqli_get_client_versionGet MySQL client info
Description
Object oriented style
mysqli {int client_version ;
}
Procedural style
int mysqli_get_client_version(mysqli link);Returns client version number as an integer.
Return Values
A number that represents the MySQL client library version in
format: main_version*10000 + minor_version *100 +
sub_version. For example, 4.1.0 is returned as 40100.
This is useful to quickly determine the version of the client library to know if some capability exits.
Examples
Example 21.86. mysqli_get_client_version
<?php
/* We don't need a connection to determine
the version of mysql client library */
printf("Client library version: %d\n", mysqli_get_client_version());
?>
See Also
mysqli_get_client_info
|
mysqli_get_server_info
|
mysqli_get_server_version
|
Copyright 1997-2010 the PHP Documentation Group.
mysqli::get_connection_statsmysqli_get_connection_statsReturns statistics about the client connection
Description
Object oriented style
bool mysqli::get_connection_stats();Procedural style
array mysqli_get_connection_stats(mysqli link);This function is currently not documented; only its argument list is available.
Returns statistics about the client connection. Available only with mysqlnd.
Parameters
-
link Procedural style only: A link identifier returned by
mysqli_connectormysqli_init
Return Values
Returns an array with connection stats if success,
FALSE
otherwise.
Examples
Example 21.87. A mysqli_get_connection_stats example
<?php
$link = mysqli_connect();
print_r(mysqli_get_connection_stats($link));
?>
The above example will output something similar to:
Array
(
[bytes_sent] => 43
[bytes_received] => 80
[packets_sent] => 1
[packets_received] => 2
[protocol_overhead_in] => 8
[protocol_overhead_out] => 4
[bytes_received_ok_packet] => 11
[bytes_received_eof_packet] => 0
[bytes_received_rset_header_packet] => 0
[bytes_received_rset_field_meta_packet] => 0
[bytes_received_rset_row_packet] => 0
[bytes_received_prepare_response_packet] => 0
[bytes_received_change_user_packet] => 0
[packets_sent_command] => 0
[packets_received_ok] => 1
[packets_received_eof] => 0
[packets_received_rset_header] => 0
[packets_received_rset_field_meta] => 0
[packets_received_rset_row] => 0
[packets_received_prepare_response] => 0
[packets_received_change_user] => 0
[result_set_queries] => 0
[non_result_set_queries] => 0
[no_index_used] => 0
[bad_index_used] => 0
[slow_queries] => 0
[buffered_sets] => 0
[unbuffered_sets] => 0
[ps_buffered_sets] => 0
[ps_unbuffered_sets] => 0
[flushed_normal_sets] => 0
[flushed_ps_sets] => 0
[ps_prepared_never_executed] => 0
[ps_prepared_once_executed] => 0
[rows_fetched_from_server_normal] => 0
[rows_fetched_from_server_ps] => 0
[rows_buffered_from_client_normal] => 0
[rows_buffered_from_client_ps] => 0
[rows_fetched_from_client_normal_buffered] => 0
[rows_fetched_from_client_normal_unbuffered] => 0
[rows_fetched_from_client_ps_buffered] => 0
[rows_fetched_from_client_ps_unbuffered] => 0
[rows_fetched_from_client_ps_cursor] => 0
[rows_skipped_normal] => 0
[rows_skipped_ps] => 0
[copy_on_write_saved] => 0
[copy_on_write_performed] => 0
[command_buffer_too_small] => 0
[connect_success] => 1
[connect_failure] => 0
[connection_reused] => 0
[reconnect] => 0
[pconnect_success] => 0
[active_connections] => 1
[active_persistent_connections] => 0
[explicit_close] => 0
[implicit_close] => 0
[disconnect_close] => 0
[in_middle_of_command_close] => 0
[explicit_free_result] => 0
[implicit_free_result] => 0
[explicit_stmt_close] => 0
[implicit_stmt_close] => 0
[mem_emalloc_count] => 0
[mem_emalloc_ammount] => 0
[mem_ecalloc_count] => 0
[mem_ecalloc_ammount] => 0
[mem_erealloc_count] => 0
[mem_erealloc_ammount] => 0
[mem_efree_count] => 0
[mem_malloc_count] => 0
[mem_malloc_ammount] => 0
[mem_calloc_count] => 0
[mem_calloc_ammount] => 0
[mem_realloc_count] => 0
[mem_realloc_ammount] => 0
[mem_free_count] => 0
[proto_text_fetched_null] => 0
[proto_text_fetched_bit] => 0
[proto_text_fetched_tinyint] => 0
[proto_text_fetched_short] => 0
[proto_text_fetched_int24] => 0
[proto_text_fetched_int] => 0
[proto_text_fetched_bigint] => 0
[proto_text_fetched_decimal] => 0
[proto_text_fetched_float] => 0
[proto_text_fetched_double] => 0
[proto_text_fetched_date] => 0
[proto_text_fetched_year] => 0
[proto_text_fetched_time] => 0
[proto_text_fetched_datetime] => 0
[proto_text_fetched_timestamp] => 0
[proto_text_fetched_string] => 0
[proto_text_fetched_blob] => 0
[proto_text_fetched_enum] => 0
[proto_text_fetched_set] => 0
[proto_text_fetched_geometry] => 0
[proto_text_fetched_other] => 0
[proto_binary_fetched_null] => 0
[proto_binary_fetched_bit] => 0
[proto_binary_fetched_tinyint] => 0
[proto_binary_fetched_short] => 0
[proto_binary_fetched_int24] => 0
[proto_binary_fetched_int] => 0
[proto_binary_fetched_bigint] => 0
[proto_binary_fetched_decimal] => 0
[proto_binary_fetched_float] => 0
[proto_binary_fetched_double] => 0
[proto_binary_fetched_date] => 0
[proto_binary_fetched_year] => 0
[proto_binary_fetched_time] => 0
[proto_binary_fetched_datetime] => 0
[proto_binary_fetched_timestamp] => 0
[proto_binary_fetched_string] => 0
[proto_binary_fetched_blob] => 0
[proto_binary_fetched_enum] => 0
[proto_binary_fetched_set] => 0
[proto_binary_fetched_geometry] => 0
[proto_binary_fetched_other] => 0
)
See Also
| Stats description |
Copyright 1997-2010 the PHP Documentation Group.
mysqli->host_infomysqli_get_host_infoReturns a string representing the type of connection used
Description
Object oriented style
mysqli {string host_info ;
}
Procedural style
string mysqli_get_host_info(mysqli link);
Returns a string describing the connection represented by the
link parameter (including the server host
name).
Parameters
-
link Procedural style only: A link identifier returned by
mysqli_connectormysqli_init
Return Values
A character string representing the server hostname and the connection type.
Examples
Example 21.88. mysqli->host_info example
Object oriented style
<?php
$mysqli = new mysqli("localhost", "my_user", "my_password", "world");
/* check connection */
if (mysqli_connect_errno()) {
printf("Connect failed: %s\n", mysqli_connect_error());
exit();
}
/* print host information */
printf("Host info: %s\n", $mysqli->host_info);
/* close connection */
$mysqli->close();
?>
Procedural style
<?php
$link = mysqli_connect("localhost", "my_user", "my_password", "world");
/* check connection */
if (mysqli_connect_errno()) {
printf("Connect failed: %s\n", mysqli_connect_error());
exit();
}
/* print host information */
printf("Host info: %s\n", mysqli_get_host_info($link));
/* close connection */
mysqli_close($link);
?>
The above examples will output:
Host info: Localhost via UNIX socket
See Also
mysqli_get_proto_info
|
Copyright 1997-2010 the PHP Documentation Group.
mysqli->protocol_versionmysqli_get_proto_infoReturns the version of the MySQL protocol used
Description
Object oriented style
mysqli {string protocol_version ;
}
Procedural style
int mysqli_get_proto_info(mysqli link);
Returns an integer representing the MySQL protocol version used
by the connection represented by the link
parameter.
Parameters
-
link Procedural style only: A link identifier returned by
mysqli_connectormysqli_init
Return Values
Returns an integer representing the protocol version.
Examples
Example 21.89. mysqli->protocol_version example
Object oriented style
<?php
$mysqli = new mysqli("localhost", "my_user", "my_password");
/* check connection */
if (mysqli_connect_errno()) {
printf("Connect failed: %s\n", mysqli_connect_error());
exit();
}
/* print protocol version */
printf("Protocol version: %d\n", $mysqli->protocol_version);
/* close connection */
$mysqli->close();
?>
Procedural style
<?php
$link = mysqli_connect("localhost", "my_user", "my_password");
/* check connection */
if (mysqli_connect_errno()) {
printf("Connect failed: %s\n", mysqli_connect_error());
exit();
}
/* print protocol version */
printf("Protocol version: %d\n", mysqli_get_proto_info($link));
/* close connection */
mysqli_close($link);
?>
The above examples will output:
Protocol version: 10
See Also
mysqli_get_host_info
|
Copyright 1997-2010 the PHP Documentation Group.
mysqli->server_infomysqli_get_server_infoReturns the version of the MySQL server
Description
Object oriented style
mysqli {string server_info ;
}
Procedural style
string mysqli_get_server_info(mysqli link);Returns a string representing the version of the MySQL server that the MySQLi extension is connected to.
Parameters
-
link Procedural style only: A link identifier returned by
mysqli_connectormysqli_init
Return Values
A character string representing the server version.
Examples
Example 21.90. mysqli->server_info example
Object oriented style
<?php
$mysqli = new mysqli("localhost", "my_user", "my_password");
/* check connection */
if (mysqli_connect_errno()) {
printf("Connect failed: %s\n", mysqli_connect_error());
exit();
}
/* print server version */
printf("Server version: %s\n", $mysqli->server_info);
/* close connection */
$mysqli->close();
?>
Procedural style
<?php
$link = mysqli_connect("localhost", "my_user", "my_password");
/* check connection */
if (mysqli_connect_errno()) {
printf("Connect failed: %s\n", mysqli_connect_error());
exit();
}
/* print server version */
printf("Server version: %s\n", mysqli_get_server_info($link));
/* close connection */
mysqli_close($link);
?>
The above examples will output:
Server version: 4.1.2-alpha-debug
See Also
mysqli_get_client_info
|
mysqli_get_client_version
|
mysqli_get_server_version
|
Copyright 1997-2010 the PHP Documentation Group.
mysqli->server_versionmysqli_get_server_versionReturns the version of the MySQL server as an integer
Description
Object oriented style
mysqli {int server_version ;
}
Procedural style
int mysqli_get_server_version(mysqli link);
The mysqli_get_server_version function
returns the version of the server connected to (represented by
the link parameter) as an integer.
Parameters
-
link Procedural style only: A link identifier returned by
mysqli_connectormysqli_init
Return Values
An integer representing the server version.
The form of this version number is main_version * 10000
+ minor_version * 100 + sub_version (i.e. version
4.1.0 is 40100).
Examples
Example 21.91. mysqli->server_version example
Object oriented style
<?php
$mysqli = new mysqli("localhost", "my_user", "my_password");
/* check connection */
if (mysqli_connect_errno()) {
printf("Connect failed: %s\n", mysqli_connect_error());
exit();
}
/* print server version */
printf("Server version: %d\n", $mysqli->server_version);
/* close connection */
$mysqli->close();
?>
Procedural style
<?php
$link = mysqli_connect("localhost", "my_user", "my_password");
/* check connection */
if (mysqli_connect_errno()) {
printf("Connect failed: %s\n", mysqli_connect_error());
exit();
}
/* print server version */
printf("Server version: %d\n", mysqli_get_server_version($link));
/* close connection */
mysqli_close($link);
?>
The above examples will output:
Server version: 40102
See Also
mysqli_get_client_info
|
mysqli_get_client_version
|
mysqli_get_server_info
|
Copyright 1997-2010 the PHP Documentation Group.
mysqli::get_warningsmysqli_get_warningsGet result of SHOW WARNINGS
Description
Object oriented style
mysqli_warning mysqli::get_warnings();Procedural style
mysqli_warning mysqli_get_warnings(mysqli link);This function is currently not documented; only its argument list is available.
Copyright 1997-2010 the PHP Documentation Group.
mysqli->infomysqli_infoRetrieves information about the most recently executed query
Description
Object oriented style
mysqli {string info ;
}
Procedural style
string mysqli_info(mysqli link);
The
mysqli_info
function returns a string providing information about the last
query executed. The nature of this string is provided below:
Table 21.8. Possible mysqli_info return values
| Query type | Example result string |
|---|---|
| INSERT INTO...SELECT... | Records: 100 Duplicates: 0 Warnings: 0 |
| INSERT INTO...VALUES (...),(...),(...) | Records: 3 Duplicates: 0 Warnings: 0 |
| LOAD DATA INFILE ... | Records: 1 Deleted: 0 Skipped: 0 Warnings: 0 |
| ALTER TABLE ... | Records: 3 Duplicates: 0 Warnings: 0 |
| UPDATE ... | Rows matched: 40 Changed: 40 Warnings: 0 |
Queries which do not fall into one of the preceding formats
are not supported. In these situations,
mysqli_info
will return an empty string.
Parameters
-
link Procedural style only: A link identifier returned by
mysqli_connectormysqli_init
Return Values
A character string representing additional information about the most recently executed query.
Examples
Example 21.92. mysqli->info example
Object oriented style
<?php
$mysqli = new mysqli("localhost", "my_user", "my_password", "world");
/* check connection */
if (mysqli_connect_errno()) {
printf("Connect failed: %s\n", mysqli_connect_error());
exit();
}
$mysqli->query("CREATE TEMPORARY TABLE t1 LIKE City");
/* INSERT INTO .. SELECT */
$mysqli->query("INSERT INTO t1 SELECT * FROM City ORDER BY ID LIMIT 150");
printf("%s\n", $mysqli->info);
/* close connection */
$mysqli->close();
?>
Procedural style
<?php
$link = mysqli_connect("localhost", "my_user", "my_password", "world");
/* check connection */
if (mysqli_connect_errno()) {
printf("Connect failed: %s\n", mysqli_connect_error());
exit();
}
mysqli_query($link, "CREATE TEMPORARY TABLE t1 LIKE City");
/* INSERT INTO .. SELECT */
mysqli_query($link, "INSERT INTO t1 SELECT * FROM City ORDER BY ID LIMIT 150");
printf("%s\n", mysqli_info($link));
/* close connection */
mysqli_close($link);
?>
The above examples will output:
Records: 150 Duplicates: 0 Warnings: 0
See Also
mysqli_affected_rows
|
mysqli_warning_count
|
mysqli_num_rows
|
Copyright 1997-2010 the PHP Documentation Group.
mysqli::initmysqli_initInitializes MySQLi and returns a resource for use with mysqli_real_connect()
Description
Object oriented style
mysqli mysqli::init();Procedural style
mysqli mysqli_init();
Allocates or initializes a MYSQL object suitable for
mysqli_options
and mysqli_real_connect.
Any subsequent calls to any mysqli function (except
mysqli_options)
will fail until mysqli_real_connect was
called.
Return Values
Returns an object.
Examples
See mysqli_real_connect.
See Also
mysqli_options
|
mysqli_close
|
mysqli_real_connect
|
mysqli_connect
|
Copyright 1997-2010 the PHP Documentation Group.
mysqli->insert_idmysqli_insert_idReturns the auto generated id used in the last query
Description
Object oriented style
mysqli {mixed insert_id ;
}
Procedural style
mixed mysqli_insert_id(mysqli link);
The mysqli_insert_id function returns the
ID generated by a query on a table with a column having the
AUTO_INCREMENT attribute. If the last query wasn't an
INSERT or UPDATE statement or if the modified table does not
have a column with the AUTO_INCREMENT attribute, this function
will return zero.
Performing an INSERT or UPDATE statement using the
LAST_INSERT_ID() function will also modify the value returned
by the mysqli_insert_id function.
Parameters
-
link Procedural style only: A link identifier returned by
mysqli_connectormysqli_init
Return Values
The value of the AUTO_INCREMENT field that
was updated by the previous query. Returns zero if there was no
previous query on the connection or if the query did not update
an AUTO_INCREMENT value.
If the number is greater than maximal int value,
mysqli_insert_id will return a string.
Examples
Example 21.93. mysqli->insert_id example
Object oriented style
<?php
$mysqli = new mysqli("localhost", "my_user", "my_password", "world");
/* check connection */
if (mysqli_connect_errno()) {
printf("Connect failed: %s\n", mysqli_connect_error());
exit();
}
$mysqli->query("CREATE TABLE myCity LIKE City");
$query = "INSERT INTO myCity VALUES (NULL, 'Stuttgart', 'DEU', 'Stuttgart', 617000)";
$mysqli->query($query);
printf ("New Record has id %d.\n", $mysqli->insert_id);
/* drop table */
$mysqli->query("DROP TABLE myCity");
/* close connection */
$mysqli->close();
?>
Procedural style
<?php
$link = mysqli_connect("localhost", "my_user", "my_password", "world");
/* check connection */
if (mysqli_connect_errno()) {
printf("Connect failed: %s\n", mysqli_connect_error());
exit();
}
mysqli_query($link, "CREATE TABLE myCity LIKE City");
$query = "INSERT INTO myCity VALUES (NULL, 'Stuttgart', 'DEU', 'Stuttgart', 617000)";
mysqli_query($link, $query);
printf ("New Record has id %d.\n", mysqli_insert_id($link));
/* drop table */
mysqli_query($link, "DROP TABLE myCity");
/* close connection */
mysqli_close($link);
?>
The above examples will output:
New Record has id 1.
Copyright 1997-2010 the PHP Documentation Group.
mysqli::killmysqli_killAsks the server to kill a MySQL thread
Description
Object oriented style
bool mysqli::kill(int processid);Procedural style
bool mysqli_kill(mysqli link,
int processid);
This function is used to ask the server to kill a MySQL thread
specified by the processid parameter.
This value must be retrieved by calling the
mysqli_thread_id function.
To stop a running query you should use the SQL command
KILL QUERY processid.
Parameters
-
link Procedural style only: A link identifier returned by
mysqli_connectormysqli_init
Return Values
Returns
TRUE
on success or
FALSE
on failure.
Examples
Example 21.94. mysqli::kill example
Object oriented style
<?php
$mysqli = new mysqli("localhost", "my_user", "my_password", "world");
/* check connection */
if (mysqli_connect_errno()) {
printf("Connect failed: %s\n", mysqli_connect_error());
exit();
}
/* determine our thread id */
$thread_id = $mysqli->thread_id;
/* Kill connection */
$mysqli->kill($thread_id);
/* This should produce an error */
if (!$mysqli->query("CREATE TABLE myCity LIKE City")) {
printf("Error: %s\n", $mysqli->error);
exit;
}
/* close connection */
$mysqli->close();
?>
Procedural style
<?php
$link = mysqli_connect("localhost", "my_user", "my_password", "world");
/* check connection */
if (mysqli_connect_errno()) {
printf("Connect failed: %s\n", mysqli_connect_error());
exit();
}
/* determine our thread id */
$thread_id = mysqli_thread_id($link);
/* Kill connection */
mysqli_kill($link, $thread_id);
/* This should produce an error */
if (!mysqli_query($link, "CREATE TABLE myCity LIKE City")) {
printf("Error: %s\n", mysqli_error($link));
exit;
}
/* close connection */
mysqli_close($link);
?>
The above examples will output:
Error: MySQL server has gone away
See Also
mysqli_thread_id
|
Copyright 1997-2010 the PHP Documentation Group.
mysqli::more_resultsmysqli_more_resultsCheck if there are any more query results from a multi query
Description
Object oriented style
bool mysqli::more_results();Procedural style
bool mysqli_more_results(mysqli link);
Indicates if one or more result sets are available from a
previous call to mysqli_multi_query.
Parameters
-
link Procedural style only: A link identifier returned by
mysqli_connectormysqli_init
Return Values
Returns
TRUE
on success or
FALSE
on failure.
Examples
See mysqli_multi_query.
See Also
mysqli_multi_query
|
mysqli_next_result
|
mysqli_store_result
|
mysqli_use_result
|
Copyright 1997-2010 the PHP Documentation Group.
mysqli::multi_querymysqli_multi_queryPerforms a query on the database
Description
Object oriented style
bool mysqli::multi_query(string query);Procedural style
bool mysqli_multi_query(mysqli link,
string query);Executes one or multiple queries which are concatenated by a semicolon.
To retrieve the resultset from the first query you can use
mysqli_use_result or
mysqli_store_result. All subsequent query
results can be processed using
mysqli_more_results and
mysqli_next_result.
Parameters
-
link Procedural style only: A link identifier returned by
mysqli_connectormysqli_init-
query The query, as a string.
Data inside the query should be properly escaped.
Return Values
Returns
FALSE
if the first statement failed. To retrieve subsequent errors
from other statements you have to call
mysqli_next_result first.
Examples
Example 21.95. mysqli::multi_query example
Object oriented style
<?php
$mysqli = new mysqli("localhost", "my_user", "my_password", "world");
/* check connection */
if (mysqli_connect_errno()) {
printf("Connect failed: %s\n", mysqli_connect_error());
exit();
}
$query = "SELECT CURRENT_USER();";
$query .= "SELECT Name FROM City ORDER BY ID LIMIT 20, 5";
/* execute multi query */
if ($mysqli->multi_query($query)) {
do {
/* store first result set */
if ($result = $mysqli->store_result()) {
while ($row = $result->fetch_row()) {
printf("%s\n", $row[0]);
}
$result->free();
}
/* print divider */
if ($mysqli->more_results()) {
printf("-----------------\n");
}
} while ($mysqli->next_result());
}
/* close connection */
$mysqli->close();
?>
Procedural style
<?php
$link = mysqli_connect("localhost", "my_user", "my_password", "world");
/* check connection */
if (mysqli_connect_errno()) {
printf("Connect failed: %s\n", mysqli_connect_error());
exit();
}
$query = "SELECT CURRENT_USER();";
$query .= "SELECT Name FROM City ORDER BY ID LIMIT 20, 5";
/* execute multi query */
if (mysqli_multi_query($link, $query)) {
do {
/* store first result set */
if ($result = mysqli_store_result($link)) {
while ($row = mysqli_fetch_row($result)) {
printf("%s\n", $row[0]);
}
mysqli_free_result($result);
}
/* print divider */
if (mysqli_more_results($link)) {
printf("-----------------\n");
}
} while (mysqli_next_result($link));
}
/* close connection */
mysqli_close($link);
?>
The above examples will output something similar to:
my_user@localhost
-----------------
Amersfoort
Maastricht
Dordrecht
Leiden
Haarlemmermeer
See Also
mysqli_use_result
|
mysqli_store_result
|
mysqli_next_result
|
mysqli_more_results
|
Copyright 1997-2010 the PHP Documentation Group.
mysqli::next_resultmysqli_next_resultPrepare next result from multi_query
Description
Object oriented style
bool mysqli::next_result();Procedural style
bool mysqli_next_result(mysqli link);
Prepares next result set from a previous call to
mysqli_multi_query which can be retrieved
by mysqli_store_result or
mysqli_use_result.
Parameters
-
link Procedural style only: A link identifier returned by
mysqli_connectormysqli_init
Return Values
Returns
TRUE
on success or
FALSE
on failure.
Examples
See mysqli_multi_query.
See Also
mysqli_multi_query
|
mysqli_more_results
|
mysqli_store_result
|
mysqli_use_result
|
Copyright 1997-2010 the PHP Documentation Group.
mysqli::optionsmysqli_optionsSet options
Description
Object oriented style
bool mysqli::options(int option,
mixed value);Procedural style
bool mysqli_options(mysqli link,
int option,
mixed value);Used to set extra connect options and affect behavior for a connection.
This function may be called multiple times to set several options.
mysqli_options
should be called after
mysqli_init
and before mysqli_real_connect.
Parameters
-
link Procedural style only: A link identifier returned by
mysqli_connectormysqli_init-
option The option that you want to set. It can be one of the following values:
Table 21.9. Valid options
Name Description MYSQLI_OPT_CONNECT_TIMEOUTconnection timeout in seconds (supported on Windows with TCP/IP since PHP 5.3.1) MYSQLI_OPT_LOCAL_INFILEenable/disable use of LOAD LOCAL INFILEMYSQLI_INIT_COMMANDcommand to execute after when connecting to MySQL server MYSQLI_READ_DEFAULT_FILERead options from named option file instead of my.cnfMYSQLI_READ_DEFAULT_GROUPRead options from the named group from my.cnfor the file specified withMYSQL_READ_DEFAULT_FILE.-
value The value for the option.
Return Values
Returns
TRUE
on success or
FALSE
on failure.
Examples
See mysqli_real_connect.
Notes
MySQLnd always assumes the server default charset. This charset is sent during connection hand-shake/authentication, which mysqlnd will use.
Libmysql uses the default charset set in the
my.cnf or by an explicit call to
mysqli_options
prior to calling mysqli_real_connect, but
after
mysqli_init.
See Also
mysqli_init
|
mysqli_real_connect
|
Copyright 1997-2010 the PHP Documentation Group.
mysqli::pingmysqli_pingPings a server connection, or tries to reconnect if the connection has gone down
Description
Object oriented style
bool mysqli::ping();Procedural style
bool mysqli_ping(mysqli link);Checks whether the connection to the server is working. If it has gone down, and global option mysqli.reconnect is enabled an automatic reconnection is attempted.
This function can be used by clients that remain idle for a long while, to check whether the server has closed the connection and reconnect if necessary.
Parameters
-
link Procedural style only: A link identifier returned by
mysqli_connectormysqli_init
Return Values
Returns
TRUE
on success or
FALSE
on failure.
Examples
Example 21.96. mysqli::ping example
Object oriented style
<?php
$mysqli = new mysqli("localhost", "my_user", "my_password", "world");
/* check connection */
if (mysqli_connect_errno()) {
printf("Connect failed: %s\n", mysqli_connect_error());
exit();
}
/* check if server is alive */
if ($mysqli->ping()) {
printf ("Our connection is ok!\n");
} else {
printf ("Error: %s\n", $mysqli->error);
}
/* close connection */
$mysqli->close();
?>
Procedural style
<?php
$link = mysqli_connect("localhost", "my_user", "my_password", "world");
/* check connection */
if (mysqli_connect_errno()) {
printf("Connect failed: %s\n", mysqli_connect_error());
exit();
}
/* check if server is alive */
if (mysqli_ping($link)) {
printf ("Our connection is ok!\n");
} else {
printf ("Error: %s\n", mysqli_error($link));
}
/* close connection */
mysqli_close($link);
?>
The above examples will output:
Our connection is ok!
Copyright 1997-2010 the PHP Documentation Group.
mysqli::pollmysqli_pollPoll connections
Description
Object oriented style
public int mysqli::poll(array read,
array error,
array reject,
int sec,
int usec);Procedural style
int mysqli_poll(array read,
array error,
array reject,
int sec,
int usec);This function is currently not documented; only its argument list is available.
Poll connections. Available only with mysqlnd.
Parameters
-
read -
error -
reject -
sec Number of seconds to wait, must be non-negative.
-
usec Number of microseconds to wait, must be non-negative.
Return Values
Returns number of ready connections in success,
FALSE
otherwise.
Examples
Example 21.97. A
mysqli_poll
example
<?php
$link1 = mysqli_connect();
$link1->query("SELECT 'test'", MYSQLI_ASYNC);
$all_links = array($link1);
$processed = 0;
do {
$links = $errors = $reject = array();
foreach ($all_links as $link) {
$links[] = $errors[] = $reject[] = $link;
}
if (!mysqli_poll($links, $errors, $reject, 1)) {
continue;
}
foreach ($links as $link) {
if ($result = $link->reap_async_query()) {
print_r($result->fetch_row());
mysqli_free_result($result);
$processed++;
}
}
} while ($processed < count($all_links));
?>
The above example will output:
Array
(
[0] => test
)
See Also
mysqli_query
|
mysqli_reap_async_query
|
Copyright 1997-2010 the PHP Documentation Group.
mysqli::preparemysqli_preparePrepare an SQL statement for execution
Description
Object oriented style
mysqli_stmt mysqli::prepare(string query);Procedural style
mysqli_stmt mysqli_prepare(mysqli link,
string query);Prepares the SQL query, and returns a statement handle to be used for further operations on the statement. The query must consist of a single SQL statement.
The parameter markers must be bound to application variables
using mysqli_stmt_bind_param and/or
mysqli_stmt_bind_result before executing
the statement or fetching rows.
Parameters
-
link Procedural style only: A link identifier returned by
mysqli_connectormysqli_init-
query The query, as a string.
NoteYou should not add a terminating semicolon or
\gto the statement.This parameter can include one or more parameter markers in the SQL statement by embedding question mark (
?) characters at the appropriate positions.NoteThe markers are legal only in certain places in SQL statements. For example, they are allowed in the
VALUES()list of anINSERTstatement (to specify column values for a row), or in a comparison with a column in aWHEREclause to specify a comparison value.However, they are not allowed for identifiers (such as table or column names), in the select list that names the columns to be returned by a
SELECTstatement, or to specify both operands of a binary operator such as the=equal sign. The latter restriction is necessary because it would be impossible to determine the parameter type. It's not allowed to compare marker withNULLby? IS NULLtoo. In general, parameters are legal only in Data Manipulation Language (DML) statements, and not in Data Definition Language (DDL) statements.
Return Values
mysqli_prepare
returns a statement object or
FALSE
if an error occurred.
Examples
Example 21.98. mysqli::prepare example
Object oriented style
<?php
$mysqli = new mysqli("localhost", "my_user", "my_password", "world");
/* check connection */
if (mysqli_connect_errno()) {
printf("Connect failed: %s\n", mysqli_connect_error());
exit();
}
$city = "Amersfoort";
/* create a prepared statement */
if ($stmt = $mysqli->prepare("SELECT District FROM City WHERE Name=?")) {
/* bind parameters for markers */
$stmt->bind_param("s", $city);
/* execute query */
$stmt->execute();
/* bind result variables */
$stmt->bind_result($district);
/* fetch value */
$stmt->fetch();
printf("%s is in district %s\n", $city, $district);
/* close statement */
$stmt->close();
}
/* close connection */
$mysqli->close();
?>
Procedural style
<?php
$link = mysqli_connect("localhost", "my_user", "my_password", "world");
/* check connection */
if (mysqli_connect_errno()) {
printf("Connect failed: %s\n", mysqli_connect_error());
exit();
}
$city = "Amersfoort";
/* create a prepared statement */
if ($stmt = mysqli_prepare($link, "SELECT District FROM City WHERE Name=?")) {
/* bind parameters for markers */
mysqli_stmt_bind_param($stmt, "s", $city);
/* execute query */
mysqli_stmt_execute($stmt);
/* bind result variables */
mysqli_stmt_bind_result($stmt, $district);
/* fetch value */
mysqli_stmt_fetch($stmt);
printf("%s is in district %s\n", $city, $district);
/* close statement */
mysqli_stmt_close($stmt);
}
/* close connection */
mysqli_close($link);
?>
The above examples will output:
Amersfoort is in district Utrecht
See Also
mysqli_stmt_execute
|
mysqli_stmt_fetch
|
mysqli_stmt_bind_param
|
mysqli_stmt_bind_result
|
mysqli_stmt_close
|
Copyright 1997-2010 the PHP Documentation Group.
mysqli::querymysqli_queryPerforms a query on the database
Description
Object oriented style
mixed mysqli::query(string query,
int resultmode);Procedural style
mixed mysqli_query(mysqli link,
string query,
int resultmode);
Performs a query against the database.
Functionally, using this function is identical to calling
mysqli_real_query followed either by
mysqli_use_result or
mysqli_store_result.
In the case where you pass a statement to
mysqli_query
that is longer than max_allowed_packet of
the server, the returned error codes are different depending
on whether you are using MySQL Native Driver
(mysqlnd) or MySQL Client Library
(libmysql). The behavior is as follows:
mysqlndon Linux returns an error code of 1153. The error message means “got a packet bigger thanmax_allowed_packetbytes”.mysqlndon Windows returns an error code 2006. This error message means “server has gone away”.libmysqlon all platforms returns an error code 2006. This error message means “server has gone away”.
Parameters
-
link Procedural style only: A link identifier returned by
mysqli_connectormysqli_init-
query The query string.
Data inside the query should be properly escaped.
-
resultmode Either the constant
MYSQLI_USE_RESULTorMYSQLI_STORE_RESULTdepending on the desired behavior. By default,MYSQLI_STORE_RESULTis used.If you use
MYSQLI_USE_RESULTall subsequent calls will return errorCommands out of syncunless you callmysqli_free_resultWith
MYSQLI_ASYNC(available with mysqlnd), it is possible to perform query asynchronously.mysqli_pollis then used to get results from such queries.
Return Values
Returns
FALSE
on failure. For successful SELECT, SHOW,
DESCRIBE or EXPLAIN queries
mysqli_query
will return a result object. For other successful queries
mysqli_query
will return
TRUE
.
Changelog
| Version | Description |
|---|---|
| 5.3.0 | Added the ability of async queries. |
Examples
Example 21.99. mysqli::query example
Object oriented style
<?php
$mysqli = new mysqli("localhost", "my_user", "my_password", "world");
/* check connection */
if (mysqli_connect_errno()) {
printf("Connect failed: %s\n", mysqli_connect_error());
exit();
}
/* Create table doesn't return a resultset */
if ($mysqli->query("CREATE TEMPORARY TABLE myCity LIKE City") === TRUE) {
printf("Table myCity successfully created.\n");
}
/* Select queries return a resultset */
if ($result = $mysqli->query("SELECT Name FROM City LIMIT 10")) {
printf("Select returned %d rows.\n", $result->num_rows);
/* free result set */
$result->close();
}
/* If we have to retrieve large amount of data we use MYSQLI_USE_RESULT */
if ($result = $mysqli->query("SELECT * FROM City", MYSQLI_USE_RESULT)) {
/* Note, that we can't execute any functions which interact with the
server until result set was closed. All calls will return an
'out of sync' error */
if (!$mysqli->query("SET @a:='this will not work'")) {
printf("Error: %s\n", $mysqli->error);
}
$result->close();
}
$mysqli->close();
?>
Procedural style
<?php
$link = mysqli_connect("localhost", "my_user", "my_password", "world");
/* check connection */
if (mysqli_connect_errno()) {
printf("Connect failed: %s\n", mysqli_connect_error());
exit();
}
/* Create table doesn't return a resultset */
if (mysqli_query($link, "CREATE TEMPORARY TABLE myCity LIKE City") === TRUE) {
printf("Table myCity successfully created.\n");
}
/* Select queries return a resultset */
if ($result = mysqli_query($link, "SELECT Name FROM City LIMIT 10")) {
printf("Select returned %d rows.\n", mysqli_num_rows($result));
/* free result set */
mysqli_free_result($result);
}
/* If we have to retrieve large amount of data we use MYSQLI_USE_RESULT */
if ($result = mysqli_query($link, "SELECT * FROM City", MYSQLI_USE_RESULT)) {
/* Note, that we can't execute any functions which interact with the
server until result set was closed. All calls will return an
'out of sync' error */
if (!mysqli_query($link, "SET @a:='this will not work'")) {
printf("Error: %s\n", mysqli_error($link));
}
mysqli_free_result($result);
}
mysqli_close($link);
?>
The above examples will output:
Table myCity successfully created.
Select returned 10 rows.
Error: Commands out of sync; You can't run this command now
See Also
mysqli_real_query
|
mysqli_multi_query
|
mysqli_free_result
|
Copyright 1997-2010 the PHP Documentation Group.
mysqli::real_connectmysqli_real_connectOpens a connection to a mysql server
Description
Object oriented style
bool mysqli::real_connect(string host,
string username,
string passwd,
string dbname,
int port,
string socket,
int flags);Procedural style
bool mysqli_real_connect(mysqli link,
string host,
string username,
string passwd,
string dbname,
int port,
string socket,
int flags);Establish a connection to a MySQL database engine.
This function differs from
mysqli_connect:
mysqli_real_connectneeds a valid object which has to be created by functionmysqli_init.With the
mysqli_optionsfunction you can set various options for connection.There is a
flagsparameter.
Parameters
-
link Procedural style only: A link identifier returned by
mysqli_connectormysqli_init-
host Can be either a host name or an IP address. Passing the
NULLvalue or the string "localhost" to this parameter, the local host is assumed. When possible, pipes will be used instead of the TCP/IP protocol.-
username The MySQL user name.
-
passwd If provided or
NULL, the MySQL server will attempt to authenticate the user against those user records which have no password only. This allows one username to be used with different permissions (depending on if a password as provided or not).-
dbname If provided will specify the default database to be used when performing queries.
-
port Specifies the port number to attempt to connect to the MySQL server.
-
socket Specifies the socket or named pipe that should be used.
NoteSpecifying the
socketparameter will not explicitly determine the type of connection to be used when connecting to the MySQL server. How the connection is made to the MySQL database is determined by thehostparameter.-
flags With the parameter
flagsyou can set different connection options:Table 21.10. Supported flags
Name Description MYSQLI_CLIENT_COMPRESSUse compression protocol MYSQLI_CLIENT_FOUND_ROWSreturn number of matched rows, not the number of affected rows MYSQLI_CLIENT_IGNORE_SPACEAllow spaces after function names. Makes all function names reserved words. MYSQLI_CLIENT_INTERACTIVEAllow interactive_timeoutseconds (instead ofwait_timeoutseconds) of inactivity before closing the connectionMYSQLI_CLIENT_SSLUse SSL (encryption) NoteFor security reasons the
MULTI_STATEMENTflag is not supported in PHP. If you want to execute multiple queries use themysqli_multi_queryfunction.
Return Values
Returns
TRUE
on success or
FALSE
on failure.
Examples
Example 21.100. mysqli::real_connect example
Object oriented style
<?php
$mysqli = mysqli_init();
if (!$mysqli) {
die('mysqli_init failed');
}
if (!$mysqli->options(MYSQLI_INIT_COMMAND, 'SET AUTOCOMMIT = 0')) {
die('Setting MYSQLI_INIT_COMMAND failed');
}
if (!$mysqli->options(MYSQLI_OPT_CONNECT_TIMEOUT, 5)) {
die('Setting MYSQLI_OPT_CONNECT_TIMEOUT failed');
}
if (!$mysqli->real_connect('localhost', 'my_user', 'my_password', 'my_db')) {
die('Connect Error (' . mysqli_connect_errno() . ') '
. mysqli_connect_error());
}
echo 'Success... ' . $mysqli->host_info . "\n";
$mysqli->close();
?>
Object oriented style when extending mysqli class
<?php
class foo_mysqli extends mysqli {
public function __construct($host, $user, $pass, $db) {
parent::init();
if (!parent::options(MYSQLI_INIT_COMMAND, 'SET AUTOCOMMIT = 0')) {
die('Setting MYSQLI_INIT_COMMAND failed');
}
if (!parent::options(MYSQLI_OPT_CONNECT_TIMEOUT, 5)) {
die('Setting MYSQLI_OPT_CONNECT_TIMEOUT failed');
}
if (!parent::real_connect($host, $user, $pass, $db)) {
die('Connect Error (' . mysqli_connect_errno() . ') '
. mysqli_connect_error());
}
}
}
$db = new foo_mysqli('localhost', 'my_user', 'my_password', 'my_db');
echo 'Success... ' . $db->host_info . "\n";
$db->close();
?>
Procedural style
<?php
$link = mysqli_init();
if (!$link) {
die('mysqli_init failed');
}
if (!mysqli_options($link, MYSQLI_INIT_COMMAND, 'SET AUTOCOMMIT = 0')) {
die('Setting MYSQLI_INIT_COMMAND failed');
}
if (!mysqli_options($link, MYSQLI_OPT_CONNECT_TIMEOUT, 5)) {
die('Setting MYSQLI_OPT_CONNECT_TIMEOUT failed');
}
if (!mysqli_real_connect($link, 'localhost', 'my_user', 'my_password', 'my_db')) {
die('Connect Error (' . mysqli_connect_errno() . ') '
. mysqli_connect_error());
}
echo 'Success... ' . mysqli_get_host_info($link) . "\n";
mysqli_close($link);
?>
The above examples will output:
Success... MySQL host info: localhost via TCP/IP
Notes
MySQLnd always assumes the server default charset. This charset is sent during connection hand-shake/authentication, which mysqlnd will use.
Libmysql uses the default charset set in the
my.cnf or by an explicit call to
mysqli_options
prior to calling mysqli_real_connect, but
after
mysqli_init.
See Also
mysqli_connect
|
mysqli_init
|
mysqli_options
|
mysqli_ssl_set
|
mysqli_close
|
Copyright 1997-2010 the PHP Documentation Group.
mysqli::real_escape_stringmysqli_real_escape_stringEscapes special characters in a string for use in an SQL statement, taking into account the current charset of the connection
Description
Object oriented style
string mysqli::escape_string(string escapestr);string mysqli::real_escape_string(string escapestr);Procedural style
string mysqli_real_escape_string(mysqli link,
string escapestr);This function is used to create a legal SQL string that you can use in an SQL statement. The given string is encoded to an escaped SQL string, taking into account the current character set of the connection.
Parameters
-
link Procedural style only: A link identifier returned by
mysqli_connectormysqli_init-
escapestr The string to be escaped.
Characters encoded are
NUL (ASCII 0), \n, \r, \, ', ", and Control-Z.
Return Values
Returns an escaped string.
Examples
Example 21.101. mysqli::real_escape_string example
Object oriented style
<?php
$mysqli = new mysqli("localhost", "my_user", "my_password", "world");
/* check connection */
if (mysqli_connect_errno()) {
printf("Connect failed: %s\n", mysqli_connect_error());
exit();
}
$mysqli->query("CREATE TEMPORARY TABLE myCity LIKE City");
$city = "'s Hertogenbosch";
/* this query will fail, cause we didn't escape $city */
if (!$mysqli->query("INSERT into myCity (Name) VALUES ('$city')")) {
printf("Error: %s\n", $mysqli->sqlstate);
}
$city = $mysqli->real_escape_string($city);
/* this query with escaped $city will work */
if ($mysqli->query("INSERT into myCity (Name) VALUES ('$city')")) {
printf("%d Row inserted.\n", $mysqli->affected_rows);
}
$mysqli->close();
?>
Procedural style
<?php
$link = mysqli_connect("localhost", "my_user", "my_password", "world");
/* check connection */
if (mysqli_connect_errno()) {
printf("Connect failed: %s\n", mysqli_connect_error());
exit();
}
mysqli_query($link, "CREATE TEMPORARY TABLE myCity LIKE City");
$city = "'s Hertogenbosch";
/* this query will fail, cause we didn't escape $city */
if (!mysqli_query($link, "INSERT into myCity (Name) VALUES ('$city')")) {
printf("Error: %s\n", mysqli_sqlstate($link));
}
$city = mysqli_real_escape_string($link, $city);
/* this query with escaped $city will work */
if (mysqli_query($link, "INSERT into myCity (Name) VALUES ('$city')")) {
printf("%d Row inserted.\n", mysqli_affected_rows($link));
}
mysqli_close($link);
?>
The above examples will output:
Error: 42000
1 Row inserted.
See Also
mysqli_character_set_name
|
Copyright 1997-2010 the PHP Documentation Group.
mysqli::real_querymysqli_real_queryExecute an SQL query
Description
Object oriented style
bool mysqli::real_query(string query);Procedural style
bool mysqli_real_query(mysqli link,
string query);
Executes a single query against the database whose result can
then be retrieved or stored using the
mysqli_store_result or
mysqli_use_result functions.
In order to determine if a given query should return a result
set or not, see mysqli_field_count.
Parameters
-
link Procedural style only: A link identifier returned by
mysqli_connectormysqli_init-
query The query, as a string.
Data inside the query should be properly escaped.
Return Values
Returns
TRUE
on success or
FALSE
on failure.
See Also
mysqli_query
|
mysqli_store_result
|
mysqli_use_result
|
Copyright 1997-2010 the PHP Documentation Group.
mysqli::reap_async_querymysqli_reap_async_queryGet result from async query
Description
Object oriented style
public mysqli_result mysqli::reap_async_query();Procedural style
mysqli_result mysqli_reap_async_query(mysql link);This function is currently not documented; only its argument list is available.
Get result from async query. Available only with mysqlnd.
Parameters
-
link Procedural style only: A link identifier returned by
mysqli_connectormysqli_init
Return Values
Returns mysqli_result in success,
FALSE
otherwise.
See Also
mysqli_poll
|
Copyright 1997-2010 the PHP Documentation Group.
mysqli::rollbackmysqli_rollbackRolls back current transaction
Description
Object oriented style
bool mysqli::rollback();Procedural style
bool mysqli_rollback(mysqli link);Rollbacks the current transaction for the database.
Parameters
-
link Procedural style only: A link identifier returned by
mysqli_connectormysqli_init
Return Values
Returns
TRUE
on success or
FALSE
on failure.
Examples
Example 21.102. mysqli::rollback example
Object oriented style
<?php
$mysqli = new mysqli("localhost", "my_user", "my_password", "world");
/* check connection */
if (mysqli_connect_errno()) {
printf("Connect failed: %s\n", mysqli_connect_error());
exit();
}
/* disable autocommit */
$mysqli->autocommit(FALSE);
$mysqli->query("CREATE TABLE myCity LIKE City");
$mysqli->query("ALTER TABLE myCity Type=InnoDB");
$mysqli->query("INSERT INTO myCity SELECT * FROM City LIMIT 50");
/* commit insert */
$mysqli->commit();
/* delete all rows */
$mysqli->query("DELETE FROM myCity");
if ($result = $mysqli->query("SELECT COUNT(*) FROM myCity")) {
$row = $result->fetch_row();
printf("%d rows in table myCity.\n", $row[0]);
/* Free result */
$result->close();
}
/* Rollback */
$mysqli->rollback();
if ($result = $mysqli->query("SELECT COUNT(*) FROM myCity")) {
$row = $result->fetch_row();
printf("%d rows in table myCity (after rollback).\n", $row[0]);
/* Free result */
$result->close();
}
/* Drop table myCity */
$mysqli->query("DROP TABLE myCity");
$mysqli->close();
?>
Procedural style
<?php
$link = mysqli_connect("localhost", "my_user", "my_password", "world");
/* check connection */
if (mysqli_connect_errno()) {
printf("Connect failed: %s\n", mysqli_connect_error());
exit();
}
/* disable autocommit */
mysqli_autocommit($link, FALSE);
mysqli_query($link, "CREATE TABLE myCity LIKE City");
mysqli_query($link, "ALTER TABLE myCity Type=InnoDB");
mysqli_query($link, "INSERT INTO myCity SELECT * FROM City LIMIT 50");
/* commit insert */
mysqli_commit($link);
/* delete all rows */
mysqli_query($link, "DELETE FROM myCity");
if ($result = mysqli_query($link, "SELECT COUNT(*) FROM myCity")) {
$row = mysqli_fetch_row($result);
printf("%d rows in table myCity.\n", $row[0]);
/* Free result */
mysqli_free_result($result);
}
/* Rollback */
mysqli_rollback($link);
if ($result = mysqli_query($link, "SELECT COUNT(*) FROM myCity")) {
$row = mysqli_fetch_row($result);
printf("%d rows in table myCity (after rollback).\n", $row[0]);
/* Free result */
mysqli_free_result($result);
}
/* Drop table myCity */
mysqli_query($link, "DROP TABLE myCity");
mysqli_close($link);
?>
The above examples will output:
0 rows in table myCity.
50 rows in table myCity (after rollback).
See Also
mysqli_commit
|
mysqli_autocommit
|
Copyright 1997-2010 the PHP Documentation Group.
mysqli::select_dbmysqli_select_dbSelects the default database for database queries
Description
Object oriented style
bool mysqli::select_db(string dbname);Procedural style
bool mysqli_select_db(mysqli link,
string dbname);Selects the default database to be used when performing queries against the database connection.
This function should only be used to change the default
database for the connection. You can select the default
database with 4th parameter in
mysqli_connect.
Parameters
-
link Procedural style only: A link identifier returned by
mysqli_connectormysqli_init-
dbname The database name.
Return Values
Returns
TRUE
on success or
FALSE
on failure.
Examples
Example 21.103. mysqli::select_db example
Object oriented style
<?php
$mysqli = new mysqli("localhost", "my_user", "my_password", "test");
/* check connection */
if (mysqli_connect_errno()) {
printf("Connect failed: %s\n", mysqli_connect_error());
exit();
}
/* return name of current default database */
if ($result = $mysqli->query("SELECT DATABASE()")) {
$row = $result->fetch_row();
printf("Default database is %s.\n", $row[0]);
$result->close();
}
/* change db to world db */
$mysqli->select_db("world");
/* return name of current default database */
if ($result = $mysqli->query("SELECT DATABASE()")) {
$row = $result->fetch_row();
printf("Default database is %s.\n", $row[0]);
$result->close();
}
$mysqli->close();
?>
Procedural style
<?php
$link = mysqli_connect("localhost", "my_user", "my_password", "test");
/* check connection */
if (mysqli_connect_errno()) {
printf("Connect failed: %s\n", mysqli_connect_error());
exit();
}
/* return name of current default database */
if ($result = mysqli_query($link, "SELECT DATABASE()")) {
$row = mysqli_fetch_row($result);
printf("Default database is %s.\n", $row[0]);
mysqli_free_result($result);
}
/* change db to world db */
mysqli_select_db($link, "world");
/* return name of current default database */
if ($result = mysqli_query($link, "SELECT DATABASE()")) {
$row = mysqli_fetch_row($result);
printf("Default database is %s.\n", $row[0]);
mysqli_free_result($result);
}
mysqli_close($link);
?>
The above examples will output:
Default database is test.
Default database is world.
See Also
mysqli_connect
|
mysqli_real_connect
|
Copyright 1997-2010 the PHP Documentation Group.
mysqli::set_charsetmysqli_set_charsetSets the default client character set
Description
Object oriented style
bool mysqli::set_charset(string charset);Procedural style
bool mysqli_set_charset(mysqli link,
string charset);Sets the default character set to be used when sending data from and to the database server.
Parameters
-
link Procedural style only: A link identifier returned by
mysqli_connectormysqli_init-
charset The charset to be set as default.
Return Values
Returns
TRUE
on success or
FALSE
on failure.
Notes
To use this function on a Windows platform you need MySQL client library version 4.1.11 or above (for MySQL 5.0 you need 5.0.6 or above).
This is the preferred way to change the charset. Using
mysqli::query to execute SET
NAMES .. is not recommended.
Examples
Example 21.104. mysqli::set_charset example
Object oriented style
<?php
$mysqli = new mysqli("localhost", "my_user", "my_password", "test");
/* check connection */
if (mysqli_connect_errno()) {
printf("Connect failed: %s\n", mysqli_connect_error());
exit();
}
/* change character set to utf8 */
if (!$mysqli->set_charset("utf8")) {
printf("Error loading character set utf8: %s\n", $mysqli->error);
} else {
printf("Current character set: %s\n", $mysqli->character_set_name());
}
$mysqli->close();
?>
Procedural style
<?php
$link = mysqli_connect('localhost', 'my_user', 'my_password', 'test');
/* check connection */
if (mysqli_connect_errno()) {
printf("Connect failed: %s\n", mysqli_connect_error());
exit();
}
/* change character set to utf8 */
if (!mysqli_set_charset($link, "utf8")) {
printf("Error loading character set utf8: %s\n", mysqli_error($link));
} else {
printf("Current character set: %s\n", mysqli_character_set_name($link));
}
mysqli_close($link);
?>
The above examples will output:
Current character set: utf8
See Also
mysqli_character_set_name
|
mysqli_real_escape_string
|
| List of character sets that MySQL supports |
Copyright 1997-2010 the PHP Documentation Group.
mysqli::set_local_infile_defaultmysqli_set_local_infile_defaultUnsets user defined handler for load local infile command
Description
void mysqli_set_local_infile_default(mysqli link);
Deactivates a LOAD DATA INFILE LOCAL handler
previously set with
mysqli_set_local_infile_handler.
Parameters
-
link Procedural style only: A link identifier returned by
mysqli_connectormysqli_init
Return Values
No value is returned.
Examples
See mysqli_set_local_infile_handler
examples
See Also
mysqli_set_local_infile_handler
|
Copyright 1997-2010 the PHP Documentation Group.
mysqli::set_local_infile_handlermysqli_set_local_infile_handlerSet callback function for LOAD DATA LOCAL INFILE command
Description
Object oriented style
bool mysqli::set_local_infile_handler(mysqli link,
callback read_func);Procedural style
bool mysqli_set_local_infile_handler(mysqli link,
callback read_func);Set callback function for LOAD DATA LOCAL INFILE command
The callbacks task is to read input from the file specified in
the LOAD DATA LOCAL INFILE and to reformat it
into the format understood by LOAD DATA
INFILE.
The returned data needs to match the format specified in the
LOAD DATA
Parameters
-
link Procedural style only: A link identifier returned by
mysqli_connectormysqli_init-
read_func A callback function or object method taking the following parameters:
-
stream A PHP stream associated with the SQL commands INFILE
-
&buffer A string buffer to store the rewritten input into
-
buflen The maximum number of characters to be stored in the buffer
-
&errormsg If an error occurs you can store an error message in here
-
The callback function should return the number of characters
stored in the buffer or a negative value
if an error occurred.
Return Values
Returns
TRUE
on success or
FALSE
on failure.
Examples
Example 21.105. mysqli::set_local_infile_handler example
Object oriented style
<?php
$db = mysqli_init();
$db->real_connect("localhost","root","","test");
function callme($stream, &$buffer, $buflen, &$errmsg)
{
$buffer = fgets($stream);
echo $buffer;
// convert to upper case and replace "," delimiter with [TAB]
$buffer = strtoupper(str_replace(",", "\t", $buffer));
return strlen($buffer);
}
echo "Input:\n";
$db->set_local_infile_handler("callme");
$db->query("LOAD DATA LOCAL INFILE 'input.txt' INTO TABLE t1");
$db->set_local_infile_default();
$res = $db->query("SELECT * FROM t1");
echo "\nResult:\n";
while ($row = $res->fetch_assoc()) {
echo join(",", $row)."\n";
}
?>
Procedural style
<?php
$db = mysqli_init();
mysqli_real_connect($db, "localhost","root","","test");
function callme($stream, &$buffer, $buflen, &$errmsg)
{
$buffer = fgets($stream);
echo $buffer;
// convert to upper case and replace "," delimiter with [TAB]
$buffer = strtoupper(str_replace(",", "\t", $buffer));
return strlen($buffer);
}
echo "Input:\n";
mysqli_set_local_infile_handler($db, "callme");
mysqli_query($db, "LOAD DATA LOCAL INFILE 'input.txt' INTO TABLE t1");
mysqli_set_local_infile_default($db);
$res = mysqli_query($db, "SELECT * FROM t1");
echo "\nResult:\n";
while ($row = mysqli_fetch_assoc($res)) {
echo join(",", $row)."\n";
}
?>
The above examples will output:
Input:
23,foo
42,bar
Output:
23,FOO
42,BAR
See Also
mysqli_set_local_infile_default
|
Copyright 1997-2010 the PHP Documentation Group.
mysqli->sqlstatemysqli_sqlstateReturns the SQLSTATE error from previous MySQL operation
Description
Object oriented style
mysqli {string sqlstate ;
}
Procedural style
string mysqli_sqlstate(mysqli link);
Returns a string containing the SQLSTATE error code for the last
error. The error code consists of five characters.
'00000' means no error. The values
are specified by ANSI SQL and ODBC. For a list of possible
values, see
http://dev.mysql.com/doc/mysql/en/error-handling.html.
Note that not all MySQL errors are yet mapped to
SQLSTATE's. The value HY000 (general
error) is used for unmapped errors.
Parameters
-
link Procedural style only: A link identifier returned by
mysqli_connectormysqli_init
Return Values
Returns a string containing the SQLSTATE error code for the last
error. The error code consists of five characters.
'00000' means no error.
Examples
Example 21.106. mysqli->sqlstate example
Object oriented style
<?php
$mysqli = new mysqli("localhost", "my_user", "my_password", "world");
/* check connection */
if (mysqli_connect_errno()) {
printf("Connect failed: %s\n", mysqli_connect_error());
exit();
}
/* Table City already exists, so we should get an error */
if (!$mysqli->query("CREATE TABLE City (ID INT, Name VARCHAR(30))")) {
printf("Error - SQLSTATE %s.\n", $mysqli->sqlstate);
}
$mysqli->close();
?>
Procedural style
<?php
$link = mysqli_connect("localhost", "my_user", "my_password", "world");
/* check connection */
if (mysqli_connect_errno()) {
printf("Connect failed: %s\n", mysqli_connect_error());
exit();
}
/* Table City already exists, so we should get an error */
if (!mysqli_query($link, "CREATE TABLE City (ID INT, Name VARCHAR(30))")) {
printf("Error - SQLSTATE %s.\n", mysqli_sqlstate($link));
}
mysqli_close($link);
?>
The above examples will output:
Error - SQLSTATE 42S01.
See Also
mysqli_errno
|
mysqli_error
|
Copyright 1997-2010 the PHP Documentation Group.
mysqli::ssl_setmysqli_ssl_setUsed for establishing secure connections using SSL
Description
Object oriented style
bool mysqli::ssl_set(string key,
string cert,
string ca,
string capath,
string cipher);Procedural style
bool mysqli_ssl_set(mysqli link,
string key,
string cert,
string ca,
string capath,
string cipher);
Used for establishing secure connections using SSL. It must be
called before mysqli_real_connect. This
function does nothing unless OpenSSL support is enabled.
Note that MySQL Native Driver does not support SSL, so calling this function when using MySQL Native Driver will result in an error. MySQL Native Driver is enabled by default on Microsoft Windows from PHP version 5.3 onwards.
Parameters
-
link Procedural style only: A link identifier returned by
mysqli_connectormysqli_init-
key The path name to the key file.
-
cert The path name to the certificate file.
-
ca The path name to the certificate authority file.
-
capath The pathname to a directory that contains trusted SSL CA certificates in PEM format.
-
cipher A list of allowable ciphers to use for SSL encryption.
Any unused SSL parameters may be given as
NULL
Return Values
This function always returns
TRUE
value. If SSL setup is incorrect
mysqli_real_connect will return an error
when you attempt to connect.
See Also
mysqli_options
|
mysqli_real_connect
|
Copyright 1997-2010 the PHP Documentation Group.
mysqli::statmysqli_statGets the current system status
Description
Object oriented style
string mysqli::stat();Procedural style
string mysqli_stat(mysqli link);
mysqli_stat
returns a string containing information similar to that provided
by the 'mysqladmin status' command. This includes
uptime in seconds and the number of running threads, questions,
reloads, and open tables.
Parameters
-
link Procedural style only: A link identifier returned by
mysqli_connectormysqli_init
Return Values
A string describing the server status.
FALSE
if an error occurred.
Examples
Example 21.107. mysqli::stat example
Object oriented style
<?php
$mysqli = new mysqli("localhost", "my_user", "my_password", "world");
/* check connection */
if (mysqli_connect_errno()) {
printf("Connect failed: %s\n", mysqli_connect_error());
exit();
}
printf ("System status: %s\n", $mysqli->stat());
$mysqli->close();
?>
Procedural style
<?php
$link = mysqli_connect("localhost", "my_user", "my_password", "world");
/* check connection */
if (mysqli_connect_errno()) {
printf("Connect failed: %s\n", mysqli_connect_error());
exit();
}
printf("System status: %s\n", mysqli_stat($link));
mysqli_close($link);
?>
The above examples will output:
System status: Uptime: 272 Threads: 1 Questions: 5340 Slow queries: 0
Opens: 13 Flush tables: 1 Open tables: 0 Queries per second avg: 19.632
Memory in use: 8496K Max memory used: 8560K
See Also
mysqli_get_server_info
|
Copyright 1997-2010 the PHP Documentation Group.
mysqli::stmt_initmysqli_stmt_initInitializes a statement and returns an object for use with mysqli_stmt_prepare
Description
Object oriented style
mysqli_stmt mysqli::stmt_init();Procedural style
mysqli_stmt mysqli_stmt_init(mysqli link);
Allocates and initializes a statement object suitable for
mysqli_stmt_prepare.
Any subsequent calls to any mysqli_stmt function will fail
until mysqli_stmt_prepare was called.
Parameters
-
link Procedural style only: A link identifier returned by
mysqli_connectormysqli_init
Return Values
Returns an object.
See Also
mysqli_stmt_prepare
|
Copyright 1997-2010 the PHP Documentation Group.
mysqli::store_resultmysqli_store_resultTransfers a result set from the last query
Description
Object oriented style
mysqli_result mysqli::store_result();Procedural style
mysqli_result mysqli_store_result(mysqli link);
Transfers the result set from the last query on the database
connection represented by the link
parameter to be used with the
mysqli_data_seek function.
Parameters
-
link Procedural style only: A link identifier returned by
mysqli_connectormysqli_init
Return Values
Returns a buffered result object or
FALSE
if an error occurred.
mysqli_store_result returns
FALSE
in case the query didn't return a result set (if the
query was, for example an INSERT statement). This function
also returns
FALSE
if the reading of the result set failed. You can check if you
have got an error by checking if
mysqli_error
doesn't return an empty string, if
mysqli_errno
returns a non zero value, or if
mysqli_field_count returns a non zero
value. Also possible reason for this function returning
FALSE
after successful call to
mysqli_query
can be too large result set (memory for it cannot be
allocated). If mysqli_field_count returns
a non-zero value, the statement should have produced a
non-empty result set.
Notes
Although it is always good practice to free the memory used by
the result of a query using the
mysqli_free_result function, when
transferring large result sets using the
mysqli_store_result this becomes
particularly important.
Examples
See mysqli_multi_query.
See Also
mysqli_real_query
|
mysqli_use_result
|
Copyright 1997-2010 the PHP Documentation Group.
mysqli->thread_idmysqli_thread_idReturns the thread ID for the current connection
Description
Object oriented style
mysqli {int thread_id ;
}
Procedural style
int mysqli_thread_id(mysqli link);
The mysqli_thread_id function returns the
thread ID for the current connection which can then be killed
using the
mysqli_kill
function. If the connection is lost and you reconnect with
mysqli_ping,
the thread ID will be other. Therefore you should get the thread
ID only when you need it.
The thread ID is assigned on a connection-by-connection basis. Hence, if the connection is broken and then re-established a new thread ID will be assigned.
To kill a running query you can use the SQL command
KILL QUERY processid.
Parameters
-
link Procedural style only: A link identifier returned by
mysqli_connectormysqli_init
Return Values
Returns the Thread ID for the current connection.
Examples
Example 21.108. mysqli->thread_id example
Object oriented style
<?php
$mysqli = new mysqli("localhost", "my_user", "my_password", "world");
/* check connection */
if (mysqli_connect_errno()) {
printf("Connect failed: %s\n", mysqli_connect_error());
exit();
}
/* determine our thread id */
$thread_id = $mysqli->thread_id;
/* Kill connection */
$mysqli->kill($thread_id);
/* This should produce an error */
if (!$mysqli->query("CREATE TABLE myCity LIKE City")) {
printf("Error: %s\n", $mysqli->error);
exit;
}
/* close connection */
$mysqli->close();
?>
Procedural style
<?php
$link = mysqli_connect("localhost", "my_user", "my_password", "world");
/* check connection */
if (mysqli_connect_errno()) {
printf("Connect failed: %s\n", mysqli_connect_error());
exit();
}
/* determine our thread id */
$thread_id = mysqli_thread_id($link);
/* Kill connection */
mysqli_kill($link, $thread_id);
/* This should produce an error */
if (!mysqli_query($link, "CREATE TABLE myCity LIKE City")) {
printf("Error: %s\n", mysqli_error($link));
exit;
}
/* close connection */
mysqli_close($link);
?>
The above examples will output:
Error: MySQL server has gone away
See Also
mysqli_kill
|
Copyright 1997-2010 the PHP Documentation Group.
mysqli::thread_safemysqli_thread_safeReturns whether thread safety is given or not
Description
Procedural style
bool mysqli_thread_safe();Tells whether the client library is compiled as thread-safe.
Return Values
TRUE
if the client library is thread-safe, otherwise
FALSE
.
Copyright 1997-2010 the PHP Documentation Group.
mysqli::use_resultmysqli_use_resultInitiate a result set retrieval
Description
Object oriented style
mysqli_result mysqli::use_result();Procedural style
mysqli_result mysqli_use_result(mysqli link);
Used to initiate the retrieval of a result set from the last
query executed using the mysqli_real_query
function on the database connection.
Either this or the mysqli_store_result
function must be called before the results of a query can be
retrieved, and one or the other must be called to prevent the
next query on that database connection from failing.
The mysqli_use_result function does not
transfer the entire result set from the database and hence
cannot be used functions such as
mysqli_data_seek to move to a particular
row within the set. To use this functionality, the result set
must be stored using mysqli_store_result.
One should not use mysqli_use_result if a
lot of processing on the client side is performed, since this
will tie up the server and prevent other threads from updating
any tables from which the data is being fetched.
Return Values
Returns an unbuffered result object or
FALSE
if an error occurred.
Examples
Example 21.109. mysqli::use_result example
Object oriented style
<?php
$mysqli = new mysqli("localhost", "my_user", "my_password", "world");
/* check connection */
if (mysqli_connect_errno()) {
printf("Connect failed: %s\n", mysqli_connect_error());
exit();
}
$query = "SELECT CURRENT_USER();";
$query .= "SELECT Name FROM City ORDER BY ID LIMIT 20, 5";
/* execute multi query */
if ($mysqli->multi_query($query)) {
do {
/* store first result set */
if ($result = $mysqli->use_result()) {
while ($row = $result->fetch_row()) {
printf("%s\n", $row[0]);
}
$result->close();
}
/* print divider */
if ($mysqli->more_results()) {
printf("-----------------\n");
}
} while ($mysqli->next_result());
}
/* close connection */
$mysqli->close();
?>
Procedural style
<?php
$link = mysqli_connect("localhost", "my_user", "my_password", "world");
/* check connection */
if (mysqli_connect_errno()) {
printf("Connect failed: %s\n", mysqli_connect_error());
exit();
}
$query = "SELECT CURRENT_USER();";
$query .= "SELECT Name FROM City ORDER BY ID LIMIT 20, 5";
/* execute multi query */
if (mysqli_multi_query($link, $query)) {
do {
/* store first result set */
if ($result = mysqli_use_result($link)) {
while ($row = mysqli_fetch_row($result)) {
printf("%s\n", $row[0]);
}
mysqli_free_result($result);
}
/* print divider */
if (mysqli_more_results($link)) {
printf("-----------------\n");
}
} while (mysqli_next_result($link));
}
/* close connection */
mysqli_close($link);
?>
The above examples will output:
my_user@localhost
-----------------
Amersfoort
Maastricht
Dordrecht
Leiden
Haarlemmermeer
See Also
mysqli_real_query
|
mysqli_store_result
|
Copyright 1997-2010 the PHP Documentation Group.
mysqli->warning_countmysqli_warning_countReturns the number of warnings from the last query for the given link
Description
Object oriented style
mysqli {int warning_count ;
}
Procedural style
int mysqli_warning_count(mysqli link);Returns the number of warnings from the last query in the connection.
For retrieving warning messages you can use the SQL command
SHOW WARNINGS [limit row_count].
Parameters
-
link Procedural style only: A link identifier returned by
mysqli_connectormysqli_init
Return Values
Number of warnings or zero if there are no warnings.
Examples
Example 21.110. mysqli->warning_count example
Object oriented style
<?php
$mysqli = new mysqli("localhost", "my_user", "my_password", "world");
/* check connection */
if (mysqli_connect_errno()) {
printf("Connect failed: %s\n", mysqli_connect_error());
exit();
}
$mysqli->query("CREATE TABLE myCity LIKE City");
/* a remarkable city in Wales */
$query = "INSERT INTO myCity (CountryCode, Name) VALUES('GBR',
'Llanfairpwllgwyngyllgogerychwyrndrobwllllantysiliogogogoch')";
$mysqli->query($query);
if ($mysqli->warning_count) {
if ($result = $mysqli->query("SHOW WARNINGS")) {
$row = $result->fetch_row();
printf("%s (%d): %s\n", $row[0], $row[1], $row[2]);
$result->close();
}
}
/* close connection */
$mysqli->close();
?>
Procedural style
<?php
$link = mysqli_connect("localhost", "my_user", "my_password", "world");
/* check connection */
if (mysqli_connect_errno()) {
printf("Connect failed: %s\n", mysqli_connect_error());
exit();
}
mysqli_query($link, "CREATE TABLE myCity LIKE City");
/* a remarkable long city name in Wales */
$query = "INSERT INTO myCity (CountryCode, Name) VALUES('GBR',
'Llanfairpwllgwyngyllgogerychwyrndrobwllllantysiliogogogoch')";
mysqli_query($link, $query);
if (mysqli_warning_count($link)) {
if ($result = mysqli_query($link, "SHOW WARNINGS")) {
$row = mysqli_fetch_row($result);
printf("%s (%d): %s\n", $row[0], $row[1], $row[2]);
mysqli_free_result($result);
}
}
/* close connection */
mysqli_close($link);
?>
The above examples will output:
Warning (1264): Data truncated for column 'Name' at row 1
See Also
mysqli_errno
|
mysqli_error
|
mysqli_sqlstate
|
- 21.10.2.8.1.
mysqli_stmt->affected_rows,mysqli_stmt_affected_rows - 21.10.2.8.2.
mysqli_stmt::attr_get,mysqli_stmt_attr_get - 21.10.2.8.3.
mysqli_stmt::attr_set,mysqli_stmt_attr_set - 21.10.2.8.4.
mysqli_stmt::bind_param,mysqli_stmt_bind_param - 21.10.2.8.5.
mysqli_stmt::bind_result,mysqli_stmt_bind_result - 21.10.2.8.6.
mysqli_stmt::close,mysqli_stmt_close - 21.10.2.8.7.
mysqli_stmt::data_seek,mysqli_stmt_data_seek - 21.10.2.8.8.
mysqli_stmt->errno,mysqli_stmt_errno - 21.10.2.8.9.
mysqli_stmt->error,mysqli_stmt_error - 21.10.2.8.10.
mysqli_stmt::execute,mysqli_stmt_execute - 21.10.2.8.11.
mysqli_stmt::fetch,mysqli_stmt_fetch - 21.10.2.8.12.
mysqli_stmt->field_count,mysqli_stmt_field_count - 21.10.2.8.13.
mysqli_stmt::free_result,mysqli_stmt_free_result - 21.10.2.8.14.
mysqli_stmt::get_warnings,mysqli_stmt_get_warnings - 21.10.2.8.15.
mysqli_stmt->insert_id,mysqli_stmt_insert_id - 21.10.2.8.16.
mysqli_stmt::num_rows,mysqli_stmt_num_rows - 21.10.2.8.17.
mysqli_stmt->param_count,mysqli_stmt_param_count - 21.10.2.8.18.
mysqli_stmt::prepare,mysqli_stmt_prepare - 21.10.2.8.19.
mysqli_stmt::reset,mysqli_stmt_reset - 21.10.2.8.20.
mysqli_stmt::result_metadata,mysqli_stmt_result_metadata - 21.10.2.8.21.
mysqli_stmt::send_long_data,mysqli_stmt_send_long_data - 21.10.2.8.22.
mysqli_stmt::sqlstate,mysqli_stmt_sqlstate - 21.10.2.8.23.
mysqli_stmt::store_result,mysqli_stmt_store_result
Copyright 1997-2010 the PHP Documentation Group.
Represents a prepared statement.
MySQLi_STMT {
MySQLi_STMT Propertiesint affected_rows ;int errno ;string error ;int field_count ;int insert_id ;int num_rows ;int param_count ;string sqlstate ;
Methodsint mysqli_stmt_affected_rows(mysqli_stmt stmt);int mysqli_stmt::attr_get(int attr);bool mysqli_stmt::attr_set(int attr,
int mode);bool mysqli_stmt::bind_param(string types,
mixed var1,
mixed ...);bool mysqli_stmt::bind_result(mixed var1,
mixed ...);bool mysqli_stmt::close();void mysqli_stmt::data_seek(int offset);int mysqli_stmt_errno(mysqli_stmt stmt);string mysqli_stmt_error(mysqli_stmt stmt);bool mysqli_stmt::execute();bool mysqli_stmt::fetch();int mysqli_stmt_field_count(mysqli_stmt stmt);void mysqli_stmt::free_result();object mysqli_stmt::get_warnings(mysqli_stmt stmt);mixed mysqli_stmt_insert_id(mysqli_stmt stmt);int mysqli_stmt_num_rows(mysqli_stmt stmt);int mysqli_stmt_param_count(mysqli_stmt stmt);mixed mysqli_stmt::prepare(string query);bool mysqli_stmt::reset();mysqli_result mysqli_stmt::result_metadata();bool mysqli_stmt::send_long_data(int param_nr,
string data);string mysqli_stmt_sqlstate(mysqli_stmt stmt);bool mysqli_stmt::store_result();
}
Copyright 1997-2010 the PHP Documentation Group.
mysqli_stmt->affected_rowsmysqli_stmt_affected_rowsReturns the total number of rows changed, deleted, or inserted by the last executed statement
Description
Object oriented style
mysqli_stmt {int affected_rows ;
}
Procedural style
int mysqli_stmt_affected_rows(mysqli_stmt stmt);
Returns the number of rows affected by
INSERT, UPDATE, or
DELETE query.
This function only works with queries which update a table. In
order to get the number of rows from a SELECT query, use
mysqli_stmt_num_rows instead.
Parameters
-
stmt Procedural style only: A statement identifier returned by
mysqli_stmt_init.
Return Values
An integer greater than zero indicates the number of rows affected or retrieved. Zero indicates that no records where updated for an UPDATE/DELETE statement, no rows matched the WHERE clause in the query or that no query has yet been executed. -1 indicates that the query has returned an error. NULL indicates an invalid argument was supplied to the function.
If the number of affected rows is greater than maximal PHP int value, the number of affected rows will be returned as a string value.
Examples
Example 21.111. Object oriented style
<?php
$mysqli = new mysqli("localhost", "my_user", "my_password", "world");
/* check connection */
if (mysqli_connect_errno()) {
printf("Connect failed: %s\n", mysqli_connect_error());
exit();
}
/* create temp table */
$mysqli->query("CREATE TEMPORARY TABLE myCountry LIKE Country");
$query = "INSERT INTO myCountry SELECT * FROM Country WHERE Code LIKE ?";
/* prepare statement */
if ($stmt = $mysqli->prepare($query)) {
/* Bind variable for placeholder */
$code = 'A%';
$stmt->bind_param("s", $code);
/* execute statement */
$stmt->execute();
printf("rows inserted: %d\n", $stmt->affected_rows);
/* close statement */
$stmt->close();
}
/* close connection */
$mysqli->close();
?>
Example 21.112. Procedural style
<?php
$link = mysqli_connect("localhost", "my_user", "my_password", "world");
/* check connection */
if (mysqli_connect_errno()) {
printf("Connect failed: %s\n", mysqli_connect_error());
exit();
}
/* create temp table */
mysqli_query($link, "CREATE TEMPORARY TABLE myCountry LIKE Country");
$query = "INSERT INTO myCountry SELECT * FROM Country WHERE Code LIKE ?";
/* prepare statement */
if ($stmt = mysqli_prepare($link, $query)) {
/* Bind variable for placeholder */
$code = 'A%';
mysqli_stmt_bind_param($stmt, "s", $code);
/* execute statement */
mysqli_stmt_execute($stmt);
printf("rows inserted: %d\n", mysqli_stmt_affected_rows($stmt));
/* close statement */
mysqli_stmt_close($stmt);
}
/* close connection */
mysqli_close($link);
?>
The above examples will output:
rows inserted: 17
See Also
mysqli_stmt_num_rows
|
mysqli_prepare
|
Copyright 1997-2010 the PHP Documentation Group.
mysqli_stmt::attr_getmysqli_stmt_attr_getUsed to get the current value of a statement attribute
Description
Object oriented style
int mysqli_stmt::attr_get(int attr);Procedural style
int mysqli_stmt_attr_get(mysqli_stmt stmt,
int attr);Gets the current value of a statement attribute.
Parameters
-
stmt Procedural style only: A statement identifier returned by
mysqli_stmt_init.-
attr The attribute that you want to get.
Return Values
Returns
FALSE
if the attribute is not found, otherwise returns the value of
the attribute.
Copyright 1997-2010 the PHP Documentation Group.
mysqli_stmt::attr_setmysqli_stmt_attr_setUsed to modify the behavior of a prepared statement
Description
Object oriented style
bool mysqli_stmt::attr_set(int attr,
int mode);Procedural style
bool mysqli_stmt_attr_set(mysqli_stmt stmt,
int attr,
int mode);Used to modify the behavior of a prepared statement. This function may be called multiple times to set several attributes.
Parameters
-
stmt Procedural style only: A statement identifier returned by
mysqli_stmt_init.-
attr The attribute that you want to set. It can have one of the following values:
Table 21.11. Attribute values
Character Description MYSQLI_STMT_ATTR_UPDATE_MAX_LENGTH If set to 1, causes mysqli_stmt_store_resultto update the metadataMYSQL_FIELD->max_lengthvalue.MYSQLI_STMT_ATTR_CURSOR_TYPE Type of cursor to open for statement when mysqli_stmt_executeis invoked.modecan beMYSQLI_CURSOR_TYPE_NO_CURSOR(the default) orMYSQLI_CURSOR_TYPE_READ_ONLY.MYSQLI_STMT_ATTR_PREFETCH_ROWS Number of rows to fetch from server at a time when using a cursor. modecan be in the range from 1 to the maximum value of unsigned long. The default is 1.If you use the
MYSQLI_STMT_ATTR_CURSOR_TYPEoption withMYSQLI_CURSOR_TYPE_READ_ONLY, a cursor is opened for the statement when you invokemysqli_stmt_execute. If there is already an open cursor from a previousmysqli_stmt_executecall, it closes the cursor before opening a new one.mysqli_stmt_resetalso closes any open cursor before preparing the statement for re-execution.mysqli_stmt_free_resultcloses any open cursor.If you open a cursor for a prepared statement,
mysqli_stmt_store_resultis unnecessary.-
mode The value to assign to the attribute.
Copyright 1997-2010 the PHP Documentation Group.
mysqli_stmt::bind_parammysqli_stmt_bind_paramBinds variables to a prepared statement as parameters
Description
Object oriented style
bool mysqli_stmt::bind_param(string types,
mixed var1,
mixed ...);Procedural style
bool mysqli_stmt_bind_param(mysqli_stmt stmt,
string types,
mixed var1,
mixed ...);
Bind variables for the parameter markers in the SQL statement
that was passed to
mysqli_prepare.
If data size of a variable exceeds max. allowed packet size
(max_allowed_packet), you have to specify b
in types and use
mysqli_stmt_send_long_data to send the
data in packets.
Care must be taken when using
mysqli_stmt_bind_param in conjunction
with call_user_func_array. Note that
mysqli_stmt_bind_param requires
parameters to be passed by reference, whereas
call_user_func_array can accept as a
parameter a list of variables that can represent references or
values.
Parameters
-
stmt Procedural style only: A statement identifier returned by
mysqli_stmt_init.-
types A string that contains one or more characters which specify the types for the corresponding bind variables:
Table 21.12. Type specification chars
Character Description i corresponding variable has type integer d corresponding variable has type double s corresponding variable has type string b corresponding variable is a blob and will be sent in packets -
var1 The number of variables and length of string
typesmust match the parameters in the statement.
Return Values
Returns
TRUE
on success or
FALSE
on failure.
Examples
Example 21.113. Object oriented style
<?php
$mysqli = new mysqli('localhost', 'my_user', 'my_password', 'world');
/* check connection */
if (mysqli_connect_errno()) {
printf("Connect failed: %s\n", mysqli_connect_error());
exit();
}
$stmt = $mysqli->prepare("INSERT INTO CountryLanguage VALUES (?, ?, ?, ?)");
$stmt->bind_param('sssd', $code, $language, $official, $percent);
$code = 'DEU';
$language = 'Bavarian';
$official = "F";
$percent = 11.2;
/* execute prepared statement */
$stmt->execute();
printf("%d Row inserted.\n", $stmt->affected_rows);
/* close statement and connection */
$stmt->close();
/* Clean up table CountryLanguage */
$mysqli->query("DELETE FROM CountryLanguage WHERE Language='Bavarian'");
printf("%d Row deleted.\n", $mysqli->affected_rows);
/* close connection */
$mysqli->close();
?>
Example 21.114. Procedural style
<?php
$link = mysqli_connect('localhost', 'my_user', 'my_password', 'world');
/* check connection */
if (!$link) {
printf("Connect failed: %s\n", mysqli_connect_error());
exit();
}
$stmt = mysqli_prepare($link, "INSERT INTO CountryLanguage VALUES (?, ?, ?, ?)");
mysqli_stmt_bind_param($stmt, 'sssd', $code, $language, $official, $percent);
$code = 'DEU';
$language = 'Bavarian';
$official = "F";
$percent = 11.2;
/* execute prepared statement */
mysqli_stmt_execute($stmt);
printf("%d Row inserted.\n", mysqli_stmt_affected_rows($stmt));
/* close statement and connection */
mysqli_stmt_close($stmt);
/* Clean up table CountryLanguage */
mysqli_query($link, "DELETE FROM CountryLanguage WHERE Language='Bavarian'");
printf("%d Row deleted.\n", mysqli_affected_rows($link));
/* close connection */
mysqli_close($link);
?>
The above examples will output:
1 Row inserted.
1 Row deleted.
See Also
mysqli_stmt_bind_result
|
mysqli_stmt_execute
|
mysqli_stmt_fetch
|
mysqli_prepare
|
mysqli_stmt_send_long_data
|
mysqli_stmt_errno
|
mysqli_stmt_error
|
Copyright 1997-2010 the PHP Documentation Group.
mysqli_stmt::bind_resultmysqli_stmt_bind_resultBinds variables to a prepared statement for result storage
Description
Object oriented style
bool mysqli_stmt::bind_result(mixed var1,
mixed ...);Procedural style
bool mysqli_stmt_bind_result(mysqli_stmt stmt,
mixed var1,
mixed ...);Binds columns in the result set to variables.
When mysqli_stmt_fetch is called to fetch
data, the MySQL client/server protocol places the data for the
bound columns into the specified variables var1,
....
Note that all columns must be bound after
mysqli_stmt_execute and prior to calling
mysqli_stmt_fetch. Depending on column
types bound variables can silently change to the corresponding
PHP type.
A column can be bound or rebound at any time, even after a
result set has been partially retrieved. The new binding takes
effect the next time mysqli_stmt_fetch is
called.
Parameters
-
stmt Procedural style only: A statement identifier returned by
mysqli_stmt_init.-
var1 The variable to be bound.
Return Values
Returns
TRUE
on success or
FALSE
on failure.
Examples
Example 21.115. Object oriented style
<?php
$mysqli = new mysqli("localhost", "my_user", "my_password", "world");
if (mysqli_connect_errno()) {
printf("Connect failed: %s\n", mysqli_connect_error());
exit();
}
/* prepare statement */
if ($stmt = $mysqli->prepare("SELECT Code, Name FROM Country ORDER BY Name LIMIT 5")) {
$stmt->execute();
/* bind variables to prepared statement */
$stmt->bind_result($col1, $col2);
/* fetch values */
while ($stmt->fetch()) {
printf("%s %s\n", $col1, $col2);
}
/* close statement */
$stmt->close();
}
/* close connection */
$mysqli->close();
?>
Example 21.116. Procedural style
<?php
$link = mysqli_connect("localhost", "my_user", "my_password", "world");
/* check connection */
if (!$link) {
printf("Connect failed: %s\n", mysqli_connect_error());
exit();
}
/* prepare statement */
if ($stmt = mysqli_prepare($link, "SELECT Code, Name FROM Country ORDER BY Name LIMIT 5")) {
mysqli_stmt_execute($stmt);
/* bind variables to prepared statement */
mysqli_stmt_bind_result($stmt, $col1, $col2);
/* fetch values */
while (mysqli_stmt_fetch($stmt)) {
printf("%s %s\n", $col1, $col2);
}
/* close statement */
mysqli_stmt_close($stmt);
}
/* close connection */
mysqli_close($link);
?>
The above examples will output:
AFG Afghanistan
ALB Albania
DZA Algeria
ASM American Samoa
AND Andorra
See Also
mysqli_stmt_bind_param
|
mysqli_stmt_execute
|
mysqli_stmt_fetch
|
mysqli_prepare
|
mysqli_stmt_prepare
|
mysqli_stmt_init
|
mysqli_stmt_errno
|
mysqli_stmt_error
|
Copyright 1997-2010 the PHP Documentation Group.
mysqli_stmt::closemysqli_stmt_closeCloses a prepared statement
Description
Object oriented style
bool mysqli_stmt::close();Procedural style
bool mysqli_stmt_close(mysqli_stmt stmt);
Closes a prepared statement.
mysqli_stmt_close also deallocates the
statement handle. If the current statement has pending or unread
results, this function cancels them so that the next query can
be executed.
Parameters
-
stmt Procedural style only: A statement identifier returned by
mysqli_stmt_init.
Return Values
Returns
TRUE
on success or
FALSE
on failure.
See Also
mysqli_prepare
|
Copyright 1997-2010 the PHP Documentation Group.
mysqli_stmt::data_seekmysqli_stmt_data_seekSeeks to an arbitrary row in statement result set
Description
Object oriented style
void mysqli_stmt::data_seek(int offset);Procedural style
void mysqli_stmt_data_seek(mysqli_stmt stmt,
int offset);Seeks to an arbitrary result pointer in the statement result set.
mysqli_stmt_store_result must be called
prior to mysqli_stmt_data_seek.
Parameters
-
stmt Procedural style only: A statement identifier returned by
mysqli_stmt_init.-
offset Must be between zero and the total number of rows minus one (0..
mysqli_stmt_num_rows- 1).
Return Values
No value is returned.
Examples
Example 21.117. Object oriented style
<?php
/* Open a connection */
$mysqli = new mysqli("localhost", "my_user", "my_password", "world");
/* check connection */
if (mysqli_connect_errno()) {
printf("Connect failed: %s\n", mysqli_connect_error());
exit();
}
$query = "SELECT Name, CountryCode FROM City ORDER BY Name";
if ($stmt = $mysqli->prepare($query)) {
/* execute query */
$stmt->execute();
/* bind result variables */
$stmt->bind_result($name, $code);
/* store result */
$stmt->store_result();
/* seek to row no. 400 */
$stmt->data_seek(399);
/* fetch values */
$stmt->fetch();
printf ("City: %s Countrycode: %s\n", $name, $code);
/* close statement */
$stmt->close();
}
/* close connection */
$mysqli->close();
?>
Example 21.118. Procedural style
<?php
/* Open a connection */
$link = mysqli_connect("localhost", "my_user", "my_password", "world");
/* check connection */
if (mysqli_connect_errno()) {
printf("Connect failed: %s\n", mysqli_connect_error());
exit();
}
$query = "SELECT Name, CountryCode FROM City ORDER BY Name";
if ($stmt = mysqli_prepare($link, $query)) {
/* execute query */
mysqli_stmt_execute($stmt);
/* bind result variables */
mysqli_stmt_bind_result($stmt, $name, $code);
/* store result */
mysqli_stmt_store_result($stmt);
/* seek to row no. 400 */
mysqli_stmt_data_seek($stmt, 399);
/* fetch values */
mysqli_stmt_fetch($stmt);
printf ("City: %s Countrycode: %s\n", $name, $code);
/* close statement */
mysqli_stmt_close($stmt);
}
/* close connection */
mysqli_close($link);
?>
The above examples will output:
City: Benin City Countrycode: NGA
See Also
mysqli_prepare
|
Copyright 1997-2010 the PHP Documentation Group.
mysqli_stmt->errnomysqli_stmt_errnoReturns the error code for the most recent statement call
Description
Object oriented style
mysqli_stmt {int errno ;
}
Procedural style
int mysqli_stmt_errno(mysqli_stmt stmt);Returns the error code for the most recently invoked statement function that can succeed or fail.
Client error message numbers are listed in the MySQL
errmsg.h header file, server error message
numbers are listed in mysqld_error.h. In
the MySQL source distribution you can find a complete list of
error messages and error numbers in the file
Docs/mysqld_error.txt.
Parameters
-
stmt Procedural style only: A statement identifier returned by
mysqli_stmt_init.
Return Values
An error code value. Zero means no error occurred.
Examples
Example 21.119. Object oriented style
<?php
/* Open a connection */
$mysqli = new mysqli("localhost", "my_user", "my_password", "world");
/* check connection */
if (mysqli_connect_errno()) {
printf("Connect failed: %s\n", mysqli_connect_error());
exit();
}
$mysqli->query("CREATE TABLE myCountry LIKE Country");
$mysqli->query("INSERT INTO myCountry SELECT * FROM Country");
$query = "SELECT Name, Code FROM myCountry ORDER BY Name";
if ($stmt = $mysqli->prepare($query)) {
/* drop table */
$mysqli->query("DROP TABLE myCountry");
/* execute query */
$stmt->execute();
printf("Error: %d.\n", $stmt->errno);
/* close statement */
$stmt->close();
}
/* close connection */
$mysqli->close();
?>
Example 21.120. Procedural style
<?php
/* Open a connection */
$link = mysqli_connect("localhost", "my_user", "my_password", "world");
/* check connection */
if (mysqli_connect_errno()) {
printf("Connect failed: %s\n", mysqli_connect_error());
exit();
}
mysqli_query($link, "CREATE TABLE myCountry LIKE Country");
mysqli_query($link, "INSERT INTO myCountry SELECT * FROM Country");
$query = "SELECT Name, Code FROM myCountry ORDER BY Name";
if ($stmt = mysqli_prepare($link, $query)) {
/* drop table */
mysqli_query($link, "DROP TABLE myCountry");
/* execute query */
mysqli_stmt_execute($stmt);
printf("Error: %d.\n", mysqli_stmt_errno($stmt));
/* close statement */
mysqli_stmt_close($stmt);
}
/* close connection */
mysqli_close($link);
?>
The above examples will output:
Error: 1146.
See Also
mysqli_stmt_error
|
mysqli_stmt_sqlstate
|
Copyright 1997-2010 the PHP Documentation Group.
mysqli_stmt->errormysqli_stmt_errorReturns a string description for last statement error
Description
Object oriented style
mysqli_stmt {string error ;
}
Procedural style
string mysqli_stmt_error(mysqli_stmt stmt);Returns a containing the error message for the most recently invoked statement function that can succeed or fail.
Parameters
-
stmt Procedural style only: A statement identifier returned by
mysqli_stmt_init.
Return Values
A string that describes the error. An empty string if no error occurred.
Examples
Example 21.121. Object oriented style
<?php
/* Open a connection */
$mysqli = new mysqli("localhost", "my_user", "my_password", "world");
/* check connection */
if (mysqli_connect_errno()) {
printf("Connect failed: %s\n", mysqli_connect_error());
exit();
}
$mysqli->query("CREATE TABLE myCountry LIKE Country");
$mysqli->query("INSERT INTO myCountry SELECT * FROM Country");
$query = "SELECT Name, Code FROM myCountry ORDER BY Name";
if ($stmt = $mysqli->prepare($query)) {
/* drop table */
$mysqli->query("DROP TABLE myCountry");
/* execute query */
$stmt->execute();
printf("Error: %s.\n", $stmt->error);
/* close statement */
$stmt->close();
}
/* close connection */
$mysqli->close();
?>
Example 21.122. Procedural style
<?php
/* Open a connection */
$link = mysqli_connect("localhost", "my_user", "my_password", "world");
/* check connection */
if (mysqli_connect_errno()) {
printf("Connect failed: %s\n", mysqli_connect_error());
exit();
}
mysqli_query($link, "CREATE TABLE myCountry LIKE Country");
mysqli_query($link, "INSERT INTO myCountry SELECT * FROM Country");
$query = "SELECT Name, Code FROM myCountry ORDER BY Name";
if ($stmt = mysqli_prepare($link, $query)) {
/* drop table */
mysqli_query($link, "DROP TABLE myCountry");
/* execute query */
mysqli_stmt_execute($stmt);
printf("Error: %s.\n", mysqli_stmt_error($stmt));
/* close statement */
mysqli_stmt_close($stmt);
}
/* close connection */
mysqli_close($link);
?>
The above examples will output:
Error: Table 'world.myCountry' doesn't exist.
See Also
mysqli_stmt_errno
|
mysqli_stmt_sqlstate
|
Copyright 1997-2010 the PHP Documentation Group.
mysqli_stmt::executemysqli_stmt_executeExecutes a prepared Query
Description
Object oriented style
bool mysqli_stmt::execute();Procedural style
bool mysqli_stmt_execute(mysqli_stmt stmt);
Executes a query that has been previously prepared using the
mysqli_prepare
function. When executed any parameter markers which exist will
automatically be replaced with the appropriate data.
If the statement is UPDATE,
DELETE, or INSERT, the
total number of affected rows can be determined by using the
mysqli_stmt_affected_rows function.
Likewise, if the query yields a result set the
mysqli_stmt_fetch function is used.
When using mysqli_stmt_execute, the
mysqli_stmt_fetch function must be used
to fetch the data prior to performing any additional queries.
Parameters
-
stmt Procedural style only: A statement identifier returned by
mysqli_stmt_init.
Return Values
Returns
TRUE
on success or
FALSE
on failure.
Examples
Example 21.123. Object oriented style
<?php
$mysqli = new mysqli("localhost", "my_user", "my_password", "world");
/* check connection */
if (mysqli_connect_errno()) {
printf("Connect failed: %s\n", mysqli_connect_error());
exit();
}
$mysqli->query("CREATE TABLE myCity LIKE City");
/* Prepare an insert statement */
$query = "INSERT INTO myCity (Name, CountryCode, District) VALUES (?,?,?)";
$stmt = $mysqli->prepare($query);
$stmt->bind_param("sss", $val1, $val2, $val3);
$val1 = 'Stuttgart';
$val2 = 'DEU';
$val3 = 'Baden-Wuerttemberg';
/* Execute the statement */
$stmt->execute();
$val1 = 'Bordeaux';
$val2 = 'FRA';
$val3 = 'Aquitaine';
/* Execute the statement */
$stmt->execute();
/* close statement */
$stmt->close();
/* retrieve all rows from myCity */
$query = "SELECT Name, CountryCode, District FROM myCity";
if ($result = $mysqli->query($query)) {
while ($row = $result->fetch_row()) {
printf("%s (%s,%s)\n", $row[0], $row[1], $row[2]);
}
/* free result set */
$result->close();
}
/* remove table */
$mysqli->query("DROP TABLE myCity");
/* close connection */
$mysqli->close();
?>
Example 21.124. Procedural style
<?php
$link = mysqli_connect("localhost", "my_user", "my_password", "world");
/* check connection */
if (mysqli_connect_errno()) {
printf("Connect failed: %s\n", mysqli_connect_error());
exit();
}
mysqli_query($link, "CREATE TABLE myCity LIKE City");
/* Prepare an insert statement */
$query = "INSERT INTO myCity (Name, CountryCode, District) VALUES (?,?,?)";
$stmt = mysqli_prepare($link, $query);
mysqli_stmt_bind_param($stmt, "sss", $val1, $val2, $val3);
$val1 = 'Stuttgart';
$val2 = 'DEU';
$val3 = 'Baden-Wuerttemberg';
/* Execute the statement */
mysqli_stmt_execute($stmt);
$val1 = 'Bordeaux';
$val2 = 'FRA';
$val3 = 'Aquitaine';
/* Execute the statement */
mysqli_stmt_execute($stmt);
/* close statement */
mysqli_stmt_close($stmt);
/* retrieve all rows from myCity */
$query = "SELECT Name, CountryCode, District FROM myCity";
if ($result = mysqli_query($link, $query)) {
while ($row = mysqli_fetch_row($result)) {
printf("%s (%s,%s)\n", $row[0], $row[1], $row[2]);
}
/* free result set */
mysqli_free_result($result);
}
/* remove table */
mysqli_query($link, "DROP TABLE myCity");
/* close connection */
mysqli_close($link);
?>
The above examples will output:
Stuttgart (DEU,Baden-Wuerttemberg)
Bordeaux (FRA,Aquitaine)
See Also
mysqli_prepare
|
mysqli_stmt_bind_param
|
Copyright 1997-2010 the PHP Documentation Group.
mysqli_stmt::fetchmysqli_stmt_fetchFetch results from a prepared statement into the bound variables
Description
Object oriented style
bool mysqli_stmt::fetch();Procedural style
bool mysqli_stmt_fetch(mysqli_stmt stmt);
Fetch the result from a prepared statement into the variables
bound by mysqli_stmt_bind_result.
Note that all columns must be bound by the application before
calling mysqli_stmt_fetch.
Data are transferred unbuffered without calling
mysqli_stmt_store_result which can
decrease performance (but reduces memory cost).
Parameters
-
stmt Procedural style only: A statement identifier returned by
mysqli_stmt_init.
Return Values
Table 21.13. Return Values
| Value | Description |
|---|---|
TRUE | Success. Data has been fetched |
FALSE | Error occurred |
NULL | No more rows/data exists or data truncation occurred |
Examples
Example 21.125. Object oriented style
<?php
$mysqli = new mysqli("localhost", "my_user", "my_password", "world");
/* check connection */
if (mysqli_connect_errno()) {
printf("Connect failed: %s\n", mysqli_connect_error());
exit();
}
$query = "SELECT Name, CountryCode FROM City ORDER by ID DESC LIMIT 150,5";
if ($stmt = $mysqli->prepare($query)) {
/* execute statement */
$stmt->execute();
/* bind result variables */
$stmt->bind_result($name, $code);
/* fetch values */
while ($stmt->fetch()) {
printf ("%s (%s)\n", $name, $code);
}
/* close statement */
$stmt->close();
}
/* close connection */
$mysqli->close();
?>
Example 21.126. Procedural style
<?php
$link = mysqli_connect("localhost", "my_user", "my_password", "world");
/* check connection */
if (mysqli_connect_errno()) {
printf("Connect failed: %s\n", mysqli_connect_error());
exit();
}
$query = "SELECT Name, CountryCode FROM City ORDER by ID DESC LIMIT 150,5";
if ($stmt = mysqli_prepare($link, $query)) {
/* execute statement */
mysqli_stmt_execute($stmt);
/* bind result variables */
mysqli_stmt_bind_result($stmt, $name, $code);
/* fetch values */
while (mysqli_stmt_fetch($stmt)) {
printf ("%s (%s)\n", $name, $code);
}
/* close statement */
mysqli_stmt_close($stmt);
}
/* close connection */
mysqli_close($link);
?>
The above examples will output:
Rockford (USA)
Tallahassee (USA)
Salinas (USA)
Santa Clarita (USA)
Springfield (USA)
See Also
mysqli_prepare
|
mysqli_stmt_errno
|
mysqli_stmt_error
|
mysqli_stmt_bind_result
|
Copyright 1997-2010 the PHP Documentation Group.
mysqli_stmt->field_countmysqli_stmt_field_countReturns the number of field in the given statement
Description
Object oriented style
mysqli_stmt {int field_count ;
}
Procedural style
int mysqli_stmt_field_count(mysqli_stmt stmt);This function is currently not documented; only its argument list is available.
Copyright 1997-2010 the PHP Documentation Group.
mysqli_stmt::free_resultmysqli_stmt_free_resultFrees stored result memory for the given statement handle
Description
Object oriented style
void mysqli_stmt::free_result();Procedural style
void mysqli_stmt_free_result(mysqli_stmt stmt);
Frees the result memory associated with the statement, which was
allocated by mysqli_stmt_store_result.
Parameters
-
stmt Procedural style only: A statement identifier returned by
mysqli_stmt_init.
Return Values
No value is returned.
See Also
mysqli_stmt_store_result
|
Copyright 1997-2010 the PHP Documentation Group.
mysqli_stmt::get_warningsmysqli_stmt_get_warningsGet result of SHOW WARNINGS
Description
Object oriented style
object mysqli_stmt::get_warnings(mysqli_stmt stmt);Procedural style
object mysqli_stmt_get_warnings(mysqli_stmt stmt);This function is currently not documented; only its argument list is available.
Copyright 1997-2010 the PHP Documentation Group.
mysqli_stmt->insert_idmysqli_stmt_insert_idGet the ID generated from the previous INSERT operation
Description
Object oriented style
mysqli_stmt {int insert_id ;
}
Procedural style
mixed mysqli_stmt_insert_id(mysqli_stmt stmt);This function is currently not documented; only its argument list is available.
Copyright 1997-2010 the PHP Documentation Group.
mysqli_stmt::num_rowsmysqli_stmt_num_rowsReturn the number of rows in statements result set
Description
Object oriented style
mysqli_stmt {int num_rows ;
}
Procedural style
int mysqli_stmt_num_rows(mysqli_stmt stmt);
Returns the number of rows in the result set. The use of
mysqli_stmt_num_rows depends on whether or
not you used mysqli_stmt_store_result to
buffer the entire result set in the statement handle.
If you use mysqli_stmt_store_result,
mysqli_stmt_num_rows may be called
immediately.
Parameters
-
stmt Procedural style only: A statement identifier returned by
mysqli_stmt_init.
Return Values
An integer representing the number of rows in result set.
Examples
Example 21.127. Object oriented style
<?php
/* Open a connection */
$mysqli = new mysqli("localhost", "my_user", "my_password", "world");
/* check connection */
if (mysqli_connect_errno()) {
printf("Connect failed: %s\n", mysqli_connect_error());
exit();
}
$query = "SELECT Name, CountryCode FROM City ORDER BY Name LIMIT 20";
if ($stmt = $mysqli->prepare($query)) {
/* execute query */
$stmt->execute();
/* store result */
$stmt->store_result();
printf("Number of rows: %d.\n", $stmt->num_rows);
/* close statement */
$stmt->close();
}
/* close connection */
$mysqli->close();
?>
Example 21.128. Procedural style
<?php
/* Open a connection */
$link = mysqli_connect("localhost", "my_user", "my_password", "world");
/* check connection */
if (mysqli_connect_errno()) {
printf("Connect failed: %s\n", mysqli_connect_error());
exit();
}
$query = "SELECT Name, CountryCode FROM City ORDER BY Name LIMIT 20";
if ($stmt = mysqli_prepare($link, $query)) {
/* execute query */
mysqli_stmt_execute($stmt);
/* store result */
mysqli_stmt_store_result($stmt);
printf("Number of rows: %d.\n", mysqli_stmt_num_rows($stmt));
/* close statement */
mysqli_stmt_close($stmt);
}
/* close connection */
mysqli_close($link);
?>
The above examples will output:
Number of rows: 20.
See Also
mysqli_stmt_affected_rows
|
mysqli_prepare
|
mysqli_stmt_store_result
|
Copyright 1997-2010 the PHP Documentation Group.
mysqli_stmt->param_countmysqli_stmt_param_countReturns the number of parameter for the given statement
Description
Object oriented style
mysqli_stmt {int param_count ;
}
Procedural style
int mysqli_stmt_param_count(mysqli_stmt stmt);Returns the number of parameter markers present in the prepared statement.
Parameters
-
stmt Procedural style only: A statement identifier returned by
mysqli_stmt_init.
Return Values
Returns an integer representing the number of parameters.
Examples
Example 21.129. Object oriented style
<?php
$mysqli = new mysqli("localhost", "my_user", "my_password", "world");
/* check connection */
if (mysqli_connect_errno()) {
printf("Connect failed: %s\n", mysqli_connect_error());
exit();
}
if ($stmt = $mysqli->prepare("SELECT Name FROM Country WHERE Name=? OR Code=?")) {
$marker = $stmt->param_count;
printf("Statement has %d markers.\n", $marker);
/* close statement */
$stmt->close();
}
/* close connection */
$mysqli->close();
?>
Example 21.130. Procedural style
<?php
$link = mysqli_connect("localhost", "my_user", "my_password", "world");
/* check connection */
if (mysqli_connect_errno()) {
printf("Connect failed: %s\n", mysqli_connect_error());
exit();
}
if ($stmt = mysqli_prepare($link, "SELECT Name FROM Country WHERE Name=? OR Code=?")) {
$marker = mysqli_stmt_param_count($stmt);
printf("Statement has %d markers.\n", $marker);
/* close statement */
mysqli_stmt_close($stmt);
}
/* close connection */
mysqli_close($link);
?>
The above examples will output:
Statement has 2 markers.
See Also
mysqli_prepare
|
Copyright 1997-2010 the PHP Documentation Group.
mysqli_stmt::preparemysqli_stmt_preparePrepare an SQL statement for execution
Description
Object oriented style
mixed mysqli_stmt::prepare(string query);Procedural style
bool mysqli_stmt_prepare(mysqli_stmt stmt,
string query);Prepares the SQL query pointed to by the null-terminated string query.
The parameter markers must be bound to application variables
using mysqli_stmt_bind_param and/or
mysqli_stmt_bind_result before executing
the statement or fetching rows.
In the case where you pass a statement to
mysqli_stmt_prepare that is longer than
max_allowed_packet of the server, the
returned error codes are different depending on whether you
are using MySQL Native Driver (mysqlnd) or
MySQL Client Library (libmysql). The
behavior is as follows:
mysqlndon Linux returns an error code of 1153. The error message means “got a packet bigger thanmax_allowed_packetbytes”.mysqlndon Windows returns an error code 2006. This error message means “server has gone away”.libmysqlon all platforms returns an error code 2006. This error message means “server has gone away”.
Parameters
-
stmt Procedural style only: A statement identifier returned by
mysqli_stmt_init.-
query The query, as a string. It must consist of a single SQL statement.
You can include one or more parameter markers in the SQL statement by embedding question mark (
?) characters at the appropriate positions.NoteYou should not add a terminating semicolon or
\gto the statement.NoteThe markers are legal only in certain places in SQL statements. For example, they are allowed in the VALUES() list of an INSERT statement (to specify column values for a row), or in a comparison with a column in a WHERE clause to specify a comparison value.
However, they are not allowed for identifiers (such as table or column names), in the select list that names the columns to be returned by a SELECT statement), or to specify both operands of a binary operator such as the
=equal sign. The latter restriction is necessary because it would be impossible to determine the parameter type. In general, parameters are legal only in Data Manipulation Language (DML) statements, and not in Data Definition Language (DDL) statements.
Return Values
Returns
TRUE
on success or
FALSE
on failure.
Examples
Example 21.131. Object oriented style
<?php
$mysqli = new mysqli("localhost", "my_user", "my_password", "world");
/* check connection */
if (mysqli_connect_errno()) {
printf("Connect failed: %s\n", mysqli_connect_error());
exit();
}
$city = "Amersfoort";
/* create a prepared statement */
$stmt = $mysqli->stmt_init();
if ($stmt->prepare("SELECT District FROM City WHERE Name=?")) {
/* bind parameters for markers */
$stmt->bind_param("s", $city);
/* execute query */
$stmt->execute();
/* bind result variables */
$stmt->bind_result($district);
/* fetch value */
$stmt->fetch();
printf("%s is in district %s\n", $city, $district);
/* close statement */
$stmt->close();
}
/* close connection */
$mysqli->close();
?>
Example 21.132. Procedural style
<?php
$link = mysqli_connect("localhost", "my_user", "my_password", "world");
/* check connection */
if (mysqli_connect_errno()) {
printf("Connect failed: %s\n", mysqli_connect_error());
exit();
}
$city = "Amersfoort";
/* create a prepared statement */
$stmt = mysqli_stmt_init($link);
if (mysqli_stmt_prepare($stmt, 'SELECT District FROM City WHERE Name=?')) {
/* bind parameters for markers */
mysqli_stmt_bind_param($stmt, "s", $city);
/* execute query */
mysqli_stmt_execute($stmt);
/* bind result variables */
mysqli_stmt_bind_result($stmt, $district);
/* fetch value */
mysqli_stmt_fetch($stmt);
printf("%s is in district %s\n", $city, $district);
/* close statement */
mysqli_stmt_close($stmt);
}
/* close connection */
mysqli_close($link);
?>
The above examples will output:
Amersfoort is in district Utrecht
See Also
mysqli_stmt_init,
mysqli_stmt_execute,
mysqli_stmt_fetch,
mysqli_stmt_bind_param,
mysqli_stmt_bind_result
mysqli_stmt_close.
Copyright 1997-2010 the PHP Documentation Group.
mysqli_stmt::resetmysqli_stmt_resetResets a prepared statement
Description
Object oriented style
bool mysqli_stmt::reset();Procedural style
bool mysqli_stmt_reset(mysqli_stmt stmt);Resets a prepared statement on client and server to state after prepare.
It resets the statement on the server, data sent using
mysqli_stmt_send_long_data, unbuffered
result sets and current errors. It does not clear bindings or
stored result sets. Stored result sets will be cleared when
executing the prepared statement (or closing it).
To prepare a statement with another query use function
mysqli_stmt_prepare.
Parameters
-
stmt Procedural style only: A statement identifier returned by
mysqli_stmt_init.
Return Values
Returns
TRUE
on success or
FALSE
on failure.
See Also
mysqli_prepare
|
Copyright 1997-2010 the PHP Documentation Group.
mysqli_stmt::result_metadatamysqli_stmt_result_metadataReturns result set metadata from a prepared statement
Description
Object oriented style
mysqli_result mysqli_stmt::result_metadata();Procedural style
mysqli_result mysqli_stmt_result_metadata(mysqli_stmt stmt);
If a statement passed to
mysqli_prepare
is one that produces a result set,
mysqli_stmt_result_metadata returns the
result object that can be used to process the meta information
such as total number of fields and individual field information.
This result set pointer can be passed as an argument to any of the field-based functions that process result set metadata, such as:
mysqli_num_fieldsmysqli_fetch_fieldmysqli_fetch_field_directmysqli_fetch_fieldsmysqli_field_countmysqli_field_seekmysqli_field_tellmysqli_free_result
The result set structure should be freed when you are done with
it, which you can do by passing it to
mysqli_free_result
The result set returned by
mysqli_stmt_result_metadata contains only
metadata. It does not contain any row results. The rows are
obtained by using the statement handle with
mysqli_stmt_fetch.
Parameters
-
stmt Procedural style only: A statement identifier returned by
mysqli_stmt_init.
Return Values
Returns a result object or
FALSE
if an error occurred.
Examples
Example 21.133. Object oriented style
<?php
$mysqli = new mysqli("localhost", "my_user", "my_password", "test");
$mysqli->query("DROP TABLE IF EXISTS friends");
$mysqli->query("CREATE TABLE friends (id int, name varchar(20))");
$mysqli->query("INSERT INTO friends VALUES (1,'Hartmut'), (2, 'Ulf')");
$stmt = $mysqli->prepare("SELECT id, name FROM friends");
$stmt->execute();
/* get resultset for metadata */
$result = $stmt->result_metadata();
/* retrieve field information from metadata result set */
$field = $result->fetch_field();
printf("Fieldname: %s\n", $field->name);
/* close resultset */
$result->close();
/* close connection */
$mysqli->close();
?>
Example 21.134. Procedural style
<?php
$link = mysqli_connect("localhost", "my_user", "my_password", "test");
mysqli_query($link, "DROP TABLE IF EXISTS friends");
mysqli_query($link, "CREATE TABLE friends (id int, name varchar(20))");
mysqli_query($link, "INSERT INTO friends VALUES (1,'Hartmut'), (2, 'Ulf')");
$stmt = mysqli_prepare($link, "SELECT id, name FROM friends");
mysqli_stmt_execute($stmt);
/* get resultset for metadata */
$result = mysqli_stmt_result_metadata($stmt);
/* retrieve field information from metadata result set */
$field = mysqli_fetch_field($result);
printf("Fieldname: %s\n", $field->name);
/* close resultset */
mysqli_free_result($result);
/* close connection */
mysqli_close($link);
?>
See Also
mysqli_prepare
|
mysqli_free_result
|
Copyright 1997-2010 the PHP Documentation Group.
mysqli_stmt::send_long_datamysqli_stmt_send_long_dataSend data in blocks
Description
Object oriented style
bool mysqli_stmt::send_long_data(int param_nr,
string data);Procedural style
bool mysqli_stmt_send_long_data(mysqli_stmt stmt,
int param_nr,
string data);
Allows to send parameter data to the server in pieces (or
chunks), e.g. if the size of a blob exceeds the size of
max_allowed_packet. This function can be
called multiple times to send the parts of a character or binary
data value for a column, which must be one of the TEXT or BLOB
datatypes.
Parameters
-
stmt Procedural style only: A statement identifier returned by
mysqli_stmt_init.-
param_nr Indicates which parameter to associate the data with. Parameters are numbered beginning with 0.
-
data A string containing data to be sent.
Return Values
Returns
TRUE
on success or
FALSE
on failure.
Examples
Example 21.135. Object oriented style
<?php
$stmt = $mysqli->prepare("INSERT INTO messages (message) VALUES (?)");
$null = NULL;
$stmt->bind_param("b", $null);
$fp = fopen("messages.txt", "r");
while (!feof($fp)) {
$stmt->send_long_data(0, fread($fp, 8192));
}
fclose($fp);
$stmt->execute();
?>
See Also
mysqli_prepare
|
mysqli_stmt_bind_param
|
Copyright 1997-2010 the PHP Documentation Group.
mysqli_stmt::sqlstatemysqli_stmt_sqlstateReturns SQLSTATE error from previous statement operation
Description
Object oriented style
mysqli_stmt {string sqlstate ;
}
Procedural style
string mysqli_stmt_sqlstate(mysqli_stmt stmt);
Returns a string containing the SQLSTATE error code for the most
recently invoked prepared statement function that can succeed or
fail. The error code consists of five characters.
'00000' means no error. The values
are specified by ANSI SQL and ODBC. For a list of possible
values, see
http://dev.mysql.com/doc/mysql/en/error-handling.html.
Parameters
-
stmt Procedural style only: A statement identifier returned by
mysqli_stmt_init.
Return Values
Returns a string containing the SQLSTATE error code for the last
error. The error code consists of five characters.
'00000' means no error.
Notes
Note that not all MySQL errors are yet mapped to
SQLSTATE's. The value HY000 (general
error) is used for unmapped errors.
Examples
Example 21.136. Object oriented style
<?php
/* Open a connection */
$mysqli = new mysqli("localhost", "my_user", "my_password", "world");
/* check connection */
if (mysqli_connect_errno()) {
printf("Connect failed: %s\n", mysqli_connect_error());
exit();
}
$mysqli->query("CREATE TABLE myCountry LIKE Country");
$mysqli->query("INSERT INTO myCountry SELECT * FROM Country");
$query = "SELECT Name, Code FROM myCountry ORDER BY Name";
if ($stmt = $mysqli->prepare($query)) {
/* drop table */
$mysqli->query("DROP TABLE myCountry");
/* execute query */
$stmt->execute();
printf("Error: %s.\n", $stmt->sqlstate);
/* close statement */
$stmt->close();
}
/* close connection */
$mysqli->close();
?>
Procedural style
<?php
/* Open a connection */
$link = mysqli_connect("localhost", "my_user", "my_password", "world");
/* check connection */
if (mysqli_connect_errno()) {
printf("Connect failed: %s\n", mysqli_connect_error());
exit();
}
mysqli_query($link, "CREATE TABLE myCountry LIKE Country");
mysqli_query($link, "INSERT INTO myCountry SELECT * FROM Country");
$query = "SELECT Name, Code FROM myCountry ORDER BY Name";
if ($stmt = mysqli_prepare($link, $query)) {
/* drop table */
mysqli_query($link, "DROP TABLE myCountry");
/* execute query */
mysqli_stmt_execute($stmt);
printf("Error: %s.\n", mysqli_stmt_sqlstate($stmt));
/* close statement */
mysqli_stmt_close($stmt);
}
/* close connection */
mysqli_close($link);
?>
The above examples will output:
Error: 42S02.
See Also
mysqli_stmt_errno
|
mysqli_stmt_error
|
Copyright 1997-2010 the PHP Documentation Group.
mysqli_stmt::store_resultmysqli_stmt_store_resultTransfers a result set from a prepared statement
Description
Object oriented style
bool mysqli_stmt::store_result();Procedural style
bool mysqli_stmt_store_result(mysqli_stmt stmt);
You must call mysqli_stmt_store_result for
every query that successfully produces a result set
(SELECT, SHOW, DESCRIBE, EXPLAIN), and only
if you want to buffer the complete result set by the client, so
that the subsequent mysqli_stmt_fetch call
returns buffered data.
It is unnecessary to call
mysqli_stmt_store_result for other
queries, but if you do, it will not harm or cause any notable
performance in all cases. You can detect whether the query
produced a result set by checking if
mysqli_stmt_result_metadata returns NULL.
Parameters
-
stmt Procedural style only: A statement identifier returned by
mysqli_stmt_init.
Return Values
Returns
TRUE
on success or
FALSE
on failure.
Examples
Example 21.137. Object oriented style
<?php
/* Open a connection */
$mysqli = new mysqli("localhost", "my_user", "my_password", "world");
/* check connection */
if (mysqli_connect_errno()) {
printf("Connect failed: %s\n", mysqli_connect_error());
exit();
}
$query = "SELECT Name, CountryCode FROM City ORDER BY Name LIMIT 20";
if ($stmt = $mysqli->prepare($query)) {
/* execute query */
$stmt->execute();
/* store result */
$stmt->store_result();
printf("Number of rows: %d.\n", $stmt->num_rows);
/* free result */
$stmt->free_result();
/* close statement */
$stmt->close();
}
/* close connection */
$mysqli->close();
?>
Procedural style
<?php
/* Open a connection */
$link = mysqli_connect("localhost", "my_user", "my_password", "world");
/* check connection */
if (mysqli_connect_errno()) {
printf("Connect failed: %s\n", mysqli_connect_error());
exit();
}
$query = "SELECT Name, CountryCode FROM City ORDER BY Name LIMIT 20";
if ($stmt = mysqli_prepare($link, $query)) {
/* execute query */
mysqli_stmt_execute($stmt);
/* store result */
mysqli_stmt_store_result($stmt);
printf("Number of rows: %d.\n", mysqli_stmt_num_rows($stmt));
/* free result */
mysqli_stmt_free_result($stmt);
/* close statement */
mysqli_stmt_close($stmt);
}
/* close connection */
mysqli_close($link);
?>
The above examples will output:
Number of rows: 20.
See Also
mysqli_prepare
|
mysqli_stmt_result_metadata
|
mysqli_stmt_fetch
|
- 21.10.2.9.1.
mysqli_result->current_field,mysqli_field_tell - 21.10.2.9.2.
mysqli_result::data_seek,mysqli_data_seek - 21.10.2.9.3.
mysqli_result::fetch_all,mysqli_fetch_all - 21.10.2.9.4.
mysqli_result::fetch_array,mysqli_fetch_array - 21.10.2.9.5.
mysqli_result::fetch_assoc,mysqli_fetch_assoc - 21.10.2.9.6.
mysqli_result::fetch_field_direct,mysqli_fetch_field_direct - 21.10.2.9.7.
mysqli_result::fetch_field,mysqli_fetch_field - 21.10.2.9.8.
mysqli_result::fetch_fields,mysqli_fetch_fields - 21.10.2.9.9.
mysqli_result::fetch_object,mysqli_fetch_object - 21.10.2.9.10.
mysqli_result::fetch_row,mysqli_fetch_row - 21.10.2.9.11.
mysqli_result->field_count,mysqli_num_fields - 21.10.2.9.12.
mysqli_result::field_seek,mysqli_field_seek - 21.10.2.9.13.
mysqli_result::free,mysqli_free_result - 21.10.2.9.14.
mysqli_result->lengths,mysqli_fetch_lengths - 21.10.2.9.15.
mysqli_result->num_rows,mysqli_num_rows
Copyright 1997-2010 the PHP Documentation Group.
Represents the result set obtained from a query against the database.
MySQLi_Result {
MySQLi_Result Propertiesint current_field ;int field_count ;array lengths ;int num_rows ;
Methodsint mysqli_field_tell(mysqli_result result);bool mysqli_result::data_seek(int offset);mixed mysqli_result::fetch_all(int resulttype= =MYSQLI_NUM);mixed mysqli_result::fetch_array(int resulttype= =MYSQLI_BOTH);array mysqli_result::fetch_assoc();object mysqli_result::fetch_field_direct(int fieldnr);object mysqli_result::fetch_field();array mysqli_result::fetch_fields();object mysqli_result::fetch_object(string class_name,
array params);mixed mysqli_result::fetch_row();int mysqli_num_fields(mysqli_result result);bool mysqli_result::field_seek(int fieldnr);void mysqli_result::free();array mysqli_fetch_lengths(mysqli_result result);int mysqli_num_rows(mysqli_result result);
}
Copyright 1997-2010 the PHP Documentation Group.
mysqli_result->current_fieldmysqli_field_tellGet current field offset of a result pointer
Description
Object oriented style
mysqli_result {int current_field ;
}
Procedural style
int mysqli_field_tell(mysqli_result result);
Returns the position of the field cursor used for the last
mysqli_fetch_field call. This value can be
used as an argument to mysqli_field_seek.
Parameters
-
result Procedural style only: A result set identifier returned by
mysqli_query,mysqli_store_resultormysqli_use_result.
Return Values
Returns current offset of field cursor.
Examples
Example 21.138. Object oriented style
<?php
$mysqli = new mysqli("localhost", "my_user", "my_password", "world");
/* check connection */
if (mysqli_connect_errno()) {
printf("Connect failed: %s\n", mysqli_connect_error());
exit();
}
$query = "SELECT Name, SurfaceArea from Country ORDER BY Code LIMIT 5";
if ($result = $mysqli->query($query)) {
/* Get field information for all columns */
while ($finfo = $result->fetch_field()) {
/* get fieldpointer offset */
$currentfield = $result->current_field;
printf("Column %d:\n", $currentfield);
printf("Name: %s\n", $finfo->name);
printf("Table: %s\n", $finfo->table);
printf("max. Len: %d\n", $finfo->max_length);
printf("Flags: %d\n", $finfo->flags);
printf("Type: %d\n\n", $finfo->type);
}
$result->close();
}
/* close connection */
$mysqli->close();
?>
Procedural style
<?php
$link = mysqli_connect("localhost", "my_user", "my_password", "world");
/* check connection */
if (mysqli_connect_errno()) {
printf("Connect failed: %s\n", mysqli_connect_error());
exit();
}
$query = "SELECT Name, SurfaceArea from Country ORDER BY Code LIMIT 5";
if ($result = mysqli_query($link, $query)) {
/* Get field information for all fields */
while ($finfo = mysqli_fetch_field($result)) {
/* get fieldpointer offset */
$currentfield = mysqli_field_tell($result);
printf("Column %d:\n", $currentfield);
printf("Name: %s\n", $finfo->name);
printf("Table: %s\n", $finfo->table);
printf("max. Len: %d\n", $finfo->max_length);
printf("Flags: %d\n", $finfo->flags);
printf("Type: %d\n\n", $finfo->type);
}
mysqli_free_result($result);
}
/* close connection */
mysqli_close($link);
?>
The above examples will output:
Column 1:
Name: Name
Table: Country
max. Len: 11
Flags: 1
Type: 254
Column 2:
Name: SurfaceArea
Table: Country
max. Len: 10
Flags: 32769
Type: 4
See Also
mysqli_fetch_field
|
mysqli_field_seek
|
Copyright 1997-2010 the PHP Documentation Group.
mysqli_result::data_seekmysqli_data_seekAdjusts the result pointer to an arbitary row in the result
Description
Object oriented style
bool mysqli_result::data_seek(int offset);Procedural style
bool mysqli_data_seek(mysqli_result result,
int offset);
The mysqli_data_seek function seeks to an
arbitrary result pointer specified by the
offset in the result set.
Parameters
-
result Procedural style only: A result set identifier returned by
mysqli_query,mysqli_store_resultormysqli_use_result.-
offset The field offset. Must be between zero and the total number of rows minus one (0..
mysqli_num_rows- 1).
Return Values
Returns
TRUE
on success or
FALSE
on failure.
Notes
This function can only be used with buffered results attained
from the use of the mysqli_store_result
or
mysqli_query
functions.
Examples
Example 21.139. Object oriented style
<?php
/* Open a connection */
$mysqli = new mysqli("localhost", "my_user", "my_password", "world");
/* check connection */
if (mysqli_connect_errno()) {
printf("Connect failed: %s\n", mysqli_connect_error());
exit();
}
$query = "SELECT Name, CountryCode FROM City ORDER BY Name";
if ($result = $mysqli->query( $query)) {
/* seek to row no. 400 */
$result->data_seek(399);
/* fetch row */
$row = $result->fetch_row();
printf ("City: %s Countrycode: %s\n", $row[0], $row[1]);
/* free result set*/
$result->close();
}
/* close connection */
$mysqli->close();
?>
Procedural style
<?php
/* Open a connection */
$link = mysqli_connect("localhost", "my_user", "my_password", "world");
/* check connection */
if (!$link) {
printf("Connect failed: %s\n", mysqli_connect_error());
exit();
}
$query = "SELECT Name, CountryCode FROM City ORDER BY Name";
if ($result = mysqli_query($link, $query)) {
/* seek to row no. 400 */
mysqli_data_seek($result, 399);
/* fetch row */
$row = mysqli_fetch_row($result);
printf ("City: %s Countrycode: %s\n", $row[0], $row[1]);
/* free result set*/
mysqli_free_result($result);
}
/* close connection */
mysqli_close($link);
?>
The above examples will output:
City: Benin City Countrycode: NGA
See Also
mysqli_store_result
|
mysqli_fetch_row
|
mysqli_fetch_array
|
mysqli_fetch_assoc
|
mysqli_fetch_object
|
mysqli_query
|
mysqli_num_rows
|
Copyright 1997-2010 the PHP Documentation Group.
mysqli_result::fetch_allmysqli_fetch_allFetches all result rows as an associative array, a numeric array, or both
Description
Object oriented style
mixed mysqli_result::fetch_all(int resulttype= =MYSQLI_NUM);Procedural style
mixed mysqli_fetch_all(mysqli_result result,
int resulttype= =MYSQLI_NUM);
mysqli_fetch_all fetches all result rows
and returns the result set as an associative array, a numeric
array, or both.
Parameters
-
result Procedural style only: A result set identifier returned by
mysqli_query,mysqli_store_resultormysqli_use_result.-
resulttype This optional parameter is a constant indicating what type of array should be produced from the current row data. The possible values for this parameter are the constants
MYSQLI_ASSOC,MYSQLI_NUM, orMYSQLI_BOTH.
Return Values
Returns an array of associative or numeric arrays holding result rows.
MySQL Native Driver Only
Available only with mysqlnd.
As mysqli_fetch_all returns all the rows as
an array in a single step, it may consume more memory than some
similar functions such as
mysqli_fetch_array, which only returns one
row at a time from the result set. Further, if you need to
iterate over the result set, you will need a looping construct
that will further impact performance. For these reasons
mysqli_fetch_all should only be used in
those situations where the fetched result set will be sent to
another layer for processing.
See Also
mysqli_fetch_array
|
mysqli_query
|
Copyright 1997-2010 the PHP Documentation Group.
mysqli_result::fetch_arraymysqli_fetch_arrayFetch a result row as an associative, a numeric array, or both
Description
Object oriented style
mixed mysqli_result::fetch_array(int resulttype= =MYSQLI_BOTH);Procedural style
mixed mysqli_fetch_array(mysqli_result result,
int resulttype= =MYSQLI_BOTH);
Returns an array that corresponds to the fetched row or
NULL
if there are no more rows for the resultset represented by the
result parameter.
mysqli_fetch_array is an extended version
of the mysqli_fetch_row function. In
addition to storing the data in the numeric indices of the
result array, the mysqli_fetch_array
function can also store the data in associative indices, using
the field names of the result set as keys.
Field names returned by this function are case-sensitive.
This function sets NULL fields to
the PHP NULL value.
If two or more columns of the result have the same field names, the last column will take precedence and overwrite the earlier data. In order to access multiple columns with the same name, the numerically indexed version of the row must be used.
Parameters
-
result Procedural style only: A result set identifier returned by
mysqli_query,mysqli_store_resultormysqli_use_result.-
resulttype This optional parameter is a constant indicating what type of array should be produced from the current row data. The possible values for this parameter are the constants
MYSQLI_ASSOC,MYSQLI_NUM, orMYSQLI_BOTH.By using the
MYSQLI_ASSOCconstant this function will behave identically to themysqli_fetch_assoc, whileMYSQLI_NUMwill behave identically to themysqli_fetch_rowfunction. The final optionMYSQLI_BOTHwill create a single array with the attributes of both.
Return Values
Returns an array of strings that corresponds to the fetched row
or
NULL
if there are no more rows in resultset.
Examples
Example 21.140. Object oriented style
<?php
$mysqli = new mysqli("localhost", "my_user", "my_password", "world");
/* check connection */
if (mysqli_connect_errno()) {
printf("Connect failed: %s\n", mysqli_connect_error());
exit();
}
$query = "SELECT Name, CountryCode FROM City ORDER by ID LIMIT 3";
$result = $mysqli->query($query);
/* numeric array */
$row = $result->fetch_array(MYSQLI_NUM);
printf ("%s (%s)\n", $row[0], $row[1]);
/* associative array */
$row = $result->fetch_array(MYSQLI_ASSOC);
printf ("%s (%s)\n", $row["Name"], $row["CountryCode"]);
/* associative and numeric array */
$row = $result->fetch_array(MYSQLI_BOTH);
printf ("%s (%s)\n", $row[0], $row["CountryCode"]);
/* free result set */
$result->close();
/* close connection */
$mysqli->close();
?>
Procedural style
<?php
$link = mysqli_connect("localhost", "my_user", "my_password", "world");
/* check connection */
if (mysqli_connect_errno()) {
printf("Connect failed: %s\n", mysqli_connect_error());
exit();
}
$query = "SELECT Name, CountryCode FROM City ORDER by ID LIMIT 3";
$result = mysqli_query($link, $query);
/* numeric array */
$row = mysqli_fetch_array($result, MYSQLI_NUM);
printf ("%s (%s)\n", $row[0], $row[1]);
/* associative array */
$row = mysqli_fetch_array($result, MYSQLI_ASSOC);
printf ("%s (%s)\n", $row["Name"], $row["CountryCode"]);
/* associative and numeric array */
$row = mysqli_fetch_array($result, MYSQLI_BOTH);
printf ("%s (%s)\n", $row[0], $row["CountryCode"]);
/* free result set */
mysqli_free_result($result);
/* close connection */
mysqli_close($link);
?>
The above examples will output:
Kabul (AFG)
Qandahar (AFG)
Herat (AFG)
See Also
mysqli_fetch_assoc
|
mysqli_fetch_row
|
mysqli_fetch_object
|
mysqli_query
|
mysqli_data_seek
|
Copyright 1997-2010 the PHP Documentation Group.
mysqli_result::fetch_assocmysqli_fetch_assocFetch a result row as an associative array
Description
Object oriented style
array mysqli_result::fetch_assoc();Procedural style
array mysqli_fetch_assoc(mysqli_result result);
Returns an associative array that corresponds to the fetched row
or
NULL
if there are no more rows.
Field names returned by this function are case-sensitive.
This function sets NULL fields to
the PHP NULL value.
Parameters
-
result Procedural style only: A result set identifier returned by
mysqli_query,mysqli_store_resultormysqli_use_result.
Return Values
Returns an associative array of strings representing the fetched
row in the result set, where each key in the array represents
the name of one of the result set's columns or
NULL
if there are no more rows in resultset.
If two or more columns of the result have the same field names,
the last column will take precedence. To access the other
column(s) of the same name, you either need to access the result
with numeric indices by using
mysqli_fetch_row or add alias names.
Examples
Example 21.141. Object oriented style
<?php
$mysqli = new mysqli("localhost", "my_user", "my_password", "world");
/* check connection */
if (mysqli_connect_errno()) {
printf("Connect failed: %s\n", mysqli_connect_error());
exit();
}
$query = "SELECT Name, CountryCode FROM City ORDER by ID DESC LIMIT 50,5";
if ($result = $mysqli->query($query)) {
/* fetch associative array */
while ($row = $result->fetch_assoc()) {
printf ("%s (%s)\n", $row["Name"], $row["CountryCode"]);
}
/* free result set */
$result->close();
}
/* close connection */
$mysqli->close();
?>
Procedural style
<?php
$link = mysqli_connect("localhost", "my_user", "my_password", "world");
/* check connection */
if (mysqli_connect_errno()) {
printf("Connect failed: %s\n", mysqli_connect_error());
exit();
}
$query = "SELECT Name, CountryCode FROM City ORDER by ID DESC LIMIT 50,5";
if ($result = mysqli_query($link, $query)) {
/* fetch associative array */
while ($row = mysqli_fetch_assoc($result)) {
printf ("%s (%s)\n", $row["Name"], $row["CountryCode"]);
}
/* free result set */
mysqli_free_result($result);
}
/* close connection */
mysqli_close($link);
?>
The above examples will output:
Pueblo (USA)
Arvada (USA)
Cape Coral (USA)
Green Bay (USA)
Santa Clara (USA)
See Also
mysqli_fetch_array
|
mysqli_fetch_row
|
mysqli_fetch_object
|
mysqli_query
|
mysqli_data_seek
|
Copyright 1997-2010 the PHP Documentation Group.
mysqli_result::fetch_field_directmysqli_fetch_field_directFetch meta-data for a single field
Description
Object oriented style
object mysqli_result::fetch_field_direct(int fieldnr);Procedural style
object mysqli_fetch_field_direct(mysqli_result result,
int fieldnr);Returns an object which contains field definition information from the specified result set.
Parameters
-
result Procedural style only: A result set identifier returned by
mysqli_query,mysqli_store_resultormysqli_use_result.-
fieldnr The field number. This value must be in the range from
0tonumber of fields - 1.
Return Values
Returns an object which contains field definition information or
FALSE
if no field information for specified fieldnr
is available.
Table 21.14. Object attributes
| Attribute | Description |
|---|---|
| name | The name of the column |
| orgname | Original column name if an alias was specified |
| table | The name of the table this field belongs to (if not calculated) |
| orgtable | Original table name if an alias was specified |
| def | The default value for this field, represented as a string |
| max_length | The maximum width of the field for the result set. |
| length | The width of the field, as specified in the table definition. |
| charsetnr | The character set number for the field. |
| flags | An integer representing the bit-flags for the field. |
| type | The data type used for this field |
| decimals | The number of decimals used (for integer fields) |
Examples
Example 21.142. Object oriented style
<?php
$mysqli = new mysqli("localhost", "my_user", "my_password", "world");
/* check connection */
if (mysqli_connect_errno()) {
printf("Connect failed: %s\n", mysqli_connect_error());
exit();
}
$query = "SELECT Name, SurfaceArea from Country ORDER BY Name LIMIT 5";
if ($result = $mysqli->query($query)) {
/* Get field information for column 'SurfaceArea' */
$finfo = $result->fetch_field_direct(1);
printf("Name: %s\n", $finfo->name);
printf("Table: %s\n", $finfo->table);
printf("max. Len: %d\n", $finfo->max_length);
printf("Flags: %d\n", $finfo->flags);
printf("Type: %d\n", $finfo->type);
$result->close();
}
/* close connection */
$mysqli->close();
?>
Procedural style
<?php
$link = mysqli_connect("localhost", "my_user", "my_password", "world");
/* check connection */
if (mysqli_connect_errno()) {
printf("Connect failed: %s\n", mysqli_connect_error());
exit();
}
$query = "SELECT Name, SurfaceArea from Country ORDER BY Name LIMIT 5";
if ($result = mysqli_query($link, $query)) {
/* Get field information for column 'SurfaceArea' */
$finfo = mysqli_fetch_field_direct($result, 1);
printf("Name: %s\n", $finfo->name);
printf("Table: %s\n", $finfo->table);
printf("max. Len: %d\n", $finfo->max_length);
printf("Flags: %d\n", $finfo->flags);
printf("Type: %d\n", $finfo->type);
mysqli_free_result($result);
}
/* close connection */
mysqli_close($link);
?>
The above examples will output:
Name: SurfaceArea
Table: Country
max. Len: 10
Flags: 32769
Type: 4
See Also
mysqli_num_fields
|
mysqli_fetch_field
|
mysqli_fetch_fields
|
Copyright 1997-2010 the PHP Documentation Group.
mysqli_result::fetch_fieldmysqli_fetch_fieldReturns the next field in the result set
Description
Object oriented style
object mysqli_result::fetch_field();Procedural style
object mysqli_fetch_field(mysqli_result result);Returns the definition of one column of a result set as an object. Call this function repeatedly to retrieve information about all columns in the result set.
Parameters
-
result Procedural style only: A result set identifier returned by
mysqli_query,mysqli_store_resultormysqli_use_result.
Return Values
Returns an object which contains field definition information or
FALSE
if no field information is available.
Table 21.15. Object properties
| Property | Description |
|---|---|
| name | The name of the column |
| orgname | Original column name if an alias was specified |
| table | The name of the table this field belongs to (if not calculated) |
| orgtable | Original table name if an alias was specified |
| max_length | The maximum width of the field for the result set. |
| length | The width of the field, as specified in the table definition. |
| charsetnr | The character set number for the field. |
| flags | An integer representing the bit-flags for the field. |
| type | The data type used for this field |
| decimals | The number of decimals used (for integer fields) |
Examples
Example 21.143. Object oriented style
<?php
$mysqli = new mysqli("localhost", "my_user", "my_password", "world");
/* check connection */
if (mysqli_connect_errno()) {
printf("Connect failed: %s\n", mysqli_connect_error());
exit();
}
$query = "SELECT Name, SurfaceArea from Country ORDER BY Code LIMIT 5";
if ($result = $mysqli->query($query)) {
/* Get field information for all columns */
while ($finfo = $result->fetch_field()) {
printf("Name: %s\n", $finfo->name);
printf("Table: %s\n", $finfo->table);
printf("max. Len: %d\n", $finfo->max_length);
printf("Flags: %d\n", $finfo->flags);
printf("Type: %d\n\n", $finfo->type);
}
$result->close();
}
/* close connection */
$mysqli->close();
?>
Procedural style
<?php
$link = mysqli_connect("localhost", "my_user", "my_password", "world");
/* check connection */
if (mysqli_connect_errno()) {
printf("Connect failed: %s\n", mysqli_connect_error());
exit();
}
$query = "SELECT Name, SurfaceArea from Country ORDER BY Code LIMIT 5";
if ($result = mysqli_query($link, $query)) {
/* Get field information for all fields */
while ($finfo = mysqli_fetch_field($result)) {
printf("Name: %s\n", $finfo->name);
printf("Table: %s\n", $finfo->table);
printf("max. Len: %d\n", $finfo->max_length);
printf("Flags: %d\n", $finfo->flags);
printf("Type: %d\n\n", $finfo->type);
}
mysqli_free_result($result);
}
/* close connection */
mysqli_close($link);
?>
The above examples will output:
Name: Name
Table: Country
max. Len: 11
Flags: 1
Type: 254
Name: SurfaceArea
Table: Country
max. Len: 10
Flags: 32769
Type: 4
See Also
mysqli_num_fields
|
mysqli_fetch_field_direct
|
mysqli_fetch_fields
|
mysqli_field_seek
|
Copyright 1997-2010 the PHP Documentation Group.
mysqli_result::fetch_fieldsmysqli_fetch_fieldsReturns an array of objects representing the fields in a result set
Description
Object oriented style
array mysqli_result::fetch_fields();Procedural style
array mysqli_fetch_fields(mysqli_result result);
This function serves an identical purpose to the
mysqli_fetch_field function with the single
difference that, instead of returning one object at a time for
each field, the columns are returned as an array of objects.
Parameters
-
result Procedural style only: A result set identifier returned by
mysqli_query,mysqli_store_resultormysqli_use_result.
Return Values
Returns an array of objects which contains field definition
information or
FALSE
if no field information is available.
Table 21.16. Object properties
| Property | Description |
|---|---|
| name | The name of the column |
| orgname | Original column name if an alias was specified |
| table | The name of the table this field belongs to (if not calculated) |
| orgtable | Original table name if an alias was specified |
| max_length | The maximum width of the field for the result set. |
| length | The width of the field, as specified in the table definition. |
| charsetnr | The character set number for the field. |
| flags | An integer representing the bit-flags for the field. |
| type | The data type used for this field |
| decimals | The number of decimals used (for integer fields) |
Examples
Example 21.144. Object oriented style
<?php
$mysqli = new mysqli("localhost", "my_user", "my_password", "world");
/* check connection */
if (mysqli_connect_errno()) {
printf("Connect failed: %s\n", mysqli_connect_error());
exit();
}
$query = "SELECT Name, SurfaceArea from Country ORDER BY Code LIMIT 5";
if ($result = $mysqli->query($query)) {
/* Get field information for all columns */
$finfo = $result->fetch_fields();
foreach ($finfo as $val) {
printf("Name: %s\n", $val->name);
printf("Table: %s\n", $val->table);
printf("max. Len: %d\n", $val->max_length);
printf("Flags: %d\n", $val->flags);
printf("Type: %d\n\n", $val->type);
}
$result->close();
}
/* close connection */
$mysqli->close();
?>
Procedural style
<?php
$link = mysqli_connect("localhost", "my_user", "my_password", "world");
/* check connection */
if (mysqli_connect_errno()) {
printf("Connect failed: %s\n", mysqli_connect_error());
exit();
}
$query = "SELECT Name, SurfaceArea from Country ORDER BY Code LIMIT 5";
if ($result = mysqli_query($link, $query)) {
/* Get field information for all columns */
$finfo = mysqli_fetch_fields($result);
foreach ($finfo as $val) {
printf("Name: %s\n", $val->name);
printf("Table: %s\n", $val->table);
printf("max. Len: %d\n", $val->max_length);
printf("Flags: %d\n", $val->flags);
printf("Type: %d\n\n", $val->type);
}
mysqli_free_result($result);
}
/* close connection */
mysqli_close($link);
?>
The above examples will output:
Name: Name
Table: Country
max. Len: 11
Flags: 1
Type: 254
Name: SurfaceArea
Table: Country
max. Len: 10
Flags: 32769
Type: 4
See Also
mysqli_num_fields
|
mysqli_fetch_field_direct
|
mysqli_fetch_field
|
Copyright 1997-2010 the PHP Documentation Group.
mysqli_result::fetch_objectmysqli_fetch_objectReturns the current row of a result set as an object
Description
Object oriented style
object mysqli_result::fetch_object(string class_name,
array params);Procedural style
object mysqli_fetch_object(mysqli_result result,
string class_name,
array params);
The mysqli_fetch_object will return the
current row result set as an object where the attributes of the
object represent the names of the fields found within the result
set.
Note that mysqli_fetch_object sets the
properties of the object before calling the object constructor.
Parameters
-
result Procedural style only: A result set identifier returned by
mysqli_query,mysqli_store_resultormysqli_use_result.-
class_name The name of the class to instantiate, set the properties of and return. If not specified, a
stdClassobject is returned.-
params An optional array of parameters to pass to the constructor for
class_nameobjects.
Return Values
Returns an object with string properties that corresponds to the
fetched row or
NULL
if there are no more rows in resultset.
Field names returned by this function are case-sensitive.
This function sets NULL fields to
the PHP NULL value.
Changelog
| Version | Description |
|---|---|
| 5.0.0 | Added the ability to return as a different object. |
Examples
Example 21.145. Object oriented style
<?php
$mysqli = new mysqli("localhost", "my_user", "my_password", "world");
/* check connection */
if (mysqli_connect_errno()) {
printf("Connect failed: %s\n", mysqli_connect_error());
exit();
}
$query = "SELECT Name, CountryCode FROM City ORDER by ID DESC LIMIT 50,5";
if ($result = $mysqli->query($query)) {
/* fetch object array */
while ($obj = $result->fetch_object()) {
printf ("%s (%s)\n", $obj->Name, $obj->CountryCode);
}
/* free result set */
$result->close();
}
/* close connection */
$mysqli->close();
?>
Procedural style
<?php
$link = mysqli_connect("localhost", "my_user", "my_password", "world");
/* check connection */
if (mysqli_connect_errno()) {
printf("Connect failed: %s\n", mysqli_connect_error());
exit();
}
$query = "SELECT Name, CountryCode FROM City ORDER by ID DESC LIMIT 50,5";
if ($result = mysqli_query($link, $query)) {
/* fetch associative array */
while ($obj = mysqli_fetch_object($result)) {
printf ("%s (%s)\n", $obj->Name, $obj->CountryCode);
}
/* free result set */
mysqli_free_result($result);
}
/* close connection */
mysqli_close($link);
?>
The above examples will output:
Pueblo (USA)
Arvada (USA)
Cape Coral (USA)
Green Bay (USA)
Santa Clara (USA)
See Also
mysqli_fetch_array
|
mysqli_fetch_assoc
|
mysqli_fetch_row
|
mysqli_query
|
mysqli_data_seek
|
Copyright 1997-2010 the PHP Documentation Group.
mysqli_result::fetch_rowmysqli_fetch_rowGet a result row as an enumerated array
Description
Object oriented style
mixed mysqli_result::fetch_row();Procedural style
mixed mysqli_fetch_row(mysqli_result result);
Fetches one row of data from the result set and returns it as an
enumerated array, where each column is stored in an array offset
starting from 0 (zero). Each subsequent call to this function
will return the next row within the result set, or
NULL
if there are no more rows.
Parameters
-
result Procedural style only: A result set identifier returned by
mysqli_query,mysqli_store_resultormysqli_use_result.
Return Values
mysqli_fetch_row returns an array of
strings that corresponds to the fetched row or
NULL
if there are no more rows in result set.
This function sets NULL fields to
the PHP NULL value.
Examples
Example 21.146. Object oriented style
<?php
$mysqli = new mysqli("localhost", "my_user", "my_password", "world");
/* check connection */
if (mysqli_connect_errno()) {
printf("Connect failed: %s\n", mysqli_connect_error());
exit();
}
$query = "SELECT Name, CountryCode FROM City ORDER by ID DESC LIMIT 50,5";
if ($result = $mysqli->query($query)) {
/* fetch object array */
while ($row = $result->fetch_row()) {
printf ("%s (%s)\n", $row[0], $row[1]);
}
/* free result set */
$result->close();
}
/* close connection */
$mysqli->close();
?>
Procedural style
<?php
$link = mysqli_connect("localhost", "my_user", "my_password", "world");
/* check connection */
if (mysqli_connect_errno()) {
printf("Connect failed: %s\n", mysqli_connect_error());
exit();
}
$query = "SELECT Name, CountryCode FROM City ORDER by ID DESC LIMIT 50,5";
if ($result = mysqli_query($link, $query)) {
/* fetch associative array */
while ($row = mysqli_fetch_row($result)) {
printf ("%s (%s)\n", $row[0], $row[1]);
}
/* free result set */
mysqli_free_result($result);
}
/* close connection */
mysqli_close($link);
?>
The above examples will output:
Pueblo (USA)
Arvada (USA)
Cape Coral (USA)
Green Bay (USA)
Santa Clara (USA)
See Also
mysqli_fetch_array
|
mysqli_fetch_assoc
|
mysqli_fetch_object
|
mysqli_query
|
mysqli_data_seek
|
Copyright 1997-2010 the PHP Documentation Group.
mysqli_result->field_countmysqli_num_fieldsGet the number of fields in a result
Description
Object oriented style
mysqli_result {int field_count ;
}
Procedural style
int mysqli_num_fields(mysqli_result result);Returns the number of fields from specified result set.
Parameters
-
result Procedural style only: A result set identifier returned by
mysqli_query,mysqli_store_resultormysqli_use_result.
Return Values
The number of fields from a result set.
Examples
Example 21.147. Object oriented style
<?php
$mysqli = new mysqli("localhost", "my_user", "my_password", "world");
/* check connection */
if (mysqli_connect_errno()) {
printf("Connect failed: %s\n", mysqli_connect_error());
exit();
}
if ($result = $mysqli->query("SELECT * FROM City ORDER BY ID LIMIT 1")) {
/* determine number of fields in result set */
$field_cnt = $result->field_count;
printf("Result set has %d fields.\n", $field_cnt);
/* close result set */
$result->close();
}
/* close connection */
$mysqli->close();
?>
Procedural style
<?php
$link = mysqli_connect("localhost", "my_user", "my_password", "world");
/* check connection */
if (mysqli_connect_errno()) {
printf("Connect failed: %s\n", mysqli_connect_error());
exit();
}
if ($result = mysqli_query($link, "SELECT * FROM City ORDER BY ID LIMIT 1")) {
/* determine number of fields in result set */
$field_cnt = mysqli_num_fields($result);
printf("Result set has %d fields.\n", $field_cnt);
/* close result set */
mysqli_free_result($result);
}
/* close connection */
mysqli_close($link);
?>
The above examples will output:
Result set has 5 fields.
See Also
mysqli_fetch_field
|
Copyright 1997-2010 the PHP Documentation Group.
mysqli_result::field_seekmysqli_field_seekSet result pointer to a specified field offset
Description
Object oriented style
bool mysqli_result::field_seek(int fieldnr);Procedural style
bool mysqli_field_seek(mysqli_result result,
int fieldnr);
Sets the field cursor to the given offset. The next call to
mysqli_fetch_field will retrieve the field
definition of the column associated with that offset.
To seek to the beginning of a row, pass an offset value of zero.
Parameters
-
result Procedural style only: A result set identifier returned by
mysqli_query,mysqli_store_resultormysqli_use_result.-
fieldnr The field number. This value must be in the range from
0tonumber of fields - 1.
Return Values
Returns
TRUE
on success or
FALSE
on failure.
Examples
Example 21.148. Object oriented style
<?php
$mysqli = new mysqli("localhost", "my_user", "my_password", "world");
/* check connection */
if (mysqli_connect_errno()) {
printf("Connect failed: %s\n", mysqli_connect_error());
exit();
}
$query = "SELECT Name, SurfaceArea from Country ORDER BY Code LIMIT 5";
if ($result = $mysqli->query($query)) {
/* Get field information for 2nd column */
$result->field_seek(1);
$finfo = $result->fetch_field();
printf("Name: %s\n", $finfo->name);
printf("Table: %s\n", $finfo->table);
printf("max. Len: %d\n", $finfo->max_length);
printf("Flags: %d\n", $finfo->flags);
printf("Type: %d\n\n", $finfo->type);
$result->close();
}
/* close connection */
$mysqli->close();
?>
Procedural style
<?php
$link = mysqli_connect("localhost", "my_user", "my_password", "world");
/* check connection */
if (mysqli_connect_errno()) {
printf("Connect failed: %s\n", mysqli_connect_error());
exit();
}
$query = "SELECT Name, SurfaceArea from Country ORDER BY Code LIMIT 5";
if ($result = mysqli_query($link, $query)) {
/* Get field information for 2nd column */
mysqli_field_seek($result, 1);
$finfo = mysqli_fetch_field($result);
printf("Name: %s\n", $finfo->name);
printf("Table: %s\n", $finfo->table);
printf("max. Len: %d\n", $finfo->max_length);
printf("Flags: %d\n", $finfo->flags);
printf("Type: %d\n\n", $finfo->type);
mysqli_free_result($result);
}
/* close connection */
mysqli_close($link);
?>
The above examples will output:
Name: SurfaceArea
Table: Country
max. Len: 10
Flags: 32769
Type: 4
See Also
mysqli_fetch_field
|
Copyright 1997-2010 the PHP Documentation Group.
mysqli_result::freemysqli_free_resultFrees the memory associated with a result
Description
Object oriented style
void mysqli_result::free();void mysqli_result::close();void mysqli_result::free_result();Procedural style
void mysqli_free_result(mysqli_result result);Frees the memory associated with the result.
You should always free your result with
mysqli_free_result, when your result
object is not needed anymore.
Parameters
-
result Procedural style only: A result set identifier returned by
mysqli_query,mysqli_store_resultormysqli_use_result.
Return Values
No value is returned.
See Also
mysqli_query
|
mysqli_stmt_store_result
|
mysqli_store_result
|
mysqli_use_result
|
Copyright 1997-2010 the PHP Documentation Group.
mysqli_result->lengthsmysqli_fetch_lengthsReturns the lengths of the columns of the current row in the result set
Description
Object oriented style
mysqli_result {array lengths ;
}
Procedural style
array mysqli_fetch_lengths(mysqli_result result);
The mysqli_fetch_lengths function returns
an array containing the lengths of every column of the current
row within the result set.
Parameters
-
result Procedural style only: A result set identifier returned by
mysqli_query,mysqli_store_resultormysqli_use_result.
Return Values
An array of integers representing the size of each column (not
including any terminating null characters).
FALSE
if an error occurred.
mysqli_fetch_lengths is valid only for the
current row of the result set. It returns
FALSE
if you call it before calling mysqli_fetch_row/array/object or
after retrieving all rows in the result.
Examples
Example 21.149. Object oriented style
<?php
$mysqli = new mysqli("localhost", "my_user", "my_password", "world");
/* check connection */
if (mysqli_connect_errno()) {
printf("Connect failed: %s\n", mysqli_connect_error());
exit();
}
$query = "SELECT * from Country ORDER BY Code LIMIT 1";
if ($result = $mysqli->query($query)) {
$row = $result->fetch_row();
/* display column lengths */
foreach ($result->lengths as $i => $val) {
printf("Field %2d has Length %2d\n", $i+1, $val);
}
$result->close();
}
/* close connection */
$mysqli->close();
?>
Procedural style
<?php
$link = mysqli_connect("localhost", "my_user", "my_password", "world");
/* check connection */
if (mysqli_connect_errno()) {
printf("Connect failed: %s\n", mysqli_connect_error());
exit();
}
$query = "SELECT * from Country ORDER BY Code LIMIT 1";
if ($result = mysqli_query($link, $query)) {
$row = mysqli_fetch_row($result);
/* display column lengths */
foreach (mysqli_fetch_lengths($result) as $i => $val) {
printf("Field %2d has Length %2d\n", $i+1, $val);
}
mysqli_free_result($result);
}
/* close connection */
mysqli_close($link);
?>
The above examples will output:
Field 1 has Length 3
Field 2 has Length 5
Field 3 has Length 13
Field 4 has Length 9
Field 5 has Length 6
Field 6 has Length 1
Field 7 has Length 6
Field 8 has Length 4
Field 9 has Length 6
Field 10 has Length 6
Field 11 has Length 5
Field 12 has Length 44
Field 13 has Length 7
Field 14 has Length 3
Field 15 has Length 2
Copyright 1997-2010 the PHP Documentation Group.
mysqli_result->num_rowsmysqli_num_rowsGets the number of rows in a result
Description
Object oriented style
mysqli_result {int num_rows ;
}
Procedural style
int mysqli_num_rows(mysqli_result result);Returns the number of rows in the result set.
The use of mysqli_num_rows depends on
whether you use buffered or unbuffered result sets. In case you
use unbuffered resultsets mysqli_num_rows
will not return the correct number of rows until all the rows in
the result have been retrieved.
Parameters
-
result Procedural style only: A result set identifier returned by
mysqli_query,mysqli_store_resultormysqli_use_result.
Return Values
Returns number of rows in the result set.
If the number of rows is greater than maximal int value, the number will be returned as a string.
Examples
Example 21.150. Object oriented style
<?php
$mysqli = new mysqli("localhost", "my_user", "my_password", "world");
/* check connection */
if (mysqli_connect_errno()) {
printf("Connect failed: %s\n", mysqli_connect_error());
exit();
}
if ($result = $mysqli->query("SELECT Code, Name FROM Country ORDER BY Name")) {
/* determine number of rows result set */
$row_cnt = $result->num_rows;
printf("Result set has %d rows.\n", $row_cnt);
/* close result set */
$result->close();
}
/* close connection */
$mysqli->close();
?>
Procedural style
<?php
$link = mysqli_connect("localhost", "my_user", "my_password", "world");
/* check connection */
if (mysqli_connect_errno()) {
printf("Connect failed: %s\n", mysqli_connect_error());
exit();
}
if ($result = mysqli_query($link, "SELECT Code, Name FROM Country ORDER BY Name")) {
/* determine number of rows result set */
$row_cnt = mysqli_num_rows($result);
printf("Result set has %d rows.\n", $row_cnt);
/* close result set */
mysqli_free_result($result);
}
/* close connection */
mysqli_close($link);
?>
The above examples will output:
Result set has 239 rows.
See Also
mysqli_affected_rows
|
mysqli_store_result
|
mysqli_use_result
|
mysqli_query
|
Copyright 1997-2010 the PHP Documentation Group.
MySQLi Driver.
MySQLi_Driver {
MySQLi_Driver Propertiespublic readonly string client_info ;public readonly string client_version ;public readonly string driver_version ;public readonly string embedded ;public bool reconnect ;public int report_mode ;
Methodsvoid mysqli_driver::embedded_server_end();bool mysqli_driver::embedded_server_start(bool start,
array arguments,
array groups);
}
-
client_info The Client API header version
-
client_version The Client version
-
driver_version The MySQLi Driver version
-
embedded Wether MySQLi Embedded support is enabled
-
reconnect Allow or prevent reconnect (see the mysqli.reconnect INI directive)
-
report_mode Set to
MYSQLI_REPORT_OFF,MYSQLI_REPORT_ALLor any combination ofMYSQLI_REPORT_STRICT(throw Exceptions for errors),MYSQLI_REPORT_ERROR(report errors) andMYSQLI_REPORT_INDEX(errors regarding indexes). See alsomysqli_report.
Copyright 1997-2010 the PHP Documentation Group.
mysqli_driver::embedded_server_endmysqli_embedded_server_endStop embedded server
Description
Object oriented style
void mysqli_driver::embedded_server_end();Procedural style
void mysqli_embedded_server_end();This function is currently not documented; only its argument list is available.
Copyright 1997-2010 the PHP Documentation Group.
mysqli_driver::embedded_server_startmysqli_embedded_server_startInitialize and start embedded server
Description
Object oriented style
bool mysqli_driver::embedded_server_start(bool start,
array arguments,
array groups);Procedural style
bool mysqli_embedded_server_start(bool start,
array arguments,
array groups);This function is currently not documented; only its argument list is available.
Copyright 1997-2010 the PHP Documentation Group.
Represents a MySQL warning.
mysqli_warning {
mysqli_warning Propertiespublic message ;public sqlstate ;public errno ;
Methods__construct();public void next();
}
Copyright 1997-2010 the PHP Documentation Group.
mysqli_warning::__constructThe __construct purpose
Description
mysqli_warning::__construct();This function is currently not documented; only its argument list is available.
Parameters
This function has no parameters.
Return Values
Copyright 1997-2010 the PHP Documentation Group.
mysqli_warning::nextThe next purpose
Description
public void mysqli_warning::next();This function is currently not documented; only its argument list is available.
Parameters
This function has no parameters.
Return Values
- 21.10.2.12.1.
mysqli_bind_param - 21.10.2.12.2.
mysqli_bind_result - 21.10.2.12.3.
mysqli_client_encoding - 21.10.2.12.4.
mysqli_connect - 21.10.2.12.5.
mysqli_disable_reads_from_master,mysqli->disable_reads_from_master - 21.10.2.12.6.
mysqli_disable_rpl_parse - 21.10.2.12.7.
mysqli_enable_reads_from_master - 21.10.2.12.8.
mysqli_enable_rpl_parse - 21.10.2.12.9.
mysqli_escape_string - 21.10.2.12.10.
mysqli_execute - 21.10.2.12.11.
mysqli_fetch - 21.10.2.12.12.
mysqli_get_cache_stats - 21.10.2.12.13.
mysqli_get_client_stats - 21.10.2.12.14.
mysqli_get_metadata - 21.10.2.12.15.
mysqli_master_query - 21.10.2.12.16.
mysqli_param_count - 21.10.2.12.17.
mysqli_report - 21.10.2.12.18.
mysqli_rpl_parse_enabled - 21.10.2.12.19.
mysqli_rpl_probe - 21.10.2.12.20.
mysqli_rpl_query_type,mysqli->rpl_query_type - 21.10.2.12.21.
mysqli_send_long_data - 21.10.2.12.22.
mysqli_send_query,mysqli->send_query - 21.10.2.12.23.
mysqli_set_opt - 21.10.2.12.24.
mysqli_slave_query
Copyright 1997-2010 the PHP Documentation Group.
Copyright 1997-2010 the PHP Documentation Group.
mysqli_bind_paramAlias for
mysqli_stmt_bind_param
Description
This function is an alias of
mysqli_stmt_bind_param.
Notes
mysqli_bind_param is deprecated and will
be removed.
See Also
mysqli_stmt_bind_param
|
Copyright 1997-2010 the PHP Documentation Group.
mysqli_bind_resultAlias for
mysqli_stmt_bind_result
Description
This function is an alias of
mysqli_stmt_bind_result.
Notes
mysqli_bind_result is deprecated and will
be removed.
See Also
mysqli_stmt_bind_result
|
Copyright 1997-2010 the PHP Documentation Group.
mysqli_client_encodingAlias of
mysqli_character_set_name
Description
This function is an alias of
mysqli_character_set_name.
See Also
mysqli_real_escape_string
|
Copyright 1997-2010 the PHP Documentation Group.
mysqli_connectAlias of
mysqli::__construct
Description
This function is an alias of:
mysqli::__construct
Copyright 1997-2010 the PHP Documentation Group.
mysqli_disable_reads_from_mastermysqli->disable_reads_from_masterDisable reads from master
Description
Object oriented style
void mysqli::disable_reads_from_master();Procedural style
bool mysqli_disable_reads_from_master(mysqli link);This function is currently not documented; only its argument list is available.
This function has been DEPRECATED and REMOVED as of PHP 5.3.0.
Copyright 1997-2010 the PHP Documentation Group.
mysqli_disable_rpl_parseDisable RPL parse
Description
bool mysqli_disable_rpl_parse(mysqli link);This function is currently not documented; only its argument list is available.
This function has been DEPRECATED and REMOVED as of PHP 5.3.0.
Copyright 1997-2010 the PHP Documentation Group.
mysqli_enable_reads_from_masterEnable reads from master
Description
bool mysqli_enable_reads_from_master(mysqli link);This function is currently not documented; only its argument list is available.
This function has been DEPRECATED and REMOVED as of PHP 5.3.0.
Copyright 1997-2010 the PHP Documentation Group.
mysqli_enable_rpl_parseEnable RPL parse
Description
bool mysqli_enable_rpl_parse(mysqli link);This function is currently not documented; only its argument list is available.
This function has been DEPRECATED and REMOVED as of PHP 5.3.0.
Copyright 1997-2010 the PHP Documentation Group.
mysqli_escape_stringAlias of
mysqli_real_escape_string
Description
This function is an alias of:
mysqli_real_escape_string.
Copyright 1997-2010 the PHP Documentation Group.
mysqli_executeAlias for
mysqli_stmt_execute
Description
This function is an alias of
mysqli_stmt_execute.
Notes
mysqli_execute is deprecated and will be
removed.
See Also
mysqli_stmt_execute
|
Copyright 1997-2010 the PHP Documentation Group.
mysqli_fetchAlias for
mysqli_stmt_fetch
Description
This function is an alias of
mysqli_stmt_fetch.
Notes
mysqli_fetch is deprecated and will be
removed.
See Also
mysqli_stmt_fetch
|
Copyright 1997-2010 the PHP Documentation Group.
mysqli_get_cache_statsReturns client Zval cache statistics
Description
array mysqli_get_cache_stats();This function is currently not documented; only its argument list is available.
Returns client Zval cache statistics. Available only with mysqlnd.
Parameters
Return Values
Returns an array with client Zval cache stats if success,
FALSE
otherwise.
Examples
Example 21.151. A mysqli_get_cache_stats example
<?php
$link = mysqli_connect();
print_r(mysqli_get_cache_stats());
?>
The above example will output something similar to:
Array
(
[bytes_sent] => 43
[bytes_received] => 80
[packets_sent] => 1
[packets_received] => 2
[protocol_overhead_in] => 8
[protocol_overhead_out] => 4
[bytes_received_ok_packet] => 11
[bytes_received_eof_packet] => 0
[bytes_received_rset_header_packet] => 0
[bytes_received_rset_field_meta_packet] => 0
[bytes_received_rset_row_packet] => 0
[bytes_received_prepare_response_packet] => 0
[bytes_received_change_user_packet] => 0
[packets_sent_command] => 0
[packets_received_ok] => 1
[packets_received_eof] => 0
[packets_received_rset_header] => 0
[packets_received_rset_field_meta] => 0
[packets_received_rset_row] => 0
[packets_received_prepare_response] => 0
[packets_received_change_user] => 0
[result_set_queries] => 0
[non_result_set_queries] => 0
[no_index_used] => 0
[bad_index_used] => 0
[slow_queries] => 0
[buffered_sets] => 0
[unbuffered_sets] => 0
[ps_buffered_sets] => 0
[ps_unbuffered_sets] => 0
[flushed_normal_sets] => 0
[flushed_ps_sets] => 0
[ps_prepared_never_executed] => 0
[ps_prepared_once_executed] => 0
[rows_fetched_from_server_normal] => 0
[rows_fetched_from_server_ps] => 0
[rows_buffered_from_client_normal] => 0
[rows_buffered_from_client_ps] => 0
[rows_fetched_from_client_normal_buffered] => 0
[rows_fetched_from_client_normal_unbuffered] => 0
[rows_fetched_from_client_ps_buffered] => 0
[rows_fetched_from_client_ps_unbuffered] => 0
[rows_fetched_from_client_ps_cursor] => 0
[rows_skipped_normal] => 0
[rows_skipped_ps] => 0
[copy_on_write_saved] => 0
[copy_on_write_performed] => 0
[command_buffer_too_small] => 0
[connect_success] => 1
[connect_failure] => 0
[connection_reused] => 0
[reconnect] => 0
[pconnect_success] => 0
[active_connections] => 1
[active_persistent_connections] => 0
[explicit_close] => 0
[implicit_close] => 0
[disconnect_close] => 0
[in_middle_of_command_close] => 0
[explicit_free_result] => 0
[implicit_free_result] => 0
[explicit_stmt_close] => 0
[implicit_stmt_close] => 0
[mem_emalloc_count] => 0
[mem_emalloc_ammount] => 0
[mem_ecalloc_count] => 0
[mem_ecalloc_ammount] => 0
[mem_erealloc_count] => 0
[mem_erealloc_ammount] => 0
[mem_efree_count] => 0
[mem_malloc_count] => 0
[mem_malloc_ammount] => 0
[mem_calloc_count] => 0
[mem_calloc_ammount] => 0
[mem_realloc_count] => 0
[mem_realloc_ammount] => 0
[mem_free_count] => 0
[proto_text_fetched_null] => 0
[proto_text_fetched_bit] => 0
[proto_text_fetched_tinyint] => 0
[proto_text_fetched_short] => 0
[proto_text_fetched_int24] => 0
[proto_text_fetched_int] => 0
[proto_text_fetched_bigint] => 0
[proto_text_fetched_decimal] => 0
[proto_text_fetched_float] => 0
[proto_text_fetched_double] => 0
[proto_text_fetched_date] => 0
[proto_text_fetched_year] => 0
[proto_text_fetched_time] => 0
[proto_text_fetched_datetime] => 0
[proto_text_fetched_timestamp] => 0
[proto_text_fetched_string] => 0
[proto_text_fetched_blob] => 0
[proto_text_fetched_enum] => 0
[proto_text_fetched_set] => 0
[proto_text_fetched_geometry] => 0
[proto_text_fetched_other] => 0
[proto_binary_fetched_null] => 0
[proto_binary_fetched_bit] => 0
[proto_binary_fetched_tinyint] => 0
[proto_binary_fetched_short] => 0
[proto_binary_fetched_int24] => 0
[proto_binary_fetched_int] => 0
[proto_binary_fetched_bigint] => 0
[proto_binary_fetched_decimal] => 0
[proto_binary_fetched_float] => 0
[proto_binary_fetched_double] => 0
[proto_binary_fetched_date] => 0
[proto_binary_fetched_year] => 0
[proto_binary_fetched_time] => 0
[proto_binary_fetched_datetime] => 0
[proto_binary_fetched_timestamp] => 0
[proto_binary_fetched_string] => 0
[proto_binary_fetched_blob] => 0
[proto_binary_fetched_enum] => 0
[proto_binary_fetched_set] => 0
[proto_binary_fetched_geometry] => 0
[proto_binary_fetched_other] => 0
)
See Also
| Stats description |
Copyright 1997-2010 the PHP Documentation Group.
mysqli_get_client_statsReturns client per-process statistics
Description
array mysqli_get_client_stats();This function is currently not documented; only its argument list is available.
Returns client per-process statistics. Available only with mysqlnd.
Parameters
Return Values
Returns an array with client stats if success,
FALSE
otherwise.
Examples
Example 21.152. A mysqli_get_client_stats example
<?php
$link = mysqli_connect();
print_r(mysqli_get_client_stats());
?>
The above example will output something similar to:
Array
(
[bytes_sent] => 43
[bytes_received] => 80
[packets_sent] => 1
[packets_received] => 2
[protocol_overhead_in] => 8
[protocol_overhead_out] => 4
[bytes_received_ok_packet] => 11
[bytes_received_eof_packet] => 0
[bytes_received_rset_header_packet] => 0
[bytes_received_rset_field_meta_packet] => 0
[bytes_received_rset_row_packet] => 0
[bytes_received_prepare_response_packet] => 0
[bytes_received_change_user_packet] => 0
[packets_sent_command] => 0
[packets_received_ok] => 1
[packets_received_eof] => 0
[packets_received_rset_header] => 0
[packets_received_rset_field_meta] => 0
[packets_received_rset_row] => 0
[packets_received_prepare_response] => 0
[packets_received_change_user] => 0
[result_set_queries] => 0
[non_result_set_queries] => 0
[no_index_used] => 0
[bad_index_used] => 0
[slow_queries] => 0
[buffered_sets] => 0
[unbuffered_sets] => 0
[ps_buffered_sets] => 0
[ps_unbuffered_sets] => 0
[flushed_normal_sets] => 0
[flushed_ps_sets] => 0
[ps_prepared_never_executed] => 0
[ps_prepared_once_executed] => 0
[rows_fetched_from_server_normal] => 0
[rows_fetched_from_server_ps] => 0
[rows_buffered_from_client_normal] => 0
[rows_buffered_from_client_ps] => 0
[rows_fetched_from_client_normal_buffered] => 0
[rows_fetched_from_client_normal_unbuffered] => 0
[rows_fetched_from_client_ps_buffered] => 0
[rows_fetched_from_client_ps_unbuffered] => 0
[rows_fetched_from_client_ps_cursor] => 0
[rows_skipped_normal] => 0
[rows_skipped_ps] => 0
[copy_on_write_saved] => 0
[copy_on_write_performed] => 0
[command_buffer_too_small] => 0
[connect_success] => 1
[connect_failure] => 0
[connection_reused] => 0
[reconnect] => 0
[pconnect_success] => 0
[active_connections] => 1
[active_persistent_connections] => 0
[explicit_close] => 0
[implicit_close] => 0
[disconnect_close] => 0
[in_middle_of_command_close] => 0
[explicit_free_result] => 0
[implicit_free_result] => 0
[explicit_stmt_close] => 0
[implicit_stmt_close] => 0
[mem_emalloc_count] => 0
[mem_emalloc_ammount] => 0
[mem_ecalloc_count] => 0
[mem_ecalloc_ammount] => 0
[mem_erealloc_count] => 0
[mem_erealloc_ammount] => 0
[mem_efree_count] => 0
[mem_malloc_count] => 0
[mem_malloc_ammount] => 0
[mem_calloc_count] => 0
[mem_calloc_ammount] => 0
[mem_realloc_count] => 0
[mem_realloc_ammount] => 0
[mem_free_count] => 0
[proto_text_fetched_null] => 0
[proto_text_fetched_bit] => 0
[proto_text_fetched_tinyint] => 0
[proto_text_fetched_short] => 0
[proto_text_fetched_int24] => 0
[proto_text_fetched_int] => 0
[proto_text_fetched_bigint] => 0
[proto_text_fetched_decimal] => 0
[proto_text_fetched_float] => 0
[proto_text_fetched_double] => 0
[proto_text_fetched_date] => 0
[proto_text_fetched_year] => 0
[proto_text_fetched_time] => 0
[proto_text_fetched_datetime] => 0
[proto_text_fetched_timestamp] => 0
[proto_text_fetched_string] => 0
[proto_text_fetched_blob] => 0
[proto_text_fetched_enum] => 0
[proto_text_fetched_set] => 0
[proto_text_fetched_geometry] => 0
[proto_text_fetched_other] => 0
[proto_binary_fetched_null] => 0
[proto_binary_fetched_bit] => 0
[proto_binary_fetched_tinyint] => 0
[proto_binary_fetched_short] => 0
[proto_binary_fetched_int24] => 0
[proto_binary_fetched_int] => 0
[proto_binary_fetched_bigint] => 0
[proto_binary_fetched_decimal] => 0
[proto_binary_fetched_float] => 0
[proto_binary_fetched_double] => 0
[proto_binary_fetched_date] => 0
[proto_binary_fetched_year] => 0
[proto_binary_fetched_time] => 0
[proto_binary_fetched_datetime] => 0
[proto_binary_fetched_timestamp] => 0
[proto_binary_fetched_string] => 0
[proto_binary_fetched_blob] => 0
[proto_binary_fetched_enum] => 0
[proto_binary_fetched_set] => 0
[proto_binary_fetched_geometry] => 0
[proto_binary_fetched_other] => 0
)
See Also
| Stats description |
Copyright 1997-2010 the PHP Documentation Group.
mysqli_get_metadataAlias for
mysqli_stmt_result_metadata
Description
This function is an alias of
mysqli_stmt_result_metadata.
Notes
mysqli_get_metadata is deprecated and
will be removed.
See Also
mysqli_stmt_result_metadata
|
Copyright 1997-2010 the PHP Documentation Group.
mysqli_master_queryEnforce execution of a query on the master in a master/slave setup
Description
bool mysqli_master_query(mysqli link,
string query);This function is currently not documented; only its argument list is available.
This function has been DEPRECATED and REMOVED as of PHP 5.3.0.
Copyright 1997-2010 the PHP Documentation Group.
mysqli_param_countAlias for
mysqli_stmt_param_count
Description
This function is an alias of
mysqli_stmt_param_count.
Notes
mysqli_param_count is deprecated and will
be removed.
See Also
mysqli_stmt_param_count
|
Copyright 1997-2010 the PHP Documentation Group.
mysqli_reportEnables or disables internal report functions
Description
bool mysqli_report(int flags);
mysqli_report is a powerful function to
improve your queries and code during development and testing
phase. Depending on the flags it reports errors from mysqli
function calls or queries which don't use an index (or use
a bad index).
Parameters
-
flags Table 21.17. Supported flags
Name Description MYSQLI_REPORT_OFFTurns reporting off MYSQLI_REPORT_ERRORReport errors from mysqli function calls MYSQLI_REPORT_STRICTThrow mysqli_sql_exceptionfor errors instead of warningsMYSQLI_REPORT_INDEXReport if no index or bad index was used in a query MYSQLI_REPORT_ALLSet all options (report all)
Return Values
Returns
TRUE
on success or
FALSE
on failure.
Changelog
| Version | Description |
|---|---|
| 5.2.15 & 5.3.4 | Changing the reporting mode is now be per-request, rather than per-process. |
Examples
Example 21.153. Object oriented style
<?php
/* activate reporting */
mysqli_report(MYSQLI_REPORT_ALL);
$mysqli = new mysqli("localhost", "my_user", "my_password", "world");
/* check connection */
if (mysqli_connect_errno()) {
printf("Connect failed: %s\n", mysqli_connect_error());
exit();
}
/* this query should report an error */
$result = $mysqli->query("SELECT Name FROM Nonexistingtable WHERE population > 50000");
/* this query should report a bad index */
$result = $mysqli->query("SELECT Name FROM City WHERE population > 50000");
$result->close();
$mysqli->close();
?>
See Also
| MySQLi_Driver::$report_mode |
mysqli_debug
|
mysqli_dump_debug_info
|
Copyright 1997-2010 the PHP Documentation Group.
mysqli_rpl_parse_enabledCheck if RPL parse is enabled
Description
int mysqli_rpl_parse_enabled(mysqli link);This function is currently not documented; only its argument list is available.
This function has been DEPRECATED and REMOVED as of PHP 5.3.0.
Copyright 1997-2010 the PHP Documentation Group.
mysqli_rpl_probeRPL probe
Description
bool mysqli_rpl_probe(mysqli link);This function is currently not documented; only its argument list is available.
This function has been DEPRECATED and REMOVED as of PHP 5.3.0.
Copyright 1997-2010 the PHP Documentation Group.
mysqli_rpl_query_typemysqli->rpl_query_typeReturns RPL query type
Description
Object oriented style
mysqli {int rpl_query_type(string query);
}
Procedural style
int mysqli_rpl_query_type(mysqli link,
string query);
Returns
MYSQLI_RPL_MASTER
,
MYSQLI_RPL_SLAVE
or
MYSQLI_RPL_ADMIN
depending on a query type. INSERT,
UPDATE and similar are
master queries, SELECT
is slave, and FLUSH,
REPAIR and similar are
admin.
This function is currently not documented; only its argument list is available.
This function has been DEPRECATED and REMOVED as of PHP 5.3.0.
Copyright 1997-2010 the PHP Documentation Group.
mysqli_send_long_dataAlias for
mysqli_stmt_send_long_data
Description
This function is an alias of
mysqli_stmt_send_long_data.
Notes
mysqli_send_long_data is deprecated and
will be removed.
See Also
mysqli_stmt_send_long_data
|
Copyright 1997-2010 the PHP Documentation Group.
mysqli_send_querymysqli->send_querySend the query and return
Description
Object oriented style
mysqli {bool send_query(string query);
}
Procedural style
bool mysqli_send_query(mysqli link,
string query);This function is currently not documented; only its argument list is available.
This function has been DEPRECATED and REMOVED as of PHP 5.3.0.
Copyright 1997-2010 the PHP Documentation Group.
mysqli_set_optAlias of
mysqli_options
Description
This function is an alias of
mysqli_options.
Copyright 1997-2010 the PHP Documentation Group.
mysqli_slave_queryForce execution of a query on a slave in a master/slave setup
Description
bool mysqli_slave_query(mysqli link,
string query);This function is currently not documented; only its argument list is available.
This function has been DEPRECATED and REMOVED as of PHP 5.3.0.
Copyright 1997-2010 the PHP Documentation Group.
This section of the manual provides an overview of the MySQL Native Driver.
Copyright 1997-2010 the PHP Documentation Group.
MySQL Native Driver is a replacement for the MySQL Client Library (libmysql). MySQL Native Driver is part of the official PHP sources as of PHP 5.3.0.
The MySQL database extensions MySQL extension,
mysqli and PDO MYSQL all communicate with the
MySQL server. In the past, this was done by the extension using
the services provided by the MySQL Client Library. The extensions
were compiled against the MySQL Client Library in order to use its
client-server protocol.
With MySQL Native Driver there is now an alternative, as the MySQL database extensions can be compiled to use MySQL Native Driver instead of the MySQL Client Library.
MySQL Native Driver is written in C as a PHP extension.
What it is not
Although MySQL Native Driver is written as a PHP extension, it is
important to note that it does not provide a new API to the PHP
programmer. The programmer APIs for MySQL database connectivity
are provided by the MySQL extension, mysqli and
PDO MYSQL. These extensions can now use the services of MySQL
Native Driver to communicate with the MySQL Server. Therefore, you
should not think of MySQL Native Driver as an API.
Why use it?
Using the MySQL Native Driver offers a number of advantages over using the MySQL Client Library.
The older MySQL Client Library was written by MySQL AB (now Oracle Corporation) and so was released under the MySQL license. This ultimately led to MySQL support being disabled by default in PHP. However, the MySQL Native Driver has been developed as part of the PHP project, and is therefore released under the PHP license. This removes licensing issues that have been problematic in the past.
Also, in the past, you needed to build the MySQL database extensions against a copy of the MySQL Client Library. This typically meant you needed to have MySQL installed on a machine where you were building the PHP source code. Also, when your PHP application was running, the MySQL database extensions would call down to the MySQL Client library file at run time, so the file needed to be installed on your system. With MySQL Native Driver that is no longer the case as it is included as part of the standard distribution. So you do not need MySQL installed in order to build PHP or run PHP database applications.
Because MySQL Native Driver is written as a PHP extension, it is tightly coupled to the workings of PHP. This leads to gains in efficiency, especially when it comes to memory usage, as the driver uses the PHP memory management system. It also supports the PHP memory limit. Using MySQL Native Driver leads to comparable or better performance than using MySQL Client Library, it always ensures the most efficient use of memory. One example of the memory efficiency is the fact that when using the MySQL Client Library, each row is stored in memory twice, whereas with the MySQL Native Driver each row is only stored once in memory.
Special features
MySQL Native Driver also provides some special features not available when the MySQL database extensions use MySQL Client Library. These special features are listed below:
Improved persistent connections
The special function
mysqli_fetch_allPerformance statistics calls:
mysqli_get_cache_stats,mysqli_get_client_stats,mysqli_get_connection_stats
The performance statistics facility can prove to be very useful in identifying performance bottlenecks.
MySQL Native Driver also allows for persistent connections when
used with the mysqli extension.
SSL Support
MySQL Native Driver has supported SSL since PHP version 5.3.3
Compressed Protocol Support
As of PHP 5.3.2 MySQL Native Driver supports the compressed client
server protocol. MySQL Native Driver did not support this in 5.3.0
and 5.3.1. Extensions such as ext/mysql,
ext/mysqli, that are configured to use MySQL
Native Driver, can also take advantage of this feature. Note that
PDO_MYSQL does NOT support
compression when used together with mysqlnd.
Named Pipes Support
Named pipes support for Windows was added in PHP version 5.3.4.
Copyright 1997-2010 the PHP Documentation Group.
Installation on Unix
By default the MySQL database extensions are configured to use MySQL Client Library. In order to use the MySQL Native Driver, PHP needs to be built specifying that the MySQL database extensions are compiled with MySQL Native Driver support. This is done through configuration options prior to building the PHP source code.
For example, to build the MySQL extension,
mysqli and PDO MYSQL using the MySQL Native
Driver, the following command would be given:
./configure --with-mysql=mysqlnd \ --with-mysqli=mysqlnd \ --with-pdo-mysql=mysqlnd \ [other options]
Installation on Windows
In the official PHP distributions from 5.3 onwards, MySQL Native Driver is enabled by default, so no additional configuration is required to use it. All MySQL database extensions will use MySQL Native Driver in this case.
Copyright 1997-2010 the PHP Documentation Group.
The behaviour of these functions is affected by settings in php.ini.
Table 21.18. MySQL Native Driver Configuration Options
| Name | Default | Changeable | Changelog |
|---|---|---|---|
| mysqlnd.collect_statistics | "1" | PHP_INI_SYSTEM | Available since PHP 5.3.0. |
| mysqlnd.collect_memory_statistics | "0" | PHP_INI_SYSTEM | Available since PHP 5.3.0. |
| mysqlnd.debug | "0" | PHP_INI_SYSTEM | Available since PHP 5.3.0. |
| mysqlnd.net_read_timeout | "31536000" | PHP_INI_SYSTEM | Available since PHP 5.3.0. |
| mysqlnd.net_cmd_buffer_size | 5.3.0 - "2048", 5.3.1 - "4096" | PHP_INI_SYSTEM | Available since PHP 5.3.0. |
| mysqlnd.net_read_buffer_size | "32768" | PHP_INI_SYSTEM | Available since PHP 5.3.0. |
For further details and definitions of the PHP_INI_* modes, see the configuration.changes.modes.
Here's a short explanation of the configuration directives.
-
mysqlnd.collect_statisticsboolean Enables the collection of various client statistics which can be accessed through
mysqli_get_client_stats,mysqli_get_connection_stats,mysqli_get_cache_statsand are shown inmysqlndsection of the output of thephpinfofunction as well.This configuration setting enables all MySQL Native Driver statistics except those relating to memory management.
-
mysqlnd.collect_memory_statisticsboolean Enable the collection of various memory statistics which can be accessed through
mysqli_get_client_stats,mysqli_get_connection_stats,mysqli_get_cache_statsand are shown inmysqlndsection of the output of thephpinfofunction as well.This configuration setting enables the memory management statistics within the overall set of MySQL Native Driver statistics.
-
mysqlnd.debugboolean Records everything from all extensions using
mysqlnd. Only available with a debug build of PHP.-
mysqlnd.net_read_timeoutinteger mysqlndand the MySQL Client Library,libmysqluse different networking APIs.mysqlnduses PHP streams, whereaslibmysqluses its own wrapper around the operating level network calls. PHP, by default, sets a read timeout of 60s for streams. This is set viaphp.ini,default_socket_timeout. This default applies to all streams that set no other timeout value.mysqlnddoes not set any other value and therefore connections of long running queries can be disconnected afterdefault_socket_timeoutseconds resulting in an error message “2006 - MySQL Server has gone away”. The MySQL Client Library sets a default timeout of 365 * 24 * 3600 seconds (1 year) and waits for other timeouts to occur, such as TCP/IP timeouts.mysqlndnow uses the same very long timeout. The value is configurable through a newphp.inisetting:mysqlnd.net_read_timeout.mysqlnd.net_read_timeoutgets used by any extension (ext/mysql,ext/mysqli,PDO_MySQL) that usesmysqlnd.mysqlndtells PHP Streams to usemysqlnd.net_read_timeout. Please note that there may be subtle differences betweenMYSQL_OPT_READ_TIMEOUTfrom the MySQL Client Library and PHP Streams, for exampleMYSQL_OPT_READ_TIMEOUTis documented to work only for TCP/IP connections and, prior to MySQL 5.1.2, only for Windows. PHP streams may not have this limitation. Please check the streams documentation, if in doubt.-
mysqlnd.net_cmd_buffer_sizelong mysqlndallocates an internal command/network buffer ofmysqlnd.net_cmd_buffer_size(inphp.ini) bytes for every connection. If a MySQL Client Server protocol command, for example,COM_QUERY(“normal” query), does not fit into the buffer,mysqlndwill grow the buffer to the size required for sending the command. Whenever the buffer gets extended for one connection,command_buffer_too_smallwill be incremented by one.If
mysqlndhas to grow the buffer beyond its initial size ofmysqlnd.net_cmd_buffer_sizebytes for almost every connection, you should consider increasing the default size to avoid re-allocations.The default buffer size is 2048 bytes in PHP 5.3.0. In later versions the default is 4096 bytes. The default can changed either through the
php.inisettingmysqlnd.net_cmd_buffer_sizeor usingmysqli_options(MYSQLI_OPT_NET_CMD_BUFFER_SIZE, int size).It is recommended that the buffer size be set to no less than 4096 bytes because
mysqlndalso uses it when reading certain communication packet from MySQL. In PHP 5.3.0,mysqlndwill not grow the buffer if MySQL sends a packet that is larger than the current size of the buffer. As a consequence,mysqlndis unable to decode the packet and the client application will get an error. There are only two situations when the packet can be larger than the 2048 bytes default ofmysqlnd.net_cmd_buffer_sizein PHP 5.3.0: the packet transports a very long error message, or the packet holds column meta data fromCOM_LIST_FIELD(mysql_list_fields()and the meta data come from a string column with a very long default value (>1900 bytes).As of PHP 5.3.2 mysqlnd does not allow setting buffers smaller than 4096 bytes.
The value can also be set using
mysqli_option(link, MYSQLI_OPT_NET_CMD_BUFFER_SIZE, size).-
mysqlnd.net_read_buffer_sizelong Maximum read chunk size in bytes when reading the body of a MySQL command packet. The MySQL client server protocol encapsulates all its commands in packets. The packets consist of a small header and a body with the actual payload. The size of the body is encoded in the header.
mysqlndreads the body in chunks ofMIN(header.size, mysqlnd.net_read_buffer_size)bytes. If a packet body is larger thanmysqlnd.net_read_buffer_sizebytes,mysqlndhas to callread()multiple times.The value can also be set using
mysqli_optionS(link, MYSQLI_OPT_NET_READ_BUFFER_SIZE, size).
Copyright 1997-2010 the PHP Documentation Group.
Using Persistent Connections
If mysqli is used with
mysqlnd, when a persistent connection is
created it generates a COM_CHANGE_USER
(mysql_change_user()) call on the server. This
ensures that re-authentication of the connection takes place.
As there is some overhead associated with the
COM_CHANGE_USER call, it is possible to switch
this off at compile time. Reusing a persistent connection will
then generate a COM_PING
(mysql_ping) call to simply test the connection
is reusable.
Generation of COM_CHANGE_USER can be switched
off with the compile flag
MYSQLI_NO_CHANGE_USER_ON_PCONNECT. For example:
shell# CFLAGS="-DMYSQLI_NO_CHANGE_USER_ON_PCONNECT" ./configure --with-mysql=/usr/local/mysql/ --with-mysqli=/usr/local/mysql/bin/mysql_config --with-pdo-mysql=/usr/local/mysql/bin/mysql_config --enable-debug && make clean && make -j6
Or alternatively:
shell# export CFLAGS="-DMYSQLI_NO_CHANGE_USER_ON_PCONNECT" shell# configure --whatever-option shell# make clean shell# make
Note that only mysqli on
mysqlnd uses
COM_CHANGE_USER. Other extension-driver
combinations use COM_PING on initial use of a
persistent connection.
Copyright 1997-2010 the PHP Documentation Group.
Using Statistical Data
MySQL Native Driver contains support for gathering statistics on the communication between the client and the server. The statistics gathered are of three main types:
Client statistics
Connection statistics
Zval cache statistics
If you are using the mysqli extension, these
statistics can be obtained through three API calls:
mysqli_get_client_statsmysqli_get_connection_statsmysqli_get_cache_stats
Statistics are aggregated among all extensions that use MySQL
Native Driver. For example, when compiling both
ext/mysql and ext/mysqli
against MySQL Native Driver, both function calls of
ext/mysql and ext/mysqli
will change the statistics. There is no way to find out how much
a certain API call of any extension that has been compiled
against MySQL Native Driver has impacted a certain statistic.
You can configure the PDO MySQL Driver,
ext/mysql and ext/mysqli
to optionally use the MySQL Native Driver. When doing so, all
three extensions will change the statistics.
Accessing Client Statistics
To access client statistics, you need to call
mysqli_get_client_stats. The function call
does not require any parameters.
The function returns an associative array that contains the name of the statistic as the key and the statistical data as the value.
Client statistics can also be accessed by calling the
phpinfo function.
Accessing Connection Statistics
To access connection statistics call
mysqli_get_connection_stats. This takes the
database connection handle as the parameter.
The function returns an associative array that contains the name of the statistic as the key and the statistical data as the value.
Accessing Zval Cache Statistics
The MySQL Native Driver also collects statistics from its internal
Zval cache. These statistics can be accessed by calling
mysqli_get_cache_stats.
The Zval cache statistics obtained may lead to a tweaking of
php.ini settings related to the Zval cache,
resulting in better performance.
Buffered and Unbuffered Result Sets
Result sets can be buffered or unbuffered. Using default settings,
ext/mysql and ext/mysqli
work with buffered result sets for normal (non prepared statement)
queries. Buffered result sets are cached on the client. After the
query execution all results are fetched from the MySQL Server and
stored in a cache on the client. The big advantage of buffered
result sets is that they allow the server to free all resources
allocated to a result set, once the results have been fetched by
the client.
Unbuffered result sets on the other hand are kept much longer on the server. If you want to reduce memory consumption on the client, but increase load on the server, use unbuffered results. If you experience a high server load and the figures for unbuffered result sets are high, you should consider moving the load to the clients. Clients typically scale better than servers. “Load” does not only refer to memory buffers - the server also needs to keep other resources open, for example file handles and threads, before a result set can be freed.
Prepared Statements use unbuffered result sets by default.
However, you can use mysqli_stmt_store_result
to enable buffered result sets.
Statistics returned by MySQL Native Driver
The following tables show a list of statistics returned by the
mysqli_get_client_stats,
mysqli_get_connection_stats and
mysqli_get_cache_stats functions.
Network
| Statistic | Scope | Description | Notes |
|---|---|---|---|
bytes_sent | Connection | Number of bytes sent from PHP to the MySQL server | Can be used to check the efficiency of the compression protocol |
bytes_received | Connection | Number of bytes received from MySQL server | Can be used to check the efficiency of the compression protocol |
packets_sent | Connection | Number of MySQL Client Server protocol packets sent | Used for debugging Client Server protocol implementation |
packets_received | Connection | Number of MySQL Client Server protocol packets received | Used for debugging Client Server protocol implementation |
protocol_overhead_in | Connection | MySQL Client Server protocol overhead in bytes for incoming traffic. Currently only the Packet Header (4 bytes) is considered as overhead. protocol_overhead_in = packets_received * 4 | Used for debugging Client Server protocol implementation |
protocol_overhead_out | Connection | MySQL Client Server protocol overhead in bytes for outgoing traffic. Currently only the Packet Header (4 bytes) is considered as overhead. protocol_overhead_out = packets_sent * 4 | Used for debugging Client Server protocol implementation |
bytes_received_ok_packet | Connection | Total size of bytes of MySQL Client Server protocol OK packets received. OK packets can contain a status message. The length of the status message can vary and thus the size of an OK packet is not fixed. | Used for debugging CS protocol implementation. Note that the total size in bytes includes the size of the header packet (4 bytes, see protocol overhead). |
packets_received_ok | Connection | Number of MySQL Client Server protocol OK packets received. | Used for debugging CS protocol implementation. Note that the total size in bytes includes the size of the header packet (4 bytes, see protocol overhead). |
bytes_received_eof_packet | Connection | Total size in bytes of MySQL Client Server protocol EOF packets received. EOF can vary in size depending on the server version. Also, EOF can transport an error message. | Used for debugging CS protocol implementation. Note that the total size in bytes includes the size of the header packet (4 bytes, see protocol overhead). |
packets_received_eof | Connection | Number of MySQL Client Server protocol EOF packets. Like with other packet statistics the number of packets will be increased even if PHP does not receive the expected packet but, for example, an error message. | Used for debugging CS protocol implementation. Note that the total size in bytes includes the size of the header packet (4 bytes, see protocol overhead). |
bytes_received_rset_header_packet | Connection | Total size in bytes of MySQL Client Server protocol result set header
packets. The size of the packets varies depending on the
payload (LOAD LOCAL INFILE,
INSERT, UPDATE,
SELECT, error message). | Used for debugging CS protocol implementation. Note that the total size in bytes includes the size of the header packet (4 bytes, see protocol overhead). |
packets_received_rset_header | Connection | Number of MySQL Client Server protocol result set header packets. | Used for debugging CS protocol implementation. Note that the total size in bytes includes the size of the header packet (4 bytes, see protocol overhead). |
bytes_received_rset_field_meta_packet | Connection | Total size in bytes of MySQL Client Server protocol result set meta data (field information) packets. Of course the size varies with the fields in the result set. The packet may also transport an error or an EOF packet in case of COM_LIST_FIELDS. | Only useful for debugging CS protocol implementation. Note that the total size in bytes includes the size of the header packet (4 bytes, see protocol overhead). |
packets_received_rset_field_meta | Connection | Number of MySQL Client Server protocol result set meta data (field information) packets. | Only useful for debugging CS protocol implementation. Note that the total size in bytes includes the size of the header packet (4 bytes, see protocol overhead). |
bytes_received_rset_row_packet | Connection | Total size in bytes of MySQL Client Server protocol result set row data
packets. The packet may also transport an error or an EOF
packet. You can reverse engineer the number of error and
EOF packets by substracting
rows_fetched_from_server_normal and
rows_fetched_from_server_ps from
bytes_received_rset_row_packet. | Only useful for debugging CS protocol implementation. Note that the total size in bytes includes the size of the header packet (4 bytes, see protocol overhead). |
packets_received_rset_row | Connection | Number of MySQL Client Server protocol result set row data packets and their total size in bytes. | Only useful for debugging CS protocol implementation. Note that the total size in bytes includes the size of the header packet (4 bytes, see protocol overhead). |
bytes_received_prepare_response_packet | Connection | Total size in bytes of MySQL Client Server protocol OK for Prepared
Statement Initialization packets (prepared statement init
packets). The packet may also transport an error. The
packet size depends on the MySQL version: 9 bytes with
MySQL 4.1 and 12 bytes from MySQL 5.0 on. There is no safe
way to know how many errors happened. You may be able to
guess that an error has occurred if, for example, you
always connect to MySQL 5.0 or newer and,
bytes_received_prepare_response_packet
!= packets_received_prepare_response *
12. See also
ps_prepared_never_executed,
ps_prepared_once_executed. | Only useful for debugging CS protocol implementation. Note that the total size in bytes includes the size of the header packet (4 bytes, see protocol overhead). |
packets_received_prepare_response | Connection | Number of MySQL Client Server protocol OK for Prepared Statement Initialization packets (prepared statement init packets). | Only useful for debugging CS protocol implementation. Note that the total size in bytes includes the size of the header packet (4 bytes, see protocol overhead). |
bytes_received_change_user_packet | Connection | Total size in bytes of MySQL Client Server protocol COM_CHANGE_USER packets. The packet may also transport an error or EOF. | Only useful for debugging CS protocol implementation. Note that the total size in bytes includes the size of the header packet (4 bytes, see protocol overhead). |
packets_received_change_user | Connection | Number of MySQL Client Server protocol COM_CHANGE_USER packets | Only useful for debugging CS protocol implementation. Note that the total size in bytes includes the size of the header packet (4 bytes, see protocol overhead). |
packets_sent_command | Connection | Number of MySQL Client Server protocol commands sent from PHP to MySQL. There is no way to know which specific commands and how many of them have been sent. At its best you can use it to check if PHP has sent any commands to MySQL to know if you can consider to disable MySQL support in your PHP binary. There is also no way to reverse engineer the number of errors that may have occurred while sending data to MySQL. The only error recoded is command_buffer_too_small (see below). | Only useful for debugging CS protocol implementation. |
Result Set
| Statistic | Scope | Description | Notes |
|---|---|---|---|
result_set_queries | Connection | Number of queries that have generated a result set. Examples of queries
that generate a result set: SELECT,
SHOW. The statistic will not be
incremented if there is an error reading the result set
header packet from the line. | You may use it as an indirect measure for the number of queries PHP has sent to MySQL, for example, to identify a client that causes a high database load. |
non_result_set_queries | Connection | Number of queries that did not generate a result set. Examples of
queries that do not generate a result set:
INSERT, UPDATE,
LOAD DATA, SHOW. The
statistic will not be incremented if there is an error
reading the result set header packet from the line. | You may use it an an indirect measure for the number of queries PHP has sent to MySQL, for example, to identify a client that causes a high database load. |
no_index_used | Connection | Number of queries that have generated a result set but did not use an index (see also mysqld start option –log-queries-not-using-indexes). If you want these queries to be reported you can use mysqli_report(MYSQLI_REPORT_INDEX) to make ext/mysqli throw an exception. If you prefer a warning instead of an exception use mysqli_report(MYSQLI_REPORT_INDEX ^ MYSQLI_REPORT_STRICT). | |
bad_index_used | Connection | Number of queries that have generated a result set and did not use a good index (see also mysqld start option –log-slow-queries). | If you want these queries to be reported you can use mysqli_report(MYSQLI_REPORT_INDEX) to make ext/mysqli throw an exception. If you prefer a warning instead of an exception use mysqli_report(MYSQLI_REPORT_INDEX ^ MYSQLI_REPORT_STRICT) |
slow_queries | Connection | SQL statements that took more than long_query_time
seconds to execute and required at least
min_examined_row_limit rows to be
examined. | Not reported through mysqli_report |
buffered_sets | Connection | Number of buffered result sets returned by “normal” queries. “Normal” means “not prepared statement” in the following notes. | Examples of API calls that will buffer result sets on the client:
mysql_query,
mysqli_query,
mysqli_store_result,
mysqli_stmt_get_result. Buffering
result sets on the client ensures that server resources
are freed as soon as possible and it makes result set
scrolling easier. The downside is the additional memory
consumption on the client for buffering data. Note that
mysqlnd (unlike the MySQL Client Library) respects the PHP
memory limit because it uses PHP internal memory
management functions to allocate memory. This is also the
reason why memory_get_usage reports a
higer memory consumption when using mysqlnd instead of the
MySQL Client Library.
memory_get_usage does not measure the
memory consumption of the MySQL Client Library at all
because the MySQL Client Library does not use PHP internal
memory management functions monitored by the function! |
unbuffered_sets | Connection | Number of unbuffered result sets returned by normal (non prepared statement) queries. | Examples of API calls that will not buffer result sets on the client:
mysqli_use_result |
ps_buffered_sets | Connection | Number of buffered result sets returned by prepared statements. By default prepared statements are unbuffered. | Examples of API calls that will not buffer result sets on the client:
mysqli_stmt_store_result |
ps_unbuffered_sets | Connection | Number of unbuffered result sets returned by prepared statements. | By default prepared statements are unbuffered. |
flushed_normal_sets | Connection | Number of result sets from normal (non prepared statement) queries with unread data which have been flushed silently for you. Flushing happens only with unbuffered result sets. | Unbuffered result sets must be fetched completely before a new query can
be run on the connection otherwise MySQL will throw an
error. If the application does not fetch all rows from an
unbuffered result set, mysqlnd does implicitly fetch the
result set to clear the line. See also
rows_skipped_normal,
rows_skipped_ps. Some possible causes
for an implicit flush:
|
flushed_ps_sets | Connection | Number of result sets from prepared statements with unread data which have been flushed silently for you. Flushing happens only with unbuffered result sets. | Unbuffered result sets must be fetched completely before a new query can
be run on the connection otherwise MySQL will throw an
error. If the application does not fetch all rows from an
unbuffered result set, mysqlnd does implicitly fetch the
result set to clear the line. See also
rows_skipped_normal,
rows_skipped_ps. Some possible causes
for an implicit flush:
|
ps_prepared_never_executed | Connection | Number of statements prepared but never executed. | Prepared statements occupy server resources. You should not prepare a statement if you do not plan to execute it. |
ps_prepared_once_executed | Connection | Number of prepared statements executed only one. | One of the ideas behind prepared statements is that the same query gets executed over and over again (with different parameters) and some parsing and other preparation work can be saved, if statement execution is split up in separate prepare and execute stages. The idea is to prepare once and “cache” results, for example, the parse tree to be reused during multiple statement executions. If you execute a prepared statement only once the two stage processing can be inefficient compared to “normal” queries because all the caching means extra work and it takes (limited) server resources to hold the cached information. Consequently, prepared statements that are executed only once may cause performance hurts. |
rows_fetched_from_server_normal,
rows_fetched_from_server_ps | Connection | Total number of result set rows successfully fetched from MySQL regardless if the client application has consumed them or not. Some of the rows may not have been fetched by the client application but have been flushed implicitly. | See also packets_received_rset_row |
rows_buffered_from_client_normal,
rows_buffered_from_client_ps | Connection | Total number of succesfully buffered rows originating from a "normal" query or a prepared statement. This is the number of rows that have been fetched from MySQL and buffered on client. Note that there are two distinct statistics on rows that have been buffered (MySQL to mysqlnd internal buffer) and buffered rows that have been fetched by the client application (mysqlnd internal buffer to client application). If the number of buffered rows is higher than the number of fetched buffered rows it can mean that the client application runs queries that cause larger result sets than needed resulting in rows not read by the client. | Examples of queries that will buffer results:
mysqli_query,
mysqli_store_result |
rows_fetched_from_client_normal_buffered,
rows_fetched_from_client_ps_buffered | Connection | Total number of rows fetched by the client from a buffered result set created by a normal query or a prepared statement. | |
rows_fetched_from_client_normal_unbuffered,
rows_fetched_from_client_ps_unbuffered | Connection | Total number of rows fetched by the client from a unbuffered result set created by a "normal" query or a prepared statement. | |
rows_fetched_from_client_ps_cursor | Connection | Total number of rows fetch by the client from a cursor created by a prepared statement. | |
rows_skipped_normal,
rows_skipped_ps | Connection | Reserved for future use (currently not supported) | |
copy_on_write_saved,
copy_on_write_performed | Process | With mysqlnd, variables returned by the extensions point into mysqlnd
internal network result buffers. If you do not change the
variables, fetched data will be kept only once in memory.
If you change the variables, mysqlnd has to perform a
copy-on-write to protect the internal network result
buffers from being changed. With the MySQL Client Library
you always hold fetched data twice in memory. Once in the
internal MySQL Client Library buffers and once in the
variables returned by the extensions. In theory mysqlnd
can save up to 40% memory. However, note that the memory
saving cannot be measured using
memory_get_usage. | |
explicit_free_result,
implicit_free_result | Connection, Process (only during prepared statement cleanup) | Total number of freed result sets. | The free is always considered explicit but for result sets created by an
init command, for example,
mysqli_options(MYSQLI_INIT_COMMAND ,
...) |
proto_text_fetched_null,
proto_text_fetched_bit,
proto_text_fetched_tinyint
proto_text_fetched_short,
proto_text_fetched_int24,
proto_text_fetched_int
proto_text_fetched_bigint,
proto_text_fetched_decimal,
proto_text_fetched_float
proto_text_fetched_double,
proto_text_fetched_date,
proto_text_fetched_year
proto_text_fetched_time,
proto_text_fetched_datetime,
proto_text_fetched_timestamp
proto_text_fetched_string,
proto_text_fetched_blob,
proto_text_fetched_enum
proto_text_fetched_set,
proto_text_fetched_geometry,
proto_text_fetched_other | Connection | Total number of columns of a certain type fetched from a normal query (MySQL text protocol). | Mapping from C API / MySQL meta data type to statistics name:
Note that the MYSQL_*-type constants may not be associated with the very same SQL column types in every version of MySQL. |
proto_binary_fetched_null,
proto_binary_fetched_bit,
proto_binary_fetched_tinyint
proto_binary_fetched_short,
proto_binary_fetched_int24,
proto_binary_fetched_int,
proto_binary_fetched_bigint,
proto_binary_fetched_decimal,
proto_binary_fetched_float,
proto_binary_fetched_double,
proto_binary_fetched_date,
proto_binary_fetched_year,
proto_binary_fetched_time,
proto_binary_fetched_datetime,
proto_binary_fetched_timestamp,
proto_binary_fetched_string,
proto_binary_fetched_blob,
proto_binary_fetched_enum,
proto_binary_fetched_set,
proto_binary_fetched_geometry,
proto_binary_fetched_other | Connection | Total number of columns of a certain type fetched from a prepared statement (MySQL binary protocol). | For type mapping see proto_text_* described in the
preceding text. |
Connection
| Statistic | Scope | Description | Notes |
|---|---|---|---|
connect_success, connect_failure | Connection | Total number of successful / failed connection attempt. | Reused connections and all other kinds of connections are included. |
reconnect | Process | Total number of (real_)connect attempts made on an already opened connection handle. | The code sequence $link = new mysqli(...);
$link->real_connect(...) will cause a
reconnect. But $link = new mysqli(...);
$link->connect(...) will not because
$link->connect(...) will explicitly
close the existing connection before a new connection is
established. |
pconnect_success | Connection | Total number of successful persistent connection attempts. | Note that connect_success holds the sum of successful
persistent and non-persistent connection attempts. The
number of successful non-persistent connection attempts is
connect_success -
pconnect_success. |
active_connections | Connection | Total number of active persistent and non-persistent connections. | |
active_persistent_connections | Connection | Total number of active persistent connections. | The total number of active non-persistent connections is
active_connections -
active_persistent_connections. |
explicit_close | Connection | Total number of explicitly closed connections (ext/mysqli only). | Examples of code snippets that cause an explicit close :
$link = new mysqli(...); $link->close(...) $link = new mysqli(...); $link->connect(...) |
implicit_close | Connection | Total number of implicitly closed connections (ext/mysqli only). | Examples of code snippets that cause an implicit close :
|
disconnect_close | Connection | Connection failures indicated by the C API call
mysql_real_connect during an attempt
to establish a connection. | It is called disconnect_close because the connection
handle passed to the C API call will be closed. |
in_middle_of_command_close | Process | A connection has been closed in the middle of a command execution (outstanding result sets not fetched, after sending a query and before retrieving an answer, while fetching data, while transferring data with LOAD DATA). | Unless you use asynchronous queries this should only happen if your script stops unexpectedly and PHP shuts down the connections for you. |
init_command_executed_count | Connection | Total number of init command executions, for example,
mysqli_options(MYSQLI_INIT_COMMAND ,
...). | The number of successful executions is
init_command_executed_count -
init_command_failed_count. |
init_command_failed_count | Connection | Total number of failed init commands. |
COM_* Commands
| Statistic | Scope | Description | Notes |
|---|---|---|---|
com_quit, com_init_db,
com_query,
com_field_list,
com_create_db,
com_drop_db,
com_refresh,
com_shutdown,
com_statistics,
com_process_info,
com_connect,
com_process_kill,
com_debug, com_ping,
com_time,
com_delayed_insert,
com_change_user,
com_binlog_dump,
com_table_dump,
com_connect_out,
com_register_slave,
com_stmt_prepare,
com_stmt_execute,
com_stmt_send_long_data,
com_stmt_close,
com_stmt_reset,
com_stmt_set_option,
com_stmt_fetch,
com_daemon | Connection | Total number of attempts to send a certain COM_* command from PHP to MySQL. | The statistics are incremented after checking the line and immediately before sending the corresponding MySQL client server protocol packet. If mysqlnd fails to send the packet over the wire the statistics will not be decremented. In case of a failure mysqlnd emits a PHP warning “Error while sending %s packet. PID=%d.” Usage examples:
|
Miscellaneous
| Statistic | Scope | Description | Notes |
|---|---|---|---|
explicit_stmt_close,
implicit_stmt_close | Process | Total number of close prepared statements. | A close is always considered explicit but for a failed prepare. |
mem_emalloc_count,
mem_emalloc_ammount,
mem_ecalloc_count,
mem_ecalloc_ammount,
mem_erealloc_count,
mem_erealloc_ammount,
mem_efree_count,
mem_malloc_count,
mem_malloc_ammount,
mem_calloc_count,
mem_calloc_ammount,
mem_realloc_count,
mem_realloc_ammount,
mem_free_count | Process | Memory management calls. | Development only. |
command_buffer_too_small | Connection | Number of network command buffer extensions while sending commands from PHP to MySQL. |
mysqlnd allocates an internal command/network buffer of
If mysqlnd has to grow the buffer beyond its initial
size of
The default buffer size is 2048 bytes in PHP 5.3.0. In
future versions the default will be 4kB or larger. The
default can changed either through the
It is recommended to set the buffer size to no less than
4096 bytes because mysqlnd also uses it when reading
certain communication packet from MySQL. In PHP 5.3.0,
mysqlnd will not grow the buffer if MySQL sends a packet
that is larger than the current size of the buffer. As a
consequence mysqlnd is unable to decode the packet and
the client application will get an error. There are only
two situations when the packet can be larger than the
2048 bytes default of
As of PHP 5.3.2 mysqlnd does not allow setting buffers smaller than 4096 bytes. |
connection_reused |
Copyright 1997-2010 the PHP Documentation Group.
This section provides a collection of miscellaneous notes on MySQL Native Driver usage.
Using
mysqlndmeans using PHP streams for underlying connectivity. Formysqlnd, the PHP streams documentation (book.stream) should be consulted on such details as timeout settings, not the documentation for the MySQL Client Library.
Copyright 1997-2010 the PHP Documentation Group.
The MySQL Native Driver Plugin API is a feature of MySQL Native
Driver, or mysqlnd. Mysqlnd
plugins operate in the layer between PHP applications and the
MySQL server. This is comparable to MySQL Proxy. MySQL Proxy
operates on a layer between any MySQL client application, for
example, a PHP application and, the MySQL server.
Mysqlnd plugins can undertake typical MySQL
Proxy tasks such as load balancing, monitoring and performance
optimizations. Due to the different architecture and location,
mysqlnd plugins do not have some of MySQL
Proxy's disadvantages. For example, with plugins, there is no
single point of failure, no dedicated proxy server to deploy, and
no new programming language to learn (Lua).
A mysqlnd plugin can be thought of as an
extension to mysqlnd. Plugins can intercept the
majority of mysqlnd functions. The
mysqlnd functions are called by the PHP MySQL
extensions such as ext/mysql,
ext/mysqli, and PDO_MYSQL.
As a result, it is possible for a mysqlnd
plugin to intercept all calls made to these extensions from the
client application.
Internal mysqlnd function calls can also be
intercepted, or replaced. There are no restrictions on
manipulating mysqlnd internal function tables.
It is possible to set things up so that when certain
mysqlnd functions are called by the extensions
that use mysqlnd, the call is directed to the
appropriate function in the mysqlnd plugin. The
ability to manipulate mysqlnd internal function
tables in this way allows maximum flexibility for plugins.
Mysqlnd plugins are in fact PHP Extensions,
written in C, that use the mysqlnd plugin API
(which is built into MySQL Native Driver,
mysqlnd). Plugins can be made 100% transparent
to PHP applications. No application changes are needed because
plugins operate on a different layer. The
mysqlnd plugin can be thought of as operating
in a layer below mysqlnd.
The following list represents some possible applications of
mysqlnd plugins.
Load Balancing
Read/Write Splitting. An example of this is the PECL/mysqlnd_ms (Master Slave) extension. This extension splits read/write queries for a replication setup.
Failover
Round-Robin, least loaded
Monitoring
Query Logging
Query Analysis
Query Auditing. An example of this is the PECL/mysqlnd_sip (SQL Injection Protection) extension. This extension inspects queries and executes only those that are allowed according to a ruleset.
Performance
Caching. An example of this is the PECL/mysqlnd_qc (Query Cache) extension.
Throttling
Sharding. An example of this is the PECL/mysqlnd_mc (Multi Connect) extension. This extension will attempt to split a SELECT statement into n-parts, using SELECT ... LIMIT part_1, SELECT LIMIT part_n. It sends the queries to distinct MySQL servers and merges the result at the client.
MySQL Native Driver Plugins Available
There are a number of mysqlnd plugins already available. These include:
PECL/mysqlnd_mc - Multi Connect plugin.
PECL/mysqlnd_ms - Master Slave plugin.
PECL/mysqlnd_qc - Query Cache plugin.
PECL/mysqlnd_pscache - Prepared Statement Handle Cache plugin.
PECL/mysqlnd_sip - SQL Injection Protection plugin.
PECL/mysqlnd_uh - User Handler plugin.
Copyright 1997-2010 the PHP Documentation Group.
Mysqlnd plugins and MySQL Proxy are different
technologies using different approaches. Both are valid tools
for solving a variety of common tasks such as load balancing,
monitoring, and performance enhancements. An important
difference is that MySQL Proxy works with all MySQL clients,
whereas mysqlnd plugins are specific to PHP
applications.
As a PHP Extension, a mysqlnd plugin gets
installed on the PHP application server, along with the rest of
PHP. MySQL Proxy can either be run on the PHP application server
or can be installed on a dedicated machine to handle multiple
PHP application servers.
Deploying MySQL Proxy on the application server has two advantages:
No single point of failure
Easy to scale out (horizontal scale out, scale by client)
MySQL Proxy (and mysqlnd plugins) can solve
problems easily which otherwise would have required changes to
existing applications.
However, MySQL Proxy does have some disadvantages:
MySQL Proxy is a new component and technology to master and deploy.
MySQL Proxy requires knowledge of the Lua scripting language.
MySQL Proxy can be customized with C and Lua programming. Lua is
the preferred scripting language of MySQL Proxy. For most PHP
experts Lua is a new language to learn. A
mysqlnd plugin can be written in C. It is
also possible to write plugins in PHP using
PECL/mysqlnd_uh.
MySQL Proxy runs as a daemon - a background process. MySQL Proxy
can recall earlier decisions, as all state can be retained.
However, a mysqlnd plugin is bound to the
request-based lifecycle of PHP. MySQL Proxy can also share
one-time computed results among multiple application servers. A
mysqlnd plugin would need to store data in a
persistent medium to be able to do this. Another daemon would
need to be used for this purpose, such as Memcache. This gives
MySQL Proxy an advantage in this case.
MySQL Proxy works on top of the wire protocol. With MySQL Proxy you have to parse and reverse engineer the MySQL Client Server Protocol. Actions are limited to those that can be achieved by manipulating the communication protocol. If the wire protocol changes (which happens very rarely) MySQL Proxy scripts would need to be changed as well.
Mysqlnd plugins work on top of the C API,
which mirrors the libmysql client and
Connector/C APIs. This C API is basically a wrapper around the
MySQL Client Server protocol, or wire protocol, as it is
sometimes called. You can intercept all C API calls. PHP makes
use of the C API, therefore you can hook all PHP calls, without
the need to program at the level of the wire protocol.
Mysqlnd implements the wire protocol. Plugins
can therefore parse, reverse engineer, manipulate and even
replace the communication protocol. However, this is usually not
required.
As plugins allow you to create implementations that use two
levels (C API and wire protocol), they have greater flexibility
than MySQL Proxy. If a mysqlnd plugin is
implemented using the C API, any subsequent changes to the wire
protocol do not require changes to the plugin itself.
Copyright 1997-2010 the PHP Documentation Group.
The mysqlnd plugin API is simply part of the
MySQL Native Driver PHP extension,
ext/mysqlnd. Development started on the
mysqlnd plugin API in December 2009. It is
developed as part of the PHP source repository, and as such is
available to the public either via SVN, or through source
snapshot downloads.
The following table shows PHP versions and the corresponding
mysqlnd version contained within.
| PHP Version | MySQL Native Driver version |
|---|---|
| 5.3.0 | 5.0.5 |
| 5.3.1 | 5.0.5 |
| 5.3.2 | 5.0.7 |
| 5.3.3 | 5.0.7 |
| 5.3.4 | 5.0.7 |
Plugin developers can determine the mysqlnd
version through accessing MYSQLND_VERSION,
which is a string of the format “mysqlnd 5.0.7-dev -
091210 - $Revision: 300535”, or through
MYSQLND_VERSION_ID, which is an integer such
as 50007. Developers can calculate the version number as
follows:
| Version (part) | Example |
|---|---|
| Major*10000 | 5*10000 = 50000 |
| Minor*100 | 0*100 = 0 |
| Patch | 7 = 7 |
| MYSQLND_VERSION_ID | 50007 |
During development, developers should refer to the
mysqlnd version number for compatibility and
version tests, as several iterations of
mysqlnd could occur during the lifetime of a
PHP development branch with a single PHP version number.
Copyright 1997-2010 the PHP Documentation Group.
This section provides an overview of the
mysqlnd plugin architecture.
MySQL Native Driver Overview
Before developing mysqlnd plugins, it is
useful to know a little of how mysqlnd itself
is organized. Mysqlnd consists of the
following modules:
| Modules Statistics | mysqlnd_statistics.c |
| Connection | mysqlnd.c |
| Resultset | mysqlnd_result.c |
| Resultset Metadata | mysqlnd_result_meta.c |
| Statement | mysqlnd_ps.c |
| Network | mysqlnd_net.c |
| Wire protocol | mysqlnd_wireprotocol.c |
C Object Oriented Paradigm
At the code level, mysqlnd uses a C pattern
for implementing object orientation.
In C you use a struct to represent an object.
Members of the struct represent object properties. Struct
members pointing to functions represent methods.
Unlike with other languages such as C++ or Java, there are no fixed rules on inheritance in the C object oriented paradigm. However, there are some conventions that need to be followed that will be discussed later.
The PHP Life Cycle
When considering the PHP life cycle there are two basic cycles:
PHP engine startup and shutdown cycle
Request cycle
When the PHP engine starts up it will call the module initialization (MINIT) function of each registered extension. This allows each module to setup variables and allocate resources that will exist for the lifetime of the PHP engine process. When the PHP engine shuts down it will call the module shutdown (MSHUTDOWN) function of each extension.
During the lifetime of the PHP engine it will receive a number of requests. Each request constitutes another life cycle. On each request the PHP engine will call the request initialization function of each extension. The extension can perform any variable setup and resource allocation required for request processing. As the request cycle ends the engine calls the request shutdown (RSHUTDOWN) function of each extension so the extension can perform any cleanup required.
How a plugin works
A mysqlnd plugin works by intercepting calls
made to mysqlnd by extensions that use
mysqlnd. This is achieved by obtaining the
mysqlnd function table, backing it up, and
replacing it by a custom function table, which calls the
functions of the plugin as required.
The following code shows how the mysqlnd
function table is replaced:
/* a place to store orginal function table */
struct st_mysqlnd_conn_methods org_methods;
void minit_register_hooks(TSRMLS_D) {
/* active function table */
struct st_mysqlnd_conn_methods * current_methods
= mysqlnd_conn_get_methods();
/* backup original function table */
memcpy(&org_methods, current_methods,
sizeof(struct st_mysqlnd_conn_methods);
/* install new methods */
current_methods->query = MYSQLND_METHOD(my_conn_class, query);
}
Connection function table manipulations must be done during Module Initialization (MINIT). The function table is a global shared resource. In an multi-threaded environment, with a TSRM build, the manipulation of a global shared resource during the request processing will almost certainly result in conflicts.
Do not use any fixed-size logic when manipulating the
mysqlnd function table: new methods may be
added at the end of the function table. The function table may
change at any time in the future.
Calling parent methods
If the original function table entries are backed up, it is still possible to call the original function table entries - the parent methods.
In some cases, such as for
Connection::stmt_init(), it is vital to call
the parent method prior to any other activity in the derived
method.
MYSQLND_METHOD(my_conn_class, query)(MYSQLND *conn,
const char *query, unsigned int query_len TSRMLS_DC) {
php_printf("my_conn_class::query(query = %s)\n", query);
query = "SELECT 'query rewritten' FROM DUAL";
query_len = strlen(query);
return org_methods.query(conn, query, query_len); /* return with call to parent */
}
Extending properties
A mysqlnd object is represented by a C
struct. It is not possible to add a member to a C struct at run
time. Users of mysqlnd objects cannot simply
add properties to the objects.
Arbitrary data (properties) can be added to a
mysqlnd objects using an appropriate function
of the
mysqlnd_plugin_get_plugin_<object>_data()
family. When allocating an object mysqlnd
reserves space at the end of the object to hold a void
* pointer to arbitrary data.
mysqlnd reserves space for one void
* pointer per plugin.
The following table shows how to calculate the position of the pointer for a specific plugin:
| Memory address | Contents |
| 0 | Beginning of the mysqlnd object C struct |
| n | End of the mysqlnd object C struct |
| n + (m x sizeof(void*)) | void* to object data of the m-th plugin |
If you plan to subclass any of the mysqlnd
object constructors, which is allowed, you must keep this in
mind!
The following code shows extending properties:
/* any data we want to associate */
typedef struct my_conn_properties {
unsigned long query_counter;
} MY_CONN_PROPERTIES;
/* plugin id */
unsigned int my_plugin_id;
void minit_register_hooks(TSRMLS_D) {
/* obtain unique plugin ID */
my_plugin_id = mysqlnd_plugin_register();
/* snip - see Extending Connection: methods */
}
static MY_CONN_PROPERTIES** get_conn_properties(const MYSQLND *conn TSRMLS_DC) {
MY_CONN_PROPERTIES** props;
props = (MY_CONN_PROPERTIES**)mysqlnd_plugin_get_plugin_connection_data(
conn, my_plugin_id);
if (!props || !(*props)) {
*props = mnd_pecalloc(1, sizeof(MY_CONN_PROPERTIES), conn->persistent);
(*props)->query_counter = 0;
}
return props;
}
The plugin developer is responsible for the management of plugin data memory.
Use of the mysqlnd memory allocator is
recommended for plugin data. These functions are named using the
convention: mnd_*loc(). The
mysqlnd allocator has some useful features,
such as the ability to use a debug allocator in a non-debug
build.
When and how to subclass
| When to subclass? | Each instance has its own private function table? | How to subclass? | |
| Connection (MYSQLND) | MINIT | No | mysqlnd_conn_get_methods() |
| Resultset (MYSQLND_RES) | MINIT or later | Yes | mysqlnd_result_get_methods() or object method function table manipulation |
| Resultset Meta (MYSQLND_RES_METADATA) | MINIT | No | mysqlnd_result_metadata_get_methods() |
| Statement (MYSQLND_STMT) | MINIT | No | mysqlnd_stmt_get_methods() |
| Network (MYSQLND_NET) | MINIT or later | Yes | mysqlnd_net_get_methods() or object method function table manipulation |
| Wire protocol (MYSQLND_PROTOCOL) | MINIT or later | Yes | mysqlnd_protocol_get_methods() or object method function table manipulation |
You must not manipulate function tables at any time later than MINIT if it is not allowed according to the above table.
Some classes contain a pointer to the method function table. All instances of such a class will share the same function table. To avoid chaos, in particular in threaded environments, such function tables must only be manipulated during MINIT.
Other classes use copies of a globally shared function table. The class function table copy is created together with the object. Each object uses its own function table. This gives you two options: you can manipulate the default function table of an object at MINIT, and you can additionally refine methods of an object without impacting other instances of the same class.
The advantage of the shared function table approach is performance. There is no need to copy a function table for each and every object.
Constructors
| Allocation, construction, reset | Can be modified? | Caller | |
| Connection (MYSQLND) | mysqlnd_init() | No | mysqlnd_connect() |
| Resultset(MYSQLND_RES) | Allocation:
Reset and re-initialized during:
| Yes, but call parent! |
|
| Resultset Meta (MYSQLND_RES_METADATA) | Connection::result_meta_init() | Yes, but call parent! | Result::read_result_metadata() |
| Statement (MYSQLND_STMT) | Connection::stmt_init() | Yes, but call parent! | Connection::stmt_init() |
| Network (MYSQLND_NET) | mysqlnd_net_init() | No | Connection::init() |
| Wire protocol (MYSQLND_PROTOCOL) | mysqlnd_protocol_init() | No | Connection::init() |
It is strongly recommended that you do not entirely replace a
constructor. The constructors perform memory allocations. The
memory allocations are vital for the mysqlnd
plugin API and the object logic of mysqlnd.
If you do not care about warnings and insist on hooking the
constructors, you should at least call the parent constructor
before doing anything in your constructor.
Regardless of all warnings, it can be useful to subclass constructors. Constructors are the perfect place for modifying the function tables of objects with non-shared object tables, such as Resultset, Network, Wire Protocol.
Destruction
| Derived method must call parent? | Destructor | |
| Connection | yes, after method execution | free_contents(), end_psession() |
| Resultset | yes, after method execution | free_result() |
| Resultset Meta | yes, after method execution | free() |
| Statement | yes, after method execution | dtor(), free_stmt_content() |
| Network | yes, after method execution | free() |
| Wire protocol | yes, after method execution | free() |
The destructors are the appropriate place to free properties,
mysqlnd_plugin_get_plugin_.
<object>_data()
The listed destructors may not be equivalent to the actual
mysqlnd method freeing the object itself.
However, they are the best possible place for you to hook in and
free your plugin data. As with constructors you may replace the
methods entirely but this is not recommended. If multiple
methods are listed in the above table you will need to hook all
of the listed methods and free your plugin data in whichever
method is called first by mysqlnd.
The recommended method for plugins is to simply hook the methods, free your memory and call the parent implementation immediately following this.
Due to a bug in PHP versions 5.3.0 to 5.3.3, plugins do not
associate plugin data with a persistent connection. This is
because ext/mysql and
ext/mysqli do not trigger all the necessary
mysqlnd end_psession()
method calls and the plugin may therefore leak memory. This
has been fixed in PHP 5.3.4.
Copyright 1997-2010 the PHP Documentation Group.
The following is a list of functions provided in the
mysqlnd plugin API:
mysqlnd_plugin_register()
mysqlnd_plugin_count()
mysqlnd_plugin_get_plugin_connection_data()
mysqlnd_plugin_get_plugin_result_data()
mysqlnd_plugin_get_plugin_stmt_data()
mysqlnd_plugin_get_plugin_net_data()
mysqlnd_plugin_get_plugin_protocol_data()
mysqlnd_conn_get_methods()
mysqlnd_result_get_methods()
mysqlnd_result_meta_get_methods()
mysqlnd_stmt_get_methods()
mysqlnd_net_get_methods()
mysqlnd_protocol_get_methods()
There is no formal definition of what a plugin is and how a plugin mechanism works.
Components often found in plugins mechanisms are:
A plugin manager
A plugin API
Application services (or modules)
Application service APIs (or module APIs)
The mysqlnd plugin concept employs these
features, and additionally enjoys an open architecture.
No Restrictions
A plugin has full access to the inner workings of
mysqlnd. There are no security limits or
restrictions. Everything can be overwritten to implement
friendly or hostile algorithms. It is recommended you only
deploy plugins from a trusted source.
As discussed previously, plugins can use pointers freely. These pointers are not restricted in any way, and can point into another plugin's data. Simple offset arithmetic can be used to read another plugin's data.
It is recommended that you write cooperative plugins, and that
you always call the parent method. The plugins should always
cooperate with mysqlnd itself.
Issues: an example of chaining and cooperation
| Extension | mysqlnd.query() pointer | call stack if calling parent |
| ext/mysqlnd | mysqlnd.query() | mysqlnd.query |
| ext/mysqlnd_cache | mysqlnd_cache.query() |
|
| ext/mysqlnd_monitor | mysqlnd_monitor.query() |
|
In this scenario, a cache (ext/mysqlnd_cache)
and a monitor (ext/mysqlnd_monitor) plugin
are loaded. Both subclass
Connection::query(). Plugin registration
happens at MINIT using the logic shown
previously. PHP calls extensions in alphabetical order by
default. Plugins are not aware of each other and do not set
extension dependencies.
By default the plugins call the parent implementation of the query method in their derived version of the method.
PHP Extension Recap
This is a recap of what happens when using an example plugin,
ext/mysqlnd_plugin, which exposes the
mysqlnd C plugin API to PHP:
Any PHP MySQL application tries to establish a connection to 192.168.2.29
The PHP application will either use
ext/mysql,ext/mysqliorPDO_MYSQL. All three PHP MySQL extensions usemysqlndto establish the connection to 192.168.2.29.Mysqlndcalls its connect method, which has been subclassed byext/mysqlnd_plugin.ext/mysqlnd_plugincalls the userspace hookproxy::connect()registered by the user.The userspace hook changes the connection host IP from 192.168.2.29 to 127.0.0.1 and returns the connection established by
parent::connect().ext/mysqlnd_pluginperforms the equivalent ofparent::connect(127.0.0.1)by calling the originalmysqlndmethod for establishing a connection.ext/mysqlndestablishes a connection and returns toext/mysqlnd_plugin.ext/mysqlnd_pluginreturns as well.Whatever PHP MySQL extension had been used by the application, it receives a connection to 127.0.0.1. The PHP MySQL extension itself returns to the PHP application. The circle is closed.
Copyright 1997-2010 the PHP Documentation Group.
It is important to remember that a mysqlnd
plugin is itself a PHP extension.
The following code shows the basic structure of the MINIT
function that will be used in the typical
mysqlnd plugin:
/* my_php_mysqlnd_plugin.c */
static PHP_MINIT_FUNCTION(mysqlnd_plugin) {
/* globals, ini entries, resources, classes */
/* register mysqlnd plugin */
mysqlnd_plugin_id = mysqlnd_plugin_register();
conn_m = mysqlnd_get_conn_methods();
memcpy(org_conn_m, conn_m,
sizeof(struct st_mysqlnd_conn_methods));
conn_m->query = MYSQLND_METHOD(mysqlnd_plugin_conn, query);
conn_m->connect = MYSQLND_METHOD(mysqlnd_plugin_conn, connect);
}
/* my_mysqlnd_plugin.c */
enum_func_status MYSQLND_METHOD(mysqlnd_plugin_conn, query)(/* ... */) {
/* ... */
}
enum_func_status MYSQLND_METHOD(mysqlnd_plugin_conn, connect)(/* ... */) {
/* ... */
}
Task analysis: from C to userspace
class proxy extends mysqlnd_plugin_connection {
public function connect($host, ...) { .. }
}
mysqlnd_plugin_set_conn_proxy(new proxy());
Process:
PHP: user registers plugin callback
PHP: user calls any PHP MySQL API to connect to MySQL
C: ext/*mysql* calls mysqlnd method
C: mysqlnd ends up in ext/mysqlnd_plugin
C: ext/mysqlnd_plugin
Calls userspace callback
Or orginal
mysqlndmethod, if userspace callback not set
You need to carry out the following:
Write a class "mysqlnd_plugin_connection" in C
Accept and register proxy object through "mysqlnd_plugin_set_conn_proxy()"
Call userspace proxy methods from C (optimization - zend_interfaces.h)
Userspace object methods can either be called using
call_user_function() or you can operate at a
level closer to the Zend Engine and use
zend_call_method().
Optimization: calling methods from C using zend_call_method
The following code snippet shows the prototype for the
zend_call_method function, taken from
zend_interfaces.h.
ZEND_API zval* zend_call_method( zval **object_pp, zend_class_entry *obj_ce, zend_function **fn_proxy, char *function_name, int function_name_len, zval **retval_ptr_ptr, int param_count, zval* arg1, zval* arg2 TSRMLS_DC );
Zend API supports only two arguments. You may need more, for example:
enum_func_status (*func_mysqlnd_conn__connect)( MYSQLND *conn, const char *host, const char * user, const char * passwd, unsigned int passwd_len, const char * db, unsigned int db_len, unsigned int port, const char * socket, unsigned int mysql_flags TSRMLS_DC );
To get around this problem you will need to make a copy of
zend_call_method() and add a facility for
additional parameters. You can do this by creating a set of
MY_ZEND_CALL_METHOD_WRAPPER macros.
Calling PHP userspace
This code snippet shows the optimized method for calling a userspace function from C:
/* my_mysqlnd_plugin.c */
MYSQLND_METHOD(my_conn_class,connect)(
MYSQLND *conn, const char *host /* ... */ TSRMLS_DC) {
enum_func_status ret = FAIL;
zval * global_user_conn_proxy = fetch_userspace_proxy();
if (global_user_conn_proxy) {
/* call userspace proxy */
ret = MY_ZEND_CALL_METHOD_WRAPPER(global_user_conn_proxy, host, /*...*/);
} else {
/* or original mysqlnd method = do nothing, be transparent */
ret = org_methods.connect(conn, host, user, passwd,
passwd_len, db, db_len, port,
socket, mysql_flags TSRMLS_CC);
}
return ret;
}
Calling userspace: simple arguments
/* my_mysqlnd_plugin.c */
MYSQLND_METHOD(my_conn_class,connect)(
/* ... */, const char *host, /* ...*/) {
/* ... */
if (global_user_conn_proxy) {
/* ... */
zval* zv_host;
MAKE_STD_ZVAL(zv_host);
ZVAL_STRING(zv_host, host, 1);
MY_ZEND_CALL_METHOD_WRAPPER(global_user_conn_proxy, zv_retval, zv_host /*, ...*/);
zval_ptr_dtor(&zv_host);
/* ... */
}
/* ... */
}
Calling userspace: structs as arguments
/* my_mysqlnd_plugin.c */
MYSQLND_METHOD(my_conn_class, connect)(
MYSQLND *conn, /* ...*/) {
/* ... */
if (global_user_conn_proxy) {
/* ... */
zval* zv_conn;
ZEND_REGISTER_RESOURCE(zv_conn, (void *)conn, le_mysqlnd_plugin_conn);
MY_ZEND_CALL_METHOD_WRAPPER(global_user_conn_proxy, zv_retval, zv_conn, zv_host /*, ...*/);
zval_ptr_dtor(&zv_conn);
/* ... */
}
/* ... */
}
The first argument of many mysqlnd methods is
a C "object". For example, the first argument of the
connect() method is a pointer to MYSQLND. The
struct MYSQLND represents a mysqlnd
connection object.
The mysqlnd connection object pointer can be
compared to a standard I/O file handle. Like a standard I/O file
handle a mysqlnd connection object shall be
linked to the userspace using the PHP resource variable type.
From C to userspace and back
class proxy extends mysqlnd_plugin_connection {
public function connect($conn, $host, ...) {
/* "pre" hook */
printf("Connecting to host = '%s'\n", $host);
debug_print_backtrace();
return parent::connect($conn);
}
public function query($conn, $query) {
/* "post" hook */
$ret = parent::query($conn, $query);
printf("Query = '%s'\n", $query);
return $ret;
}
}
mysqlnd_plugin_set_conn_proxy(new proxy());
PHP users must be able to call the parent implementation of an overwritten method.
As a result of subclassing it is possible to refine only selected methods and you can choose to have "pre" or "post" hooks.
Buildin class: mysqlnd_plugin_connection::connect()
/* my_mysqlnd_plugin_classes.c */
PHP_METHOD("mysqlnd_plugin_connection", connect) {
/* ... simplified! ... */
zval* mysqlnd_rsrc;
MYSQLND* conn;
char* host; int host_len;
if (zend_parse_parameters(ZEND_NUM_ARGS() TSRMLS_CC, "rs",
&mysqlnd_rsrc, &host, &host_len) == FAILURE) {
RETURN_NULL();
}
ZEND_FETCH_RESOURCE(conn, MYSQLND* conn, &mysqlnd_rsrc, -1,
"Mysqlnd Connection", le_mysqlnd_plugin_conn);
if (PASS == org_methods.connect(conn, host, /* simplified! */ TSRMLS_CC))
RETVAL_TRUE;
else
RETVAL_FALSE;
}
Copyright 1997-2010 the PHP Documentation Group.
PDO_MYSQL is a driver that implements the PHP Data Objects (PDO) interface to enable access from PHP to MySQL 3.x, 4.x and 5.x databases.
PDO_MYSQL will take advantage of native prepared statement support present in MySQL 4.1 and higher. If you're using an older version of the mysql client libraries, PDO will emulate them for you.
Beware: Some MySQL table types (storage engines) do not support transactions. When writing transactional database code using a table type that does not support transactions, MySQL will pretend that a transaction was initiated successfully. In addition, any DDL queries issued will implicitly commit any pending transactions.
The constants below are defined by
this driver, and will only be available when the extension has been either
compiled into PHP or dynamically loaded at runtime. In addition, these
driver-specific constants should only be used if you are using this driver.
Using driver-specific attributes with another driver may result in
unexpected behaviour. PDO::getAttribute may be used to
obtain the PDO_ATTR_DRIVER_NAME attribute to check the
driver, if your code can run against multiple drivers.
-
PDO::MYSQL_ATTR_USE_BUFFERED_QUERY(integer) If this attribute is set to
TRUEon aPDOStatement, the MySQL driver will use the buffered versions of the MySQL API. If you're writing portable code, you should usePDOStatement::fetchAllinstead.Example 21.154. Forcing queries to be buffered in mysql
<?php if ($db->getAttribute(PDO::ATTR_DRIVER_NAME) == 'mysql') { $stmt = $db->prepare('select * from foo', array(PDO::MYSQL_ATTR_USE_BUFFERED_QUERY => true)); } else { die("my application only works with mysql; I should use \$stmt->fetchAll() instead"); } ?>-
PDO::MYSQL_ATTR_LOCAL_INFILE(integer) Enable
LOAD LOCAL INFILE.Note, this constant can only be used in the
driver_optionsarray when constructing a new database handle.-
PDO::MYSQL_ATTR_INIT_COMMAND(integer) Command to execute when connecting to the MySQL server. Will automatically be re-executed when reconnecting.
Note, this constant can only be used in the
driver_optionsarray when constructing a new database handle.-
PDO::MYSQL_ATTR_READ_DEFAULT_FILE(integer) Read options from the named option file instead of from
my.cnf. This option is not available if mysqlnd is used, because mysqlnd does not read the mysql configuration files.-
PDO::MYSQL_ATTR_READ_DEFAULT_GROUP(integer) Read options from the named group from
my.cnfor the file specified withMYSQL_READ_DEFAULT_FILE. This option is not available if mysqlnd is used, because mysqlnd does not read the mysql configuration files.-
PDO::MYSQL_ATTR_MAX_BUFFER_SIZE(integer) Maximum buffer size. Defaults to 1 MiB. This constant is not supported when compiled against mysqlnd.
-
PDO::MYSQL_ATTR_DIRECT_QUERY(integer) Perform direct queries, don't use prepared statements.
-
PDO::MYSQL_ATTR_FOUND_ROWS(integer) Return the number of found (matched) rows, not the number of changed rows.
-
PDO::MYSQL_ATTR_IGNORE_SPACE(integer) Permit spaces after function names. Makes all functions names reserved words.
-
PDO::MYSQL_ATTR_COMPRESS(integer) Enable network communication compression. This is not supported when compiled against mysqlnd.
The behaviour of these functions is affected by settings in php.ini.
Table 21.19. PDO_MYSQL Configuration Options
| Name | Default | Changeable |
|---|---|---|
| pdo_mysql.default_socket | "/tmp/mysql.sock" | PHP_INI_SYSTEM |
| pdo_mysql.debug | NULL | PHP_INI_SYSTEM |
For further details and definitions of the PHP_INI_* modes, see the configuration.changes.modes.
Here's a short explanation of the configuration directives.
-
pdo_mysql.default_socketstring Sets a Unix domain socket. This value can either be set at compile time if a domain socket is found at configure. This ini setting is Unix only.
-
pdo_mysql.debugboolean Enables debugging for PDO_MYSQL. This setting is only available when PDO_MYSQL is compiled against mysqlnd and in PDO debug mode.
Copyright 1997-2010 the PHP Documentation Group.
PDO_MYSQL DSNConnecting to MySQL databases
Description
The PDO_MYSQL Data Source Name (DSN) is composed of the following elements:
- DSN prefix
The DSN prefix is
mysql:.-
host The hostname on which the database server resides.
-
port The port number where the database server is listening.
-
dbname The name of the database.
-
unix_socket The MySQL Unix socket (shouldn't be used with
hostorport).-
charset Currently ignored.
Examples
Example 21.155. PDO_MYSQL DSN examples
The following example shows a PDO_MYSQL DSN for connecting to MySQL databases:
mysql:host=localhost;dbname=testdb
More complete examples:
mysql:host=localhost;port=3307;dbname=testdb
mysql:unix_socket=/tmp/mysql.sock;dbname=testdb
Notes
When the host name is set to
"localhost", then the connection to
the server is made thru a domain socket. If PDO_MYSQL is
compiled against libmysql then the location of the socket file
is at libmysql's compiled in location. If PDO_MYSQL is
compiled against mysqlnd a default socket can be set thru the
pdo_mysql.default_socket setting.
The MySQL Connector/PHP is a version of the
mysql and mysqli extensions
for PHP optimized for the Windows operating system. Later versions
of the main PHP mysql/mysqli
drivers are compatible with Windows and a separate, Windows
specific driver is no longer required.
For PHP for all platforms, including Windows, you should use the
mysql or mysqli extensions
shipped with the PHP sources. See Section 21.10, “MySQL PHP API”.
Error: Maximum Execution Time Exceeded: This is a PHP limit; go into thephp.inifile and set the maximum execution time up from 30 seconds to something higher, as needed. It is also not a bad idea to double the RAM allowed per script to 16MB instead of 8MB.Fatal error: Call to unsupported or undefined function mysql_connect() in ...: This means that your PHP version isn't compiled with MySQL support. You can either compile a dynamic MySQL module and load it into PHP or recompile PHP with built-in MySQL support. This process is described in detail in the PHP manual.Error: Undefined reference to 'uncompress': This means that the client library is compiled with support for a compressed client/server protocol. The fix is to add-lzlast when linking with-lmysqlclient.Error: Client does not support authentication protocol: This is most often encountered when trying to use the oldermysqlextension with MySQL 4.1.1 and later. Possible solutions are: downgrade to MySQL 4.0; switch to PHP 5 and the newermysqliextension; or configure the MySQL server with--old-passwords. (See Section C.5.2.4, “Client does not support authentication protocol”, for more information.)
Those with PHP4 legacy code can make use of a compatibility layer for the old and new MySQL libraries, such as this one: http://www.coggeshall.org/oss/mysql2i.
If you're experiencing problems with enabling both the
mysql and the mysqli
extension when building PHP on Linux yourself, you should try the
following procedure.
Configure PHP like this:
./configure --with-mysqli=/usr/bin/mysql_config --with-mysql=/usr
Edit the
Makefileand search for a line that starts withEXTRA_LIBS. It might look like this (all on one line):EXTRA_LIBS = -lcrypt -lcrypt -lmysqlclient -lz -lresolv -lm -ldl -lnsl -lxml2 -lz -lm -lxml2 -lz -lm -lmysqlclient -lz -lcrypt -lnsl -lm -lxml2 -lz -lm -lcrypt -lxml2 -lz -lm -lcrypt
Remove all duplicates, so that the line looks like this (all on one line):
EXTRA_LIBS = -lcrypt -lcrypt -lmysqlclient -lz -lresolv -lm -ldl -lnsl -lxml2
Build and install PHP:
make make install
The Perl DBI module provides a generic interface
for database access. You can write a DBI script that works with many
different database engines without change. To use DBI, you must
install the DBI module, as well as a DataBase
Driver (DBD) module for each type of server you want to access. For
MySQL, this driver is the DBD::mysql module.
Perl DBI is the recommended Perl interface. It replaces an older
interface called mysqlperl, which should be
considered obsolete.
Installation instructions for Perl DBI support are given in Section 2.15, “Perl Installation Notes”.
DBI information is available at the command line, online, or in printed form:
Once you have the
DBIandDBD::mysqlmodules installed, you can get information about them at the command line with theperldoccommand:shell>
perldoc DBIshell>perldoc DBI::FAQshell>perldoc DBD::mysqlYou can also use
pod2man,pod2html, and so forth to translate this information into other formats.For online information about Perl DBI, visit the DBI Web site, http://dbi.perl.org/. That site hosts a general DBI mailing list. Oracle Corporation hosts a list specifically about
DBD::mysql; see Section 1.6.1, “MySQL Mailing Lists”.For printed information, the official DBI book is Programming the Perl DBI (Alligator Descartes and Tim Bunce, O'Reilly & Associates, 2000). Information about the book is available at the DBI Web site, http://dbi.perl.org/.
For information that focuses specifically on using DBI with MySQL, see MySQL and Perl for the Web (Paul DuBois, New Riders, 2001). This book's Web site is http://www.kitebird.com/mysql-perl/.
MySQLdb provides MySQL support for Python,
compliant with the Python DB API version 2.0. It can be found at
http://sourceforge.net/projects/mysql-python/.
Two APIs available for Ruby programmers. The MySQL/Ruby API is based
on the libmysql API library. The Ruby/MySQL API
is written to use the native MySQL network protocol (a native
driver).
For more information on Ruby, see Ruby Programming Language.
For information on installing and using the MySQL/Ruby API, see Section 21.13.1, “The MySQL/Ruby API”.
For information on installing and using the Ruby/MySQL API, see Section 21.13.2, “The Ruby/MySQL API”.
The MySQL/Ruby module provides access to MySQL databases using
Ruby through libmysql.
For information on installing the module, and the functions exposed, see MySQL/Ruby.
The Ruby/MySQL module provides access to MySQL databases using Ruby through a native driver interface using the MySQL network protocol.
For information on installing the module, and the functions exposed, see Ruby/MySQL.
MySQLtcl is a simple API for accessing a MySQL
database server from the Tcl programming language. It can be found
at http://www.xdobry.de/mysqltcl/.
Eiffel MySQL is an interface to the MySQL database server using the Eiffel programming language, written by Michael Ravits. It can be found at http://efsa.sourceforge.net/archive/ravits/mysql.htm.