Chapter 11 Using Storage Devices
Your system accommodates one internally mounted diskette drive and up to two internal CD-ROM or tape drives. This chapter contains basic information about how to use these devices.
Tasks covered in this chapter include:
Other information covered in this chapter includes:
How to Prevent Overwriting of a Diskette
You can physically protect a diskette (write-protect it) so that data cannot be erased or overwritten. Once you have write-protected a diskette, additional information cannot be saved on it. When you no longer want to protect the information on a diskette, you can change it back to write-enable status and once again write and store information on it.
What to Do
-
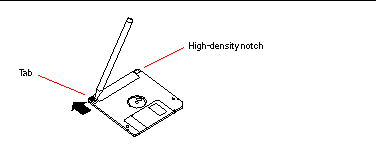
Turn the diskette upside-down and find the write-protect tab.
-
Move the tab toward the diskette's edge until you can see through the notch.
Use a ballpoint pen or other implement. When you can see through the notch, the diskette is write-protected.
Figure 11-1
What Next
If you want to change the diskette to write-enable status, see:
How to Allow Writing to a Diskette
You can physically protect a diskette (write-protect it) so that data cannot be erased or overwritten. Once you have write-protected a diskette, additional information cannot be saved on it. When you no longer want to protect the information on a diskette, you can change it back to write-enable status and once again write and store information on it.
What to Do
-
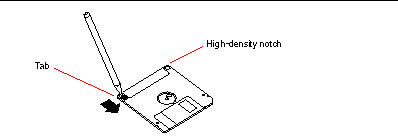
Turn the diskette upside-down and find the write-protect tab.
-
Push the tab away from the diskette's edge as far as it will go.
Use a ballpoint pen or other implement. When the notch is covered, the diskette is write-enabled.
Figure 11-2
What Next
You can now write to the diskette. If the diskette hasn't been formatted, see:
If you want to change the diskette to write-protect status, see:
How to Insert a Diskette Into Its Drive
What to Do
-
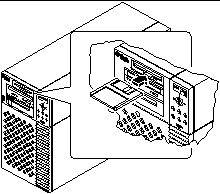
Insert the diskette, with the label side up, into the drive.
-
Push firmly until you feel the diskette click into position.
Figure 11-3
What Next
For instructions on removing a diskette from the drive, see:
How to Remove a Diskette From Its Drive
Before You Begin
If your system is a server set up without a local console, you need to set up a console on it in order to issue software commands. See "About Setting Up a Console".
What to Do
-
From the console device, type eject
The operating system unmounts the file system on the diskette.
-
Press the Eject button on the front of the diskette drive.
The diskette unseats itself and pops halfway out of the drive. Pull it from the diskette drive.
How to Use fdformat to Format a New Diskette
Before You Begin
You must format new diskettes before you use them. The simplest way to format, list the contents of, read, copy, or eject a diskette is to use the File Manager tool. Refer to Solaris User's Guide for information about File Manager.
If the server is set up without a local console, you need to set up a console on it in order to issue software commands; see:
If the diskette is write-protected, you need to remove the write protection; see:
What to Do
-
Insert the diskette into the diskette drive.
-
From the console device, enter the fdformat command.
Type the appropriate command, as listed for your diskette. It takes a minute or two for the system to format the diskette.
Table 11-1Diskette Density
Storage Capacity
(Formatted)
Command
High Density (HD)
1.44 Mbytes
fdformat
Medium Density (MD)
1.2 Mbytes
fdformat -m
Low Density (2DD)
720 Kbytes
fdformat -l
You can now write to and read from the diskette.
How to Use fdformat to Reformat a Used Diskette
Before You Begin
The simplest way to format, list the contents of, read, copy, or eject a diskette is to use the File Manager tool. Refer to Solaris User's Guide for information about File Manager.
Formatting erases everything on a diskette. Do not format a used diskette unless you want to erase its contents.
If the server is set up without a local console, you need to set up a console on it in order to issue software commands; see:
If the diskette is write-protected, you have to remove the write protection; see:
What to Do
-
Insert a diskette into the diskette drive.
-
From the console device, enter the fdformat command.
Type the appropriate command, as listed for your diskette. It takes a minute or two for the system to format the diskette.
Table 11-2Diskette Density
Storage Capacity
(Formatted)
Command
High Density (HD)
1.44 Mbytes
fdformat -U
Medium Density (MD)
1.2 Mbytes
fdformat -mU
Low Density (2DD)
720 Kbytes
fdformat -lU
You can now write to and read from the diskette.
How to Copy Files To and From a Diskette
What to Do
For instructions on how to copy files and file systems to and from a diskette, see Solaris 2.x Handbook for SMCC Peripherals and Solaris User's Guide.
How to Insert a Compact Disc Into the Drive
What to Do
-
Push the Eject button on the CD-ROM drive to release the drive tray.
-
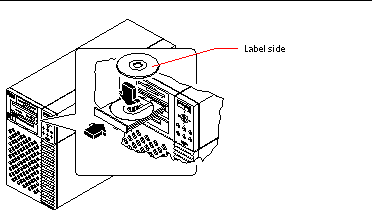
Place a CD into the drive tray, label side up.
A compact disc is a single-sided storage medium. Place it into the tray with the label side up, as shown.
Figure 11-4
-
Gently push the tray back into the drive.
The CD drive has an automated closing mechanism that retracts the tray into the drive.
What Next
You can eject a compact disc from the drive by using one of three methods:
-
With software commands; see "How to Eject a Compact Disc With Software Commands"
-
Manually; see "How to Eject a Compact Disc Manually"
-
Using an emergency procedure; see "How to Eject a Compact Disc in an Emergency"
How to Eject a Compact Disc With Software Commands
Before You Begin
If the server is set up without a local console, you need to set up a console on it in order to issue software commands; see:
What to Do
-
Kill processes accessing the CD-ROM drive, if necessary.
The disc will not eject while the drive is in use. To kill any processes accessing the CD-ROM drive, become superuser and type the following:
% su
Password:
# fuser -k /cdrom/cdrom0
Note -You should warn users before abruptly halting processes. The command fuser -u /cdrom/cdrom0 helps you identify who's accessing the CD-ROM drive. Refer to the Solaris 2.x System Administrator's Guide for more information about the fuser command.
-
From the console device, enter:
% eject cdrom0
The CD-ROM disc should eject.
What Next
You can also eject a compact disc by using one of these methods:
-
Manually; see "How to Eject a Compact Disc Manually"
-
Using an emergency procedure; see "How to Eject a Compact Disc in an Emergency"
How to Eject a Compact Disc Manually
What to Do
-
Kill processes accessing the CD-ROM drive, if necessary.
The front panel Eject button will not eject a disc while the disc is in use. To kill any processes accessing the CD-ROM drive, become superuser and type the following:
% su
Password:
# fuser -k /cdrom/cdrom0
Note -You should warn users before abruptly halting processes. The command fuser -u /cdrom/cdrom0 helps you identify who's accessing the CD-ROM drive. Refer to the Solaris 2.x System Administrator's Guide for more information about the fuser command.
-
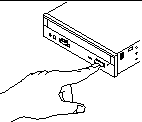
Press the Eject button on the front panel.
The drive ejects the CD tray and you can remove the disc.
Figure 11-5
What Next
You can also eject a compact disc by using one of these methods:
-
With software commands; see "How to Eject a Compact Disc With Software Commands"
-
Using an emergency procedure; see "How to Eject a Compact Disc in an Emergency"
How to Eject a Compact Disc in an Emergency
Before You Begin
Use the emergency ejection procedure only in emergency situations, for instance, if you unmounted the disc and the Eject button does not function.
What to Do
If this procedure is used while a disc is mounted, you can degrade or destroy data in your system.
-
Turn off the power to your system.
-
Unfold and straighten one end of a large wire paper clip.
-
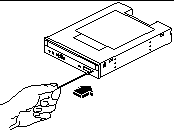
Insert the straightened end of the clip into the emergency eject hole and press firmly.
Pull the tray from the drive after the clip is inserted into the hole.
Figure 11-6
What Next
You can also eject a compact disc by using one of these methods:
-
With software commands; see "How to Eject a Compact Disc With Software Commands"
-
Manually; see "How to Eject a Compact Disc Manually"
About the Tape Drive and Tape Cartridges
There are a number of different tape drives offered by Sun Microsystems for your system. Each tape drive is shipped with a specification sheet that contains the following information:
-
Type of cartridges that can be used with the drive
-
Cartridge storage capacity
-
Handling and storage information
-
Physical characteristics
-
Power requirements
-
Cleaning instructions
-
Description of controls, indicators, and jumper setting
Handling and Storing Tape Cartridges
The following general handling and storage information applies to cartridges for any of the tape drives offered for your system:
-
Keep cartridges away from anything magnetic.
-
Store cartridges in a dust-free environment.
-
Keep cartridges away from direct sunlight and sources of heat, cold, or humidity. Constant room temperature and 50% humidity is recommended.
-
Do not touch the surface of the tape.
Thermal Conditioning
To ensure proper thermal conditioning, keep the tape cartridge at the same temperature as the drive for 24 hours. (This applies to cartridges for any of the tape drives offered for your system.)
How to Insert a Tape Cartridge
What to Do
-
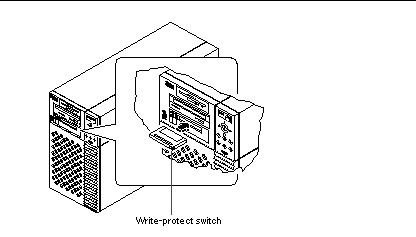
Verify that the tape cartridge write-protect switch is set correctly.
If the lock window is open, the tape is write-protected.
Figure 11-7
-
Insert the cartridge into the drive label side up.
-
Push gently on the cartridge until it is pulled into the drive.
What Next
To remove a tape cartridge from the drive, see:
How to Remove a Tape Cartridge
Before You Begin
Note -
The information in this section applies to a DDS-3 tape drive. If you have a different type of tape drive installed, see the specifications shipped with the drive for information.
What to Do
-
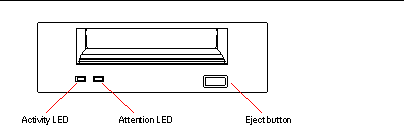
Check that there is no drive activity.
The green activity LED should be unlit. A flashing LED indicates drive activity.
 Caution -
 Do not eject the tape cartridge when the drive is active, or you may incur data loss or equipment damage.
Figure 11-8
-
Push the Eject button and remove the tape cartridge.
What Next
To insert a cartridge into the drive, see:
How to Control the Tape Drive
What to Do
For information about software commands needed to read and write data with your tape drive, refer to the Solaris 2.x Handbook for SMCC Peripherals or the Solaris User's Guide.
How to Clean the Tape Drive
Before You Begin
Observe these rules about when to clean a tape drive:
-
Clean the drive after the first four hours of use with a new tape.
-
After that, clean the tape drive after every 25 hours of use to maintain reliable operation.
-
Clean the drive twice as often if you use it in a dusty environment or operate it infrequently.
What to Do
-
Insert a cleaning cartridge into the drive.
The tape should play for a short while, and then eject automatically.
Figure 11-9
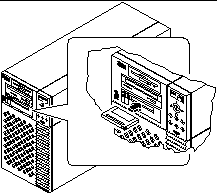
Do not use any cartridge other than a DDS-approved cleaning tape cartridge to clean your tape drive.
What If Your CD Drive Can't Read a CD?
Before You Begin
Eject the compact disc and remove it from the tray; see "How to Eject a Compact Disc With Software Commands".
Note -
If the drive cannot read a disc, you may have a dusty or dirty disc.
What to Do
-
Clean the disc with compressed air.
Compressed air can remove most accumulations of dust and large dirt particles.
-
If spraying with compressed air fails to remove the dirt on a disc, wipe the disc using a soft, clean, lint-free, dry cloth.
-
Wipe the non-labeled side of the disc radially from the center to the outside.
-
Do not wipe in a circular motion.
-
Wipe only the affected areas of the disc.
-
The figure below shows the correct and incorrect ways to clean a compact disc.
Figure 11-10

What Next
To insert the compact disc into the drive, see:
- © 2010, Oracle Corporation and/or its affiliates
