What to Do
-
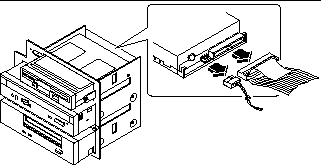
Disconnect the diskette data cable and the removable media power cable from the rear of the diskette drive.
Figure 7-18

-
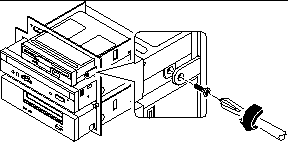
Remove the four Phillips screws securing the drive to the removable media assembly.
There are two screws located on each side of the drive.
Figure 7-19

-
Slide the drive out the front of its bay in the removable media assembly.
Push the drive from the rear to start the removal process.
-
Place the drive on an antistatic mat.
-
If you are not replacing the drive right away, install a metal filler panel in the empty drive bay.
Align the two metal retainer clips in the front of the drive bay, and press the filler panel into place.
-
If necessary, install a plastic filler panel in the drive bay opening in the RMA plastic cover.
Insert the two retainer posts into their corresponding slots and press on the filler panel until it snaps into place.
- © 2010, Oracle Corporation and/or its affiliates
