Chapter 7 Removing and Installing Storage Devices
This chapter describes how to remove and install storage devices and removable media devices. For a list of part numbers for field-replaceable units and optional equipment, see "Illustrated Parts Breakdown".
Tasks covered in this chapter include:
How to Remove the Removable Media Assembly (RMA)
Removing the removable media assembly activates the system power interlock switches. This safety mechanism prevents all DC voltages (except 5V standby power) from reaching any internal component when the removable media assembly is removed and the front panel keyswitch is left on. Do not remove the removable media assembly while the system is operating or the system will power off abruptly.
Before You Begin
Complete these tasks:
Video Demonstration
Figure 7-1

Click on the icon above for a video demonstration.
Click here for Appendix E, Video Player Help.
What to Do
-
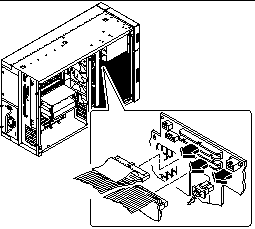
Disconnect the diskette data cable (if present) from the top of the UltraSCSI backplane at connector J0502.
Figure 7-2
-
Disconnect the removable media power cable from the UltraSCSI backplane at connector J0104.
-
Disconnect the removable media SCSI cable from the top of the UltraSCSI backplane at connector J0501.
Leave all other cabling connected to the rear of the drives in the removable media assembly.
-
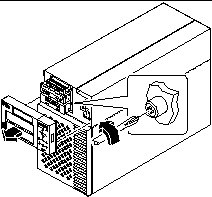
At the front of the system, pull off the plastic cover from the front of the removable media assembly.
Grasp the cover on both sides, and pull it away from the front of the system.
-
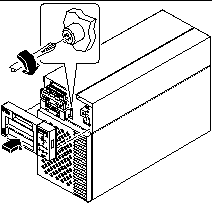
Loosen the two captive Phillips screws securing the removable media assembly to the chassis.
Figure 7-3
-
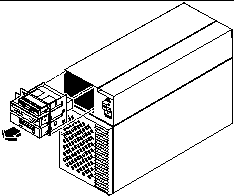
Slide the removable media assembly out of the system chassis.
Be sure that you feed all the cables carefully out of the RMA chassis opening as you remove the assembly.
Note -At this point all the power and data cables are attached to the rear of the drives installed in the assembly.
Figure 7-4
-
Place the assembly on an antistatic mat.
What Next
For information about removing drives from, or installing drives in the removable media assembly, see:
To replace the removable media assembly, complete this task:
How to Install the Removable Media Assembly (RMA)
Video Demonstration
Figure 7-5

Click on the icon above for a video demonstration.
Click here for Appendix E, Video Player Help.
What to Do
-
Install the appropriate metal filler panel into any empty RMA drive bay opening.
Align the two metal retainer clips in the front of the drive bay, and press the filler panel into place.
-
Grasp any cables attached to the rear of the removable media devices and feed them into the RMA opening at the front of the chassis.
Hold the removable media assembly in one hand and use the other hand to feed the cables into the opening.
-
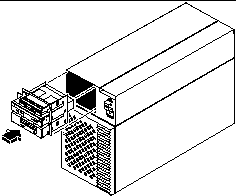
Slide the removable media assembly into the system chassis.
Make sure that the cables are not caught between the removable media assembly and the chassis as you slide the assembly into the chassis.
Figure 7-6
-
Tighten the two captive Phillips screws securing the removable media assembly to the system chassis.
Figure 7-7
-
If necessary, install one or more plastic filler panels in any empty drive bay openings in the RMA plastic cover.
Align the filler panel with its opening and press it into place.
-
Replace the RMA plastic cover.
Align the two posts on the cover with the corresponding holes at the front of the chassis and press the cover evenly on both sides until it snaps into place.
-
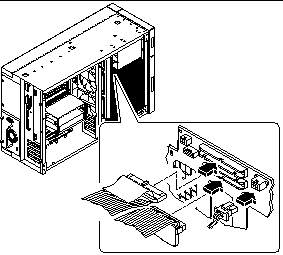
Connect the removable media SCSI cable to the UltraSCSI backplane at connector J0501.
Each connector is keyed so that it connects in only one way.
-
If applicable, connect the diskette data cable to the SCSI backplane at connector J0502.
-
Connect the removable media power cable to the UltraSCSI backplane at connector J0104.
Figure 7-8
What Next
To reassemble the system, complete these tasks:
How to Remove a Disk Drive
The system's disk "hot-plug" feature lets you remove a disk drive without shutting down the operating system or turning off the system power. For more information, see:
Before You Begin
You must follow antistatic precautions when handling a disk drive. For more information, see:
What to Do
-
Prepare the system for disk removal.
The hot-plug removal procedure involves software commands for preparing the system prior to removing the disk drive. See "About Internal Disk Drives".
Note -If the server is set up without a local graphics console, terminal, or monitor, you need to set up one of these options in order to issue software commands. See "How to Attach an Alphanumeric Terminal", or "How to Configure a Local Graphics Console".
-
If you are not hot-plugging the disk drive, halt the operating system and turn off the system power.
-
Unlock the disk access door and swing it open.
-
Attach the antistatic wrist strap to a metal surface inside the system chassis.
-
Identify the disk drive to be removed and note the bay in which it is installed.
For information about disk status LEDs, see "About Internal Disk Drives".
-
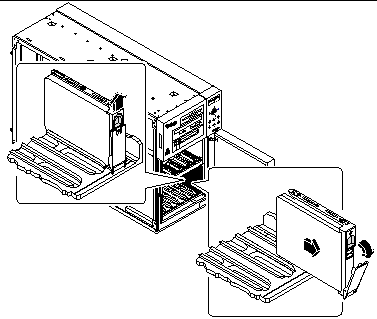
Using your thumb and forefinger, push the drive latch upward to release the drive handle.
Swing the handle out away from the drive until you feel the drive connector disengage from the backplane.
Figure 7-9
-
Holding the drive by the handle, slide it out of the drive bay.
Place the drive on an antistatic mat.
Note -When you reinstall the drive (or a replacement drive), be sure to install it in the same drive bay as the one from which it was just removed.
What Next
If you removed the drive as part of another procedure, complete the other procedure now.
To replace the disk drive, complete this task:
How to Install a Disk Drive
The system's disk "hot-plug" feature lets you install a disk drive without shutting down the operating system or turning off the system power. For more information, see:
Before You Begin
You must follow antistatic precautions when handling a disk drive. For more information, see:
What to Do
-
Prepare the system to receive the new disk drive.
The hot-plug installation procedure involves software commands for preparing the system prior to installing the disk drive. See "About Internal Disk Drives".
Note -If the server is set up without a local graphics console, terminal, or monitor, you need to set up one of these options in order to issue software commands. See "How to Attach an Alphanumeric Terminal", or "How to Configure a Local Graphics Console".
-
If you are not hot-plugging the disk drive, halt the operating system and turn off system power.
-
Unlock the disk access door and swing it open.
-
Attach the antistatic wrist strap to a metal surface inside the system chassis.
-
Release the drive handle on the disk drive.
Use your thumb and forefinger to pinch the drive latch sideways to open it.
-
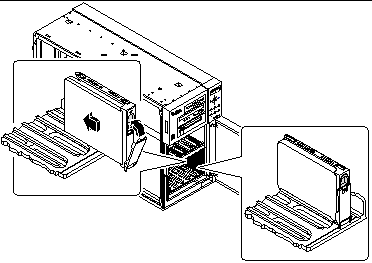
Align the disk drive to its drive bay.
Orient the drive so the drive handle's hinge faces the bottom of the drive bay (the left side of the bay in a rackmount configuration).
Note -If you are replacing a drive that you removed previously, be sure to install the drive in the same drive bay as the one you removed.
Figure 7-10
-
Holding the drive by its handle, fit the drive into the guide rails at the top and bottom of the drive bay.
-
Slide the drive into the bay until it barely contacts the backplane.
-
Press carefully on the center of the drive and watch as the handle begins to close.
The drive handle begins to close as the drive engages its backplane connector.
-
Press the handle toward the drive until the latch closes, securing the drive in place.
-
Close the disk access door and lock it if necessary.
-
If you are performing a hot-plug installation, complete the software part of the installation procedure.
What Next
If you have other parts to replace in the system, do so now.
When you are ready to restart the system, be sure to run POST and OpenBoot Diagnostic tests to verify that the system functions correctly with the new parts you have just installed. You must also perform a reconfiguration boot so that your system is able to recognize the new device(s). For additional information, see:
How to Remove a CD-ROM Drive or Tape Drive
Before You Begin
Complete these tasks:
Video Demonstration
Figure 7-11

Click on the icon above for a video demonstration.
Click here for Appendix E, Video Player Help.
What to Do
-
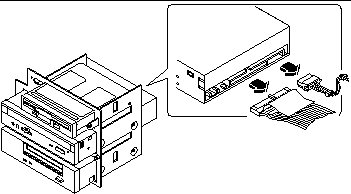
Disconnect the SCSI data and power cables from the rear of the CD-ROM or tape drive.
Figure 7-12
-
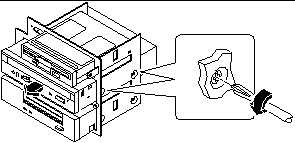
Remove the four screws securing the drive in the removable media assembly.
There are two screws on each side of the drive.
Figure 7-13
-
Slide the drive out the front of its bay in the removable media assembly.
Push the drive from the rear to start the removal process.
-
Place the drive on an antistatic mat.
What Next
To replace the CD-ROM or tape drive, complete this task:
How to Install a CD-ROM Drive or Tape Drive
Before You Begin
Know the configuration guidelines for installing removable media devices, see:
Complete these tasks:
Video Demonstration
Figure 7-14

Click on the icon above for a video demonstration.
Click here for Appendix E, Video Player Help.
What to Do
-
If necessary, remove the metal filler panel from the appropriate drive bay in the removable media assembly.
To release the panel, deflect its two retainer tabs through the small rectangular slots on each side of the RMA enclosure.
-
If necessary, remove the plastic filler panel from the RMA plastic cover.
On the back side of the RMA cover, push the filler panel retainer tabs inward to disengage the filler panel.
-
If you are replacing a defective drive, make sure that the jumper settings on the new drive match the settings on the old drive.
-
Slide the CD-ROM or tape drive into its drive bay.
Align the two screw holes on each side of the drive with the corresponding holes in each side of the drive bay.
-
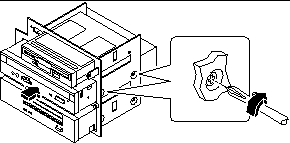
Insert and tighten the four flat-head Phillips screws that secure the drive in its bay.
There are two screws on each side that secure the drive in the RMA.
Figure 7-15
-
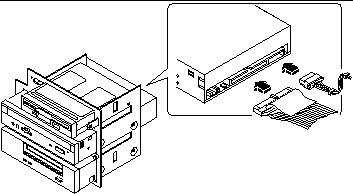
Connect the SCSI data and power cables to their corresponding connectors at the rear of the drive.
The connectors are keyed so that they install in only one way.
Figure 7-16
Note -Wide SCSI removable media devices require a 68-to-50 pin SCSI adapter. These devices only operate in narrow SCSI mode.
What Next
To reassemble the system, complete these tasks:
When you are ready to restart the system, be sure to run POST and OpenBoot Diagnostic tests to verify that the system functions correctly with the new parts you have just installed. You must also perform a reconfiguration boot so that your system is able to recognize the new device(s). For additional information, see:
How to Remove the Diskette Drive
Before You Begin
Complete these tasks:
Video Demonstration
Figure 7-17

Click on the icon above for a video demonstration.
Click here for Appendix E, Video Player Help.
What to Do
-
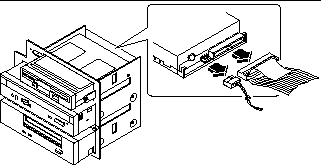
Disconnect the diskette data cable and the removable media power cable from the rear of the diskette drive.
Figure 7-18
-
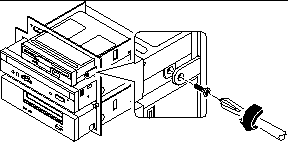
Remove the four Phillips screws securing the drive to the removable media assembly.
There are two screws located on each side of the drive.
Figure 7-19
-
Slide the drive out the front of its bay in the removable media assembly.
Push the drive from the rear to start the removal process.
-
Place the drive on an antistatic mat.
-
If you are not replacing the drive right away, install a metal filler panel in the empty drive bay.
Align the two metal retainer clips in the front of the drive bay, and press the filler panel into place.
-
If necessary, install a plastic filler panel in the drive bay opening in the RMA plastic cover.
Insert the two retainer posts into their corresponding slots and press on the filler panel until it snaps into place.
What Next
To replace the diskette drive, complete this task:
How to Install the Diskette Drive
Before You Begin
Complete these tasks:
Video Demonstration
Figure 7-20

Click on the icon above for a video demonstration.
Click here for Appendix E, Video Player Help.
What to Do
-
If necessary, remove the metal filler panel from the diskette drive bay in the removable media assembly.
Pinch the two metal retainers together to release the filler panel from the front of the RMA enclosure.
-
If necessary, remove the plastic filler panel from the RMA plastic cover.
Squeeze the two retainer posts together to release the filler panel from the RMA plastic cover.
-
Slide the diskette drive into the diskette drive bay.
Align the two screw holes on each side of the diskette drive with the corresponding holes in each side of the diskette drive bay.
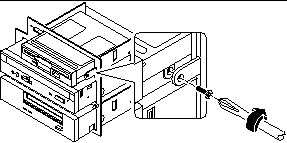
Figure 7-21
-
Insert and tighten the four flat-head Phillips screws that secure the drive in its bay.
-
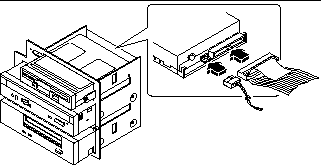
Connect the removable media power cable to the power connector at the rear of the diskette drive.
The connector is keyed and only fits one way.
-
Connect the diskette data cable to the data connector at the rear of the drive.
The connector is keyed and only fits one way.
Figure 7-22
What Next
Complete these tasks to reassemble the system:
When you are ready to restart the system, be sure to run POST and OpenBoot Diagnostic tests to verify that the system functions correctly with the new parts you have just installed. You must also perform a reconfiguration boot so that your system is able to recognize the new device(s). For additional information, see:
- © 2010, Oracle Corporation and/or its affiliates
