| Sun Fire V215 and V245 Servers Administration Guide |
| Sun Fire V215 and V245 Servers Administration Guide |
| C H A P T E R 1 |
|
Performing General Administrative Tasks |
This chapter describes how to perform general administrative tasks on the Sun Fire V215 and V245 servers. The following topics are discussed:
The following default server prompts are used by the Sun Fire V215 and V245 servers:
FIGURE 1-1 shows the relationship between the three prompts and how to change from one prompt to another.

This section contains procedures for controlling the server power.

|
Caution - Before you remove or replace a system configuration card or DVD Dual drive, the server must be completely powered down by removing the power cord(s). |
|
Tip - For detailed information on controlling server power with the ALOM software, go to: http://docs.sun.com |
|

|
Caution - Never move the system when the system power is on. Movement can cause catastrophic hard drive failure. Always power off the system before moving it. |
1. Connect the server to an AC power source.
After the power cord is connected, the server automatically goes into Standby power mode.
2. Turn on power to any peripherals and external storage devices you have connected to the server.
Read the documentation supplied with the device for specific instructions.
3. Press the On/Standby button.
Verify that the LED for the On/Standby button illuminates.
|
1. Notify users that the system will be powered down.
2. Back up the system files and data, if necessary.
3. Press and release the On/Standby button.
The system begins an orderly software system shutdown.
4. Wait for the front panel green power indicator to blink slowly.
|
You can power on the server from the system controller by using the poweron command at the SC console.
 To initiate the power-on sequence, issue the poweron command.
You see an sc> alert message on the system console. This indicates that the system has reset.
To install your system software or to diagnose problems, you need some way to interact at a low level with the system. The system console is Sun's facility for doing this. You use the system console to view messages and issue commands. There can be only one system console per computer.
The serial management port (SER MGT) is the default port for accessing the system console upon initial system installation. After installation, you can configure the system console to accept input from and send output to different devices.
The system console displays status and error messages generated by firmware-based tests during system startup. After those tests have been run, you can enter special commands that affect the firmware and alter system behavior.
After the operating system is booted, the system console displays UNIX system messages and accepts UNIX commands.
To use the system console, you need to attach an input/output device to the system. Initially, you might have to configure that hardware, and load and configure appropriate software as well.
You must also ensure that the system console is directed to the appropriate port on the server's back panel, generally, the one to which your hardware console device is attached (see FIGURE 1-2). You do this by setting the input-device and output-device OpenBoot configuration variables.
|
Note - The connectors in FIGURE 1-2 are not representative of the physical location of the connectors on the server. |

On Sun Fire V215 and V245 servers, the system console comes preconfigured. Input and output is enabled only by means of hardware devices connected to the serial or network management ports. However, because the network management port is not available until you assign it an IP address, your first connection must be to the serial management port (SER MGT).
Typically, you connect one of the following hardware devices to the serial management port:
This provides for secure access at the installation site.
Using a TIP line enables you to use windowing and operating system features on the system making the connection to the server.
The serial management port is not a general-purpose serial port. If you want to use a general-purpose serial port with your server, to connect a serial printer, for instance, use the SER TTYB serial port on the back panel of the server. The Solaris OS sees this port as TTYB.
After you have assigned an IP address to the network management port (NET MGT), you can connect an Ethernet-capable device to the system console through your network. This provides for remote monitoring and control. In addition, up to eight simultaneous connections to the system controller sc> prompt are available through the network management port.
In the default configuration, system controller alerts and system console output appear interspersed in the same window. After initial system installation, you can redirect the system console to take its input from and send its output to a graphics card's port.
For the following reasons, the best practice is to leave the console port in its default configuration:
You change the system console configuration by setting OpenBoot configuration variables. See Using the OpenBoot Configuration Variables.
The Sun Fire V215 and V245 servers are shipped without a mouse, keyboard, monitor, or frame buffer for the display of bitmapped graphics. To install a graphics monitor on the server, you must install a graphics accelerator card into a PCI slot, and attach a monitor, mouse, and keyboard to the appropriate front or rear USB ports.
After starting the system, you might need to install the correct software driver for the PCI card you have installed. For detailed hardware instructions, see Accessing the System Console Through a Local Graphics Monitor.
|
Note - POST diagnostics cannot display status and error messages to a local graphics monitor. |
Output from POST, OpenBoot, and the Solaris OS is displayed in the system console using the network console on the system controller. Use the following procedure to connect to the system console.
Execute the console command, and use the -f option to force the console to be attached to your session.
Multiple users can be connected to the console, but only one can be attached.
The following procedure assumes that you are accessing the system console by connecting a terminal server to the serial management port (SER MGT) of the server.
|
Note - The figure in this section shows the Sun Fire V245 server; however, the procedure applies to the Sun Fire V215 as well. |
1. Complete the physical connection from the serial management port to your terminal server.
The serial management port on the server is a data terminal equipment (DTE) port. The pinouts for the serial management port correspond with the pinouts for the RJ-45 ports on the Serial Interface Breakout Cable supplied by Cisco for use with the Cisco AS2511-RJ terminal server. If you use a terminal server made by another manufacturer, check that the serial port pinouts of the server match those of the terminal server you plan to use.

TABLE 1-1 shows the cross-overs that the cable must perform.
2. Open a terminal session on the connecting device, and type:
For example, for a server connected to port 10000 on a terminal server whose IP address is 192.20.30.10, you would type:
This procedure assumes that you are accessing the system console by connecting the serial port of another Sun system to the serial management port of the Sun Fire V245 server (FIGURE 1-4).
|
Note - The figure in this section shows the Sun Fire V245 server; however, the procedure applies to the Sun Fire V215 as well. |

1. Connect the RJ-45 serial cable.
The cable and adapter connect between another Sun system's serial port (typically TTYB) and the serial management port on the rear panel of the server.
2. Ensure that the /etc/remote file on the Sun system contains an entry for hardwire.
Most releases of Solaris OS software shipped since 1992 contain an /etc/remote file with the appropriate hardwire entry. However, if the Sun system is running an older version of Solaris OS software, or if the /etc/remote file has been modified, you might need to edit it. See Modifying the /etc/remote File for details.
3. In a shell tool window on the Sun system, type:
The Sun system responds by displaying:
The shell tool is now a TIP window directed to the server through the Sun system's serial port. This connection is established and maintained even when the server is completely powered off or just powering on.
|
Note - Use a shell tool or a CDE terminal (such as dtterm), not a command tool. Some tip(1) commands might not work properly in a command tool window. |
This procedure might be necessary if you are accessing the server using a TIP connection from a Sun system running an older version of the Solaris OS software. You might also need to perform this procedure if the /etc/remote file on the Sun system has been altered and no longer contains an appropriate hardwire entry.
This procedure assumes that you are logged in as superuser to the system console of a Sun system that you intend to use to establish a TIP connection to the Sun Fire V245 server.
1. Determine the release level of Solaris OS software installed on the Sun system. Type:
The system responds with a release number.
2. Take one of the following actions, depending on the number displayed.
The Solaris OS software shipped with an appropriate entry for hardwire in the /etc/remote file. If you have reason to suspect that this file was altered and the hardwire entry was modified or deleted, check the entry against the following example, and edit it as needed.
|
Note - If you intend to use the Sun system's serial port A rather than serial port B, edit this entry by replacing /dev/term/b with /dev/term/a. |
Check the /etc/remote file and add the following entry, if it does not already exist.
|
Note - If you intend to use the Sun system's serial port A rather than serial port B, edit this entry by replacing /dev/ttyb with /dev/ttya. |
The /etc/remote file is now properly configured. Continue establishing a TIP connection to the system console. See Accessing the System Console Through a TIP Connection.
If you have redirected the system console to TTYB and want to change the system console settings back to use the serial management and network management ports, see Using the OpenBoot Configuration Variables.
This procedure assumes that you are accessing the system console by connecting the serial port of an alphanumeric terminal to the serial management port of the Sun Fire V245 server.
|
|
1. Attach one end of the serial cable to the alphanumeric terminal's serial port.
Use a null modem serial cable or an RJ-45 serial cable and null modem adapter. Connect this cable to the terminal's serial port connector.
2. Attach the opposite end of the serial cable to the serial management port on the server.
3. Connect the alphanumeric terminal's power cord to an AC outlet.
4. Set the alphanumeric terminal to receive:
Refer to the documentation accompanying your terminal for information about how to configure the terminal.
You can issue system commands and view system messages using the alphanumeric terminal. Continue with your installation or diagnostic procedure, as needed. When you are finished, type the alphanumeric terminal's escape sequence.
After initial system installation, you can install a local graphics monitor and configure it to access the system console. You cannot use a local graphics monitor to perform initial system installation, nor can you use a local graphics monitor to view power-on self-test (POST) messages.
To install a local graphics monitor, you must have the following items:
|
|
1. Install the graphics card into an appropriate PCI slot.
Installation must be performed by a qualified service provider. For further information, refer to the Sun Fire V215 and V245 Servers Service Manual or contact your qualified service provider.
2. Attach the monitor's video cable to the graphics card's video port.
Tighten the thumbscrews to secure the connection.
3. Connect the monitor's power cord to an AC outlet.
4. Connect the USB keyboard cable to one of the USB ports on the rear panel and the USB mouse cable to the USB port on the keyboard.
6. Set OpenBoot configuration variables, as appropriate.
If you have changed the default input and output devices, change the settings back to the defaults by typing:
7. To cause the changes to take effect, type:
The system stores the parameter changes, and boots automatically when the OpenBoot configuration variable auto-boot? is set to true (the default value).
|
Note - To store parameter changes, you can also power cycle the system using the front panel Power button. |
You can issue system commands and view system messages using your local graphics monitor. If you want to redirect the system console back to the serial management and network management ports, see Using the OpenBoot Configuration Variables.
The system console is directed to the serial management and network management ports (SER MGT and NET MGT). If you have connected a graphics monitor the output is directed to that device by default. You can also redirect the system console back to the serial management and network management ports.
Certain OpenBoot configuration variables control from where system console input is taken and to where its output is directed. The following table shows how to set these variables in order to use the serial management and network management ports, or a local graphics monitor as the system console connection.
The serial management port does not function as a standard serial connection. If you want to connect a conventional serial device (such as a printer) to the system, you must connect it to TTYA not the serial management port.
It is important to note that the sc> prompt and POST messages are only available through the serial management port and network management port. In addition, the ALOM console command is ineffective when the system console is redirected to a local graphics monitor.
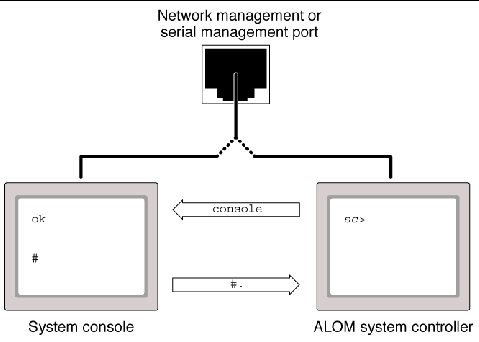
The Sun Fire V215 and V245 servers feature two management ports, labeled SER MGT and NET MGT, located on the server's rear panel. If the system console is directed to use the serial management and network management ports, these ports provide access to both the system console and the ALOM, each on a separate channel (see FIGURE 1-5).
If the system console is configured to be accessible from the serial management and network management ports, when you connect through one of these ports you can access either the ALOM command-line interface or the system console. You can switch between the ALOM interface and the system console at any time, but you cannot access both at the same time from a single terminal window or shell tool.
The prompt displayed on the terminal or shell tool tells you which channel you are accessing:
|
Note - If no text or prompt appears, it might be that no console messages were recently generated by the system. If this happens, pressing the terminal's Enter or Return key should produce a prompt. |
To reach the system console from the ALOM system controller, type the console command at the sc> prompt. To reach the ALOM system controller from the system console, type the system controller escape sequence, which by default is #. (pound period).
At times, you might need to reset the server. Follow the instructions in this section to do so. If the server is not responding to the reset, you will have to cycle the power. This section includes a procedure to cycle the power.
|
If it is necessary to reset the server, use the uadmin command.
To simply reset the server, it is not necessary to power the system off and on.
|
If a simple reset does not clear a problem, you can power the server off and on with this procedure.
At the Solaris OS prompt, issue the uadmin command to halt the Solaris OS and to return to the ok prompt.
2. Switch from the system console prompt to the SC console prompt by issuing the #. escape sequence.
3. Issue the poweroff command.
5. Reconnect to the system console using the console command.
The server outputs various messages, followed by the ok prompt.
This section explains how to turn the Locator indicator on and off and how to check the status of the Locator indicator.
|
|
|
The boot device is specified by the setting of an OpenBoot configuration variable called boot-device. The default setting of this variable is disk net. Because of this setting, the firmware first attempts to boot from the system hard drive, and if that fails, from the on-board NET0 Gigabit Ethernet interface.
This procedure assumes that you are familiar with the OpenBoot firmware and that you know how to enter the OpenBoot environment. If you want to boot from a networked device, you must connect the network interface to the network.
|
where device-specifier is one of the following:
If you want to specify a network interface other than an on-board Ethernet interface as the default boot device, you can determine the full path name of each interface by typing:
The show-devs command lists the system devices and displays the full path name of each PCI device.
The flashupdate command updates both the service processor firmware and the host firmware.
The flash image consists of the following components:
To use the features and fixes in subsequent firmware releases, perform this procedure.
|
1. Ensure that the SC Ethernet management port is configured.
This is required to access the new flash image over the network.
2. Open a Telnet session and connect to the system controller, as in the following example.
% alternate 129.xxx.xx.xx Trying 129.xxx.xx.xx... Connected to 129.xxx.xx.xx. Escape character is'^]'. Use is subject to license terms. Symptom) Advanced Lights Out Manager 1.0.11 () Please login: |
Substitute the IP address of your system controller.
3. Login as admin, using the password you defined during the configuration of the system controller.
4. Execute flashupdate command.
The flashupdate SC command updates the system controller flash image. The flashupdate command requires the following information:
The command usage is as follows:
flashupdate [-s IP-address -f pathname] [-v]
5. Reset the system controller.
After the flash has been updated, you must reset the system controller for the new image to take effect. To reset the system controller, issue the resetsc command. When you issue this command, you will be prompted to confirm that you want to reset the system controller. Reply y when prompted.
The system controller resets, runs diagnostics, and returns to the login prompt. The following example is for the serial console.
| Sun Fire V215 and V245 Servers Administration Guide | 819-3036-10 |
Copyright © 2006, Sun Microsystems, Inc. All Rights Reserved.
 To Power On the Server By Using the On/Standby Button