| Sun Fire V880z Server and Sun XVR-4000 Graphics Accelerator Installation and User's Guide |
| Sun Fire V880z Server and Sun XVR-4000 Graphics Accelerator Installation and User's Guide |
| C H A P T E R 6 |
|
Using Sun XVR-4000 Graphics Accelerator Features |
This chapter provides Sun XVR-4000 graphics accelerator feature information.
The Sun XVR-4000 graphics accelerator man pages describe how you can query and set frame buffer attributes such as screen resolutions and visual configurations.
Use the fbconfig(1M) man page for configuring all Sun graphics accelerators.
SUNWzulu_config(1M) contains Sun XVR-4000 device-specific configuration information.
Use the fbconfig -help option to display the attributes and parameters information of the man page.
host% fbconfig -dev zulu0 -help |
 To access the fbconfig man page, type:
host% man fbconfig |
To access the SUNWzulu_config man page, type:
host% man SUNWzulu_config |
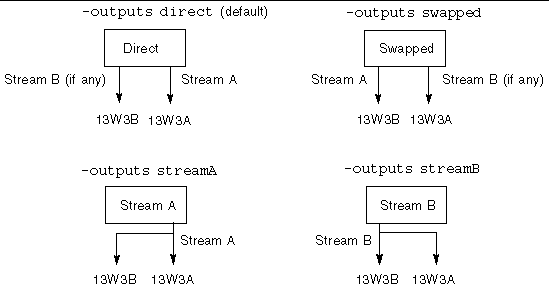
The Sun XVR-4000 graphics accelerator contains two 13W3 output port connectors. The -outputs port mapping options correspond to the 13W3A and 13W3B ports as designed on the Sun XVR-4000 graphics accelerator back panel (FIGURE 6-1). The 13W3B output port is to the left of the 13W3A output port.
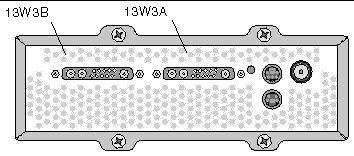
FIGURE 6-2 shows the four -outputs options: direct, swapped, Stream A, and
Stream B.
The X Window system screen locations determine the side of the monitor the cursor must be moved to in order to cause it to appear on a second monitor. The X Window system screen locations do not change when fbconfig sets -outputs. -outputs determines the output display devices while the X Window system states the graphics accelerator frame buffer managed areas (X Window screens). When you set or change fbconfig -outputs, the graphics accelerator frame buffer X Window screens remain the same for the new devices.
|
Note - The -outputs option is overridden when one stream is an S-video stream. See Appendix B for S-video information. |
The SUNWzulu_config(1M) man page contains information regarding the
-outputs options.
There are three methods described in this section for streaming video from which to choose with the Sun XVR-4000 graphics accelerator. All are subject to -outputs port mapping (see -outputs Port Mapping). The following section, Setting Up Streaming Methods, describes how to set up these streaming methods.
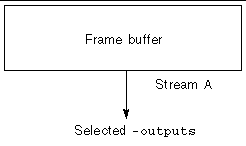
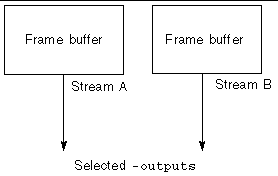
Use the fbconfig -outputs option to choose the 13W3 output port for receiving the video stream, or to enable the same video stream to flow out of both 13W3 output ports.
Two outputs are active where one large frame buffer is displayed across both display devices.
|
Note - See Xinerama for more information. |

Two outputs are active and independent.
This procedure enables a single video stream to come out of the selected -outputs.
To set up single video output, do the following:
1. If enabled, disable doublewide mode and re-enable maximizing sample density by using -samples max or -defaults:
host% fbconfig -dev zulu0 -defaults |
2. Set the desired screen resolution:
host% fbconfig -dev zulu0 -res SUNW_STD_1280x1024x76 |
To find all possible Sun XVR-4000 graphics accelerator resolutions, type:
host% fbconfig -res \? |
This procedure enables two-monitor support without the use of Xinerama software. This means that the Sun XVR-4000 graphics accelerator creates one wide (or tall) frame buffer, displayed across two screens.
1. Enable both streams, sharing a single frame buffer, and set the sample density:
host% fbconfig -dev zulu0 -doublewide enable -samples max |
Use the -doublehigh option for displays that are set one above the other (rather than side-by-side as for the -doublewide option).
2. Set the desired screen resolution:
host% fbconfig -dev zulu0 -res SUNW_STD_1280x1024x76 |
This procedure enables independent resolution and sample density for each stream.
|
Note - This streaming method is not supported in Xinerama. X Window system and Sun OpenGL for Solaris performance might be noticeably degraded in this mode. Many resources (for example, color LUTs and WID entries) are managed independently and the two streams compete with each other.
|
1. Select an independent screen resolution (and sample density, if desired) for each frame buffer:
host% fbconfig -dev zulu0a -res SUNW_STD_1280x1024x76 host% fbconfig -dev zulu0b -res SUNW_STD_1152x900x66 |
You can mix any resolutions (TABLE 2-1) at appropriate sample densities (see Multisample Antialiasing).
2. To enable both streams, both devices /dev/fbs/zulu0a and /dev/fbs/zulu0b must appear in the /etc/dt/config/Xservers file.
# cd /etc/dt/config # vi + Xservers |
Enter the Xservers file content in one long line.
:0 Local local_uid@console root /usr/openwin/bin/Xsun -dev /dev/fbs/zulu0a -dev /dev/fbs/zulu0b |
If both devices are configured to use maximum sample density (the default), the first stream will use many more samples than the second stream. These may be made equal by limiting the first stream (or both) using the fbconfig -samples option.
To use three (or four) video streams (monitors), you need to use two graphics boards. You may link those boards with Xinerama.
With three streams, one would be doublewide (or doublehigh) and one would be "normal." For four streams, both would be doublewide. For example, here are the steps to create the following monitor setup:
zulu0 left (13W3A) to monitor 1
zulu0 right (13W3B) to monitor 2
zulu1 left (13W3A) to monitor 3
zulu1 right (13W3B) to monitor 4
1. Configure each Sun XVR-4000 graphics accelerator as follows:
host% fbconfig -dev zulu0 -doublewide enable host% fbconfig -dev zulu1 -doublewide enable |
2. Put both devices in the Xservers file.
# cd /etc/dt/config # vi + Xservers |
Enter the Xservers file content in one long line. You may link the two graphics boards together with Xinerama by adding the +xinerama option, as shown.
:0 Local local_uid@console root /usr/openwin/bin/Xsun +xinerama -dev /dev/fbs/zulu0 -dev /dev/fbs/zulu1 top |
In this example, you need to include top to indicate that zulu1 is above zulu0, as shown in FIGURE 6-3 on the left. Without top included, the X Window system arranges the monitors linearly, left to right, as shown below on the right:

Multisampling (full-scene multisample antialiasing) removes the jagged edges on 3D data. An image is sampled at a higher resolution than the screen's resolution, typically four to 16 samples per pixel. This method yields improved images, but at the price of possible increased render time.
The Sun XVR-4000 graphics accelerator has 144 Mbytes of memory for the frame buffer so that the image can be multisampled at up to 16 samples per pixel in a single pass, depending on the resolution. The higher number of samples per pixel, the better the image quality but the longer the rendering time (and the more memory is consumed). Depending on the screen resolution (TABLE 6-2), the number of samples per pixel can be increased to improve image quality.
To invoke multisampling, use the fbconfig command -multisample and
-samples options and, if necessary, environment variables. You can enable multisample mode for a particular OpenGL application or for all OpenGL applications.
fbconfig controls frame buffer memory consumption (at the time the X Window system starts). Environment variables can control whether an OpenGL application renders to all samples or only to pixels.
When multisampling is enabled and sample density is 1, OpenGL filtering and jitter can be applied although jitter is not recommended at low sample densities (see Controlling Jitter and Filtering). When multisampling is disabled, filtering and jitter are disabled. For non-OpenGL windows, multisampling is always disabled.
Multisample allocation occurs at startup/configuration load time. The configuration samples-per-pixel parameter specifies the depth that is pre-allocated. TABLE 6-1 describes the fbconfig -multisample options.
-multisample [forceon | available | disable]
-samples specifies the number of samples per pixel to allocate when multisample is not set to disable. The maximum sample size is 16 samples per pixel. Using fbconfig -samples max, sample size is automatically allocated based on the frame buffer memory and video resources available to the stream as the window system starts up. Allowable choices are 1 to 16 or max, but a very high sample density can be allocated only at low resolution. Setting sample density to 1 is not equivalent to disabling multisampling; samples will still be subject to filtering and jitter. See Disabling Multisampling.
TABLE 6-2 lists how many samples per pixel are supported at various resolutions:
1. Use fbconfig to enable all OpenGL application windows for multisampling.
host% fbconfig -dev zulu0 -multisample forceon -samples max |
This option enables multisampling for all OpenGL applications. This is also the default, you can select by typing:
host% fbconfig -dev zulu0 -defaults |
2. Log out, then log back in to restart the X Window system for the changes to take effect.
This section describes interfaces to control multisampling when fbconfig multisampling is set to available (see TABLE 6-1). While multisampling is set to forceon or disable, these interfaces will be ignored.
To enable multisampling in an OpenGL program when fbconfig multisampling is set to available, use glXChooseVisual to select a multisampled visual. Then the application can use GL_ARB_multisample to switch its use of multisampling on and off. See http://www.opengl.org for information on OpenGL programming.
For applications that do not perform these calls, multisampling can be controlled using environment variables.
1. Use fbconfig to enable multisampling.
host% fbconfig -dev zulu0 -multisample available -samples max |
2. Log out, then log back in to restart the X Window system for the changes to take effect.
The Sun OpenGL for Solaris displays a message such as the following
ogl_zfb: Auto multisample buffer mode |
If multisampling is not needed at this time, it is more efficient to select a
single-sampled (non-multisampling) visual than to disable multisampling using GL_ARB_multisample.
When you disable multisampling, no multisample rendering is possible. Only one sample per pixel is allocated, despite any -samples option value. Display filtering and jitter is also disabled, as discussed in the next section.
1. To disable multisampling, type:
host% fbconfig -dev zulu0 -multisample disable |
|
Note - Setting sample density to 1 is not equivalent to disabling multisampling; setting sample density to 1 is still subject to filtering and jitter, where disabling multisampling is not. |
2. Log out, then log back in to restart the X Window system for the changes to take effect.
The following briefly describes jitter and filtering, which are set through fbconfig. See the SUNWzulu_config(1M) man page for more details.
Jitter indirectly determines the subpixel (X,Y) locations of the samples stored in the sample buffer. The sample density also affects the sample locations. TABLE 6-3 describes the fbconfig -jitter options.
-jitter [regular | random | permuted | auto]
Because the subpixel locations of samples within pixels varies from pixel to pixel, windows containing multisampled graphics should be redrawn after they are moved. Until the application redraws the window, the window displays a crude approximation of the original contents; straight lines or edges may appear jagged.
3D applications started after changing the -jitter option parameters will look correct. Any 3D applications running when jitter is changed should be restarted. You do not need to restart the window system.
Filtering accesses samples from a buffer segment (A or B) of a sample buffer and generates video pixels for display. You may select from the predefined fbconfig
-filter options listed in TABLE 6-4.
-filter [cylinder | gaussian | mitchell | catmull]
-filter_file filter_filename
The -filter_file option enables users to provide their own filter by producing a filter file and copying or linking it into directory /etc/openwin/server/etc/filters
or
/usr/openwin/server/etc/filters
(Both directories are writable only by superuser by default.)
The filter_filename must not start with "/" or "../" nor contain the substring "/../", but may contain subdirectory components.
Filters with negative weights (often called "negative lobes") cause a video pixel to be the result of subtracting a portion of nearby samples. Negative lobe filters provide antialiasing while still preserving details such as edges. However, they can produce artifacts near the edges of light and very dark colors (for example, light objects on a black background). Negatively weighting a color component can lead to a video pixel component less than 0, which must be clamped to black; there is no color blacker than black. The clamping leads to visual artifacts. When using filters with negative lobes, the background color components should be greater than the filter's negative lobes. The Mitchell filter has negative lobes less than 3.7%; Catmull, less than 7.5%. (For the Catmull example, if the maximum color component used in the scene is 1.0, no significant area should have a color component less than .075.)
Use fbconfig to check the X Window system (-propt) and the Sun XVR-4000 graphics accelerator (-prconf) device configuration values. The fbconfig -propt option displays the values of all options (for the specified device) saved in the OWconfig file. These are the values the X Window system uses the next time it starts on that device.
The fbconfig -prconf option displays the current Sun XVR-4000 graphics accelerator device configuration, including version numbers of each class of chip and the actual sample density. (When the sample density is max, -prconf output tells what density was achieved.) If certain values differ from those displayed in -propt, it is because those values have been configured since the X Window system started.
| Sun Fire V880z Server and Sun XVR-4000 Graphics Accelerator Installation and User's Guide | 817-2400-10 |
Copyright © 2003, Sun Microsystems, Inc. All rights reserved.