| Solstice Enterprise Manager 4.1 Installation Guide |
Installing Solstice Enterprise Manager
This chapter describes how to install Solstice Enterprise Manager (Solstice EM) software, including the following topics:
- Section 3.1 Installation Methods
- Section 3.2 Upgrading From Previous Versions
- Section 3.3 Installing Solstice EM Software Using setup Program
- Section 3.4 Post-Installation Activities Done by setup Program
- Section 3.5 Installing Solstice EM Using the em_install Script
- Section 3.6 Installing Solstice EM Using pkgadd Utility
- Section 3.7 Installing from a Remote CD-ROM Drive
- Section 3.8 Adding a Component After Installation
- Section 3.9 Example Command-Line Mode Installation
3.1 Installation Methods
There are three methods for installing Solstice EM software:
- The setup program - The recommended installation method. Use setup when you have access to a system running CDE or OpenWindows. For more information, see Section 3.3 Installing Solstice EM Software Using setup Program.
- The em_install script - For the Solstice EM users who have written programs using the em_install script. For more information, see Section 3.5 Installing Solstice EM Using the em_install Script.
- The pkgadd utility - For experienced Solaris users who want to install one or more packages rather than the entire Solstice EM software. For more information, see Section 3.6 Installing Solstice EM Using pkgadd Utility.
The recommended method is the setup program, which installs all the packages as components, based on function. To do a complete installation, use the setup program. The setup program performs these additional tasks that the pkgadd and em_install methods do not:
- Preserves existing runtime data
- Takes care of package dependencies
- Sets up the database user account
- Installs Solstice EM licenses
Caution – Do not attempt to install the Solstice EM software on a machine by copying it over the network from a machine where it has already been installed. Copying files without installing them will not properly configure the Solstice EM software.
3.2 Upgrading From Previous Versions
The setup program checks to see if any previous version of Solstice EM software exists on your machine. Follow the instructions in Section 3.3 Installing Solstice EM Software Using setup Program.
Depending upon your installed version, you may need to perform additional steps. See the following subsections for upgrade requirements.
3.2.1 Installing Solstice EM 4.1 Over Versions 1.0 and 2.0
If the installation program detects version 1.0 or 2.0, it prompts that you cannot upgrade from the existing version. The installation program then terminates.
If you have previously installed version 1.0 or 2.0, and you want to install version 4.1, use the pkgrm utility to remove the existing packages. Then, start the installation program again. For information on removing Solstice EM software, see Chapter 7.
3.2.2 Upgrading From Versions 2.0.1, 2.1, 3.0, and 4.0

To Preserve Existing Data and Upgrade to 4.1
1. Save all the existing data manually using em_topoimex and em_imex2. Manually remove existing Solstice EM installation using em_uninstall program of the existing Solstice EM version.3. If the Operating System (OS) is 5.6 or 5.7, upgrade to 5.8.4. Install Solstice EM 4.1.5. Import the saved MIS data from Step1 manually.3.3 Installing Solstice EM Software Using setup Program
The setup program installs and configures Solstice EM software. It is the recommended method for installing Solstice EM. If you have a previous version of Solstice EM, the program prompts you to select options for upgrading.
The following options are available for invoking the setup command to install Solstice EM.
TABLE 3-1 Options for the setup Command GUI mode setup Administrative mode setup -a Silent mode setup -s filename Command-line interface (CLI) mode setup -c
The setup installation process includes the following phases:
- Pre-installation - The setup program gathers information about the user, the target directory in which to install Solstice EM software, licenses, and which components to install.
- Configuration - By default, setup configures selected protocols, such as IP and Common Management Information Protocol (CMIP). You can choose to view and change default values for the selected protocols. If you selected the MIS and installed a license for it, setup can start the MIS after installing components.
- Installation - During this phase, the setup program copies the appropriate Solaris packages for each selected component from the CD-ROM to the disk.
- Post-Installation - The setup program conducts a number of post-installation activities, depending upon the type of system on which you install Solstice EM, the components you selected, and the automatic startup options you selected. If you chose to start the MIS, you can also choose to start the following post-installation activities:
3.3.1 Installing Solstice EM in GUI Mode
Use this method to install all the Solstice EM software from a graphical user interface (GUI). By default, the installation program configures the Solstice EM software, but, you can view and change the default configuration. After installing the Solstice EM software, the installation program can start the MIS and other tools automatically, if you choose.
The following procedures include steps for upgrading from previous versions. For other considerations about upgrading, see Section 3.2 Upgrading From Previous Versions.
To Install Solstice EM in GUI Mode
- The installation procedure takes about 45 minutes for installing all the packages from a local CD-ROM drive. It may take longer if you are installing it from a remote CD-ROM drive over a busy network.
1. Make sure your system meets the requirements for installing Solstice EM software and that you have the information you will be asked to provide.
- For detailed information, see Chapter 2.
2. Log in as root or change to superuser.3. If installing from a remote machine's CD drive, perform the steps in Section 3.7 Installing from a Remote CD-ROM Drive then resume from Step4 .4. Insert the Solstice EM CD-ROM into the CD-ROM drive, or perform the installation over a mounted network drive.
- The CD-ROM Autoplay displays a banner window with two options:
- Install Solstice Enterprise Manager - Starts the installation program
- Information - Starts the browser
Note – If you are installing on a system that does not have the Autoplay function, type the setup command in a command window to start the installation program.
5. Click Install Enterprise Manager.
- If the installation program detects a previous version of Solstice EM software, it displays a warning message and upgrade options.
- If there are no previous versions of Solstice EM, the installation program begins with a Welcome Screen.
6. If you are upgrading, choose one of the following options:
- Click Yes to install Solstice EM software and preserve existing data.
- Click No to install Solstice EM software without preserving existing data.
- The installation program begins with a Welcome Screen.
7. Click Next to step through the installation screens, answering the questions.
- The installation program asks for general user information, license information, and the components to be installed.
8. On the Configure - Log Export screen, choose whether to export log files:
- To export a log file, click Yes, type the name of the log file to export, and click Add.
- To remove a log file from the list, select the file and click Remove.
- When you have finished adding log files, click Next to continue the installation.
- If you do not want to export a log file, click No.
- If you are upgrading from a previous version, the installation program will export user-defined logs to /var/tmp/misc_data.exp. After installation, you must use the Log Event tool to create a log for each exported log, then import the logs in /var/tmp/misc_data.exp to Solstice EM. For detailed instructions on importing logs, refer to Section 5.3.2 To Import Logs in Customizing Guide. On the Configuration screen, click Yes to configure Enterprise Manager. Otherwise, click Next to continue.
- By default, the installation program configures the protocols you chose to install. You can view and change these default values.
- If you selected the MIS and installed a license for it, the installation program starts the MIS after installing components. If you choose to start the MIS, you can also choose to start the following post-installation activities:
9. SEM-HA Option - If Sun Cluster 3.0 is installed on your system you will be prompted to install EM for High Availability, choose Yes.
- To install High Availability Option for Solstice EM (SEM-HA) refer to Chapter 2 in HA Installation Guide. Otherwise choose No.
10. On the Configure - Security screen, click Yes to enable Security, or click Next to continue.
- Security gives you control over who can access the tools and objects within the product. You can enable security now or after installation. If you do not enable security, all users will have full access to everything. If you choose to enable security, you can add one or more users to the pre-defined privileges list during installation. Those users can then log in immediately after the installation ends and begin work. For more information, refer to Chapter 6 in Managing Your Network.
11. On the Configuration - ORB Information screen, select the ORB and specify the path for the ORB.
- Panel will only appear if you have selected the CORBA supplement from the CORBA supplement panel.
12. On the Configure - Data Definitions screen, choose whether to load additional data definitions into the MIS.
- You can load additional MIB, GDMO, and SNM Schema files now or after installation, as shown in the figure below. For more information, refer to Chapter 2 in Management Information Server (MIS) Guide.
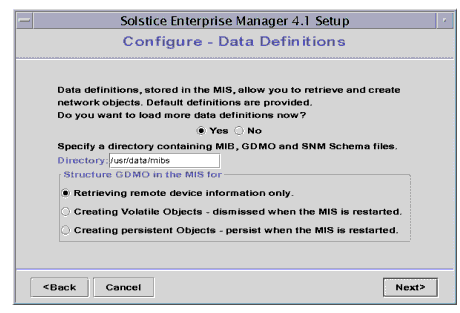
FIGURE 3-1 Configure - Data Definitions Screen
- Click Yes to load more data definitions into the MIS.
- In the Directory text box, enter the name of a directory containing the MIB, GDMO, or SNM Schema files.
- All files within the directory will be processed. Acceptable file types include the following:
- GDMO, having a .gdmo extension
- ASN.1, having a .asn1 extension
- SNM schema, having a .schema extension
- SNMP MIB, having a .mib extension
Note – When you load a GDMO document, you must also load its associated ASN.1 document, if there is one.
- If the specified directory contains GDMO data definitions, select one of the following options under Structure GDMO in the MIS.
- Select "Retrieving remote device information only" if you will not need to create object instances using this data definition. For example, if you are loading a MIB for a new device, you do not need to create objects based on this definition.
- Select "Creating Volatile Objects-dismissed when MIS is restarted" if you want to be able to create objects based on this definition, but the objects need not be persistent--for example, if you are creating a new event type, it need not be persistent because events can be logged, and the event notification itself need not be permanent.
- Select "Creating Persistent Objects-persist when MIS is restarted" if you want objects created based on this definition to remain after the MIS is restarted--for example, if you are adding a new user class, you would want objects based on this class to be persistent.
13. On the Configure - Browser as Network Tool, specify an HTML browser.
- You can configure an HTML browser now or after installation. Specify the path to the browser in the Browser text box. If you do not know where the browser is located, click Browse to display a dialog box in which you can navigate the file system and select the browser you want.
14. On the Configure - Network Discovery screen, choose to automatically start discovery when installation completes.
- Network Discovery finds and adds network objects, such as hosts, routers, networks, subnets, links, and SNMP devices to the MIS. If you choose not to automatically start discovery when installation completes, you can start discovery at any time after installation.
- Click Yes to automatically start discovery after installation.
- Select one of the following Network Discovery Options:
- Select "Discover the Local Subnet" to search only the local network for network objects.
- Select "Let Me Configure Discovery in the Network Discovery Tool" to configure the discovery options. The installation program opens the Network Discovery tool after installation, so that you can configure network discovery.
15. On the Configure - Automatic Management screen, choose to automatically launch a request against router interfaces, or all hosts.
- For more information, refer to Chapter 7 in Managing Your Network.
16. On the Configure - Database Password screen, enter an administrator's password for the Solstice EM database, then enter the password again in the Confirm Password text box.
- When you have finished configuring the components you selected, your choices are displayed on the Configuration Complete screen.
- Review your selections and click Back to make any needed changes.
17. Click Install when you are ready to install.
- Once the installation begins, it cannot be interrupted.
- The installation program copies Solstice EM files to the installation directory, and then conducts post-installation activities, such as starting any services (MIS and applications) you selected to start. As installation proceeds, the installation program shows the progress of installation and post-installation activities.
18. When installation is complete, click Finish to end the installation program.
- The installation program saves a record of the installation in the /var/tmp/emsetup.log file.
- If you installed the MIS and the Solstice EM tools, the final screen presents the option of running the Solstice EM Panel. If you select Run Solstice EM Panel, the installation program opens the Network Tools window.
- The installation program copies Solstice EM files to the installation directory, then conducts post-installation activities, such as starting any services (MIS and applications) you selected to start.
- The setup program shows the progress of installation and any post-installation activities.
19. If you upgraded from a previous version, use the Log Event tool to create a log for each exported log, then import the logs in /var/tmp/misc_data.exp to Solstice EM.
- For detailed instructions on importing logs, refer to Section 5.3.2 To Import Logs in Customizing Guide
20. If Solstice EM did not install successfully, look at the /var/tmp/emsetup.log file and refer to Chapter 2 in Troubleshooting Guide.3.3.2 Installing on a Remote Host
When installing on a remote host perform the following procedures to avoid the setup command running in command line mode.
1. Check that the DISPLAY environment variable has been set correctly by typing:
3.3.3 Installing Solstice EM in Administrative and Silent Modes
If you need to install Solstice EM on multiple machines at the same site, either yourself or with the help of other administrators, you can simplify the process by using two setup program options, administrative mode and silent mode.
First, use the administrative option to produce an install file that contains all the site and installation information you need for installation on each machine.
Next, install Solstice EM on each machine by invoking the silent option at the command line of each machine. The silent option uses the setup file created in administrative mode to provide installation and configuration information.
The installation proceeds as specified by the setup file and can be completed without user interaction. The exception is that the user will see any screen that contains a field with no value assigned to it in the setup file. In this way, you can enter values that need to be customized for each machine.
To Create an Administrative Installation File
To create an administrative installation file for use during silent installations, run the installation program in administration mode.
Note – Create the administrative installation file on a machine that uses the same language as the machine where you or others will run the silent installation.
Because you must supply an argument to the setup command, you must start this program from a command window.
1. Make sure your system meets the requirements for installing Solstice EM software and that you have the information you will be asked to provide.
- For detailed information see Chapter 2.
2. Log in as root or change to superuser.3. If you are installing from a remote machine's CD drive, perform the steps in Section 3.7 Installing from a Remote CD-ROM Drive," then resume from Step4.4. Insert the Solstice EM CD-ROM into the CD-ROM drive, or perform the installation over a mounted network drive.5. In a command tool, change to the directory where the CD-ROM is mounted.
6. In the same command tool, execute /setup -a to start the installation program in administrative mode.
- The installation program starts in administration mode, displaying the following Admin Installation screen.
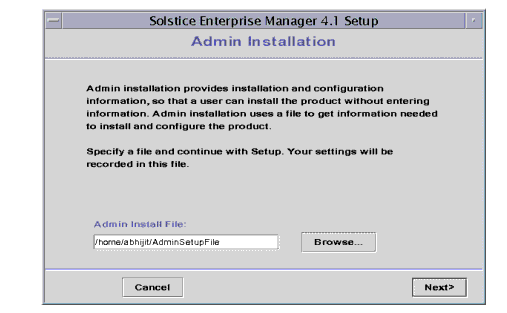
FIGURE 3-2 Admin Installation Screen7. Enter the directory path and name of the file where you want to store installation information.
- If you do not enter full path name, the installation program will place the file in your current directory. The setup program's default feature that normally specifies a standard installation directory is disabled in the administrative mode.
8. Progress through the installation screens, entering information as requested.9. Complete all fields that contain information common to the type of installation you are designing.
- If any field is left blank on a screen, the screen that contains the blank field will be displayed to the user during installation.
- The installation program saves a record of the installation in the /var/tmp/emsetup.log file.
10. If the administrative mode is unsuccessful, look at /var/tmp/emsetup.log file and refer to Chapter 2 in Troubleshooting Guide.
To Install Solstice EM in Silent Mode
After you create an installation file using the administrative option of the setup program, install the software on each machine. For procedures, see information at the beginning of this section.
1. Make sure your system meets the requirements for installing Solstice EM software.
- See Chapter 2 for detailed information.
2. Log in as root or change to superuser.3. If installing from a remote machine's CD-ROM drive, perform the steps in Section 3.7 Installing from a Remote CD-ROM Drive," then resume from Step4.4. Insert the Solstice EM CD-ROM into the CD-ROM drive, or perform the installation over a mounted network drive.5. In a command tool, change to the directory where the CD-ROM is mounted.
6. In the same command tool, type setup -s followed by the full path name of the setup file.
- For example, enter the command:
- The Solstice EM installation proceeds according to the contents of the setup file.
- If any field was left blank on a screen when the setup file was created, the screen that contains the blank field will be displayed to you during installation.
7. If any screens display, enter the requested data or choose the appropriate option.3.3.4 Installing Solstice EM in Command-Line Mode
You can run the setup installation program in command-line mode. In this mode, you can install Solstice EM software from a command window; no screens are displayed. Running the installation in command-line mode is useful when you are installing Solstice EM in a terminal window from a remote system, for example, in a Telnet session.
To Install Solstice EM in Command-Line Mode
1. Make sure your system meets the requirements for installing Solstice EM software and that you have the information you will be asked to provide.
- For detailed information, see Chapter 2.
2. Log in as root or change to superuser.3. If installing from a remote machine's CD drive, perform the steps in Section 3.7 Installing from a Remote CD-ROM Drive," then resume from Step4.4. Insert the Solstice EM CD-ROM into the CD-ROM drive, or perform the installation over a mounted network drive.5. In a command tool, change to the directory where the CD-ROM is mounted.
6. In the same command tool, type setup -c to start the installation program in command-line mode.7. Click Next to step through the installation screens, answering the questions.
- The installation program asks for general user information, license information, and the components to be installed.
8. On the Configuration screen, choose whether to configure Solstice Enterprise Manager.
- Choose Yes to view and change default values for the selected protocols.
- Also, you can choose whether to have the MIS started after installation. If you choose to start the MIS, you can configure:
- Choose No to use default values for the selected protocols.
- You must start the MIS and configure applications after installation. See Chapter 4.
- When you have finished configuring the components you selected, your choices are displayed on the Confirmation screen.
9. Review your selections.10. If you need to make any changes, press Quit to end the installation, then restart the installation, making any desired changes.11. If you are satisfied with your selections, press Return to begin the installation.
- Once the installation begins, it cannot be interrupted.
12. Installation begins.
- The installation program copies Solstice EM files to the installation directory, and then starts any services (MIS and applications) you selected to start.
- The installation program saves a record of the installation in
/var/tmp/emsetup.log file. If Solstice EM did not install successfully, look at this log file and refer to Chapter 2 in Troubleshooting Guide.3.3.5 Installing Java APIs, Java Dynamic Management Kit, and the Java Development Environment
The Typical installation option of setup does not install the Java APIs, the Java Dynamic Management Kit (JDMK), or the Java Development Environment. To install these components:
- Select the Custom installation option of setup and select the components for installation.
3.3.6 Installing Correct Version of JDK
The Java APIs and JDMK in Solstice EM 4.1 have been ensured to work with JDK version Solaris_JDK_1.2. If you already have a version of JDK installed on your machine, perform the following procedures before running setup.
1. Determine which version of JDK is already installed by typing:
3.3.7 Installing to a Non-Default Location
Before using setup to install to a non-default location as root,
1. Create the directory to which you will install Solstice EM 4.1
.
Caution – If these procedures are not followed, setup will create the directory with incorrect permissions, and the MIS will fail to start.
3.4 Post-Installation Activities Done by setup Program
The setup installation program installs the components you selected, then automatically conducts post-installation activities, which depend on the following variables:
- Solaris version you are installing on
- Patches you have installed
- Components you installed
- Whether you chose to have the installation program start the MIS and any applications for you after installation
The setup installation program performs the following post-installation activities:
- If you installed IP, setup installs the SNMP Patch 104018-08, if needed.
- If you installed only the CMIP protocol (not IP), setup creates symbolic links from the configuration files for Alarm Manager, Log Manager, and Log Viewer to CMIP versions of those files. If you install both CMIP and IP protocols, these configuration files are linked to IP versions of the files.
- If you did not install Solstice EM software in the default location (/opt), setup creates symbolic links from the directory where you installed Solstice EM software to the default installation directory, so that Discover will work correctly.
- The setup program installs the Java Runtime Environment.
- The setup program installs the em_uninstall files in /install directory/SUNWconn
- If you chose to install licenses during installation, setup installs those licenses now.
- If you successfully installed a license for the Management Information Server (MIS) and you chose to have it automatically started after installation, setup starts the MIS.
- If you are upgrading from Solstice 2.0.1, 2.1, 3.0 or 4.0 and you chose to preserve your existing data, setup imports topographical and alarm data.
- If you configured Automatic Management and chose to launch a request against all router interfaces in the topology, setup launches this request. This request checks "up" and "operational" status whenever a router is discovered and every 20 seconds there after. If there is a problem, status is posted and an alarm is generated.
- If you chose to launch a request against all hosts in the topology, setup launches this request, which tests for reachability using the ping utility whenever a host is discovered and every five minutes there after.
- The setup program sets up access control.
- If you installed the HTML documentation, setup adds an icon to the Network Tools window for the HTML browser and configures the Network Tools window to start the browser when you click the icon.
- If you chose to automatically run Network Discovery after installation, setup runs Discovery.
3.5 Installing Solstice EM Using the em_install Script
The em_install script is an optional front-end to the pkgadd command. The em_install script provides the option of performing either a default or non-default installation. Additionally, if the em_install script detects a previous version on your machine, it will back up the existing data (if possible) and remove the existing packages before installing the new packages. For more information on using the em_install script to install Solstice EM, see Appendix B.
To Install Solstice EM Using em_install Script
1. Make sure your system meets the requirements for installing Solstice EM software and that you have the information you will be asked to provide.
- For detailed information, see Chapter 2.
2. Log in as root or change to superuser.3. Insert the Solstice EM CD-ROM into the CD-ROM drive, or perform the installation over a mounted network drive.4. In a command tool, change to the directory where the CD-ROM is mounted.
5. In the same command tool, type /em_install to start the installation script.
- The installation menu is displayed.
6. If Sun Cluster 3.0 is installed on your system you will be prompted to install SEM-HA, choose Yes.
- To install SEM-HA (High Availability option for Solstice EM) refer to Chapter 2 in HA Installation Guide. Otherwise, choose No.
7. Select one of the first three options, then press Return.
- Select option 1 to install for IP and CMIP management.
- The Solstice EM common libraries, daemons, CMIP MPA, and Solstice Enterprise Agents are installed. Additionally, CMIP 9.0 is installed, if necessary. You also have the option of installing the MIS component, the Cooperative Consoles component, the applications, and the online documentation.
- Select option 2 to install for IP management only.
- The Solstice EM common libraries, daemons, and Solstice Enterprise Agents are installed. In addition, you also have the option of installing the MIS component, the Cooperative Consoles component, the applications, and the online documentation.
- Select option 3 to install for CMIP management only.
- The Solstice EM common libraries and CMIP MPA are installed. Additionally, CMIP 9.0 is installed, if necessary. You also have the option of installing the MIS component, the applications, and the online documentation.
- If shared memory and semaphores have not been enabled on your system, you will see the following information on the screen.
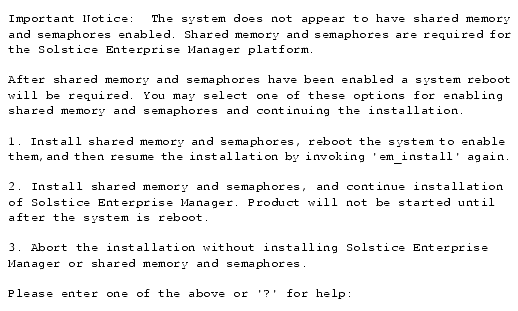 8. Select one of the first two options, then press Return:
- If you select option 1, your system is reconfigured and you are asked to confirm that you want to reboot the system.
- If you reboot the system, you must run the em_install command again and start over. If you do not reboot the system, the installation continues.
- If you select option 2, you receive a message stating that the appropriate system files have been updated, but that you must reboot the system at the conclusion of the installation before any applications can be started.
Note – If you select option 2, do not forget to reboot your system after the installation is complete. The MIS will not start unless the system is rebooted.
9. Enter the location of the Solstice EM media. Press Return if the default path is correct, or type the location of the Solstice EM software.10. Choose where to install Solstice EM software. Press Return to accept the default location, or type the name of the directory where you want to install the Solstice EM software.
Note – /opt/SUNWconn/em is the default location. If you specify a different location, for example, /software, then the packages are installed in the /software/SUNWconn/em directory. This is the only structure available.
11. Choose a default or non-default installation. Press Return to accept the default installation, or type n to customize your installation.12. By default, Access Control is active. Press Return to leave Access Control turned on, or enter n to turn it off.
- The default access control configuration will only allow a user logged in as root to start Solstice EM applications and connect with the MIS, have access to the applications' features, and have access to all the objects in the database. All non-root users must be granted permissions by using the Access Manager application. Turning Access Control off means that any user can use the Solstice EM applications and their features, as well as access the objects in the database. Answer either y or n, then press Return.
Note – It is possible to turn Access Control on or off at any time following installation. For more information, refer to Chapter 6 in Managing Your Network.
At this point, what you see on your screen will vary depending upon whether you are performing a default or non-default installation, and whether you are installing for both IP and CMIP management, IP management only, or CMIP management only.
- If you are performing a non-default installation, you are asked a series of package-specific questions after you have answered the Access Control question. For information on the questions asked during installation, see Section 2.3 Information You Provide.
- When the installation is complete, the em_install script saves a record of the installation in /var/tmp/em_install.log file and displays the following message:
- A log of the installation has been saved as /var/tmp/em_install.log
- Installation is now complete.
- cleaning up...
13. If Solstice EM is not installed successfully, look at the log file and refer to Chapter 2 in Troubleshooting Guide.3.6 Installing Solstice EM Using pkgadd Utility
The pkgadd utility installs the contents of a software package from the distribution medium or directory to your system.
The pkgadd utility is best suited for experienced users who want to install a small number of individual packages, rather than doing a complete Solstice EM installation.
To do a complete installation, use either the setup command or the em_install script. See Section 3.1 Installation Methods. The setup command performs these additional installation tasks that the pkgadd utility does not:
- Preserves existing runtime data
- Takes care of package dependencies
- Sets up the database user account
- Installs licenses
The setup command also performs post-installation tasks, such as starting the Solstice EM MIS and tools. (For more information, see Section 3.4 Post-Installation Activities Done by setup Program.) If you use the pkgadd utility to install Solstice EM software, you must perform these tasks manually after installation. See Chapter 4.
3.6.1 Upgrading from Versions 2.0.1, 2.1, 3.0 and 4.0
Unlike the setup program, the pkgadd utility does not give you the option of preserving existing runtime data. If you have version 2.0.1, 2.1, 3.0, or 4.0 installed, you must manually preserve your existing runtime data before installing a new version of the software. Preservation of the runtime data for versions prior to 2.0 is not supported if you are installing version 4.1.
3.6.2 Package Dependencies
Several Solstice EM software packages require the existence of other packages. The pkgadd utility requires that you add packages in order of dependency--for example, if you want to add the Java Management Environment (SUNWemjme), you must first add the packages it depends on: SUNWemalb,SUNWjvjit,SUNWjvdev, and SUNWjvjrt.
The setup command automatically takes care of all such package dependencies. However, if you install the Solstice EM software using the pkgadd utility, you must be familiar with package dependencies. TABLE A-3 lists the Solstice EM packages in alphabetical order, along with their dependencies.
To Install a Package Using pkgadd
1. Make sure your system has the disk space requirements for installing each package.
- For detailed information see Chapter 2 .
2. Log in as root or change to superuser.3. Insert the Solstice EM CD-ROM into the CD-ROM drive, or perform the installation over a mounted network drive.4. In a command tool, change to the directory where the CD-ROM is mounted.
5. In the same command tool, type one of the following pkgadd commands:
- To install the software in the default directory /opt/SUNWconn/em
- To install the Solstice EM software in a different directory,
- The pkgadd utility prompts you to enter the path of the directory to install the software--for example, Solstice EM is installed in the path /emsetup/products/Solstice_Enterprise_Manager_4.1/Solaris_2.8+/sparc/Product
- CMIP 9.0 is installed in the path /emsetup/products/Common_Management_Information_Protocol_9.0/Solaris_2.8+/sparc/Product
- JDMK is installed in the path /emsetup/Java_Dynamic_Management_Kit_4.2/Solaris_2.8+/common/Product
- CCON is installed in the path /emsetup/products/Cooperative_Console_1.2/Solaris_2.8+/sparc/Product
- License is installed in the path /emsetup/products/License
- GDMO is installed in the path /emsetup/products/GDMO/Solaris_2.8+/sparc/Product
- JDK is installed in the path /emsetup/products/Java_Development_Kit_1.2/Solaris_2.8/sparc/Product
- SNM is installed in the path /emsetup/products/Sun_Net_Manager_2.3/Solaris_2.8+/sparc/Product
- Patches are installed in the path /emsetup/products/patches
The pkgadd utility displays a numbered list of Solstice EM packages in screens of ten packages at a time.
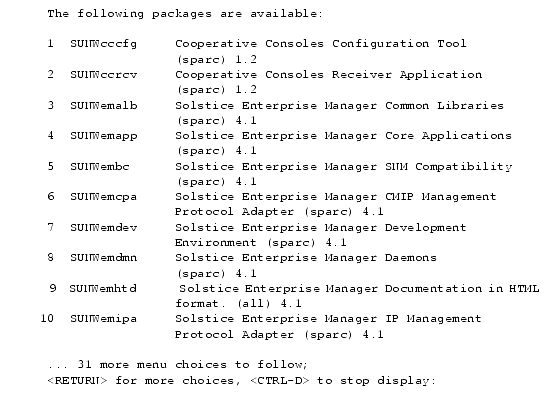 6. Press Return after each screen to list the next packages.7. When you know which package(s) to install, press CTRL-D to stop the display of packages.8. Enter the number of the package to install, or to install multiple packages, type each package number, separated by a comma.
Note – The pkgadd utility installs packages one at a time, and only performs disk space verification prior to the installation of each package. This means that the installation will stop if the package that does not fit is about to be installed. If you choose to continue with the installation, there is a good chance it will fail.
- After you have specified the packages you want to install, pkgadd adds the packages one by one, in alphabetical order.
- For most of the packages, you receive questions regarding the following during installation:
- Executing scripts with superuser permissions
- Installing files with setuid and/or setgid permissions
- For each of these questions, type y if you want to continue, or n if you do not.
- Several packages also ask questions pertaining to the installation of the specific package. For help in answering these questions, refer to Chapter 2.
9. When the installation completes, use the em_services command to start the MIS.
- See Section 4.4 Starting the Solstice EM MIS and Tools.
10. Install licenses for any EM software that requires a license.
- See Chapter 5.
3.7 Installing from a Remote CD-ROM Drive
To install the software on a machine that does not have its own CD-ROM drive, you must perform some activities on the remote machine (the machine with the CD-ROM device) and some on the local machine (the machine onto which you are installing the software). The instructions specify on which machine you must perform the steps.
As you mount the software from a remote CD-ROM, you must export or share the CD-ROM from the remote machine. This section explains how to share and to mount a CD-ROM from a Solaris 2.8 system.
To Set Up a Remote CD-ROM Machine
Perform the following steps on the remote machine so you can use its CD-ROM to install Solstice EM.
1. Type the following commands to find out if the NFS daemons are running:
- # ps -ef | grep mountd
- root 179 1 0 Jul 06 ? 0:37 /usr/lib/autofs/automountd
- root 625 1 0 Jul 06 ? 0:00 /usr/lib/nfs/mountd
- root 6882 6873 0 11:23:48 pts/5 0:00 grep mountd
- # ps -ef | grep nfsd
- root 627 1 0 Jul 06 ? 0:00 /usr/lib/nfs/nfsd -a 16
- root 6892 6873 0 11:24:04 pts/5 0:00 grep nfsd
2. If the NFS daemon is not already running, start the NFS daemon by typing the following commands:
# /usr/lib/nfs/mountd3. Share the directory from the remote machine by typing the command:
. . .
- /cd ro " "
. . .
- It can take a few minutes for this shared directory to become available over the network.
To Mount a Remote CD-ROM From a Local Machine
To mount the remote CD-ROM on the local machine, follow these steps:
1. Use the automounter to automatically mount the exported or shared file system by executing the following command:
3.8 Adding a Component After Installation
If the most current version of Solstice EM has been installed, and you want to add a component that was omitted during installation, use the setup or pkgadd command.
Caution – You must select all the components already installed plus the component you want to add. If you do not select the same components that were selected during the previous installation, those components are removed.
For example, if you used the setup program to perform a typical installation, the Geographic Maps are not installed. If you then start a new setup installation and select only the Geographic Map component, all components are removed. To add the Geographic Map component, select Custom installation and select all components originally installed and the Geographic Map component.
3.9 Example Command-Line Mode Installation
The following code example shows a sample custom installation run in command-line mode.
|
Sun Microsystems, Inc. Copyright information. All rights reserved. |
Doc Set | Contents | Previous | Next | Index |