| Solstice Enterprise Manager 4.1 Customizing Guide |
Configuring Communication With CMIP Agents
This chapter provides detailed instructions for installation and configuration of the components required to manage Common Management Information Protocol (CMIP) agents.
This chapter describes the following topics:
- Section 12.1 Tasks for Setting Up Your System to Manage CMIP Agents
- Section 12.2 Preparing the System for CMIP Configuration
- Section 12.3 Compile and Load CMIP Agent Object Types into MIS
- Section 12.4 Starting and Configuring SunLink OSI
- Section 12.5 Access Control
- Section 12.6 Starting and Configuring SunLink CMIP 9.0
- Section 12.7 Starting and Configuring the CMIP MPA
- Section 12.8 Runtime Parameters
- Section 12.9 Configuring Multiple MPAs on One System
12.1 Tasks for Setting Up Your System to Manage CMIP Agents
The following list summarizes the activities that you must complete before your system can manage a CMIP Agent. These procedures must be performed as root.

To Prepare Your System to Manage a CMIP Agent
1. Prepare your system for CMIP configuration.
- Define the distribution model.
- Install all the required products and patches.
- Gather the configuration information that you will use later.
2. Load the CMIP Agent Object Classes into the MIS.
- The MIS needs to understand the kinds of objects that your CMIP Agent supports. Many standard object classes are delivered with Solstice Enterprise Manager (Solstice EM). For those not shipped with Solstice EM, you must compile the definitions and load them into the MIS.
3. Start up and configure SunLink OSI 8.1 /9.0.
- SunLink OSI provides access to the lower layers of the OSI stack. This handles the data transportation and presentation aspects of communication with a CMIP Agent. This is required if you are using LLC or CONS/X.25.
4. Start up and configure SunLink CMIP 9.0.
- Sunlink CMIP provides the upper layers of the OSI stack and uses the services provided by SunLink OSI to communicate with a CMIP Agent.
5. Start up and configure the Solstice EM CMIP MPA.The following figure illustrates the configuration procedure.
- The Solstice EM CMIP MPA translates CMIP requests and responses to and from Solstice EM. It uses the services provided by SunLink CMIP. Before Solstice EM can access the objects in the CMIP Agent, the CMIP agent must be configured in the MIS. You can use the Solstice EM Object Properties/Create Object to configure CMIP objects. Refer to Managing Your Network for detailed instructions on OCT.
Note – Perform all procedures in this chapter as root. All commands assume a PATH environment variable that includes /opt/SUNWconn/cmip/sbin and /opt/SUNWconn/sbin/ See Chapter 4 in Installation Guide for instructions on setting your PATH environment variable.
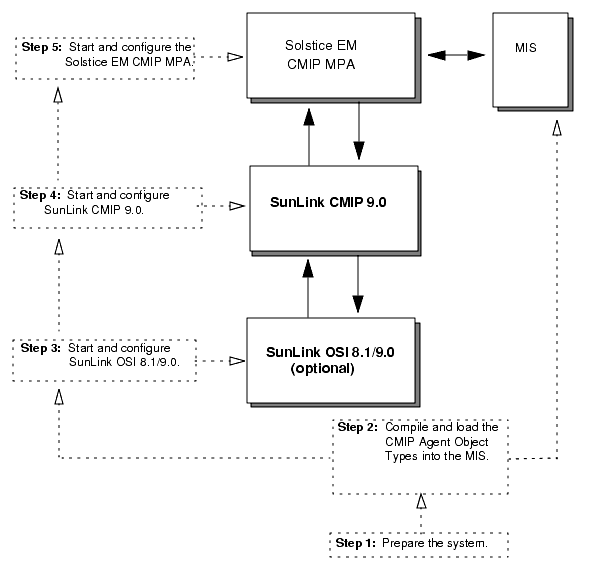
FIGURE 12-1 Configuring Solstice EM for Communication with CMIP AgentsThe following sections provide detailed instructions to configure Solstice EM for CMIP Agent communication.
12.2 Preparing the System for CMIP Configuration
Before you begin, there are several steps you must undertake before you can configure the system for communication with CMIP agents.
To Prepare Your System for Configuration
1. Determine the distribution model.
- See Chapter 11 for complete instructions. Before you begin, you must determine the distribution model you will use for CMIP communications.
2. Install the required SunLink products.
- See Chapter 12 for instructions. Install the following products, as required for your environment:
- SunLink CMIP 9.0 RT or SunLink CMIP 9.0 SDE
- SunLink OSI 8.1/9.0 (optional)
- SunLink X25 9.0 or above (optional)
Note – You can also use CMIP 8.1.2 and CMIP 8.2.2.
3. Gather your configuration information.
- See Chapter 12 for instructions. Before proceeding, you should gather all the information that you will need to complete the configuration process.
12.2.1 Determining the Distribution Model
Before you begin, you must determine the overall distribution model you are to use for CMIP communications. For this you must be aware of which MPAs and MISs will be communicating, how many there are, and how they are configured. You will need the following information:
- Which MISs will the MPA be communicating with
- How many agents are there and how are they configured
- Address of the MPA
- Address of the agents
12.2.2 Installing the Required SunLink Products
You can use one of the following configurations of SunLink products for CMIP communications, depending on your target environment:
- SunLink CMIP 9.0, if using RFC1006.
- SunLink CMIP 9.0 & SunLink OSI 9.0, if using CLNP/LLC.
- SunLink OSI 9.0 & SunLink CMIP 9.0 SDE & SunLink X25 9.0, if using CONS/X.25.
You should have the appropriate patches for your installation before proceeding. Patches can be obtained from your normal source or Sun point of contact. Refer to your installation documentation for these products for patch information.

To install the lowest layer of the protocol stack
1. SunLink OSI 9.0 (Optional)
- First, install SunLink OSI 9.0. See the provided documentation for details on installation. A typical installation for OSI 9.0 will include the following product packages:
- SUNWcorpc
- SUNWcosia
- SUNWcosib
- SUNWcosic
- SUNWcosid
- SUNWlicsw
- SUNWlit
2. SunLink CMIP 9.0 (Required)
- Install either SunLink CMIP 9.0 RT or SunLink CMIP 9.0 SDE. See the provided documentation for details on installation. A typical installation for SunLink CMIP 9.0 RT will include the following product packages:
- SUNWomgta
- SUNWomgtb
- SUNWomgtc
- SUNWrk6 (if RFC1006 is used)
- SUNWlicsw
- SUNWlit
- The License Installation Tool package, SUNWlit, must be installed even though you have already installed a version for SunLink OSI 9.0.
3. SunLink X.25 9.0. (Optional)
- You will be required to install SunLink X.25 if you are communicating with a CMIP Agent over X.25. See the provided documentation for details on installation. Once you have installed SunLink X.25 you should also install any required SunLink X.25 9.x patches.
12.2.3 Gathering Your Configuration Information
You will need the following information to configure Solstice EM for communication with CMIP agents:
- Presentation Selector for CMIP Agent
- Session Selector for CMIP Agent
- Transport Selector for CMIP Agent
- Whether underlying communication with CMIP Agents is via TCP/IP(RFC1006), CLNP/LLC or X.25 (CONS)
- The Network Service Access Point Address: IP Address of CMIP Agent (RFC1006) or OSI Network Address (CLNP/CONS)
- Name of object directly contained by Root in the Management Information Tree (MIT) of the CMIP Agent
- ASN.1 and GDMO descriptions of the objects supported by the CMIP Agent
12.3 Compile and Load CMIP Agent Object Types into MIS
The MIS must understand the kinds of objects that your CMIP Agent supports before it can access the objects maintained in the CMIP Agent. Many standard object types are delivered with Solstice EM. For those of which the MIS is unaware, you must compile and load the appropriate CMIP Agent ASN.1 and GDMO definitions into the Solstice EM MIS. You can do this by using the compilers em_asn1 and em_gdmo, supplied with Solstice EM. Refer to the Management Information Server (MIS) Guide for instructions on using these compilers.
12.4 Starting and Configuring SunLink OSI
To configure SunLink OSI 9.0 to communicate with CMIP agents, do the following.
Note – If you will be using RFC1006, you need not set up the Network Layer Address.
To Configure SunLink OSI 9.0 to Communicate with CMIP Agents
1. Halt the CMIP MPA.2. Halt the CMIP stack.3. Start the SunLink OSI stack.
4. Run ositool
- Your distribution of SunLink OSI 9.0 provides a tool for configuring SunLink OSI, called ositool. Use this tool to configure the Network Layer Address, OSI routing, and Application Selectors to successfully communicate with the Agent.
- You can run ositool by entering the following command:
- For detailed instructions on using this tool, consult the SunLink OSI 9.0 Communication Platform Administrator's Guide.
5. Restart osinetd
- After you have entered all of your configuration information, use ositool to restart osinetd.
12.5 Access Control
Access control for associations, requests, and notifications processed by the CMIP MPA is enforced by using a username that is made available at start-up. If a username is specified at the command line, it is used as a fallback value.
12.6 Starting and Configuring SunLink CMIP 9.0
To configure SunLink CMIP 9.0 to communicate with CMIP agents, do the following.
To Configure SunLink CMIP 9.0 to Communicate with CMIP Agents
1. Ensure the OSI stack and CMIP stack are running.
- If the OSI stack and CMIP are not running, start them.
2. Run cmiptool
3. Enter the type of Subnetwork.
- Go to the section entitled "Default XMP Address." Select the subnetwork that you are using. Depending on the protocol used to communicate with the CMIP Agents, click one of the buttons as follows:
- CONS(X.25), if you are using X.25
- TCP-IP(RFC1006), if you are using TCP/IP
- CLNP(LLC1), if you are using Ethernet
4. Enter the value for the Request Timer (optional).
- The Request Timer in the CMIP/MCS Parameters section specifies the maximum time allowed for requests to extract information from agents. By default, SunLink CMIP has a timeout parameter value of 5. The parameter value is then multiplied times 10 to calculate the actual length of the timeout in seconds. The SunLink CMIP timeout is 50 seconds.
- If you intend to issue requests to CMIP Agents, which require a longer timeout, you should increase the value of this parameter. The maximum allowable Timeout value is 127, which equals 1270 seconds.
- If you do not want to see the communication alarm, you can set the inactivity timer on the cmiptool to 0 on the agent side. In this case, the agent does not issue CMI-RELEASE-Rq if it idles for a specified time.
- When the communication between manager and agent idles for an amount of time, which is specified on the inactivity timer from cmiptool on the agent side, the CMIP stack of the agent will issue CMI-RELEASE_Rq to the CMIP MPA. When the CMIP MPA receives this request, it sends MCS-RELT-Rs response to the request to the agent and at the same time the CMIP MPA needs to notify the user that the association is down between manager and agent. That's why the CMIP MPA reports a communication alarm.
5. Select Apply.6. Exit cmiptool12.7 Starting and Configuring the CMIP MPA
A CMIP MPA is a Solstice EM component that provides access to CMIP Agents and Managers. The CMIP MPA receives management directives from the MIS and translates the directives into proper CMIP messages. The CMIP MPA is the CMIP Proxy Agent for the MIS. The CMIP MPA can also act as a CMIP Agent allowing the objects in the MIS to be managed by a CMIP Manager.
When a CMIP MPA is started, a unique transient CMIP MPA object (containing the CMIP MPA runtime parameters) is created in the Auxiliary Server Container. The object is named by the auxServerId attribute. The value of the name is a concatenation of the MIS host and the CMIP MPA port number.
/systemId=name:"<hostname>"/auxServerTyp e="cmip_mpa"/auxServerId="<host-name>":<port-number& gt;
Note – When the CMIP MPA is externally terminated, it does not delete its objects and terminate its connections as it usually does when it terminates in an orderly manner. If you restart the CMIP MPA after an external termination and reconfigure it to start at a different port, a new CMIP MPA object is created in the Auxiliary Server Container. This action invalidates (but does not delete) the older object that was created when the CMIP MPA was first started. In this case, if you perform a scoped get request operation that includes the container's objects, the get request returns two objects rather than one.
The Solstice EM CMIP MPA performs association management. You can choose what Solstice EM will do when a previously established association goes down. The two choices are the default CMIP MPA association recovery algorithm and an agent silent recovery-free algorithm.
- The default recovery algorithm generates a communicationsAlarm notification indicating an association is found broken only after all attempts to re-establish the association fail. If a failing agent/association recovers fast enough for the association to be re-established before or by the last retry, no communicationsAlarm is emitted.
- The agent silent recovery-free algorithm makes the CMIP MPA generate a communicationsAlarm when an association is found broken and before retrying to re-establish the association.
In both cases, if a communicationsAlarm is sent to the MIS, it is cleared by the MPA when the connection is re-established.
To choose the agent silent recovery-free management algorithm, set the EM_CMIP_MPA_SEND_ALARM_EARLY variable to YES in the shell from which the CMIP MPA daemon will be started.
A CMIP MPA must be configured prior to attempting to access managed objects over CMIP. A CMIP MPA can be located on the same machine where the MIS is located (the default) or on a remote machine.
To Configure a CMIP MPA for Communication Over CMIP
1. Start the CMIP MPA by entering the following command at the operating system prompt:
- The Object Properties/Create Object enables you to configure objects managed under Solstice EM. For detailed instructions on using OCT, refer to Managing Your Network.
3. Enter the appropriate information into the appropriate fields (see the following table).
- Following are sample Presentation Address values when using CLNS(LLC1)/CONS(X.25):
- Following are sample Presentation Address values when using TCP-IP (RFC1006):
- Note that the Network SAP in this case is the value of the IP address of the CMIP Agent represented in hexadecimal.
12.8 Runtime Parameters
Access control for associations, requests, and notification processed by the CMIP MPA is enforced by using a username that is made available at start-up. If a username is specified at the command line, it is used as a fallback value.
12.8.1 Auxiliary Server Container
The Auxiliary Server Container is a persistent object created with cmip_mpa as its naming attribute value. It enables you to access the CMIP MPA runtime parameters programmatically.
The containment of the Auxiliary Server defined under its name binding is as follows:
/systemId=name:"<hostname>"/auxServerTyp e="cmip_mpa"
Every time a CMIP MPA is started, a unique CMIP MPA object is created in the Auxiliary Server Container (which is a subtree of the MIT) as illustrated in the figure.
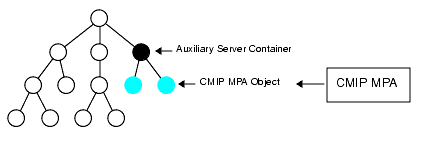
FIGURE 12-2 Auxiliary Server Container12.8.2 CMIP MPA Object
When a CMIP MPA is started a unique transient CMIP MPA object (containing the CMIP MPA runtime parameters) is created in the Auxiliary Server Container. The object is named by the auxServerId attribute. The value of the name is a concatenation of the MIS host and the CMIP MPA port number.
/systemId=name:"<hostname>"/auxServerTyp e="cmip_mpa"/auxServerId="<host-name>":<port-number& gt;
Note – When the CMIP MPA is externally terminated, it does not delete its objects and terminate its connections as it usually does when it terminates in an orderly manner. If you restart the CMIP MPA after an external termination and reconfigure it to start at a different port, a new CMIP MPA object is created in the Auxiliary Server Container. This invalidates (but does not delete) the older object that was created when the CMIP MPA was first started. In this case, if you perform a scoped get operation that includes the container's objects, the get function returns two objects rather than one.
12.8.3 em_cmip Parameters
Each of the parameters of the CMIP MPA has a corresponding environment variable. Some parameters can be set by both command line parameters and environment variables. In this case, the command line value takes precedence. For example, if the environment variable is set to NO and the command line is set to YES, em_cmip will run with the YES value for the option.
Because useful names are used in all cases, you must match the CMIP MPA command line parameters to the CMIP MPA environment variables.
The optional parameters are shown in the following table:
12.8.4 Sample Program to Retrieve Runtime Parameters
The sample program get.cc is an example of how to retrieve the CMIP MPA's runtime parameters from the MIT. The get.cc program is provided with Solstice EM and is located in the $(EM_HOME)/src/pmi_hi/ directory. The following code example shows the usage and output of the get.cc sample program.
12.9 Configuring Multiple MPAs on One System
The following is an example of configuring multiple MPAs on a single system.
1. Set the PSEL, SSEL, TSEL, and NSAP environment variables using the setenv command:
2. Start MPA #1 for communication with agent #1.
3. Set up MPA #2 for communication with Agent #2:
5. Configure Agent(1) and (2) using em_oct -cmip.
- Whereas Agent(1) uses the default MPA to talk to Agent #1, Agent #2 will use the custom MPA port to talk to Agent #2.
- The configuration for Agent #1 would therefore be as follows:
'MDN=/systemId=name:"<system_name>"'The configuration for Agent #2 would be as follows:
'MDN=/networkId=pString:"network"'As seen in above examples, both MPAs are running on same system and MIS forwards requests to Agent1 and Agent2 using MPA1 and MPA2 respectively.
|
Sun Microsystems, Inc. Copyright information. All rights reserved. |
Doc Set | Contents | Previous | Next | Index |