Installing a Board
Board Slot Selection
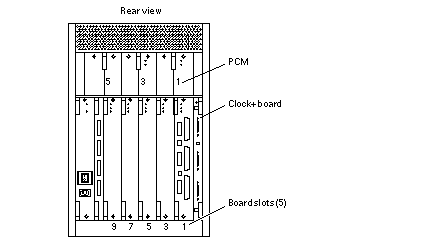
Logically there is no difference between the board slots, and each slot can accept any board type. However, since the lowest numbered board slot (slot 1) is the only slot connected to the onboard SCSI devices, this slot is usually reserved for the first I/O+ board (Figure 3-5).
Note -
Board slot numbers are marked on the chassis.
Figure 3-4 Board Slot Locations

Cooling and Power Issues
There should be one power/cooling module (PCM) for every two boards to adhere to cooling and power requirements. The PCMs must be installed adjacent to populated board slots to ensure the fan in the PCM can cool the respective boards.
Note -
All empty slots must have a filler panel installed to ensure proper cooling and for EMI protection. See "Filler Panels".
Powered-On or Powered-Off System
-
Carefully insert the board in the proper slot in the card cage, component side to the right, ensuring that the board does not slip out of the top and bottom card guides.
All empty slots must have a filler panel installed.
-
Ensure that both extraction levers are in the outward position as you slide the board toward the centerplane receptacles.
The board will not seat fully unless the levers are in this starting position. See Figure 3-3 for positioning of the levers.
 Caution -
 DO NOT FORCE any board into a slot; it can cause damage to the board and system. The board should insert and seat smoothly. If it binds, remove the board and inspect the card cage slot for any obvious obstructions. Also inspect both the board and the centerplane for bent pins or other damage.
-
Push the board into the card cage, then simultaneously press both extraction levers to seat the board on the centerplane.
Pushing both levers simultaneously avoids twisting the board and bending the connector pins, and mates the board centerplane connector to the matching receptacle on the centerplane. Do not press on board front panel to seat it--doing so will damage the connector pins.
-
Mechanically lock the board to the system chassis by inserting a Phillips #1 screwdriver into each quarter-turn access slot and then turning to the locked position.
See Figure 3-2.
-
Once the board is installed, when the system is powered on, a message similar to the following will be displayed on the monitor:
Example depicts screen output when a new CPU/Memory+ board has been hot-plugged into slot 5 of an operating Enterprise system:
NOTICE: CPU Board Hotplugged into Slot 5
NOTICE: Board 5 is ready to remove
Additionally, any subsequent prtdiag(1M) output would include information for board slot 5. Again, note that the system will not use the new board until the system is rebooted.
-
Reboot the system now or schedule a later time to reboot when system disruption will be minimized.
- © 2010, Oracle Corporation and/or its affiliates
