Key Switch Assembly
Removing the Key Switch Assembly
-
Completely power off the Enterprise system.
See the power off instructions in Chapter 11, Powering Off and On .
-
Remove the system key.
-
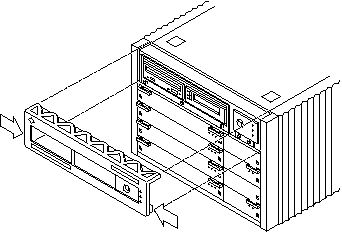
Grasp the bottom corners of both sides of the top bezel and pull it toward you.
-
Tilt the top bezel upward to a 45o angle and remove the bezel.
Set the bezel aside (Figure E-15).
Figure E-15 Removing the Top Bezel

-
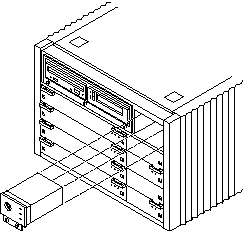
Loosen the two captive screws securing the key switch assembly to the enclosure.
Viewed from the front of the system, the key switch assembly is on the right side of the enclosure.
-
Gently pull the key switch assembly from the enclosure (Figure E-16).
Figure E-16 Replacing the Key Switch/LED Tray Assembly in the Enterprise 4500 System

Replacing the Key Switch Assembly
-
Gently insert the key switch assembly in the enclosure.
Viewed from the front of the system, the key switch assembly is on the right side of the enclosure (Figure E-16).
 Caution -
 DO NOT FORCE the key switch assembly into the slot; this can cause damage to the key switch assembly and system.
The key switch assembly should insert and seat smoothly. If it binds, remove it, and inspect the slot for any obvious obstructions. Do not damage the springfingers at the bottom of the key switch assembly.
-
Tighten the two captive screws securing the key switch assembly to the enclosure.
-
Tilt the top bezel at a 45o angle and insert the lip of the bezel under the top of the enclosure (Figure E-15).
-
Lower the top bezel.
The top bezel should snap into place.
-
Replace the system key.
-
Power on the Enterprise system.
See the power on instructions in Chapter 11, Powering Off and On .
- © 2010, Oracle Corporation and/or its affiliates
