Chapter 7 Power Supplies
This chapter describes the power supplies and environmental sensing and reporting in Sun Enterprise systems.
There are two types of power supplies: a power/cooling module (PCM) and a peripheral power supply (PPS). Both types of power supplies are hot-pluggable. This feature allows you to physically remove the failed component from a running system. A new hot-pluggable component can be inserted into a running system.
Note -
The hot-plug feature requires a functioning peripheral power supply to provide electrical precharge current. Use the prtdiag (1M) command to determine if precharge current is available.
Table 7-1 lists the sources of power supply voltages.
Table 7-1 Power Supply Summary|
Voltage |
Source |
Where Used |
|---|---|---|
|
2.0V |
PCM |
GTL centerplane termination |
|
3.3V |
PCM |
CPU/Memory+ Board (AC+, DC+s, FHC, SIMMs) UltraSPARC II Module (SRAMs, SDBs, CPU I/O) |
|
5V |
PCM, PPS |
SBus, Clock+ Board UltraSPARC II Module power (via DC/DC converter) |
|
12V |
PPS |
Peripherals (CD drive, tape drive) |
Safety Precautions
Any servicing of equipment should be performed by qualified personnel.
Observe the precautions in Table 7-2.
Table 7-2 Safety Precautions|
Item |
Problem |
Precaution |
|---|---|---|
|
Wrist or foot strap |
ESD |
Wear a conductive wrist strap or foot strap when handling power supplies. |
|
ESD mat |
ESD |
An approved ESD mat provides protection from static damage when used with a wrist strap or foot strap. |
|
Cover panels |
System damage and overheating |
Re-install all cabinet cover panels after performing any service work on the system. |
|
SBus slot covers |
System damage and overheating |
Install SBus slot covers in all unused SBus slots. |
Power Distribution
The system has a single peripheral power supply, and each pair of board slots has a slot for a PCM. AC is distributed to each of the PCMs within the chassis. The software monitors the status of the AC power source. Current-sharing between power supplies provides redundant power.
Peripheral Power Supply
The peripheral power supply (Figure 7-1) provides power to the peripheral subsystems, the drives, the fans in the AC box, and the fan in the key switch box. The PPS provides auxiliary 5V output to power an optional remote console.
Figure 7-1 Peripheral Power Supply
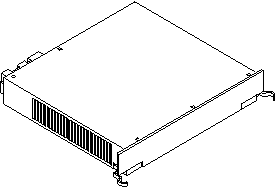
The peripheral power supply provides three precharge outputs (3.3V, 5V, and 12V) to enable hot plug-in of system boards, PCMs, or drives into an active centerplane.
The PPS shares current with PCMs on the 5V output at the centerplane. In this way the PPS helps to reduce the possibility of a system failure if a PCM fails.
Troubleshooting a Peripheral Power Supply
A green LED is lit on the power supply when it is operational. When a peripheral power supply fails, a yellow LED is lit on the power supply.
See Chapter 10, Flow Diagrams for Troubleshooting for more information.
Replacing a Peripheral Power Supply
Remove and replace the peripheral power supply in a running system. Do not replace the PPS when the system is in the low power mode.
-
Verify that the system is running and is not in the low power mode.
If you replace the PPS in low power mode, the system will power on unexpectedly. Note that when the system is in low power mode, the front panel and board LEDs are all off, and the yellow power supply LEDs are on.
-
Verify that onboard peripheral devices are not in use, or data may be lost.
Note that while the PPS is removed:
-
There is no peripheral power, and onboard peripheral devices will not operate.
-
There is no precharge current. Do not attempt to replace hot-pluggable devices except for the PPS itself.
-
-
Use a Phillips #1 screwdriver to unlock the quarter-turn access slots (Figure 7-2) on the power supply.
Figure 7-2 Quarter-Turn Access Slot

-
Pull the ends of the extraction levers outward to release the power supply from the centerplane (Figure 7-3 for Enterprise 6500 or 5500 system, or Figure 7-4 for Enterprise 4500 system).
Figure 7-3 Replacing the Enterprise 6500/5500 PPS
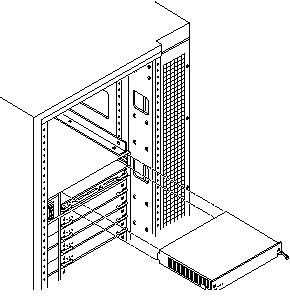
Figure 7-4 Replacing the Enterprise 4500 PPS
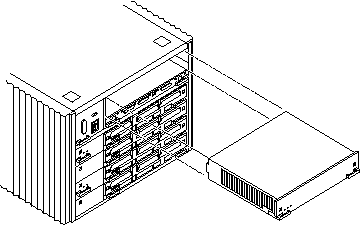
-
Pull out the power supply.
You will see a message similar to the following example on your system console:
WARNING: Peripheral 5.0 Volt Power Failing
WARNING: AC Power failure detected
WARNING: Peripheral 12 Volt Power Failing
WARNING: Auxiliary 5.0 Volt Power Failing
WARNING: Keyswitch fan failure detected
NOTICE: Peripheral Power Supply 0 Removed
WARNING: AC Box fan failure detected
-
Place the replacement PPS halfway into the slot, and:
-
Slide the PPS to the centerplane, then use the extraction levers to seat the PPS.
Simultaneously swing both levers inward to the locked position. Do not press on the front panel of the power supply to seat it; doing so will damage the connector pins.
 Caution -
 DO NOT FORCE the power supply into a slot; this can damage the power supply and the centerplane.
The power supply should insert and seat smoothly. If it binds, remove it, and inspect the slot for any obstructions. Do not damage the springfingers at the bottom of the power supply.
-
Use a Phillips #1 screwdriver to turn quarter-turn access slots to the locked position (Figure 7-2).
-
Be sure the green LED is lit.
If the green LED is not lit, the power supply may not be seated properly. Check to see if it is seated properly by repeating Step 3 to Step 9. If the green LED is still not lit, see Chapter 10, Flow Diagrams for Troubleshooting for more information.
You will see a message similar to the following example on your system console:
NOTICE: Peripheral Power Supply 0 Installed
NOTICE: AC Power failure no longer detected
NOTICE: Peripheral Power Supply OK
NOTICE: Peripheral 5.0 Volt Power OK
NOTICE: Peripheral 12 Volt Power OK
NOTICE: Auxiliary 5.0 Volt Power OK
NOTICE: Peripheral 5.0 Volt Precharge OK
NOTICE: Peripheral 12 Volt Precharge OK
NOTICE: System 3.3 Volt Precharge OK
NOTICE: System 5.0 Volt Precharge OK
NOTICE: AC Box fans OK
NOTICE: Keyswitch fans OK
Power/Cooling Module (PCM)
The power/cooling module (PCM) provides power for two boards. The PCM also supplies cooling air to the board slots, so in normal operation each board must be next to a working PCM.
Figure 7-5 PCM
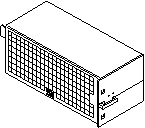
The PCM incorporates an AC inrush limit circuit and two precharge inputs (3.3V and 5V) that enable it to be hot-pluggable into a live centerplane.
Within a system all PCMs operate in a parallel redundant mode, sharing 2.0V, 3.3V, and 5V output currents. The shared 5V output also includes the 5V output of a peripheral power supply.
Requirements for Redundant Power
If a DC supply in a PCM fails, the system boards will continue to be powered and cooled by the other power supplies if sufficient redundancy (an additional power supply) is present.
For example, if an Enterprise system needs a minimum of three power supplies and four are present, then the system has redundancy. However, fully configured Enterprise systems represent a different situation and are always hot-pluggable. That is, an Enterprise 5500 or 4500 system with seven or eight boards and four PCMs is hot-pluggable. (The peripheral power supply acts as the "extra" power supply.) Similarly, an Enterprise 6500 system with fifteen or sixteen boards and eight power supplies is also hot-pluggable. (Seven PCMs are sufficient to power sixteen active boards; the eighth PCM is "extra." However, the eighth PCM is required for cooling purposes.) See Table 7-3.
Note -
The presence of an additional (extra) PCM in the system provides redundancy and allows hot-plug of PCMs.
Table 7-3 Minimum and Redundant Working Power Supplies Required to Power Active Boards
|
|
Enterprise 5500/4500 Systems |
Enterprise 6500 System |
||
|---|---|---|---|---|
|
Number of Boards |
Minimum Working Power Supplies |
Redundant Working Power Supplies (Hot-pluggable) |
Minimum Working Power Supplies |
Redundant Working Power Supplies (Hot-pluggable) |
|
1-2 |
1 |
2 |
1 |
2 |
|
3-4 |
2 |
3 |
2 |
3 |
|
5-6 |
3 |
4 |
3 |
4 |
|
7-8 |
3 + peripheral supply* |
4 + peripheral supply |
4 |
5 |
| *Note: System needs a fourth PCM for cooling purposes | ||||
|
9-10 |
|
|
5 |
6 |
|
11-12 |
|
|
6 |
7 |
|
13-14 |
|
|
7 |
8 |
|
15-16 |
|
|
7* |
8 |
| *Note: System needs an eighth PCM for cooling purposes | ||||
Failed power supplies must be replaced as soon as practical. Operating an Enterprise system without a redundant power supply will result in an outage at the next PCM failure.
Cooling Requirements
Note -
In the Enterprise system, all boards must be adjacent to a PCM. The fans in the PCM cool the boards. The minimum configuration is one PCM for every two adjacent boards.
The power supplies incorporate redundant bulk fan electrical power so that the fans continue to operate in a failed power supply with the redundant fan power from the peripheral power supply.
Troubleshooting a PCM
A green LED is lit on the power supply when it is operational. When a PCM fails, a yellow LED is lit on the power supply.
You will see a message similar to the following example on your system console when a PCM fails:
WARNING: Core Power Supply 2 Failing
WARNING: Redundant power lost
See Chapter 10, Flow Diagrams for Troubleshooting for more information.
Replacing a PCM
Do not replace a PCM while the system is in the low power mode. Remove and replace the PCM only in a running system. Replacing a PCM during low power mode will cause the system to power up immediately and result in a severe overload condition for that PCM (the other PCMs will remain in the low power mode). (The system is in the low power mode if the front panel and board LEDs are all off while the yellow LEDs are lit on the power supplies.)
Replace the PCM within several minutes or risk overheating the board(s) cooled by the fans in that power supply.
Remember the following rules for hot-plug replacement of a PCM:
-
The peripheral power supply must be fully operational (to provide precharge current.)
-
There must be a redundancy of electrical power (Table 7-3) in the system.
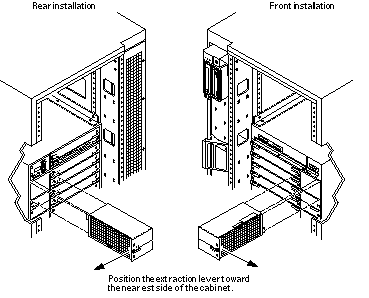
Figure 7-6 PCM -- Front and Rear Installation
-
Use the printdiag (1M) command to determine if precharge current is present.
-
Use a Phillips #1 screwdriver to turn each quarter-turn access slot on the power supply to the unlocked position (Figure 7-7).
Figure 7-7 Quarter-Turn Access Slots

-
Pull the end of the extraction lever outward to release the power supply from the centerplane.
-
Pull out the power supply.
You will see a message similar to the following example on your system console:
NOTICE: Core Power Supply 2 Removed
-
Insert the replacement power supply halfway into the guide slots, then:
-
Verify that power supply is oriented so that the extraction lever is toward the outside edge of the system (Figure 7-6).
-
Verify that the arrows in the quarter-turn access slots are turned to the unlocked position.
-
Open the extraction lever to the unlocked position.
The power supply will not seat fully unless the extraction lever is in the unlocked position.
 Caution -
 DO NOT FORCE the power supply into a slot; this can cause damage to the power supply and system.
The power supply should insert and seat smoothly. If it binds, remove it, and inspect the slot for obstructions. Take care to avoid damaging the springfingers at the bottom of the power supply.
-
-
Slide the power supply to the centerplane, then use the extraction lever to seat the power supply.
Swing the lever inward to the locked position. Do not press on the front panel of the power supply to seat it; doing so will damage the connector pins.
-
Use a Phillips #1 screwdriver to turn each quarter-turn access slot to the locked position (Figure 7-7).
-
Check to be sure the green LED is lit.
If the green LED is not lit, the power supply is not seated properly. Repeat Step 2 to Step 8. If the green LED is still not lit, see Chapter 10, Flow Diagrams for Troubleshooting for more information.
When the power supply is correctly installed, you will see a message similar to the following example on your system console:
NOTICE: Core Power Supply 2 Installed
NOTICE: Core Power Supply 2 OK
NOTICE: Redundant power available
- © 2010, Oracle Corporation and/or its affiliates
