| Sun Fire V890 Server Diagnostics Guide
|
    |
Troubleshooting Strategies
|
This chapter provides information about error indications and software commands to help you determine which component you need to replace. It contains the following sections:
|
Note - The procedures in this chapter assume that you are familiar with the OpenBoot firmware and that you know how to enter the OpenBoot environment. For more information about the OpenBoot firmware, see the OpenBoot 4.x Command Reference Manual. An online version of the manual is included with the OpenBoot Collection AnswerBook2 that ships with Solaris software. firmware and that you know how to enter the OpenBoot environment. For more information about the OpenBoot firmware, see the OpenBoot 4.x Command Reference Manual. An online version of the manual is included with the OpenBoot Collection AnswerBook2 that ships with Solaris software.
|
The following chart shows which tools you can use to diagnose hardware and software problems.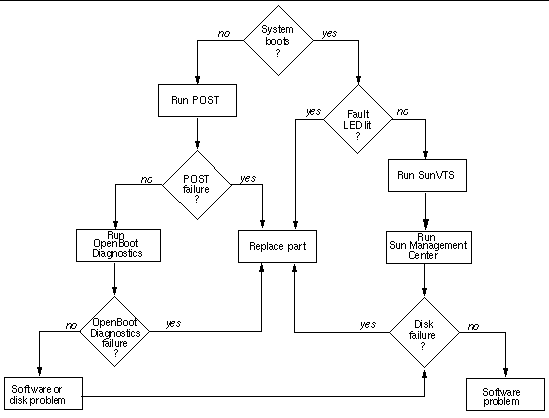
About Troubleshooting Your System
The system provides the following features to help you identify and isolate hardware problems:
- Error indications
- Software commands
- Diagnostic tools
This section describes the error indications and software commands provided to help you troubleshoot your system. Diagnostic tools are covered in About Diagnostic Tools.
Error Indications
The system provides error indications via LEDs and error messages. Using the two in combination, you can isolate a problem to a particular field-replaceable uint (FRU) with a high degree of confidence.
The system provides status indicator LEDs in the following places:
- Front panel
- CPU/Memory board slots
- Power supplies
- Disk drives
- PCI slots
- Fan trays
Error messages are logged in the /var/adm/messages file and are also displayed on the system console by the diagnostic tools.
For additional information about LEDs, see the Sun Fire V890 Server Owner's Guide.
Status Indicator LEDs
Front panel LEDs provide your first indication that there is a problem with your system. Usually, a front panel LED is not the only indication of a problem. Error messages and other LEDs within the enclosure can help to isolate the problem further. For additional information about the front panel LEDs, see the Sun Fire V890 Server Owner's Guide.
The front panel LEDs provide general system status, alert you to system problems, and help you determine the location of system faults:
- At the top of the status and control panel, three general status LEDs provide a snapshot of the system status.
- Below the Power button and security keyswitch, a graphical display provides additional LED icons to indicate specific fault conditions and locations.
Located on the rear of each power supply, the power supply LEDs indicate:
- Whether the power supply has encountered a fault
- Whether the power input and outputs are functional and within acceptable limits
For additional information about the power supply LEDs, see the Sun Fire V890 Server Owner's Guide.
Fault LEDs within the enclosure help pinpoint the location of the faulty device. LEDs within the enclosure include:
- CPU/Memory board slot LEDs
- PCI slot LEDs
- CPU, I/O, and motherboard fan trays LEDs
- Disk drive LEDs
For detailed information about these LEDs, see the Sun Fire V890 Server Owner's Guide.
Since all front panel and power supply LEDs are powered by the system's 5-volt standby power source, fault LEDs remain illuminated for any fault condition that results in a system shutdown.
During system startup, the front panel LEDs are individually toggled on and off to verify that each one is working correctly.
Error Messages
Error messages and other system messages are saved in the file /var/adm/messages. The two firmware-based diagnostic tools, POST and OpenBoot Diagnostics, also display error messages in a standard format on the local system console or on an RSC console (if configured). See Sample POST Error Messages and Sample OpenBoot Diagnostics Error Messages for more information.
The amount of information displayed in OpenBoot Diagnostics messages is determined by the keywords specified for the OpenBoot configuration variable test-args. See OpenBoot Configuration Variables for OpenBoot Diagnostics for additional details.
Software Commands
Several Solaris and OpenBoot firmware commands are available for diagnosing system problems. For more information about Solaris commands, see the appropriate man pages. For additional information about OpenBoot commands, see the OpenBoot 4.x Command Reference Manual. An online version of the manual is included with the OpenBoot Collection AnswerBook that ships with Solaris software.
Solaris prtdiag Command
The prtdiag command is a UNIX shell command used to display system configuration and diagnostic information. You can use the prtdiag command to display:
- System configuration, including information about clock frequencies, CPUs, memory, and I/O card types
- Diagnostic and environmental information
- Failed field-replaceable units (FRUs)
To run prtdiag, type:
% /usr/platform/sun4u/sbin/prtdiag
|
An example of prtdiag output follows.
% /usr/platform/sun4u/sbin/prtdiag
System Configuration: Sun Microsystems sun4u Sun Fire V890
System clock frequency: 150 MHz
Memory size: 32768 Megabytes
========================= CPUs ===============================================
Run E$ CPU CPU
Brd CPU MHz MB Impl. Mask
--- ----- ---- ---- ------- ----
A 0, 16 1200 16.0 US-IV 2.4
B 1, 17 1200 16.0 US-IV 2.4
A 2, 18 1200 16.0 US-IV 2.4
B 3, 19 1200 16.0 US-IV 2.4
C 4, 20 1200 16.0 US-IV 2.4
D 5, 21 1200 16.0 US-IV 2.4
C 6, 22 1200 16.0 US-IV 2.4
D 7, 23 1200 16.0 US-IV 2.4
|
========================= Memory Configuration ===============================
Logical Logical Logical
MC Bank Bank Bank DIMM Interleave Interleaved
Brd ID num size Status Size Factor with
---- --- ---- ------ ----------- ------ ---------- -----------
A 0 0 1024MB no_status 512MB 8-way 0
A 0 1 1024MB no_status 512MB 8-way 0
A 0 2 1024MB no_status 512MB 8-way 0
A 0 3 1024MB no_status 512MB 8-way 0
B 1 0 1024MB no_status 512MB 8-way 1
B 1 1 1024MB no_status 512MB 8-way 1
B 1 2 1024MB no_status 512MB 8-way 1
B 1 3 1024MB no_status 512MB 8-way 1
A 2 0 1024MB no_status 512MB 8-way 0
A 2 1 1024MB no_status 512MB 8-way 0
A 2 2 1024MB no_status 512MB 8-way 0
A 2 3 1024MB no_status 512MB 8-way 0
B 3 0 1024MB no_status 512MB 8-way 1
B 3 1 1024MB no_status 512MB 8-way 1
B 3 2 1024MB no_status 512MB 8-way 1
B 3 3 1024MB no_status 512MB 8-way 1
C 4 0 1024MB no_status 512MB 8-way 2
C 4 1 1024MB no_status 512MB 8-way 2
C 4 2 1024MB no_status 512MB 8-way 2
C 4 3 1024MB no_status 512MB 8-way 2
D 5 0 1024MB no_status 512MB 8-way 3
D 5 1 1024MB no_status 512MB 8-way 3
D 5 2 1024MB no_status 512MB 8-way 3
D 5 3 1024MB no_status 512MB 8-way 3
C 6 0 1024MB no_status 512MB 8-way 2
C 6 1 1024MB no_status 512MB 8-way 2
C 6 2 1024MB no_status 512MB 8-way 2
C 6 3 1024MB no_status 512MB 8-way 2
D 7 0 1024MB no_status 512MB 8-way 3
D 7 1 1024MB no_status 512MB 8-way 3
D 7 2 1024MB no_status 512MB 8-way 3
D 7 3 1024MB no_status 512MB 8-way 3
========================= IO Cards =========================
Bus Max
IO Port Bus Freq Bus Dev,
Brd Type ID Side Slot MHz Freq Func State Name Model
---- ---- ---- ---- ---- ---- ---- ---- ----- ---------------------------- ---------
I/O PCI 8 B 2 33 33 3,0 ok pci108e,1000-pci108e,1000.1
I/O PCI 8 B 2 33 33 3,1 ok SUNW,hme-pci108e,1001
I/O PCI 8 B 0 33 33 5,0 ok pci12de,200-pci12de,200.0
I/O PCI 9 B 6 33 33 2,0 ok pci108e,3de7-pci108e,3de7.0
I/O PCI 9 A 8 33 66 2,0 ok pci108e,3de7-pci108e,3de7.0
|
To isolate an intermittent failure, it may be helpful to maintain a prtdiag history log. Use prtdiag with the -l (log) option to send output to a log file in /var/adm.
To display environmental information, use prtdiag with the -v option. Type:
% /usr/platform/sun4u/sbin/prtdiag -v
|
The prtdiag command with the -v option produces all of the output of the prtdiag command (shown in the preceding example) in addition to environmental information, current keyswitch position, LED indications, and other information.
The following is an example of the additional output produced by the -v option.
========================= Environmental Status =========================
System Temperatures (Celsius):
-------------------------------
Device Temperature Status
---------------------------------------
CPU0 66 OK
CPU1 64 OK
CPU2 66 OK
CPU3 70 OK
CPU4 70 OK
CPU5 72 OK
CPU6 74 OK
CPU7 71 OK
MB 14 OK
IOB 3 OK
DBP0 5 OK
=================================
Front Status Panel:
-------------------
Keyswitch position: NORMAL
System LED Status:
GEN FAULT REMOVE
[OFF] [OFF]
DISK FAULT POWER FAULT
[OFF] [OFF]
LEFT THERMAL FAULT RIGHT THERMAL FAULT
[OFF] [OFF]
LEFT DOOR RIGHT DOOR
[OFF] [OFF]
=================================
|
Disk Status:
Presence Fault LED Remove LED
DISK 0: [PRESENT] [OFF] [OFF]
DISK 1: [PRESENT] [OFF] [OFF]
DISK 2: [PRESENT] [OFF] [OFF]
DISK 3: [PRESENT] [OFF] [OFF]
DISK 4: [PRESENT] [OFF] [OFF]
DISK 5: [PRESENT] [OFF] [OFF]
DISK 6: [ EMPTY]
DISK 7: [ EMPTY]
DISK 8: [ EMPTY]
DISK 9: [ EMPTY]
DISK 10: [ EMPTY]
DISK 11: [ EMPTY]
=================================
Fan Bank :
----------
Bank Speed Status Fan State
( RPMS )
---- -------- --------- ---------
CPU0_PRIM_FAN 2127 [ENABLED] OK
CPU1_PRIM_FAN 2222 [ENABLED] OK
CPU0_SEC_FAN 0 [DISABLED] OK
CPU1_SEC_FAN 0 [DISABLED] OK
IO0_PRIM_FAN 3000 [ENABLED] OK
IO1_PRIM_FAN 2857 [ENABLED] OK
IO0_SEC_FAN 0 [DISABLED] OK
IO1_SEC_FAN 0 [DISABLED] OK
IO_BRIDGE_PRIM_FAN 3614 [ENABLED] OK
IO_BRIDGE_SEC_FAN 0 [DISABLED] OK
=================================
Power Supplies:
---------------
Supply Status Fan Fail Temp Fail CS Fail 3.3V 5V 12V 48V
------ ------------ -------- --------- ------- ---- -- --- ---
PS0 GOOD 6 6 4 2
PS1 GOOD 7 6 4 2
PS2 GOOD 7 6 4 2
========================= HW Revisions =======================================
System PROM revisions:
----------------------
OBP 4.15.1 2004/06/02 16:06
IO ASIC revisions:
------------------
Port
Model ID Status Version
-------- ---- ------ -------
Schizo 8 ok 7
Schizo 9 ok 7
|
|
Note - Refer to the prtdiag man page for additional information.
|
Solaris prtconf Command
The prtconf command displays system configuration information, including the total amount of memory and the device configuration as described by the system's device hierarchy.
To run prtconf, type:
The following is partial sample output.
% /usr/sbin/prtconf
System Configuration: Sun Microsystems sun4u
Memory size: 3072 Megabytes
System Peripherals (Software Nodes):
SUNW,Sun-Fire-V890
packages (driver not attached)
SUNW,builtin-drivers (driver not attached)
deblocker (driver not attached)
disk-label (driver not attached)
terminal-emulator (driver not attached)
obp-tftp (driver not attached)
SUNW,debug (driver not attached)
dropins (driver not attached)
kbd-translator (driver not attached)
ufs-file-system (driver not attached)
chosen (driver not attached)
openprom (driver not attached)
client-services (driver not attached)
options, instance #0
aliases (driver not attached)
memory (driver not attached)
virtual-memory (driver not attached)
|
cmp (driver not attached)
cpu (driver not attached)
cpu (driver not attached)
memory-controller, instance #0
cmp (driver not attached)
cpu (driver not attached)
cpu (driver not attached)
memory-controller, instance #1
cmp (driver not attached)
cpu (driver not attached)
cpu (driver not attached)
memory-controller, instance #2
cmp (driver not attached)
cpu (driver not attached)
cpu (driver not attached)
memory-controller, instance #3
cmp (driver not attached)
cpu (driver not attached)
cpu (driver not attached)
memory-controller, instance #4
cmp (driver not attached)
cpu (driver not attached)
cpu (driver not attached)
memory-controller, instance #5
cmp (driver not attached)
cpu (driver not attached)
cpu (driver not attached)
memory-controller, instance #6
cmp (driver not attached)
cpu (driver not attached)
cpu (driver not attached)
|
pci, instance #0
scsi, instance #0
disk (driver not attached)
tape (driver not attached)
sd, instance #0 (driver not attached)
sd, instance #1 (driver not attached)
sd, instance #2 (driver not attached)
TSI,gfxp (driver not attached)
pci, instance #1
network (driver not attached)
SUNW,qlc, instance #0
fp (driver not attached)
disk (driver not attached)
fp, instance #0
ses (driver not attached)
ssd, instance #0
ssd, instance #1
ssd, instance #2
ssd, instance #3
pci, instance #2
ebus, instance #0
flashprom (driver not attached)
bbc, instance #0
power (driver not attached)
i2c, instance #1
fru, instance #0
fru, instance #1
fru, instance #2
fru, instance #3
fru, instance #4
fru, instance #5
fru, instance #6
fru, instance #7
temperature, instance #0
temperature, instance #1
temperature, instance #2
temperature, instance #3
temperature, instance #4
temperature, instance #5
temperature, instance #6
|
Solaris prtfru Command
The prtfru command displays specific information about the following FRUs:
- I/O board
- System controller card
- Power distribution board and power supplies
- FC-AL backplane
- Motherboard
- CPU/Memory boards
- DIMMs
The prtfru command also displays the contents of the FRU SEEPROMs:
- FRU description
- Part number and serial number
- Hardware revision levels
- Temperature, voltage, and power data
The following is partial sample output from the prtfru command.
% prtfru
/frutree
/frutree/chassis (fru)
/frutree/chassis/io-board (container)
SEGMENT: SD
/ManR
/ManR/UNIX_Timestamp32: Tue May 9 09:36:08 EDT 2000
/ManR/Fru_Description: ASSY,PCB,PCI/IO,BRD,RHINO
/ManR/Manufacture_Loc: BENCHMARK ELECTRONICS INC,HUNTSVILLE,ALABAMA,USA
/ManR/Sun_Part_No: 5015142
/ManR/Sun_Serial_No: 000069
/ManR/Vendor_Name: NO JEDEC CODE FOR THIS VENDOR
/ManR/Initial_HW_Dash_Level: 03
/ManR/Initial_HW_Rev_Level: 01
/ManR/Fru_Shortname: /Dak_IOBoardR
/Dak_IOBoardR/PROM_Format_Version: 1
/Dak_IOBoardR/Ambient_Temp_Array: 9223372036854775806
/Dak_IOBoardR/Min_Power_Rating (4 iterations)
/Dak_IOBoardR/Min_Power_Rating[0]: 11
/Dak_IOBoardR/Min_Power_Rating[1]: 22
/Dak_IOBoardR/Min_Power_Rating[2]: 33
/Dak_IOBoardR/Min_Power_Rating[3]: 44
|
/Dak_IOBoardR/Max_Power_Rating (4 iterations)
/Dak_IOBoardR/Max_Power_Rating[0]: 22
/Dak_IOBoardR/Max_Power_Rating[1]: 33
/Dak_IOBoardR/Max_Power_Rating[2]: 44
/Dak_IOBoardR/Max_Power_Rating[3]: 55
/frutree/chassis/rsc-board (container)
SEGMENT: SD
/frutree/chassis/fcal-backplane-slot?Label=0
/frutree/chassis/fcal-backplane-slot?Label=0/fcal-backplane (container)
/frutree/chassis/fcal-backplane-slot?Label=1
/frutree/chassis/fcal-backplane-slot?Label=1/fcal-backplane (container)
/frutree/chassis/power-dist-board (container)
/frutree/chassis/power-dist-board/power-supply-slot?Label=0
/frutree/chassis/power-dist-board/power-supply-slot?Label=0/power-supply (container)
/frutree/chassis/power-dist-board/power-supply-slot?Label=1
/frutree/chassis/power-dist-board/power-supply-slot?Label=1/power-supply (container)
/frutree/chassis/power-dist-board/power-supply-slot?Label=2
/frutree/chassis/power-dist-board/power-supply-slot?Label=2/power-supply (container)
/frutree/chassis/system-board (container)
/frutree/chassis/system-board/cpu-mem-slot?Label=A
/frutree/chassis/system-board/cpu-mem-slot?Label=B
/frutree/chassis/system-board/cpu-mem-slot?Label=B/cpu-mem-module (container)
SEGMENT: SD
/ManR
/ManR/UNIX_Timestamp32: Mon Jun 12 14:31:06 EDT 2000
/ManR/Fru_Description: ASSY,CPU,DUAL,DAK
/ManR/Manufacture_Loc: BENCHMARK ELECTRONICS INC, HUNTSVILLE, AL, USA
/ManR/Sun_Part_No: 5014150
/ManR/Sun_Serial_No: 001135
/ManR/Vendor_Name: NO JEDEC CODE FOR THIS VENDOR
/ManR/Initial_HW_Dash_Level: 03
/ManR/Initial_HW_Rev_Level: 06
/ManR/Fru_Shortname:
|
Solaris prtpicl Command
The prtpicl command displays the name and Platform Information and Control Library (PICL) class of all nodes in the PICL tree.
To display the high temperature and low temperature critical thresholds for each component, use the prtpicl -v option. See Environmental Failures for more information.
The following is partial sample output from the prtpicl command.
% prtpicl
/ (picl, 4300000001)
SYSTEM (picl, 4300000005)
MOTHERBOARD (picl, 430000000a)
CPU0_PFAN_TACH (fan-tachometer, 43000000e5)
CPU1_PFAN_TACH (fan-tachometer, 43000000ef)
CPU0_SFAN_TACH (fan-tachometer, 43000000f9)
CPU1_SFAN_TACH (fan-tachometer, 4300000103)
IO_BRIDGE_PFAN_TACH (fan-tachometer, 4300000135)
IO_BRIDGE_SFAN_TACH (fan-tachometer, 430000013f)
IO_PFAN_ONOFF_SWITCH (switch, 430000015a)
IO_SFAN_ONOFF_SWITCH (switch, 430000015f)
IO_BRIDGE_PFAN_ONOFF_SWITCH (switch, 4300000164)
IO_BRIDGE_SFAN_ONOFF_SWITCH (switch, 4300000169)
DISK_BP0_PR_SENSOR (gpio, 430000016e)
DISK_BP1_PR_SENSOR (gpio, 4300000175)
RSC_PR_SENSOR (gpio, 430000017c)
CPU_0_2_MOD_SLOT (picl, 4300000274)
CPU_1_3_MOD_SLOT (picl, 4300000279)
CPU_1_3_MOD_CARD (picl, 430000028d)
CPU1_DIE_TEMPERATURE_SENSOR (temperature-sensor, 43000002f2)
CPU3_DIE_TEMPERATURE_SENSOR (temperature-sensor, 4300000306)
24C64_A0_1 (i2c, 4300000696)
24C64_A2_1 (i2c, 430000069b)
24C64_A4_1 (i2c, 43000006a0)
24C64_A6_1 (i2c, 43000006a5)
24C64_A8_1 (i2c, 43000006aa)
24C64_AA_1 (i2c, 43000006af)
24C64_AC_1 (i2c, 43000006b4)
24C64_AE_1 (i2c, 43000006b9)
24C64_A0_3 (i2c, 43000006e6)
24C64_A2_3 (i2c, 43000006eb)
24C64_A4_3 (i2c, 43000006f0)
24C64_A6_3 (i2c, 43000006f5)
24C64_A8_3 (i2c, 43000006fa)
|
CPU_4_6_MOD_SLOT (picl, 430000027e)
CPU_5_7_MOD_SLOT (picl, 4300000283)
CPU_0_2_MOD_PR_SENSOR (gpio, 43000002cc)
CPU_1_3_MOD_PR_SENSOR (gpio, 43000002d3)
CPU_4_6_MOD_PR_SENSOR (gpio, 43000002da)
CPU_5_7_MOD_PR_SENSOR (gpio, 43000002e1)
DAR8_DIE_TEMPERATURE_SENSOR (temperature-sensor, 430000034c)
DCS8_DIE_TEMPERATURE_SENSOR (temperature-sensor, 4300000356)
24C64_A8_4 (i2c, 4300000718)
SSC050_80_5 (i2c, 4300000786)
HPC3130_EC_5 (i2c, 43000007fe)
24C64_A0_11 (i2c, 43000008bc)
IO_BOARD (picl, 430000000f)
FAN_BLAST_OFF_SWITCH (switch, 430000003c)
CPU_PFAN_PR_SENSOR (gpio, 43000000bb)
CPU_SFAN_PR_SENSOR (gpio, 43000000c2)
IO_PFAN_PR_SENSOR (gpio, 43000000c9)
IO_SFAN_PR_SENSOR (gpio, 43000000d0)
IO_BRIDGE_PFAN_PR_SENSOR (gpio, 43000000d7)
IO_BRIDGE_SFAN_PR_SENSOR (gpio, 43000000de)
IO0_PFAN_TACH (fan-tachometer, 430000010d)
IO1_PFAN_TACH (fan-tachometer, 4300000117)
IO0_SFAN_TACH (fan-tachometer, 4300000121)
PS1_PR_SENSOR (gpio, 430000022a)
PS1_PR_SENSOR (gpio, 430000022a)
PS2_PR_SENSOR (gpio, 430000026d)
MB_AMB_TEMPERATURE_SENSOR (temperature-sensor, 4300000338)
IOB_AMB_TEMPERATURE_SENSOR (temperature-sensor, 4300000342)
PCI0_SLOT (picl, 43000003b4)
PCI0_CARD (picl, 43000003e1)
PCI1_SLOT (picl, 43000003b9)
PCI2_SLOT (picl, 43000003be)
PCI3_SLOT (picl, 43000003c3)
PCI4_SLOT (picl, 43000003c8)
PCI5_SLOT (picl, 43000003cd)
PCI6_SLOT (picl, 43000003d2)
PCI7_SLOT (picl, 43000003d7)
PCI8_SLOT (picl, 43000003dc)
PCI0_PR_SENSOR (gpio, 430000047a)
PCI1_PR_SENSOR (gpio, 4300000481)
PCI2_PR_SENSOR (gpio, 4300000488)
PCI3_PR_SENSOR (gpio, 430000048f)
PCI4_PR_SENSOR (gpio, 4300000496)
PCI5_PR_SENSOR (gpio, 430000049d)
PCI6_PR_SENSOR (gpio, 43000004a4)
|
Solaris showrev Command
The showrev command displays revision information for the current hardware and software. When used with the -p option, this command displays installed patches.
The following is partial sample output from the showrev command with the -p option.
% /usr/sbin/showrev -p
Patch: 109729-01 Obsoletes: Requires: Incompatibles: Packages: SUNWcsu
Patch: 109783-01 Obsoletes: Requires: Incompatibles: Packages: SUNWcsu
Patch: 109807-01 Obsoletes: Requires: Incompatibles: Packages: SUNWcsu
Patch: 109809-01 Obsoletes: Requires: Incompatibles: Packages: SUNWcsu
Patch: 110905-01 Obsoletes: Requires: Incompatibles: Packages: SUNWcsu
Patch: 110910-01 Obsoletes: Requires: Incompatibles: Packages: SUNWcsu
Patch: 110914-01 Obsoletes: Requires: Incompatibles: Packages: SUNWcsu
Patch: 108964-04 Obsoletes: Requires: Incompatibles: Packages: SUNWcsr
|
Solaris psrinfo Command
The psrinfo command displays the date and time each CPU came online.
The psrinfo command with the -v option displays additional information about the CPUs, including clock speed.
The following is sample output from the psrinfo command with the -v option.
% /usr/sbin/psrinfo -v
Status of processor 0 as of: 04/11/01 12:03:45
Processor has been on-line since 04/11/01 10:53:03.
The sparcv9 processor operates at 750 MHz,
and has a sparcv9 floating point processor.
Status of processor 2 as of: 04/11/01 12:03:45
Processor has been on-line since 04/11/01 10:53:05.
The sparcv9 processor operates at 750 MHz,
and has a sparcv9 floating point processor.
|
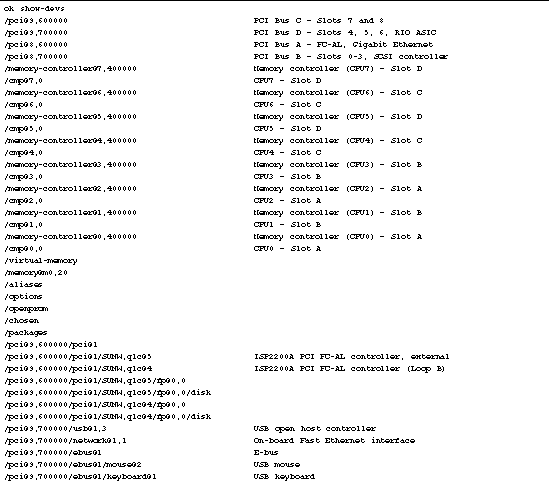
OpenBoot show-devs Command
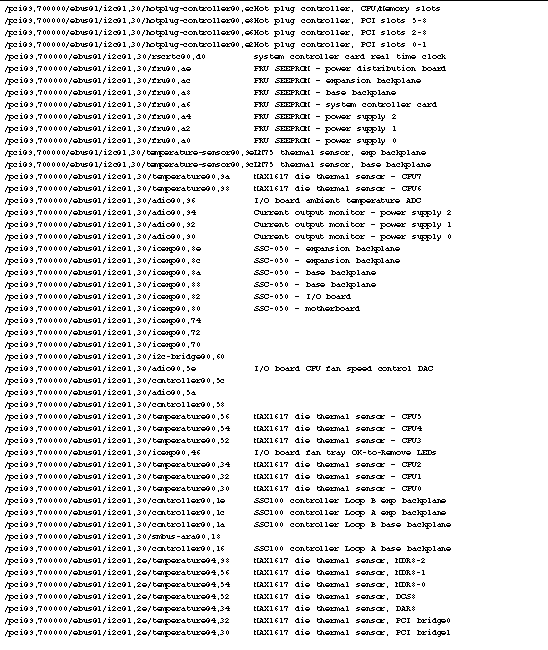
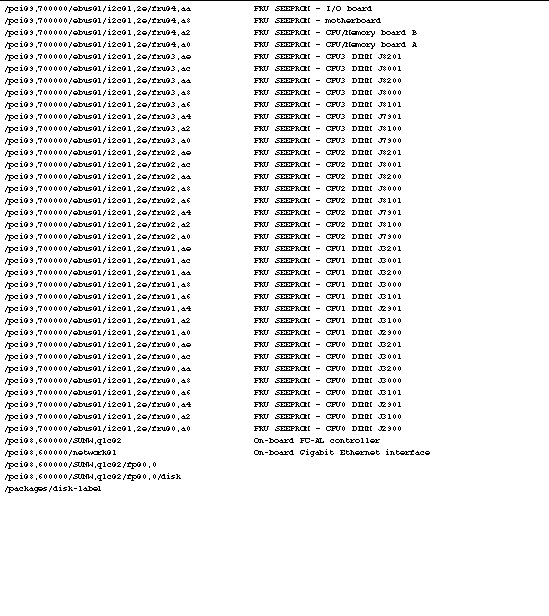
If you are working from the ok prompt, you can use the OpenBoot show-devs command to list the devices in the system configuration. The following is sample show-devs output for a Sun Fire V890 server configured with a full complement of CPU/Memory boards, DIMMs, power supplies, and FC-AL disk backplanes. The system also includes a Sun StorEdge Dual Fibre Channel Host Adapter card to drive Loop B of the FC-AL mass storage subsystem. The show-devs output displays the device tree for the system. Helpful descriptions for most of the devices are provided to the right of the sample output.


OpenBoot .env Command
Use the OpenBoot .env command to display the current environmental status information.
The following is sample output from the .env command.
ok .env
Environmental Status:
Power Supplies:
PS0: Present, receiving AC power
PS1: Present, receiving AC power
PS2: Present, receiving AC power
Fans:
Tray 1 (CPU): Present, Fan A @ 3225 RPM, Fan B @ 3191 RPM
Tray 2 (CPU): Present, Fan A @ 3614 RPM, Fan B @ 3571 RPM
Tray 3 (I/O): Present, Fan A @ 3488 RPM, Fan B @ 3409 RPM
Tray 4 (I/O): Present, Fan A @ 3157 RPM, Fan B @ 3061 RPM
Fan 5 (IO-Bridge): Present, Fan @ 3846 RPM
Fan 6 (IO-Bridge): Present, Fan @ 3529 RPM
Temperatures:
CMP0: Ambient = 40 deg. C, Die = 61 deg. C
CMP1: Ambient = 40 deg. C, Die = 57 deg. C
CMP2: Ambient = 39 deg. C, Die = 59 deg. C
CMP3: Ambient = 39 deg. C, Die = 61 deg. C
CMP4: Ambient = 45 deg. C, Die = 63 deg. C
CMP5: Ambient = 41 deg. C, Die = 58 deg. C
CMP6: Ambient = 42 deg. C, Die = 65 deg. C
CMP7: Ambient = 40 deg. C, Die = 61 deg. C
Motherboard: Ambient = 29 deg. C
I/O Board: Ambient = 22 deg. C
Disk Backplane 0: Ambient = 21 deg. C
Environmental monitor is ON
|
OpenBoot printenv Command
Use the OpenBoot printenv command to display the OpenBoot configuration variables. The display includes the current values for these variables as well as the default values.
The following is sample output for the printenv command.
ok printenv
Variable Name Value Default Value
test-args
diag-passes 1 1
local-mac-address? true false
scsi-initiator-id 7 7
oem-logo No default
oem-logo? false false
oem-banner No default
oem-banner? false false
ansi-terminal? true true
screen-#columns 80 80
screen-#rows 34 34
ttyb-rts-dtr-off false false
ttyb-ignore-cd true true
ttya-rts-dtr-off false false
ttya-ignore-cd true true
ttyb-mode 9600,8,n,1,- 9600,8,n,1,-
ttya-mode 9600,8,n,1,- 9600,8,n,1,-
output-device ttya screen
input-device ttya keyboard
auto-boot-on-error? true true
load-base 16384 16384
auto-boot? false true
boot-command boot boot
diag-file
diag-device disk net net
boot-file
boot-device /pci@8,600000/SUNW,qlc@2 ... disk net
use-nvramrc? false false
nvramrc
security-mode none No default
security-password No default
security-#badlogins 0 No default
verbosity debug normal
fcode-debug? false false
diag-out-console false false
diag-trigger none error-reset
power-on-res ...
service-mode? false false
diag-script none normal
diag-level off max
diag-switch? false false
error-reset-recovery sync sync
|
OpenBoot probe-scsi and probe-scsi-all Commands
To diagnose problems with the SCSI or FC-AL devices, you can use the OpenBoot probe-scsi and probe-scsi-all commands. Both commands require that you get to the ok prompt after a reset.
|
Note - When it is not practical to halt the system, you can use SunVTS software as an alternative method of testing the SCSI and FC-AL interfaces. See About SunVTS Software for more information.
|
The probe-scsi command transmits an inquiry command to all SCSI and FC-AL devices connected to the on-board SCSI and FC-AL controllers. This includes any internal tape or DVD/CD-ROM drives connected to an optional SCSI controller. For any SCSI or FC-AL device that is connected and active, its target address, unit number, device type, and manufacturer name are displayed.
The probe-scsi-all command transmits an inquiry command to all SCSI and FC-AL devices connected to the on-board SCSI and FC-AL controllers, and any host adapters installed in PCI slots. The first identifier listed in the display is the host adapter address in the system device tree, followed by the device identification data.
The following is sample output from the probe-scsi command.
ok probe-scsi
/pci@8,600000/SUNW,qlc@2
LiD HA LUN --- Port WWN --- ----- Disk description -----
0 0 0 2100002037bd356f SEAGATE ST318304FSUN18G 042D
6 6 0 508002000011fd5d SUNW SUNWGS INT FCBPL9216
8 8 0 2100002037bd3981 SEAGATE ST318304FSUN18G 042D
|
About Diagnosing Specific Problems
This section describes how to diagnose the following problems:
Network Communication Failure
Symptom
The system is unable to communicate over the network.
Action
Your system conforms to the Ethernet 10/100BASE-T standard, which states that the Ethernet 10BASE-T link integrity test function should always be enabled on both the host system and the Ethernet hub. If you have trouble establishing a connection between the Sun Fire V890 server and your Ethernet hub, verify that the Ethernet hub also has the link test function enabled.
This problem applies only to 10BASE-T network hubs, where the Ethernet link integrity test is optional. This is not a problem for 100BASE-T networks, where the test is enabled by default. Refer to the documentation provided with your Ethernet hub for more information about the link integrity test function.
Use the test command to test an individual network device. At the ok prompt, type test and the full path name of the device as shown in the following example:
ok test /pci@9,700000/network@1,1
|
If you connect the system to a network and the network does not respond, use the OpenBoot PROM command watch-net-all to display conditions for all network connections:
For most PCI Ethernet cards, the link integrity test function can be enabled or disabled with a hardware jumper on the PCI card, which you must set manually. (See the documentation supplied with the card.) For the standard TPE I/O board port, the link test is enabled or disabled through software, as described below.
|
Note - Some hub designs permanently enable or disable the link integrity test through a hardware jumper. In this case, refer to the hub installation or user manual for details of how the test is implemented.
|
Determining the Device Name of the Ethernet Interface
To enable or disable the link integrity test for the standard Ethernet interface, or for a PCI-based Ethernet interface, you must first know the device name of the desired Ethernet interface. To list the device name, follow these steps:
1. Shut down the operating system and take the system to the ok prompt.
2. Determine the device name for the desired Ethernet interface:
a. Type:
b. In the show-devs listing, find the device name for the desired Ethernet interface.
The device name is /pci@9,700000/network@1,1 for the Fast Ethernet interface. For a PCI-based Ethernet interface, the device name may appear similar to the following: /pci@8,700000/pci@2/SUNW,hme@0,1
Enabling or Disabling the Link Integrity Test
Solution 1
Use this method while the operating system is running:
1. Become superuser.
2. Type:
# eeprom nvramrc="probe-all install-console banner apply disable-link-pulse device-name"
(Repeat for any additional device names.)
# eeprom "use-nvramrc?"=true
|
3. Reboot the system (when convenient) to make the changes effective.
Solution 2
Use this alternative method when the system is already at the OpenBoot prompt:
1. At the ok prompt, type:
ok nvedit
0: probe-all install-console banner
1: apply disable-link-pulse device-name
(Repeat this step for other device names as needed.)
(Press CONTROL-C to exit nvedit.)
ok nvstore
ok setenv use-nvramrc? true
|
2. Reboot the system to make the changes effective.
Power-On Failure
Symptom
The system attempts to power on but does not boot or initialize the terminal or monitor.
Action
1. Verify that the CPU/Memory boards are seated correctly.
2. Run POST diagnostics.
See Running POST Diagnostics.
3. Observe POST results.
Check the POST output using a locally attached terminal, tip connection, or RSC console. If you see no front panel LED activity, a power supply may be defective. See the Sun Fire V890 Server Owner's Guide for information about power supply LED indications.
If the front panel System Fault LED remains lit or the POST output contains an error message, POST has failed. The most probable cause for this type of failure is the motherboard.
4. Before you replace the motherboard, run the OpenBoot Diagnostics test-all command from the ok prompt or obdiag> prompt.
|
Note - To get to the ok prompt, you must set the OpenBoot PROM configuration variable auto-boot? to false and then reset the system. (The default setting for auto-boot? is true.) See Running OpenBoot Diagnostics for instructions.
|
5. If OpenBoot Diagnostics error messages show any defective components, remove or replace those components and run firmware diagnostics again.
Remove any failed components that are optional. Replace any failed components that are required for a minimum configuration. Be sure the required eight DIMMs are installed in groups A0 and B0 for each CPU/Memory board installed.
6. If POST still fails after you have removed or replaced all failed components, replace the motherboard.
Video Output Failure
Symptom
No video at the system monitor.
Action
1. Check that the power cord is connected to the monitor and to the wall outlet.
2. Verify with a volt-ohmmeter that the wall outlet is supplying AC power.
3. Verify that the video cable connection is secure between the monitor and the video output port.
Use a volt-ohmmeter to perform the continuity test on the video cable.
4. If the cables are connected securely, troubleshoot the monitor and the graphics card. Use the test command.
|
Note - To test the graphics card, a graphics display may be required.
|
RSC Console Failure
Symptom
The system console has been redirected to an RSC console, but the RSC console is not working.
Action
The most likely cause of this problem is a faulty system controller card. To recover from this problem and gain access to the system from a local system console, follow these steps:
1. Press the system Power button briefly to initiate a graceful software shutdown.
2. Make sure that the system is connected to a local console device.
Install a local console if necessary. See the Sun Fire V890 Server Owner's Guide for instructions.
3. Press and release the Power button and wait until the System Fault LED on the front panel begins to blink.
4. Immediately press the Power button twice (with a one-second delay between presses).
A screen similar to the following is displayed to indicate that you have successfully reset the OpenBoot NVRAM configuration variables to their default values.
Sun Fire V890 (8 X UltraSPARC-III), Keyboard Present
OpenBoot x.x, 256 MB memory installed, Serial #xxxxxxxx.
Ethernet address xx:xx:xx:xx:xx:xx, Host ID: xxxxxxxx.
Safe NVRAM mode, the following nvram configuration variables have
been overridden:
`diag-switch?' is false
`use-nvramrc?' is false
`input-device', `output-device' are defaulted
`ttya-mode', `ttyb-mode' are defaulted
These changes are temporary and the original values will be
restored after the next hardware or software reset.
ok
|
By changing the NVRAM configuration variables to their default values, you temporarily redirect the system console to the local console device. Note that these NVRAM settings are reset to the defaults for this power cycle only. If you do nothing other than reset the system at this point, the values are not permanently changed. Only settings that you change manually at this point become permanent.
5. To permanently redirect the system console to the local console device, type the following commands at the system ok prompt:
ok diag-console ttya
ok setenv input-device keyboard
ok setenv output-device screen
|
6. To cause the changes to take effect, power cycle the system, or type:
The system permanently stores the parameter changes
7. Run OpenBoot Diagnostics and/or SunVTS tests for the system controller card.
8. Replace the system controller card, if necessary.
FC-AL Loop or Disk Drive Failure
Symptom
A disk drive read, write, or parity error is reported by the operating system or a software application.
Action
 Replace the drive indicated by the failure message.
Symptom
An internal FC-AL disk drive fails to boot, is not responding to commands, or an FC-AL loop fails to initialize.
Action
Run OpenBoot Diagnostics tests for the mass storage subsystem.
1. At the ok prompt, type:
ok setenv auto-boot? false
ok setenv diag-level max
ok setenv diag-switch true
ok setenv test-args verbose,subtests
|
2. Power off the system.
3. Verify that all cables attached to the FC-AL disk backplanes are properly connected.
4. Power on the system and observe the POST status messages.
If POST reports a problem, replace the component indicated by the failure message and repeat POST diagnostics until the problem is resolved.
5. At the ok prompt, type:
The OpenBoot Diagnostics menu is displayed, followed by the obdiag> prompt.
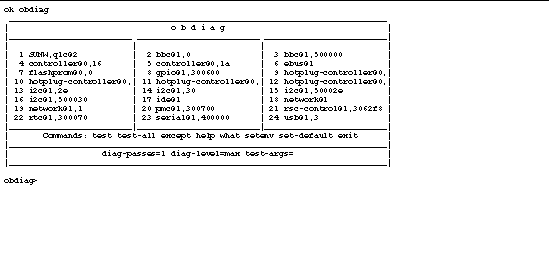
6. Test segment 5 of the I2C bus (i2c@1,30) to verify that it is operating correctly.
Enter the test number corresponding to the i2c@1,30 test. For example:
|
Note - The OpenBoot Diagnostics menu entries and test numbers vary according to system configuration.
|
I2C segment 5 must be working correctly in order to test the FC-AL subsystem. If this test fails, test the remaining segments of the I2C bus and replace the component or components indicated by the failure messages. Segment 5 test failures can also result from a faulty I2C cable.
7. Run the SSC-100 SES controller tests in the following order:
a. controller@0,16 - base backplane Loop A
b. controller@0,1c - expansion backplane Loop A (if installed)
c. controller@0,1a - base backplane Loop B
d. controller@0,1e - expansion backplane Loop A (if installed)
- If the tests indicate a problem with any of the following components--DPM, CRC, SSC-100, SSC-050, or LM75--the most likely source of the problem is the backplane under test. Replace the backplane and repeat the test.
- If a loop-empty subtest fails in a single backplane configuration, replace the backplane and repeat the test.
- If a loop-empty subtest fails in a dual-backplane configuration, remove the FC-AL data cables between backplanes and repeat the test. If the failure persists, replace the backplane under test; otherwise, the failure may be due to the other backplane or the FC-AL cables between the two.
- If a failure message identifies one or more specific disks, replace the disks with known good disks and repeat the test.
8. Run the ISP2200A FC-AL controller tests in the following order:
a. SUNW,qlc@2 - on-board FC-AL controller (Loop A)
b. SUNW,qlc@4 - PCI FC-AL controller (Loop B, if installed)
For example:
If a failure message identifies one or more specific disks, replace the disks with known good disks and repeat the testing. Disk failure messages identify a specific disk by its AL_PA address, according to the following table.
|
Base Backplane
|
AL_PA
|
Expansion Backplane
|
AL_PA
|
|
Disk 0
|
EF
|
Disk 6
|
D9
|
|
Disk 1
|
E8
|
Disk 7
|
D6
|
|
Disk 2
|
E4
|
Disk 8
|
D5
|
|
Disk 3
|
E2
|
Disk 9
|
D4
|
|
Disk 4
|
E1
|
Disk 10
|
D3
|
|
Disk 5
|
E0
|
Disk 11
|
D2
|
|
SSC-100 SES processor
|
DC
|
|
|
Other types of failures during the on-board controller test usually indicate a problem with the motherboard or the motherboard FC-AL cable. When testing the PCI controller, these types of failure messages point to the PCI card or the FC-AL cable between the card and the base backplane.
In a dual-backplane configuration, removing the FC-AL cables between backplanes and repeating the test can help to isolate the problem.
DVD-ROM Drive Failure
Symptom
A DVD-ROM drive read error or parity error is reported by the operating system or a software application.
Action
Replace the DVD-ROM drive.
Symptom
DVD-ROM drive fails to boot or is not responding to commands.
Action
Test the drive response to the probe-ide command as follows.
|
Note - You must halt the system to execute the probe-ide command. If this is not practical, you can use the SunVTS software to test the DVD-ROM. See About SunVTS Software.
|
1. At the ok prompt, type:
ok setenv auto-boot? false
ok reset-all
ok probe-ide
|
2. Check the output message.
If a target address, unit number, device type, and manufacturer name are displayed for the device, the system IDE controller has successfully probed the device. This indicates that the motherboard is operating correctly.
3. Take one of the following actions, depending on what the probe-ide command reports:
a. Replace the DVD-ROM data cable.
b. If the problem is still evident after replacing the cable, replace the drive.
c. If the problem is still evident, replace the motherboard.
Power Supply Failure
Symptom
If there is a problem with a power supply, the environmental monitoring system lights the following LEDs:
- System Fault LED on the front panel
- Power Fault LED on the status and control panel
- Fault LED at the rear of the problem power supply
In addition, the AC Status and DC Status LEDs at the rear of each power supply indicate any problem with the AC input and DC output, respectively. See the Sun Fire V890 Server Owner's Guide for more information about the LEDs.
Action
After you identify the problem power supply, replace it according to the removal and installation instructions in the Sun Fire V890 Server Service Manual.
DIMM Failure
Symptom
SunVTS and POST diagnostics can report memory errors encountered during program execution. Memory error messages typically indicate the location number
("J" number) of the failing DIMM.
Action
1. Use the following diagram to identify the location of a failing DIMM
from its J number.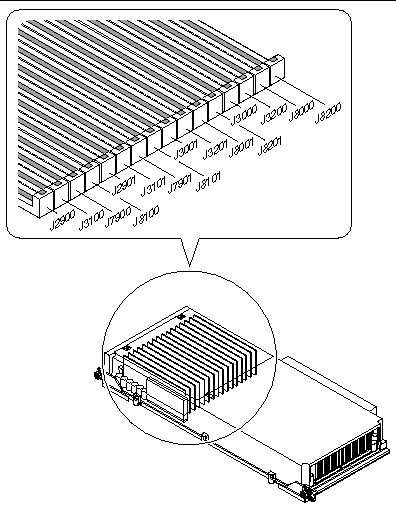
2. After you identify the defective DIMM, replace it according to the removal and installation instructions in the Sun Fire V890 Server Service Manual.
Environmental Failures
The Sun Fire V890 server features an environmental monitoring subsystem designed to protect against:
- Extreme temperatures
- Lack of adequate airflow through the system
- Power supply problems
Monitoring and control capabilities reside at the operating system level as well as in the system's flash PROM firmware. This ensures that monitoring capabilities remain operational even if the system has halted or is unable to boot.
The environmental monitoring subsystem uses an industry-standard I2C bus. The I2C bus is a simple two-wire serial bus, used throughout the system to allow the monitoring and control of temperature sensors, fans, power supplies, status LEDs, and the front panel keyswitch.
Monitoring Temperatures
Temperature sensors are located throughout the system to monitor the ambient temperature of the system and the temperature of each CPU. The monitoring subsystem frequently polls each sensor and uses the sampled temperatures to report and respond to any overtemperature or undertemperature conditions.
The hardware and software together ensure that the temperatures within the enclosure do not stray outside predetermined "safe operation" ranges. If the temperature observed by a sensor falls below a low-temperature warning threshold or rises above a high-temperature warning threshold, the monitoring subsystem software generates a Warning message to the system console. If the temperature exceeds a low-temperature or high-temperature critical threshold, the software issues a Critical message and proceeds to gracefully shut down the system. In both cases, the System Fault and Thermal Fault LEDs on the front status panel are illuminated to indicate the nature of the problem.
This thermal shutdown capability is also built into the hardware circuitry as a fail-safe measure. This feature provides backup thermal protection in the unlikely event that the environmental monitoring subsystem becomes disabled at both the software and firmware levels.
All error and warning messages are displayed on the system console (if one is attached) and are logged in the /var/adm/messages file. Front panel fault LEDs remain lit after an automatic system shutdown to aid in problem diagnosis.
Monitoring Airflow
The monitoring subsystem is also designed to detect fan failures. The basic system features three primary fan trays, which include a total of five individual fans. Systems equipped with the redundant cooling option include three additional (secondary) fan trays for a total of 10 individual fans. During normal operation, only the five primary fans are active.
If any primary fan fails, the monitoring subsystem detects the failure and performs the following:
- Generates an error message and logs it in the /var/adm/messages file
- Lights the System Fault and Thermal Fault LEDs on the status and control panel
- Lights the appropriate Fan Fault LED inside the system
- Automatically activates the appropriate secondary fan tray (if installed)
Monitoring Power Supplies
The power subsystem is monitored in a similar fashion. The monitoring subsystem periodically polls the power supply status registers for a power supply OK status, indicating the status of each supply's 3.3V, 5.0V, 12V, and 48V DC outputs.
If a power supply problem is detected, an error message is displayed on the system console and logged in the /var/adm/messages file. The System Fault and Power Fault LEDs on the status and control panel are also lit. LEDs located on the back of each power supply indicate the source and nature of the fault.
|
Note - The Sun Fire V890 server power supplies have their own built-in overtemperature protection circuits that will automatically shut down the supplies in response to certain overtemperature and power fault conditions. To recover from an automatic power supply shutdown, you must disconnect the AC power cord, wait approximately 10 seconds, and then reconnect the power cord.
|
Environmental Error Messages
The error messages, generated by the monitoring subsystem in response to an environmental error condition are listed and described in the following table. The environmental error messages are displayed on the system console (if one is attached) and logged in the /var/adm/messages file.
|
Message
|
Type
|
Description
|
|
CRITICAL: HIGH TEMPERATURE DETECTED Temp,Temperature-Sensor
|
Critical
|
Indicates that the temperature measured at Temperature-Sensor has exceeded the critical threshold. This message is displayed briefly and then followed by the shutdown message, "The system will be shutting down in one minute." After one minute, the system automatically shuts down.
Note: Output from the prtpicl -v command shows the high-temperature critical threshold for each component. See the prtpicl man page for information.
|
|
CRITICAL: LOW TEMPERATURE DETECTED
Temp,Temperature-Sensor
|
Critical
|
Indicates that the temperature measured at Temperature-Sensor has fallen below the critical threshold. This message is displayed briefly and then followed by the shutdown message, "The system will be shutting down in one minute." After one minute, the system automatically shuts down.
Note: Output from the prtpicl -v command shows the low-temperature critical threshold for each component. See the prtpicl man page for information.
|
|
WARNING: HIGH TEMPERATURE DETECTED
Temp,Temperature-Sensor
|
Warning
|
Indicates that the temperature measured at Temperature-Sensor has exceeded the warning threshold. If the temperature continues to rise and exceeds the critical threshold, the system issues the "CRITICAL: HIGH TEMPERATURE..." Warning and the shut down message.
Note: Output from the prtpicl command shows the high-temperature warning threshold for each component. See the prtpicl man page for information.
|
|
WARNING: LOW TEMPERATURE DETECTED
Temp,Temperature-Sensor
|
Warning
|
Indicates that the temperature measured at Temperature-Sensor has fallen below the warning threshold. If the temperature continues to fall and goes below the critical threshold, the system issues the "CRITICAL: LOW TEMPERATURE..." warning and the shutdown message.
Note: Output from the prtpicl command shows the low-temperature warning threshold for each component. See the prtpicl man page for information.
|
|
WARNING: Device Device failure detected
|
Warning
|
Indicates that there is a problem with a power supply or fan. The system may shut down abruptly if Device identifies a power supply or fan in a non-redundant configuration.
Note: PS0 is the right-side power supply; PS1 is the center power supply; PS2 is the left-side power supply.
|
|
WARNING: Fan missing, id = Fan
|
Warning
|
Appears at boot time if a primary fan tray is missing. The missing fan tray is identified by the value Fan.
|
|
WARNING: Power supply overcurrent detected
WARNING: Only 1 Power Supply in system ADD 2nd Power Supply
WARNING: Power Supply at 95% current Remove some load
|
Warning
|
Indicates a power supply is overloaded. The "Power supply overcurrent detected" message appears with one of the other warning messages ("...Add 2nd Power Supply" "...Remove some load" message).
|
|
WARNING: Secondary fan failure, device Device
|
Warning
|
Indicates a secondary fan is turned on and the speed of the fan is zero. Secondary fans are turned on only if the primary fans are not present or not operational.
|
|
Device Device inserted
|
Advisory
|
Appears as a hot-swap message indicating that a power supply or fan identified by Device was installed without service disruption.
|
|
Device Device removed
|
Advisory
|
Appears as a hot-swap message indicating that a power supply or fan identified by Device was removed without service disruption.
|
|
Device Device OK
|
Advisory
|
Appears when a power supply or fan failure reported by the message "WARNING: Device failure detected" is corrected.
|
|
Device Power-Supply unplugged
Device Power-Supply plugged in
|
Advisory
|
Indicates a power supply is inserted, but the AC power cord is not plugged in. As soon as the AC cord is plugged in, the message "Device POWER SUPPLY plugged in" is displayed.
Note - Environmental monitoring of a power supply occurs only if the power cord is plugged in.
|
|
Disk Error Reported
Disk Error Cleared
|
Advisory
|
Appears if a fault is detected for any of the installed internal disks. The message "Disk Error cleared" appears when the disk fault is cleared.
|
|
Keyswitch position
changed to Position
|
Advisory
|
Indicates keyswitch position has changed and gives the current position.
|
| Sun Fire V890 Server Diagnostics Guide
|
817-5950-11
|
|
Copyright © 2004, Sun Microsystems, Inc. All Rights Reserved.