| C H A P T E R 6 |
|
Setting Up a System Console Device |
This chapter provides information on connecting a system console device to the server. To install the Solaris operating system and any application software, you must set up a terminal or other device to access the system console. You can either:
Regardless of the method you choose, for the initial power-on you must connect the device to the serial management port (SERIAL MGT). All of the procedures in the following sections assume that you are setting up a system console device using this default configuration. After the initial power-on, you may use the NET MGT port if you choose.
See the appropriate section for the connection method that you want to use:
The serial management port on the Netra 240 server is a data terminal equipment (DTE) port. The pinouts for the serial management port correspond with the pinouts for the RJ-45 ports on the serial interface breakout cable supplied by Cisco for use with the Cisco AS2511-RJ terminal server. If you use a terminal server made by another manufacturer, ensure that the serial port pinouts of the Netra 240 server match those of the terminal server you plan to use.
If the pinouts for the server serial ports correspond with the pinouts for the RJ-45 ports on the terminal server, you have two connection options:
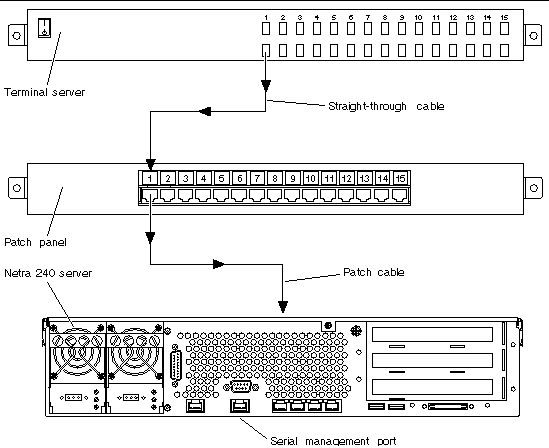
The following illustration shows how to connect a patch cable between a terminal server, patch panel, and the serial management port (SERIAL MGT) on the Netra 240 server.
FIGURE 6-1 Patch Panel Connection Between a Terminal Server and a Netra 240 Server

If the pinouts for the serial management port do not correspond with the pinouts for the RJ-45 ports on the terminal server, you need to make a crossover cable that takes each pin on the Netra 240 server serial management port to the corresponding pin in the terminal server's serial port.
TABLE 6-1 shows the crossovers that the cable must perform.
 Open a terminal session on the connecting device, and type:
For example, for a Netra 240 server connected to port 10000 on a terminal server whose IP address is 192.20.30.10, you would type:
The following procedure assumes that you are accessing the system console device by connecting an alphanumeric terminal to the serial management port (SERIAL MGT) of the Netra 240 server.
1. Turn off power to the alphanumeric terminal.
2. Attach one end of the serial cable to the alphanumeric terminal's serial port.
Use an RJ-45 null modem serial cable or an adapter that is appropriate for your device. If you are using a laptop system or a terminal with a DB-9 connector, use an appropriate RJ-45/DB-9 adapter. Plug in this cable or adapter to the terminal's serial port connector. The supplied DB-9 and DB-25 adapters are suitable for most applications.
3. Attach the serial cable's RJ-45 connector to the server's serial management port (SERIAL MGT).
See Serial Management Port for the location and more information about this port.
4. Connect the alphanumeric terminal's power cable to an outlet and turn it on.
5. Set the terminal to receive:
See the documentation accompanying your terminal for information about how to configure it.
The following procedure assumes that you are setting up a system console device for the Netra 240 server by connecting the serial port of another Sun system to the serial management port (SERIAL MGT) of the Netra 240 server.
1. Make sure that the Sun system to which you are establishing the TIP connection is powered on and active.
2. Connect the RJ-45 serial cable and RJ-45/DB-25 adapter.
Use the cable and adapter to connect the other Sun system's TTYB serial port to the Netra 240 server's serial management port (SERIAL MGT). See Serial Management Port for more information about this port.
3. Ensure that the /etc/remote file on the Sun system contains an entry for hardwire.
Most releases of Solaris operating system software shipped since 1992 contain an /etc/remote file with the appropriate hardwire entry. However, if the Sun system is running an older version of Solaris software, or if the /etc/remote file has been modified, you might need to edit it.
4. In a terminal window on the other Sun system, type:
The other Sun system responds by displaying:
The terminal window is now a TIP window directed to the Netra 240 server through the other Sun system's TTYB port. This connection is established and maintained even when the Netra 240 server is completely powered off or just starting up.
| Note - Use a terminal tool, not a console tool. Some tip commands might not work properly in a console tool window. |
Copyright © 2007, Sun Microsystems, Inc. All Rights Reserved.