Chapter 12 Common Job Operations
This chapter explains how to perform operations that are common to all Sun Update Connection – Enterprise jobs: Inventory-based, Complex, and scheduled.
This chapter covers the following topics:
Job Preparation
While you are preparing the settings for a job, either an Inventory-based job or the objects of a Complex job, you can access features to make the procedures more efficient; or in the case of Solaris PKG preference settings, to make the jobs succeed at all.
Procedures in this section include:
Settings for PKG Jobs
This procedure is essential for any job that installs, uninstalls, upgrades, or downgrades Solaris PKGs or patches.
Solaris admin File
The PKG preferences in the Solaris admin file describe how Solaris PKGs are deployed on Solaris machines. When you install the Sun Update Connection – Enterprise Agent on a Solaris machine, the path name of the Solaris admin file is /opt/local/uce/agent/config_files/admin.
You can change these parameters in the Preferences -> Host -> PKGs window, to change the parameters individually for a specific host; or you can point Sun Update Connection – Enterprise to your own customized Solaris admin file.
Configure Agents on Idle
This procedure explains the steps for changing the Sun Update Connection – Enterprise preferences of Solaris agents in your environment. You cannot do the steps if the agent is busy with an Sun Update Connection – Enterprise job. Make sure the agents are idle before continuing.
 To Set PKG Preferences
In this procedure you will access and edit Preferences as needed. This procedure must be done before you deploy PKGs on hosts.
-
From the Tools menu, choose Preferences.
The Preferences window opens.

-
In the Preferences window, select the Host radio button.
The Host Selection window opens.
-
Select one of the hosts to receive the job and then click OK.
The Host Selection window closes and you are returned to the Preferences window. Wait while the Preferences values of the selected agent are uploaded to the console and displayed in the Preferences window.
-
In the Category list, click PKGs.
The PKGs preferences are displayed.
-
Make appropriate changes and then click Submit.
The Preferences Confirmation window opens.
The listed Target will be Host. The bottom panel lists the PKG parameters that you changed, with their new values.
-
Check Restart Agent on target hosts.
-
Click Submit.
Wait for the agent to restart and come back online and then select the same host again in the Host Selection window.
-
Click Select target hosts.
The Select Hosts window opens.
-
Add the hosts to receive PKG deployment to the Selected Hosts list and then click OK.
The preferences that you changed in the original host are copied to the selected hosts.
-
Mail address – Notification emails will be sent to these addresses when PKGs are installed.
-
Package install basedir – Base directory where relocatable packages are to be installed.
-
Instance – If the PKG to install already exists on this machine, this parameter determines what Sun Update Connection – Enterprise will do and has the following options:
-
Quit – Do not install the PKG
-
Overwrite – Install the PKG again
-
Unique – Install the PKG as a unique instance
-
-
Partial – If a partial install of a PKG is already on this machine, you can do the following:
-
Nocheck – Do not check for partially installed PKGs
-
Quit – Do not install the PKG if it is already partially installed
-
-
RunLevel – If the system status is not correct for installing or uninstalling a PKG, you can choose one of the following:
-
Nocheck – Do not check run level
-
Quit – Do not install or uninstall if run level requirement is not met
-
-
Install Depend – If other PKGs depend on the one being installed, you can choose one of the following:
-
Nocheck – Do not check for dependencies
-
Quit – Do not install a PKG if its dependencies are not met
-
-
Remove depend – If other PKGs depend on the one that you want to uninstall, you can choose one of the following:
-
Nocheck – Do not check for dependencies
-
Quit – Do not uninstall a PKG that is needed by others
-
-
Check space – If the disk space of this managed host does not meet the requirements of the PKG to install, you can choose one of the following:
-
Setuid flags – The setuid and setgid flags are used in Solaris programming for security. If a PKG should enable these flags after installation, you can choose one of the following:
-
Nocheck – Do not check for setuid/setgid executables
-
Quit – Do not install the PKG if it will turn on these flags
-
Nochange – Install the PKG, but override the flags
-
-
Check conflicts – If the installation of a PKG will overwrite a file provided by a previous PKG and create a conflict between files, you can choose one of the following:
-
Nocheck – Do not check for conflicts and force install
-
Quit – Do not install the PKG if file conflicts are detected
-
Nochange – Install the PKG, but do not install conflicting files
-
-
Action scripts – If an install of a PKG provides an action script that contains possible security impacts, you can choose one of the following:
-
Nocheck – Do not check for security impact of action scripts
-
Quit – Do not install the PKG if its action scripts could negatively impact security
-
-
Custom admin file full path name – Path name of a customized Solaris admin file; if none, leave default.
-
Multiple Distribution Host Lists
Sun Update Connection – Enterprise has the ability to simultaneously manage machines of different operating systems and architectures. You can create a single job and send it to any or all of your hosts. A single agent will ignore the components that are irrelevant to its distribution.
You can create Inventory-based jobs, profiles, and policies that contain components of several distributions, by selecting a new distribution in the drop-down list. However, Sun Update Connection – Enterprise offers a feature to make multiple distribution management easier.
For example, if you have a group of web servers, some of which are Red Hat 9.0 and others are Red Hat Enterprise Linux 3.0 Advanced Server, you can create one profile for web servers.
While you create the profile, you can apply settings to components of either of the distributions. Then, rather than searching for the same components in the other distribution, you can use the multiple distribution feature. It will automatically align the selected components with similar components on the other distribution. You can either accept the automatic alignment or intervene with checks and changes of your own.
 To Align Component Settings for Multiple Distributions
In this procedure, you will make the component settings of a profile, policy, or inventory job applicable to hosts of multiple distributions. This will enable you to simultaneously manage hosts of different distributions in a consistent manner. This feature is available from the Profile Editor, the Policy Editor, and the Inventory panel of the main window.
-
In the Components list, select the component and the setting or action that you want.
The component and the action appear in the Actions list.
-
Do one of the following:
-
From the tool bar (main window or Profile Editor), click the Multi Distributions button.
-
Right-click in the Actions list and choose Multi Distributions.
-
From the bottom of the Policy Editor, click the Multi Distro button.
-
From the Actions menu of the main window, choose Multi Distributions.
The Multiple Distribution window opens.
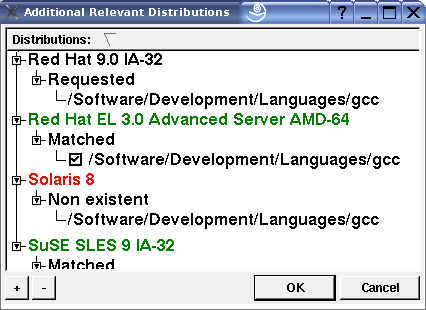
The list of distributions is color-coded to show which have the selected components and which do not.
-
-
Expand the distributions that have the components (shown in green or yellow).
-
Click OK to close the window.
You are returned to the Profile Editor, Policy Editor, or Inventory window. The aligned component settings are added to the Actions list.
-
To add more components from the distributions that did not have similar components (shown in red in the Multi Distribution window), select a new distribution in the drop-down list.
The components list changes to show components from that distribution. Select the ones you want and add them to the Actions list. You can add as many component settings, from multiple distributions, as you choose.
Component Search
At any time that you are focused on a Components list, the Find feature is available. It operates on the list of components that is currently active, according to the distribution that you selected. As each list contains thousands of components, the Find feature is indispensable.
 To Find Components
Sun Update Connection – Enterprise jobs are based on the component level. You decide what the requirements are for each type of machine, or for each individual machine, by selecting components and setting actions on them. In this procedure you will search the active components list for a component name or partial string.
-
Make sure that the active components list is of a relevant distribution.
If it is not, change the selected distribution in the drop-down list on the tool bar.
-
Do one of the following:
-
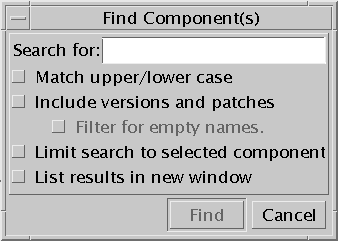
In the text field, type a component name or partial string.
-
Select the options that you want.
Option
Checked
Unchecked
Match upper/lower case
Case-sensitive
Case-insensitive
Include versions
Results include package versions, categories, and package groups
Results include categories and package groups
Filter for empty names
Results include non-certified objects that have no software components associated with them
Results include categories and package groups
Limit search to selected component
Search within selected category or package group
Search throughout the entire list
List results in new window
Display results in Search Result window
First result highlighted in Components list
-
Click Find.
The Find window closes.
If the list results in the new window are checked, the Search Result window opens and shows all matching components.
-
Double-click a result item to highlight it in the Components list.
-
Click Close in the Search Result window to apply a setting on the component.
-
To find the next matching component, press F3.
If the list results in the new window are unchecked, the first matching component is highlighted in the Components list.
-
To find the next matching component, press F3.
-
To find the previous match, press Shift + F3.
-
To Use Regular Expressions
The Find feature supports regular expressions and pattern matching wildcards.
Sun Update Connection – Enterprise assumes that all search strings might be partial strings. You do not need a wildcard for “any characters”. For example, if you search for gimp, the results include gimp, gimp-print, and xsane-gimp.
If you want to restrict the default behavior, to search only for packages that begin with gimp, use: ^gimp. The carrot (outside of brackets) indicates that the string must be the beginning of the pattern.
-
[char] – Find any of the characters in the brackets.
To find packages dealing with markup languages, either xml or html, search for [xht]ml.
-
[^char] – Find any of the characters not in the brackets.
If you want to find http packages, but do not want the list of httpd, search for http[^d]
-
[char-char] – Find a range of characters.
A regular expression of c[a-u]p results in a list that includes cups, cdparanoia-libs, cipe, and libcap.
Job Management Features
The following procedures explain how to use various Sun Update Connection – Enterprise features that enable you to monitor and manage jobs after they have been created.
If your user account is restricted to simulate jobs only, you will not be able to perform all these features. Users with full permissions can use all the procedures.
Procedures in this section include:
 To Confirm Tasks
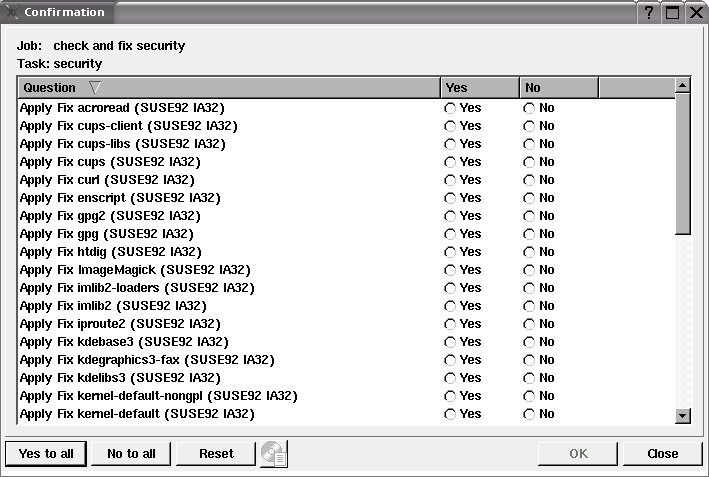
If you create a policy, you can predefine which actions should be done automatically (see To Create a Policy). If you chose the predefined Always ask me policy, or if the selected policy did not answer all actions, the job will pause for your confirmation. In this procedure, you will confirm or deny actions of a task of a job. The confirmation answers apply to all hosts selected for the job.
-
Make sure the Jobs panel of the main window is available. From the View menu, choose Jobs.
-
From the Jobs list, click a paused job, indicated with the confirmation icon.
The tasks of the job appear in the Tasks list.
-
Select a task name with the confirmation icon.
-
Do one of the following:
-
If a confirmation question deals with a component for which you need more information, select the question and click the Details button.
The Component Information window opens.
-
When you have the information you need, click OK to close the Component Information window. You are returned to the Confirmation window.
-
In the Confirmation window, select Yes to the questions you confirm and No to those you do not want Sun Update Connection – Enterprise to perform on the selected hosts.
There are different types of questions, and your answers will cause different effect.
-
Click OK.
More Information About Confirmation
What Happens After Task Confirmation
If the job was in Simulate mode, the actions and results are calculated, giving you an accurate estimation of the required time and changes, and whether your answers will allow the job to succeed.
If the job was in Deploy mode, the confirmed actions that Sun Update Connection – Enterprise can do automatically are done on the selected hosts. If you have confirmed an Acknowledge question, the Host Progress windows shows Acknowledged: <action>. Remember that the results of the job might not be applied to the hosts until you actually do the acknowledged action.
If the Host Progress window shows Attention! <action>, you should do the action to have the results applied. Some actions can be done through Sun Update Connection – Enterprise. For others, you should ask make sure the action is done at some point, by someone.
If a job fails because you said No to a question, the reason given in the Host Log is: Resolve failure - cannot resolve solution. User request.
 To Monitor a Current Job
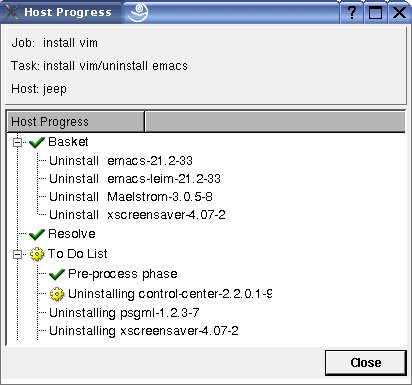
After you send a single job to be done on a list of hosts, the agent installed on each host finds an individual solution for the job. You can monitor the progress of each host, separately, as it performs the actions of a task in a job. You can also view the job log of each host. This procedure explains how to open and understand the Host Progress window and the Job Log window for a host.
-
Make sure the Jobs panel of the main window is available. From the View menu, choose Jobs.
-
From the Jobs list, select a job.
The tasks of the job appear in the Tasks list.
-
From the Tasks list, select a task.
The hosts running this task appear in the Hosts list of the Jobs panel.
-
Select a host.
-
Do one of the following:
-
Monitor the actions of the host for the selected task:
-
Basket – The actions that you requested.
-
Resolve – Status of the dependency resolver finding a solution.
-
To Do List – List of actions to be taken to fulfill the solution. This list might contain special actions. If it is Perform <action>, Sun Update Connection – Enterprise does the action automatically. If the To Do item is Attention! <action>, you are expected to handle the action yourself before the job will continue.
If there is a problem, you can click the Stop Job button. The job will stop at a safe place.
-
 To View Job Log
When a job is done, either on success or failure, you can see the log of actions for all tasks of the job on the selected host. Each host may have a different log for the same job.
-
Make sure the Jobs panel of the main window is available. From the View menu, choose Jobs.
-
From the Jobs list, select a job.
The tasks of the job appear in the Tasks list.
-
From the Tasks list, select a task.
The hosts running this task appear in the Hosts list of the Jobs panel.
-
Select a host.
-
Open the Job Log. Do one of the following:
-
From the tool bar, click the Job Log button.
-
Right-click the selected host and choose Show Log.
-
From the Jobs menu, choose Hosts -> Show Log.
The Job Log window opens.
The Job Log shows each phase and whether it started and finished successfully. If there are any errors, they are listed.
To send the log to technical support, click Save As, save the log on the console machine, and email it with all relevant details.
If the failure reason is User request, run the job again with different Confirmation answers or a different Policy. This error indicates that you denied actions that were necessary to the success of the job.
-
 To Rerun a Job
Rerun a job that has completed, either successfully or with a failure.
-
Make sure the Jobs panel of the main window is available.
From the View menu, choose Jobs.
-
From the Jobs list, select a job.
-
Do one of the following:
-
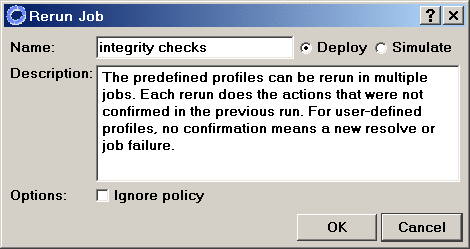
Give the job a new name and an optional description.
-
Select a mode for the job:
-
If the job failed because the policy did not allow certain components to be changed, check Ignore Policy to ensure that the job has a chance to succeed.
-
Click OK.
The Rerun window closes and the new job is added to the Jobs list. This job runs the same tasks, on the same host list, as the original job.
 To Filter the Jobs Panel
Set the filters to show the information you want in the Jobs panel. This enables you to easily find information about jobs, tasks, and hosts in the Jobs list that is important to you.
-
Make sure the Jobs panel of the main window is available.
From the View menu, choose Jobs.
-
Do one of the following:
-
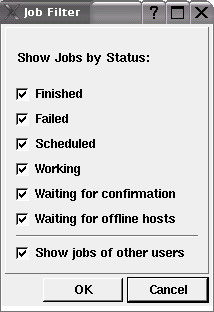
Check options to filter the list for jobs by status and by owner.
-
Click OK.
The Jobs list changes to display only the jobs that match the checked filtering options.
Note –You can organize the Jobs list by dragging columns in any order you choose. You can click a column header to order the list alphanumerically.
 To Delete Jobs
In this procedure, you will delete job listings that are no longer relevant. When you delete a job listing, the data remains in the system dependency server. You can query job history from reports (see Job History Reports).
Note –
You can use the profiles and policies of jobs that are in the list, so do not delete jobs until you are sure they are no longer relevant.
-
Make sure the Jobs panel of the main window is available.
From the View menu, choose Jobs.
-
From the Jobs list, select a job that is no longer current.
-
Do one of the following:
 To Refresh the Jobs List
The Jobs list is updated for current dynamics on a schedule. If you want to make sure that the list is accurate, use this procedure to force the update and refresh the list.
-
Make sure the Jobs panel of the main window is available. From the View menu, choose Jobs.
-
Do one of the following:
 To Reschedule Recurring Jobs
If you set a Complex job for a recurring schedule, you can change the schedule at any time after it is in the Jobs list.
-
Make sure the Jobs panel of the main window is available. From the View menu, choose Jobs.
-
Do one of the following:
-
Select days of the month:
-
Select time of the day:
-
Click OK.
 To Install Interactive Solaris Patches
You can install Solaris patches as an inventory-based job or as a complex job. Some patches are handled automatically by Sun Update Connection – Enterprise, while other patches demand user interaction.
When you need to install an interactive Solaris patch, Sun Update Connection – Enterprise downloads the patch for you, but you must handle the manual intervention actions yourself.
-
Create a job to install the patches.
-
Run the job.
The job will pause with confirmation questions.
-
From the Jobs panel, select the task that contains the patch and click the Confirmation button.
The Confirmation window opens.
One of the following questions will appear:
-
Accept Install of patch requires manual intervention for component
-
Accept Uninstall of patch requires manual intervention for component
-
-
Click Yes for this question.
This means that you accept the responsibility for handling this patch. If you select No, the job fails.
-
In the Confirmation window, click OK.
The job begins. It downloads the patch you requested to the /opt/local/uce/agent/blobs.save directory on the selected Solaris machines.
When the job reaches the point where it would install the patch, it is marked as failed and stops.
-
On the Solaris machines, manually install /opt/local/uce/agent/blobs.save/patchname-ver.
-
On the console machine, right-click the job in the Jobs panel and choose Rerun.
The Rerun window opens.
-
Select Deploy and then click OK.
Sun Update Connection – Enterprise runs the job again, recognizes the installed required patch, and continues.
Troubleshooting Jobs
In the Jobs panel, you might see that a job failed on a host. There are various reasons for a failed job, and different ways in which you can handle the issue.
To which troubleshooting procedure is most relevant, open the Job Log (see To Monitor a Current Job).
Procedures in this section include the following:
Handling Resolve Failures
If a job failure occurs during the resolve stage, troubleshoot the solution offered by the Dependency Resolver with these checks.
-
Open the Host Progress window of a failed host and check for manual intervention points. Handle the manual procedures and rerun the job.
-
Open the Job Log of a failed host. Carefully check components and actions in the job. For example, you might have created a profile that demanded conflicting actions on some components. Recreate the job without the problematic components.
-
Change or create a policy that causes the agent to look for a different DR for the job. The confirmation policy should Not Allow the components listed under the failure reason to receive the failed actions.
You might find it helpful to review the Resolve Log of the failed host. Open the Preferences window of the selected host to find the directory and file name of this log (see Host Preferences – Logs).
Handling Failures Due to Cost
Sometimes a failed DR cannot be fixed. The message cost in change too high indicates that the DR found so many components that would have had to be changed, that it will not go on.
-
If you requested many components, break up your request into smaller jobs.
-
If you requested only a few components, try making a job of each component separately. You will probably find one that demands too many dependency fixes. Perhaps you can select an alternative component.
Handling Missing Components
Sometimes a component cannot be installed or uninstalled. One of the following errors might appear to explain the DR failure:
-
component is not installable by current KB
-
component is not removable by current KB
Only Local components may be not installable or not removable. To handle these issues, open the Local category in the Components list of the main window. Expand the subcategories until you find the problematic components.
-
The Components list might include listings for which you do not have the software component: an NCO without an attached software, a 3rd-Party application for which you do not have a license, a tool without an uploaded script, and so on.
If this is the problem, the package will be marked with an empty software icon.
If you see one of these icons, upload the required software component.
-
The local component might be in the knowledge base, but missing dependencies according to the deployment rules.
If this is the problem, the package will be marked with an exclamation point in a red circle.
Right-click the component and choose Component Details.
The Component Information window opens, displaying the missing requirements in the Dependencies tab.
Handling Installation Issues
If the job failed during installation, use these checks to find a solution.
-
Check the permissions needed by the component for install. The permissions might conflict with the permissions of the logged-in user. The Job Log of the failed host will show permissions as the reason for failure.
-
Try to install the component manually with Linux terminal commands. Afterwards, run a Check System (see Running Predefined Profiles) to handle dependency issues.
If the installation fails for an NCO (non-certified component), the Job Log might provide one of the following reasons.
-
Conflict with. Listed NCO has possible conflicts with a component from the To Do list.
-
Downgrade. Listed NCO appears to be a newer version of a component from the To Do list.
-
Possible Unavailability. Installing one of the components from the To Do list might cause the listed NCO to become inoperable.
-
-
Run the Local Software Review predefined profile and replace NCOs with COs, or uninstall the NCOs.
-
Make sure that the NCO has been detected and added to the components list. If the local software package is not under Local RPMs or Local PKGs, search for it under a CO listing in Software (see To Find Components). If the NCO is not in the components list, add it (see Adding Undetected Linux Software).
- © 2010, Oracle Corporation and/or its affiliates

