Chapter 2 Getting Started
This chapter describes the main application window in the Console. This chapter also explains how to access the user interfaces, how to start the Sun Update Connection – Enterprise applications, and how to start managing a host.
This chapter covers the following topics:
Overview of the Console User Interface
The following sections describe the following parts of the console user interface:
Main Window Control Area
The control area of the main window is divided into the following tool bars:
You can customize which tool bars appear in the control area. Right-click anywhere in a tool bar or on the menu bar to select or deselect tool bar names.
Hosts Tool Bar
Use the buttons of the Hosts tool to perform operations on managed hosts or groups.
Table 2–1 Hosts Buttons|
Icon |
Button |
Description |
Enabled |
|---|---|---|---|

|
Add Group |
Create a new user-defined group of managed hosts. |
Always |

|
Add Host |
Predefine a managed host. |
Start the console with the manual_host_create command. |

|
Edit Host/Group |
Modify the properties of the selected managed host or group. |
Host or group selected |

|
Delete Host/Group |
Delete the selected host or group. |
Host or group selected |

|
Save Inventory |
Save a record of the installed components of the selected host or group with a name that you choose. |
Host or group selected |

|
Compare Inventories |
Compare current or saved inventories. You can either compare two different hosts or different inventories of a single host. |
Always |

|
Profile Compliance Check |
Check that the selected host is currently compliant with its associated profile. |
Host selected |
Components Tool Bar
Use the buttons of the Components tool bar to manipulate the Components list, mark selected components for jobs, and manage local components.
Table 2–2 Components Buttons|
Icon |
Button |
Description |
Enabled |
|---|---|---|---|
|
Distribution Architecture |
Drop-down menu |
List of activated distributions. Select a distribution to show its components in the Components list. |
Always |

|
Find |
Search for components. |
Always |

|
Details |
View detailed information about the selected component. |
Component selected |

|
Show Installed |
In the Components list, show only the components that are installed on the selected host or group. All hosts are shown if none are selected. |
Always |

|
Required |
Add the selected component to the Actions list and mark it as required, which means that it should be installed. |
Component selected |

|
Not Allowed |
Add the selected component to the Actions list and mark it as not allowed, which means that it should be uninstalled. |
Component selected |

|
Upgrade |
Add the selected component to the Actions list and mark it as upgrade, which means that it should be upgraded to a later version, if possible. |
Component selected |

|
Add Category |
Add a category to the Local Components list |
Local category selected |

|
Add Local |
Add a local component to the Local Components list, which is a private software package or your own file. |
Local category selected |

|
Upload Local |
Upload software or file to an empty listing. Or, replace an upload with one of the same name. |
Package selected |

|
Edit Local |
Modify the properties of the selected item from the Local Components list. |
Component selected |

|
Move Local Component |
Move the selected item to another category in the Local Components list. |
Component selected |

|
Open Host File |
Open a file from a remote managed host for viewing and editing. |
Host and local file selected |

|
Open Knowledge Base File |
Open a file from the knowledge base server for viewing and editing. |
Host and local file selected |

|
Delete Local |
Delete the selected item from the Local Components list. |
Component selected |
Actions Tool Bar
Use the buttons of the Actions tool bar to manage the Actions list of the Inventory panel. Actions buttons offer advanced features both for inventory-based jobs and for complex jobs.
Table 2–3 Actions Buttons|
Icon |
Button |
Description |
Enabled |
|---|---|---|---|

|
Save a Profile |
Save the Actions list as a reusable profile. |
Actions are in the Actions list |

|
Multi Distributions |
Expand the Actions list to include actions on components of other active distributions. |
Actions are in the Actions list |

|
Run on Selected Hosts |
Execute actions of Actions list on selected hosts. |
Host or group selected and there are actions |

|
Delete Selected Action |
Delete selected action from Actions list. |
Action selected |
Jobs Tool Bar
Use the buttons of the Jobs tool bar to manage jobs. Most buttons are for complex jobs, while some are also for inventory-based jobs.
Table 2–4 Jobs Buttons|
Icon |
Button |
Description |
Enabled |
|---|---|---|---|

|
New Job |
Create a new complex job. |
Always |

|
Copy Job |
Copy the job with its profile based on the original job. |
Job selected |

|
Stop Job |
Stop the selected job. |
Job in progress selected |

|
Reschedule Job |
Modify the schedule of a complex job. You can only reschedule a job if the job had a schedule when it was first created. |
Job with schedule selected |

|
Rerun Job |
Rerun the selected job. |
Completed job selected |

|
Delete Job |
Delete the job from the Jobs list. |
Job selected |

|
Job Summary Report |
View the summary information of a selected job. |
Job selected |

|
Confirm Task Actions |
Confirm or deny the actions of a task. |
Task with questions selected |

|
Copy Profile |
Copy the profile of a task and save it with a new name. |
Task selected |

|
Edit Scheduled Profile |
Modify the profile of a task. You can only modify a profile if it is yours and is scheduled to be used in a future job. |
Task with such a profile selected |

|
Copy Policy |
Copy the policy of a task and save it with a new name. |
Task selected |

|
Edit Scheduled Policy |
Modify the policy of a task. You can only modify a policy if it is yours and is scheduled to be used in a future job. |
Task with such a policy selected |

|
Show Progress |
Display the progress of a host running a job. |
Host in the Jobs panel is selected |

|
Show Log |
Display the log of actions taken on a host for a job. |
Host in the Jobs panel is selected |

|
Filter |
Display only job listings that meet the specified criteria. |
Always |

|
Refresh |
Refresh the job status information. This list is refreshed periodically. |
Always |
Tools Tool Bar
Use the buttons of the Tools tool bar to manage user accounts, profiles, polices, reports, and Sun Update Connection – Enterprise preferences.
Table 2–5 Tools Buttons|
Icon |
Button |
Description |
Enabled |
|---|---|---|---|

|
Users |
Access the user account list and features. |
Always |

|
Profiles |
Access the profile list and features. |
Always |

|
Policies |
Access the policy list and features. |
Always |

|
Reports |
Access the report list and features. |
Always |

|
Preferences |
View and edit the behavior parameters of the console, the agents, or the dependency manager applications. |
Always |
Main Window Inventory Panel
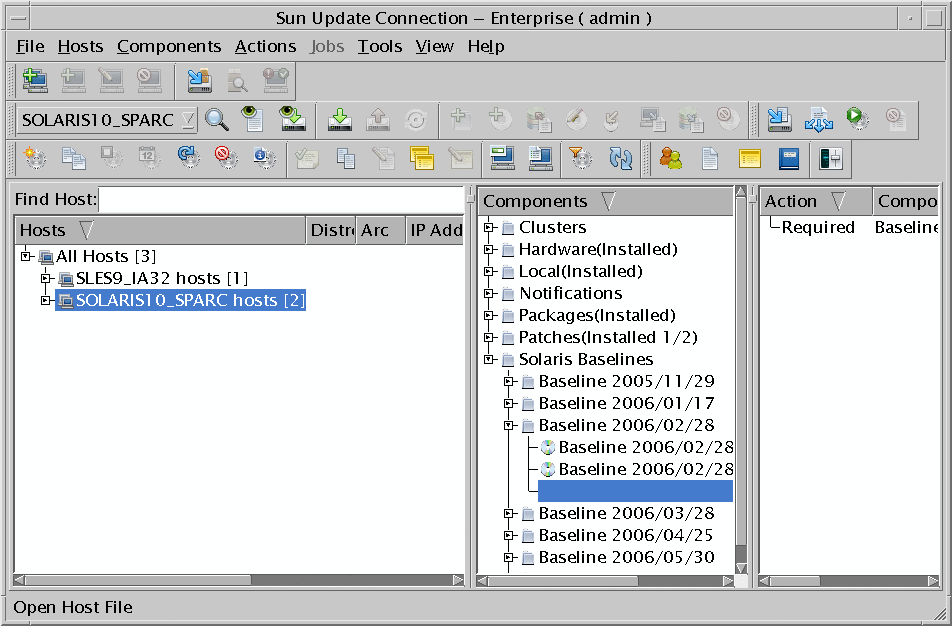
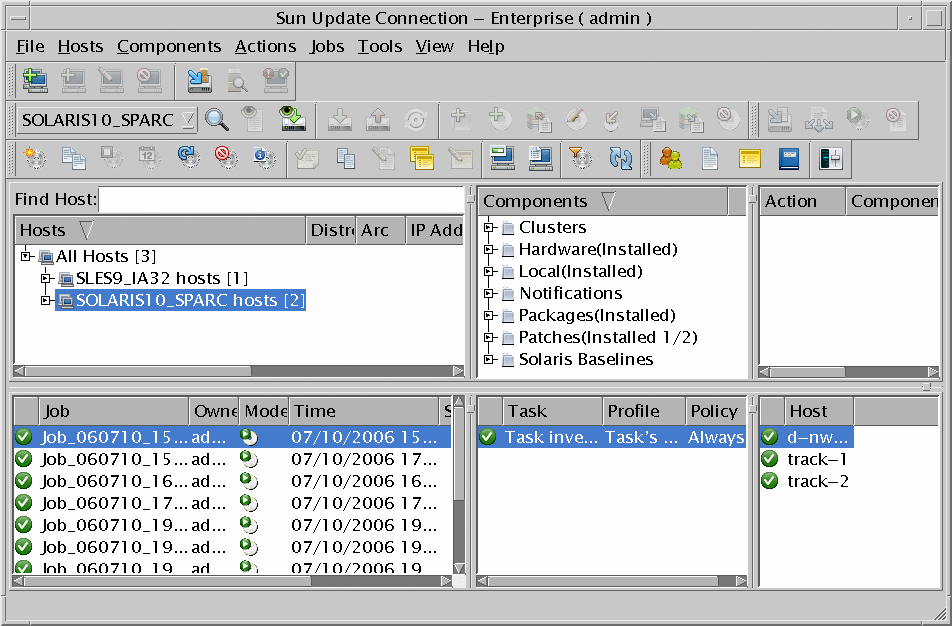
From the Inventory panel, you can see hosts and groups, components of the knowledge base for the selected distribution, components installed on selected hosts and groups, and component-action settings.
If you do not see the Inventory panel on the main window, choose Inventory from the View menu.
Figure 2–1 Main Window – Inventory Panel

Hosts List
The Hosts frame shows information about hosts and groups. Right-click to open the Hosts menu in a pop-up window.
This frame includes the following fields:
-
Hosts – Group names, with number of hosts in group, host names, and the status icon of the host
-
Distro – Distribution installed on the managed host
-
Arch – Hardware architecture of the managed host
-
IP Address – IP address of the managed host
-
Register Time – Date and time at which the agent was registered with the dependency manager
-
Last Inventory update – Date and time that the host inventory was last updated to the console
-
Find Host – Search feature for host names
Components List
The Components frame shows hardware drivers for distributions, local components, and software packages of the selected distribution. Right-click to open the Components menu in a pop-up window.
Actions List
The Actions frame shows actions that you set on specific components. Right-click to open the Actions menu in a pop-up window.
This frame includes the following fields:
-
Action – One of these values: Required, Not Allowed, or Upgrade.
-
Component – Any item from the Components list of any active distribution
-
Arch – Hardware architecture of a component
-
Distro – Distribution of a component
Main Window Jobs Panel
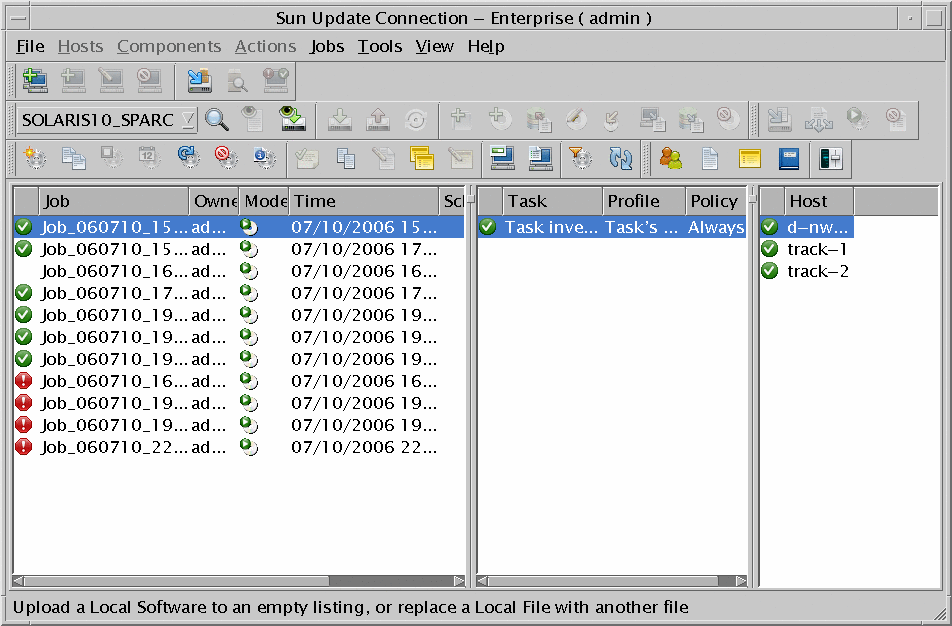
The Jobs panel shows the status of jobs, both complex jobs and inventory-based jobs. Select a job to view its tasks and the hosts that are running the task.
If the Jobs panel does not appear on the main window, choose Jobs from the View menu.
Figure 2–2 Main Window – Jobs Panel

Jobs List
The Jobs panel shows completed, active, and scheduled jobs. Job information includes the following:
-
Job name
-
Name of the user who created the job
-
Date and time at which the job was received by the dependency manager
-
Mode and status icons
Right-click the Jobs list to open the Jobs menu in a pop-up window.
Table 2–7 Jobs List Mode Icons|
Icons |
Description |
|---|---|

|
Perform an action (deploy) on a managed host. |

|
Simulate the action, but do not actually do anything on the managed hosts. |
Table 2–8 Jobs Panel Status Icons
Tasks List
The Tasks panel shows the job tasks. Right-click to open the Tasks submenu of the Jobs menu in a pop-up window.
-
Task status
-
Task name
-
Name of the profile associated with the task
-
Name of the policy associated with the task
Hosts in Jobs List
The Hosts in Jobs panel lists selected hosts receiving the task selected in the Tasks list. Right-click to open the Hosts submenu of the Jobs menu in a pop-up window.
-
Host status in the job
-
Host name
Logging In and Starting Applications (Task Map)
The following table identifies the tasks that you might perform when you need to log in to the console and to start or restart Sun Update Connection – Enterprise applications.
|
Task |
Description |
For Instructions |
|---|---|---|
|
Log in to the console for the first time. |
You must log in as the admin user the first time you log in to the Sun Update Connection – Enterprise Console. As the admin user, you can create other user accounts to be used for managing systems. | |
|
Log in to the console. |
You do not need to be superuser to run the console, but you must be a user with full permissions or use the admin user's password to log in. | |
|
Access the command-line interface (CLI). |
You do not need to be superuser to use the CLI, but you must be a user with full permissions or use the admin user's password to log in. | |
|
(Optional) Restart the system dependency server. |
The system dependency server starts automatically after installation. If you need to restart it, you must restart both the server application, which includes the knowledge base, and the dependency manager application. | |
|
(Optional) Restart the agent on a managed host. |
The agent starts automatically after installation. The agent software must be installed on each machine you want to manage. |
 To Log In to the Console for the First Time
Sun Update Connection – Enterprise provides a default user, the admin user. Log in as admin the first time you access the console. You must be the admin user to create other user accounts.
You can also use the uce_cli command. For more information, see Chapter 14, Command-Line Interface.
-
Start the console.
$ uce_console
Click Exit to prevent the console from starting.
Wait for your locally active distributions to be updated from the universal server.
-
Log in as the admin user.
-
Specify the password.
The default password is 123.
-
Click OK.
After the first login of any user, including the admin user, the Change Password window appears. Change default passwords immediately.
-
Type the new password, verify it, and click OK.
The password is changed.
The console opens, and shows the main window.

 To Log In to the Console
You do not need to be superuser to access the console.
You can also use the uce_cli command. For more information, see Chapter 14, Command-Line Interface.
-
Start the console.
$ uce_console
The Login window appears.
-
Type your user name in the User Name field.
-
Type your password in the Password field.
-
Click OK.
The console initializes and the main window appears.
If you do not want to log in, click Cancel.
 To Access the uce_cli CLI
You do not need to be superuser to use the CLI, but you must be a user with full permissions or use the admin user password.
Type a CLI command.
$ uce_cli -command -param value [...] [-flag][...] -u username -p password |
For more information about the uce_cli command, see Chapter 14, Command-Line Interface.
 To Restart the System Dependency Server
-
Log in to the system dependency server as superuser.
-
Restart the server.
# /etc/init.d/uce_server restart
-
Restart the DM:
# /etc/init.d/uce_engine restart
-
(Optional) If you have a proxy SDS, restart the proxy.
-
Restart the DM of both the server and the proxy server.
 To Restart the Agent
Providing Authentication Information (Task Map)
The following table identifies the tasks that you might perform when you need to provide authentication information to the console application.
|
Task |
Description |
For Instructions |
|---|---|---|
|
View authentication information. |
Some of your Linux and Solaris managed hosts might need to download content from an external vendor source. These vendor sources require that you specify a user name and a password to access and download content. | |
|
Edit authentication information. |
You must be the admin user to edit the authentication information for an external vendor source. The user name and password you specify are not verified with the external vendor source. So, ensure that you supply the correct information or jobs that attempt to access an external vendor source will fail. |
 To View Authentication Information
Some of your Linux and Solaris managed hosts might need to download content from an external vendor source. These vendor sources require that you specify a user name and a password to access and download content.
-
Choose Authentication from the Tools menu.
The Authentication window opens.
Note –The Authentication window might open when you start the console. This window opens when the authentication information for a vendor source is incomplete.
-
View the authentication information for each vendor source that is appropriate for your environment.
A complete vendor source entry includes the following information:
-
Name of the vendor source
-
User name you use to access content
-
Password shown as asterisks
-
 To Edit Authentication Information
You must be the admin user to edit the authentication information for an external vendor source.
Note –
The user name and password you specify are not verified with the external vendor source. So, ensure that you supply the correct information or jobs that attempt to access the external vendor source will fail.
-
Choose Authentication from the Tools menu.
The Authentication window opens.
-
Select the vendor source that needs its information updated, and click Edit.
The Authentication Editor window opens.
-
Type the user name associated with the selected vendor source in the Username field.
-
Type the password in the Password field.
-
Type the password again in the Verify Password field.
-
Click OK.
The Authentication Editor window closes.
The updated authentication information appears in the Authentication window.
Managing Hosts (Task Map)
The following table identifies the tasks that you might perform to get started with basic host-management features.
|
Task |
Description |
For Instructions |
|---|---|---|
|
View managed hosts. |
The console shows a hierarchical view of the inventory of each of the managed hosts. You can also customize your view of the information. | |
|
Save the inventory of a managed host. |
An inventory is saved for each managed host prior to running a job. By creating an inventory, you can roll back to a previous inventory if you have problems with the current inventory. You can also use this procedure to save an inventory manually. When you assign it a name, the name should be used to help you identify a particular configuration. | |
|
Change the inventory of a managed host. |
You can create and execute a simple job on a managed host. This procedure can be used as a starting point for running simple jobs. |
 To View Managed Hosts
Sun Update Connection – Enterprise provides a hierarchical view of the inventory of all managed hosts. An inventory is a list of components that are installed on a managed host.
This view includes a brief description of the information shown for each host. You can also perform a procedure to manipulate the views.
-
Choose Inventory from the View menu to open the Inventory panel.
-
In the Hosts list, view the data of the managed hosts whose agents have registered with the system dependency server.
Expand the All Hosts group and a distribution subgroup to view the list of managed hosts.
Information about each managed host appears in the following columns:
-
Distro – Linux distribution version or Solaris release that is installed on the managed host
-
Arch – Hardware architecture of the managed host
-
IP Address – IP address of the managed host
-
Register Time – Date and time at which the agent registered with the dependency manager
-
Last Inventory update – Date and time that the host inventory was last updated to the console
-
-
Select a managed host from the list to view information about it.
When no host is selected, you can browse the Components list to see what is available in the knowledge base for installation. This information pertains only to the distribution selected in the drop-down list in the tool bar.
-
To see the Components list of a different distribution, change the selection of the tool bar drop-down list.
-
To see which of the knowledge base components are installed on a specific host or hosts, select one or more hosts or groups from the Hosts list. The components installed on the selected hosts are marked as Installed on the Components list.
-
To see only the installed inventory of hosts, select the hosts. Then, choose Show Installed from the Components menu.
The Components list displays only the inventory of the selected hosts.
-
 To Save the Inventory of a Host
Sun Update Connection – Enterprise provides a rollback feature. You can restore a managed host to a previous inventory, either full or filtered, as needed. The software automatically saves host inventories before executing a job to ensure that rollback is possible. You can also save inventories manually and give them meaningful names. Using such names makes it easier for you to choose the particular configuration to use.
-
From the Hosts list, right-click a host or a group and choose Save Inventory.
The Save Inventory window opens.
-
(Optional) Specify the name of the saved inventory.
The default file name uses this format name_yymmdd_hhmmss.
name is either the name of a managed host or a group. yymmdd represents the date as a two-digit year, two-digit month, and two-digit day. hhmmss represents the time as a two-digit hour, two-digit minute, and two-digit second.
-
Click OK.
The host inventory is saved and the Save Inventory window closes.
If you selected a group, an inventory is saved for each managed host in the group.
-
View a list of saved inventories in the Inventory Comparison window.
Right-click a managed host or group in the Hosts list, and then choose Compare Inventories.
-
Expand one of the Inventory drop-down lists to see the list of saved inventories for the selected host or group.
 To Change the Inventory of a Host
This procedure creates and executes a simple job. Besides offering a starting point, you should run a task-driven job the first time you use Sun Update Connection – Enterprise to deploy software.
-
From the View menu, choose Inventory.
-
From the drop-down list on the tool bar, select a distribution for a particular architecture.
The Components list changes to display components of the selected distribution.
-
From the Hosts list, select a host.
-
From the Components list, right-click a component, and then select Required.
The action-component setting appears in the Actions list.
-
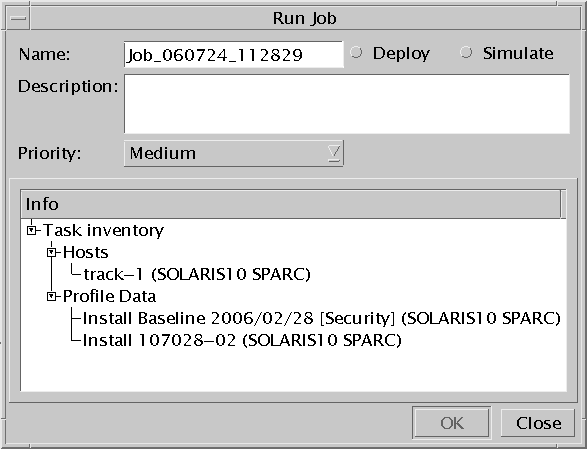
From the tool bar, click Run Job.
The Run Job window opens.

-
Specify a job name, a description, and select Deploy.
-
Click OK.
The job starts and the Run Job window closes.
- © 2010, Oracle Corporation and/or its affiliates


