Installing the System Dependency Server
The following procedures explain how to install the Sun Update Connection – Enterprise system dependency server or the proxy system dependency server with ezinstaller.
Navigating Through the ezinstaller Screens
Use the following keystrokes to navigate through the ezinstaller interface.
Unpacking Sun Update Connection – Enterprise Applications and Files
From the Sun Update Connection – Enterprise CD, the ezinstaller installs the following software. Expand the UCE-1.0.1-number.tgz file to access the ezinstaller application.
Note –
In the tgz file name, number indicates a release build number.
Table 3–1 Sun Update Connection – Enterprise Components
The following procedure provides step-by-step instructions on installing the system dependency server.
 To Unpack the Installation Archive
-
Log in as superuser.
-
Copy the UCE-1.0.1-number.tgz file to a directory where you want to work.
-
Expand the contents of the tar file, for example:
# tar xPfzv UCE-1.0.1.165.tgz
The UCE-1.0.1-number directory is created. This directory contains all the files needed for installation.
-
Change to the UCE-1.0.1-number directory.
Installing the Sun Update Connection – Enterprise System Dependency Server
When an agent of a managed host with a new distribution registers on the system dependency server, channels are activated for distribution.
 To Install the System Dependency Server
Before You Begin
Review Table 2–13 for information that you might need before installing. This table includes a description of installation options.
-
Log in as superuser.
-
Change to the product directory where you expanded the tar file.
-
Decide how to start the installation.
-
For a standard installation, type:
# ./ezInstall
-
For a secure installation, type:
# ./ezInstall -s
Access to the universal server is verified first. Then you type your secure password twice.
Note –Correct mistakes by selecting Cancel and then selecting No. You are returned to a blank screen and can start over.
-
To predefine channels, type:
# ./ezInstall -channels
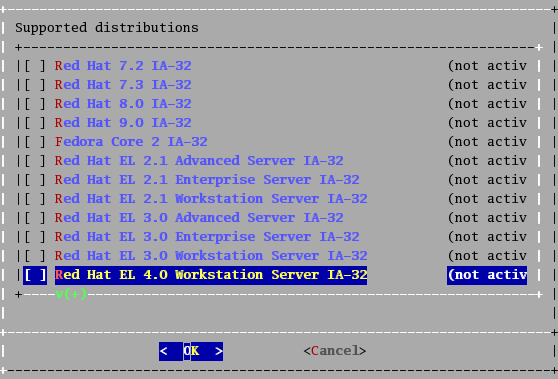
After you have entered information on the following screens regarding the license, a supported channels screen is displayed. This screen provides a list of all supported channels that you can activate.
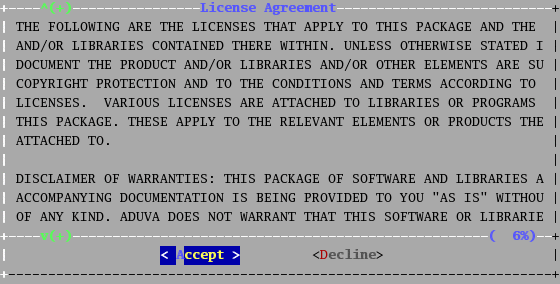
The License Agreement screen is displayed.

-
-
To accept the terms of the license, select Accept.
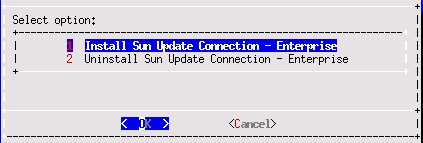
The install installation screen is displayed.

-
Select Install Sun Update Connection – Enterprise.
The Preparing Installation screen is displayed.

-
Type the full path name to the license file and select OK.
A screen is displayed that shows the progress of the retrieval of channel configuration information is displayed.
 Caution –
 If ezinstaller could not connect to the universal server, you see the following message:
Failed to connect to Universal Server.
If you have a web proxy, configuring it might solve this problem.
Would you like to set up proxy settings?
If your local network has an HTTP web proxy server, the connection fails. You must configure your web proxy to pull the necessary files. In the screens, fill in the name of the web proxy server and the open port. After you have provided the information, ezinstaller configures Sun Update Connection – Enterprise to work with the proxy servers and tests the connections. After successfully accessing the universal server, the installation continues.
-
For the standard installation, the Sun Online Account screen is then displayed. Continue with Step 7.
-
For a predefining channels installation, a Preinstall Phase screen is displayed. This screen prepares the installation files. Then a Supported distributions screen is displayed.

a. Select one or more distributions to activate. You must activate at least one.
b. To apply your choices, press Enter. Continue with Step 8.
-
-
Specify the Sun Online Account user name.
The Sun Online Account information is used to download Solaris updates. Provide this information only if you plan to have Solaris manage hosts in your Sun Update Connection – Enterprise solution.
-
If you do not support Solaris managed hosts, leave the field blank.
-
If you specified your Sun Online Account user name, a screen prompts you to supply your Sun Online Account password.
The Preinstall Phase screen is displayed that prepares files for the installation. Then the Preparing Installation screen is displayed. This screen shows the local host name or IP address.

-
-
Ensure that the host name or IP address of the system dependency server is correct. If the default localhost.localdomain is incorrect, type the correct local host name and domain, or IP address.
The host name or IP address of the system dependency server is automatically included in the configuration files of the agents and consoles.
Note –If you need to correct typed text on a screen, do not use the Delete key. The Delete key exits the ezinstaller. Use the right arrow key to move to the end of the text and use Backspace.
The screen with the path to the console on Windows is displayed.
-
Decide to keep or change the default path on Windows where the console should be installed. The default path is C:\uce_console.
-
To keep the default path, press Enter.
-
To change the path, use the Backspace to clear the default path and then type the new path.
The ezinstaller searches for matching SSL certificates.
Note –You might see a cursor under the ezinstaller screen for a moment. Do not press Enter or exit from ezinstaller. Wait for the command to return to the application after a few seconds.
The SSL certificate screen is displayed.

-
-
Specify information about your organization for the SSL certificate.
You can use the Sun information for the certificate that is displayed, but for your own security, you should provide information about your organization.
-
If you select Yes, answer the questions for the SSL certificate. None of your information is released outside your network or to Sun Microsystems.
-
If you select No, your SSL certificate is filled with Sun Microsystems information.
Note –The cursor appears at the bottom of the screen. Do not press Enter. Wait until the next screen is displayed.
The Preparing Installation screen that configures ports is displayed. This screen checks your connection from the local system to the universal server and configures the ports.
Note –If ezinstaller cannot find a direct outbound connection, you are offered various solutions.
The Installing System Dependency Server screen shows the progress of installation for the system dependency server. More screens are displayed that install the server components and prepare files for the agent, console, CLI, and proxy system dependency server.

The last screen notifies you that the Sun Update Connection – Enterprise software has been successfully installed.

-
-
To exit ezinstaller, press Enter. ezinstaller returns the terminal window to its default settings. After ezinstaller exits, a few second's delay might occur before the terminal is ready to accept input.
See Also
-
The system dependency server begins automatically, but if needed you can restart or check status, see Chapter 1, Application Administration, in Sun Update Connection - Enterprise 1.0 Administration Guide.
-
If you need to balance network traffic or want to install other applications, see the following installations.
- © 2010, Oracle Corporation and/or its affiliates
