The Login Process
Before you can get access to the environment, your Trusted Solaris system administrator and security administrator must set up a user account for you. The account gives you permission to use some of the computer facilities and contains identifying information, such as the username assigned to you and your user ID (UID). The username in conjunction with your password lets you log into the system. The user ID identifies all of your transactions as well as the files and directories that you own.
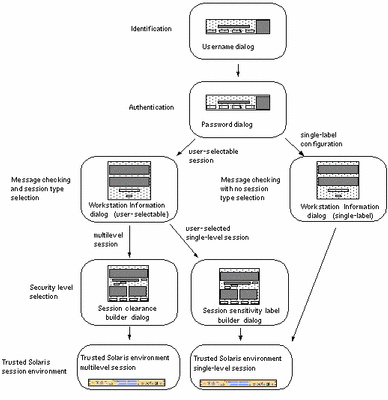
An overview of the login process is shown in Figure 2-1. The process is described in more detail in the material following the overview figure. The steps in the process include:
-
Identification - entering your username in the Username dialog box
-
Authentication - entering your password in the Password dialog box. A password is a private combination of keystrokes that validates your identity to the system. Since it is stored in an encrypted form, your password is not accessible by other users on the system. It is your responsibility to protect your password so that other users cannot use it to gain unauthorized access. Never write your password down or disclose it to anyone else, because a person with your password has access to all your data without being identifiable or accountable. Your initial password is supplied by your Trusted Solaris administrator.
Successful completion of identification and authentication confirms your right to use the system.
-
Message checking and session type selection -The Workstation Information dialog box displays the message of the day, provides account access information (so that you can check for any possible security breaches), and lets you specify the type of session: single-level or multilevel.
Note -Your account may be configured such that you always operate at the same sensitivity label (a single-label configuration). If this is the case, you will not be able to select the type of session in the Workstation Information dialog box or set a security level.
-
Security level selection - setting the highest security level at which you intend to operate while in your session.
Figure 2-1 Trusted Solaris Login Process
Identification
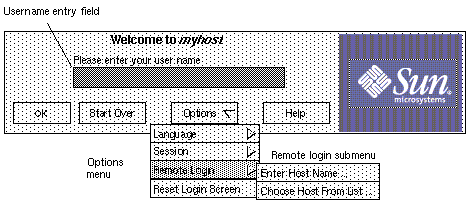
When a Trusted Solaris workstation is not in a work session, it displays the login screen. The login screen initially contains the username dialog box, which enables the next user to enter his or her username (see Figure 2-2). This is the identification part of the login process.
To Identify Yourself to the System
-
You can log in remotely by selecting Remote Login from the Options menu in the username dialog box (see following figure) and selecting Enter Host Name or Choose Host From List; otherwise, go to Step 2 to log in locally.
A dialog box for direct host entry or a list dialog box is displayed. The host you specify must be running a compatible version of Trusted Solaris. In either case, after host selection, another username dialog is displayed with the name of the remote host.
Figure 2-2 Username Dialog Box
-
Type your username in the text field in the username dialog box.
Be sure to type it exactly as your administrator assigned it to you with regard to spelling and upper and lower case.
-
Click the OK button (or press Enter) to confirm your entry of the username or select one of the other options if you are not ready to log in.
If you are not ready to log in, you can choose one of these options:
-
Click the Start Over button to re-enter your username.
-
Click Reset login in the Options menu to restart the windowing system.
-
Click Help to get information on using the login username dialog box.
 Caution -
 You should never see the Trusted Stripe when the login screen appears. If you ever see the screen stripe while attempting to log in or unlock the screen, do not type your password because there's a chance you are being spoofed, that is, an intruder's program is masquerading as a login program to capture passwords.
-
Authentication
After you have entered the username, the username dialog box is replaced in the login screen by the password dialog box (see Figure 2-3). This part of the process is referred to as authentication, that is, authenticating that you are indeed the user authorized to use that username.
To Authenticate Yourself
-
Type your password in the password entry field.
For security purposes, the characters do not actually display in the field.
Figure 2-3 Password Dialog Box

-
Click the OK button (or press Enter) to confirm your entry of the password or select one of the other options if you are not ready to log in.
If you are ready to log in, click OK or press Enter. Otherwise. you have these options:
-
Click the Start Over button to re-enter your username.
-
Click Reset login in the Options menu to restart the windowing system.
-
Click Help to get information on using the login username dialog box
The system compares the entered login name and password against a list of authorized users. If you have entered your password incorrectly, a message dialog box appears displaying the message:
Login incorrect; please try again.
Click OK to dismiss the error dialog box and return to Step 1.
-
Message Checking and Session Type Selection
After you successfully enter your username and password, the Workstation Information dialog box is displayed. It provides status information and, if your account is configured for user-specified sessions, lets you a select a single- or multilevel session. If your account is set up for a single-label configuration, then there will be no option for selecting a session level.
Single-level Versus Multilevel Sessions
In a multilevel session, you can operate at different sensitivity labels. The range in which you operate is bounded at the upper end by the session clearance you specify and at the lower end by the minimum sensitivity label assigned to you by your administrator.
In a single-level session, you specify a session sensitivity label at which you operate for the entire session. In a single-level session, you can access and write to files at that sensitivity label only. You cannot change the sensitivity label of workspaces in the session. Note that you can assume a role within a single-level session and then operate at any sensitivity label available to that role.
Session Selection Example
Table 2-1 provides an example of the difference between a single- and multilevel session. It contrasts a user choosing to operate in a single-level session at SECRET A against the user selecting a multilevel session, also at SECRET A. Note that sensitivity labels are shown in their long form inside square brackets ([]).
The three columns on the left show the user's session selections at login. Note that users set session sensitivity labels for single-level sessions and session clearances for multilevel sessions. (This is a minor distinction that is taken care of by the system; the correct label builder dialog box is always displayed with the choices permitted.)
The two columns on the right show the label values available in the session. The Initial Workspace SL column represents the sensitivity label when the user first enters the Trusted Solaris environment. The Available Sensitivity Labels column lists the sensitivity labels that the user is permitted to switch to in the session.
Table 2-1 How Session Selections Affect Session Values|
User Selections |
Session Label Values |
|||
|---|---|---|---|---|
|
Session Type |
Session Sensitivity Label |
Session Clearance |
Initial Workspace SL |
Available Sensitivity Labels |
|
single-level |
[S A] |
-- |
[S A] |
[S A] |
|
multilevel |
-- |
[S A] |
[C] |
[C], [C A], [S], [S A] |
In the first row of the table, the user has selected a single-level session with a session sensitivity label of [S A]. In the Trusted Solaris environment, the user has an initial workspace sensitivity label of [S A] which is also the only sensitivity label at which the user can operate.
In the second row of the table, the user has selected a multilevel session with a session clearance of [S A]. The user's initial workspace sensitivity label is set to [U], that is, a sensitivity label of [UNCLASSIFIED], because that is the lowest possible sensitivity label in the user's account sensitivity label range. The user can switch to any sensitivity label between [U], the minimum, and [S A], the session clearance.
To Check Messages and Select Session Type
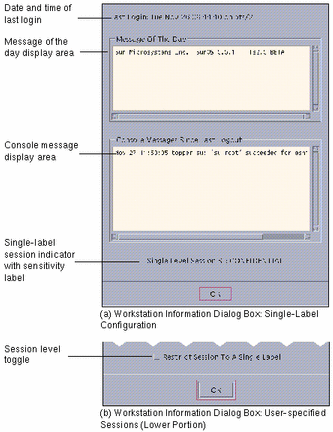
If your account is set up with a single-label configuration, the Workstation Information dialog box in the upper portion of Figure 2-4is displayed and you can ignore step 4. If you are permitted to specify single- or multilevel sessions, the session level toggle shown at the bottom of the figure is displayed.
-
Check the date and time of the last login.
This field indicates when your system was last used. You should always check that there is nothing suspicious about the last login, such as an unusual time of day, and report such occurrences to your security administrator.
-
Read any messages in the Message of the Day field.
This field contains messages from your administrator. Since this message may contain warnings about scheduled maintenance or security problems, you should always read it.
-
Read any console messages since last logout.
Typically, these system messages contain messages concerning cron (batch) jobs, but you should check that there are no messages indicating suspicious activity or other problems.
-
Click the session level toggle if you intend to work at only one sensitivity label in your session (user-specified session operation only).
In a single-level session, you operate at a single discrete sensitivity label. You can only access and write to files at the same sensitivity label. If you do not click the toggle, you are implicitly selecting a multilevel session and can view data at different sensitivity labels. The range in which you can operate is bounded at the upper end by the session clearance that you select in the session clearance dialog box and at the lower end by the minimum sensitivity label assigned to you by your administrator.
Figure 2-4 Workstation Information Dialog Box
-
Click OK (or press the Enter or Return key) to close the Workstation Information dialog box.
If your account is configured for single-label operation, the Trusted Solaris environment is displayed after the Workstation Information dialog box is closed; otherwise you will set the session level next.
Setting the Session Level
Note -
If your account is set up for a single-label configuration, the Trusted Solaris environment will be displayed after you close the Workstation Information dialog box and you have no need to read further in this section.
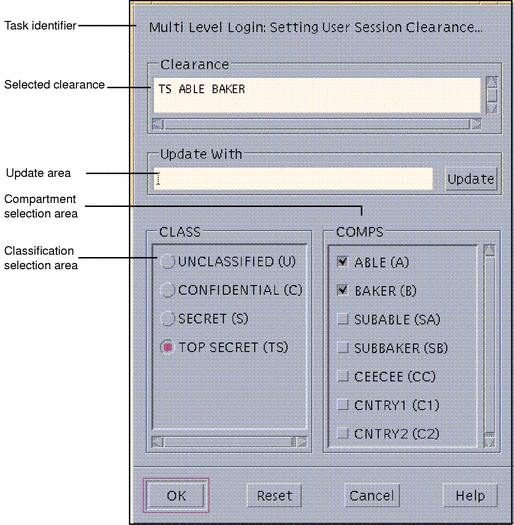
If you do not select Restrict Session to a Single Level, the Clearance Builder version of the Label Builder dialog box is displayed so that you can specify the session clearance (see Figure 2-5).
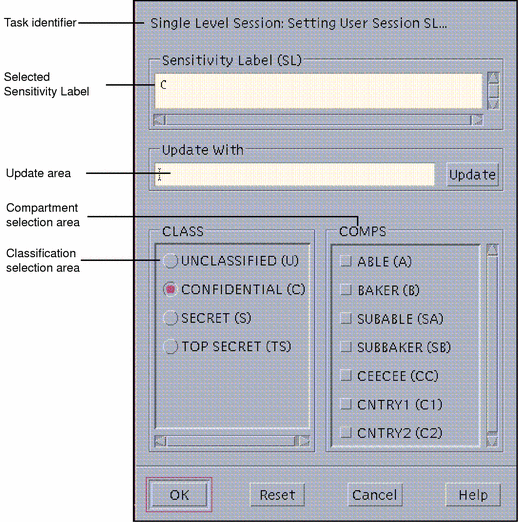
If you select Restrict Session to a Single Level, the user session sensitivity label version of the Label Builder dialog box is displayed and you select the sensitivity label for your entire session (see Figure 2-6).
Note -
Workstations can be restricted to a limited range of session clearances and sensitivity labels. For example, a workstation in a lobby might be limited to UNCLASSIFIED labels only. If the session clearance or sensitivity label you enter is not accepted, check with an administrator to see if the workstation is restricted.
To Select a Clearance for a Multilevel Session
The session clearance sets the top boundary for sensitivity labels of files that you will be able to access in the session. To set the clearance, you use the Clearance Builder dialog box (see Figure 2-5).
-
To use the default clearance in the Clearance field, click OK (or press Enter) and wait for the Trusted Solaris environment to be displayed.
For a different clearance, go to step 2 to build a new clearance.
-
Click the desired classification in the classification selection area.
-
Click the desired compartments (if any) in the compartments selection area.
-
Check the clearance you have built in the selected clearance field. Click OK or press Enter if it is correct or go back to step 2 to build a different clearance.
Figure 2-5 Session Clearance Builder Dialog Box
To Select a Sensitivity Label for a Single-level Session
The session sensitivity label sets the sensitivity label at which you intend to operate in this single-level session. To set the session sensitivity label, you use the Single-Level Session Sensitivity Label Builder dialog box shown in Figure 2-6.
-
To use the default sensitivity label in the Sensitivity Label field, click OK (or press Enter) and wait for the Trusted Solaris environment to be displayed.
For a different sensitivity label, go to step 2 to build a new sensitivity label.
-
Click the desired classification in the classification selection area.
-
Click the desired compartments (if any) in the compartments selection area.
-
Check the sensitivity label you have built in the selected sensitivity label field. Click OK or press Enter if it is correct or go back to step 2 to build a different sensitivity label.
Figure 2-6 Single-Level Session Sensitivity Label Builder
- © 2010, Oracle Corporation and/or its affiliates
